El activador de Error Catcher te permite invocar un detector de errores definido o personalizado para controlar la falla de un activador, una tarea o una condición perimetral identificada en tu integración.
Agrega un activador de Error Catcher
Para agregar un activador de Error Catcher en tu integración, sigue estos pasos:
En la consola de Google Cloud , ve a la página Application Integration.
En el menú de navegación, haz clic en Integraciones.
Aparecerá la página Lista de integraciones, en la que se enumeran todas las integraciones disponibles en el proyecto de Google Cloud.
Selecciona una integración existente o haz clic en Crear integración para crear una nueva.
Si creas una integración nueva, haz lo siguiente:
Ingresa un nombre y una descripción en el panel Crear integración.
Selecciona una región para la integración.
Selecciona una cuenta de servicio para la integración. Puedes cambiar o actualizar los detalles de la cuenta de servicio de una integración en cualquier momento desde el panel infoResumen de la integración en la barra de herramientas de la integración.
Haz clic en Crear.
La integración recién creada se abrirá en el editor de integración.
En la barra de navegación del editor de integración, haz clic en Activadores para ver la lista de los activadores disponibles.
Haz clic y coloca el elemento activador de Error Catcher en el diseñador de integración.
Configura el activador de Error Catcher
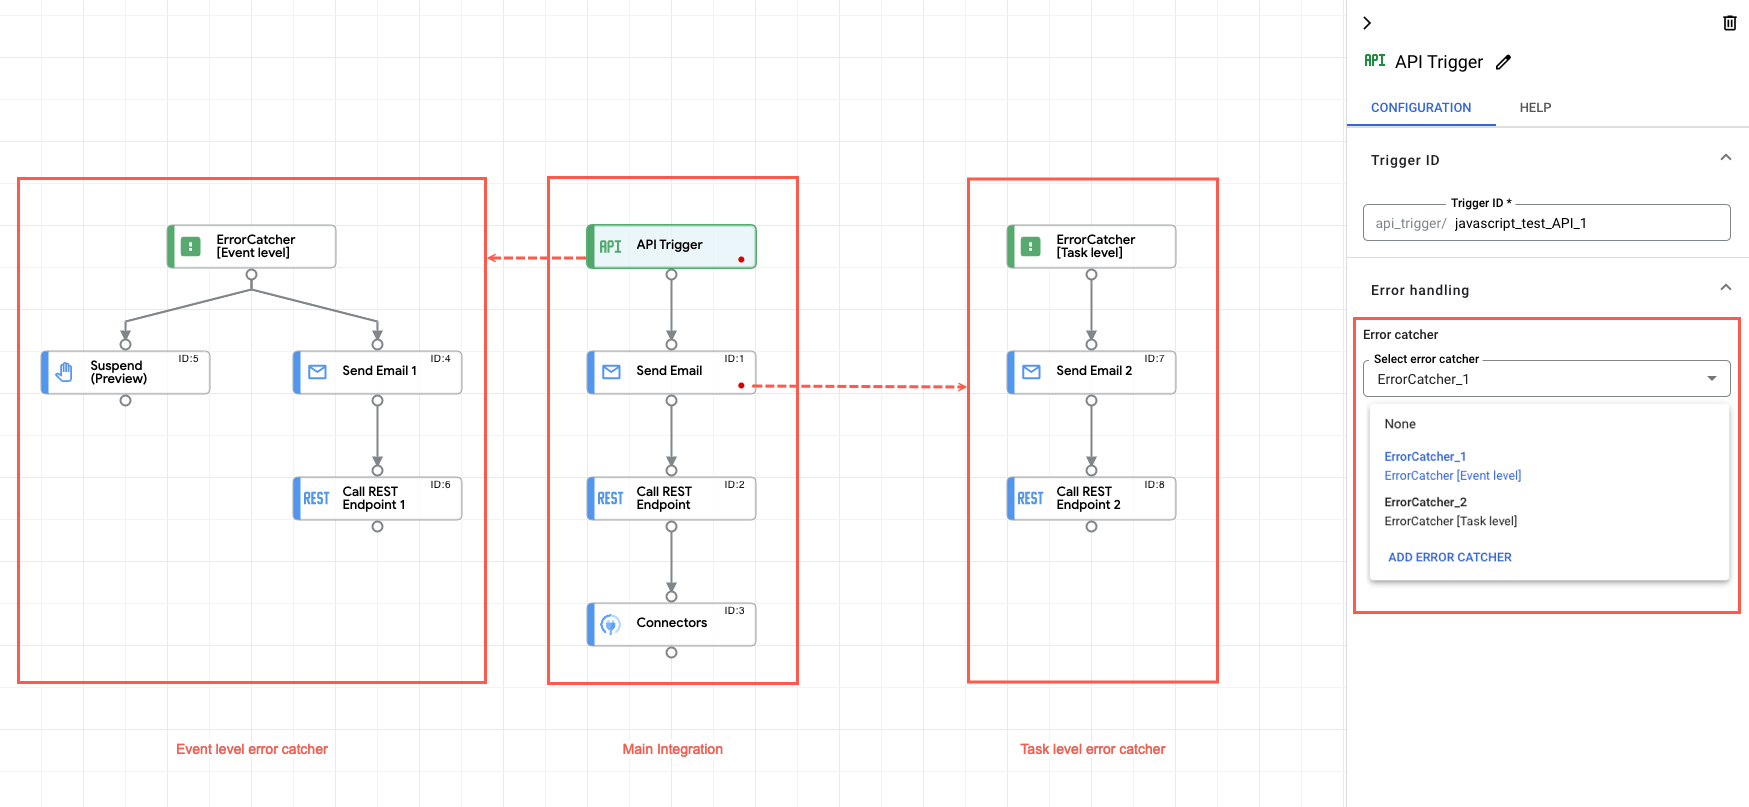
Haz clic en el elemento del activador de Error Catcher en el diseñador de integración para ver el panel de configuración del activador.
La pestaña Configuración muestra el ID del recolector de errores, que se genera automáticamente cuando agregas el activador en el diseñador de integración. De manera opcional, puedes editar el ID generado automáticamente si es necesario. No se requiere ninguna configuración adicional para este activador.
Crea la lógica de detección de errores
Una vez que hayas agregado el activador de Error Catcher en el diseñador de integración, puedes crear la lógica de captura de errores personalizada mediante las tareas disponibles en la Application Integration. Haz clic y coloca los elementos deseados de tareas de integración en el diseñador de integración y conéctalos con el activador de Error Catcher.
Adjunta la captura de errores
Una vez que hayas creado la lógica de detección de errores personalizada, puedes usarla para controlar los errores o las fallas de ejecución en los niveles de tarea y evento. Para usar o adjuntar un controlador de errores en la integración principal, realiza los siguientes pasos:
Haz clic en el activador o la tarea existentes en tu integración principal para abrir el panel de configuración de la activación o la tarea.
En el panel de configuración, expande la sección Manejo de errores y ve a Captura de errores.
Haz clic en Seleccionar error de captura y selecciona el ID del activador de Error Ccher que deseas usar.
Aparece un indicador rojo en el activador o el elemento de tarea correspondiente que indica que el elemento está conectado a un recolector de errores.
En la siguiente imagen, se muestra un flujo de integración de muestra que usa la detección de errores:
Cuotas y límites
Para obtener más información sobre las cuotas y los límites, consulta Cuotas y límites.
[[["Fácil de comprender","easyToUnderstand","thumb-up"],["Resolvió mi problema","solvedMyProblem","thumb-up"],["Otro","otherUp","thumb-up"]],[["Difícil de entender","hardToUnderstand","thumb-down"],["Información o código de muestra incorrectos","incorrectInformationOrSampleCode","thumb-down"],["Faltan la información o los ejemplos que necesito","missingTheInformationSamplesINeed","thumb-down"],["Problema de traducción","translationIssue","thumb-down"],["Otro","otherDown","thumb-down"]],["Última actualización: 2025-09-03 (UTC)"],[[["\u003cp\u003eThe Error Catcher trigger allows you to define custom logic to handle failures in your integration at the trigger, task, or edge level.\u003c/p\u003e\n"],["\u003cp\u003eAdding the Error Catcher trigger involves placing it in the integration designer, after navigating to the integration editor and selecting the triggers panel.\u003c/p\u003e\n"],["\u003cp\u003eThe Error Catcher trigger has an auto-generated ID that can be edited, and this ID is unique, meaning no other Error Catcher trigger can share it.\u003c/p\u003e\n"],["\u003cp\u003eAfter creating the Error Catcher trigger, you can build custom error-handling logic using the available tasks in Application Integration.\u003c/p\u003e\n"],["\u003cp\u003eTo attach the Error Catcher, you select the desired ID in the error handling section of a trigger or task in the main integration.\u003c/p\u003e\n"]]],[],null,["# Error catcher trigger\n\nSee the [supported connectors](/integration-connectors/docs/connector-reference-overview) for Application Integration.\n\nError catcher trigger\n=====================\n\n\nThe **Error Catcher** trigger lets you invoke an [error catcher](/application-integration/docs/error-catcher) that is defined or customized to handle the failure of an identified trigger, task, or edge condition in your integration.\n\nAdd an Error Catcher trigger\n----------------------------\n\nTo add an **Error Catcher** trigger in your integration, perform the following steps:\n\n1. In the Google Cloud console, go to the **Application Integration** page.\n\n [Go to Application Integration](https://console.cloud.google.com/integrations)\n2. In the navigation menu, click **Integrations**\n\n\n The **Integrations List** page appears listing all the integrations available in the Google Cloud project.\n3. Select an existing integration or click **Create integration** to create a new one.\n\n\n If you are creating a new integration:\n 1. Enter a name and description in the **Create Integration** pane.\n 2. Select a region for the integration. **Note:** The **Regions** dropdown only lists the regions provisioned in your Google Cloud project. To provision a new region, Click **Enable Region** . See [Enable new region](/application-integration/docs/enable-new-region) for more information.\n 3. Select a service account for the integration. You can change or update the service account details of an integration any time from the info **Integration summary** pane in the integration toolbar. **Note:** The option to select a service account is displayed only if you have enabled integration governance for the selected region.\n 4. Click **Create**.\n\n\n The newly created integration opens in the *integration editor*.\n4. In the *integration editor* navigation bar, click **Triggers** to view the list of available triggers.\n5. Click and place the **Error Catcher** trigger element in the integration designer.\n\nConfigure the Error Catcher trigger\n-----------------------------------\n\nClick the **Error Catcher** trigger element in the integration designer to view the trigger configuration\npane.\n\nThe **Configuration** tab displays the **Error catcher ID**, which is auto-generated when you add the trigger in your integration designer. You can optionally edit the auto-generated ID if needed. No further configuration is required for this trigger.\n| **Note:** Error catcher IDs are unique to each **Error Catcher** trigger, therefore you can't have more than one **Error Catcher** trigger with the same **Error catcher ID**.\n\n\u003cbr /\u003e\n\nCreate the error catcher logic\n------------------------------\n\n\nOnce you have added the **Error Catcher** trigger in the integration designer, you can create your custom [error catcher](/application-integration/docs/error-catcher) logic using the available tasks in Application Integration. Click and place the desired\n[integration tasks](/application-integration/docs/how-to-guides#configure-integration-tasks)\nelements in the integration designer and connect them with your **Error Catcher** trigger.\n\n\n### Attach the error catcher\n\nOnce you have created your custom error catcher logic, you can use it to handle the errors or execution failures at both, the [task](/application-integration/docs/error-catcher#task) and [event](/application-integration/docs/error-catcher#event) levels. To use or attach an error catcher in your main integration, perform the following steps:\n\n1. Click the existing trigger or task in your main integration to open the trigger or task configuration pane.\n2. In the configuration pane, expand the **Error handling** section and go to **Error catcher**.\n3. Click **Select error catcher** and select the **Error Catcher** trigger ID that you want to use.\n\n A red indicator appears on the respective trigger or task element indicating that the element is attached to an error catcher.\n\n| **Notes:**\n|\n| - You can't attach multiple error catchers to the same task or trigger in your main integration.\n| - Error catchers can't be nested. This means that you cannot invoke an Error catcher trigger using another Error catcher trigger in your integration.\n| - You cannot establish an edge connection between the tasks configured inside an error catcher and the tasks or triggers used in your main integration flow.\n\nThe following image shows a sample integration flow that uses error catcher:\n\n\nQuotas and limits\n-----------------\n\nFor information about quotas and limits, see [Quotas and limits](/application-integration/docs/quotas).\n\nWhat's next\n-----------\n\n- Learn about [all tasks and triggers](/application-integration/docs/all-triggers-tasks).\n- Learn how to [test and publish an integration](/application-integration/docs/test-publish-integrations).\n\n- Learn about [error handling](/application-integration/docs/error-handling-strategy).\n- Learn about [integration execution logs](/application-integration/docs/introduction-logs)."]]