Custom CRM Solution
Overview
The Custom CRM solution allows companies to take advantage of the CCAI Platform Portal when using a CRM that is not a current standard integration with CCAI Platform. Custom CRM configuration works when using a homegrown CRM or any non-standard CRM.
Agents handle calls and chats, and supervisors can monitor and pull reports via the CCAI Platform Portal. All details about the call or chat session are stored in a session metadata file. This file can contain 20+ data points, including session information, transfers, handle duration, participants, diagnostic information, and much more. The session metadata file can be easily parsed and used for post-session analysis and tracking.
Session metadata and consumer-uploaded media files are pushed to an external storage service and agents are able to see consumer-uploaded media files directly in the Agent Adapter during the session.
Custom CRM solution is implemented with a combination of the following components. Some components may or may not apply to your configuration:
Generating the session metadata file for each call and chat session
Pushing metadata and media files to an external storage service
Generic API integration
Custom lookup URL
CRM record update by email
Account/Case lookup from the Agent Adapter
Prerequisites
In order to utilize the Custom CRM feature, you must first set up External Storage. Please see External Storage for Custom CRM Solutions for more information.
Session metadata
The session metadata file contains detailed information about the session. This is sent 15 mins after the session has completed. Please see Session Metadata File for more information.
Custom CRM interaction and integration methods
| Generic API | Custom URL | |
| Account lookup | Yes | Yes |
| Case lookup | Yes | |
| Case update | Yes | No |
Generic API
The Generic API integration method allows you to utilize the API of your Custom CRM to establish a two-way connection with CCAI Platform. This seamless method feels the same as the out of the box CRM integration experience. The Agent does not have to take an action to create a CRM record for call or chat sessions and depending on the unique API configuration, it can enable a seamless record lookup and record update.
Custom URL
The Custom Link option allows your agents to interact with your CRM by utilizing a custom link created for each session. Unlike the standard CRM integration and the Generic API experience, the Agent needs to take action for a CRM record to be created. In some cases this might be just launching a tab with the custom link from the session, and in other cases the Agent may need to manually create the record.
Custom lookup URL Details and Configuration
The basic functionality of the URL is to perform a CRM lookup, but depending on your CRM, more complex processes can be triggered based on the custom URL content. The URL for the Custom CRM can be configured with variables containing session information and is accessible in the Agent Adapter during the session. Once the URL is accessed, it will trigger the Custom CRM to perform a lookup. This CRM lookup is how Agents can leverage a "ticket pop" for the active call or chat session. The custom link process solely relies upon the Custom CRM's ability to process this link and modify or rewrite it if necessary.
The externally stored session metadata, call recordings, and other files will not be tied back to the CRM record unless the Email Update method listed below is also leveraged.
In this configuration, the Agent will log into the CCAI Platform Portal and log into their CRM on separate tabs. Calls and chats will be handled on the CCAI Platform tab, and ticket details will be accessed on a CRM tab.
For this configuration to work:
The Agent must be logged in to their CRM in their browser
The Agent must be logged into the CCAI Platform Portal in their browser
The custom lookup URL must be pre-configured
Your CRM needs to handle the custom URL to display relevant CRM record
Custom lookup URL behavior
CCAI Platform will only include parameters in the URL that are not empty
CCAI Platform does not store the generated URL containing ANI/UID/Email in the CCAI Platform database once the session is finished
Custom lookup URL configuration
Due to varying unique identifiers and CRM capabilities and behaviors, you will need to create 2 different URLs -- one for IVR/PSTN/SMS sessions and one for Web/Mobile SDK sessions. IVR/PSTN/SMS sessions will use ANI as the unique identifier whereas Web/Mobile SDK will likely use CUID and/or Email.
The following variables can be used to configure your lookup URL:
Variable |
Values |
{ANI} |
Phone number |
{CUID} |
Custom User ID |
{EMAIL} |
Consumer email |
{MENU_PATH} |
The whole queue menu path. i.e., "Orders/Order confirmation/Order info". |
{MENU_ID} |
Menu ID |
{CHANNEL} |
|
{TYPE} |
For Calls
For Chats
|
CCAI Platform Portal configuration
Log in to the CCAI Platform Portal using an account with Admin role assigned.
Go to Settings > Developer Settings.
In the CRM section, select Custom CRM.
Under CRM lookup, enter your custom URLs.
Select the Phone Number Format to be used in CRM requests.
Click Save Changes.
If you have not already done so, configure your external storage service. For more information, see External Storage.
CRM record update by email
In configurations like the custom lookup URL, once a session has been completed, the session metadata needs to be updated in the CRM. With this feature, CCAI Platform can automatically send session data via email. Approximately 15 minutes after as a session ends, an email is sent to a configured location and the email content is used to update a record in your CRM. This feature can be configured globally and per-queue. Once the email is received, your CRM may be configured to update or create a new CRM record for the session.
Email details
Sent from no-reply@ccaiplatform.com
Contains:
Subject line
Body with the session metadata in JSON syntax
Attachment in .txt format with chat transcript when applicable
The CCAI Platform Platform will wait for 15 minutes after the session ends, then send the email.
Emails are sent for successfully finished sessions only. It is not sent for failed or abandoned sessions.
Global configuration
Log in to the CCAI Platform Portal using an account with Admin role assigned.
Go to Settings > Developer Settings.
In the CRM section ensure Custom CRM is selected.
Enable Send session outcome via Email.
Enter an email address where you would like the email to be sent.
Click Save Changes.
Per-queue configuration
Log in to the CCAI Platform Portal using an account with Admin role assigned.
Go to Settings > Queue and select any sub-queue.
Enable Send session outcome via Email.
Enter an email address where you would like the email to be sent.
Click Save Custom CRM setting.
Settings inheritance and overriding
Settings |
Behavior |
Global = NOT enabled Queue = NOT enabled |
Do not send for all queues. |
Global = NOT enabled Queue = Enabled |
The queue setting (i.e., on/off state) overrides the global setting. Email is sent from a given queue to an email address defined in the queue setting. |
Global = Enabled Queue = NOT enabled |
The queue setting (email address, on/off state) inherits the global setting. Email is sent from a given queue to an email address defined in the global setting. |
Global = Enabled Queue = Enabled |
The queue setting (email address) overrides the global setting. Email is sent from a given queue to an email address defined in the queue setting. If the email address is empty, then email is not sent. |
Agent experience
CRM record lookup
Log in to the CCAI Platform Portal using an account with the Agent role assigned.
Open the Call or Chat Adapter.
Use the Open in new browser window button to trigger the lookup.
Use the Copy link button to copy the lookup URL to clipboard.
External Storage for Custom CRM Solutions
Overview
External Storage for Custom Solutions enables the use of an external storage service to store and retrieve CCAI Platform session metadata, call recordings, chat transcripts, and consumer-uploaded media files. The files are stored outside of a CRM.
In order to configure External Storage, you must have:
A valid CCAI Platform account with Admin and Agent role assigned for configuration and testing
An external storage service
Folder structure
The following folder structure will be organized in your external storage in Folder Path:
ujet-chat-transcripts
ujet-media
ujet-metadata
ujet-voice-recordings
ujet-voicemails
File formats and naming conventions
The following file types can be pushed to the external storage service. Files are encrypted during transit using HTTPS:
File |
Name |
Call recordings |
|
Media files |
|
Chat transcripts |
|
Session metadata |
|
Agent and supervisor experience
During the call or chat session, photos and videos uploaded by the consumer via SmartActions are displayed in the Agent Adapter.
If using Custom URL CRM interaction combined with the Session metadata file email update method, Agents and Supervisors can access session information via your external server.
Configuring the External Storage Service
Complete these steps to configure your external storage:
Log in to the CCAI Platform Portal using an account with the Admin role assigned.
Go to Settings > Developer Settings.
On the Developer Settings page, scroll to the External Storage section.
Enable information storage outside CRM servers by toggling the switch to On, then select the types of files to be stored.
In the Server Setup section, select your storage type and complete the setup steps: SFTP server, Google Cloud bucket.
SFTP Server
Enter the SFTP Host (URL or IP address.)
Enter the Port number.
Enter the SFTP Login User ID.
If the SFTP server requires a password for authentication, enter it in the Password field.
If the SFTP server requires a private key for authentication, select the SSH Private Key checkbox.
Enter (copy & paste) the SSH Private Key.
Enter the private key Passphrase. If the session information should be stored in a specific folder on the SFTP server, select the Folder Path checkbox and enter the SFTP folder path.
Click Save Changes.
Google Cloud
Enter the destination Google Cloud Bucket Name.
Enter Google Cloud Client ID.
Enter the Google Cloud Client Secret.
If the session information should be stored in a specific folder in the Google Cloud bucket, select the Folder Path checkbox and enter the Google Cloud folder path.
Click Link & Save.
Testing the external storage configuration
For CRMs with existing standard integration:
Log in to your CRM.
Log in to CCAI Platform within the CRM using CCAI Platform credentials with an Agent role assigned.
Place a call or chat. The CRM record that is associated with the session is displayed.
When the session is finished, the transcript file should be uploaded within seconds.
Navigate to the external server storage folder directly and verify the file is available.
Sending Session Files to the CRM
When External Storage is enabled, the CRM Storage and External Storage URLs developer settings allows you to send session files and decide which source to use to display files in the Agent Adapter.
To view these settings External Storage must be enabled at Settings > Developer Settings > External Storage. Toggle the Enable information storage outside CRM servers to On.
CRM Storage
Go to Settings > Developer Settings > External Storage > CRM Storage.
Check the box beside Also send session files to the CRM to send session files such as call recordings or chat transcripts to your CRM and to the configured external storage.
Click Save Changes.
If the check box is checked, then the recordings will be stored in both the CRM and the external storage.
External Storage URLs
The External Storage url is used in two places:
The Agent Adapter.
Reporting: displays the media url in the report as well as in the menus such as Settings, Calls, Completed.
Go to Settings > Developer Settings > External Storage > External Storage URLs
Select the source CRM URLs or External Storage URLs to display files in the Agent Adapter.
Click Save Changes.
CRM Storage
If the check box for CRM storage is unchecked, the recordings will be stored only in the external storage and a link to the CRM will be used.
If the check box is checked, then the recordings will be stored in both the CRM and the external storage.
External Storage URLs
The url is used in two places:
One is showing the media in the CCAI Platform adapter. The external storage or CRM.
The other one is in the report. We reveal the media url in the reports as well as in the menus such as Settings, Calls, Completed.
Display Custom CRM in CCAI Platform Portal
Overview
When using the Custom CRM integration with your own custom-built CRM, you can load your CRM on a dedicated page within the CCAI Platform Portal. Once enabled, the CRM tab in the CCAI Platform Portal loads and displays your custom-built CRM page. This can be configured in Developer Settings > CRM.
This functionality allows agents to handle live support sessions via the CCAI Platform Call and Chat adapters while also working in your custom CRM. This includes reviewing automatically popped open account and record details and session specific files and data passed in from your mobile app or by consumers, all via the CCAI Platform portal.
IMPORTANT: To display on the CCAI Platform portal, your CRM must be allowed to be displayed inside an iframe hosted on a separate domain.
Admin Config
In the CCAI Platform Portal, go to Settings > Developer > Settings > CRM.
Under Agent Platform, select Custom CRM.
3. Switch the Display CRM in CCAI Platform Portal toggle to On.
4. Under Display URL, enter the URL to display in the CCAI Platform Portal.

Custom CRM Field Mapping (Salesforce, Zendesk, Kustomer)
Overview
In order to allow metadata from CRM records to be analyzed quickly, the CCAI Platform Web & Mobile SDKs can push data into CRM custom fields.
Custom CRM Mapping allows you to fully customize the CRM fields and what data is pushed into those fields from the CCAI Platform Web & Mobile SDKs.
Mobile SDK API Example
Data from SDK to SERVER
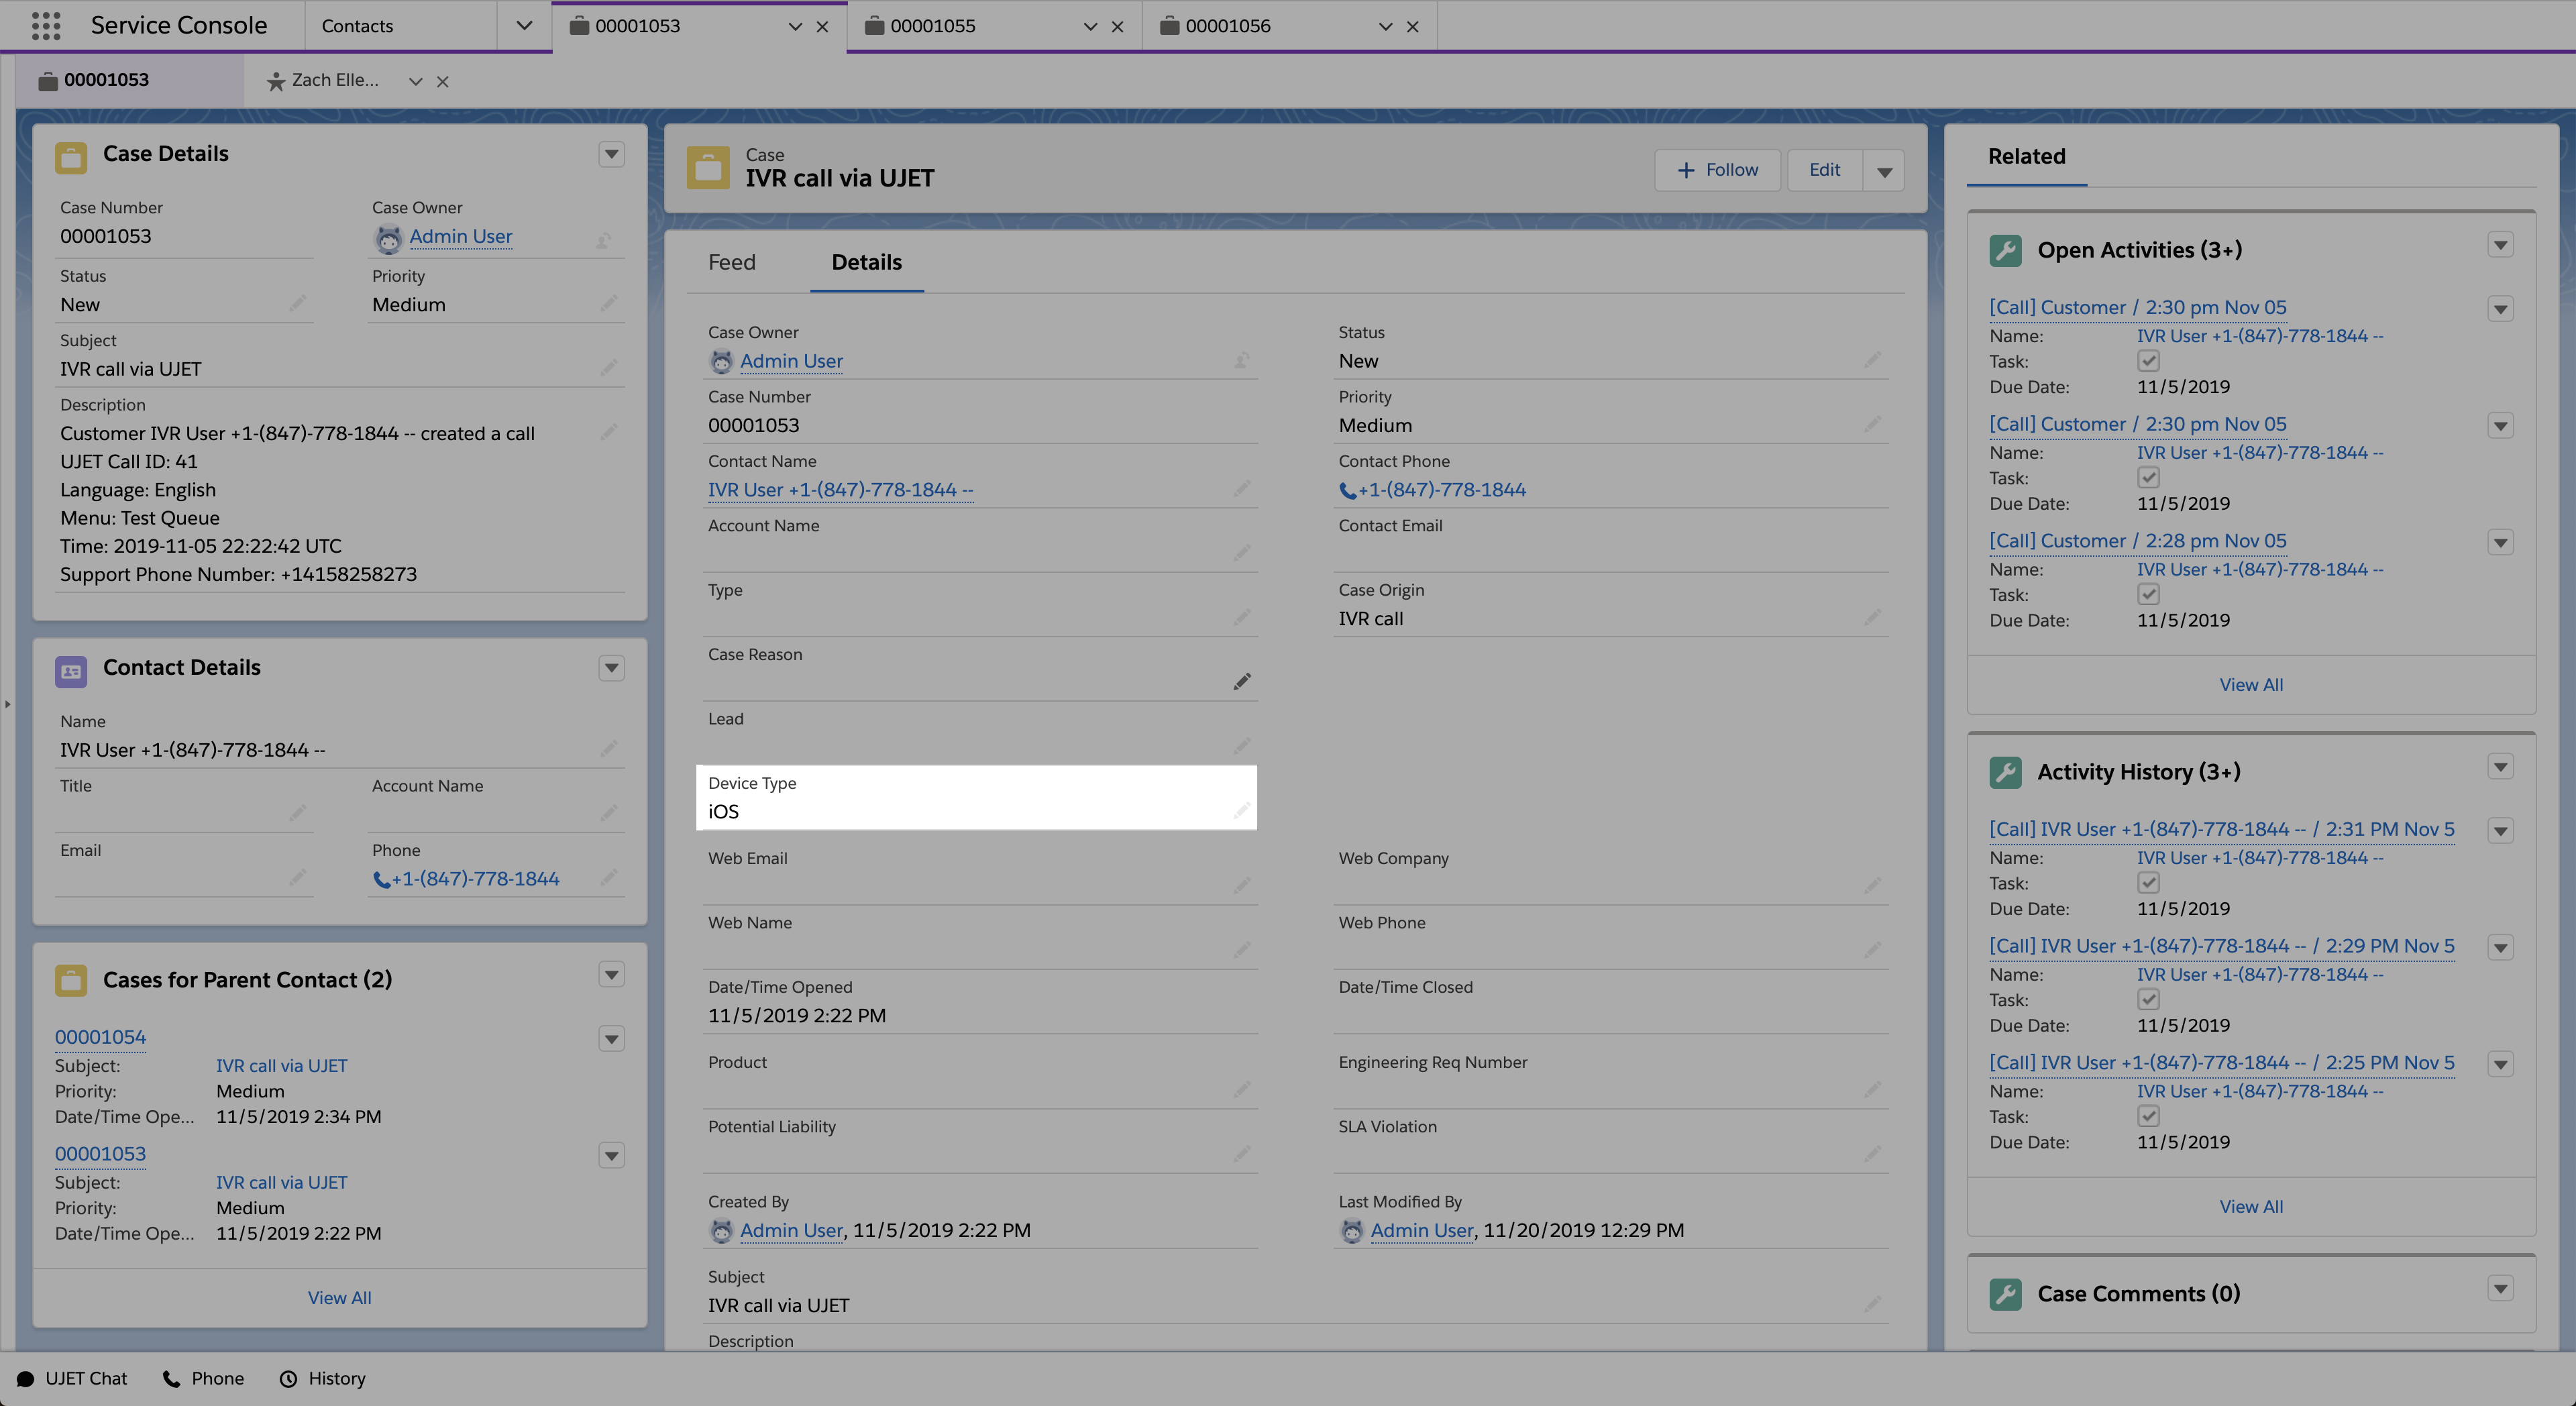
custom_data: { # same format with previous custom data from SDKdata_name: {value: value,type: string,label:'Data Name',},device: { # examplevalue:``'iOS'``,type:'string',label:``'Device Type'}} |
Data from SERVER to CRM Adaptor
key: {crm_field:``'crm custom field name'``,type: text / checkbox ...,value: value``},``device: { # examplecrm_field:'device',type:``'text'``,value:'iOS'} |
API Endpoint
POST, GET /crm_custom_fields
PUT, DELETE /crm_custom_fields/:id
Steps to configure
Create the custom field and values in your CRM.
Assign the new values to contacts in your CRM.
Configure the setting in the CCAI Platform Portal.
Test.
Zendesk configuration
Create a custom field for User (Contact)
Log into Zendesk as an Admin.
Click on the Gear icon to access the Admin options.
Select User Fields.
Select the Field Type that you want to create.
Add a Field Title - Field name within an Agent's view.
- Field key will be filled automatically
Click Create field.
You can now see this new field in the Active fields list and this new field will appear in the left side column when viewing a User.
Create a custom field for Ticket
Log into Zendesk as an Admin.
Click on the Gear icon to access the Admin options.
Select Ticket Fields.
Click the add custom field button.
Select a field type that you want to create by clicking select >>.
Add a Field Title - The Field Title will appear in your Agent's view.
We recommend using the same value as the crm_field from the API
Click the Add field button.
You can now see this new field in the Active fields list and this new field will appear in the left side column when viewing a Ticket.
Salesforce configuration
Go to Setup.
Select Object Manager.
Choose the object on which you want to append custom fields. (Case or CCAI Platform Session)
Click Fields & Relationships.
Click New.
Select Text as the Data Type.
Enter a name for the field in FieldLabel.
Enter 255 under length.
Field Name should automatically populate after you enter Field Label.
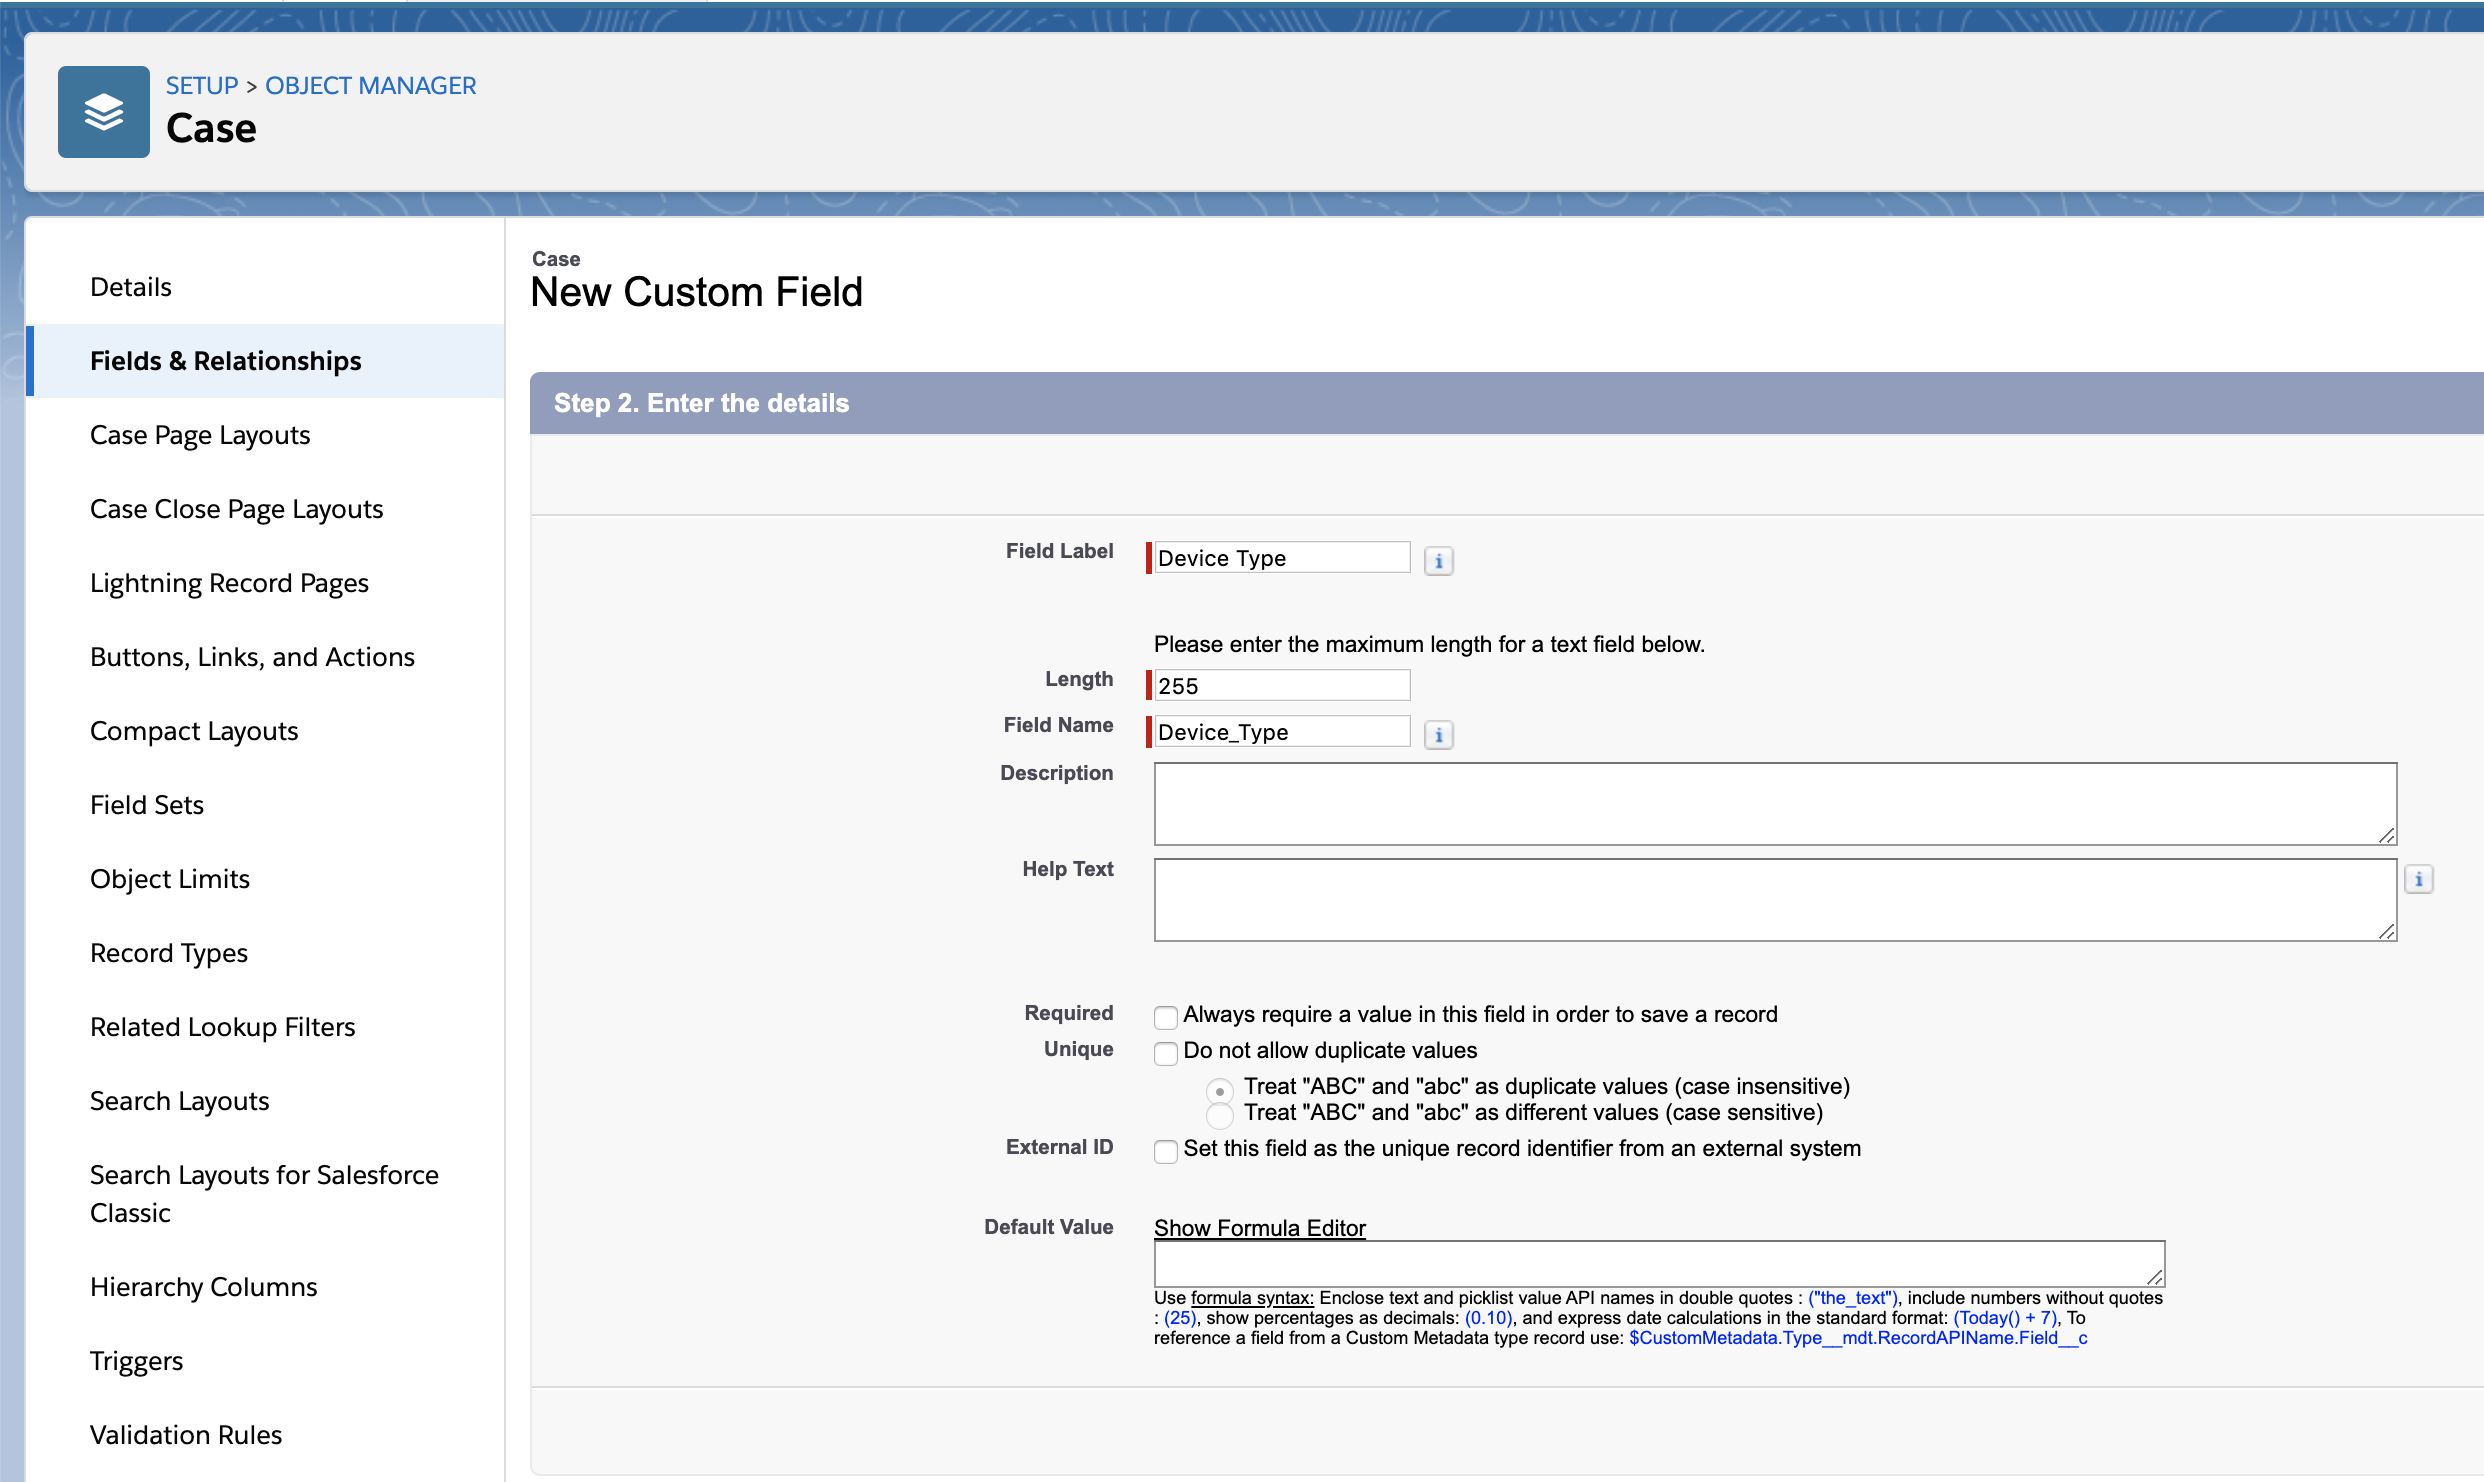
You may leave the rest of the variables at their default value.
Click Next.
Check the Visible box for any of the profiles that access the object. (Case or CCAI Platform Session)
Click Next.
Click Save.
This will take you back to the Fields & Relationships view. Find the field that you just created, and take note of the Field Name.

The Field Name is what you will enter in CRM Field Label in the CCAI Platform Custom Field Mapping page.
Example below of what a new field will look like when correctly set up and used on the Case object:
Kustomer configuration
Please see the Kustomer Help Center for details and information regarding setting up Custom Fields.
CCAI Platform Portal configuration
Add CRM field mapping
Go to Settings > Operation Management.
Go to CRM Custom Field Mapping section > click View All.
Click the + Add CRM Field Mapping link.
Field Mapping Title: CCAI Platform name for this custom field mapping used in the CCAI Platform Portal
CRM Field Label: Label within your CRM of the CRM field to which you are mapping
Custom Data Field Label: Label of the SDK data field from which you are mapping
Open Custom URL screen pop
Overview
Use Open Custom URL to bring up a custom URL screen pop when a contact is not found in the system. Create a CRM record with a temporary account ID, and trigger a custom link with parameters based on the queue level configuration.
Enable screen pop on a per queue basis
Go to Settings > Queue > IVR, click on a queue to edit.
Go to Open Custom URL in the panel on the right
Enter a URL to bring up a screen pop.
Include the variable parameters {ACCOUNT_ID} and {PHONE_NUMBER} into the URL.
An example is provided.
- Click Save.
Custom CRM Generic API Integration
Overview
The Generic API integration method allows you to utilize the API of your CRM to establish a two-way connection with CCAI Platform. This seamless method has the same feel as the out-of-the-box CRM integration experience.
The Agent does not have to take any action to create a CRM record for call or chat sessions. Depending on the unique API configuration, it can enable a seamless record lookup and record update.
Terminology
Term |
Description |
Account |
It is used to refer to the Account/Contact/Customer/Lead entity in the CRM. Your CRM may have another name for this entity. Accounts contain Records. |
Record |
It is used to refer to the Case/Ticket/Conversation/Incident entity in the CRM. Your CRM may have another name for this entity. Records belong to Accounts. |
Comment |
It is used to refer to the Comment/Note entity in the CRM. Your CRM may have another name for this entity. Comments belong to Records. |
API settings
Authentication Method
CCAI Platform Platform supports three authentication methods for your CRM:
Basic authentication: Configure Authentication Credentials: Username and password.
Custom header: Configure custom header key/value pairs: Field Key and Field Value. Enter as many pairs as you need.
OAuth: CCAI Platform Platform supports the industry-standard protocol for authorization OAuth 2.0. Specify if you need to enable the "Include the Redirect URL as part of the Authorization URL and Token URL" option.Configure the following values(* fields are required):
- Authorization URL *
- Token URL *
- Client ID *
- Client Secret *
- Scope
- State
- Access Type
Phone Number Format
Select the Phone Number Format to be used in CRM requests:
Automatic: Create: +1 222 333 4444, Search: *222*333*4444
E.164: +12223334444
US Local: 2223334444
US local standard: (111) 222-3333
International: +1 222 333 4444
API Request Timeout
Configure the API Request Timeout from 1-10 seconds using the dropdown. This timeout will be applied to all endpoints you configure.
CRM lookup URLs
Specify lookup URLs that will be used to point an Agent to the current account and/or record.
Enter lookup URLs as they appear in your CRM when you have an account or record page opened in your browser.
Account lookup URL
Use the {ACCOUNT_ID} variable to insert the actual account ID.
Example:
https://www.example.com/contact/{ACCOUNT_ID}
Record lookup URL
Use the {RECORD_ID} variable to insert the actual record ID.
Example:
https://www.example.com/record/{RECORD_ID}
API endpoints
This is the most important configuration for Generic API.
To make account lookup available to your agents, you have to configure the Find an account and Create an account endpoints.
Additionally, you can set up Find a record and Create a record endpoints to enable record lookup/creation to your agents. Account setup from the previous step is required for this.
Finally, if you enter Update a record, Upload a file, and Comment endpoints, it will enable record updates. Record setup from the previous step is required for this.
Endpoint configuration
Configure the following settings:
Request URL: API endpoint URL.
Choose the request method from POST, GET, PUT, or PATCH.
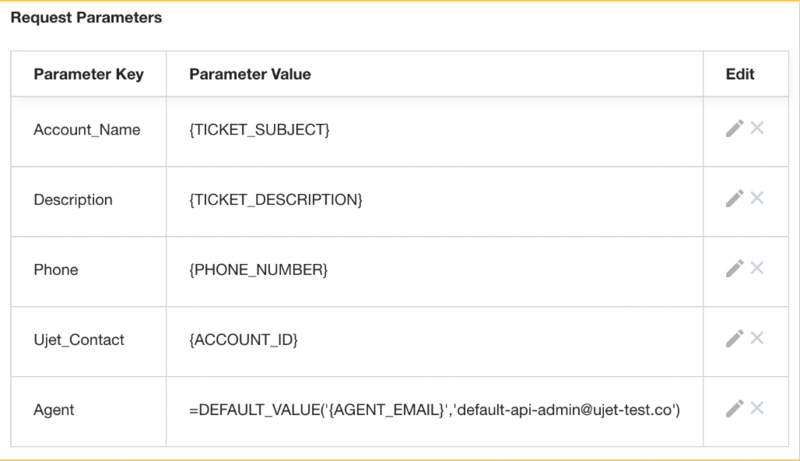
Specify the request Parameters. You can use the CCAI Platform defined variables to pass the required information (see the table below). Also, you can enter plain text or numbers as parameters' values. You can add as many parameters as you need.
If the endpoint is POST/PUT/PATCH, CCAI Platform offers more fine-tuned controls on how the request is built. Choose Request Data Format from Property or Container. It specifies the format of the request JSON.
Property. This indicates that the request object is a basic property map when CCAI Platform builds the request body from parameters.
Container. This indicates the request object data to be sent needs to be nested within a structure. Choose Container Type from Map or Array. Enter Container Name. It is used as the parent object name when building the request body from parameters.
Example: Map: { container_name : { ...parameters } }
Example: Array: {container_name : [ { ...parameters } ] }
Enter Response Data Location. It is used to locate the target response object in the JSON response.
Request URL Parameters
| Parameter | Variable | Comment |
|---|---|---|
| Agent ID | {AGENT_ID} | The internal agent ID. |
| Agent Custom ID | {AGENT_CUSTOM_ID} | Optional field from the user's profile. |
| Agent Email | {AGENT_EMAIL} | The answering agent's email if applicable. |
| End user name | {NAME} | |
| End user first name | {FIRST_NAME} | Taken from Name |
| End user last name | {LAST_NAME} | Taken from Name, defaults to -- if missing. |
| External ID | {CCAIP_ID} | CCAI Platform end-user ID |
| {EMAIL} | ||
| Call Type/Session Type | {SESSION_TYPE} | |
| End user phone number | {PHONE_NUMBER} | Formatted using setting choice |
| Call ID | {Call_ID} | CCAIP call ID. |
| Chat ID | {Chat_ID} | CCAIP chat ID. |
| Language | {LANG} | |
| Custom UID | {CUSTOM_USER_ID} | For Mobile: this is the left-hand side of the email. For example, test.user3 from test.user3@test.co |
| Account ID | {ACCOUNT_ID} | Found by calling Find/Create contact endpoint. |
| Record ID | {RECORD_ID} | Found by calling Find/Create record endpoint. |
| Session ID | {SESSION_ID} | CCAI Platform session ID |
| Menu path | {MENU_PATH} | |
| Outbound phone number | {OUTBOUND_PHONE_NUMBER} | Formatted using setting choice |
| Queue name | {QUEUE_NAME} | |
| Queue ID | {QUEUE_ID} | The internal queue ID. |
| SmartAction session id | {SMART_ACTION_SESSION_ID} | |
| SmartAction: verification | (Coming soon) | |
| SmartAction: text input | (Coming soon) | |
| Rating | {RATING} | Only available if a user left it |
| Feedback message | {FEEDBACK} | Only available if a user left it |
| Call duration | {CALL_DURATION} | In mm:ss |
| Hold time | {HOLD_TIME} | In mm:ss |
| Wait time | {WAIT_TIME} | In mm:ss |
| After call work duration | (Coming soon) | |
| Device Type | {DEVICE_TYPE} | |
| Disconnected By | {DISCONNECTED_BY} | |
| Channel | {CHANNEL} | |
| Record Subject | {TICKET_SUBJECT} | Used as record title |
| Record Description | {TICKET_DESCRIPTION} | |
| Record Description HTML | {TICKET_DESCRIPTION_HTML} | Same as description just formatted for html |
| Comment Body | {COMMENT_BODY} | Only available in add comment situation (save rating, end call/chat, call/chat started) |
| File Data | {FILE_DATA} | Only available in the upload file endpoint, but contains the base64 or data for multipart form. |
Request URL Parameter Functions
Functions are provided to help with dynamic CCAIP variables. These functions are only available for use in the Request Parameter section of the endpoint settings.
The resulting value created from a function will be a string. If no values are returned from the function, the parameter is removed from the parameters list in the request before execution.
| Function | Function Syntax | Description |
|---|---|---|
| Default Value | =DEFAULT_VALUE(val1, val2) |
Value will use val1 unless null or empty, and default back to val2. |
Concatenation Or |
=CONCAT_OR(val1, val2, val3) |
Concatenation of multiple values with or. Example: 'val1 or val2 or val3' |
Concatenation And |
=CONCAT_AND(val1, val2, val3) |
Concatenation of multiple values with and. Example: 'val1 and val2 and val3' |
Examples
Default
The following example uses DEFAULT_VALUE in the Create a Record Endpoint.
The key and value for agent setup use the default function to have a fallback in
case of an empty value for an agent email. Agent email may be empty on record
creation for a few reasons: a customer may have ended the IVR call before an
assigned agent answers the incoming call, or in the case of chats, a record will
be created before an agent answers. In this way, required parameters might be
defaulted to safe values until later updates or set in cases of abandoned calls.

Concantenation or/And
The following example uses CONCAT_OR in the Find an Account by Query
endpoint. This example is specific to Zoho CRM, but shows how CONCAT_OR can be
used. CONCAT_AND follows the same rules instead connecting values with and
instead of or. Examine the cases below for values present in the endpoint at
the time of execution and the resulting value passed as the request parameter.

| Keys present | Resulting value |
|---|---|
ACCOUNT_ID |
(Id:equals: |
ACCOUNT_ID, EMAIL |
(Id:equals: |
PHONE_NUMBER, EMAIL |
(Phone:equals:+12223334444) or (Email:equals:james.bond@007) |
API account
Find an account by query endpoint (formerly find an account endpoint)
This endpoint is used to find an account by phone number, email, or internal CRM ID. This is the default endpoint used for finding an account.
Example response:
{
        id: 123,
        name: 'James Bond',
        phone: 11234567890,
        email: 'james.bond@agents.co',
}
Find an account by ID endpoint
This endpoint is used to find an account by ID. Generally, this ID will be part of the URL. URL validation will also account for if the URL is not formed with the ID, then this endpoint will not be used. This will follow REST standards. If a 404 is returned on failed lookup, find by query will be next.
Example response:
{
        id: 123,
        name: 'James Bond',
        phone: 11234567890,
        email: 'james.bond@agents.co',
}
Create an account endpoint
This endpoint is used to create an account if we haven't found one. Most CRMs require records to be attached to accounts. To create a unified flow, we enforce this requirement for all CRMs.
API record
Find a record by query (formerly find a record endpoint)
This endpoint is used to find a record by a criteria. Generally, this is used to find associated records to an account. If the CCAI Platform is configured to re-use existing records, then the found record will be used. This is the default endpoint used for finding a record.
Example response:
{
        id: 456,
        subject: 'Record title',
        status: 'open', // enumerated status open/closed, or 1,2,3
        contactId: 123, // contact attached to ticket
        phone: 11234567890, // contact phone
}
Create a record endpoint
This endpoint is used to create a record. A new record is created if a record is not found from the Find a record request or if CCAI Platform is configured not to re-use existing records.
Example request:
{
        id: 123,
       subject: 'Record title',
        description: 'A longer description of the record, can be formatted in html',
        phone: 11234567890, // can be saved in multiple formats
        contactId: 123,
        // some optional variables below
        sourceType: 'PHONE', // PHONE/CHAT
        menu: 'queue1',
        direction: 'outgoing',
        rating: 5, // 1-5 scale
        feedback: 'the agent was great!', // description of rating
}
Update a record endpoint
This endpoint is used to update a record. It updates the record's title and description. This endpoint also optionally works to update the record according to CCAI Platform events, such as save CSAT rating, call/chat finish events, selected queues, verifying users, and others.
Upload a file endpoint
This endpoint is used to upload an attachment.
Choose the Type for your upload endpoint
Base64 encoded form
Multi-part form
Select which files to attach
Call recordings
Chat transcripts
Voicemails
Photos
Videos
Session metadata file
Choose Attachment Type from ID and Attachment URL. It specifies the format of the response JSON.
ID
Attachment ID. Enter the location of a parameter in JSON response for attachment's ID. This will be available for attachment builder URL as {ATTACHMENT_ID}.
Attachment Builder URL. Enter URL to download the file attachment. RECORD_ID and ATTACHMENT_ID are available variables.
Example:
https://www.example.com/Accounts/{RECORD_ID}/Attachments/{ATTACHMENT_ID}Attachment URL
Enter the location of a parameter in JSON response for the file download URL.
Select the Add comment to CRM record checkbox if you want CCAI Platform to leave a comment to a record when a file was uploaded. The Text Format setting from the Comment endpoint will be respected for these comments.
The following example is a multipart form example using POST/PUT/PATCH:
{
  file:
  id: 123, // optional, this can also just be part of the url;
   i.e., https://example-customer.com/upload/record/{RECORD_ID}
}
Example response:
Example A: A download URL exists
{
  id: 123,
  url: https://some-hosted-url.com
}
Example B
In this case a download URL does not exist but there is a download attachment
endpoint that uses this id. For example,
https://www.customer-api.com/record/{RECORD_ID}/Attachments/{ATTACHMENT_ID}.
{
  id: 123
}
Comment endpoint
This endpoint is used to add a comment to a record. If the endpoint is configured, the CCAI Platform Platform will add comments to records with the events:
call or chat start
call or chat end
CSAT rating and comment
custom data package
transfer comments
disposition code and notes
survey questions and answers
Choose Text Format for comments. If the Convert text to HTML checkbox is checked, the text will be in HTML format or plain text otherwise.
Example request, POST/PUT/PATCH:
{
  comment: 'Some text',
 // string can also be formatted on ujet side as html
  id: 123,
 // optional, this can also just be part of the url;
 i.e., https://example-customer.com/comment/record/{RECORD_ID}
}
Custom CRM Generic API: Flows
Flow charts
Basic flow
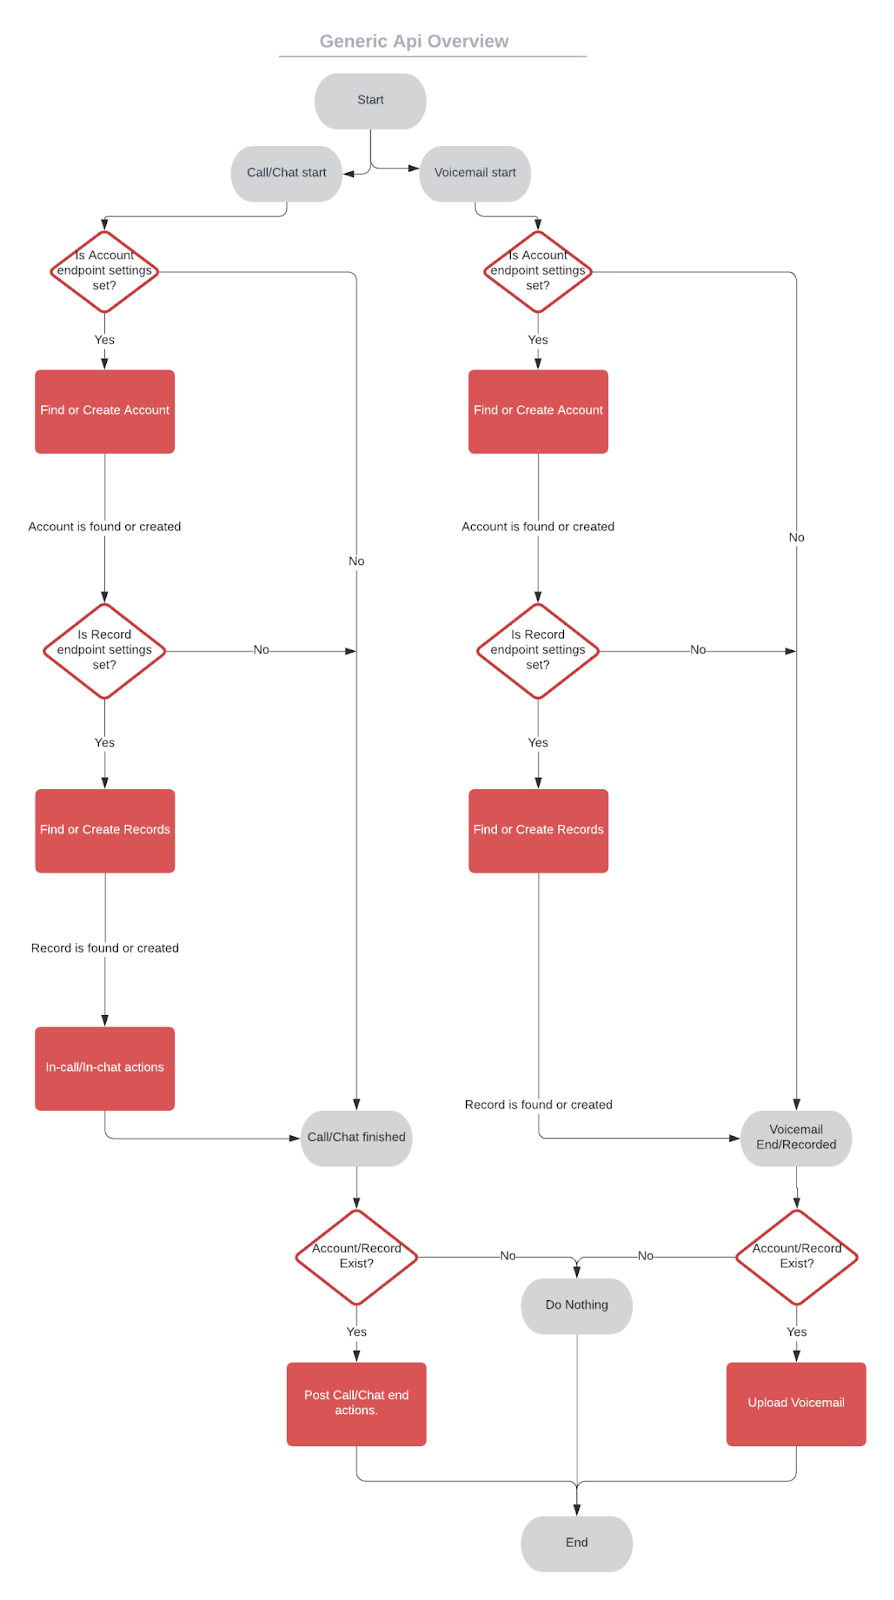
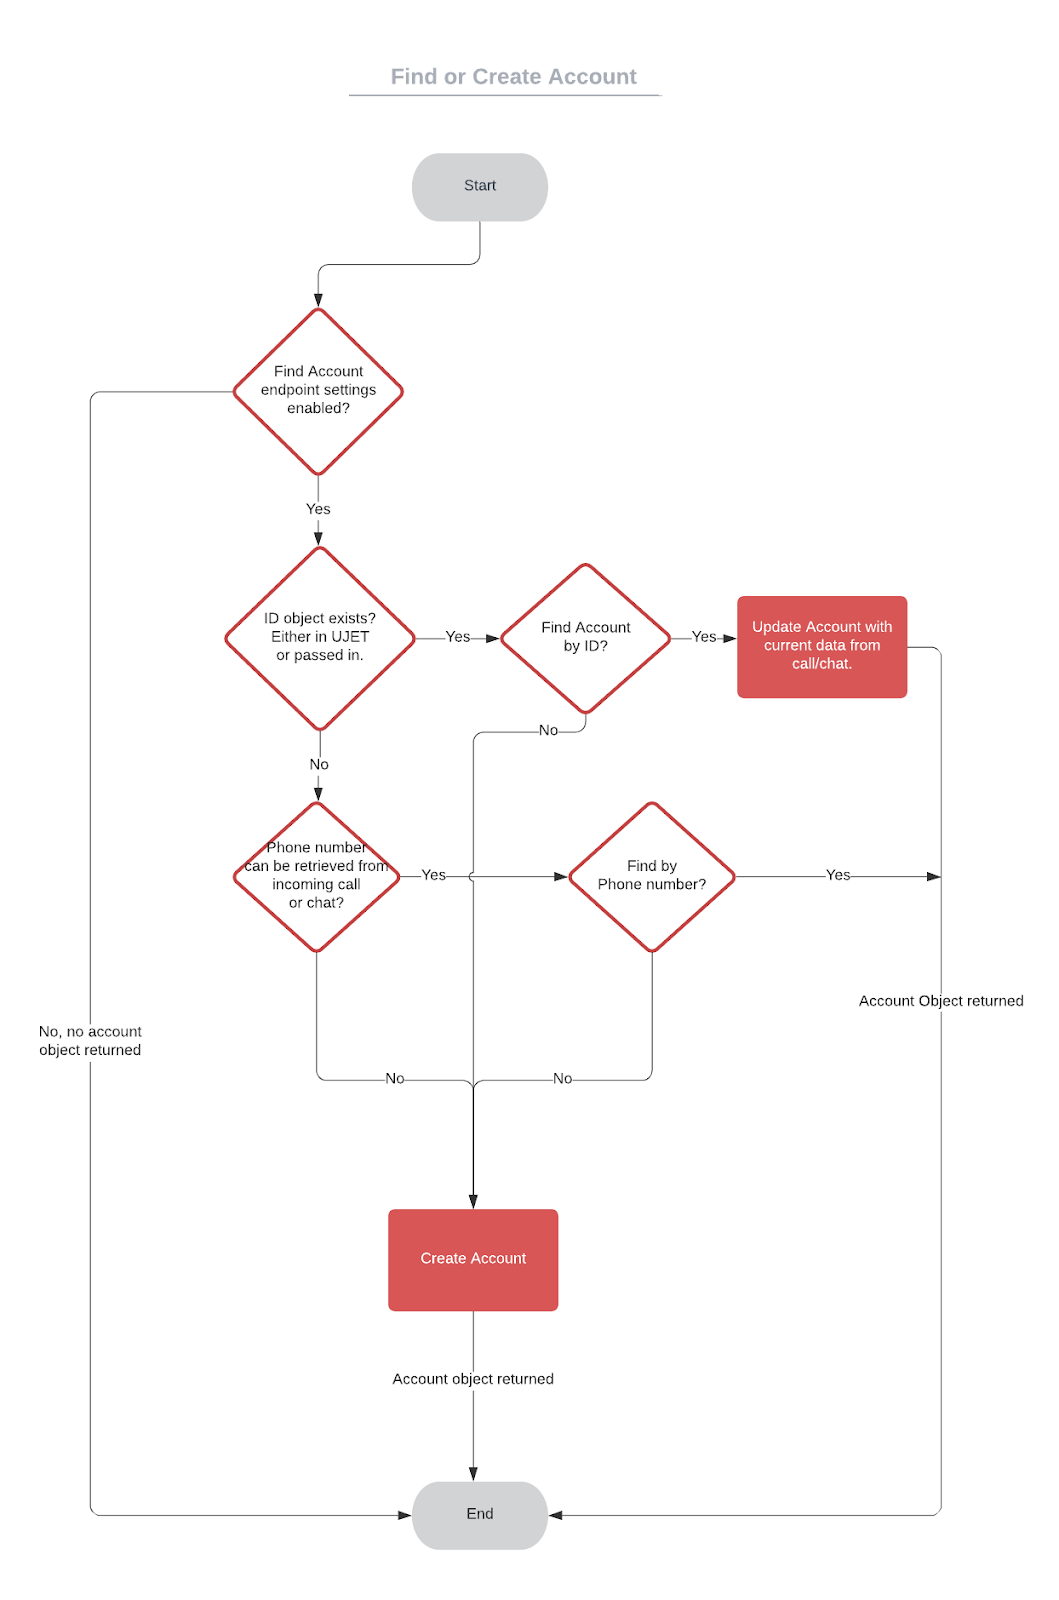
Find or create account flow
Find or create record flow

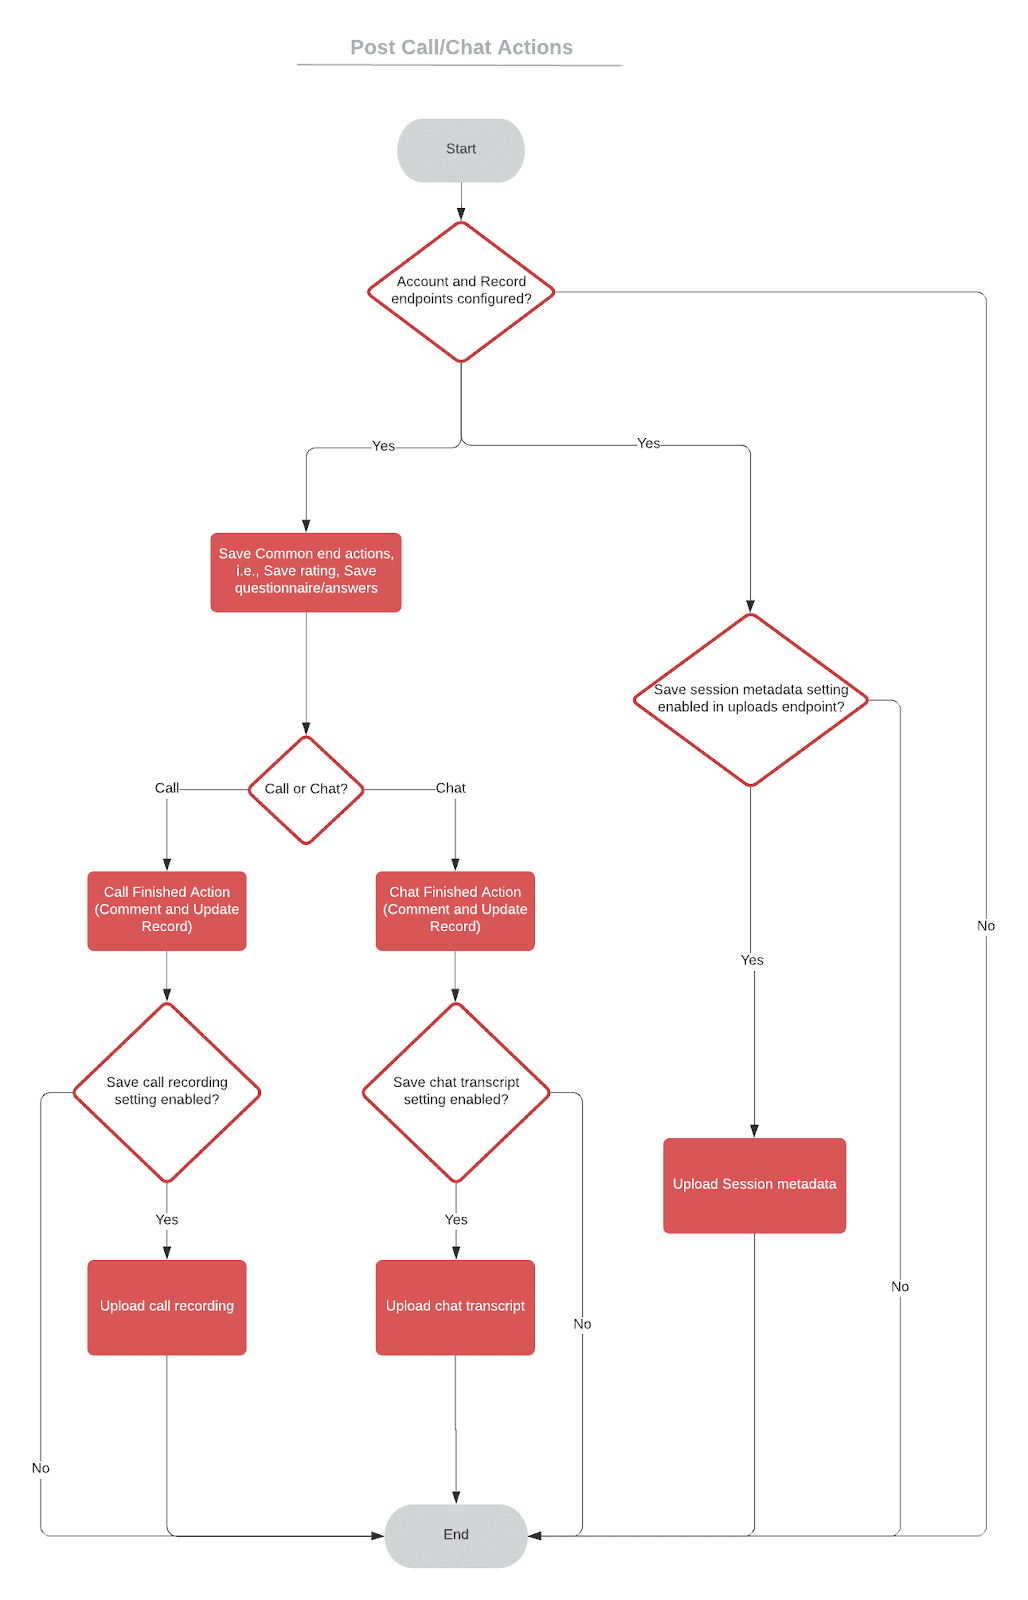
Post call/chat actions flow
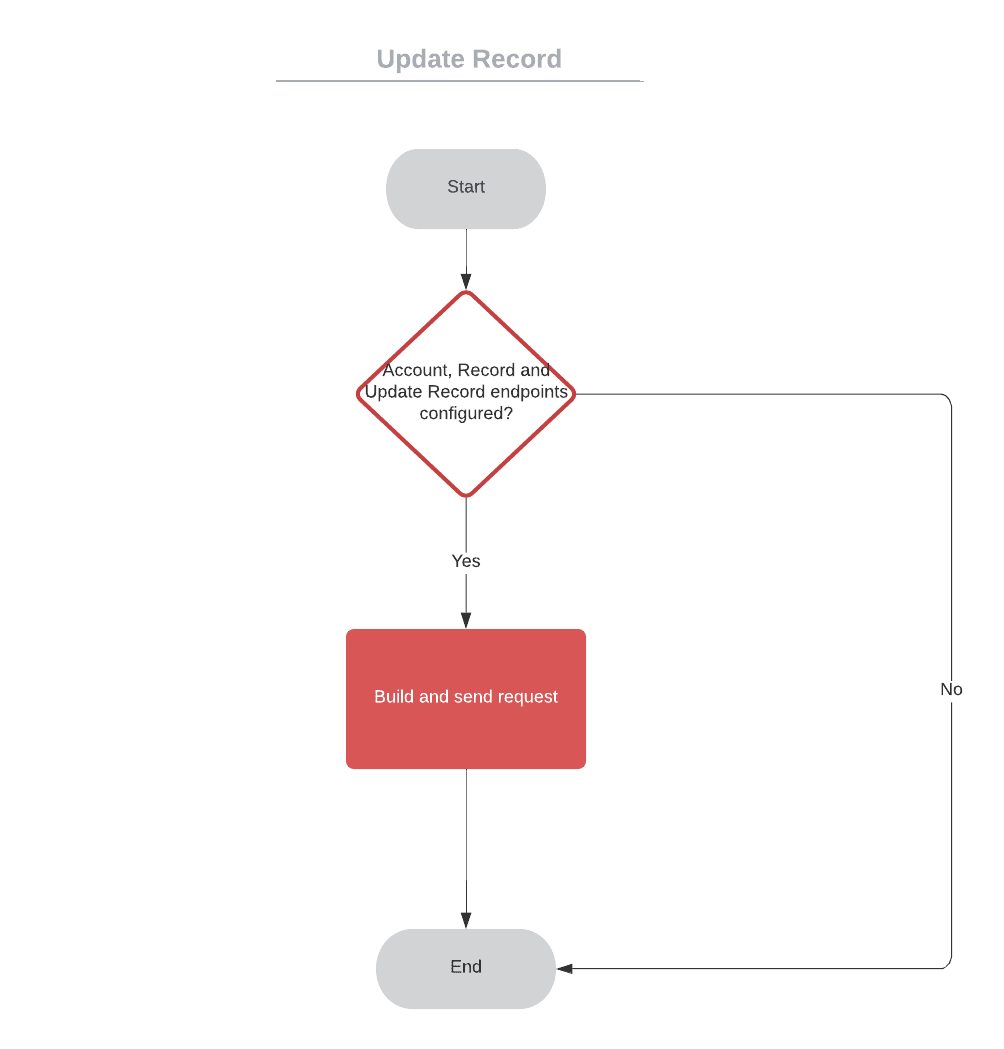
Update record flow
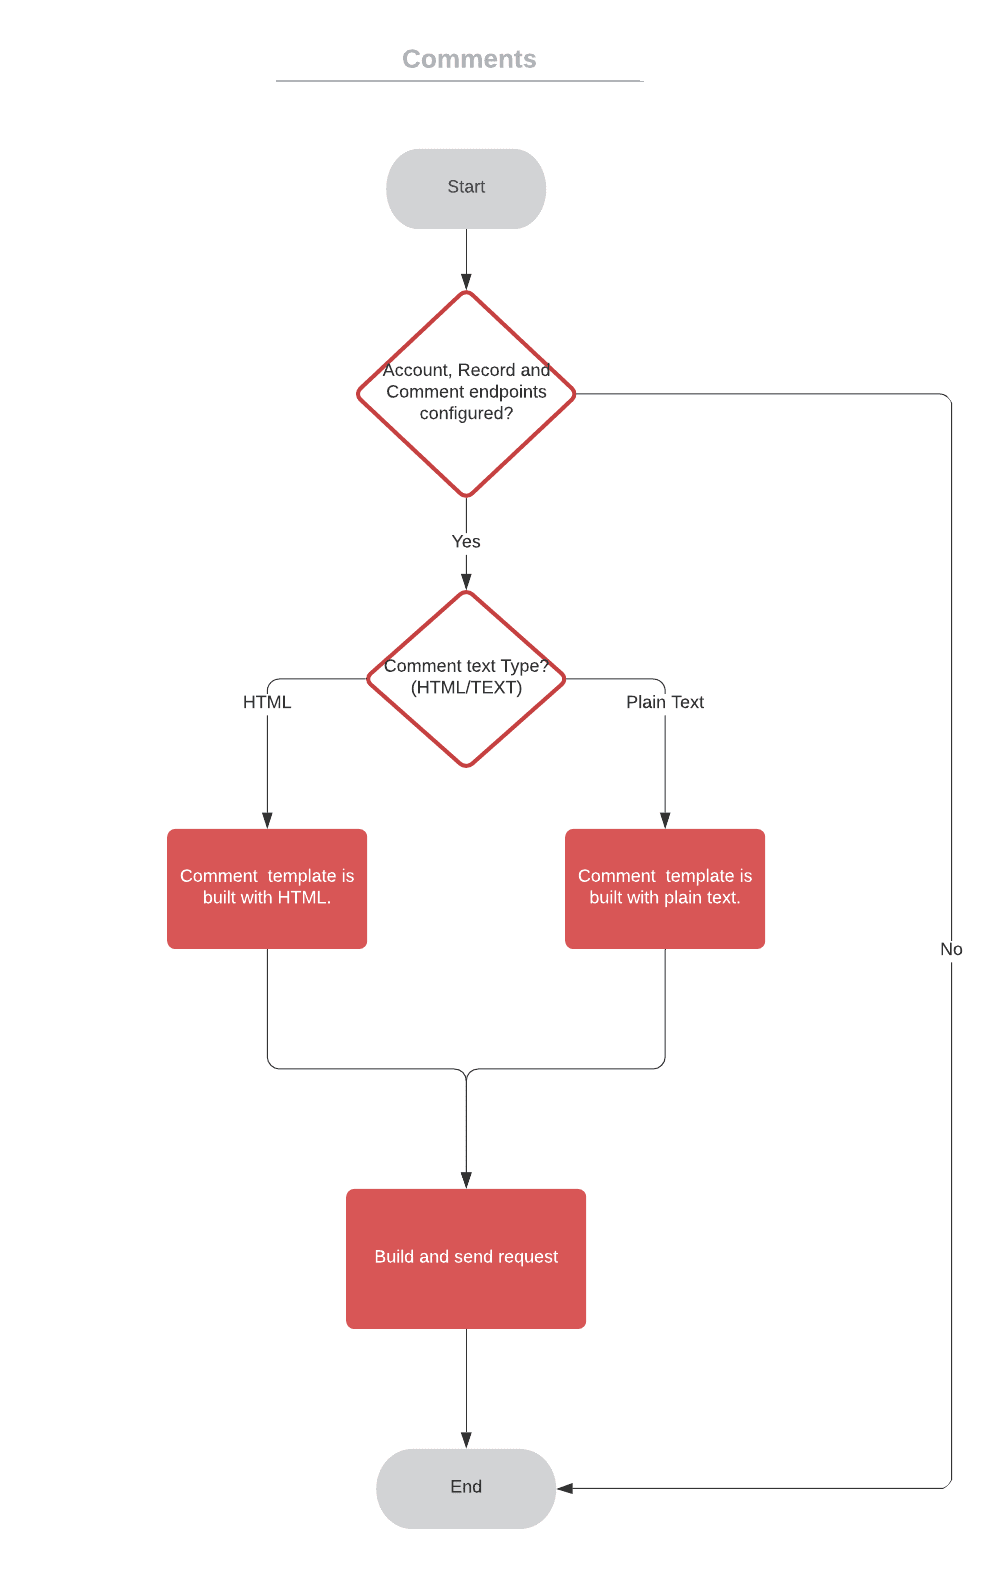
Comment flow
Upload file flow

Agent Adapters
Custom CRM offers a generic method to integrate adapters (UI widgets) into CRM systems. The CRM system must be able to handle the way the adapters are activated and triggered within it.
In order to integrate user interface adapters, a CRM software or application is typically necessary. We already provide this capability for several CRM software such as Salesforce, Kustomer, Zendesk and others.
iFrame
Agent Adapters can be seamlessly integrated into a CRM or any other tool through the use of an iFrame tag. To learn more about the HTML iframe Tag see HTML iframe Tag.
However, the CRM needs to handle how the Adapters are presented to the user. For instance, it might feature UI buttons to allow for showing and hiding the Adapters. Furthermore, the Adapters can be designed to be draggable, allowing the Agent to reposition them on the screen at their convenience. The following examples demonstrate URL format.
Call adapter:
https://tenant.loc.ccaiplatform.com/agent/?type=call&from=custom
Chat adapter:
https://tenant.loc.ccaiplatform.com/agent/?type=chat&from=custom
iFrame template
Call Adapter:
<iframe src="https://tenant.loc.ccaiplatform.com/agent/?type=call&from=custom" allow="microphone; camera; geolocation" width="290" height="600"></iframe>
Chat Adapter:
<iframe src="https://tenant.loc.ccaiplatform.com/agent/?type=chat&from=custom" allow="microphone; camera; geolocation" width="450" height="590"></iframe>
URL Parameters
URL parameters can be used to provide additional information to the software, such as the type of interaction (call or chat), the source of the interaction (custom), and other relevant details.
If the tenant CRM setting is not available in the lists, the From parameter must always be set to Custom.
Type
- Call
- Chat
From
- Custom (This must match with the tenant CRM setting). It must always be custom for any CRM other than in the lists. If there is no CRM setup, you can skip this parameter.
Events in Agent Adapters
Agent Adapters post events that can be hooked into by the CRM system, which then processes updates to the CRM. To do this, the CRM needs to listen to the posts from the parent window and read the post data. Based on the data, it can trigger actions such as opening a ticket tab for a specific session ID.
Both the Call Adapter and Chat Adapter have specific events that can be utilized to enhance the CRM capabilities.
Call Adapter
- New Call
- End Call
Chat Adapter
- New Chat
- Active Chat
- Chat Inbound Message
- Chat Outbound Message
- End Chat
- Dismissed Chat
Both Adapters
- Agent Login
- Co-browse session started
- Co-browse session remote control changed
- Co-browse session full device changed
- Co-browse session ended
- Transfer
- Add Party
- Agent Connects to Session
Data for events
call_id: This is a unique identifier for a voice inbound call with IVR (Interactive Voice Response).chat_id: This is a unique identifier for a messaging inbound call (web or mobile chat).cobrowse_session_id: This is a unique identifier for a co-browse session. A co-browse session can be initiated in a call or chat session.session_type: This is the type of session, such as voice, chat, or messaging.va_data_parameters: Optional. All the variables configured in the queue to send to the Virtual Agent. This is only required for events involving the Virtual Agent.session_variable: Optional. All the variables from the Virtual Agent that get sent to CCAIP in the payload.custom_sip_headers: Optional. This enables custom SIP headers from incoming SIP calls to appear in the POST event log. It is only required if custom SIP headers are used.custom_data_secured: Optional. Contains signed, custom data from your server.custom_data_not_secured: Optional. Contains unsigned, custom data from your web page. For more information, see Chat unsigned custom data (Optional).
Agent IDs
agent_id: This is a unique identifier for an agent.from_agent_id: Used when routing calls or chats from one agent to another, to indicate the originating agent.to_agent_id: Used when routing calls or chats from one agent to another, to indicate the destination agent.
agent_custom_id: Optional. This is an agent ID from the user profile, if it has been entered in the profile.from_agent_custom_id: Used when routing calls or chats from one agent to another, to indicate the originating agent.to_agent_custom_id: Used when routing calls or chats from one agent to another, to indicate the destination agent.
agent_email: This is the email address of the agent.from_agent_email: Used when routing calls or chats from one agent to another, to indicate the originating agent.to_agent_email: Used when routing calls or chats from one agent to another, to indicate the destination agent.
Virtual Agent IDs
virtual_agent_id: This is the ID number assigned to a specific Virtual Agent.
Queue IDs
queue_id: This is the unique identifier for a CCAIP queue, and only exists when the call originates from a queue.from_queue_id: Used when routing calls or chats from one queue to another, to indicate the originating queue.to_queue_id: Used when routing calls or chats from one queue to another, to indicate the destination queue.
queue_path: This is the path for a CCAIP queue, and only exists when the call originates from a queue.from_queue_path: Used when routing calls or chats from one queue to another, to indicate the originating queue.to_queue_path: Used when routing calls or chats from one queue to another, to indicate the destination queue.
Campaign ID
campaign_id: A CCAIP campaign ID (only exists when the call type is a campaign call).campaign_name: A CCAIP campaign name (only exists when the call type is a campaign call).
Message
message: Event indicating a new consumer message was received, plus message content.
Session Types
session_type: A CCAIP session type. The following section details the session/interaction types.cobrowse_session_remote_control: Indicates the status of a requested remote control co-browse session. Values:off,requested,rejected,on.cobrowse_session_full_device: Indicates the status of a full device co-browse session. Values:off,requested,rejected,on.
Participants
type: Participant type -end_user;agent; and so on (from participants.type of /api/v1/calls or /api/v1/chats response).cobrowse_session_requested_by: Indicates who initiated a co-browse session. Values:agent,end_user.cobrowse_session_ended_by: Indicates who ended a co-browse session. Values:agent,end_user,api.end_user_id:participants.end_user_idof/api/v1/callsor/api/v1/chatsresponse. This field is only present if type:end_user.
Interaction / Session Types
Call Types
- Voice Inbound: Standard PSTN calls.
- Voice Inbound (IVR via Mobile): Fallback PSTN calls made from the Mobile SDK.
- Voice Inbound (Mobile): Placed by consumers via an installed Mobile SDK.
- Voice Callback (Web): Initiated from the Web SDK.
- Voice Inbound (API): Initiated via API.
- Voice Scheduled (Mobile): Scheduled via an installed Mobile SDK.
- Voice Scheduled (Web): Scheduled via an installed Web SDK.
- Voice Outbound: Initiated by an Agent by dialing a number.
- Voice Outbound (API): Initiated via API.
- Voice Campaign: Initiated via an Outbound Dialer (Campaign).
Chat Types
- Messaging (Whatsapp): Initiated via Whatsapp.
- Messaging Inbound (SMS)
- Messaging Outbound (SMS)
- Messaging Outbound (SMS via API)
- Messaging (Web): Initiated via an installed Web SDK.
- Messaging (Mobile): Initiated via an installed Mobile SDK.
Call or Chat Type
- Co-browse Session: Initiated by an agent or end-user during a call or a chat.
Event types
Here are the event types that are posted by the agent adapter:
Agent login
An agent login event occurs when the agent logs into the adapter.
Here's an example of a JSON object for an agent login event:
{
  "type": "Agent_Login",
    "data": {
    "agent_id": 1,
    "agent_custom_id": "007",
    "agent_email": "james.bond@agents.co",
  }
}
Here are descriptions for the event data fields:
agent_id: the agent identifier.Optional:
agent_custom_id: The custom identifier of the agent, if it was entered in the agent's profile.agent_email: the email address associated with the agent's account.
New call
A new call event occurs when an agent picks up a call. This event contains information such as when the call started, which agent handled the call, and where the call originated.
Here's an example of a JSON object for a new call event:
{
  "type": "New_Call",
  "data": {
    "agent_id": 1,
    "agent_custom_id": "007",
    "agent_email": "james.bond@agents.co",
    "queue_id": 8469,
    "queue_path": "Developers / James",
    "campaign_id": 1432,
    "campaign_name": "Survey Movie",
    "call_id": 103646,
    "session_type": "Voice Campaign (UJET)"
  }
}
Here are descriptions for the event data fields:
agent_id: The agent identifier.agent_custom_id: Optional. The custom identifier of the agent, if it was entered in the agent's profile.agent_email: The email address associated with the agent's account.queue_id: Optional. The identifier of the queue that the call originated from. This field is included when the call originated from a queue.queue_path: Optional. The path of the queue that the call originated from. This field is included when the call originated from a queue.campaign_id: Optional. The identifier of the campaign. This field is included for a campaign call.campaign_name: Optional. The name of the campaign. This field is included for a campaign call.call_id: The call identifier.session_type: The session type.virtual_agent_id: Optional. The virtual agent identifier. This field is included for events involving the virtual agent.va_data_parameters: Optional. The variables configured in the queue to send to the virtual agent. This field is included for events involving the virtual agent.session_variable: Optional. All the variables from the virtual agent that are sent to Contact Center AI Platform.custom_sip_headers: Optional. Enables custom Session Initiation Protocol (SIP) headers from incoming SIP calls to appear in the POST event log. This field is included if custom SIP headers are used.custom_data_secured: Optional. Contains signed, custom data from your server.custom_data_not_secured: Optional. Contains unsigned, custom data from your web page. For more information, see Chat unsigned custom data (Optional).
End call
An end call event occurs when a call is ended. This event contains information such as when the call ended, which agent handled the call, and where the call originated.
Here's an example of a JSON object for an end call event:
{
  "type": "End_Call",
  "data": {
    "agent_id": 1,
    "agent_custom_id": "007",
    "agent_email": "demo+zdco+qa@ujet.co",
    "queue_id": 8469,
    "queue_path": "Developers / James",
    "campaign_id": 1432,
    "campaign_name": "Survey Movie",
    "call_id": 103646,
    "session_type": "Voice Campaign (UJET)"
  }
}
Here are descriptions for the event data fields:
agent_id: The agent identifier.agent_custom_id: Optional. The custom identifier of the agent, if it was entered in the agent's profile.agent_email: The email address associated with the agent's account.queue_id: Optional. The identifier of the queue that the call originated from. This field is included when the call originated from a queue.queue_path: Optional. The path of the queue that the call originated from. This field is included when the call originated from a queue.campaign_id: Optional. The identifier of the campaign. This field is included for a campaign call.campaign_name: Optional. The name of the campaign. This field is included for a campaign call.call_id: The call identifier.session_type: The session type.virtual_agent_id: Optional. The virtual agent identifier. This field is included for events involving the virtual agent.va_data_parameters: Optional. The variables configured in the queue to send to the virtual agent. This field is included for events involving the virtual agent.session_variable: Optional. All the variables from the virtual agent that are sent to Contact Center AI Platform.custom_sip_headers: Optional. Enables custom Session Initiation Protocol (SIP) headers from incoming SIP calls to appear in the POST event log. This field is included if custom SIP headers are used.custom_data_secured: Optional. Contains signed, custom data from your server.custom_data_not_secured: Optional. Contains unsigned, custom data from your web page. For more information, see Chat unsigned custom data (Optional).
New chat
A new chat event occurs when an agent picks up a chat session. This event indicates when the chat started and contains information such as which agent handled the chat where the chat originated.
Here's an example of a JSON object for a new chat event:
{
  "type": "New_Chat",
  "data": {
    "chat_id": 73522,
    "session_type": "messaging inbound (web chat)",
    "agent_id": 1,
    "agent_email": "james.bond@agents.co",
    "queue_id": 7678,
    "queue_path": "HB TEAM / Edvards"
  }
Here are descriptions for the event data fields:
chat_id: The chat identifier.session_type: The session type.agent_id: The agent identifier.agent_custom_id: Optional. The custom identifier of the agent, if it was entered in the agent's profile.agent_email: The email address associated with the agent's account.queue_id: Optional. The identifier of the queue that the call originated from. This field is included when the call originated from a queue.queue_path: Optional. The path of the queue that the call originated from. This field is included when the call originated from a queue.custom_data_secured: Optional. Contains signed, custom data from your server.custom_data_not_secured: Optional. Contains unsigned, custom data from your web page. For more information, see Chat unsigned custom data (Optional).
End chat
The end chat event occurs when a chat session ends. This event indicates when the chat ended and contains information such as which agent handled the chat where the chat originated.
Here's an example of a JSON object for an end chat event:
{
  "type": "End_Chat",
  "data": {
    "chat_id": 73522,
    "session_type": "Messaging Inbound (Web Chat)",
    "agent_id": 1,
    "agent_email": "james.bond@agents.co",
    "queue_id": null,
    "queue_path": null,
    "agent_custom_id": null
  }
}
Here are descriptions for the event data fields:
chat_id: The chat identifier.session_type: The session type.agent_id: The agent identifier.agent_custom_id: Optional. The custom identifier of the agent, if it was entered in the agent's profile.agent_email: The email address associated with the agent's account.queue_id: Optional. The identifier of the queue that the call originated from. This field is included when the call originated from a queue.queue_path: Optional. The path of the queue that the call originated from. This field is included when the call originated from a queue.custom_data_secured: Optional. Contains signed, custom data from your server.custom_data_not_secured: Optional. Contains unsigned, custom data from your web page. For more information, see Chat unsigned custom data (Optional).
Active chat
An active chat event occurs when the agent switches to a chat tab in the chat adapter.
Here's an example of a JSON object for an active chat event:
{
  "type": "Active_Chat",
  "data": {
    "chat_id": 73521,
    "session_type": "messaging inbound (web chat)",
    "agent_id": 1,
    "agent_email": "james.bond@agents.co",
    "queue_id": 7678,
    "queue_path": "HB TEAM / Edvards"
  }
}
Here are descriptions for the event data fields:
chat_id: The chat identifier.session_type: The session type.agent_id: The agent identifier.agent_custom_id: Optional. The custom identifier of the agent, if it was entered in the agent's profile.agent_email: The email address associated with the agent's account.queue_id: Optional. The identifier of the queue that the call originated from. This field is included when the call originated from a queue.queue_path: Optional. The path of the queue that the call originated from. This field is included when the call originated from a queue.custom_data_secured: Optional. Contains signed, custom data from your server.custom_data_not_secured: Optional. Contains unsigned, custom data from your web page. For more information, see Chat unsigned custom data (Optional).
Dismissed chat
A dismissed chat event occurs when the agent closes the chat tab in the chat adapter.
Here's an example of a JSON object for a dismissed chat event:
{
  "type":"Dismissed_Chat",
  "data":{"chat_id":73522,
    "session_type":"Messaging Inbound (Web Chat)",
    "agent_id":1,
    "agent_email":"james.bond@agents.co"
  }
}
Here are descriptions for the event data fields:
chat_id: The chat identifier.session_type: The session type.agent_id: The agent identifier.agent_custom_id: Optional. The custom identifier of the agent, if it was entered in the agent's profile.agent_email: The email address associated with the agent's account.queue_id: Optional. The identifier of the queue that the call originated from. This field is included when the call originated from a queue.queue_path: Optional. The path of the queue that the call originated from. This field is included when the call originated from a queue.custom_data_secured: Optional. Contains signed, custom data from your server.custom_data_not_secured: Optional. Contains unsigned, custom data from your web page. For more information, see Chat unsigned custom data (Optional).
Co-browse session started
A co-browse session started event occurs when a co-browse session is started by an agent or an end-user. A co-browse sessions can be started during a call or a chat. For more information, see Configure co-browse.
Here's an example of a JSON object for a co-browse session started event:
{
  "type": "Cobrowse_Session_Started",
  "data": {
    "agent_id": 5,
    "chat_id": 791,
    "cobrowse_session_id": "Y1zYY6XIYX4oapqpEz3qHw",
    "cobrowse_session_requested_by": "agent",
    "cobrowse_session_remote_control": "off",
    "cobrowse_session_full_device": "off"
  }
}
Here are descriptions for the event data fields:
agent_id: The agent identifier.call_id: The identifier for an inbound call on the IVR (interactive voice response) channel. This field is included if the co-browse session was started during a call.chat_id: The identifier for an inbound chat on the web or mobile channel. This field is included if the co-browse session was started during a chat.cobrowse_session_id: The identifier for a co-browse session.cobrowse_session_requested_by: Indicates who started a co-browse session. Values areagentandend-user.cobrowse_session_remote_control: Indicates the status of a remote control co-browse session. Values areon,rejected,requested, andoff.cobrowse_session_full_device: Indicates the status of a full device co-browse session. Values areon,rejected,requested, andoff.custom_data_secured: Optional. Contains signed, custom data from your server.custom_data_not_secured: Optional. Contains unsigned, custom data from your web page. For more information, see Chat unsigned custom data (Optional).
Co-browse session remote control changed
A co-browse session remote control changed event occurs when the status of a remote control co-browse session changes. This event indicates the status of the remote control co-browse session. For more information, see Configure co-browse.
Here's an example of a JSON object for a co-browse session remote control changed event:
{
  "type": "Cobrowse_Session_Remote_Control_Changed",
  "data": {
    "agent_id": 5,
    "chat_id": 791,
    "cobrowse_session_id": "Y1zYY6XIYX4oapqpEz3qHw",
    "cobrowse_session_remote_control": "requested"
  }
}
Here are descriptions for the event data fields:
agent_id: The agent identifier.call_id: The identifier for an inbound call on the IVR (interactive voice response) channel. This field is included if the co-browse session was started during a call.chat_id: The identifier for an inbound chat on the web or mobile channel. This field is included if the co-browse session was started during a chat.cobrowse_session_id: The identifier for a co-browse session.cobrowse_session_remote_control: Indicates the status of a remote control co-browse session. Values areon,rejected,requested, andoff.custom_data_secured: Optional. Contains signed, custom data from your server.custom_data_not_secured: Optional. Contains unsigned, custom data from your web page. For more information, see Chat unsigned custom data (Optional).
Co-browse session full device changed
A co-browse session full device changed event occurs when the status of a full device co-browse session changes. This event indicates the status of the full device co-browse session. For more information, see Configure co-browse.
Here's an example of a JSON object for a co-browse session full device changed event:
{
  "type": "Cobrowse_Session_Full_Device_Changed",
  "data": {
    "agent_id": 5,
    "cobrowse_session_id": "9-Kshrag-gn6ZSuIxoMtWQ",
    "cobrowse_session_full_device": "rejected"
  }
}
Here are descriptions for the event data fields:
agent_id: The agent identifier.call_id: The identifier for an inbound call on the IVR (interactive voice response) channel. This field is included if the co-browse session was started during a call.chat_id: The identifier for an inbound chat on the web or mobile channel. This field is included if the co-browse session was started during a chat.cobrowse_session_id: The identifier for a co-browse session.cobrowse_session_full_device: Indicates the status of a full device co-browse session. Values areon,rejected,requested, andoff.custom_data_secured: Optional. Contains signed, custom data from your server.custom_data_not_secured: Optional. Contains unsigned, custom data from your web page. For more information, see Chat unsigned custom data (Optional).
Co-browse session ended
A co-browse session started event occurs when a co-browse session is ended by an agent, an end-user, or the API. For more information, see Configure co-browse.
Here's an example of a JSON object for a co-browse session ended event:
{
  "type": "Cobrowse_Session_Ended",
  "data": {
    "agent_id": 5,
    "cobrowse_session_id": "9-Kshrag-gn6ZSuIxoMtWQ",
    "cobrowse_session_requested_by": "end_user",
    "cobrowse_session_ended_by": "agent",
    "cobrowse_session_remote_control": "on",
    "cobrowse_session_full_device": "rejected"
  }
}
Here are descriptions for the event data fields:
agent_id: The agent identifier.call_id: The identifier for an inbound call on the IVR (interactive voice response) channel. This field is included if the co-browse session was started during a call.chat_id: The identifier for an inbound chat on the web or mobile channel. This field is included if the co-browse session was started during a chat.cobrowse_session_id: The identifier for a co-browse session.cobrowse_session_ended_by: Indicates who ended the co-browse session. Values areagent,end-userandapi.cobrowse_session_remote_control: Indicates the status of a remote control co-browse session. Values areon,rejected,requested, andoff.cobrowse_session_full_device: Indicates the status of a full device co-browse session. Values areon,rejected,requested, andoff.custom_data_secured: Optional. Contains signed, custom data from your server.custom_data_not_secured: Optional. Contains unsigned, custom data from your web page. For more information, see Chat unsigned custom data (Optional).
Background screen pop
The screen pop capability enables agents to do a CRM screen pop in the background, which means that customer information is displayed on the agent's screen without any action required by the agent. This provides a more seamless experience for consumers and reduces handling time for agents.
CRM record pop
The event, CRM_Record_Pop, is a server-side event that triggers when a ticket
needs to be popped. This event includes a parameter called recordUrl that
contains the URL of the CRM record, allowing you to perform a screen pop by
subscribing to POST events if you are using embedded adapters.
To achieve this, the following example demonstrates how to add an event listener that listens to messages sent from another frame or window. This code snippet is designed to enable communication between different frames or windows and allow for dynamic updates to the content displayed in the iframe based on received messages.
// name below is the html property of the iframe
const iframeTarget = document.querySelector('iframe[name="target_iframe_adapter"]')

// example usage of add event listener
// https://developer.mozilla.org/en-US/docs/Web/API/EventTarget/addEventListener
window.addEventListener('message', (e) => {
  try {
    const data = JSON.parse(e.data)
    const type = data.type
    console.log('EventListener: ', JSON.stringify(data))

    if (type === 'CRM_Record_Pop') {
      const recordUrl = data.data.recordUrl
      if (!recordUrl) {
        return
      }
      console.log(`Opening <strong>recordUrl</strong> in iframe <strong>${iframeTarget.getAttribute('name')}</strong>`)

      // changing an iframe target to the record url pop
      iframeTarget.src = recordUrl
    } else if (type === 'New_Chat') {
      console.log(`<strong>Chat started...</strong>`)

      // handling here for new_chat events
    } else if (type === 'End_Chat') {
      console.log(`<strong>Chat ended...</strong>`)
      // handling here for end_chat events
    } if (.... //other event types) {
      // code handling for other types
    }else {
      console.log(JSON.stringify(data))
    }
  } catch (e) {
    log(e, true)
  }
}, false)