Salesforce Status App Installation Steps (Ver 1.0)
Installation link: Status App for Salesforce Enterprise 1.0
Agent Status Inheritance App installed to a Salesforce org gives admins an ability for mapping CRM agent statuses to agent status in real time. By inheriting the CRM's agent status, it allows admins to drive agent status from their CRM in real time.
For example, if an agent is handling email in the CRM, that could be configured to define the agent's status as unavailable in agent adapter.
The installation consists of seven high level steps (Steps 1 - 7) containing sub-steps outlined below.
Before you begin
Salesforce and Portal access needed
Portal Access: ask your internal contact or Admin for a user account with both Admin and Agent roles assigned
Admin role will give you access to Developer settings
Agent role will give you access to the Agent Adapter to utilize and test the Agent Status functionality
Salesforce permissions and setup:
Administrative access
Assigned Omni-channel access
Your profile will need to be assigned to the Call Center that has been set up in order to see the agent adapter in Salesforce
Your organization's environment URL will be used throughout the process. It can be found in your Admin Portal link that you should gain access to when your account is set up. The url is https://[subdomain].[domain].
Support Center articles
Feature details
1 to 1 Salesforce agent account to agent account mapping is required
- This feature does not support a single SFDC agent account mapped to multiple agent accounts. Real time status mappings from the CRM will be ignored.
Step 1: Install App
In this section, we will guide you to install App before you install the Agent Status Inheritance App.
Prerequisites
- The latest Salesforce package.
Result
- Package is installed in your Salesforce org.
Step 2: Configure Omni-Channel
This section is only supplemental information and should be used in conjunction with the Salesforce Documentation.
In this section, we will guide you to configure the minimal Omni-Channel settings in the Salesforce org to use Agent Status Inheritance App.
Prerequisites
Salesforce Administrator access
General background knowledge about Salesforce Omni-Channel. Example resources to consult:
Notes
- The following steps address minimal settings to be able to utilize the Agent Status Inheritance App and does not cover Service Channels, Routing Configurations and Queues setup which may be required for your specific business purposes.
Sub-steps
Enable Omni-Channel Settings
Add Presence Statuses
Add Omni-Channel to the console app in Salesforce Classic
Add Omni-Channel to the console app in Salesforce Lightning
Grant Users or Profiles Access to Service Presence Status
Verify Omni-Channel works in the Salesforce Classic Console
Verify Omni-Channel works in the Salesforce Lightning Console
Sub-step 1: Enable Omni-Channel Settings
From Setup, enter omni in the Quick Find box, then select Omni-Channel Settings.
Select Enable Omni-Channel.
Click Save.
 |
Sub-step 2: Add Presence Statuses
The Presence statuses should match those used in the Admin Portal. If Statuses are already set up in the Admin Portal, make sure the statuses are all entered here as well. For more information, see Agent Statuses.
From Setup, enter Presence Statuses in the Quick Find box, then select Presence Statuses under Omni-Channel.
Click New.
In the next screen, you can add a status. For example type "Available" for Status Name and this will fill automatically "Available" for Developer Name.
Repeat Step 3 according to your needs. For example you can create "Available For Email", "Busy", "Meal" etc for the Presence Statuses.
 |
 |
 |
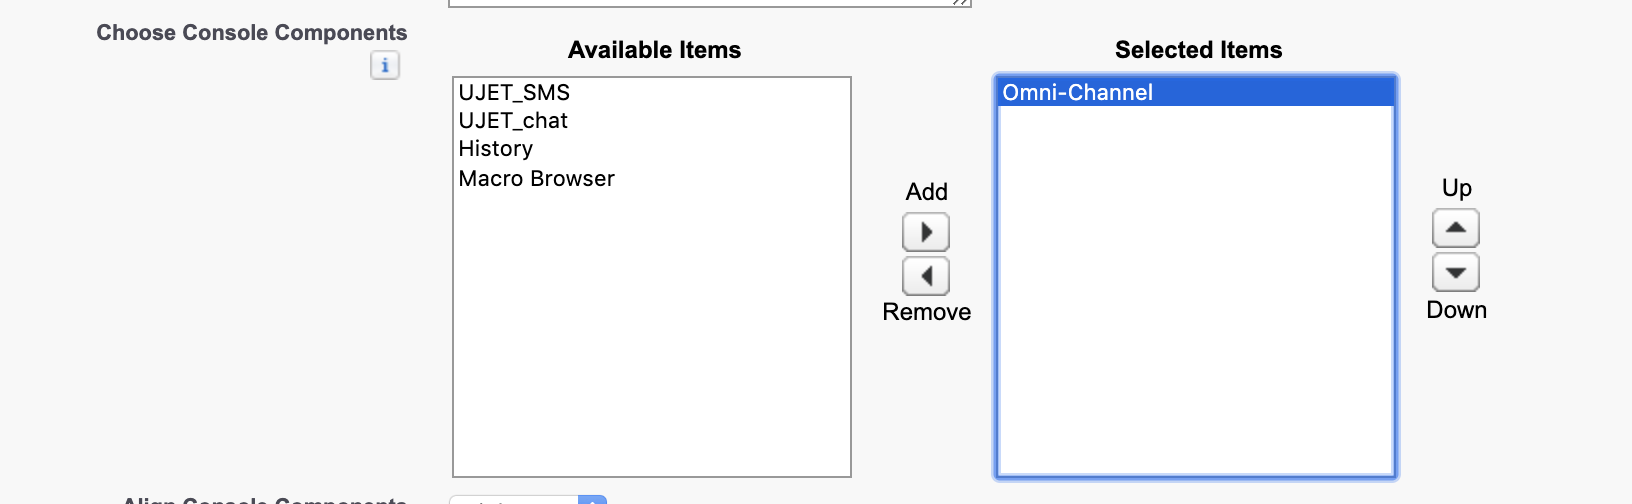
Sub- step 3: Add Omni-Channel - Salesforce Classic
If you are using Lightning only, skip this step.
From Setup, enter App in the Quick Find box, then select Apps under Create.
Click the Edit button left of Sample Console (You may have a different name).
In the Edit screen, find the Choose Console Components section.
Select Omni-Channel in the Available Items dropdown.
Click Add then Omni-Channel will appear in the Selected Items dropdown.
Click Save.
 |
 |
 |
|| ||
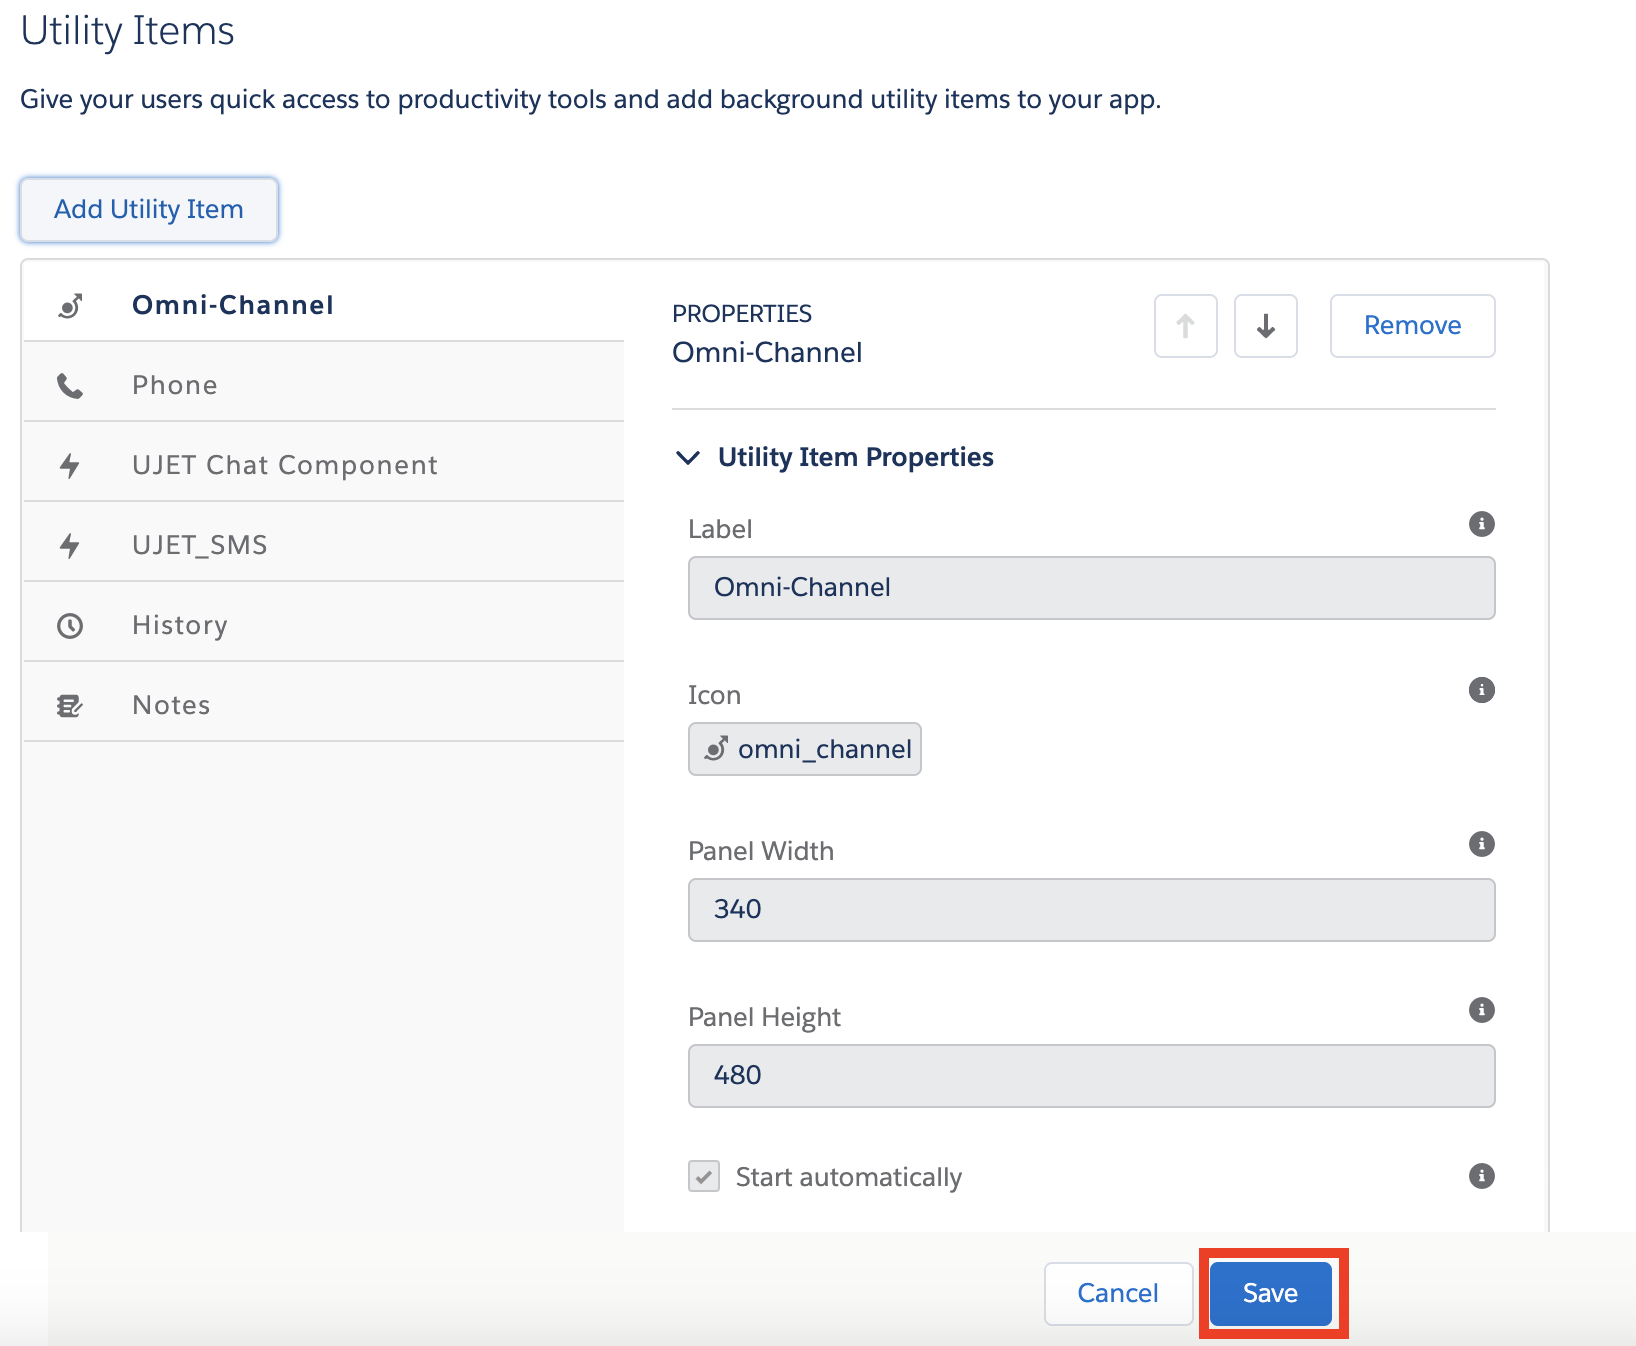
Sub-step 4: Add Omni-Channel - Salesforce Lightning
If you are using Classic only, skip this step.
If you are currently in Classic, click Switch to Lightning Experience.
Click the gear icon, then click Setup in the upper right area of the Lightning screen.
From Setup, enter App in the Quick Find box, then select App Manager under Apps.
Click the downward arrow icon in the upper-right of Service Console (You may have a different name).
Click Edit.
Click Utility Items in the Lightning App Builder screen.
Click Add Utility Item and select Omni-Channel.
Click Save.
Click Back in the upper right corner of the screen.
 |
 |
 |
 |
 |
 |
 |
Sub-step 5: Grant Users access to Service Presence Statuses
In order for a Service Presence Status to be available to a User, access for each status needs to be granted to each applicable Profile/Permission Set. If a Profile/Permission set does not have access to a certain Service Presence Status, then that status will not be available/visible in the omni-channel widget for the assigned users.
Please reference Give Users Access to Presence Statuses with Profiles and Give Users Access to Presence Statuses with Permission Sets from Salesforce. The below steps are the simplified steps for giving access with Profiles.
From Setup, enter Users in the Quick Find box, then select Profiles under Manage Users.
Click a Profile name in the main section that you want grant access to Service Presence Status.
Find Enabled Service Presence Status Access and click Edit.
In the edit screen, select items in the Available Service Presence Statuses dropdown and click Add.
Click Save.
Repeat the steps 3 through 6 for each profile that you want to grant access to Service Presence Status.
 |
 |
Sub- step 6: Verify Omni-Channel works - Salesforce Classic Console
If you are using Lightning only, skip this step.
If you are in Setup, click Back to Sample Console in the upper-left area of the screen (You may have a different name).
In the bottom-right area of the Console click the Omni-Channel button.
Click the Offline link in the Omni-Channel widget.
Select one of Service Presence Status and see if you can change the status.
 |
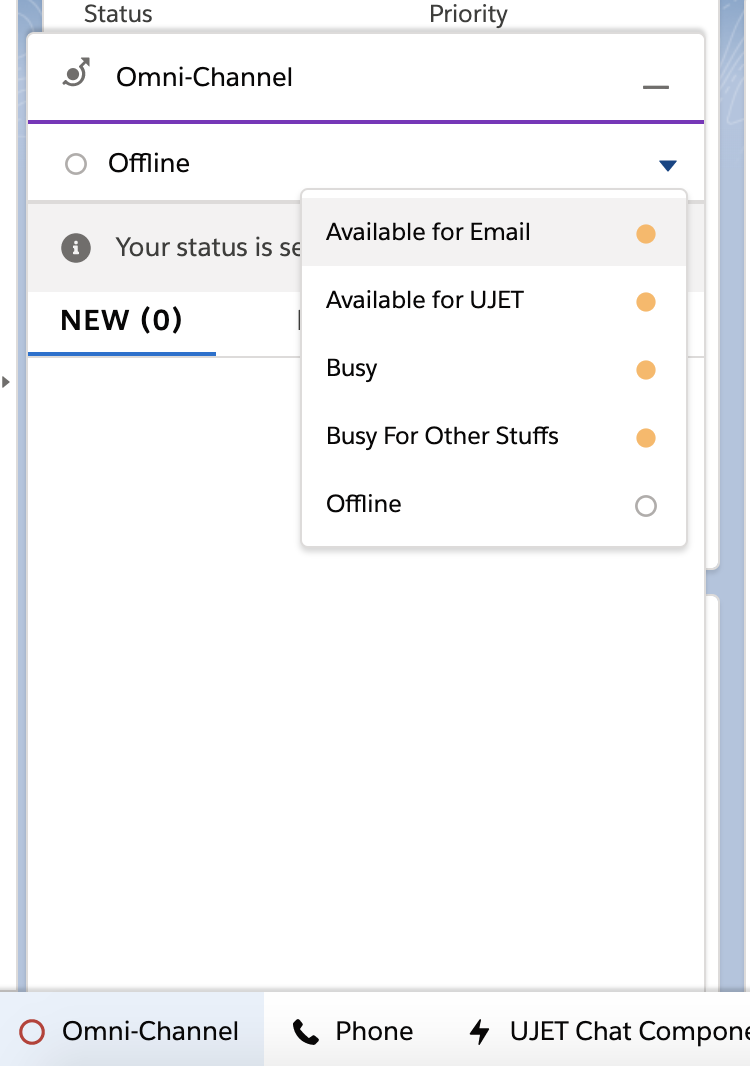
Sub- step 7: Verify Omni-Channel works - Salesforce Lightning
If you are using Classic only, skip this step.
In the bottom-left area of the Console screen, click the Omni-Channel button.
Click Offline link in the Omni-Channel widget.
Select one of Service Presence Status and see if you can change the status.
 |
|| ||
Result
Now Omni-Channel is enabled in your Salesforce org.
You can use Omni-Channel in your Salesforce console.
Step 3: Remote Site Settings
In this section, we will guide you to configure the remote site settings for the Agent Status Inheritance App to be able to send data from your Salesforce org to the server.
Prerequisites
- Ask for your dedicated environment domain, used for your Admin Portal. The url is https://[generico].[domain].
Sub- step
- Add a remote url to the Remote Site Settings
Sub- step 1: Add a remote url to the Remote Site Settings
From Setup, enter remote in the Quick Find box, then select Remote Site Settings under Security Controls.
Click New Remote Site button.
In the next screen input Remote Site Name and Remote Site URL. Ex. input value for Remote Site Name. Input your domain for Remote Site URL.
 |
 |
Result
- The Agent Status Inheritance App can send data from your Salesforce org to the API Server.
Step 4: Link Admin Token in Admin Portal
In this section, we will guide you through one sub-step to configure Salesforce Admin Token in Admin Portal so that the Admin Portal can fetch your Salesforce Omni-Channel Service Presence Statuses.
Prerequisites
- Log in your Admin Portal as an administrator. Ask your internal point of contact for an account with Admin and Agent roles assigned if you don't already have access.
Note
- If possible, it's best to use a Salesforce Admin account that is not tied to a specific user. Individual user accounts are prone to being disabled without understanding the underlying connections.
Sub-step 1: Link your Salesforce Admin Token
From the Admin Portal, go to Settings > Developer Settings > Salesforce Admin Token.
Click Link New User.
In the oAuth popup, log in as your Salesforce administrator and allow the oAuth request
You will see your administrator user is linked in the Connected Admin Users section
These steps and more can be found in the Support Center: CRM Default User.
 |
 |
Result
- The Admin Portal can fetch your Salesforce Omni-Channel Service Presence Statuses
Step 5: Status Mapping in Admin Portal
In this section, we will guide you through two sub-steps to configure Salesforce Omni-Channel Agent Status Inheritance Settings in the CCAI Platform portal.
Prerequisites
- User account with Admin and Agent roles assigned
Notes
- Refer to the Support article for more details. This section describes only the basic settings.
Sub-steps
Enable Salesforce Omnichannel Agent Status Inheritance in Admin Portal
Manage Status Mapping
Sub-step 1 : Enable Salesforce Omni-Channel Agent Status Inheritance in Admin Portal
In the CCAI Platform portal, go to Settings > Developer Settings > Salesforce Omnichannel Agent Status Inheritance.
Toggle the feature setting to On.
 |
Sub-step 2: Manage Status Mapping
Salesforce Statuses will be fetched from your Salesforce org automatically. If you don't see SFDC statuses please check Step 4, Link Admin Token in Admin Portal and Step 2, Configure Omni-Channel.
From the Admin Portal, go to Settings > Developer Settings > Salesforce Omnichannel Agent Status Inheritance.
Click Manage in Status Mapping.
In the popup, select a preferred Status for each Salesforce Status.
 |
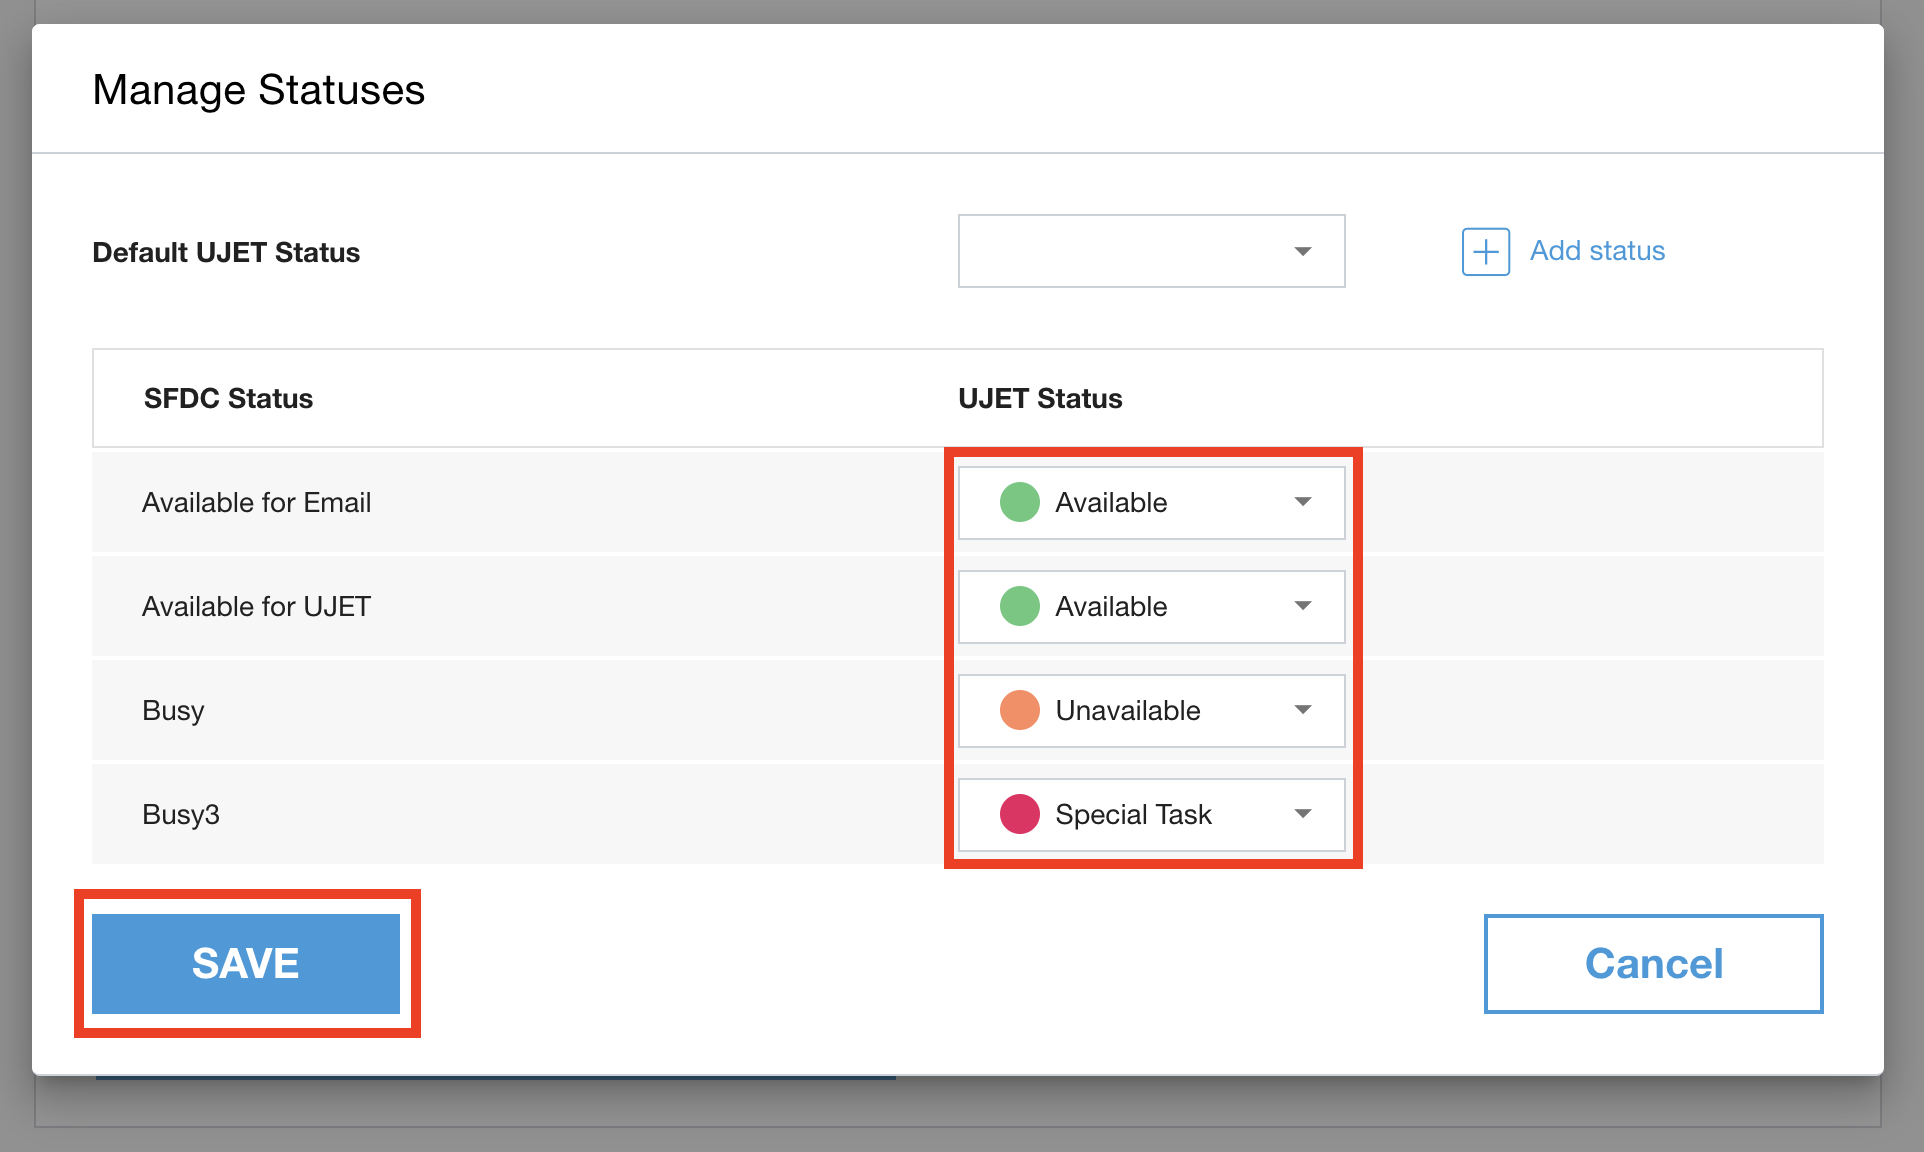 |
Result
- Now your Salesforce Agent Statuses are mapped to Status
Step 6: Copy settings value from the Admin Portal
In this section, we will guide you through 4 sub-steps to copy settings values from the Admin Portal that will be used in Step 7, Install Agent Status Inheritance App.
Prerequisites
- Log in your Admin Portal as an admin.
Sub- steps
Locate Company Key and Company Secret Code in Admin Portal
Identify your tenant name
Identify your Connected App name
Identify your dedicated API Url that is used in the step 3 Remote Site Settings
Sub-step 1: Locate Company Key and Company Secret Code in Admin Portal
From the Admin Portal, go to Settings > Developer Settings > Company Key & Secret Code.
Gather the Company Key and Company Secret Code.
Sub-step 2: Identify your tenant/environment name
- Your tenant/environment name is included in your Admin Portal url.
If your url is https://generico.example.com then your tenant
name is generico. The url follows this structure:
https://YOURTENANT.example.com.

Sub-step 3: Identify your Connected App name
From Setup, enter app in the Quick Find box, then select Connected Apps under Manage Apps.
Identify your Connected App.
|| ||

Sub-step 4: Identify your dedicated environment domain
This url is also used in Step 3, Remote Site Settings, and is usually the same url as your Admin Portal. https://generico.example.com.
Result
- You have setting values ready for use in Step 7, Install Agent Status Inheritance App
Step 7: Install Agent Status Inheritance App
In this section, we will guide you through two sub-steps install Agent Status Inheritance App to your Salesforce org.
Prerequisites
Completed all previous steps (Steps 1- 6).
Log in to your Salesforce org as an administrator
Sub- steps
Install the Agent Status Inheritance App in your Salesforce org
Configure the app
Sub-step 1: Install the Agent Status Inheritance App to your Salesforce Org
Paste the installation link in the browser's url bar: https://login.salesforce.com/packaging/installPackage.apexp?p0=04t6g000003Rzxv
Select Install for all users.
After the installation is complete click Done. For longer installations, you will get a notification email after the installation is complete.
 |
 |
Sub-step 2: Configure the app
From Setup, enter package in the Quick Find box, then select Installed Packages.
Click Configure left of the UJET_App_Status.
In the new window, click Add New Configuration.
In the configuration screen, select Organization as Setup Owner.
Fill the values for Company Key, Company Secret, Tenant and Connected App you have copied in the step 6, Copy settings value from the Admin Portal.
Check Enable Agent Status Inheritance.
Fill the value in URL you have copied in the step 6 Copy settings value from Admin Portal.
Click Save Configuration.
Close the window.
 |
 |
 |
Result
- Now your Agent Status Inheritance App is installed and configured.
8. Verify Agent Status Inheritance App is Working
In this section, we will guide you to verify Agent Status Inheritance App is working correctly.
Prerequisites
- Completed all previous Steps 1 through 7.
Steps
Change Omni-Channel status in your console.
See if the status is changed according to the mapping setting in the Admin Portal.
 |
 |
Result
- Now it is verified that your Agent Status Inheritance App is working correctly
Version History
1.0
- The first package version