With Contact Center AI Platform (CCAI Platform), you can use an IVA-only solution to add Google Cloud's generative AI virtual agent services for customer call interactions without having to replace your existing contact center infrastructure. This means you can retain your current phone system, CRM, and other tools, while still benefiting from Google's advanced AI capabilities. The interface used by agents is unchanged.
The IVA solution is particularly useful if you want to improve your customer service using AI but are not ready to replace your entire contact center infrastructure. You get access to Dialogflow for natural language understanding, Conversational Insights for real-time interaction analysis, and Agent Assist summarization for generating summaries of conversations. This gives you valuable insights into customer interactions. AI-powered virtual agent can handle a wide range of customer inquiries, freeing up human agents for more complex issues.
Telephony integration options
The following telephony integration options are available:
SIP integration
You can integrate with an existing enterprise Session Border Controller (SBC) by using session initiation protocol (SIP) through the Bring Your Own Carrier option provided by Contact Center AI Platform. For more information about BYOC, see Bring Your Own Carrier (BYOC).
Call flow
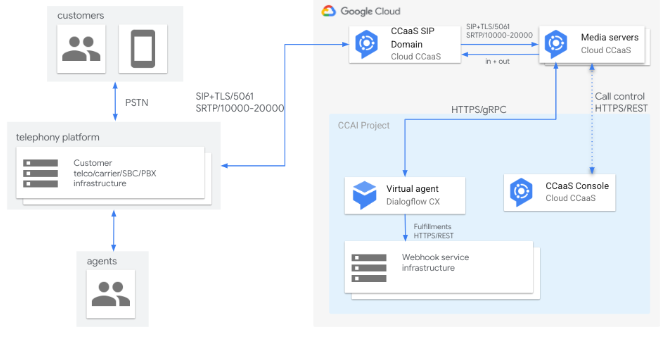
The following is an example of the call flow with IVA when using SIP integration:
An inbound call is received from an end-user into the existing telephony infrastructure.
The existing SBC routes the call through SIP REFER to Contact Center AI Platform for handling through the IVA.
Contact Center AI Platform establishes a connection to Dialogflow CX to handle the interaction between the virtual agent and the end-user.
When the call is escalated by the virtual agent it is routed back to the existing telephony using SIP REFER.
A human agent handles the call using the legacy contact center.

Call forwarding over the public switched telephone network (PSTN)
You can use call forwarding to pass the call from the existing IVR to the Contact Center AI Platform and the phone number assigned to the Contact Center AI Platform instance. Alternatively, you can port the existing phone number by using the telephony provided by Contact Center AI Platform.
When a call needs to be escalated to a human agent on your existing contact center solution, the call can be forwarded to a phone number provided by your contact center. This solution is less desirable, as the originating phone number is not provided when escalating to a human agent. In addition, there latency when forwarding a call over the PSTN, and passing contextual information, like intent, through the call metadata is not possible.
Virtual agent escalation
Virtual agent escalation is the process of transferring calls from a virtual agent to another agent. Typically escalation is to a human agent, but it can be to an IVR menu or an external virtual agent.
Virtual agent escalation using SIP integration
This section explains how to create a Dialogflow CX custom payload for virtual agent escalations when you have the following requirements:
The virtual agent needs to escalate to human agents on your own contact center using SIP.
The virtual agent needs to dynamically pass custom session headers.
You can do this using a custom
payload in
Dialogflow CX, where CCAI Platform uses three different types
of
transfers.
If you've configured BYOC, Google recommends that you transfer calls to a SIP
endpoint using the SIP REFER method.
The following is an sample custom payload:
{
    "ujet": {
       "type": "action",
       "action": "deflection",
       "deflection_type" : "sip"
       "sip_uri": "sip:1-999-123-4567@voip-provider.example.net:5060"
       "sip_refer": true
       "sip_parameters": {
       "x-header": "value",
       "x-header": "value"
       }
    }
}
In the example, "sip_refer": true indicates that the call is transferred using the
SIP REFER method. Otherwise it uses the INVITE method.
This option is only used by Dialogflow CX virtual agents. You can
define session parameters in this payload from the Dialogflow CX
interaction to pass in custom headers using SIP by assigning key value pairs in
sip_parameters. These custom headers are also known as x-headers.
The REFER method requires that the Bring-Your-Own-Carrier telephony integration has been implemented with the Contact Center AI Platform instance.
Virtual agent escalation using call forwarding
When a Dialogflow CX virtual agent needs to escalate to a human agent, the telephony platform uses a fixed configuration of the instance's IVR voice channel. For more information about how to add the IVR voice channel and the queue, see IVR: Add and edit queue menus.
You can do this using queue nodes that have automatic redirection enabled. The following steps describe how to configure your call transfers at the queue level. For more information, see Configure call transfers at the queue level.
To set up call forwarding for escalation to a human agent, follow these steps:
Create your queue menu and nodes where the transfers will be organized in the IVR Voice channel. Save the
menu_idfor this queue node as you will need to add the ID to the escalation custom payload for Dialogflow CX.
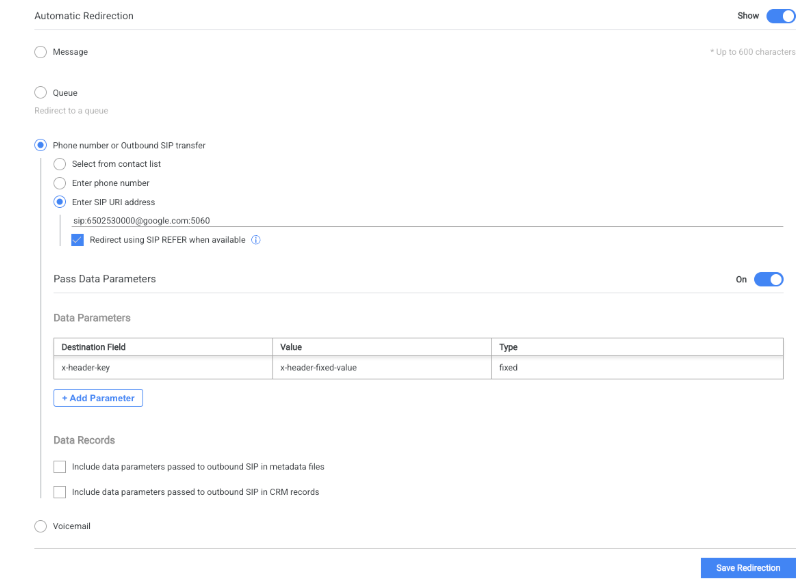
Enable automatic redirection in your queue nodes. This is used to redirect callers to the phone number (e164 format) or Outbound SIP Transfer (SIP URI) that you configure. You can configure the Outbound SIP Transfer using either the INVITE or REFER method. These configurations can be manually added in this step, or alternatively you can link a contact list to use in the configuration. For more information about automatic redirection, see Automatic Redirection.
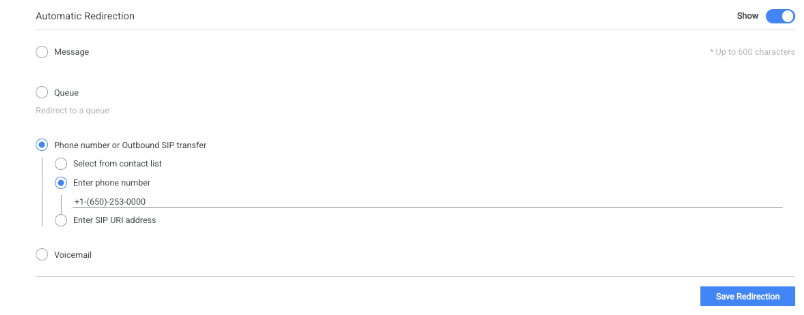
Setting up an outbound SIP transfer through either the INVITE or REFER method requires a correctly formatted SIP to be configured, as shown in the following example.
Set up the Dialogflow CX custom payload for an escalation that routes to a Contact Center AI Platform queue by specifying a
menu_id. This will set up an automatic redirection for transferring to an existing third party telephony platform.{ "ujet": { "type": "action", "action": "escalation", "escalation_reason": "by_virtual_agent", "menu_id": 100, "language": "ko" } }
The menu_id is the value that you saved for the automatic redirection queue
node in step 1. The language setting in the payload is an optional value if
the automatic redirection queue node is in a different language IVR Voice menu
than the language for the current interaction.
For more information about the data parameters configuration, see Pass data parameters to outbound SIP headers. Configuration in this option can send a fixed parameter to a custom header (x-header), or a dynamic value. For more information, see Add a dynamic parameter from CCAI Platform metadata or Add a dynamic custom form parameter.
Configuration steps
The following procedure shows how to set up an IVA-only solution. It assumes that the implementation is using SIP integration with BYOC.
To set up an IVA-only solution, following these steps:
Create a Contact Center AI Platform instance in your Google Cloud region.
Create and assign roles for that instance.
Set up queues that are configured in the language that end-users will communicating in.
In a typical IVA deployment, all communications and messages are provided by the virtual agent. For this reason you should turn off the system default messages.
To turn off system default messages, follow these steps:
In the CCAI Platform portal, click Settings > > Languages & Messages > Audible Messages. If you don't see the Settings menu, click Menu.
For Audible Messages, select your language, and then select from the following options to upload an audio track:
For Connecting Message, click Upload Audio Recording for Connecting Message, and then select an empty audio file to upload.
For Record a Call Message, click Upload Audio Recording for recording a call, and then select and an empty audio file.
For Record an Outbonud Call Message, click Upload Audio Recording for recording an outbound call, and then select an empty audio file to upload.
Click Save.
Create the virtual agent platform and add the virtual agent.
Create a queue for the virtual agent.
Assign the virtual agent to the queue.
Assign a Support Phone number Direct Access Point (DAP) to the queue using the phone number assigned to the Contact Center AI Platform instance. After the DAP is assigned, test your virtual agent by calling the assigned phone number.
Open a Google Support case to request BYOC enablement of your instance. Include the Google Cloud project ID and URL for the Contact Center AI Platform. Google support will share the BYOC information worksheet from the request that will include the BYOC integration requirements and details for the IP.
Set up BYOC between your existing Session Border Controller and the Contact Center AI Platform SIP FQDNs. Add the DAP to the queue for the inbound phone number that you have routed to the Google Cloud Contact Center AI Platform instance from your SBC. To pass data from your inbound SIP Headers to Dialogflow CX with the BYOC integration, you need to enable pass data parameters for your instance. For more information, see Capture data parameters from inbound SIP headers.
Test the call routing by calling into the phone number that you have assigned at your SBC. Ensure that the calls are successfully routed from the SBC to the Google Cloud Contact Center AI Platform instance and are handled by the virtual agent.
If you have external storage configured, you can check whether the data passed in the metadata file for the session. To do so, look at the Dialogflow CX Storage is configured and the Dialogflow CX logging for more information.