The page shows how to use chat endpoints as described in Chat endpoints.
Terminology
For clarity, here are some definitions which are important to keep in mind when using this document.
Customer: The Contact Center AI Platform (CCAI Platform) customer that is implementing the chat platform API in their software.
Consumer: The software that makes requests to the chat platform API.
End-user: The user of the customer's software who is attempting to conduct a chat with an agent.
Webhook auth
The chat platform API communicates events that take place during the chat to the consumer by sending webhook requests to the consumer's server. Webhook payloads and types are defined in the API spec. Each webhook request contains two headers, X-Signature and X-Signature-Timestamp.
X-Signature contains a webhook signature with the following format:
primary=<primary_signature> secondary=<secondary_signature>
Primary and secondary signatures are a base64-encoded sha256 digest of the primary or secondary webhook secrets, respectively, with a concatenated string of the X-Signature-Timestamp header and the json payload of the request.
The following is an example implementation of authorization for the webhook requests in a sample Ruby on Rails app:
def authorize_webhook
    # In a real consumer use case, these webhook secrets would be
    # stored/retrieved along with other application secrets, however the application chooses to do that
    primary_secret = @company.primary_webhook_secret
    secondary_secret = @company..secondary_webhook_secret

    signature_header = request.headers['X-Signature']
    timestamp_header = request.headers['X-Signature-Timestamp']

    if signature_header.present? && timestamp_header.present?

      # Header will be in the format "primary=abcdefg12341234 secondary=qwertyuiop567890" if a tenant has both webhook
      # secrets generated in Contact Center AI Platform, otherwise it will be in the format ""primary=abcdefg12341234"
      primary_signature, secondary_signature = signature_header.scan(/primary=(.*)\ssecondary=(.*)/).flatten

      # Optional: check age of request timestamp to protect against replays
      # raise UnauthorizedException unless Time.now - timestamp_header.to_time < 1.minute

      # String value of the request body JSON
      payload = request.body.read

      expected_primary_signature = Base64.strict_encode64(OpenSSL::HMAC.digest(OpenSSL::Digest::SHA256.new, primary_secret, "#{timestamp_header}#{payload}"))
      expected_secondary_signature = Base64.strict_encode64(OpenSSL::HMAC.digest(OpenSSL::Digest::SHA256.new, secondary_secret, "#{timestamp_header}#{payload}"))

      # Only one signature needs to be valid, this allows for easier rotation of secrets in the Contact Center AI Platform developer portal
      if primary_signature == expected_primary_signature || primary_signature == expected_secondary_signature ||
        secondary_signature == expected_primary_signature || secondary_signature == expected_secondary_signature
        true
      else
        head :unauthorized
      end

    else
      head :bad_request
    end
  end
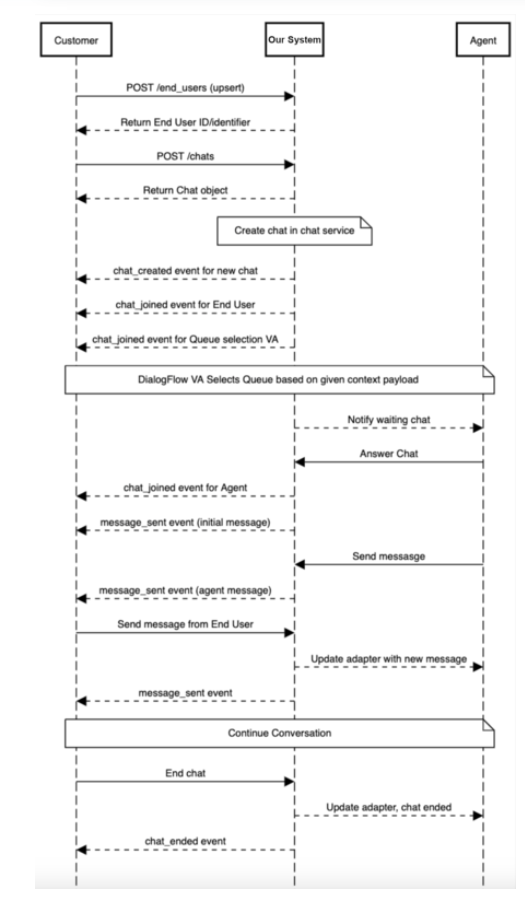
Overview
In general, the basic flow of a chat platform API conversation should go as follows. Key points are numbered and notes are provided for additional context. Note that the customer is only responsible for implementing the "Customer" side of the diagram, while Contact Center AI Platform handles the our system and agent sides of the diagram. Their inclusion in the diagram is meant only to give the reader context for the overall flow of a chat.
Create end-users
Chats require a valid end-user ID when they are created, which means an end-user must exist in the Contact Center AI Platform system before a chat is created.
End-users are uniquely identified by their
identifierattribute, which is a string value provided by the consumer. It is possible for an end user to already exist in the system if they have used the web or mobile SDKs. ThePOST /end_usersendpoint is implemented as an idempotent upsert, so in the case of an existing end-user, attempting to create them again will update any changed data and return the end-user's information.
Create chats
To create chats using the chat platform API, follow these steps:
Handling new chat payloads: The chat initialization process happens asynchronously from the
POST /chatsrequest. Because of this, thechat_createdevent may be received before or after the API response from thePOST /chatscreation endpoint. It is recommended to handle thechat_createdevent and the chat creation API response in an idempotent manner to avoid any bugs in the consumer.Creating chats with transcripts: The chat platform API supports creating a chat with a transcript of an existing conversation, for a scenario where a chat happens within a customer's platform, for example, with a chatbot, before being sent to Contact Center AI Platform. This provides the agent answering the chat with additional information on the chat session, and helps prevent the end user repeating themselves. See the OpenApi spec for details on transcript payload format.
The queue selection virtual agent
To streamline menu selection for API consumers, the chat platform API is designed to be used in conjunction with a Dialogflow virtual agent to aid in queue placement for new chats.
The following steps need to be taken to set up the virtual agent:
Create a designated virtual agent for this purpose, and assign it to a queue. All new chats created by the chat platform API should be created in this queue. Creating and configuring a new virtual agent is out of scope of this document.
When creating a new chat with the POST or chats endpoint, include a custom context payload that includes some context on the created chat that the virtual agent can use to determine which queue the chat should be routed to. The context payload can contain any custom data as defined by the customer, but must be in the following format for the data to be accessible by the virtual agent assigned to the queue.
- Example:
"context": {"value": {"foo": "bar" } }would allow the virtual agent to read$session.params.context.foowith a value ofbar.
- Example:
Using the data contained in the context field, the virtual agent (based on how the customer has configured it) escalates the chat to the selected queue. If there is no agent available in the target queue (such as a scenario where a queue is after hours or over capacity), the escalation is deflected, and the consumer receives a webhook indicating the reason for deflection and available deflection options.
Escalation deflections: Chat escalations in the chat platform API support the following deflection options, if configured in the Contact Center AI Platform portal:
Email: Have the end user send an email to support and end the chat. When an end user selects this option, after the email is sent, The customer will need to mark the chat as deflected and ended by using the
PATCH /chats/:idendpoint with the following params in the request body:"status": "finished" , "escalation_id": <id of escalation> ,and"deflection_channel": "email"Continue with virtual agent: This is technically a valid deflection option, however it doesn't make sense for using the queue selection VA as the VA would just try to escalate the chat again.
Keep waiting for human agent: This option can only be used for escalations with a reason of
over_capacity. If the end-user chooses this option, update the escalation deflection withPATCH chats/:id/escalations/:id with deflection_channel=human_agent- External deflection link: Warn the end-user that selecting a link
provided in the deflection will end the chat. If a link is selected, end
the chat and use
external_linkfor thedeflection_channelparameter
- External deflection link: Warn the end-user that selecting a link
provided in the deflection will end the chat. If a link is selected, end
the chat and use
Send and receive messages
To send or receive messages, follow these steps:
Text content: To send text messages, use the
POST /chats/:id/messageendpoint as defined in the API doc. To receive messages, listen for themessage_receivedwebhook event. Note that the API consumer will receive amessage_receivedevent for all messages sent using the API, including messages sent by the end-user.Photo and Video content: Photo and video content is sent by fetching a pre-signed upload URL for a configured Cloud Storage service from Contact Center AI Platform, uploading to the storage service, and then sending the storage URL in a message payload to Contact Center AI Platform.
Fetching the pre-signed URL: Fetch a presigned upload URL from Contact Center AI Platform using the
POST /v1/chats/:chat_id/photos/uploadorPOST /v1/chats/:chat_id/videos/upload endpoints. This endpoint returns a presigned URL, along with a collection of fields to forward to the storage service when uploading the file. Presigned uploads have the following restrictions:Content-Type is
image/jpegfor photos,video/mp4for videos.Max photo size is 2 MB. Max video size is 20 MB.
Expiration time is 5 minutes.
Client must resize and adjust orientation of photo before uploading.
Each pre-signed URL is for a single photo or video - to send multiple attachments, you must request a pre-signed URL for each one.
Uploading the media file: To upload the media file, make a POST request to the pre-signed URL fetched in 2a with the following in the request body:
"file": the file to be uploadedAll fields returned in the fields object in the pre-signed URL request.
Adding the media file to the chat: To add the media file to the chat, use the
POST /chats/:id/photosorPOST /chats/:id/videosendpoint. Note that the photos endpoint supports sending an array of photos, while the video endpoint only supports one video at a time.The
s3_pathrequest body parameter should be the same value as thekeyfield of the pre-signed URL response.The request will return two fields on success. It is recommended to save or cache a mapping of
media_idto URL in the API consumer, as all media in chat messages will be referenced bymedia_idonly.url: the read-only S3 or Cloud Storage URL where the file is located.media_id: the ID of the media file in Contact Center AI Platform. This is the ID by which the media will be referred to in chat payloads.
Sending the media file as a chat message: To send the media file as a chat message, send the following payload to the
POST /chats/:id/message
endpoint
:
{
  "from_user_id": <id of end user>,
  "message":
    "type": <"photo" or "video">,
    "content": {
      "media_id": < media_id returned as described in 2.c >
    }
}