Operation Management: General Settings
Overview
The Operation Management settings page covers settings that impact your entire environment.
The settings below offer options CRM integration configuration, showing abandoned call metrics or not after a specified period of time, or specifying specific values when configuring advanced features.
Timeout on Contact Center AI Platform (CCAI Platform)
This setting will logout a user when there is no activity after a set number of minutes (default and max time is 1440 minutes or 24 hours). The timeout setting applies to all user accounts, including those used for dashboard monitoring screens
Go to Settings > Operation Management > Timeout on CCAI Platform.
Enter the timeout threshold in minutes.
Click Set General to save.
CRM Record Creation Details
Append call or chat session to latest open [CRM Record] in the same leaf queue: Select this option and CCAI Platform will append sessions to an existing open record if it came in from the same exact queue ("leaf queue).
Salesforce: by default, this applies when a Case/Account/Opportunity is in New, Working, Escalated, or another non-closed status.
Secondary option to append to a closed case within a configurable duration. Click to enable and enter the number of days the case can be closed but still have a new session appended.
After appending the session, the case status is changed to default the open status.
Delay call record until call is connected: Standard record creation takes place when the call is assigned. When this setting is enabled, record creation takes place when the call is connected to an agent, after it has been assigned. Enabling this feature covers the edge case where callers abandon the call after the call has been assigned to an agent but before the call is connected to the agent. When this setting is combined with the abandoned call setting below, only calls that are connected to an agent will trigger record creation.
Because record creation normally occurs when the call is assigned, ticket/case creation will appear to be delayed 5-10 seconds. Please communicate this change to Agents.
Delay chat case creation until chat has a minimum of ___ messages sent by consumer: By default, records are created when a chat is assigned to an Agent, then the chat is connected to an Agent. If the consumer doesn't send messages, empty records are created. Enabling this option:
Delays record creation until the consumer sends the set number of messages, preventing empty records.
Record pop for the Agent in the CRM is delayed 5-10 seconds after the set number of messages are received. Please communicate this change to Agents.
Create CRM tickets for abandoned calls: Creates a new CRM record even if the caller abandons a call before reaching an agent. This is recommended if you would like to report on "who" abandoned the call since CCAI Platform does not store specific caller information.
Create CRM tickets for abandoned chats
When disabled: Tickets are not created for abandoned or short abandoned chats. Short abandoned chats are based on the below short abandon setting for chats.
When enabled: Two options appear:
All abandoned chats: Tickets will be created for short abandoned and abandoned chats.
Abandoned chats with a minimum of ____ messages sent by user: Tickets will only be created for abandoned chats with the set number of chat messages.
CRM record title
To customize the title of your records (tickets/cases), adjust the text in this section.
Customization variables can be included in the title and will pull in available information:
CALL_TYPE
IVR Call
Incoming Call (App)
Incoming Call (Web)
Voice Scheduled (App)
Scheduled Call (Web)
Outbound Call
CALL_ID
: CCAI Platform Call ID value
MENU_PATH
: Menu end-user selected
PHONE_NUMBER
: Phone number dialed
LANGUAGE
: Language selected or routed to based on dialed number and associated DAP.
TIMESTAMP
: Time session started
CRM record (case/ticket) tags
Along with the above record titles, you can add tags with the session type name to CRM records. It will allow you to sort between different session types by how records are tagged. CRM record tags are available for Zendesk, Kustomer, and Freshdesk.
Examples for how each CRM applies the session types as tags
Zendesk: Voice Inbound (IVR) → voice_inbound_ivr
Kustomer: Voice Inbound (IVR) → Voice Inbound - IVR
Freshdesk: Messaging Inbound (Web Chat) → Messaging Inbound (Web Chat)
Configuration options
Add session type tags to cases: Add a tag to the record with the session type, for example, Scheduled Call (Web) or Incoming Call (App).
Add CCAI Platform tag to cases: Adds the tag "UJET" to all cases created via the CCAI Platform integration.
Customer abandoned details
Ignore and exclude short abandoned call in metrics: Abandoned calls will not affect monitoring metrics if abandoned within a certain amount of time. This removes those calls from the dashboard but they will show in reports. Please see the below example of a chat dashboard for which areas of the dashboard will be impacted by this setting.
Ignore and exclude short abandoned chat in metrics: Abandoned chats will not affect monitoring metrics if abandoned within a certain amount of time. This removes those calls from the dashboard but they will show in reports.
CRM access
- Grants CCAI Platform access to your CRM. Used for any CCAI Platform feature that requires access to your CRM connections like user segment DAPs.
Group settings
Group settings allow you to further customize call and chat routing to queues.
% Allocation - Routing Options: Set calls or chats to be offered to all percent allocation groups if not picked up by the selected group after a defined length of time. Leave this unselected if you do not want the call or chat to go to any other group.
Cascade Group: Set the number of seconds for the call to remain in one group before also including agents from the consecutive group.
Click Set General to save changes.
Custom and Default User Avatars
Overview
CCAI Platform Mobile and Web SDKs allow for an image to be displayed when interacting with agents via chat or voice calls. The avatar can be set by an Admin or each user can set their own avatar.
Details
- Images must be PNG or JPG, 512px square or larger
Agent avatar visibility
Mobile SDK
During chat sessions
On call sessions
Rating screen
Web SDK
- During chat sessions
Admin configuration
Admins can set a default image for all avatars in the environment and choose if that image is locked and can't be changed.
Adding a default avatar
Go to Settings > Operation Management.
Scroll to the Default Avatar section.
Click Choose Image
Select an image file.
Adjust image and click Crop.
If you would like to lock the default avatar and overwrite any custom images that users have uploaded, click Overwrite all other uploaded Avatars with default."
Click Save avatar setting to save your changes.
Agent - custom avatar upload
Based on Admin configured settings, the option for a user to upload their own avatar may or may be available.
From the CCAI Platform portal, click the avatar in the upper-right.
Click My Profile.
Click the Choose file button.
Adjust the image as needed in the edit screen.
Click Crop to save the image selection.
Click Upload Image to save.
Agent Statuses
Overview
Agent statuses, also known as Aux codes, are used to track time spent on different tasks, make agents available for calls or chats, and are used extensively in Workforce Management reporting. CCAI Platform has default statuses and the ability to create custom statuses to fit a variety of processes and needs.
Agent status details
All statuses are available for all agents in your environment with the exception of Special Task, which is only available to Managers.
With the exception of Available and In-chat, all default and custom statuses will be considered. "unavailable" states so calls/chats will not be routed to agents while in that status.
The Agent Monitoring Page shows Agent Statuses.
Default status and changing statuses.
The system maintains your last status: when putting the computer to sleep or logging out, in most cases the status you're in will be saved when you come back to your computer or log in.
Admins can set the default status on login in Settings> Operation Management. See Auto Answer - Calls for default status setting specifics.
Agents can change their status while not on a call or chat, OR
When enabled, Agents can have the ability to choose which status to go into after their current call/chat to go on break.
Managers and Admins can update Agent's statuses. See Admin or Manager - Updating an Agent's Status for details.
Default and custom statuses
Default statuses
With the exception of Available and In-chat, all default and custom statuses will be considered "unavailable" states and calls/chats will not be routed to agents. If an agent is in In-Chat status and has not reached the max chat threshold, they will be routed new chats until the threshold is met. See Chat Settings for Max Chat details.
Status name |
Color |
Set by |
Meaning |
Notes |
|---|---|---|---|---|
Available |
Green |
System/Agent |
Calls and chats will be routed to agents |
|
Unavailable |
Red |
System/Agent |
Calls and chats will not be routed to agents |
|
Break |
Yellow |
System/Agent |
Calls and chats will not be routed to agents |
|
Special Task |
Pink |
Manager Only |
Calls and chats will not be routed to agents |
Agents cannot put themselves in this status, it must be assigned by a manager from the Agents page. |
Meal |
Brown |
Agent |
Calls and chats will not be routed to agents |
|
Missed Call |
Purple |
System |
If using Deltacast, this status will show after an agent misses a set amount of calls. |
When a call gets put into Missed Call status, the agent then has to put themselves back into Available status. See Call Multicast and deltacast for more details. |
Missed Chat |
Grey |
System |
If using Deltacast, this status will show after an agent misses a set amount of chats. |
See Call Multicast and deltacast for more details. |
Unresponsive |
Lime |
System |
A system status an agent is put into if our system registers more than x (a configurable number) consecutive `skipped` calls. |
This status is indicative of an agent unable to receive calls, due to the hardware, software, networks, or combination of these factors. See Unresponsive Status for more details. |
Wrap-up |
Purple |
System/Agent |
Calls and chats will not be routed to agents. This status is either system-set based on automatic wrap-up settings, or can be selected manually by the agent. |
Wrap-up status set manually shows the same in reports as when agents are placed in Wrap-up automatically. To differentiate, we suggest creating a custom status for Wrap up called "Manual Wrap-up" or "Excess Wrap-up" and train agents to use this instead when using the status manually. |
Light Grey |
System |
Calls and chats will not be routed to agents. |
This status is system-set and cannot be selected by a manager or agent. Once it is on, the transition from wrap-up status to wrap-up exceeded is automatic. |
|
In-call |
Light Blue |
System |
Agents are automatically placed in this status when on a call |
Agents cannot log out during this status |
In-chat |
Indigo |
System |
Agents are automatically placed in this status when in a chat |
Agents cannot log out during this status |
Offline |
Grey |
System/Agent |
When an agent logs out or the Timeout limit is met, an agent will be considered offline |
Create or edit a custom agent status
This sections shows you how to create or edit a custom agent status.
Create a custom agent status
You can create a custom agent status if the default and system statuses don't
meet your needs. Custom agent statuses are designated Unavailable. That is,
agents that are in one of your custom statuses won't receive calls or chats.
To create a custom agent status, follow these steps:
- In the CCAI Platform portal, click Settings > Operation Management. If you don't see the Settings menu, click Menu.
- Go to the Agent Status pane, and then click View agent status list. The Agent Status list appears.
- Click Add Status. The Add Agent Status dialog appears.
- In the Status name field, enter a name for your custom agent status. This name appears in the Agent Status list.
- Click the Status color field. A list of colors appears.
- Click a color. The color appears next to your status name in the Agent Status list.
- To prevent users from selecting this agent status, do the following:
- Under Status access, click Restrict agent status.
- Do one of the following:
- To prevent all users (regardless of their roles) from selecting this agent status, click To all roles.
- To prevent users with specific roles from selecting this agent status, do the following:
- Click To specific roles.
- Click the List of restricted roles is required field. A list of available roles appears.
- Click a role that you want to prevent from selecting this agent status. The role appears in the field.
- To add additional roles, repeat these steps.
- If you want calls to break through to an agent in this status, click Allow calls to breakthrough this agent status. For more information, see Agent status breakthrough.
- To add translations, follow these steps:
- Click Add Translation. The Add a translation dialog appears.
- Click the Language field. A list of languages appears. Languages for which you already have a translation are not in this list.
- Click a language for which you want to add a translation.
- In the Translation field, enter your translation, and then click Add. Your new translation appears in the table under Translations.
- To add another translation, click Add Translation and repeat these steps.
- Click Add.
Edit a custom agent status
To edit a custom agent status, follow these steps:
In the CCAI Platform portal, click Settings > Operation Management. If you don't see the Settings menu, click Menu.
Go to the Agent Status pane, and then click View agent status list. The Agent Status list appears.
For the agent status that you want edit, click More, and then click Edit agent status.
Make your edits, and then click Save.
Status settings
Agent status on login
Go to Settings > Operation Management.
Scroll to the Agent Status section.
Select one option:
Same status before logout: assigns the last status of that specific agent before the last logout.
Specific status: select from the list of available statuses to always assign the same status at login.
Click Set Agent Status.
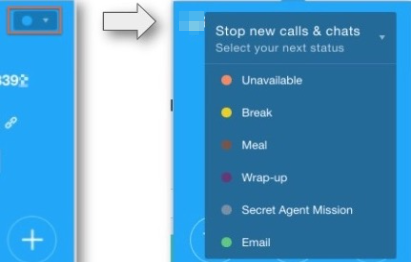
Allow agents to set their next status while on a call or chat
By default, the status selector is only available to agents when not in In-call or In-chat status. When the below option is enabled, the agent is presented with a menu to change their "next status" so that once they are off their current call/chats, they will not be placed into Available.
Go to Settings > Operation Management.
Scroll to the Agent Status section.
Mark the checkbox to enable.
Click Set Agent Status.
Enable transfers to all logged in agents
When this setting is enabled, agents can transfer a call or chat to another agent, regardless of their current status. This is useful for escalations and allowing consumers to work with the same agent without having to call back when they are busy.
Go to Settings > Operation Management.
Scroll to the Agent Status section.
Mark the checkbox to enable call/chat transfers to all logged in agents.
Click Set Agent Status.
Agent Experience
Reporting
For a summary of time spent in each status, pull the Agent Activity Summary Report (Reports > Agent & Team > Agent Activity - Summary Report).
For a detailed timeline view of when and for how long an agent was in each status, as well as other detailed actions, pull the Agent Activity Timeline Report (Reports > Agent & Team > Agent Activity -Timeline Report).
Agent status translation
CCAI Platform translates default and system agent statuses into a specific set of languages. The agent adapter displays these agent statuses according to the location that is assigned to the agent. If an agent isn't assigned a location, agent statuses appears in English (US).
Custom agent status translation
When you create custom agent statuses, you can provide your own translations for them in any of the languages that CCAI Platform supports. You can provide translations for only the languages that you need. If there isn't an agent status translation available for the location assigned to an agent, the status appears in English (US) in the agent adapter.
You can only add translations for custom agent statuses. Default and system statuses are translated by default and these translations are not editable.
View translations for default and system agent statuses
You can view the translations that are available for default and system agent statuses. These translations are not editable.
To view translations for default and system agent statuses, follow these steps:
In the CCAI Platform portal, click Settings > Operation Management. If you don't see the Settings menu, click Menu.
Go to the Agent Status pane, and then click View agent status list. The Agent Status list appears.
For any default or system agent status, click More, and then Edit agent status. Under Translations, a table appears that shows the agent status translations for each available language.
Create a custom agent status with translations
To create a custom agent status with translations, follow these steps:
- In the CCAI Platform portal, click Settings > Operation Management. If you don't see the Settings menu, click Menu.
- Go to the Agent Status pane, and then click View agent status list. The Agent Status list appears.
- Click Add Status. The Add Agent Status dialog appears.
- In the Status name field, enter a name for your custom agent status. This name appears in the Agent Status list.
- Click the Status color field. A list of colors appears.
- Click a color. The color appears next to your status name in the Agent Status list.
- To prevent users from selecting this agent status, do the following:
- Under Status access, click Restrict agent status.
- Do one of the following:
- To prevent all users (regardless of their roles) from selecting this agent status, click To all roles.
- To prevent users with specific roles from selecting this agent status, do the following:
- Click To specific roles.
- Click the List of restricted roles is required field. A list of available roles appears.
- Click a role that you want to prevent from selecting this agent status. The role appears in the field.
- To add additional roles, repeat these steps.
- If you want calls to break through to an agent in this status, click Allow calls to breakthrough this agent status. For more information, see Agent status breakthrough.
- To add translations, follow these steps:
- Click Add Translation. The Add a translation dialog appears.
- Click the Language field. A list of languages appears. Languages for which you already have a translation are not in this list.
- Click a language for which you want to add a translation.
- In the Translation field, enter your translation, and then click Add. Your new translation appears in the table under Translations.
- To add another translation, click Add Translation and repeat these steps.
- Click Add.
Add translations to an existing custom agent status
To add translations to an existing custom agent status, follow these steps:
In the CCAI Platform portal, click Settings > Operation Management. If you don't see the Settings menu, click Menu.
Go to the Agent Status pane, and then click View agent status list. The Agent Status list appears.
For the custom agent status that you want to edit, click More, and then click Edit agent status.
- To add translations, follow these steps:
- Click Add Translation. The Add a translation dialog appears.
- Click the Language field. A list of languages appears. Languages for which you already have a translation are not in this list.
- Click a language for which you want to add a translation.
- In the Translation field, enter your translation, and then click Add. Your new translation appears in the table under Translations.
- To add another translation, click Add Translation and repeat these steps.
Click Save.
Reporting
Agent status names appear in English (US) in reports.
Agent status breakthrough
Agent status breakthrough allows incoming calls to be routed to agents even when
they are in a specific status, such as Unavailable`. This feature provides
greater flexibility in managing call routing and agent availability.
Statuses that you can breakthrough
Default statuses:
- Unavailable
- Break
- Special task
- Meal
- Wrap-up
System:
- Missed Call
- Missed Chat
- In-chat
- Wrap-up Exceeded [if enabled]
Custom:
- Any custom status.
Enable agent status breakthrough
Go to Settings > Operation Management > Agent Status > Agent Status Breakthrough.
Check the checkbox Allow incoming calls to be routed to agents while on breakthrough status.
Click Save.
Set an agent status as breakthrough
In Settings > Operations Management > Agent Status, click View Agent Status List.
Go to the desired status and select the pencil icon to edit it.
In the pop up window, under Breakthrough Status, check the Allow calls to breakthrough the agent status checkbox.
Select Okay.
Select a queue for breakthrough
Go to Settings > Queue and select the desired queue.
In the side panel queue level menu settings, go to Agent Status Breakthrough.
Select Configure.
Toggle the switch to On to enable agent breakthrough status.
Configure breakthrough for certain DAPs
In the queue level Agent Breakthrough Status settings, check the Allow calls to breakthrough agent status only when received through certain DAPs checkbox. When checked, a Select DAP dropdown is available.
Select your desired DAP.
Click Add DAP.
Click Save.
Agent experience: Breakthrough status
After the status is set, the call announcement will be available to the agent in
the Agent Adapter. For example, the Unavailable status can be configured to
allow calls to breakthrough the Unavailable agent status.
Wrap-up Exceeded Status
Overview
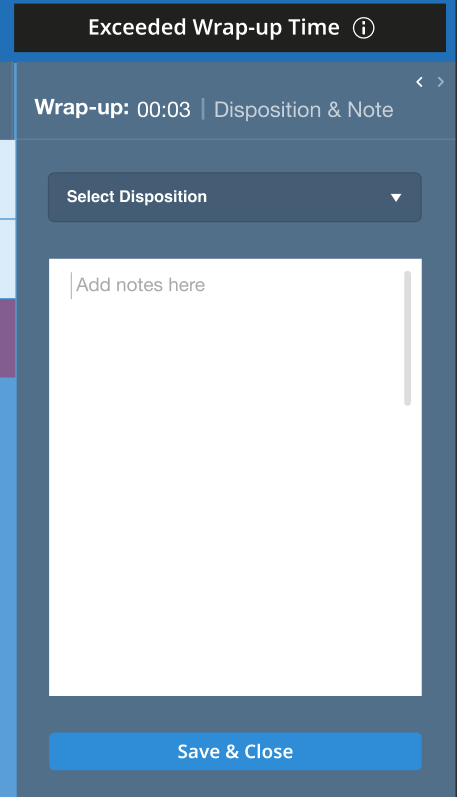
Wrap-up Exceeded is a system-set status that allows you to transition agents into a Wrap-up Exceeded Status once they have gone beyond a wrap-up threshold time and have cleared all ongoing sessions. When an agents transitions to Wrap-up Exceeded status, an agent-level notification appears:
For more information, see Agent Statuses.
Enable Wrap-up Exceeded
Go to Settings Operation Management > Wrap-up.
Turn on the Wrap-up Exceeded status.
Agent Status Transition Examples
The following are common scenarios from the agent's perspective demonstrating how the Wrap-up Exceeded status transitions based on the adapter activity.
The Wrap-up Exceeded status is impacted by the following configuration considerations:
The Wrap-up Exceeded status functions as a single configuration for calls and chats. Once enabled, agents can transition to Wrap-up Exceeded after a call or chat session.
Once the agent exceeds wrap-up time on a communication, and have cleared all ongoing sessions, they transition into Wrap-up Exceeded status. While in this status, or when Wrap-up Exceeded is their next status, the agent cannot receive new communication and will not be able to manually change their next status. However, the agent is not taken away from the wrap-up screen and still can enter disposition codes/ notes. See Scenarios 2 and 3 for examples.
Once the agent is in Wrap-up Exceeded status and is not handling any calls or chats, they can switch to their next status and still can enter disposition codes/notes, depending on configuration.
Scenario 1: Call Adapter is Active / Chat Adapter is off
An active call ends and goes to the wrap-up screen.
The agent status moves from In-call to Wrap-up.
The agent exceeds the wrap-up time.
The agent is moved to Wrap-up Exceeded status, where the agent can still work on the wrap-up screen.
The agent completes the wrap-up work in the notes/disposition screen, then clicks Save.
The agent stays in the Wrap-up Exceeded status and the wrap-up screen closes.
The agent selects a new status.
The agent successfully moves to the newly selected status.
Scenario 2: Call Adapter is off / Chat Adapter is active
There are two active chats: one chat ends and goes to the wrap-up screen (Chat A), and the second chat (Chat B) is still ongoing.
The agent status stays in In-chat status (Chat A wrap-up is in progress, Chat B is in progress).
The agent exceeds wrap-up time on Chat A.
A Wrap-up Exceeded banner displays on the call and agent adapter since Chat A Wrap-up exceeded and Chat B is in progress. This alerts the agent that the next status is Wrap-up Exceeded.
The agent stays in In-chat status (the agent is still working on Chat B). The agent still can work on the wrap-up screen of Chat A.
The agent finishes Chat B and goes to wrap-up for Chat B.
The agent stays in the In-chat status.
The agent exceeds the wrap-up time on Chat B.
The agent is moved to the Wrap-up Exceeded status, where the agent can still work on the wrap-up for both chats (A and B). The agent still can not move into a new status while they are working on the wrap-up.
The agent completes the wrap-up work and clicks Save & Close on both chats.
The agent stays in Wrap-up Exceeded status (no communications are active or in wrap-up state).
The agent chooses a new status.
The agent successfully moves to the newly selected status.
Scenario 3: Call Adapter is active / Chat Adapter is active
There is an active call and an active chat. The agent finishes the call, and the chat is still in progress (active).
The agent status changes from In-call to Wrap-up status.
The agent exceeds call wrap-up time.
The agent stays in Wrap-up status because there is still an active chat in progress.
A Wrap-up Exceeded banner displays on the call and agent adapter, which alerts the agent that the next status is Wrap-up Exceeded.
The agent finishes call wrap-up and clicks Save on the wrap-up screen.
The agent moves from Wrap-up status to In-chat status, because there is still an active chat in progress.
The agent finishes the chat wrap-up in the chat allotted wrap-up time.
The agent moves from In-chat status to Wrap-up Exceeded status since the prior call wrap-up time was exceeded.
The agent chooses a new status.
The agent successfully moves to the newly selected status.
Reporting
Wrap-up Exceeded can be found in the following standard reports:
Agents & Teams
Interactions Summary by Agent Report
- Wrap-up Exceeded: (Count) The total number of times the agent goes into Wrap-up Exceeded status.
Agent Activity Summary Report
- Total Exceeded Wrap-up (Calls/Chats) - The total time the agent(s) was in Wrap-up Exceeded status. This is calculated as the time from when the wrap-up timer elapses to when the agent submits the wrap-up.
Individual Call/Chat History Report
- Wrap-up Exceeded: Indicates whether a wrap-up exceeded status occurred. This formats as a True or False.
Activity Timeline Report
- Wrap-up Exceeded appears as a status under Activity log.
Barge for calls and chat
Barge lets a supervisor join any of their agents' ongoing calls or chats. After barging into a call or chat session, the supervisor has access to the same agent adapter controls as the agent. The supervisor can leave the session and let the agent continue, or the supevisor can stay until the end of the session.
In reports, you can see which calls and chats that barge was used with.
Barge behavior
Barge behaves as follows:
A supervisor can only barge into an active call or chat.
A supervisor can only barge into one one call or chat at a time.
Multiple supervisors can barge into a single call or chat.
Configure barge
To use barge, you need to enable it. Enabling barge makes it available to users with barge permissions. The CCAI Platform Admin and Manager roles have barge permissions by default. Users with the Admin role can barge into the call or chat sessions of any agent, while users with the Manager role can only barge into sessions of agents on their team. If you need to create a custom role with barge permissions, see Create a custom role with barge permissions.
Enable barge
To enable barge, follow these steps:
In the CCAI Platform portal, click Settings > Operation Management. If you don't see the Settings menu, click Menu, and then click Settings > Operation Management.
Go to the Barge pane.
Do one of the following, or both, depending on your requirements:
Click the Calls toggle to the on position. This enables barge for calls.
Click the Chats toggle to the on position. This enables barge for chats.
Click Save Barge.
Create a custom role with barge permissions
The Admin and Manager roles have barge permissions by default. You can create a custom role with barge permissions if you need one.
To create a custom role with barge permissions, follow these steps:
In the CCAI Platform portal, click Settings > Users and Teams. If you don't see the Settings menu, click Menu, and then click Settings > Users and Teams.
Click the Roles and Permissions tab.
Click Add Roles.
In the Add Role dialog, enter a role name, label name, and optional description for your custom role.
Do one or more of the following, depending on your requirements:
To monitor agents and barge into sessions from the Agents page: in the Monitor | Agents row, select the View and Edit checkboxes. For more information, see Barge from the Agents page.
To monitor and barge into calls from the Connected Calls page: in the Monitor | Calls row, select the View checkbox. For more information, see Barge from the Connected Calls or the Connected Chats page.
To monitor and barge into chats from the Connected Chats page: in the Monitor | Chats row, select the View checkbox. For more information, see Barge from the Connected Calls or the Connected Chats page.
In the Monitor | Agents, Calls, Chats row, select the Edit checkbox. To make barge only available for those calls or chats that are assigned to the user's team, also select the Assigned teams only checkbox.
Add any other permissions that you require.
Click Save.
Barge into a call or chat session
You can barge into a call or a chat from the Agents page. You can also barge into a call from the Connected Calls page and barge into a chat from the Connected Chats page.
Barge from the Agents page
To barge into a call or chat session from the Agents page, follow these steps:
In the CCAI Platform portal, click Agents > Agents. If you don't see the Agents menu, click Menu, and then click Agents > Agents.
In the row for the call or chat that you want to barge into, click More, and then click Barge. The Call Details or Chat Details dialog appears, depending on context.
In the details dialog, review the session details and click Barge to continue.
In the confirmation dialog, click Barge to continue. The agent adapter appears and you're connected to the session. You can access the same agent adapter controls that the agent can.
To leave the session, click End Call or End Chat, depending on context. If the agent is still in the session, the session stays active. If the agent has already left the session, it ends.
For more information, see Behavior after a barge is initiated.
Barge from the Connected Calls or the Connected Chats page
To barge into a session from the Connected Calls or Connected Chats page, follow these steps:
Do one of the following:
To barge into a call: in the CCAI Platform portal, click Calls > Connected. If you don't see the Calls menu, click Menu, and then click Calls > Connected.
To barge into a chat: in the CCAI Platform portal, click Chats > Connected. If you don't see the Chats menu, click Menu, and then click Chats > Connected.
In the row for the call or chat that you want to barge into, click More, and then click Barge. The Call Details or Chat Details dialog appears, depending on context.
In the details dialog, review the session details and click Barge to continue.
In the confirmation dialog, click Barge to continue. The agent adapter appears and you're connected to the session. You can access the same agent adapter controls that the agent can.
To leave the session, click End Call or End Chat, depending on context. If the agent is still in the session, the session stays active. If the agent has already left the session, it ends.
For more information, see Behavior after a barge is initiated.
Behavior after a barge is initiated
The following shows what happens after a supervisor barges into a call or chat:
The agent hears a tone and sees a banner that indicates who has joined the session.
For calls:
The call becomes a conference call that shows each caller and provides the ability to place callers on hold.
The end-user is not alerted that another user has joined the call.
For chats:
The chat becomes a multiparty chat.
End-users see a message that indicates that another user has joined the chat.
The agent can remain in the session or click Done to leave. If the agent leaves, the supervisor remains in the session.
View session data in the agent adapter
You can configure CCAI Platform so that users can view session data in the agent adapter. This includes virtual agent session variables and custom data from the web and mobile SDKs. This information can be useful for an agent to get additional information during a session, or for a supervisor to get an overview of a session that they barge into.
Let users view virtual agent session variables
You can configure CCAI Platform so that agents or supervisors can view virtual agent session variables in the agent adapter. This gives the user an overview of any virtual agent interactions that the end-user has had.
For session variables that contain custom payloads, you can use the
invisible_to_agent property to specify payload properties that: (1) You don't
want to be displayed in the agent adapter, and (2) You don't want to sent to
your CRM. For more information, see Capture from intent
response.
To let users view virtual agent session variables in the chat adapter, follow these steps:
In the CCAI Platform portal, click Settings > Operation Management. If you don't see the Settings menu, click Menu.
Go to the Virtual Agent pane.
Under Chats, select Collect configured custom data in chat sessions and sent it to CRM. The Display collected custom data in Agent Adapter checkbox appears.
Select Display collected custom data in Agent Adapter, and then click Save Changes.
To let users view virtual agent session variables in the call adapter, follow these steps:
In the CCAI Platform portal, click Settings > Operation Management. If you don't see the Settings menu, click Menu.
Go to the Virtual Agent pane.
Under Calls, select Collect configured custom data in call sessions and sent it to CRM. The Display collected custom data in Agent Adapter checkbox appears.
Select Display collected custom data in Agent Adapter, and then click Save Changes.
Let users view SDK custom data
You can configure CCAI Platform so that agents or supervisors can view, in the agent adapter, custom data that you send to your CRM. This custom data can come from the web SDK, the Android SDK or the iOS SDK. This gives the user quick access to the SDK custom data for that session.
You can used the invisible_to_agent property to specify custom properties that
you don't want to be displayed in the agent adapter. For more information, see
the "Prevent the display of custom data" section of the web SDK
guide, the Android SDK
guide, and the iOS SDK
guide.
To let users view SDK custom data, follow these steps:
In the CCAI Platform portal, click Settings > Operation Management. If you don't see the Settings menu, click Menu.
Go to the Data Parameters pane.
Under Display SDK custom data in Agent Adapter, select the type of SDK custom data that you want to be displayed in the agent adapter, and then click Save Data Parameters.
Call Recording: Caller Announcements
Caller Announcements
Various laws require that callers know when and if they are being recorded. Using the following announcements, you can make sure your callers are alerted as needed. Please work with your internal legal team to determine when and where you are responsible to announce call recording.
Record a call
This message is in Settings > Languages & Messages and is played for incoming calls.
When is the "Record a call" message not played to the caller?
Below are the scenarios in which a caller would not hear the "Record a Call" message:
Outbound calls see Call Recording - Configuration Options
An agent clicks on the "Hang up and callback" option in the agent adapter while on a call
A caller chooses "Callback" as an option when no agents are available to take the call (must have Callback on as an Overcapacity Deflection option)
Caller selects the "Schedule a Call" option, currently available for Mobile and Web SDKs
Record an outbound call message
This message is set up in Settings > Languages & Messages > Record an Outbound Call Message and is played for outbound calls. There are 2 types of outbound calls for Call Recording purposes, Callback and Agent initiated.
Callback outbound calls are placed by the system automatically when either the caller has reached the top of the queue when selecting "callback" from overcapacity settings, or for scheduled calls. See more in Call Settings: Over Capacity Deflection & Caller Announcements.
Agent initiated calls are outbound calls that the agent has to take deliberate action to place the call:
Dialed Outbound Calls
An agent uses the dial pad in the Agent Adapter to place a call
An agent clicks a phone number in the CRM record to place a call
An agent listens to a voicemail and uses the call back feature
Short call callbacks see Call Recovery Features
"Hang Up And Callbacks" see Call Recovery Features
Add a Third Party Calls
Priority User Segments
Overview
Priority User Segments are a simple way to give VIP and other high-value contacts the prompt, efficient service they expect by placing them at the front of the queue. When a consumer initiates a call or chat session, CCAI Platform checks for a contact record in the CRM. If the contact is marked as a Priority User, the consumer goes to the top of any queue they select.
Feature details
When a call or chat session is initiated, CCAI Platform searches for a matching contact record in your CRM. If a match exists, the contact record is scanned for CRM fields. If the specified field matches a priority user segment, the session becomes high priority and jumps toward the front of the queue. The consumer is offered the same queue options as any other consumer, but no matter which one they chose, their session will be marked high priority.
Other feature specifics
Once a priority segment is set up, contacts will be routed when reaching out from any entry point or channel:
IVR, Mobile SDKs and Web SDKs
Call, chat, and SMS
Applies no matter what queue is selected
Works in combination with queue priority and Direct Access Points
Example use cases
Assign a VIP field that can be marked when a specific contact requires special treatment
Use a "stage" field and whenever a customer is in "Onboarding" they will be routed using priority segmentation
Use the "customer segment" field in your CRM and assign priority segmentation to "platinum" account contacts
CRM configuration
The first step is to create a custom field in your CRM. Please check your CRM specific documentation on ow to create a custom field in your CRM
Admin Config
From the CCAI Platform portal, use an admin login to complete these steps:
Allow CRM access for user segment information.
Add a priority user segment.
Allowing CRM Access for user segment information
Go to Settings > Operation Management.
Under CRM Access, mark the checkbox to allow CCAI Platform to access the user segment information in your CRM.
Click Set General to save.
Adding a priority user segment
Go to Settings > Operation Management > Priority User Segments.
Click Add a user segment.
Click into the CRM Field and select from the available CRM Fields. Selection options should include any that have been created in your CRM (this is called the key in your CRM).
Enter the user segment CRM value created in your CRM. If the selected value is "gold," when the field in your CRM shows "gold" on the contact record, the caller will be prioritized over other callers in the same queue.
Click Add to save the priority user segment.
Target Metrics
Overview
Each contact center has a unique set of target metrics that are used to evaluate the efficiencies at goals for the operation. One set of target metrics can be set per environment, and those metrics will be used in dashboards and also show in the Agent Adapter.
These target metrics are set for all applicable channels and queues in the environment. Some metrics like Service Level and Chat Concurrency can also be set at the queue level, overriding this global setting.
Metric details
Repeat Contact Time Period: Tracks the number of consumers who initiated multiple incoming sessions that finished in the same queue within the set time period.
Service Level Target (SLA): Tracks call percentage of calls and chats answered within the set timeframe, shown in dashboards and reports. Used as the default target for all queues and can be overridden for each queue (Settings > Queue).
Chat Concurrency: (Chats only) Goal number of chats handled by an individual agent at a time. Used as the default target for all queues and can be overridden for each queue (Settings > Queue). This target is displayed on the Chat dashboard.
Target Pick Up Time: (Calls only) A target time countdown that agents see in their adapter during an incoming call. Once the target pickup time has been reached, the size of the countdown font grows in size.
Admin configuration
Go to Settings > Operation Management
Set or edit the values for each metric.
Click Set Metrics to save changes.
Queue Groups
Overview
Queue Groups allow you to organize queues. Use this function to group together related queues, such as those handled by the same BPO, market, or supervisor.
You can then view data specific to a Queue Group in real-time reporting. On the Call and Chat Dashboards as well as the Agent Monitoring page, you can filter by Queue Groups.
Queue Groups configuration details
Consist of a collection of top-level, sub-queues, and leaf-level/end-queues
Be created by any user that has the Report Configuration permission assigned
Once a queue group is created, all CCAI Platform users with access will see all queue groups
Queue groups can be edited after they are created both the name, queue assignments and assigned Productive Agents
Can only contain either call or chat queues, the two types cannot be combined.
Manage and View Queue Groups
Add a Queue Group
Go to Settings > Queue Group Settings.
Click Add Queue Group.
Enter a name in
Enter Queue Group NameSet the Queue Group to On.
Queue Groups that are off will not display in reporting.
Select a Channel: Call or Chat.
Add the queue you would like to add to your Queue Group by searching via the Add Queue.
Select Show Productive Agents. (Optional) See below explanation.
If checked, the number of Productive Agents will display on the Queue Reports dashboard.
You can configure which statuses are considered productive by clicking on the gear icon.

Statuses configured to be productive will have extra visibility on the Queue Groups dashboard.
Click Save.
Productive Agents
Productive Agent statuses can be configured for each Queue Group and give added visibility to the selected Agent statuses. When a status is marked as Productive, a detailed breakdown showing these statuses will be available on the Queue Report dashboard.
Productive agents are represented in a column in the Queue Report dashboard. To see the breakdown of the agents in each productive status, hover over the value in the dashboard.
Edit a Queue Group
- Click the pencil icon next to the Queue Group you want to edit in the Queue Group overview.
Viewing in Monitoring and Reporting
In Real-time reporting, you can view data specific to a Queue Group. You can filter by Queue Groups on the Call and Chat Dashboards, as well as the Agent Monitoring page.
Filter by Queue Group on Call and Chat Dashboard
Go to Dashboards > Call or
Dashboards > Chat
Filter by available Queue Groups
Click the gear icon to go to Queue Groups Settings to add or edit a queue group.
Filter by queue group on Agent Monitoring Page
Go to Agents
Expand the Filter Settings by clicking on the drop-down arrow next to the name.
Select + Add Filters

4. Select Queue Groups.
5. Click Save.
Setting Unresponsive Threshold
Overview
Unresponsive status is a system-set status different from most other default statuses. It allows Managers and Admins to identify an unresponsive Adapter and take action to return the adapter and agent to a state where calls/chats can be received.
Unresponsive Status Details
When a session chat/call is routed to an Agent via Deltacast and the system does not receive a response from the Agent's Adapter, the system logs this event as a Skipped call or chat.
By default, an Agent is set to Unresponsive after three (3) consecutive skipped calls/chats are recorded for that Agent. This is a "passive status" as neither Agents nor Managers can place an agent in this status; the status is triggered only by non-responsive Adapters that have logged skipped events.
If Agents are being put into Unresponsive, they are NOT intentionally avoiding calls/chats, instead, their machines are failing to receive CCAI Platform notifications. Agents generally do not know their call adapters are unresponsive and might be seeing a valid status, such as "Available". Unresponsive status allows Managers and Admins to identify an unresponsive Adapter and take action to return the adapter and agent to a state where calls/chats can be received.
Admin Config
This default value of (3) is configurable at Settings > Operation Management > Deltacast, and can be customized by specifying how many consecutive skipped calls or chats need to occur before the Agent is placed into "Unresponsive" status.
Skipped vs. Missed Calls
Skipped call - Our system does not receive an acknowledgment that a call notification was sent to the agent's call adapter. This leads to an agent status of "Unresponsive" (depending on the configured number of sequential occurrences).
Missed call - The agent's adapter successfully received the call notification and the agent was notified, but the agent did not pick up the call. This leads to a "Missed call" status.
CSAT Survey for IVR Calls
Overview
This feature invites callers to submit their customer satisfaction rating, or CSAT score, following the conclusion of their IVR call to collect valuable feedback. The CSAT rating used is a fixed 1-5 scale and the results of the survey will be stored in your CRM. Admins can choose if the caller is alerted of the survey before connecting to an agent, or if the CSAT survey isn't announced until the end of the call. Because the survey is automated, enabling this feature requires no additional agent training. If you are using the Web or Mobile SDKs, see: Mobile and Web Customer Satisfaction Ratings (CSAT)
Details
CSAT is offered for inbound calls only.
The feature can be enabled and disabled globally or per-queue.
Pre-call and Post-call message options offer the ability to configure whether the CSAT survey announcement occurs prior to connecting with an agent or after the support session is complete.
Callers will have the opportunity to submit a score 3 times. If they fail to enter a valid option 3 times, the call will end with no CSAT score recorded.
Admin Configuration
Enable CSAT surveys globally
Go to Settings > Operation Management.
Scroll to the Customer Satisfaction Ratings section.
Enable by toggling the switch to ON.
Options to enable:
Enable Customer Satisfaction Rating to post in CRM ticket (mandatory).
When enabled, the 1-5 rating will be posted as a comment in the CRM record.
When disabled, the rating will not be stored with CCAI Platform or in the CRM - making the above setting mandatory.
Enable Customer Satisfaction qualitative feedback (does not apply).
Click Set CSAT to save.
Go to Settings > Call.
In the CallerAnnouncements section, toggle Enable CSAT After Calls for All IVR Queues to ON.
Mark the checkbox next to Enable CSAT Notification Announcement Prior to Connecting to an Agent to play a message letting the caller know that the CSAT survey will be offered to them after the call. This message is recommended for higher response rates since callers might hang up before the survey plays if not alerted before-hand. Message can be customized, see Uploading custom messages.
Click Set Caller Announcements to save.
Enable CSAT surveys per-queue
Go to Settings > Queue > IVR Edit/View.
Click on a queue - the queue must not contain child queues below.
In the queue settings section on the right, toggle Enable CSAT Survey After Call to On.
The setting is automatically saved.
Customizing messages
Messages to customize:
Pre-Call Notification of CSAT Survey: Occurs prior to connecting with an agent and notifies the caller that there will be a CSAT survey once the call with the agent is finished
Post-Call Notification for CSAT Rating: Occurs once the agent ends the call to instruct the caller to enter a 1 through 5 for their overall satisfaction rating
Order of messages
If Estimated Wait Time Announcement is enabled, the order of announcements to a caller will be:
Estimated Wait Time
Connecting Message
Recording a Call Message
Pre-Call Notification of CSAT Rating
Call takes place
Post-Call Notification of CSAT Rating
Uploading custom messages
From the Admin Portal, go to Settings > Languages& Messages.
Select the language you would like to configure if you are using multiple languages.
Scroll to Pre-Call Notification of CSAT Rating and enter the Text-to-speech message, or upload a recording.
-Proposed message: Please stay on the line after the call to take a brief survey.
Scroll to Post-Call Notification of CSAT Rating and enter the Text-to-speech message, or upload a recording.
-Proposed message: "Using the dial pad, rate your satisfaction on a scale of 1 to 5 with 5 being the best rating."
Click Apply to save.
Viewing scores in the CRM record
Be sure to Enable Customer Satisfaction Rating to post in CRM ticket in Operation Management (as shown in Enable CSAT surveys globally) in order for CSAT scores to save to the CRM record. CCAI Platform does not store your CSAT ratings and ratings collected from IVR calls will not be available in CCAI Platform reports.
In Zendesk: CSAT rating is posted as a private comment formatted as "Customer rating feedback received - [score]" and can be mapped to a custom field.
In Salesforce: CSAT rating is posted as a comment within a task associated with the Case or CCAI Platform Session object.
Localized Languages in the Agent Adapter and User Location Entry
Overview
Agents can choose from a list of supported languages using the CCAI Platform portal and localized Adapters.
Admins can assign the default Agent Adapters language based on their location. Locations are managed by an Admin, and each location has an assigned language. Users can override their location-based language setting via the Agent Adapter.
UI Components
Localized UI components:
- The agent will see all call and chat adapter controls in the language set/selected, including call flows, confirmation/error messages, Agent stats and more
Not localized
Agent Statuses will show as they are configured in Operation Management > Agent Statuses
Queue names are not translated and will appear as they are set up in Settings > Queue for each language
The incoming or outgoing call/chat session will not be translated or impacted in any way.
Admin configuration
Admin role required for configuration
Add a new location
Go to Settings > Operation Management.
Scroll to Localization and click Manage Location Setting.
Click Add Location.
Enter the Location name.
Select a Language.
Click Save.
Assign a language/location to Users
Bulk update multiple users
To update the location for a list of users, use the Importing Users process. Capitalization and spelling must match exactly for a successful import.
Assign locations to individual users
Go to Settings > Users & Teams.
Navigate to the user you would like to add a location for.
Click on the edit icon next to the user's name.
Select one of the pre-configured locations from the Location dropdown.
Click Update to save.
Agent Adapter
Set language
In the Agent Adapter in your CRM, click on the profile icon.
Click on the language drop-down and select a language.
The Agent Adapter now displays in the language selected.
Localized Adapter examples
Mobile and Web SDK Customer Satisfaction Ratings (CSAT)
Overview
Customer Satisfaction Ratings, also known as CSAT are valuable indicators of support interaction effectiveness. CCAI Platform offers a straight-forward CSAT option for customers with the Mobile or Web SDK.
CSAT details
Available for inbound sessions only
CSAT is based on a 1-5 star rating
Consumers are not able to skip the rating screen when enabled
When enabled, CSAT UI will show for web and mobile SDKs
To set a time limit for how long a consumer has to rate the interaction, please reach out to Support.
Admin Configuration
Go to Settings > Operation Management.
To enable the CSAT UI in your SDK, scroll to the Customer Satisfaction Rating section and click to toggle On.
Post CSAT in CRM ticket to attach the numerical customer rating to the CRM record.
Mark the checkbox next to enable Qualitative Feedback to allow end-users to provide feedback in an open-text field. All Qualitative feedback will be added to the CRM record. Feedback text limit is 3000 characters.
Click Set CSAT to save.
Mobile and Web UI
Mobile
After the voice or chat interaction, the consumer will be taken to a screen similar to the one below in the Mobile SDK.
Web
After the voice or chat interaction, the consumer will be taken to a screen similar to the one below in the Web SDK.
Viewing CSAT results
Scores are stored in CCAI Platform dashboards and reports, as well as in your CRM. Comments will not be stored in CCAI Platform, they will be stored in your CRM as long as the setting has been enabled as shown above.
Dashboards
Go to Dashboards > Call OR Chat.
Go to the CSAT section. This shows the average CSAT for the time duration selected in the dashboard filters.
CRM
Depending on which CRM you use and your specific configuration, CSAT ratings are stored in the comments or Case details.
Enabling Pre-session SmartActions
For pricing and implementation contact Support.
Overview
Pre-session SmartActions (Verification, Images, Videos, Text Input) can be used to gather consumer information prior to starting a mobile support session.
With Pre-session SmartActions enabled, you can verify a consumer's identity, gather support request-related information, and gather assets before the consumer enters a support queue.
Pre-session SmartActions can be configured to be optional and/or conditional based on the estimated wait time in the queue.
The following contact channels are supported:
Chat
Instant Calls (from the Mobile channel)
Email
Prerequisites
In order to enable the Pre-session SmartActions, you must have the following:
A valid CCAI Platform account with Admin role assigned,
A valid Legacy, Pro, Enterprise, or Digital License Package, and
An integrated CCAI Platform Mobile SDK version 0.39 or higher.
Admin Configuration
Step 1: Enable the Pre-session SmartAction for the environment
Go to Settings > Operation Management > Pre-session SmartActions section.
Toggle ON the Pre-session SmartAction switch.
Step 2: Configure Pre-session SmartActions for a specific queue
Go to Settings > Queue > Mobile.
Select a queue to enable the feature.
In the Queue Settings panel on the right, go to the Pre-session SmartActions section.
Turn ON the Pre-session SmartAction toggle switch. Pre-session SmartAction queue configurations are displayed.
Scroll down and expand the Custom Copy & Feature Enablement sub-section and expand the sub-section. Pre-session SmartActions selection options are displayed.
Select the checkboxes of the SmartActions you want to enable as pre-session SmartActions for the specific queue.
Click the Save button. The Pre-session SmartAction feature is now enabled for the specific mobile queue.
Optional Configuration
Scenario 1: Trigger the Pre-session SmartAction only when Estimated Wait Time is above configured time limits across all Mobile queues.
On the Operation Management page, scroll down to the Pre-session SmartActions section.
Under the Time Limit configurations, select the desired Estimated Wait Time limit below which the Pre-session SmartActions must not be triggered.
Select the Do not display checkbox.
Click the Set button. The Pre-session SmartAction feature will now be triggered in all mobile queues only when the queue estimated wait time is below the set threshold.
Scenario 2: Trigger the Pre-session SmartAction only when Estimated Wait Time is above configured time limits in a specific Mobile queue.
Go to Settings > Queue > Mobile.
Click on a specific queue for which you want to set up the Estimated Wait Time limit.
On the Queue Settings panel, scroll down to the Pre-session SmartActions section.
Under the Time Limit configurations, select the desired Estimated Wait Time limit below which the Pre-session SmartActions must not be triggered.
Select the Do not display checkbox.
Click the Save button. The Pre-session SmartAction feature will now be triggered in the specific mobile queue only when the queue estimated wait time is below the set threshold.
Scenario 3: Trigger the Pre-session SmartActions as an optional step in the Mobile support flow in a specific mobile queue
Go to Settings > Queue > Mobile.
Navigate to the Queue Settings page of the desired mobile queue where you want to set up the Estimated Wait Time limit by clicking on the name of the queue.
On the Queue Settings panel on the right, scroll down to the Pre-session SmartActions section.
Under the Flow Skip configurations, select the Optional checkbox.
Click the Save button. The Pre-session SmartAction flow in the specific mobile queue will now be optional in the mobile support flow and can be skipped if necessary.
SMS Messaging: Consumer Privacy
Overview
SMS Chat introduces unique obligations related to consumer privacy and it's important to train both managers and agents on the appropriate handling of SMS Chat sessions.
Opting in
Consumers must consent to receiving SMS messages by opting in. When the consumer initiates a chat, they are assumed to have opted in but you still need to send a message that includes the following information:
Brand or product name
"Recurring messages" disclosure
"Message and data rates may apply" disclosure
Opt-out instructions
This can be achieved by composing an opt-in "greeting message" that is sent automatically when the first chat message is received.
Similarly, for outbound SMS messages, the agent should always initiate the session with an opt-in message. This can be achieved by setting up a chat shortcut.
Unsubscribing and Do Not Contact list
A consumer can stop all future SMS messages by sending one of these default command words: STOP, STOPALL, UNSUBSCRIBE, CANCEL, END, QUIT.
These commands are not case sensitive but the word must be complete and the message cannot include any extra spaces or characters. The consumer can send the command at any time by texting the word to your SMS phone number or short code.
When the consumer opts out, their phone number is added to an encrypted "Do Not Contact" list maintained by CCAI Platform. The only phone number added to the list is the one used by the consumer to send the STOP command (even if the consumer has multiple phone numbers in their CRM record.)
For detailed information on the rules and regulations surrounding SMS messaging, refer to the CTIA Short Code Monitoring Handbook v1.7.
When a consumer opts out of receiving future messages:
The chat ends immediately and the agent adapter displays a message to the agent.
The agent makes an entry in the CRM record, indicating that the consumer has opted out.
CCAI Platform adds the consumer's phone number to a "Do Not Contact" list. If an agent tries to use the number, an error message is displayed.
The consumer can opt back in at any time by texting START to any of the incoming SMS numbers.
When using outbound SMS, it is imperative that agents send an opt-in message before sending any other text to the consumer. The easiest way to achieve this is by using a chat shortcut. In this example, the agent simply types /sms to send a standard opt-in message:
Configure global and queue level disposition notes, code, and lists
Disposition codes and notes are tools that allow contact center agents to document the final outcome of a customer interaction. The codes are used to classify and label inbound and outbound sessions, while the notes provide additional context about the session outcome—for example, to indicate the next steps that need to be taken. This feature helps to inform the team of the context of the session and streamline the follow-up process.
Disposition codes are typically short, predefined codes that are used to
classify the outcome of a call or chat. They can be used to indicate the type of
issue that was resolved, the status of the end-user's request, or the level of
satisfaction of the end-user. Some examples of disposition codes include:
Issue Resolved, Follow-up Required, Escalated, Satisfied, and
Unsatisfied.
Disposition notes are more detailed explanations of the outcome of the call or chat, and they usually provide more context about the consumer's issue and the actions that were taken to resolve it. They can include information such as the customer's name, the specific problem that was addressed, the resolution that was provided, and any follow-up actions that need to be taken.
Disposition codes and notes are important for documenting interactions and for tracking the performance of agents and the contact center as a whole. They can also be used to generate reports and metrics that can help to identify trends, areas for improvement, and to make decisions about staffing, training, and other operational issues.
Configuration considerations
Automatic wrap-up for calls must be enabled.
Disposition codes and notes can be enabled and set as optional or mandatory.
Each agent can add one disposition code and note entry per interaction. For example, if a call is transferred to another agent, each agent can enter one code and one note.
Fifteen minutes after the call or chat session ends, the disposition code and notes are saved and made available to connected data sources or APIs. All interaction codes and notes are sent 15 minutes after the session ends.
The Agent Adapter feature works in conjunction with the Next Status feature. After the disposition code and notes are added, CCAI Platform checks for the Next Status set by the agent instead of defaulting to Available. See Agent Statuses for more information.
Agent status behavior
Call:
When disposition and notes are enabled for calls, the Disposition UI appears when the agent is placed in wrap-up status. This allows them to enter a code and/or note. Automatic wrap-up must be enabled.
The agent will remain in wrap-up status for as long as it takes them to enter the code and/or note.
Chat:
If an agent is on one chat and the chat interaction ends, the agent will be in In-chat status until they finish entering the code and note.
If there is an ongoing call, the status will be In-call.
If there are multiple chats, the status will be In-chat.
When disposition and notes are enabled for chats, the agent is presented with the Disposition UI when the chat is completed or transferred.
The status that the agent is in is determined by the agent's activity at that time.
Enable disposition codes and notes
Go to Settings > Operation Management > Wrap-up.
Click to enable Automatic Wrap-up if not already enabled.
Click to Enable Disposition Codes.
Select optional or mandatory.
Click to enable Notes. Select optional or mandatory.
Click Save.
Disposition codes
Disposition code management is based on creating codes and organizing them into lists.
Disposition code: A code to organize the outcome of a call, and help determine whether further action is needed.
Disposition Lists: A set of codes with a unique name, used to organize and anage dispositions relevant to a specific queue. Max 100 active and inactive codes.
Codes cannot be deleted. They can only be set to Inactive.
Agents cannot add their own disposition codes.
Codes are shared for both call and chat sessions.
Sort and Filter: Lists can be filtered to show all lists or only currently active lists, and can be sorted in the following ways:
Custom order
Alphabetical order
Search: Lists and codes can be searched for without respect to case.
Disposition code settings
To manage global disposition codes, go to Operation Management > Wrap-up > Automatic Wrap-up. Click Manage Disposition Codes to open the disposition codes menu.
To manage queue-level disposition codes, go to Settings > Queues > [Queue Name] > Wrap-up. Click Manage Disposition Codes to open the disposition codes menu.
You can create, edit, activate, and deactivate disposition codes using both of these disposition codes menus.
Disposition lists
You can group a collection of disposition codes to create a disposition list. You can sort and filter the Disposition lists tab using the options at the top of the page. From the List menu screen, you can activate or deactivate lists using the slider in the Status column. You can order lists in the following ways:
Custom order
Alphabetical order
Create a new disposition list
Go to the Lists tab.
Click Create disposition list.
Enter a disposition list name in the Name field. Names must be unique, and no longer than 150 alphanumeric characters.
Optional: Enter a custom ID in the Custom ID field.
Click Save. The list appears in the disposition list menu. You can then add codes to the list as needed by opening the list folder in the disposition list menu.
Add new codes to an existing disposition list
Go to the Lists tab.
Select the name of the disposition list that you want to add codes to.
Click to open the list. A list of any codes contained within the list appears.
Click Add disposition code to add an existing code, or Create disposition code to create a new code.
If you choose Add disposition code, A dropdown list will appear where you can select an existing code. Click Save to add the code to the list.
If you choose Create disposition code, enter the disposition name in the Name field. This field is mandatory, and entries are limited to 150 characters. (Optional) Enter a Custom ID for your disposition code in the Custom ID field and click Save. You will then see this code in the disposition list, and it will be available in the Codes Tab for use in other lists.
Sort disposition codes for agents
Admins have control over how agents view disposition codes in the Agent Adapter. The following are the available sorting options:
Custom order: Codes will be presented to the agent in the same order they appear in the list. You can use this option to manually arrange codes in the most appropriate way for your workflow.
Alphabetical order: Codes displayed in a case-insensitive alphabetical order.
Any changes made to the order or timeframe of codes are immediately reflected in the Agent Adapter when the disposition selection popup reopens. CCAI Platform displays codes in the same order as presented to the agent, ensuring consistency between Admin and Agent views.
Data output and reporting
Fifteen minutes after a call or chat session ends, the disposition code and notes are saved and made available to all connected data sources or APIs. All interaction codes and notes are sent 15 minutes after the session ends.
Disposition codes and notes can be viewed by agents in the following ways:
API calls
- Disposition codes are available using the following API endpoints:
/manager/api/v1/callsand/manager/api/v1/chats.
- Disposition codes are available using the following API endpoints:
CRM comments
Metadata files