This page explains how to install and use the Contact Center AI Platform (CCAI Platform) web SDK. To help you get started, Google recommends downloading and using our Web SDK version 2 examples files.
Before you begin
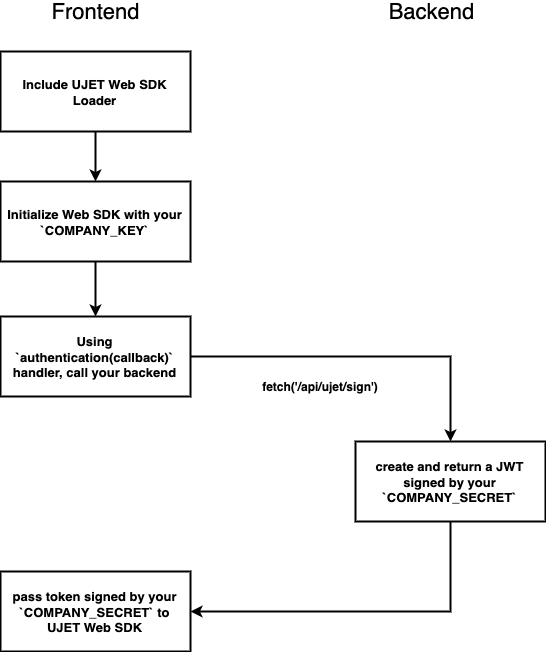
Include the CCAI Platform web SDK loader in your web client.
<script src="https://websdk.ujet.co/v2/loader.js"></script>Initialize the CCAI Platform web SDK with your COMPANY_KEY.
Initialize authentication with your COMPANY_SECRET using your backend code.
Installation workflow
Get started
The following sections provide information for getting started with the CCAI Platform web SDK.
Initialize the web SDK
You can initialized the web SDK using your company key.
Get your company key
To get your company key, follow these steps:
Sign into the CCAI Platform portal using administrator credentials.
Click Menu, and then click Settings > Developer settings.
Go to the Company key and secret code pane and save the code in the Company key field.
You can then initialize the web SDK with the UJET(config) method and
ujet.on('created', function) event. Provide your CCAI Platform
instance host, for example myccaip.uc1.ccaiplatform.com.
// INITIALIZE WEB SDK
var ujet = new UJET({
  companyId: "YOUR_COMPANY_ID",
  host: "https://myccaip.uc1.ccaiplatform.com",
});

ujet.on('created', function () {
  ujet.authenticate(getAuthToken);
});
Alternatively, you can use authenticate option without a created event:
var ujet = new UJET({
  companyId: "YOUR_COMPANY_ID",
  authenticate: getAuthToken,
  host: "https://myccaip.uc1.ccaiplatform.com",
});
where getAuthToken() is a function that calls upon a JWT signing
mechanism from your backend:
function getAuthToken() {
  // YOU SHOULD HAVE THIS KIND OF API ON YOUR SERVER
  return fetch('/auth/token')
    .then(function(resp) {
      // { token: '....' }
      return resp.json();
    });
}
where fetch() calls upon a JWT signing mechanism from your backend. For more
information, see
Mozilla Fetch API.
Configure the web SDK for co-browse
Co-browse is an optional feature that enables an agent to see an end-user's screen and, optionally, take control of it. To use co-browse, you need to provide the co-browse domain and license key of your CCAI Platform instance during SDK initialization.
To configure the web SDK for co-browse, follow these steps:
To get the co-browse domain and license key of your CCAI Platform instance, do the following:
Sign into the CCAI Platform portal using administrator credentials.
Click Menu, and then click Settings > Developer Settings.
Go to the Co-browse pane and click the toggle to the on position.
Save the values in the Co-browse Domain and License Key fields.
To provide the co-browse domain and license key during SDK initialization, include the following code when you Initialize the web SDK:
var ujet = new UJET({
  // other options
  cobrowseOptions: {
    license: "LICENSE_KEY",
    trustedOrigins: ["CO-BROWSE_DOMAIN"],
    api: "CO-BROWSE_DOMAIN"
  },
  // other options
})
Replace the following:
LICENSE_KEY: the license key that you saved in the previous stepCO-BROWSE_DOMAIN: the co-browse domain that you saved in the previous step
For more information, see Set up co-browse.
Initialize authentication with your company secret
The function getAuthToken() should call your API and encode your
payload with your COMPANY_SECRET.
Here is an example of a JWT signing using ExpressJS:
const express = require('express')
const jwt = require('jsonwebtoken')

const port = process.env.PORT || 3000
const secret = process.env.COMPANY_SECRET || 'secret'

const app = express()

app.use(express.json())

app.post('/auth/token', function (req, res) {
  const payload = {}
  payload['iss'] = 'YOUR_COMPANY_NAME'
  const iat = parseInt(Date.now() / 1000, 10)
  payload['iat'] = iat
  payload['exp'] = iat + 600
  const token = jwt.sign(payload, secret, { algorithm: 'HS256' })
  res.json({ token })
})

app.listen(port, function () {
  console.log(`Listing at http://localhost:${port}`)
})
You can use any backend service.
Content security policy
If your production server has a content security policy, add
https://websdk.ujet.co/ into your script-src and frame-src.
Support for Internet Explorer 11
To support Internet Explorer, babel-polyfill is used in our code. If your website also uses babel-polyfill, don't import it to the web SDK as using the same library globally and in the web SDK could cause an exception. Before importing the package, we recommend adding code to check for this and to help prevent this.
Keep track of users
The previous example won't keep track of users. If you would like to identify repeat users in your CRM and use pre-canned responses with the users' information, you must add identifiers to users.
To do this you must add identifiers in the following places:
Pass to backend in
getAuthToken()function getAuthToken() { // YOU SHOULD HAVE THIS KIND OF API ON YOUR SERVER return fetch('/auth/token', { headers: { 'Content-Type': 'application/json' }, method: "POST", body: JSON.stringify({ payload: { identifier: 'c727f2851b64b29761da170d0adee67a9a89c2d9960c8eee0ae53737413cfa4e', name: 'Test user', email: 'test@user.com', phone: '1800UJETSDK' } }) }).then(function(resp) { return resp.json(); }); }Add to payload when encoding JWT
const express = require('express')
const jwt = require('jsonwebtoken')

const port = process.env.PORT || 3000
const secret = process.env.COMPANY_SECRET || 'secret'

const app = express()

app.use(express.json())

app.post('/auth/token', function (req, res) {
  const payload = req.body.payload
  payload['iss'] = 'YOUR_COMPANY_NAME'
  const iat = parseInt(Date.now() / 1000, 10)
  payload['iat'] = iat
  payload['exp'] = iat + 600
  const token = jwt.sign(payload, secret, { algorithm: 'HS256' })
  res.json({ token })
})

app.listen(port, function () {
  console.log(`Listing at http://localhost:${port}`)
})
Add extra options in
authentication()new UJET({ // ... authenticate: function() { return getAuthToken().then({ token } => { return { token: token, user: { identifier: YOUR_UNIQUE_USER_ID, name: 'Test user' //optional, email: 'test@user.com', //optional, phone: '000000000' //optional } }; }); }, })
External chatbot transfer
When you transfer a chat from the virtual agent to the agent, you can override the greeting message and pass the transcripts to the agent by backfilling the external_chat_transfer field to the custom data. The greeting_override supports Markdown formatting.
{
  "external_chat_transfer": {
    "greeting_override": "Please hold while we connect you with a human agent.",
    "agent": {
      "name": "Agent Name",
      "avatar": "https://ujet.s3.amazonaws.com/default-virtual-agent-avatar-1.png"
    },
    "transcript": [
      {
        "sender": "agent",
        "timestamp": "2021-03-15 12:00:00Z",
        "content": [
          {
            "type": "text",
            "text": "Hello! How can I help you today?"
          },
          {
            "type": "buttons",
            "buttons": [
              {
                "label": "Create New Order",
                "selected": false
              },
              {
                "label": "Check Order Status",
                "selected": true
              },
              {
                "label": "Check Account Balance",
                "selected": false
              }
            ]
          }
        ]
      },
      {
        "sender": "end_user",
        "timestamp": "2021-03-15 12:00:15Z",
        "content": [
          {
            "type": "txt",
            "text": "Ceck Order Status"
          }
        ]
      },
      {
        "sender": "aget",
        "timestamp": "021-03-15 12:00:16Z",
        "content": [
          {
            "type": "txt",
            "text": "Ican help you with that, what's your order number?"
          }
        ]
      },
      {
        "sender": "enduser",
        "timestamp": "021-03-15 12:00:20Z",
        "content": [
          {
            "type": "mdia",
            "media": {
              "type": image",
              "url": "https://ujet.s3.amazonaws.com/default-virtual-agent-avatar-1.png"
            }
          }
        ]
      }
    ]
  }
}
Chat unsigned custom data
When a chat is started, you can pass custom data with the chat object. Custom data can be the operating system, the version number, the location, or any other data that might be relevant to the chat. This data is unencrypted and therefore shouldn't contain Personally Identifiable Information (PII).
You can also pass this custom data into a virtual agent. For more information, see Virtual agents.
var ujet = new UJET({
  // other parameters
  customData: {
    version: {
      label: 'Version',
      value: '1.1.0'
    },
    platform: {
      label: 'Platform',
      value: navigator.platform
    }
  },
});
The custom data format is similar to JSON. Each data field and contains a key, a label and a value. Here is an example:
{
  "k1": {
    "label": "Version",
    "value": "1.2.3"
  },
  "k2": {
    "label": "Dashboard",
    "value": "http://example.com"
  }
}
In this example, k1 and k2 are keys. label is a label on a
CRM page, and value is the value of the label.
Prevent the display of custom data
You can use the invisible_to_agent property with a customData object to
prevent signed or unsigned custom data from being displayed in the agent
adapter. In the following example, the version is shown in the agent adapter,
but the platform is not shown.
var ujet = new UJET({
  // Other parameters
});

ujet.config({
  customData: {
    version: {
      label: 'Version',
      value: '1.1.0'
      invisible_to_agent: true
    },
    platform: {
      label: 'Platform',
      value: navigator.platform
      invisible_to_agent: false
    }
  }
});
When you include the "invisible_to_agent" : true property with a custom data object,
you can expect the following behavior:
- The custom data is included in the session metadata file.
- The custom data is not included in CRM records.
For more information, see View session data in the agent adapter.
Reserved data properties
You can send reserved data properties to Contact Center AI Platform (CCAI Platform) as signed custom data when a session begins. For more information, see Send reserved data properties.
The following is an example of reserved data properties in custom data:
  {
    "custom_data": {
      "reserved_verified_customer": {
        "label": "Verified Customer",
        "value": "VERIFIED_CUSTOMER_BOOLEAN": ,
        "type": "boolean"
      },
      "reserved_bad_actor": {
        "label": "Bad Actor",
        "value": "VERIFIED_BAD_ACTOR_BOOLEAN": ,
        "type": "boolean"
      },
      "reserved_repeat_customer": {
        "label": "Repeat Customer",
        "value": "REPEAT_CUSTOMER_BOOLEAN": ,
        "type": "boolean"
      }
    }
  }
Replace the following:
VERIFIED_CUSTOMER_BOOLEAN: True if you consider this end-user to be a legitimate customer.VERIFIED_BAD_ACTOR_BOOLEAN: True if you consider this end-user to potentially be a bad actor.REPEAT_CUSTOMER_BOOLEAN: True if you have determined that this end-user has contacted your contact center before.
Disable attachments
You can stop consumers from uploading attachments with the
disableAttachment option:
new UJET({
// ...
  disableAttachment: true
});
With disableAttachment: true, there will be no attachment icon in the
chat input area and consumers can't drag files into the message area.
Chat deflection
When agents are not available, you can specify options for automatically handling this condition for web and mobile chats.
Options for chat deflection can be found in the CCAI Platform portal, at Settings>Chat>Web & mobile deflection.
After hours deflection
After hours deflection is specific to the contact center or the queue being outside of the operational hours. To enable after hours deflection, do the following:
In the CCAI Platform portal, at Settings > Chat > Web & mobile deflection.
If After hours deflection is turned off, it can be enabled by selecting the After hours deflection option.
Change the Allow Transfers option to allow transfers to queues outside of hours of operation for the following behavior:
Agents will be able to see the following queues as options to transfer to in the Agent Adapter:
All queues within operating hours
All queues that are outside of hours of operation with no deflection enabled and active, logged-in agents
All queues that are after hours with an assigned virtual agent in 24-hour availability mode
Agents won't be able to see the following types of queues:
All queues that are after hours with after hour deflection enabled
All queues that are outside of operating hours with an assigned virtual agent limited to queue hours of operation
Over capacity deflection
Over capacity deflection is specific to the current agent capacity and current wait time for the queue that the session is assigned to. To enable this option, do the following:
In the Contact Center AI Platform Portal, at Settings > Chat > Web & Mobile Deflection.
If Overcapacity Deflection is turned off, select the Overcapacity Deflection toggle to turn it on.
Set the wait time in minutes that would change the status of the queue to overcapacity.
This time threshold setting is also used to set the frequency at which the end-user will see the overcapacity message.
Deflection options
It is possible to specify the options available to the end-user when the deflection occurs.
The email option when enabled provides the ability for the end-user to be deflected to email. When the end-user establishes a web or mobile chat session after hours they are prompted if they want to compose an email.
The specific behavior is as follows:
Mobile: With email deflection enabled and the estimated wait time threshold met, when the end-user taps on the Chat option, they are directed to their default email app. The app version and iOS/Android version are automatically inserted into the email body and the subject is Support for [selected menu path]. Alternatively, the email form may be enabled. For more information, see Integrated email form for mobile and web SDKs.
Web: Presents an Email option to end-users. When clicked, an email form will appear. For more information, see Integrated email form for mobile and web SDKs.
Keep Waiting (Web only): Allows the end-user to click an option to keep waiting.
Customize the co-browse consent dialogs and session-end button
Co-browse consent dialogs let an end-user consent to an initial co-browse
session request, as well as a subsequent remote control request or full device
access request. When you configure the web SDK for
co-browse, the web SDK provides default
consent dialogs and session-end button. However, you can add optional fields to
the cobrowseOptions object that let you customize the consent dialogs as well
the session-end button. Not only does this give you control of the look and feel
of these elements, but it also lets you tailor the consent statements in the
consent dialogs to suit your requirements.
The consent statement
A consent statement appears in a consent dialog. The consent statement indicates to the end-user what behavior they can expect from the co-browse experience and what they are consenting to. If you intend to record a co-browse session, you should say that in your consent statement. See Code sample for customized consent dialogs for examples of customized consent dialogs that contain consent statements.
Procedure
To configure the web SDK for co-browse and customize the consent dialogs, follow these steps:
To get the co-browse domain and license key of your CCAI Platform instance, do the following:
Sign into the CCAI Platform portal using administrator credentials.
Click Menu, and then click Settings > Developer Settings.
Go to the Co-browse pane, and then click the toggle to the on position.
Save the values in the Co-browse Domain and License Key fields.
To initialize the web SDK and include the co-browse customization fields, run the following code:
var ujet = new UJET({
  // other options
  cobrowseOptions: {
    license: "LICENSE_KEY",
    trustedOrigins: ["CO-BROWSE_DOMAIN"],
    api: "CO-BROWSE_DOMAIN"
    cobrowseRequestHtml: "COBROWSE_REQUEST_HTML",
    remoteControlHtml: "REMOTE_CONTROL_HTML",
    fullDeviceHtml: "FULL_DEVICE_HTML",
    styles: "STYLES",
    sessionControlsHtml: "SESSION_CONTROLS_HTML"
  },
  // other options
})
Replace the following:
LICENSE_KEY: the license key that you saved in the previous stepCO-BROWSE_DOMAIN: the co-browse domain that you saved in the previous stepCOBROWSE_REQUEST_HTML: the HTML code for your consent dialog for a co-browse session in screen share mode. For an example, seecobrowseRequestHtmlin Code sample for customized consent dialogs.REMOTE_CONTROL_HTML: the HTML code for your consent dialog for a co-browse session in remote control mode. For an example, seeremoteControlHtmlin Code sample for customized consent dialogs.FULL_DEVICE_HTML: the HTML code for your consent dialog for a co-browse session in full device mode. For an example, seefullDeviceHtmlin Code sample for customized consent dialogs.STYLES: style information for the elements in your consent dialogs and end-session button. For an example, seestylesin Code sample for customized consent dialogs.SESSION_CONTROLS_HTML: the HTML code for your end-session button. For an example, seesessionControlsHtmlin Code sample for customized consent dialogs.
Button classes
The consent dialogs contain buttons the let the user allow or deny the co-browse request, or close the consent dialog. For these buttons to communicate with the web SDK, you must associate the following button classes with the corresponding button types. The web SDK searches the code for these classes and adds an event listener for each of them. Here are the button classes:
cobrowse-allow: a button for the end-user to allow the requestcobrowse-deny: a button for the end-user to deny the requestcobrowse-close: a button for the end-user to close the consent dialog
Code sample for customized consent dialogs
The following code sample contains customized consent dialogs, an end-session button, and style information for these elements. Each consent dialog in the example contains a consent statement. Here are properties for the consent dialogs for each of the three co-browse modes:
cobrowseRequestHtml: the consent dialog for screen share moderemoteControlHtml: the consent dialog for remote control modefullDeviceHtml: the consent dialog for full device mode
"cobrowseOptions": {
    "license": "example_license",
    "trustedOrigins": "[https://example.com]",
    "cobrowseRequestHtml": "<div class=\"custom-backdrop\">\n <div class=\"cobrowse-confirm-dialog\">\n <div class=\"title\">\n <div></div>\n <span>Co-browse</span>\n <div class=\"cobrowse-close cobrowse-deny\">\n <svg width=\"14\" height=\"14842 13.1765 11.5294L8.64706 7L13.1765 2.47059C13.6313 2.01577 13.6313 1.27835 13.1765 0.823529C12.7216 0.368707 11.9842 0.368706 11.5294 0.823529L7 5.35294Z\" fill=\"#919191\"/>\n </svg>\n </div>\n </div>\n <div class=\"body\">\n <h2>Get step-by-step live and secure guidance with a Care Expert</h2>\n \n <ul>\n <li>Stop screen sharing at any time</li>\n <li>Personal info automatically hidden</li>\n  <li>Only your_company_name screens are shared</li>\n </ul>\n </div>\n <div class=\"description\">\n <svg id=\"loader\" xmlns=\"http://www.w3.org/2000/svg\" viewBox=\"0 0 24 24\" fill=\"none\" stroke=\"currentColor\" stroke-width=\"2\" stroke-linecap=\"round\" stroke-linejoin=\"round\"><line x1=\"12\" y1=\"2\" x2=\"12\" y2=\"6\"></line><line x1=\"12\" y1=\"18\" x2=\"12\" y2=\"22\"></line><line x1=\"4.93\" y1=\"4.93\" x2=\"7.76\" y2=\"7.76\"></line><line x1=\"16.24\" y1=\"16.24\" x2=\"19.07\" y2=\"19.07\"></line><line x1=\"2\" y1=\"12\" x2=\"6\" y2=\"12\"></line><line x1=\"18\" y1=\"12\" x2=\"22\" y2=\"12\"></line><line x1=\"4.93\" y1=\"19.07\" x2=\"7.76\" y2=\"16.24\"></line><line x1=\"16.24\" y1=\"7.76\" x2=\"19.07\" y2=\"4.93\"></line></svg>\n <span>\n Co-browse lets us view your active session in a limited way to give you live, on-screen assistance. We won't be able to view any other applications on your device.\n </span>\n </div>\n <div class=\"footer\">\n <span>\n By tapping accept & continue, you are consenting to allow the your_company_name Expert to view your screen to initiate assisted navigation. <a href=\"https://www.example.com\">View the your_company_name Privacy Policy</a>\n </span>\n <button class=\"cobrowse-allow\">Accept & continue</button>\n </div>\n </div>\n </div>\" viewBox=\"0 0 14 14\" fill=\"none\" xmlns=\"http://www.w3.org/2000/svg\">\n <path d=\"M7 5.35294L2.47059 0.823529C2.01577 0.368707 1.27835 0.368707 0.823529 0.823529C0.368707 1.27835 0.368706 2.01576 0.823529 2.47059L5.35294 7L0.823529 11.5294C0.368707 11.9842 0.368707 12.7216 0.823529 13.1765C1.27835 13.6313 2.01576 13.6313 2.47059 13.1765L7 8.64706L11.5294 13.1765C11.9842 13.6313 12.7216 13.6313 13.1765 13.1765C13.6313 12.7216 13.6313 11.9",
    "remoteControlHtml": "<div class=\"custom-backdrop\">\n <div class=\"cobrowse-confirm-dialog\">\n <div class=\"title\">\n <div></div>\n <span>Co-browse</span>\n <div class=\"cobrowse-close cobrowse-deny\">\n  <svg width=\"14\" height=\"14\" viewBox=\"0 0 14 14\" fill=\"none\" xmlns=\"http://www.w3.org/2000/svg\">\n <path d=\"M7 5.35294L2.47059 0.823529C2.01577 0.368707 1.27835 0.368707 0.823529 0.823529C0.368707 1.27835 0.368706 2.01576 0.823529 2.47059L5.35294 7L0.823529 11.5294C0.368707 11.9842 0.368707 12.7216 0.823529 13.1765C1.27835 13.6313 2.01576 13.6313 2.47059 13.1765L7 8.64706L11.5294 13.1765C11.9842 13.6313 12.7216 13.6313 13.1765 13.1765C13.6313 12.7216 13.6313 11.9842 13.1765 11.5294L8.64706 7L13.1765 2.47059C13.6313 2.01577 13.6313 1.27835 13.1765 0.823529C12.7216 0.368707 11.9842 0.368706 11.5294 0.823529L7 5.35294Z\" fill=\"#919191\"/>\n  </svg>\n </div>\n </div>\n <div class=\"body\">\n <h2>Get step-by-step live and secure guidance with a Care Expert</h2>\n \n <ul>\n  <li>Stop screen sharing at any time</li>\n  <li>Personal info automatically hidden</li>\n <li>Only your_company_name screens are shared</li>\n</ul>\n</div>\n<div class=\"description\">\n<svg id=\"loader\" xmlns=\"http://www.w3.org/2000/svg\" viewBox=\"0 0 24 24\" fill=\"none\" stroke=\"currentColor\" stroke-width=\"2\" stroke-linecap=\"round\" stroke-linejoin=\"round\"><line x1=\"12\" y1=\"2\" x2=\"12\" y2=\"6\"></line><line x1=\"12\" y1=\"18\" x2=\"12\" y2=\"22\"></line><line x1=\"4.93\" y1=\"4.93\" x2=\"7.76\" y2=\"7.76\"></line><line x1=\"16.24\" y1=\"16.24\" x2=\"19.07\" y2=\"19.07\"></line><line x1=\"2\" y1=\"12\" x2=\"6\" y2=\"12\"></line><line x1=\"18\" y1=\"12\" x2=\"22\" y2=\"12\"></line><line x1=\"4.93\" y1=\"19.07\" x2=\"7.76\" y2=\"16.24\"></line><line x1=\"16.24\" y1=\"7.76\" x2=\"19.07\" y2=\"4.93\"></line></svg>\n<span>\n Co-browse lets us view your active session in a limited way to give you live, on-screen assistance. We won't be able to view any other applications on your device.\n</span>\n</div>\n<div class=\"footer\">\n<span>\n By tapping accept & continue, you are consenting to allow the your_company_name Expert to view your screen to initiate assisted navigation. <a href=\"https://www.example.com\">View the your_company_name Privacy Policy</a>\n </span>\n <button class=\"cobrowse-allow\">Accept & continue</button>\n </div>\n </div>\n </div>",
    "fullDeviceHtml": "<div class=\"custom-backdrop\">\n <div class=\"cobrowse-confirm-dialog\">\n <div class=\"title\">\n <div></div>\n <span>Co-browse</span>\n <div class=\"cobrowse-close cobrowse-deny\">\n  <svg width=\"14\" height=\"14\" viewBox=\"0 0 14 14\" fill=\"none\" xmlns=\"http://www.w3.org/2000/svg\">\n <path d=\"M7 5.35294L2.47059 0.823529C2.01577 0.368707 1.27835 0.368707 0.823529 0.823529C0.368707 1.27835 0.368706 2.01576 0.823529 2.47059L5.35294 7L0.823529 11.5294C0.368707 11.9842 0.368707 12.7216 0.823529 13.1765C1.27835 13.6313 2.01576 13.6313 2.47059 13.1765L7 8.64706L11.5294 13.1765C11.9842 13.6313 12.7216 13.6313 13.1765 13.1765C13.6313 12.7216 13.6313 11.9842 13.1765 11.5294L8.64706 7L13.1765 2.47059C13.6313 2.01577 13.6313 1.27835 13.1765 0.823529C12.7216 0.368707 11.9842 0.368706 11.5294 0.823529L7 5.35294Z\" fill=\"#919191\"/>\n </svg>\n </div>\n </div>\n <div class=\"body\">\n <h2>Get step-by-step live and secure guidance with a Care Expert</h2>\n \n <ul>\n <li>Stop screen sharing at any time</li>\n <li>Personal info automatically hidden</li>\n <li>Only your_company_name screens are shared</li>\n </ul>\n </div>\n <div class=\"description\">\n <svg id=\"loader\" xmlns=\"http://www.w3.org/2000/svg\" viewBox=\"0 0 24 24\" fill=\"none\" stroke=\"currentColor\" stroke-width=\"2\" stroke-linecap=\"round\" stroke-linejoin=\"round\"><line x1=\"12\" y1=\"2\" x2=\"12\" y2=\"6\"></line><line x1=\"12\" y1=\"18\" x2=\"12\" y2=\"22\"></line><line x1=\"4.93\" y1=\"4.93\" x2=\"7.76\" y2=\"7.76\"></line><line x1=\"16.24\" y1=\"16.24\" x2=\"19.07\" y2=\"19.07\"></line><line x1=\"2\" y1=\"12\" x2=\"6\" y2=\"12\"></line><line x1=\"18\" y1=\"12\" x2=\"22\" y2=\"12\"></line><line x1=\"4.93\" y1=\"19.07\" x2=\"7.76\" y2=\"16.24\"></line><line x1=\"16.24\" y1=\"7.76\" x2=\"19.07\" y2=\"4.93\"></line></svg>\n <span>\n Co-browse lets us view your active session in a limited way to give you live, on-screen assistance. We won't be able to view any other applications on your device.\n </span>\n </div>\n <div class=\"footer\">\n <span>\n By tapping accept & continue, you are consenting to allow the your_company_name Expert to view your screen to initiate assisted navigation. <a href=\"https://www.example.com\">View the your_company_name Privacy Policy</a>\n </span>\n  <button class=\"cobrowse-allow\">Accept & continue</button>\n </div>\n </div>\n </div>",
    "styles": ".some-end-button {\n border-radius: 20px;\n background-color: blue;\n color: white;\n display: marquee;\n width: 20rem;\n font-size:200%;\n height: 20rem;\n }\n .custom-backdrop {\n background: rgba(0, 0, 0, 0.1);\n position: fixed;\n z-index: 2147483647;\n bottom: 0;\n top: 0;\n left: 0;\n right: 0;\n }\n .cobrowse-confirm-dialog {\n color: #232424;\n font-family:sans-serif;\n line-height:140%;\n position:fixed;\n background:white;\n border-radius:5px;\n z-index:2147483647;\n top:50px;\n left:50%;\n width:75%;\n max-width:450px;\n transform:translateX(-50%);\n box-shadow:2px 2px 30px rgb(0,0,0,0.08);\n padding: 1.5rem;\n }\n .title {\n text-align:center;\n display: flex;\n align-items: center;\n justify-content: space-between;\n font-size: 125%;\n line-height: 25px;\n padding: 20px;\n border-radius: 5px 5px 0 0;\n }\n \n .description {\n height: 8rem;\n display: flex;\n flex-direction:column;\n justify-content: center;\n align-items: center;\n background-color: #F3F3F3;\n }\n \n #loader {\n height:4rem;\n }\n \n .footer {\n margin-top: 1rem;\n margin-bottom: 1rem;\n display: flex;\n flex-direction: column;\n justify-content: flex-start\n }\n .cobrowse-allow {\n background-color: pink;\n color: white;\n flex-grow: 2;\n height: 3rem;\n }\n #cobrowse-end-button {\n cursor: pointer;\n position: fixed;\n z-index: 2147483647;\n top: 50%;\n left: 25%;\n transform: translateX(-50%);\n display: flex;\n justify-content: center;\n align-items: center;\n }\n #cobrowse-end-button:hover {\n background-color: #92162D;\n }",
    "sessionControlsHtml": " <div class=\"some-end-button\">\n End Session\n </div>"
  }
For more information, see Set up co-browse.
Multiple language and visual message customization
The new CCAI Platform (option) method has two fields to support multiple languages and visual message customization:
lang: This indicates the default language when the end-user did not choose a preferred language. This code conforms to ISO 639-1 and if omitted, is en by default.translation: The web SDK supports multiple languages for displayed texts. With the translation object, you can customize texts for existing language or even add texts for new languages. For example: de, es, fr, ja.
The following is an example of a translation object which is customizing English copy. As you can see, the top level keys of the translation object should be the language code.
// ES6
let translation = `{
  "en": {
    "ujet_start_title": "Hi!"
  },
  "es": {
    "ujet_start_title": "¡Hola!"
  },
  "fr": {
    "ujet_start_title": "Salut!"
  },
  "de": {
    "ujet_start_title": "Hallo!"
  },
  "it": {
    "ujet_start_title": "Ciao!"
  },
  "ja": {
    "ujet_start_title": "こんにちは!"
  },
  "ko": {
    "ujet_start_title": "안녕하세요!"
  },
  "pt": {
    "ujet_start_title": "Olá!"
  },
  "pt-BR": {
    "ujet_start_title": "Olá!"
  },
  "sv": {
    "ujet_start_title": "Hej!"
  }
}`;

// initialize when dom ready
var ujet = new UJET({
  // other fields
  lang: 'en',
  translation: translation
});
The customization messages are:
"ujet_ask_phone_number_button_title": "Call Me"
"ujet_ask_phone_number_description": "Provide your phone number below"
"ujet_ask_phone_number_title_instant": "We'll Call You"
"ujet_ask_phone_number_title_scheduled": "Let's Schedule a Call"
"ujet_ask_phone_number_warning": "Your call may be monitored or recorded for training and quality assurance purposes."
"ujet_call_confirm_content": "Your phone should be ringing right about - {0}"
"ujet_call_confirm_start_new_conversation": "Start A New Conversation"
"ujet_call_record_permission_subtitle": "Do you give permission for {0} to record your call for training and quality?"
"ujet_call_record_permission_title": "Permission to Record"
"ujet_channel_chat": "Let's connect you to one of our chat support specialists",
"ujet_channel_instant_call": "Let one of our support specialists give you a call now",
"ujet_channel_menu_chat": "Chat now"
"ujet_channel_menu_email": "Email"
"ujet_channel_menu_instant_call": "Call now"
"ujet_channel_menu_keep_waiting": "Keep Waiting"
"ujet_channel_menu_scheduled_call": "Schedule call"
"ujet_channel_scheduled_call": "Let's schedule a time for a support specialist to call and help you",
"ujet_channel_email": "Please send us an email so we can help",
"ujet_chat_end": "End chat"
"ujet_chat_ended": "This chat has ended"
"ujet_chat_input_placeholder": "Type your message here"
"ujet_chat_leave": "Leave chat"
"ujet_chat_timed_out": "This chat has timed out"
"ujet_chat_title_with_multiple_agent": "Multiple Agents"
"ujet_chat_title_with_one_agent": "Chatting with {0}"
"ujet_chat_title_with_two_agent": "Chatting with {0} & {1}"
"ujet_chat_transfer_failed": "Transfer has failed"
"ujet_chat_transfer_joined": "<b>{0}<\/b> just joined the conversation"
"ujet_chat_transfer_left": "<b>{0}<\/b> just left the conversation"
"ujet_chat_transfer_started_menu": "<b>{0}<\/b> is transferring this chat to another agent..."
"ujet_chat_transfer_started_user": "<b>{0}<\/b> is adding another agent to this conversation..."
"ujet_common_back": "Back"
"ujet_common_cancel": "Cancel"
"ujet_common_end": "End"
"ujet_common_no": "No"
"ujet_common_save": "Save"
"ujet_common_submit": "Submit"
"ujet_common_support": "Support"
"ujet_common_yes": "Yes"
"ujet_deflection_menu_title": "Select from the options below"
"ujet_error_no_available_language": "No Available Language"
"ujet_error_phone_number_invalid": "Please input a valid phone number."
"ujet_file_upload_button": "Choose a file to upload"
"ujet_file_upload_failure_size": "Looks like we couldn't upload. <br> Please try uploading a file <br> that is less than {0}."
"ujet_file_upload_failure_type": "Looks like we couldn't upload. <br> We only accept <br> .JPG, .PNG, or .MP4."
"ujet_file_upload_failure_unknown": "Looks like we couldn't upload. <br> Please try again!"
"ujet_file_upload_subtitle": "Drop files here to upload"
"ujet_file_upload_title": "Upload Files"
"ujet_greeting": "Hi there, how can we help?"
"ujet_instant_call_confirm_content": "Your phone should be ringing shortly"
"ujet_language_chinese": "中文"
"ujet_language_english": "English"
"ujet_language_french": "Français"
"ujet_language_german": "Deutsch"
"ujet_language_italian": "Italiano"
"ujet_language_japanese": "日本語"
"ujet_language_korean": "한국어"
"ujet_language_portuguese": "Português (Portugal)"
"ujet_language_portuguese_brazil": "Português (Brazil)"
"ujet_language_spanish": "Español"
"ujet_language_swedish": "Svenska"
"ujet_menu_title": "Select an option"
"ujet_message_back_in_menu": "Looks like you changed your mind! How else can we help?"
"ujet_message_channel": "How would you like to communicate?"
"ujet_message_chat_deflection_afterhour": "We are currently closed. We look forward to helping you during our normal business hours."
"ujet_message_chat_deflection_default": "We are currently experiencing a high volume of requests with a current wait time of <b>{0}<\/b>. How would you like to reach out?"
"ujet_message_chat_deflection_email": "Please contact us via email: <b><a href="mailto:{0}">{0}<\/a><\/b>."
"ujet_message_chat_deflection_keepwaiting": "Thank you for continuing to wait. The remaining wait time is <b>{0}<\/b>."
"ujet_message_chat_deflection_outage": "We are currently experiencing a high volume of request, how would you like to reach out?"
"ujet_message_chat_deflection_recurring": "Thanks for your patience! The remaining wait time is <b>{0}<\/b>."
"ujet_message_chat_restart": "Connecting to your ongoing chat, one moment please..."
"ujet_message_chat_start": "One moment please..."
"ujet_message_queue": "Let's help you with<br /><strong>{0}<\/strong>"
"ujet_rating_feedback_placeholder": "Let us know how we can improve."
"ujet_rating_result_subtitle": "We appreciate your feedback"
"ujet_rating_result_title": "Thank you!"
"ujet_rating_title": "Rate Your Experience"
"ujet_redirect_action_title": "Open this page in a new tab"
"ujet_redirect_url_title": "Visit the page below"
"ujet_schedule_time_description": "Pick a time that works best for you"
"ujet_schedule_time_title": "Let's Schedule a Call"
"ujet_scheduled_call_cancel_cancel": "Cancel"
"ujet_scheduled_call_cancel_content": "You scheduled a support call for<br><b>{0}<\/b> at <b>{1}<\/b>."
"ujet_scheduled_call_cancel_keep": "Keep It"
"ujet_scheduled_call_cancel_title": "Cancel the existing call?"
"ujet_screenshot_init_cancel": "No Thanks"
"ujet_screenshot_init_okay": "Accept"
"ujet_screenshot_init_title": "Screenshot Request"
"ujet_screenshot_install_cancel": "Cancel"
"ujet_screenshot_install_okay": "Install"
"ujet_screenshot_install_title": "Install Chrome Extension"
"ujet_screenshot_take_action": "Take Screenshot"
"ujet_screenshot_take_title": "Click the button below to send a screenshot to the agent"
"ujet_screenshot_verify_cancel": "No"
"ujet_screenshot_verify_okay": "Yes"
"ujet_screenshot_verify_title": "Successfully Installed Chrome Extension"
"ujet_start_title": "Need any help?"
"ujet_tap_to_minimize": "Tap to minimize"
"ujet_time_hour": "hour | hours"
"ujet_time_minute": "minute | minutes"
Logo and icon customization
The new UJET(option) method has fields to support the customization of the
logo and icon.
logo: The URL of the logo image
The position of the widget (Only applies desktop)
right: Sets the right edge position in px (Default value is 50)
bottom: Sets the bottom edge position in px (Default value is 50)
The position of the icon (Only applies desktop)
right: Sets the right edge position in px (Default value is 50)
bottom: Sets the bottom edge position in px (Default value is 50)
Example of logo and icon customization
new UJET({
  logo: 'https://example.com/logo.svg',
  // widget position
  right: '50px',
  bottom: '150px',

  // launcher position
  launcher: {
    right: '50px',
    bottom: '50px',
  }
})

Logo and icon customization
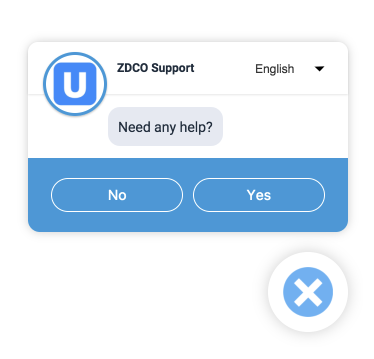
Logo and icon customization
Theme customization
The new UJET(option) method has a field to support theme customization.
style: The theme object supports fours values for the widget.
links: A list of style sheet links for web fonts
--primary-font: A value for the font-family css style applied to the entire Web UI e.g. Merriweather
--primary-color: A hex code value used as the primary color of the Web UI e.g. #51C3C3
--link-color: A hex code value used as the link color of the Web UI e.g. #51C3C3
launcher: The launcher object supports four values for the launcher.
cssText: A css syntax used as the css style for the launcher
chatIcon: A svg icon URL used for the normal chat icon
closeIcon: A svg icon URL used for the close icon
style: This separated theme object supports two values for the launcher.
- --background-color: A hex code value used as the background color of launcher e.g. #E85230 --icon-color: A hex code value used as the icon color of the launcher icon e.g. #FFF
var ujet = new UJET({
  // ...
  style: {
    links: [
      'https://fonts.example.com/css?family=Droid+Serif:400,700&display=swap',
    ],
    '--primary-font': 'Droid Serif, Georgia, serif',
    '--primary-color': '#F1684A',
    '--link-color': '#F1684A',
  },
  launcher: {
    cssText: '.wrap button {background: #E85230}',
    chatIcon: 'https://example.com/logo.svg',
    closeIcon: 'https://example.com/close.svg',
    style: {
      '--background-color': '#F1684A',
      '--icon-color': '#fff',
    }
  }
});

Tracking channel selection and email submission
To allow tracking of channel selection and email submission, the web SDK uses the postMessage function which passes a message with the following data:
application: The device type.
sdk_version: The version of the Web SDK.
user_agent: The browser version.
company: The tenant name.
menu_name: The name of the queue or menu that the end-user has selected.
menu_path: The path to the queue or menu that the end-user has selected.
menu_id: The Menu ID of the queue or menu that the end-user has selected.
url: The URL of the web page that the end-user was on when they made a channel selection or submitted an email.
timestamp: The time that the end-user made their selection.
has_attachments: Whether or not an email had attachments when it was submitted (this only appears during email submission, not during channel selection).
Message data is stored in a ujet object with 2 attributes: one called action that will be a string containing the name of the action completed, one called data that will include the data described previously.
To retrieve data from the message, you can create an event listener listening for "message". An example that will print the action and data to the console is outlined in the next section. A working example can be found in the tracking-channel-selection folder.
window.addEventListener('message', (e) => {
  if (e.data && e.data.ujet) {
    console.log(`Action: ${e.data.ujet.action}`);
    console.log(`Message Data: ${e.data.ujet.data}`);
  }
});
Hiding the agent logo border
To hide the Agent Logo Border, add the '--logo-shadow': 'none' in the style attribute and set it to true in new UJET(option):
new UJET({
  // ...
  style: {
    '--logo-shadow': 'none',
  }
});
Hiding the launch icon
For aesthetic reasons, it is possible to hide the Web UI launch icon, opting to instead use a Proactive Chat Trigger or to start the chat programmatically. To remove the launch icon, add the launcher attribute and set it to true in new UJET(option):
new UJET({
  // ...
  launcher: false,
});
To programmatically start the Web UI, see Programmatically starting the Web UI. To start the web UI with a proactive chat trigger, see Proactive Trigger.
Using a direct access point
You can use a direct access to send an end-user directly to a specific queue.
To use a direct access point, follow these steps:
Sign into the CCAI Platform portal.
Go to Settings > Queue.
Ensure that the web channel is enabled by toggling use.
Go to Edit > View for the web channel. The web structure is displayed.
Select the queue that you want the end-user to go directly to.
Go to the Access Point section, and then click Create direct access point.
Provide the following information:
Set the access point type to general.
Provide the Access Point Name. This is the name that appears in the Access Point list.
Provide the General Access Point Label. This is the value that you will use to configure the web SDK.
Click Create.
You can pass the name of a direct access point using the ujet.start(options)
method. See the following example:
var launcher = document.getElementById('launcher');
launcher.addEventListener('click', function() {
  if (ujet.status === 'open') {
    ujet.close();
  } else {
    ujet.start({ menuKey: '__MENU_KEY__' });
  }
});
Programmatically close the web UI
This is an optional step. Without this step, the Web UI will be finished and minimized by itself.
This step lets you call the callback function when the consumer wants to close the Web SDK.
ujet.on('close', function() {
  // do something here
});
Programmatically start the web UI
This is an optional step. Without this step, end-user can start the Web UI by clicking the Web UI launch icon.
This step lets you open the Web UI programmatically with the ujet.start(options) method. You may want the end-user to click an additional button to open the Web UI like this:
<button id="launcher">Click to open</button>
var ujet = new UJET({
  companyId: "YOUR_COMPANY_ID",
  host: "HOST_URL",
  launcher: false
});

var launcher = document.getElementById('launcher');
launcher.addEventListener('click', function() {
  if (ujet.status === 'open') {
    ujet.close();
  } else {
    ujet.start();
  }
});

ujet.on('ready', function() {
  launcher.textContent = 'ready to talk';
});

ujet.registerHook('loading', function() {
  launcher.textContent = 'loading';
});

ujet.registerHook('open', function() {
  launcher.textContent = 'Click to close';
});

ujet.registerHook('close', function() {
  launcher.textContent = 'Click to open';
});

ujet.on('created', function() {
  ujet.authenticate(getAuthToken);
});
You can also close the widget with ujet.close() method, and you can
remove the widget with ujet.destroy() method.
Proactive trigger
With proactive triggers, you can trigger the web SDK to proactively send a message to the end-user.
To set up a proactive trigger, follow these steps:
In the CCAI Platform portal, go to Settings > Chat.
Go to the Web Proactive Chat Triggers pane, and then click View triggers. The Triggers pane appears.
Click Add Trigger. The Choose Name pane appears.
In the Trigger name field, enter a name, and then click Next. The Set Conditions pane appears.
To set conditions, do the following:
Next to The end user, select a condition.
In the Enter a keyword field, enter a keyword that you want the condition to refer to, and then press the Enter key.
Repeat the previous step for each keyword that you want to enter.
To add another condition, click Add Another Condition, and then click the condition type that you want.
Set the configuration option for the condition.
To add another condition, repeat the previous two steps.
Click Next. The Define Actions pane appears.
To define actions, do the following:
Under Queue Assignment, enter the name of the chat queue node that you want to assign the end-user to. If a chat queue by this name exists, the name appears in bold under the field.
Click the bold chat queue name. A confirmation dialog appears.
Click OK to continue.
Under Chat message, enter the message you want to display in the triggered chat.
Click Finish.
To activate your new trigger, click Go live.
Existing ticket IDs
If you have an existing ticket for a end-user, you can retrieve the
ticket ID from your CRM and pass it into the web SDK by calling
ujet.start().
For example:
yourFunctionToRetrieveTicket()
  .then((existingTicket) => {
    ujet.start({ ticketId: existingTicket });
  });
You can refer to the example in the ticket-id folder for reference.