This page shows how to mount an NFS file share as a volume in Cloud Run. You can use any NFS server, including your own NFS server hosted on-premises, or on a Compute Engine VM. If you don't already have an NFS server, we recommend Filestore, which is a fully managed NFS offering from Google Cloud.
Mounting the NFS file share as a volume in Cloud Run presents the file share as files in the container file system. After you mount the file share as a volume, you access it as if it were a directory on your local file system, using your programming language's file system operations and libraries.
Disallowed paths
Cloud Run does not allow you to mount a volume at /dev,
/proc, or /sys, or on their subdirectories.
Limitations
In order to write to an NFS volume, your container must run as root. If your container only reads from the file system, it can run as any user.
Cloud Run does not support NFS locking. NFS volumes are automatically mounted in no-lock mode.
Before you begin
To mount an NFS server as a volume in Cloud Run, make sure you have the following:
- A VPC Network where your NFS server or Filestore instance is running.
- An NFS server running in a VPC network, with your Cloud Run job connected to that VPC network. If you don't already have an NFS server, create one by creating a Filestore instance.
- Your Cloud Run job is attached to the VPC network where your NFS server is running. For best performance, use Direct VPC rather than VPC Connectors.
- If you're using an existing project, make sure that your VPC Firewall configuration allows Cloud Run to reach your NFS server. (If you're starting from a new project, this is true by default.) If you're using Filestore as your NFS server, follow the Filestore documentation to create a Firewall egress rule to enable Cloud Run to reach Filestore.
Required roles
To get the permissions that you need to configure Cloud Run jobs, ask your administrator to grant you the following IAM roles on job:
-
Cloud Run Developer (
roles/run.developer) - the Cloud Run job -
Service Account User (
roles/iam.serviceAccountUser) - the service identity
For a list of IAM roles and permissions that are associated with Cloud Run, see Cloud Run IAM roles and Cloud Run IAM permissions. If your Cloud Run job interfaces with Google Cloud APIs, such as Cloud Client Libraries, see the service identity configuration guide. For more information about granting roles, see deployment permissions and manage access.
Mount an NFS volume
You can mount multiple NFS servers, Filestore instances, or other volume types at different mount paths.
If you are using multiple containers, first specify the volume(s), then specify the volume mount(s) for each container.
Console
In the Google Cloud console, go to the Cloud Run jobs page:
Select Jobs from the menu, and click Deploy container to fill out the initial job settings page. If you are configuring an existing job, select the job, then click Edit.
Click Container(s), Volumes, Connections, Security to expand the job properties page.
Click the Volumes tab.
- Under Volumes:
- Click Add volume.
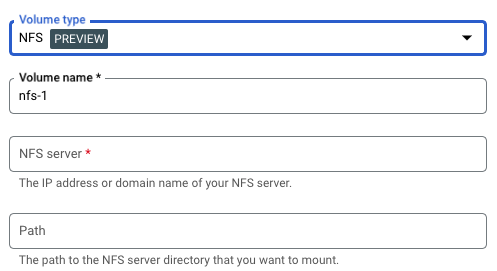
- In the Volume type drop-down, select NFS as the volume type.
- In the Volume name field, enter the name you want to use for the volume.
- In the NFS server field, enter the domain name or location (in the
form
IP_ADDRESS) of the NFS file share. - In the Path field, enter the path to the NFS server directory that you want to mount.
- Click Done.
- Click the Container tab, then expand the container you are mounting the volume to, to edit the container.
- Click the Volume Mounts tab.
- Click Mount volume.
- Select the NFS volume from the menu.
- Specify the path where you want to mount the volume.
- Click Mount Volume
- Under Volumes:
Click Create or Update.
gcloud
To add a volume and mount it:
gcloud run jobs update JOB \
--add-volume name=VOLUME_NAME,type=nfs,location=IP_ADDRESS:NFS_PATH \
--add-volume-mount volume=VOLUME_NAME,mount-path=MOUNT_PATH
Replace:
- JOB with the name of your job.
- VOLUME_NAME with the name you want to give your volume.
- IP_ADDRESS with the location of the NFS file share.
- NFS_PATH with the path to the NFS file share.
- MOUNT_PATH with the path within the container file system where you want to mount this volume.
To mount your volume as a read-only volume:
--add-volume name VOLUME_NAME,type=nfs,location=IP_ADDRESS:NFS_PATH,readonly=true
If you are using multiple containers, first specify the volumes, then specify the volume mounts for each container:
gcloud run jobs update JOB \
--add-volume name=VOLUME_NAME,type=nfs,location=IP_ADDRESS:NFS_PATH \
--container CONTAINER_1 \
--add-volume-mount volume= VOLUME_NAME,mount-path=MOUNT_PATH \
--container CONTAINER_2 \
--add-volume-mount volume=VOLUME_NAME,mount-path=MOUNT_PATH2
YAML
If you are creating a new job, skip this step. If you are updating an existing job, download its YAML configuration:
gcloud run jobs describe JOB_NAME --format export > job.yaml
Update the MOUNT_PATH, VOLUME_NAME, IP_ADDRESS, and NFS_PATH as needed. If you have multiple volume mounts, you will have multiples of these attributes.
apiVersion: run.googleapis.com/v1
kind: Job
metadata:
  name: JOB_NAME
spec:
  metadata:
  template:
    metadata:
      annotations:
        run.googleapis.com/execution-environment: gen2
    spec:
      template:
        spec:
          containers:
          - image: IMAGE_URL
            volumeMounts:
            - name: VOLUME_NAME
              mountPath: MOUNT_PATH
          volumes:
          - name: VOLUME_NAME
            nfs:
              server: IP_ADDRESS
              path: NFS_PATH
              readonly: IS_READ_ONLY
Replace
- JOB with the name of your Cloud Run job
- MOUNT_PATH with the relative path where you are mounting the volume, for example,
/mnt/my-volume. - VOLUME_NAME with any name you want for your volume. The VOLUME_NAME value is used to map the volume to the volume mount.
- IP_ADDRESS with the address of the NFS file share.
- NFS_PATH with the path to the NFS file share.
- IS_READ_ONLY with
Trueto make the volume read-only, orFalseto allow writes.
Create or update the job using the following command:
gcloud run jobs replace job.yaml
Terraform
To learn how to apply or remove a Terraform configuration, see Basic Terraform commands.
Add the following to agoogle_cloud_run_v2_job
resource in your Terraform configuration:resource "google_cloud_run_v2_job" "default" {
name = "JOB_NAME"
location = "REGION"
template {
template {
containers {
image = "us-docker.pkg.dev/cloudrun/container/hello"
volume_mounts {
name = "VOLUME_NAME"
mount_path = "MOUNT_PATH"
}
}
vpc_access {
network_interfaces {
network = "default"
subnetwork = "default"
}
}
volumes {
name = "VOLUME_NAME"
nfs {
server = google_filestore_instance.default.networks[0].ip_addresses[0]
path = "NFS_PATH"
read_only = IS_READ_ONLY
}
}
}
}
}
resource "google_filestore_instance" "default" {
name = "cloudrun-job"
location = "REGION"
tier = "BASIC_HDD"
file_shares {
capacity_gb = 1024
name = "share1"
}
networks {
network = "default"
modes = ["MODE_IPV4"]
}
}
Replace:
- JOB_NAME with the name of your Cloud Run job.
- REGION with the Google Cloud region. For example,
europe-west1. - MOUNT_PATH with the relative path where you are mounting the
volume, for example,
/mnt/nfs/filestore. - VOLUME_NAME with any name you want for your volume. The VOLUME_NAME value is used to map the volume to the volume mount.
- NFS_PATH with the path to the NFS file share starting with a
forward slash, for example,
/share1. - IS_READ_ONLY with
Trueto make the volume read-only, orFalseto allow writes.
Reading and writing to a volume
If you use the Cloud Run volume mount feature, you access a mounted volume using the same libraries in your programming language that you use to read and write files on your local file system.
This is especially useful if you're using an existing container that expects data to be stored on the local file system and uses regular file system operations to access it.
The following snippets assume a volume mount with a mountPath set to /mnt/my-volume.
Nodejs
Use the File System module to create a new file or append to an existing file
in the volume, /mnt/my-volume:
var fs = require('fs');
fs.appendFileSync('/mnt/my-volume/sample-logfile.txt', 'Hello logs!', { flag: 'a+' });
Python
Write to a file kept in the volume, /mnt/my-volume:
f = open("/mnt/my-volume/sample-logfile.txt", "a")Go
Use the os package to create a new file kept in the volume, /mnt/my-volume:
f, err := os.Create("/mnt/my-volume/sample-logfile.txt")Java
Use the Java.io.File class to create a log file in the volume, /mnt/my-volume:
import java.io.File;
File f = new File("/mnt/my-volume/sample-logfile.txt");
Troubleshooting NFS
If you experience problems, check the following:
- Your Cloud Run service is connected to the VPC network that the NFS server is on.
- There are no firewall rules preventing Cloud Run from reaching the NFS server.
- If your container writes to your NFS server, make sure it is running as root.
Container startup time and NFS volume mounts
Using NFS volume mounts can slightly increase your Cloud Run container cold start time because the volume mount is started prior to starting the container(s). Your container will start only if NFS is successfully mounted.
Note that NFS successfully mounts a volume only after establishing a connection to the server and fetching a file handle. If Cloud Run fails to establish a connection to the server, the Cloud Run job will fail to start.
Also, any networking delays can have an impact on container startup time since Cloud Run has a total 30-second timeout for all mounts. If NFS takes longer than 30 seconds to mount, then Cloud Run job will fail to start.
NFS performance characteristics
If you create more than one NFS volume, all volumes are mounted in parallel.
Because NFS is a network file system, it is subject to bandwidth limits and access to the file system can be impacted by limited bandwidth.
When you write to your NFS volume, the write is stored in Cloud Run memory until the data is flushed. Data is flushed in the following circumstances:
- Your application flushes file data explicitly using sync(2), msync(2), or fsync(3).
- Your application closes a file with close(2).
- Memory pressure forces reclamation of system memory resources.
For more information, see the Linux documentation on NFS.
Clear and remove volumes and volume mounts
You can clear all volumes and mounts or you can remove individual volumes and volume mounts.
Clear all volumes and volume mounts
To clear all volumes and volume mounts from your single-container job, run the following command:
gcloud run jobs update JOB \
    --clear-volumes
    --clear-volume-mounts
If you have multiple containers, follow the sidecars CLI conventions to clear volumes and volume mounts:
gcloud run jobs update JOB \
    --clear-volumes \
    --clear-volume-mounts \
    --container=container1 \
    --clear-volumes \
    -–clear-volume-mounts \
    --container=container2 \
    --clear-volumes \
    -–clear-volume-mounts
Remove individual volumes and volume mounts
In order to remove a volume, you must also remove all volume mounts using that volume.
To remove individual volumes or volume mounts, use the remove-volume and remove-volume-mount flags:
gcloud run jobs update JOB \
    --remove-volume VOLUME_NAME
    --container=container1 \
    --remove-volume-mount MOUNT_PATH \
    --container=container2 \
    --remove-volume-mount MOUNT_PATH