This page describes how to enable real time replication of data from SAP applications to Google Cloud using SAP Landscape Transformation (SLT). The content applies to the SAP SLT Replication and SAP SLT No RFC Replication plugins, which are available in the Cloud Data Fusion Hub. It shows the configurations for the SAP Source System, SLT, Cloud Storage, and Cloud Data Fusion to do the following:
- Push SAP metadata and table data to Google Cloud using SAP SLT.
- Create a Cloud Data Fusion replication job that reads the data from a Cloud Storage bucket.
The SAP SLT Replication lets you replicate your data continuously and in real time from SAP sources into BigQuery. You can configure and execute data transfers from SAP systems without any coding.
The Cloud Data Fusion SLT replication process is as follows:
- Data comes from an SAP Source System.
- SLT tracks and reads the data and pushes it to Cloud Storage.
- Cloud Data Fusion pulls data from the storage bucket and writes it to BigQuery.
You can transfer data from supported SAP systems, including SAP systems hosted in Google Cloud.
For more information, see the Overview of SAP on Google Cloud and support details.
Before you begin
To use this plugin, you will need domain knowledge in the following areas:
- Building pipelines in Cloud Data Fusion
- Access management with IAM
- Configuring SAP Cloud and on-premises enterprise resource planning (ERP) systems
Admins and users who perform the configurations
The tasks on this page are performed by people with the following roles in Google Cloud or in their SAP system:
| User type | Description |
|---|---|
| Google Cloud Admin | Users assigned this role are administrators of Google Cloud accounts. |
| Cloud Data Fusion User | Users assigned this role are authorized to design and run data
pipelines. They are granted, at minimum, the Data Fusion Viewer
(
roles/datafusion.viewer) role. If you are using
role-based access control, you might need
additional
roles.
|
| SAP Admin | Users assigned this role are administrators of the SAP system. They have access to download software from the SAP service site. It is not an IAM role. |
| SAP User | Users assigned this role are authorized to connect to an SAP system. It is not an IAM role. |
Supported replication operations
The SAP SLT Replication plugin supports the following operations:
Data Modeling: All data modeling operations (record insert, delete, and
update) are supported by this plugin.
Data Definition: As described in SAP Note 2055599 (SAP support login required to view), there are limitations as to what source system table structure changes are replicated by SLT automatically. Some data definition operations are not supported in the plugin (you need to manually propagate them).
- Supported:
- Add non-key field (after making changes in SE11, activate the table using SE14)
- Not supported:
- Add/delete key field
- Delete non-key field
- Modify data types
SAP requirements
The following items are required in your SAP system:
- You have SLT Server version 2011 SP17 or later installed either on the source SAP system (embedded) or as a dedicated SLT hub system.
- Your source SAP system is SAP ECC or SAP S/4HANA, which supports DMIS 2011 SP17 or higher, such as DMIS 2018, DMIS 2020.
- Your SAP user interface add-on must be compatible with your SAP Netweaver version.
Your support package supports
/UI2/CL_JSONclassPL 12or later. Otherwise, implement the latest SAP Note for/UI2/CL_JSONclasscorrectionsaccording to your user interface add-on version, such as SAP Note 2798102 forPL12.The following security is in place:
Cloud Data Fusion requirements
- You need a Cloud Data Fusion instance, version 6.4.0 or later, any edition.
- The service account assigned to the Cloud Data Fusion instance is granted the required roles (see Granting service account user permission).
- For private Cloud Data Fusion instances, VPC peering is required.
Google Cloud requirements
- Enable the Cloud Storage API in your Google Cloud project.
- The Cloud Data Fusion user must be granted permission to create folders in the Cloud Storage bucket (see IAM roles for Cloud Storage).
- Optional: Set the retention policy, if required by your organization.
Create the storage bucket
Before you create an SLT replication job, create the Cloud Storage bucket. The job transfers data to the bucket and refreshes the staging bucket every five minutes. When you run the job, Cloud Data Fusion reads the data in the storage bucket and writes it to BigQuery.
If SLT is installed on Google Cloud
The SLT server must have permission to create and modify Cloud Storage objects in the bucket that you created.
At minimum, grant the following roles to the service account:
- Service Account Token Creator (
roles/iam.serviceAccountTokenCreator) - Service Usage Consumer (
roles/serviceusage.serviceUsageConsumer) - Storage Object Admin (
roles/storage.objectAdmin)
If SLT is not installed on Google Cloud
Install Cloud VPN or Cloud Interconnect between the SAP VM and Google Cloud to allow connection to an internal metadata endpoint (see Configuring Private Google Access for on-premises hosts.
If internal metadata cannot be mapped:
Install the Google Cloud CLI based on the operating system of the infrastructure that SLT is running on.
Create a service account in the Google Cloud project where Cloud Storage is enabled.
On the SLT operating system, authorize access to Google Cloud with a service account.
Create an API key for the service account and authorize Cloud Storage related scope.
Import the API key into the gcloud CLI installed earlier using the CLI.
To enable the gcloud CLI command that prints the access token, configure the SAP Operating System Command in the transaction SM69 tool in the SLT system.
Print an access token
The SAP administrator configures the operating system command, SM69, that
retrieves an access token from Google Cloud.
Create a script to print an access token and configure an SAP operating system
command to call the script as user <sid>adm from the SAP LT Replication Server
host.
Linux
To create an OS command:
On the SAP LT Replication Server host, in a directory that is accessible to
<sid>adm, create a bash script that contains the following lines:PATH_TO_GCLOUD_CLI/bin/gcloud auth print-access-token SERVICE_ACCOUNT_NAMEUsing the SAP user interface, create an external OS command:
- Enter transaction
SM69. - Click Create.
- In the Command section of the External Command panel, enter
the name of the command, such as
ZGOOGLE_CDF_TOKEN. In the Definition section:
- In the Operating System Command field, enter
shas the script file extension. In the Parameters for Operating System Command field, enter:
/PATH_TO_SCRIPT/FILE_NAME.sh
- In the Operating System Command field, enter
Click Save.
To test the script, click Execute.
Click Execute again.
A Google Cloud token is returned and displayed at the bottom of the SAP user interface panel.
- Enter transaction
Windows
Using the SAP user interface, create an external operating system command:
- Enter transaction
SM69. - Click Create.
- In the Command section of the External Command panel, enter the
name of the command, such as
ZGOOGLE_CDF_TOKEN. In the Definition section:
- In the Operating System Command field, enter
cmd /c. In the Parameters for Operating System Command field, enter:
gcloud auth print-access-token SERVICE_ACCOUNT_NAME
- In the Operating System Command field, enter
Click Save.
To test the script, click Execute.
Click Execute again.
A Google Cloud token is returned and displayed at the bottom of the SAP user interface panel.
SLT requirements
The SLT connector must have the following setup:
- The connector supports SAP ECC NW 7.02, DMIS 2011 SP17 and later.
- Configure an RFC or database connection between SLT and the Cloud Storage system.
- Set up the SSL certificates:
- Download the following CA certificates from the
Google Trust Services repository:
- GTS Root R1
- GTS CA 1C3
- In the SAP user interface, use the
STRUSTtransaction to import both the root and subordinate certificates into theSSL Client (Standard) PSEfolder.
- Download the following CA certificates from the
Google Trust Services repository:
- Internet Communication Manager (ICM) must be set up for HTTPS. Ensure that
the HTTP and HTTPS ports are maintained and activated in the SAP SLT system.
This can be checked through transaction code
SMICM > Services. - Enable the access to Google Cloud APIs on the VM where the SAP SLT system is hosted. This enables private communication between the Google Cloud services without routing through the public internet.
- Ensure that the network can support the required volume and speed of the data transfer between the SAP infrastructure and Cloud Storage. For a successful installation, Cloud VPN and/or Cloud Interconnect are recommended. The throughput of the streaming API depends on the client quotas that have been granted to your Cloud Storage project.
Configure the SLT Replication Server
The SAP user performs the following steps.
In the following steps, you connect the SLT server to the source system and the bucket in Cloud Storage, specifying the source system, the data tables to replicate, and the target storage bucket.
Configure Google ABAP SDK
To configure SLT for data replication (once per Cloud Data Fusion instance), follow these steps:
To configure the SLT connector, the SAP-User enters the following information in the configuration screen (SAP Transaction
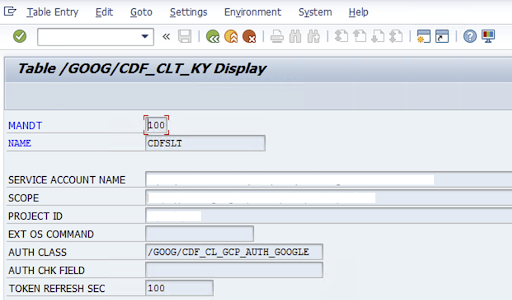
/GOOG/CDF_SETTINGS) about the Google Cloud service account key for transferring data to Cloud Storage. Configure the following properties in the table /GOOG/CDF_CLT_KY using Transaction SE16 and note this key:- NAME: The name for your service account key (for example,
CDFSLT) - SERVICE ACCOUNT NAME: The IAM service account name
- SCOPE: The scope of the service account
- PROJECT ID: The ID of your Google Cloud project
- Optional: EXT OS Command: Only use this field if SLT is not installed on Google Cloud
AUTH CLASS: If the OS command is set up in table
/GOOG/CDF_CLT_KY, use the fixed value:/GOOG/CDF_CL_GCP_AUTH.TOKEN REFRESH SEC: Duration for authorization token refresh
- NAME: The name for your service account key (for example,
Create the replication configuration
Create a Replication configuration in transaction code: LTRC.
- Before proceeding with LTRC configuration, make sure that the RFC connection between SLT and Source SAP system is established.
- For one SLT configuration, there might be multiple SAP tables assigned for replication.
Go to transaction code
LTRCand click New Configuration.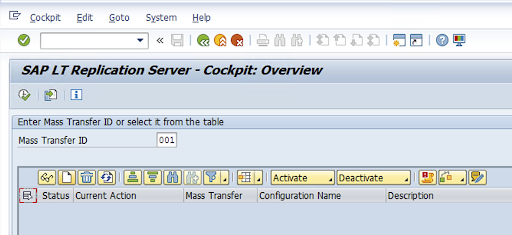
Enter the Configuration Name and Description, and click Next.
Specify the SAP Source system RFC Connection, and click Next.

In the Target System Connection Details, select Other.
Expand the Scenario for RFC Communication field, select SLT SDK, and click Next.
Go to the Specify Transfer Settings window and enter the application name:
ZGOOGLE_CDF.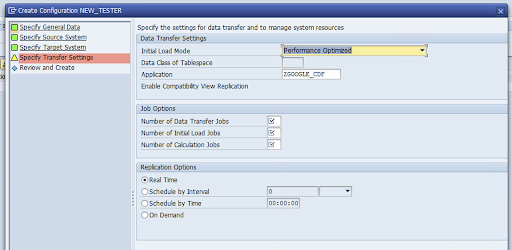
Enter the Number of Data Transfer Jobs, the Number of Initial Load Jobs, and the Number of Calculation Jobs. For more information about performance, see the SAP LT Replication Server performance optimization guide.
Click Real Time > Next.
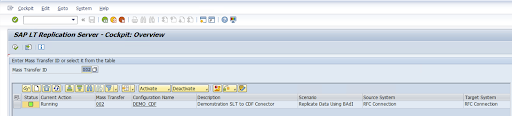
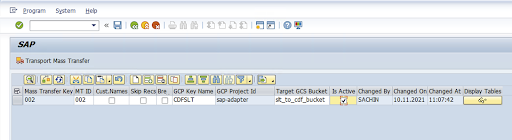
Review the configuration and click Save. Note the Mass Transfer ID for the following steps.
To maintain the Mass Transfer ID and SAP table details, run the SAP transaction:
/GOOG/CDF_SETTINGS.Click Execute or press
F8.Create a new entry by clicking the append row icon.
Enter the Mass Transfer ID, Mass Transfer Key, GCP Key Name, and Target GCS Bucket. Select the Is Active checkbox and save the changes.
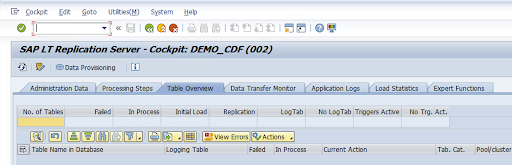
Select the configuration in the Configuration Name column and click Data Provisioning.
Optional: Customize the table and field names.
Click Custom Names and save.
Click Display.
Create a new entry by clicking the Append row or Create buttons.
Enter the SAP table name and external table name to use in BigQuery and save the changes.
Click the View button in the Display fields column to maintain the mapping for table fields.
A page opens with suggested mappings. Optional: Edit the Temp Field Name and Field Description, and then save the mappings.
Go to the LTRC transaction.
Select the value in the Configuration Name column and click Data Provisioning.
Enter the table name in the Table Name in Database field and select the replication scenario.
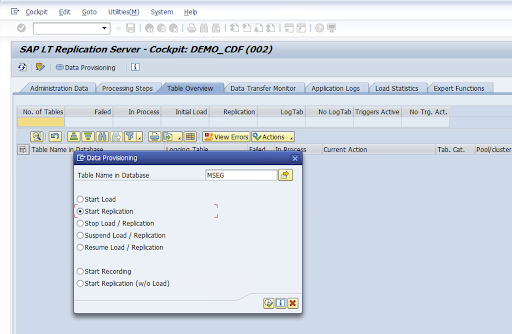
Click Execute. This triggers SLT SDK implementation and starts transferring the data to the target bucket in Cloud Storage.
Install SAP transport files
To design and run replication jobs in Cloud Data Fusion, the SAP components are delivered as SAP transport files that are archived in a zip file. The download is available when you deploy the plugin in the Cloud Data Fusion Hub.
To install the SAP transports, follow these steps:
Step 1: Upload the transport request files
- Log into the operating system of the SAP Instance.
- Use the SAP transaction code
AL11to get the path for theDIR_TRANSfolder. Typically, the path is/usr/sap/trans/. - Copy the cofiles to the
DIR_TRANS/cofilesfolder. - Copy the data files to the
DIR_TRANS/datafolder. - Set the User and Group of data and cofile to
<sid>admandsapsys.
Step 2: Import the transport request files
The SAP administrator can import the transport request files by using the SAP transport management system or the operating system:
SAP transport management system
- Log in to the SAP system as an SAP administrator.
- Enter the transaction STMS.
- Click Overview > Imports.
- In the Queue column, double-click the current SID.
- Click Extras > Other Requests > Add.
- Select the transport request ID and click Continue.
- Select the transport request in the import queue, and then click Request > Import.
- Enter the Client number.
On the Options tab, select Overwrite Originals and Ignore Invalid Component Version (if available).
Optional: To reimport the transports later, click Leave Transports Requests in Queue for Later Import and Import Transport Requests Again. This is useful for SAP system upgrades and backup restorations.
Click Continue.
Verify that the function module and authorization roles were imported successfully by using transactions, such as
SE80andPFCG.
Operating system
- Log in to the SAP system as an SAP administrator.
Add requests to the import buffer:
tp addtobuffer TRANSPORT_REQUEST_ID SIDFor example:
tp addtobuffer IB1K903958 DD1Import the transport requests:
tp import TRANSPORT_REQUEST_ID SID client=NNN U1238Replace
NNNwith the client number. For example:tp import IB1K903958 DD1 client=800 U1238Verify that the function module and authorization roles were imported successfully by using any appropriate transactions, such as
SE80andPFCG.
Required SAP authorizations
To run a data pipeline in Cloud Data Fusion, you need an SAP user. The SAP
user must be of Communications or Dialog type. To prevent using SAP dialog
resources, Communications type is recommended. Users can be created by the SAP
Admin using SAP transaction code SU01.
SAP Authorizations are required to maintain and configure the connector for SAP, a combination of SAP standard and new connector authorization objects. You maintain authorization objects based on your organization's security policies. The following list describes some important authorizations needed for the connector:
Authorization Object: Authorization Object
ZGOOGCDFMTis shipped as part of the Transport Request Role.Role Creation: Create a Role using transaction code
PFCG.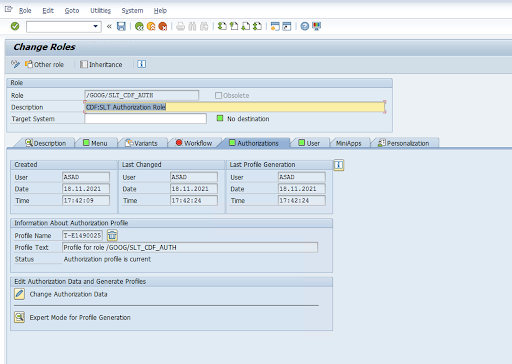
For standard SAP Authorization Objects, your organization manages permissions with its own security mechanism.
For Custom Authorization Objects, provide values in the authorization fields for authorization objects
ZGOOGCDFMT.For fine-grained access control,
ZGOOGCDFMTprovides authorization group based authorization. Users with complete, partial, or no access to authorization groups are provided access based on the authorization group assigned in their role./GOOG/SLT_CDF_AUTH: Role with access to all Authorization Groups. To restrict the access specific to a particular Authorization Group, maintain the Authorization Group FICDF in the configuration.
Create an RFC Destination for the source
Before starting with the configuration, make sure that the RFC connection is established between source and destination.
Go to transaction code
SM59.Click Create > Connection Type 3 (ABAP Connection).
In the Technical Settings window, enter the details about the RFC Destination.
Click the Logon and Security tab to maintain RFC credentials (RFC user and password).
Click Save.
Click Connection Test. After a successful test, you can proceed.
Verify that the RFC Authorization Test is successful.
Click Utilities > Test > Authorization Test.
Configure the plugin
To configure the plugin, deploy it from the Hub, create a replication job, and configure the source and target with the following steps.
Deploy the plugin in Cloud Data Fusion
The Cloud Data Fusion user performs the following steps.
Before you can run the Cloud Data Fusion replication job, deploy the SAP SLT Replication plugin:
Go to your instance:
In the Google Cloud console, go to the Cloud Data Fusion Instances page.
Enable Replication in a new or existing instance:
- For a new instance, click Create instance, enter an instance name, click Add accelerators, select the Replication checkbox, and click Save.
- For an existing instance, see Enable Replication on an existing instance.
Click View instance to open the instance in the Cloud Data Fusion web interface.
Click Hub.
Go to the SAP tab, click SAP SLT, and click SAP SLT Replication Plugin or SAP SLT No RFC Replication Plugin.
Click Deploy.
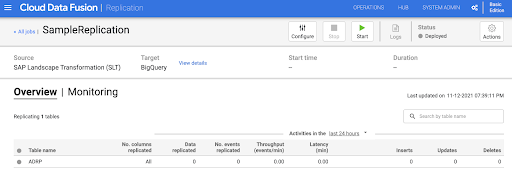
Create a replication job
The SAP SLT Replication plugin reads the content of SAP tables using a Cloud Storage API staging bucket.
To create a replication job for your data transfer, follow these steps:
In your open Cloud Data Fusion instance, click Home > Replication > Create a replication job. If there's no Replication option, enable replication for the instance.
Enter a unique Name and Description for the replication job.
Click Next.
Configure the source
Configure the source by entering values in the following fields:
- Project ID: The ID of your Google Cloud project (this field is pre-populated)
Data Replication GCS Path: The Cloud Storage path that contains data for replication. It must be the same path that is configured in the SAP SLT jobs. Internally, the provided path is concatenated with
Mass Transfer IDandSource Table Name:Format:
gs://<base-path>/<mass-transfer-id>/<source-table-name>Example:
gs://slt_bucket/012/MARAGUID: The SLT GUID—a unique identifier assigned to SAP SLT Mass Transfer ID.
Mass Transfer ID: The SLT Mass Transfer ID is a unique identifier assigned to the configuration in SAP SLT.
SAP JCo Library GCS Path: The storage path that contains the user-uploaded SAP JCo library files. SAP JCo libraries can be downloaded from SAP Support Portal. (Removed in plugin version 0.10.0.)
SLT Server Host: SLT Server hostname or IP address. (Removed in plugin version 0.10.0.)
SAP System Number: Installation system number provided by the system administrator (for example,
00). (Removed in plugin version 0.10.0.)SAP Client: The SAP client to use (for example,
100). (Removed in plugin version 0.10.0.)SAP Language: SAP logon language (for example,
EN). (Removed in plugin version 0.10.0.)SAP Logon Username: SAP username. (Removed in plugin version 0.10.0.)
- Recommended: If the SAP Logon Username changes periodically, use a macro.
SAP Logon Password (M): SAP User password for user authentication.
- Recommended: Use secure macros for sensitive values, such as passwords. (Removed in plugin version 0.10.0.)
Suspend SLT replication when CDF job stops: Attempts to stop the SLT replication job (for the tables involved) when the Cloud Data Fusion replication job stops. Might fail if the job in Cloud Data Fusion unexpectedly stops.
Replicate Existing Data: Indicates whether to replicate existing data from the source tables. By default, the jobs replicate the existing data from source tables. If set to
false, any existing data in the source tables is ignored and only the changes that happen after the job starts are replicated.Service Account Key: The key to use when interacting with Cloud Storage. The service account must have permission to write to Cloud Storage. When running on a Google Cloud VM, this should be set to
auto-detectto use the service account attached to the VM.
Click Next.
Configure the target
To write data to BigQuery, the plugin requires write access to both BigQuery and a staging bucket. Change events are first written in batches from SLT to Cloud Storage. They are then loaded into staging tables in BigQuery. Changes from the staging table are merged into the final target table using a BigQuery merge query.
The final target table includes all the original columns from the source table
plus one additional _sequence_num column. The sequence number ensures that
data is not duplicated or missed in replicator failure scenarios.
Configure the source by entering values in the following fields:
- Project ID: Project of the BigQuery dataset. When running on a Dataproc cluster, this can be left blank, which will use the project of the cluster.
- Credentials: See Credentials.
- Service Account Key: The contents of the service account key to use when interacting with Cloud Storage and BigQuery. When running on a Dataproc cluster, this should be left blank, which uses the service account of the cluster.
- Dataset Name: Name of the dataset to be created in BigQuery. It's optional and, by default, the dataset name is the same as source database name. A valid name must only contain letters, numbers, and underscores and maximum length can be 1024 characters. Any invalid chars would be replaced with underscore in the final dataset name and any characters exceeding length limit are truncated.
- Encryption Key Name: the customer-managed encryption key (CMEK) used to
secure the resources created by this target. The encryption key name must be
of the form
projects/<project-id>/locations/<key-location>/keyRings/<key-ring-name>/cryptoKeys/<key-name>. - Location: The location where the BigQuery dataset and
Cloud Storage staging bucket are created. For example,
us-east1for regional buckets,usfor multi-regional buckets (see Locations). This value is ignored if an existing bucket is specified, as the staging bucket and the BigQuery dataset are created in the same location as that bucket. Staging Bucket: The bucket where change events are written before they are loaded into staging tables. Changes are written to a directory that contains the replicator name and namespace. It's safe to use the same bucket across multiple replicators within the same instance. If it's shared by replicators across multiple instances, ensure that the namespace and name are unique, otherwise the behavior is undefined. The bucket must be in the same location as the BigQuery dataset. If not provided, a new bucket is created for each job named as
df-rbq-<namespace-name>-<job-name>-<deployment-timestamp>.Load Interval (seconds): Number of seconds to wait before loading a batch of data into BigQuery.
Staging Table Prefix: Changes are first written to a staging table before merged to the final table. Staging table names are generated by prepending this prefix to the target table name.
Require Manual Drop Intervention: Whether to require manual administrative action to drop tables and datasets when a drop table or drop database event is encountered. When set to true, the replicator does not delete a table or dataset. Instead, it fails and retry until the table or dataset does not exist. If the dataset or table does not exist, no manual intervention is required. The event is skipped as normal.
Enable Soft Deletes: If set to true, when a delete event is received by the target, the
_is_deletedcolumn for the record gets set totrue. Otherwise the record is deleted from the BigQuery table. This configuration is no-op for a source that generates events out of order and records are always soft deleted from the BigQuery table.
Click Next.
Credentials
If the plugin is run on a Dataproc cluster, the service account key should be set to auto-detect. Credentials are automatically read from the cluster environment.
If the plugin is not run on a Dataproc cluster, the path to a service account key must be provided. The service account key can be found in the IAM page in the Google Cloud console. Make sure the account key has permission to access BigQuery. The service account key file must be available on every node in your cluster and must be readable by all users running the job.
Limitations
- Tables must have a primary key to be replicated.
- Table rename operations are not supported.
- Table alters are partially supported.
- An existing non-nullable column can be altered into a nullable column.
- New nullable columns can be added to an existing table.
- Any other type of alteration to the table schema will fail.
- Changes to the primary key won't fail, but existing data is not rewritten to obey uniqueness on the new primary key.
Select tables and transformations
On the Select tables and transformations step, a list of tables selected for replication in the SLT system appears.
- Select the tables to replicate.
- Optional: Select additional schema operations, such as Inserts, Updates, or Deletes.
- To view the schema, click Columns to replicate for a table.
Optional: To rename columns in the schema, follow these steps:
- While viewing the schema, click Transform > Rename.
- In the Rename field, enter a new name and click Apply.
- To save the new name, click Refresh and Save.
Click Next.
Optional: Configure advanced properties
If you know how much data you're replicating in an hour, you can select the appropriate option.
Review assessment
The Review assessment step scans for schema issues, missing features, or connectivity issues that occur during replication.
On the Review assessment page, click View mappings.
If any issues occur, they must be resolved before you can proceed.
Optional: If you renamed columns when you selected your tables and transformations, verify the new names are correct in this step.
Click Next.
View summary and deploy the replication job
On the Review replication job details page, review the settings and click Deploy replication job.
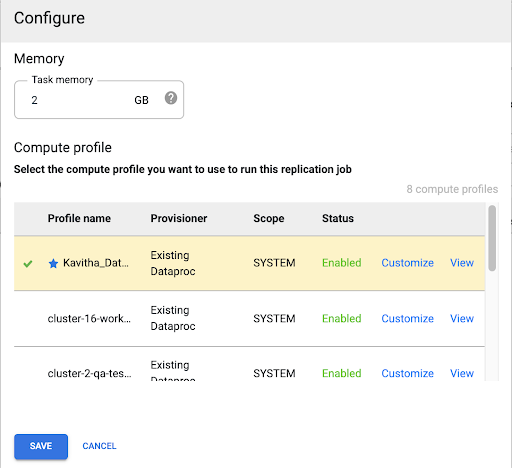
Select a Compute Engine profile
After you deploy the replication job, click Configure from any page in the Cloud Data Fusion web interface.
Select the Compute Engine profile you want to use to run this replication job.
Click Save.
Start the replication job
- To run the replication job, click go to the Start.
Optional: Optimize performance
By default, the plugin is configured for optimal performance. For additional optimizations, see Runtime arguments.
The performance of SLT and Cloud Data Fusion communication depends on these factors:
- SLT on the source system versus a dedicated central SLT system (preferred option)
- Background job processing on the SLT system
- Dialog work processes on the source SAP system
- The number of background job processes allocated to each Mass Transfer ID in LTRC Administration tab
- LTRS settings
- Hardware (CPU and memory) of SLT system
- The database used (for example: HANA, Sybase, or DB2)
- The internet bandwidth (connectivity between the SAP system and Google Cloud over the internet)
- Pre-existing utilization (load) on the system
- The number of columns in the table. With more columns, the replication becomes slow and latency can increase.
The following read types in LTRS settings are recommended for initial loads:
| SLT system | Source system | Table type | Recommended read type [initial load] |
|---|---|---|---|
| SLT 3.0 standalone [DMIS 2018_1_752 SP 2] |
S/4 HANA 1909 | Transparent (small/medium) Transparent (large) Cluster table |
1 range calculation 1 range calculation 4 sender queue |
| SLT embedded [S4CORE 104 HANA 1909] |
N/A | Transparent (small/medium) Transparent (large) Cluster table |
1 range calculation 1 range calculation 4 sender queue |
| SLT 2.0 standalone [DMIS 2011_1_731 SP 17] |
ECC NW 7.02 | Transparent (small/medium) Transparent (large) Cluster table |
5 sender queue 5 sender queue 4 sender Queue |
| SLT embedded [DMIS 2011_1_700 SP 17] |
N/A | Transparent (small/medium) Transparent (large) Cluster table |
5 sender queue 5 sender queue 4 sender Queue |
- For replication, use No Ranges to improve performance:
- Ranges must be used only when backlogs are generated in a logging table with high latency.
- Using one range calculation: Read type for initial load is not recommended in case of SLT 2.0 and Non-HANA systems.
- Using one range calculation: Read type for initial load might result in duplicate records in BigQuery.
- Performance is always better when a standalone SLT system is used.
- A standalone SLT system is always recommended if the resource utilization of the source system is already high.
Runtime arguments
snapshot.thread.count: Passes the number of threads to start to performSNAPSHOT/INITIALdata load in parallel. By default, it uses the number of vCPUs available in the Dataproc cluster where the replication job runs.Recommended: only set this parameter in cases where you need precise control over the number of parallel threads (for example, to decrease usage on cluster).
poll.file.count: Passes the number of files to poll from the Cloud Storage path provided in the Data Replication GCS Path field in the web interface. By default, the value is500per poll, however based on the cluster configuration, it can be increased or decreased.Recommended: Only set this parameter if you have strict requirements for replication delay. Lower values might reduce the delay. You can use it to improve throughput (if unresponsive, use values higher than the default).
bad.files.base.path: Passes the base Cloud Storage path where all the error or faulty data files are copied that were found during replication. This is useful when there are strict requirements for data auditing and a specific location must be used to record failed transfers.By default, all the faulty files are copied from the Cloud Storage path provided in the Data Replication Cloud Storage Path field in the web interface.
Faulty data files final path pattern:
gs://BASE_FILE_PATH/MASS_TRANSFER_ID/SOURCE_TABLE_NAME/bad_files/REPLICATION_JOB_NAME/REPLICATION_JOB_ID/BAD_FILE_NAME
Example:
gs://slt_to_cdf_bucket/001/MARA/bad_files/MaraRepl/05f97349-7398-11ec-9443-8
ac0640fc83c/20220205_1901205168830_DATA_INIT.xml
The criteria for a bad file are a corrupted or invalid XML file, missing PK values, or a Field data type mismatch issue.
Support details
Supported SAP products and versions
- SAP_BASIS 702 release, SP-Level 0016 and later.
- SAP_ABA 702 release, SP-Level 0016 and later.
- DMIS 2011_1_700 release, SP-Level 0017 and later.
Supported SLT versions
SLT versions 2 and 3 are supported.
Supported SAP deployment models
SLT as a standalone system or embedded on the source system.
SAP Notes that need to be implemented before you start using the SLT
If your Support Package does not include /UI2/CL_JSON class corrections for PL
12 or later, implement the latest SAP Note for /UI2/CL_JSON class corrections,
for example, SAP Note 2798102 for PL12.
Recommended: Implement the SAP Notes recommended by report
CNV_NOTE_ANALYZER_SLT based on the Central or Source system condition. For
more information, see
SAP Note 3016862
(SAP login required).
If SAP is already set up, no additional note must be implemented. For any specific errors or issues, see the central SAP Note for your SLT release.
Limits for the volume of data or record width
There is no defined limit to the volume of data extracted and record width.
Expected throughput for the SAP SLT Replication plugin
For an environment configured according to the guidelines in Optimize performance, the plugin can extract around 13 GB per hour for the Initial Load and 3 GB per hour for Replication (CDC). Actual performance might vary with the Cloud Data Fusion and SAP system load or network traffic.
Support for SAP delta (changed data) extraction
SAP delta extraction is supported.
Required: Tenant peering for Cloud Data Fusion instances
Tenant peering is required when the Cloud Data Fusion instance is created with an internal IP address. For more information about tenant peering, see Creating a private instance.
Troubleshoot
Replication job keeps restarting
If the replication job keeps restarting automatically, increase the replication job cluster memory and rerun the replication job.
Duplicates in the BigQuery sink
If you define the number of parallel jobs in the advanced settings of the SAP SLT Replication plugin, when your tables are large, an error occurs causing duplicate columns in the BigQuery sink.
To prevent the issue, for loading data, remove the parallel jobs.
Error scenarios
The following table lists some common error messages (text in quotes will be replaced by actual values at runtime):
| Message ID | Message | Recommended action |
|---|---|---|
CDF_SAP_SLT_01402 |
Service account type is not defined for
SERVICE_ACCT_NAME_FROM_UI. |
Ensure the provided Cloud Storage path is correct. |
CDF_SAP_SLT_01403 |
Service account key provided is not valid due to error:
     ROOT_CAUSE. Please provide a valid service account key for
service account type : SERVICE_ACCT_NAME_FROM_UI. |
Check the root cause displayed in the message and take appropriate action. |
CDF_SAP_SLT_01404 |
Mass Transfer ID could not be found. Please ensure that it exists
in given GCS Bucket. |
Check that the given Mass Transfer ID is in the correct format. |
CDF_SAP_SLT_01502 |
The specified data replication GCS path 'slt_to_cdf_bucket_1' or
     Mass Transfer ID '05C' could not be found. Please ensure that it exists in
GCS. |
Ensure that the provided Cloud Storage path is correct. |
CDF_SAP_SLT_01400 |
Metadata file not found. The META_INIT.json file is not present or
file is present with invalid format. |
Check the root cause displayed in the message and take appropriate action. |
CDF_SAP_SLT_03408 |
Failed to start the event reader. |
Check the root cause displayed in the message and take appropriate action. |
CDF_SAP_SLT_03409 |
Error while processing TABLE_NAME file for source table
     gs://CLOUD_STORAGE_BUCKET_NAME/MT_ID/TABLE_NAME
/FILE_NAME. Root cause: ROOT_CAUSE. |
Check the root cause displayed in the message and take appropriate action. |
CDF_SAP_SLT_03410 |
Failed to replicate data for source table TABLE_NAME
     from file: gs://CLOUD_STORAGE_BUCKET_NAME/MT_ID/
     TABLE_NAME/FILE_NAME. Root cause:
ROOT_CAUSE. |
Check the root cause displayed in the message and take appropriate action. |
CDF_SAP_SLT_03411 |
Failed data replication for source table TABLE_NAME.
Root cause: ROOT_CAUSE. |
Check the root cause displayed in the message and take appropriate action. |
CDF_SAP_SLT_03412 |
Failed to create target table for source table
TABLE_NAME. Root cause: ROOT_CAUSE. |
Check the root cause displayed in the message and take appropriate action. |
Data type mapping
The following table shows the mapping between data types used in SAP applications and Cloud Data Fusion.
| SAP data type | ABAP type | Description (SAP) | Cloud Data Fusion data type |
|---|---|---|---|
| Numeric | |||
| INT1 | b | 1-byte integer | int |
| INT2 | s | 2-byte integer | int |
| INT4 | i | 4-byte integer | int |
| INT8 | 8 | 8-byte integer | long |
| DEC | p | Packed number in BCD format (DEC) | decimal |
| DF16_DEC DF16_RAW |
a | Decimal floating point 8-bytes IEEE 754r | decimal |
| DF34_DEC DF34_RAW |
e | Decimal floating point 16-bytes IEEE 754r | decimal |
| FLTP | f | Binary floating point number | double |
| Character | |||
| CHAR LCHR |
c | Character string | string |
| SSTRING GEOM_EWKB |
string | Character string | string |
| STRING GEOM_EWKB |
string | Character string CLOB | bytes |
| NUMC ACCP |
n | Numeric text | string |
| Byte | |||
| RAW LRAW |
x | Binary data | bytes |
| RAWSTRING | xstring | Byte string BLOB | bytes |
| Date/Time | |||
| DATS | d | Date | date |
| Tims | t | Time | time |
| TIMESTAMP | utcl | ( Utclong ) TimeStamp |
timestamp |
What's next
- Learn more about Cloud Data Fusion.
- Learn more about SAP on Google Cloud.