Cette page explique comment configurer votre pipeline de données pour lire les données d'une table Microsoft SQL Server.
Avant de commencer
- Sign in to your Google Cloud account. If you're new to Google Cloud, create an account to evaluate how our products perform in real-world scenarios. New customers also get $300 in free credits to run, test, and deploy workloads.
-
In the Google Cloud console, on the project selector page, select or create a Google Cloud project.
Roles required to select or create a project
- Select a project: Selecting a project doesn't require a specific IAM role—you can select any project that you've been granted a role on.
-
Create a project: To create a project, you need the Project Creator
(
roles/resourcemanager.projectCreator), which contains theresourcemanager.projects.createpermission. Learn how to grant roles.
-
Verify that billing is enabled for your Google Cloud project.
-
Enable the Cloud Data Fusion, BigQuery, Cloud Storage, and Dataproc APIs.
Roles required to enable APIs
To enable APIs, you need the Service Usage Admin IAM role (
roles/serviceusage.serviceUsageAdmin), which contains theserviceusage.services.enablepermission. Learn how to grant roles. - Créez une instance Cloud Data Fusion.
- Votre base de données SQL Server doit accepter les connexions depuis Cloud Data Fusion. Pour des raisons de sécurité, utilisez une instance Cloud Data Fusion privée.
Dans la console Google Cloud , accédez à la page Instances de Cloud Data Fusion.
Dans la colonne Actions de l'instance, cliquez sur Afficher l'instance pour ouvrir l'instance dans Cloud Data Fusion.
Ouvrir votre instance Cloud Data Fusion
Stocker votre mot de passe SQL Server en tant que clé sécurisée
Ajoutez votre mot de passe SQL Server en tant que clé sécurisée dans votre instance Cloud Data Fusion.
Dans Cloud Data Fusion, cliquez sur Administrateur système.
Cliquez sur l'onglet Configuration.
Cliquez sur Envoyer des appels HTTP.

Sélectionnez PUT.
Dans le champ "Chemin d'accès", saisissez
namespaces/NAMESPACE_ID/securekeys/password.Dans le champ Corps, saisissez
{"data":"password"}. Remplacez password par votre mot de passe SQL Server.Cliquez sur Envoyer.
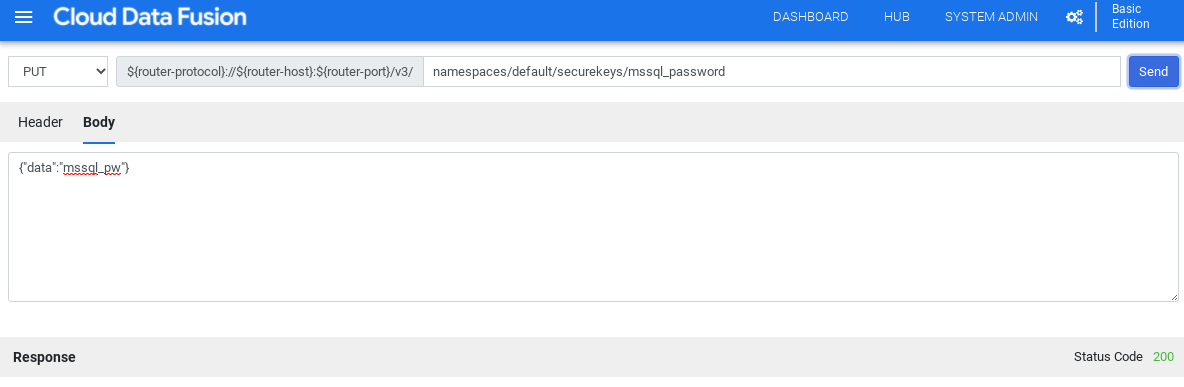
La Réponse doit avoir le code d'état 200 pour continuer.
Obtenir le pilote JDBC pour SQL Server
Vous pouvez obtenir le pilote depuis le Hub ou dans Pipeline Studio de Cloud Data Fusion.
Hub
Dans l'interface utilisateur de Cloud Data Fusion, cliquez sur Hub.
Dans la barre de recherche, saisissez
SQL Server JDBC Driveret sélectionnez le pilote.Cliquez sur Télécharger. Suivez la procédure de téléchargement affichée.
Cliquez sur Déployer. Importez le fichier JAR de l'étape précédente.
Cliquez sur Terminer.
Pipeline Studio
Accédez à Microsoft.com.
Choisissez votre téléchargement, puis cliquez sur Télécharger.
Dans Cloud Data Fusion, cliquez sur menu Menu, puis accédez à la page Pipeline Studio.
Cliquez sur Ajouter.
Pour le pilote, cliquez sur Importer.
Sélectionnez le fichier JAR, situé dans le dossier
jre7.Cliquez sur Suivant.
Pour configurer le pilote, saisissez un nom et un nom de classe.
Cliquez sur Terminer.
Déployer le plug-in SQL Server
Dans Cloud Data Fusion, cliquez sur Hub.
Dans la barre de recherche, saisissez
SQL Server Plugins.Cliquez sur Plug-ins SQL Server.
Cliquez sur Déployer.
Cliquez sur Terminer.
Cliquez sur Créer un pipeline.
Se connecter à SQL Server
Vous pouvez vous connecter à SQL Server depuis Cloud Data Fusion dans Wrangler ou Pipeline Studio.
Wrangler
Dans Cloud Data Fusion, cliquez sur menu Menu, puis accédez à la page Wrangler.
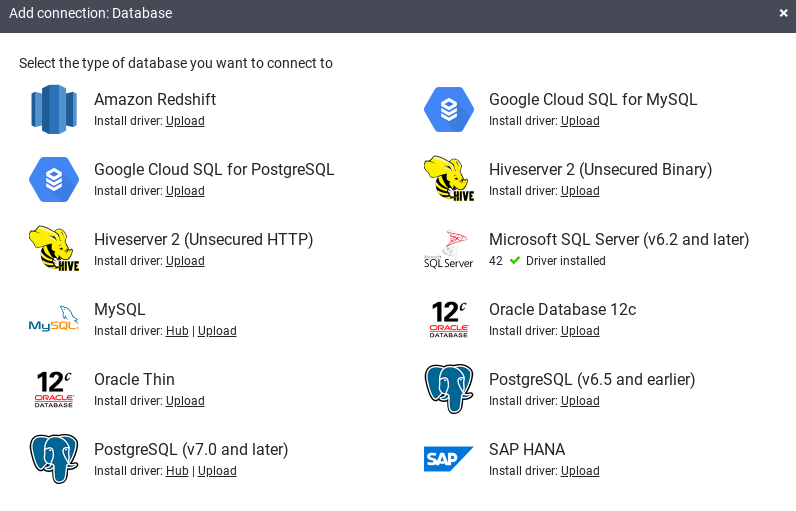
Cliquez sur Ajouter une connexion.
Une fenêtre Ajouter une connexion s'ouvre.
Cliquez sur SQL Server pour vérifier que le pilote est installé.
Saisissez les informations dans les champs de connexion requis. Dans le champ Mot de passe, sélectionnez la clé sécurisée que vous avez stockée précédemment. Cela garantit que votre mot de passe est récupéré à l'aide de Cloud KMS.
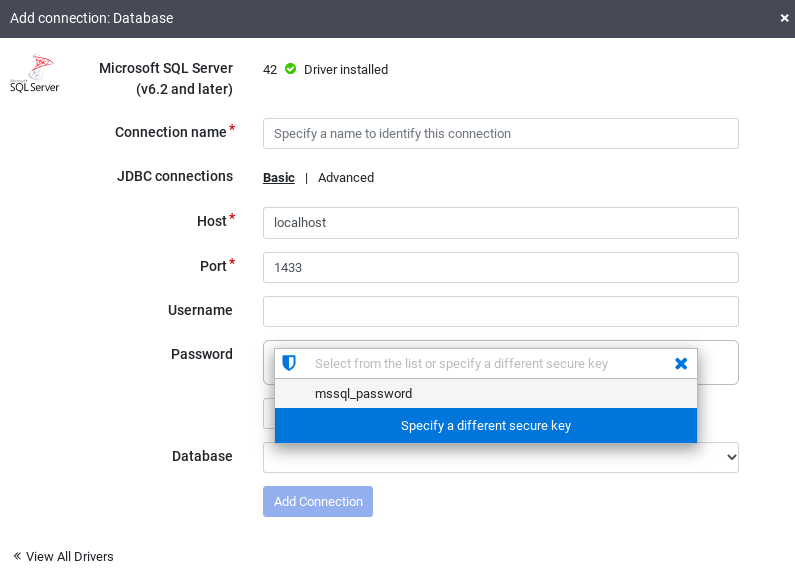
Pour vérifier qu'une connexion peut être établie avec la base de données, cliquez sur Tester la connexion.
Cliquez sur Ajouter une connexion.
Une fois que votre base de données SQL Server est connectée et que vous avez créé un pipeline lisant votre table SQL Server, vous pouvez appliquer des transformations et écrire votre sortie dans un récepteur.
Pipeline Studio
Ouvrez votre instance Cloud Data Fusion et accédez à la page Pipeline Studio.
Développez le menu Source, puis cliquez sur SQL Server.
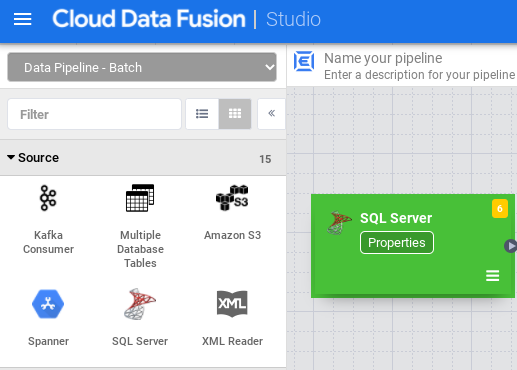
Dans le nœud SQL Server, cliquez sur Propriétés.

Dans le champ Nom de référence, saisissez un nom qui identifie votre source SQL Server.
Dans le champ Base de données, saisissez le nom de la base de données à laquelle vous souhaitez vous connecter.
Dans le champ Importer une requête, saisissez la requête à exécuter. Exemple :
SELECT * FROM table WHERE $CONDITIONS.Cliquez sur Valider.
Cliquez sur Fermer .
Une fois que votre base de données SQL Server est connectée et que vous avez créé un pipeline lisant votre table SQL Server, ajoutez les transformations souhaitées et écrivez votre sortie dans un récepteur.
Étapes suivantes
- Apprenez à lire des données issues de plusieurs tables SQL Server.
- Apprenez-en plus sur Cloud Data Fusion.
- Suivez l'un des tutoriels.