Mantenha tudo organizado com as coleções
Salve e categorize o conteúdo com base nas suas preferências.
Nesta página, descrevemos como configurar seu pipeline de dados para ler dados de uma tabela do Microsoft SQL Server.
Antes de começar
Sign in to your Google Cloud account. If you're new to
Google Cloud,
create an account to evaluate how our products perform in
real-world scenarios. New customers also get $300 in free credits to
run, test, and deploy workloads.
In the Google Cloud console, on the project selector page,
select or create a Google Cloud project.
No Cloud Data Fusion, clique em menuMenu e acesse a página Pipeline Studio.
Clique em
add
Adicionar.
Para o driver, clique em Fazer upload.
Selecione o arquivo JAR, localizado na pasta jre7.
Clique em Próxima.
Para configurar o driver, insira um Nome e um Nome da classe.
Clique em Concluir.
Implantar o plug-in do SQL Server
No Cloud Data Fusion, clique em Hub.
Na barra de pesquisa, digite SQL Server Plugins.
Clique em Plug-ins do servidor SQL.
Clique em Implantar.
Clique em Finish.
Clique em Criar um pipeline.
Conectar-se ao SQL Server
É possível se conectar ao SQL Server no Cloud Data Fusion usando o Wrangler ou o Pipeline Studio.
Wrangler
No Cloud Data Fusion, clique em menuMenu e acesse a página Wrangler.
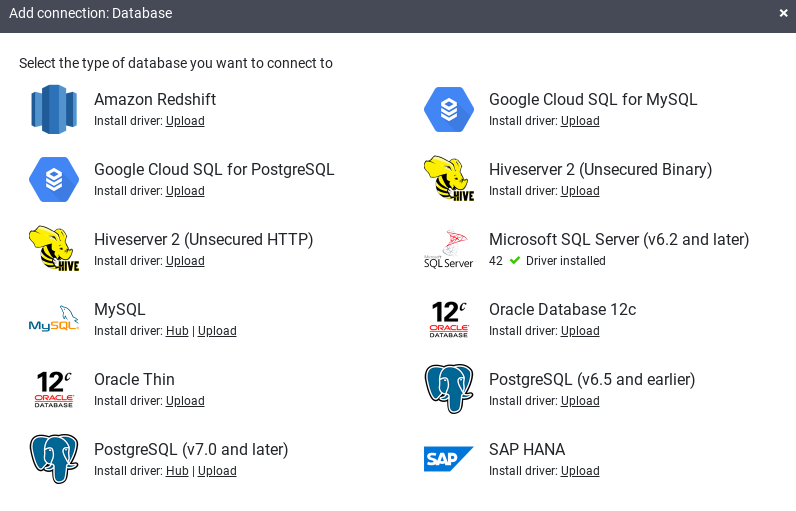
Clique em Adicionar conexão.
A janela Adicionar conexão será aberta.
Clique em SQL Server para verificar se o driver está instalado.
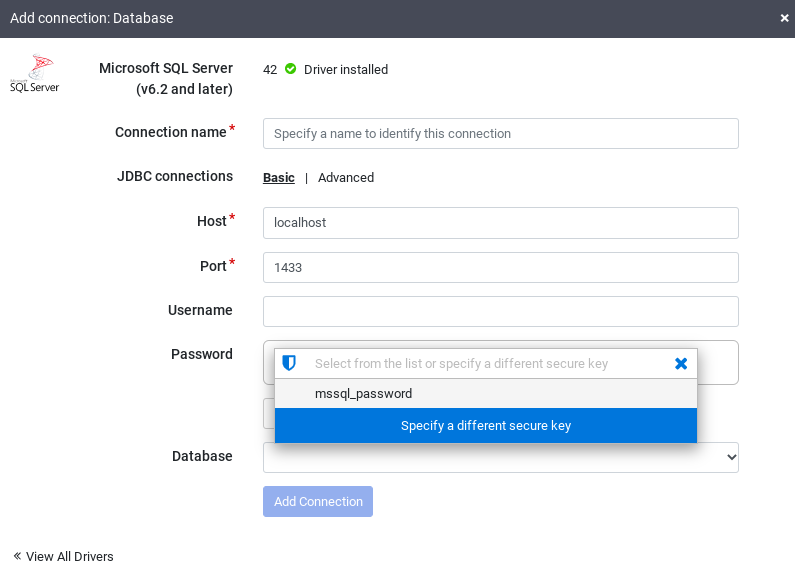
Insira os detalhes nos campos de conexão obrigatórios. No campo Senha, selecione a chave segura armazenada anteriormente.
Isso garante que sua senha seja recuperada usando o Cloud KMS.
Para verificar se uma conexão pode ser estabelecida com o banco de dados, clique em Testar conexão.
Clique em Adicionar conexão.
Depois que o banco de dados do SQL Server estiver conectado e criado um pipeline que seja lido na tabela do SQL Server, será possível aplicar transformações e gravar a saída em um coletor.
Pipeline Studio
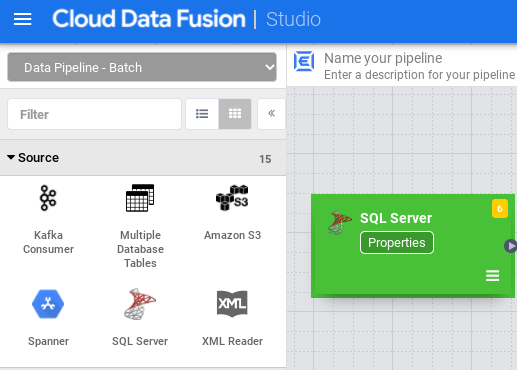
Abra sua instância do Cloud Data Fusion e acesse a página Pipeline Studio.
Expanda o menu Origem e clique em SQL Server.
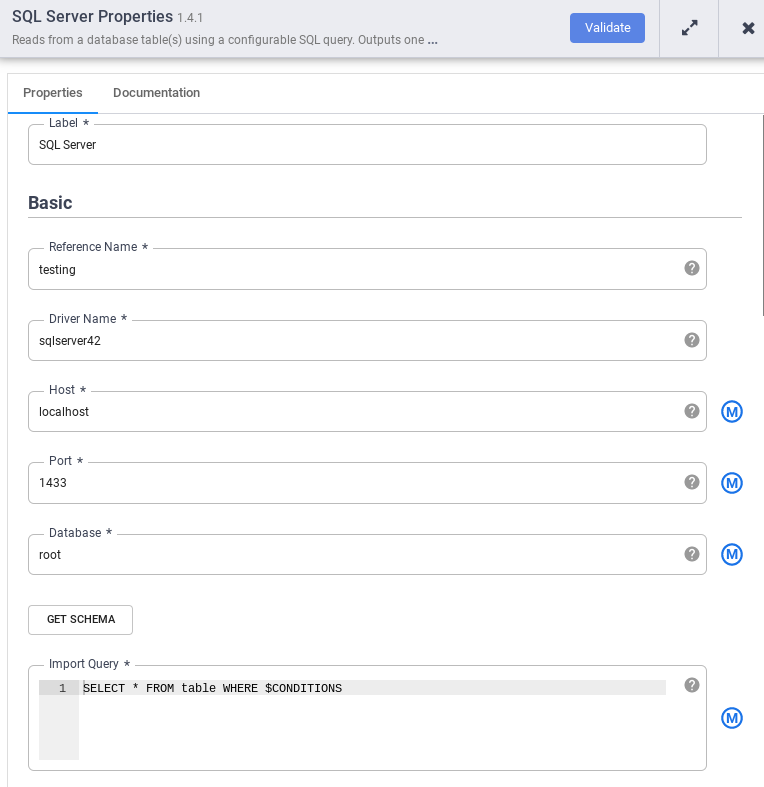
No nó SQL Server, clique em Propriedades.
No campo Nome de referência, insira um nome que identifique sua origem do SQL Server.
No campo Banco de dados, insira o nome do banco de dados a ser conectado.
No campo Importar consulta, insira a consulta a ser executada. Por exemplo, SELECT * FROM table WHERE $CONDITIONS.
Clique em Validate (Validar).
Clique em Fechar close.
Depois que o banco de dados do SQL Server estiver conectado e você tiver criado um pipeline que
leia da tabela do SQL Server, adicione as transformações desejadas e
grave a saída em um coletor.
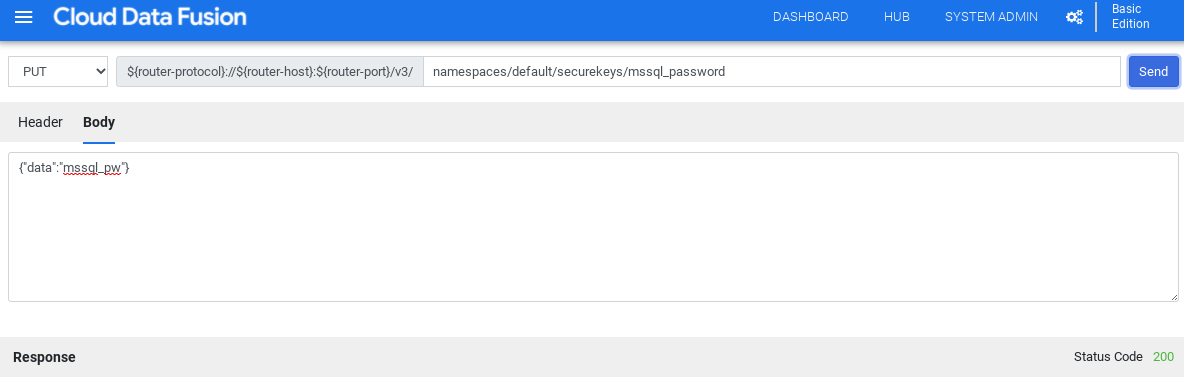
[[["Fácil de entender","easyToUnderstand","thumb-up"],["Meu problema foi resolvido","solvedMyProblem","thumb-up"],["Outro","otherUp","thumb-up"]],[["Difícil de entender","hardToUnderstand","thumb-down"],["Informações incorretas ou exemplo de código","incorrectInformationOrSampleCode","thumb-down"],["Não contém as informações/amostras de que eu preciso","missingTheInformationSamplesINeed","thumb-down"],["Problema na tradução","translationIssue","thumb-down"],["Outro","otherDown","thumb-down"]],["Última atualização 2025-09-04 UTC."],[[["\u003cp\u003eThis page provides instructions on setting up a data pipeline to read data from a Microsoft SQL Server table using Cloud Data Fusion.\u003c/p\u003e\n"],["\u003cp\u003eIt details the process of enabling necessary APIs, creating a Cloud Data Fusion instance, and establishing a secure connection to your SQL Server database.\u003c/p\u003e\n"],["\u003cp\u003eThe guide explains how to store your SQL Server password securely using Cloud Data Fusion's secure key feature.\u003c/p\u003e\n"],["\u003cp\u003eInstructions are included for obtaining and deploying the required SQL Server JDBC driver from the Cloud Data Fusion Hub or Pipeline Studio.\u003c/p\u003e\n"],["\u003cp\u003eThe document covers connecting to SQL Server using both Wrangler and the Pipeline Studio within Cloud Data Fusion, including setting connection properties and validating the connection.\u003c/p\u003e\n"]]],[],null,["# Read from a SQL Server table\n\n*** ** * ** ***\n\nThis page describes how to set up your data pipeline to read data from a\nMicrosoft SQL Server table.\n\nBefore you begin\n----------------\n\n- Sign in to your Google Cloud account. If you're new to Google Cloud, [create an account](https://console.cloud.google.com/freetrial) to evaluate how our products perform in real-world scenarios. New customers also get $300 in free credits to run, test, and deploy workloads.\n- In the Google Cloud console, on the project selector page,\n select or create a Google Cloud project.\n\n | **Note**: If you don't plan to keep the resources that you create in this procedure, create a project instead of selecting an existing project. After you finish these steps, you can delete the project, removing all resources associated with the project.\n\n [Go to project selector](https://console.cloud.google.com/projectselector2/home/dashboard)\n-\n [Verify that billing is enabled for your Google Cloud project](/billing/docs/how-to/verify-billing-enabled#confirm_billing_is_enabled_on_a_project).\n\n-\n\n\n Enable the Cloud Data Fusion, BigQuery, Cloud Storage, and Dataproc APIs.\n\n\n [Enable the APIs](https://console.cloud.google.com/flows/enableapi?apiid=datafusion.googleapis.com,bigquery.googleapis.com,storage.googleapis.com,dataproc.googleapis.com)\n\n- In the Google Cloud console, on the project selector page,\n select or create a Google Cloud project.\n\n | **Note**: If you don't plan to keep the resources that you create in this procedure, create a project instead of selecting an existing project. After you finish these steps, you can delete the project, removing all resources associated with the project.\n\n [Go to project selector](https://console.cloud.google.com/projectselector2/home/dashboard)\n-\n [Verify that billing is enabled for your Google Cloud project](/billing/docs/how-to/verify-billing-enabled#confirm_billing_is_enabled_on_a_project).\n\n-\n\n\n Enable the Cloud Data Fusion, BigQuery, Cloud Storage, and Dataproc APIs.\n\n\n [Enable the APIs](https://console.cloud.google.com/flows/enableapi?apiid=datafusion.googleapis.com,bigquery.googleapis.com,storage.googleapis.com,dataproc.googleapis.com)\n\n1.\n\n\n Enable the Cloud Data Fusion, BigQuery, Cloud Storage, and Dataproc APIs.\n\n\n [Enable the APIs](https://console.cloud.google.com/flows/enableapi?apiid=datafusion.googleapis.com,bigquery.googleapis.com,storage.googleapis.com,dataproc.googleapis.com)\n2. [Create a Cloud Data Fusion instance](/data-fusion/docs/how-to/create-instance).\n3. Your SQL Server database must accept connections from Cloud Data Fusion. For security reasons, use a [private\n Cloud Data Fusion instance](/data-fusion/docs/how-to/create-private-ip).\n\n### Open your Cloud Data Fusion instance\n\n1. In the Google Cloud console, go to the Cloud Data Fusion **Instances**\n page.\n\n [Go to Instances](https://console.cloud.google.com/data-fusion/locations/-/instances)\n2. In the **Actions** column for the instance, click **View instance** to open\n the instance in Cloud Data Fusion.\n\nStore your SQL Server password as a secure key\n----------------------------------------------\n\nAdd your SQL Server password as a secure key in your Cloud Data Fusion\ninstance.\n\n1. From Cloud Data Fusion, click **System Admin**.\n\n2. Click the **Configuration** tab.\n\n3. Click **Make HTTP Calls**.\n\n \u003cbr /\u003e\n\n4. Select **PUT**.\n\n5. In the path field, enter\n `namespaces/`\u003cvar translate=\"no\"\u003eNAMESPACE_ID\u003c/var\u003e`/securekeys/password\n `.\n\n6. In the **Body** field, enter `{\"data\":\"`\u003cvar translate=\"no\"\u003epassword\u003c/var\u003e`\"}`.\n Replace \u003cvar translate=\"no\"\u003epassword\u003c/var\u003e with your SQL Server password.\n\n7. Click **Send**.\n\nThe **Response** must have status code `200` to continue.\n\nGet the JDBC driver for SQL Server\n----------------------------------\n\nYou can get the driver from the Hub or in the Pipeline Studio in Cloud Data Fusion. \n\n### Hub\n\n1. In the Cloud Data Fusion UI, click **Hub**.\n\n2. In the search bar, enter `SQL Server JDBC Driver` and select the driver.\n\n3. Click **Download**. Follow the download steps shown.\n\n4. Click **Deploy**. Upload the JAR file from the previous step.\n\n5. Click **Finish**.\n\n### Pipeline Studio\n\n1. Go to [Microsoft.com](https://www.microsoft.com/en-us/download/details.aspx?id=11774).\n\n2. Choose your download and click **Download**.\n\n3. In Cloud Data Fusion, click *menu*\n **Menu** and go to the **Pipeline Studio** page.\n\n4. Click add **Add**.\n\n5. For the driver, click **Upload**.\n\n6. Select the JAR file, located in the `jre7` folder.\n\n7. Click **Next**.\n\n8. To configure the driver, enter a **Name** and **Class name**.\n\n9. Click **Finish**.\n\nDeploy the SQL Server Plugin\n----------------------------\n\n1. In Cloud Data Fusion, click **Hub**.\n\n2. In the search bar, enter `SQL Server Plugins`.\n\n3. Click **SQL server plugins**.\n\n4. Click **Deploy**.\n\n5. Click **Finish**.\n\n6. Click **Create a pipeline**.\n\nConnect to SQL Server\n---------------------\n\nYou can connect to SQL Server from Cloud Data Fusion in Wrangler or the Pipeline Studio. \n\n### Wrangler\n\n1. In Cloud Data Fusion, click *menu*\n **Menu** and go to the **Wrangler** page.\n\n2. Click **Add connection**.\n\n An **Add connection** window opens.\n3. Click **SQL Server** to verify that the driver is installed.\n\n \u003cbr /\u003e\n\n4. Enter details in the required connection fields. In the **Password** field, select the\n [secure key you stored previously](#store_your_sql_server_password_as_a_secure_key).\n It ensures that your password is retrieved using [Cloud KMS](/kms/docs).\n\n \u003cbr /\u003e\n\n5. To check that a connection can be established with the database, click\n **Test connection**.\n\n6. Click **Add connection**.\n\nAfter your SQL Server database is connected and you've created a pipeline that\nreads from your SQL Server table, you can apply transformations and\nwrite your output to a sink.\n\n### Pipeline Studio\n\n1. Open your Cloud Data Fusion instance and go to the **Pipeline Studio**\n page.\n\n2. Expand the **Source** menu and click **SQL Server**.\n\n \u003cbr /\u003e\n\n3. On the **SQL Server** node, click **Properties**.\n\n4. In the **Reference name** field, enter a name that\n identifies your SQL Server source.\n\n5. In the **Database** field, enter the name of the database to connect to.\n\n6. In the **Import query** field, enter the query to run. For example,\n `SELECT * FROM table WHERE $CONDITIONS`.\n\n7. Click **Validate**.\n\n8. Click close close.\n\nAfter your SQL Server database is connected and you've created a pipeline that\nreads from your SQL Server table, add any desired transformations and\nwrite your output to a sink.\n\nWhat's next\n-----------\n\n- Learn how to [read data from multiple SQL Server tables](/data-fusion/docs/how-to/reading-from-sqlserver-multi).\n- Learn more about [Cloud Data Fusion](/data-fusion/docs/concepts/overview).\n- Follow one of the [tutorials](/data-fusion/docs/tutorials)."]]