Tetap teratur dengan koleksi
Simpan dan kategorikan konten berdasarkan preferensi Anda.
Halaman ini menjelaskan cara menyiapkan pipeline data untuk membaca data dari tabel Microsoft SQL Server.
Sebelum memulai
Sign in to your Google Cloud account. If you're new to
Google Cloud,
create an account to evaluate how our products perform in
real-world scenarios. New customers also get $300 in free credits to
run, test, and deploy workloads.
In the Google Cloud console, on the project selector page,
select or create a Google Cloud project.
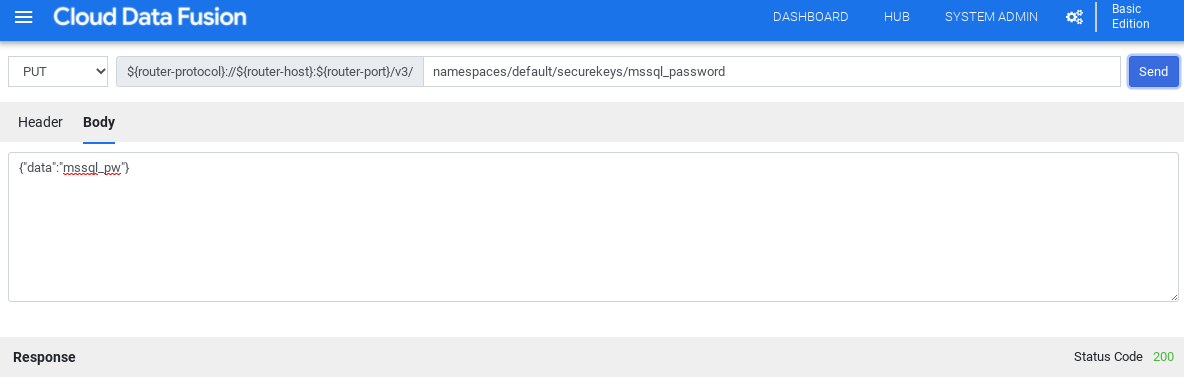
Untuk memeriksa apakah koneksi dapat dibuat dengan database, klik
Uji koneksi.
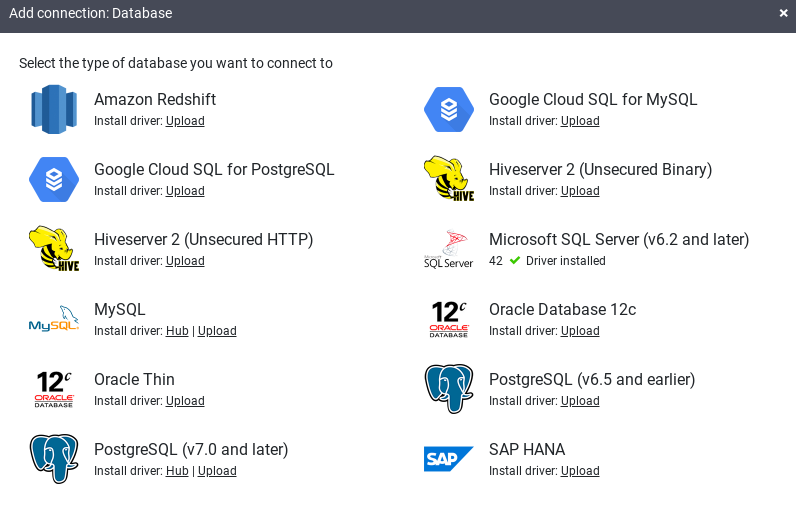
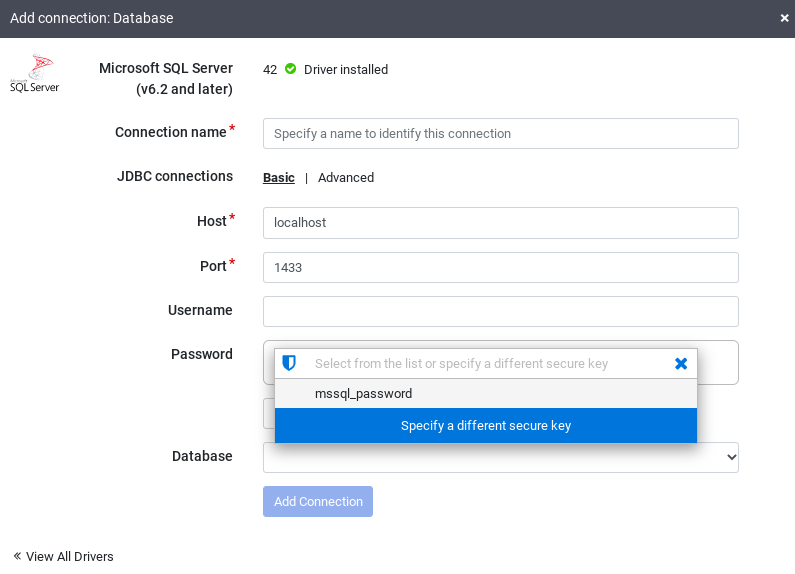
Klik Tambahkan koneksi.
Setelah database SQL Server Anda terhubung dan Anda telah membuat pipeline yang
membaca dari tabel SQL Server, Anda dapat menerapkan transformasi dan
menulis output ke sink.
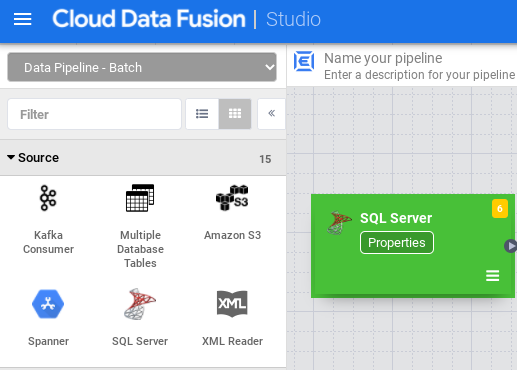
Pipeline Studio
Buka instance Cloud Data Fusion Anda dan buka halaman Pipeline Studio.
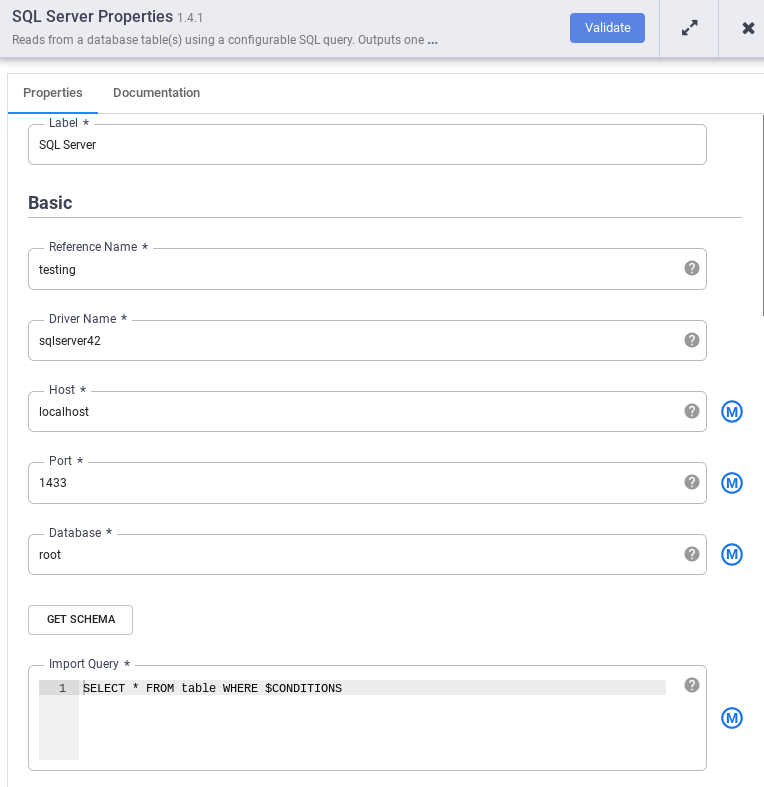
Luaskan menu Sumber, lalu klik SQL Server.
Di node SQL Server, klik Properties.
Di kolom Nama referensi, masukkan nama yang
mengidentifikasi sumber SQL Server Anda.
Di kolom Database, masukkan nama database yang akan dihubungkan.
Di kolom Import query, masukkan kueri yang akan dijalankan. Contoh, SELECT * FROM table WHERE $CONDITIONS.
Klik Validasi.
Klik tutup close.
Setelah database SQL Server Anda terhubung dan Anda telah membuat pipeline yang
membaca dari tabel SQL Server, tambahkan transformasi yang diinginkan dan
tulis output ke sink.
[[["Mudah dipahami","easyToUnderstand","thumb-up"],["Memecahkan masalah saya","solvedMyProblem","thumb-up"],["Lainnya","otherUp","thumb-up"]],[["Sulit dipahami","hardToUnderstand","thumb-down"],["Informasi atau kode contoh salah","incorrectInformationOrSampleCode","thumb-down"],["Informasi/contoh yang saya butuhkan tidak ada","missingTheInformationSamplesINeed","thumb-down"],["Masalah terjemahan","translationIssue","thumb-down"],["Lainnya","otherDown","thumb-down"]],["Terakhir diperbarui pada 2025-09-04 UTC."],[[["\u003cp\u003eThis page provides instructions on setting up a data pipeline to read data from a Microsoft SQL Server table using Cloud Data Fusion.\u003c/p\u003e\n"],["\u003cp\u003eIt details the process of enabling necessary APIs, creating a Cloud Data Fusion instance, and establishing a secure connection to your SQL Server database.\u003c/p\u003e\n"],["\u003cp\u003eThe guide explains how to store your SQL Server password securely using Cloud Data Fusion's secure key feature.\u003c/p\u003e\n"],["\u003cp\u003eInstructions are included for obtaining and deploying the required SQL Server JDBC driver from the Cloud Data Fusion Hub or Pipeline Studio.\u003c/p\u003e\n"],["\u003cp\u003eThe document covers connecting to SQL Server using both Wrangler and the Pipeline Studio within Cloud Data Fusion, including setting connection properties and validating the connection.\u003c/p\u003e\n"]]],[],null,["# Read from a SQL Server table\n\n*** ** * ** ***\n\nThis page describes how to set up your data pipeline to read data from a\nMicrosoft SQL Server table.\n\nBefore you begin\n----------------\n\n- Sign in to your Google Cloud account. If you're new to Google Cloud, [create an account](https://console.cloud.google.com/freetrial) to evaluate how our products perform in real-world scenarios. New customers also get $300 in free credits to run, test, and deploy workloads.\n- In the Google Cloud console, on the project selector page,\n select or create a Google Cloud project.\n\n | **Note**: If you don't plan to keep the resources that you create in this procedure, create a project instead of selecting an existing project. After you finish these steps, you can delete the project, removing all resources associated with the project.\n\n [Go to project selector](https://console.cloud.google.com/projectselector2/home/dashboard)\n-\n [Verify that billing is enabled for your Google Cloud project](/billing/docs/how-to/verify-billing-enabled#confirm_billing_is_enabled_on_a_project).\n\n-\n\n\n Enable the Cloud Data Fusion, BigQuery, Cloud Storage, and Dataproc APIs.\n\n\n [Enable the APIs](https://console.cloud.google.com/flows/enableapi?apiid=datafusion.googleapis.com,bigquery.googleapis.com,storage.googleapis.com,dataproc.googleapis.com)\n\n- In the Google Cloud console, on the project selector page,\n select or create a Google Cloud project.\n\n | **Note**: If you don't plan to keep the resources that you create in this procedure, create a project instead of selecting an existing project. After you finish these steps, you can delete the project, removing all resources associated with the project.\n\n [Go to project selector](https://console.cloud.google.com/projectselector2/home/dashboard)\n-\n [Verify that billing is enabled for your Google Cloud project](/billing/docs/how-to/verify-billing-enabled#confirm_billing_is_enabled_on_a_project).\n\n-\n\n\n Enable the Cloud Data Fusion, BigQuery, Cloud Storage, and Dataproc APIs.\n\n\n [Enable the APIs](https://console.cloud.google.com/flows/enableapi?apiid=datafusion.googleapis.com,bigquery.googleapis.com,storage.googleapis.com,dataproc.googleapis.com)\n\n1.\n\n\n Enable the Cloud Data Fusion, BigQuery, Cloud Storage, and Dataproc APIs.\n\n\n [Enable the APIs](https://console.cloud.google.com/flows/enableapi?apiid=datafusion.googleapis.com,bigquery.googleapis.com,storage.googleapis.com,dataproc.googleapis.com)\n2. [Create a Cloud Data Fusion instance](/data-fusion/docs/how-to/create-instance).\n3. Your SQL Server database must accept connections from Cloud Data Fusion. For security reasons, use a [private\n Cloud Data Fusion instance](/data-fusion/docs/how-to/create-private-ip).\n\n### Open your Cloud Data Fusion instance\n\n1. In the Google Cloud console, go to the Cloud Data Fusion **Instances**\n page.\n\n [Go to Instances](https://console.cloud.google.com/data-fusion/locations/-/instances)\n2. In the **Actions** column for the instance, click **View instance** to open\n the instance in Cloud Data Fusion.\n\nStore your SQL Server password as a secure key\n----------------------------------------------\n\nAdd your SQL Server password as a secure key in your Cloud Data Fusion\ninstance.\n\n1. From Cloud Data Fusion, click **System Admin**.\n\n2. Click the **Configuration** tab.\n\n3. Click **Make HTTP Calls**.\n\n \u003cbr /\u003e\n\n4. Select **PUT**.\n\n5. In the path field, enter\n `namespaces/`\u003cvar translate=\"no\"\u003eNAMESPACE_ID\u003c/var\u003e`/securekeys/password\n `.\n\n6. In the **Body** field, enter `{\"data\":\"`\u003cvar translate=\"no\"\u003epassword\u003c/var\u003e`\"}`.\n Replace \u003cvar translate=\"no\"\u003epassword\u003c/var\u003e with your SQL Server password.\n\n7. Click **Send**.\n\nThe **Response** must have status code `200` to continue.\n\nGet the JDBC driver for SQL Server\n----------------------------------\n\nYou can get the driver from the Hub or in the Pipeline Studio in Cloud Data Fusion. \n\n### Hub\n\n1. In the Cloud Data Fusion UI, click **Hub**.\n\n2. In the search bar, enter `SQL Server JDBC Driver` and select the driver.\n\n3. Click **Download**. Follow the download steps shown.\n\n4. Click **Deploy**. Upload the JAR file from the previous step.\n\n5. Click **Finish**.\n\n### Pipeline Studio\n\n1. Go to [Microsoft.com](https://www.microsoft.com/en-us/download/details.aspx?id=11774).\n\n2. Choose your download and click **Download**.\n\n3. In Cloud Data Fusion, click *menu*\n **Menu** and go to the **Pipeline Studio** page.\n\n4. Click add **Add**.\n\n5. For the driver, click **Upload**.\n\n6. Select the JAR file, located in the `jre7` folder.\n\n7. Click **Next**.\n\n8. To configure the driver, enter a **Name** and **Class name**.\n\n9. Click **Finish**.\n\nDeploy the SQL Server Plugin\n----------------------------\n\n1. In Cloud Data Fusion, click **Hub**.\n\n2. In the search bar, enter `SQL Server Plugins`.\n\n3. Click **SQL server plugins**.\n\n4. Click **Deploy**.\n\n5. Click **Finish**.\n\n6. Click **Create a pipeline**.\n\nConnect to SQL Server\n---------------------\n\nYou can connect to SQL Server from Cloud Data Fusion in Wrangler or the Pipeline Studio. \n\n### Wrangler\n\n1. In Cloud Data Fusion, click *menu*\n **Menu** and go to the **Wrangler** page.\n\n2. Click **Add connection**.\n\n An **Add connection** window opens.\n3. Click **SQL Server** to verify that the driver is installed.\n\n \u003cbr /\u003e\n\n4. Enter details in the required connection fields. In the **Password** field, select the\n [secure key you stored previously](#store_your_sql_server_password_as_a_secure_key).\n It ensures that your password is retrieved using [Cloud KMS](/kms/docs).\n\n \u003cbr /\u003e\n\n5. To check that a connection can be established with the database, click\n **Test connection**.\n\n6. Click **Add connection**.\n\nAfter your SQL Server database is connected and you've created a pipeline that\nreads from your SQL Server table, you can apply transformations and\nwrite your output to a sink.\n\n### Pipeline Studio\n\n1. Open your Cloud Data Fusion instance and go to the **Pipeline Studio**\n page.\n\n2. Expand the **Source** menu and click **SQL Server**.\n\n \u003cbr /\u003e\n\n3. On the **SQL Server** node, click **Properties**.\n\n4. In the **Reference name** field, enter a name that\n identifies your SQL Server source.\n\n5. In the **Database** field, enter the name of the database to connect to.\n\n6. In the **Import query** field, enter the query to run. For example,\n `SELECT * FROM table WHERE $CONDITIONS`.\n\n7. Click **Validate**.\n\n8. Click close close.\n\nAfter your SQL Server database is connected and you've created a pipeline that\nreads from your SQL Server table, add any desired transformations and\nwrite your output to a sink.\n\nWhat's next\n-----------\n\n- Learn how to [read data from multiple SQL Server tables](/data-fusion/docs/how-to/reading-from-sqlserver-multi).\n- Learn more about [Cloud Data Fusion](/data-fusion/docs/concepts/overview).\n- Follow one of the [tutorials](/data-fusion/docs/tutorials)."]]