Tetap teratur dengan koleksi
Simpan dan kategorikan konten berdasarkan preferensi Anda.
Halaman ini menjelaskan cara membaca beberapa tabel dari database Microsoft SQL Server, menggunakan sumberMulti Tabel.
Gunakan sumber Multi Tabel jika Anda ingin pipeline membaca dari beberapa tabel. Jika Anda ingin pipeline membaca dari satu tabel, lihat
Membaca dari tabel SQL Server.
Sumber Multi Tabel menampilkan data dengan beberapa skema dan menyertakan kolom nama tabel yang menunjukkan tabel asal data. Saat menggunakan sumber Multi Tabel, gunakan salah satu tujuan multi tabel, BigQuery Multi Tabel atau GCS Multi File.
Sebelum memulai
Sign in to your Google Cloud account. If you're new to
Google Cloud,
create an account to evaluate how our products perform in
real-world scenarios. New customers also get $300 in free credits to
run, test, and deploy workloads.
In the Google Cloud console, on the project selector page,
select or create a Google Cloud project.
Pastikan database SQL Server Anda dapat menerima koneksi dari
Cloud Data Fusion. Untuk melakukannya dengan aman, sebaiknya Anda
membuat instance
Cloud Data Fusion pribadi.
Melihat instance Cloud Data Fusion Anda
Saat menggunakan Cloud Data Fusion, Anda menggunakan konsol Google Cloud dan UI Cloud Data Fusion yang terpisah. Di konsol Google Cloud , Anda
dapat membuat project Google Cloud , serta membuat dan menghapus
instance Cloud Data Fusion. Di UI Cloud Data Fusion, Anda dapat menggunakan
berbagai halaman, seperti Studio atau Wrangler, untuk menggunakan
fitur Cloud Data Fusion.
Di konsol Google Cloud , buka halaman Cloud Data Fusion.
Untuk membuka instance di Cloud Data Fusion Studio,
klik Instance, lalu klik View instance.
Menyimpan sandi SQL Server Anda sebagai kunci aman
Tambahkan sandi SQL Server Anda sebagai kunci aman untuk mengenkripsi di instance Cloud Data Fusion Anda. Nanti dalam panduan ini, Anda akan memastikan bahwa
sandi Anda diambil menggunakan Cloud KMS.
Di pojok kanan atas halaman Cloud Data Fusion mana pun, klik Admin
Sistem.
Klik tab Configuration.
Klik Make HTTP Calls.
Di menu dropdown, pilih PUT.
Di kolom jalur, masukkan namespaces/NAMESPACE_ID/securekeys/PASSWORD.
Di kolom Body, masukkan {"data":"SQL_SERVER_PASSWORD"}.
Klik Kirim.
Pastikan Respons yang Anda dapatkan adalah kode status 200.
Mendapatkan driver JDBC untuk SQL Server
Menggunakan Hub
Di UI Cloud Data Fusion, klik Hub.
Di kotak penelusuran, masukkan Microsoft SQL Server JDBC Driver.
Klik Microsoft SQL Server JDBC Driver.
Klik Download. Ikuti langkah-langkah download yang ditampilkan.
Klik Deploy. Upload file JAR dari langkah sebelumnya.
Di UI Cloud Data Fusion, klik menuMenu, lalu buka halaman Studio.
Klik addAdd.
Di bagian Pengemudi, klik Upload.
Upload file JAR yang didownload di langkah 2.
Klik Berikutnya.
Konfigurasi driver dengan memasukkan Nama.
Di kolom Nama kelas, masukkan com.microsoft.sqlserver.jdbc.SQLServerDriver.
Klik Selesai.
Men-deploy Plugin Beberapa Tabel
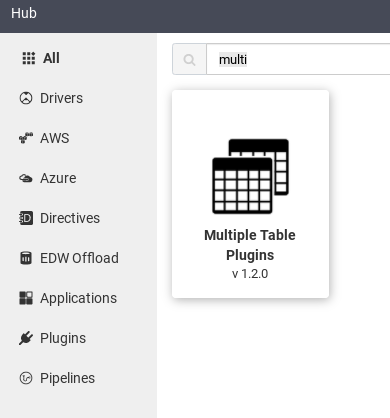
Di UI web Cloud Data Fusion, klik Hub.
Di kotak penelusuran, masukkan Multiple table plugins.
Klik Multiple Table Plugins.
Klik Deploy.
Klik Selesai.
Klik Create a Pipeline.
Menghubungkan ke SQL Server
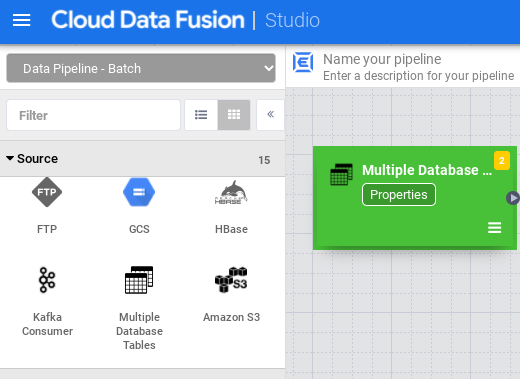
Di UI Cloud Data Fusion, klik menuMenu, lalu buka halaman Studio.
Di Studio, luaskan menu Sumber.
Klik Multiple Database Tables.
Arahkan pointer ke node Multiple Database Tables, lalu klik
Properties.
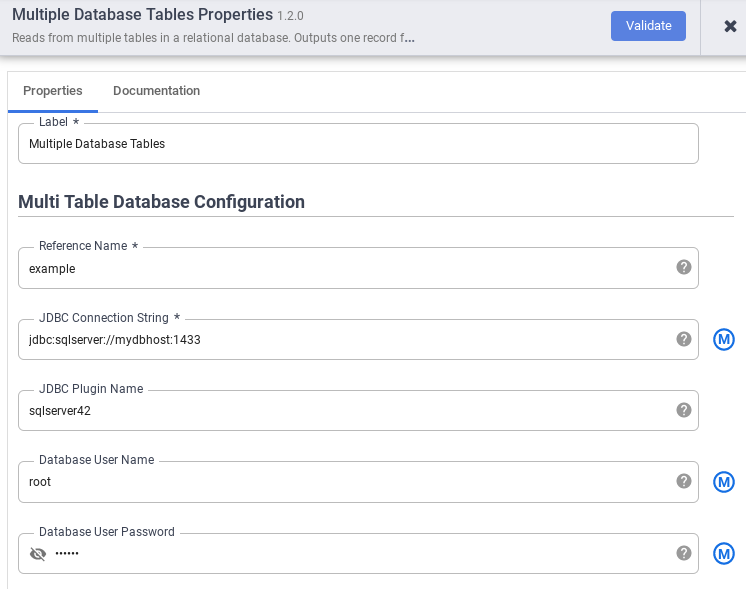
Di kolom Reference name, tentukan nama referensi yang akan digunakan untuk
mengidentifikasi sumber SQL Server Anda.
Di kolom JDBC Connection String, masukkan string koneksi JDBC. Contoh,
jdbc:sqlserver://mydbhost:1433. Untuk mengetahui informasi selengkapnya, lihat
Membangun URL koneksi.
Masukkan Nama Plugin JDBC, Nama Pengguna Database, dan
Sandi Pengguna Database.
Klik Validasi.
Klik closeTutup.
Menghubungkan ke BigQuery atau Cloud Storage
Di UI Cloud Data Fusion, klik menuMenu, lalu buka halaman Studio.
Luaskan Sink.
Klik BigQuery Multi Table atau GCS Multi File.
Hubungkan node Multiple Database Tables dengan BigQuery Multi Table
atau GCS Multi File.
Arahkan kursor ke node BigQuery Multi Table
atau GCS Multi File, klik Properties, lalu konfigurasikan sink.
[[["Mudah dipahami","easyToUnderstand","thumb-up"],["Memecahkan masalah saya","solvedMyProblem","thumb-up"],["Lainnya","otherUp","thumb-up"]],[["Sulit dipahami","hardToUnderstand","thumb-down"],["Informasi atau kode contoh salah","incorrectInformationOrSampleCode","thumb-down"],["Informasi/contoh yang saya butuhkan tidak ada","missingTheInformationSamplesINeed","thumb-down"],["Masalah terjemahan","translationIssue","thumb-down"],["Lainnya","otherDown","thumb-down"]],["Terakhir diperbarui pada 2025-09-04 UTC."],[[["\u003cp\u003eThis guide outlines the process of reading data from multiple Microsoft SQL Server tables using the Cloud Data Fusion Multi Table source.\u003c/p\u003e\n"],["\u003cp\u003eThe Multi Table source is used when a pipeline needs to read from multiple tables, in contrast to using a single table source, and it outputs data with multiple schemas while providing a table name field.\u003c/p\u003e\n"],["\u003cp\u003eTo use the Multi Table source, you will need to utilize one of the compatible multi table sinks, either BigQuery Multi Table or GCS Multi File.\u003c/p\u003e\n"],["\u003cp\u003eThe process involves enabling APIs, creating a Cloud Data Fusion instance, securely storing your SQL Server password, getting the appropriate JDBC driver, and deploying multiple table plugins.\u003c/p\u003e\n"],["\u003cp\u003eConnecting to SQL Server and the chosen sink (BigQuery or Cloud Storage) is done through the Cloud Data Fusion Studio, and the guide provides steps to run a preview and deploy the pipeline.\u003c/p\u003e\n"]]],[],null,["# Read from multiple Microsoft SQL Server tables\n\n*** ** * ** ***\n\nThis page describes how to read multiple tables from a Microsoft SQL Server\ndatabase, using the **Multi Table** [source](/data-fusion/docs/concepts/overview#source).\nUse the Multi Table source when you want your pipeline to read from\nmultiple tables. If you want your pipeline to read from a single table, see\n[Reading from a SQL Server table](/data-fusion/docs/how-to/reading-from-sqlserver).\n\nThe Multi Table source outputs data with multiple schemas and includes a\ntable name field that indicates the table from which the data came. When\nusing the Multi Table source, use one of the multi table [sinks](/data-fusion/docs/concepts/overview#sink),\n**BigQuery Multi Table** or **GCS Multi File**.\n\nBefore you begin\n----------------\n\n- Sign in to your Google Cloud account. If you're new to Google Cloud, [create an account](https://console.cloud.google.com/freetrial) to evaluate how our products perform in real-world scenarios. New customers also get $300 in free credits to run, test, and deploy workloads.\n- In the Google Cloud console, on the project selector page,\n select or create a Google Cloud project.\n\n | **Note**: If you don't plan to keep the resources that you create in this procedure, create a project instead of selecting an existing project. After you finish these steps, you can delete the project, removing all resources associated with the project.\n\n [Go to project selector](https://console.cloud.google.com/projectselector2/home/dashboard)\n-\n [Verify that billing is enabled for your Google Cloud project](/billing/docs/how-to/verify-billing-enabled#confirm_billing_is_enabled_on_a_project).\n\n-\n\n\n Enable the Cloud Data Fusion, Cloud Storage, BigQuery, and Dataproc APIs.\n\n\n [Enable the APIs](https://console.cloud.google.com/flows/enableapi?apiid=datafusion.googleapis.com,bigquery.googleapis.com,storage.googleapis.com,dataproc.googleapis.com)\n\n- In the Google Cloud console, on the project selector page,\n select or create a Google Cloud project.\n\n | **Note**: If you don't plan to keep the resources that you create in this procedure, create a project instead of selecting an existing project. After you finish these steps, you can delete the project, removing all resources associated with the project.\n\n [Go to project selector](https://console.cloud.google.com/projectselector2/home/dashboard)\n-\n [Verify that billing is enabled for your Google Cloud project](/billing/docs/how-to/verify-billing-enabled#confirm_billing_is_enabled_on_a_project).\n\n-\n\n\n Enable the Cloud Data Fusion, Cloud Storage, BigQuery, and Dataproc APIs.\n\n\n [Enable the APIs](https://console.cloud.google.com/flows/enableapi?apiid=datafusion.googleapis.com,bigquery.googleapis.com,storage.googleapis.com,dataproc.googleapis.com)\n\n1.\n\n\n Enable the Cloud Data Fusion, Cloud Storage, BigQuery, and Dataproc APIs.\n\n\n [Enable the APIs](https://console.cloud.google.com/flows/enableapi?apiid=datafusion.googleapis.com,bigquery.googleapis.com,storage.googleapis.com,dataproc.googleapis.com)\n2. [Create a Cloud Data Fusion instance](/data-fusion/docs/how-to/create-instance).\n3. Ensure that your SQL Server database can accept connections from Cloud Data Fusion. To do this securely, we recommend that you [create a private\n Cloud Data Fusion instance](/data-fusion/docs/how-to/create-private-ip).\n\n### View your Cloud Data Fusion instance\n\nWhen using Cloud Data Fusion, you use both the Google Cloud console\nand the separate Cloud Data Fusion UI. In the Google Cloud console, you\ncan create a Google Cloud project, and create and delete\nCloud Data Fusion instances. In the Cloud Data Fusion UI, you can use\nthe various pages, such as **Studio** or **Wrangler**, to use\nCloud Data Fusion features.\n\n1. In the Google Cloud console, go to the Cloud Data Fusion page.\n\n2. To open the instance in the Cloud Data Fusion Studio,\n click **Instances** , and then click **View instance**.\n\n[Go to Instances](https://console.cloud.google.com/data-fusion/locations/-/instances) \n\nStore your SQL Server password as a secure key\n----------------------------------------------\n\nAdd your SQL Server password as a secure key to encrypt on your\nCloud Data Fusion instance. Later in this guide, you will ensure that\nyour password is retrieved using [Cloud KMS](/kms/docs).\n\n1. In the top-right corner of any Cloud Data Fusion page, click **System\n Admin**.\n\n2. Click the **Configuration** tab.\n\n3. Click **Make HTTP Calls**.\n\n \u003cbr /\u003e\n\n4. In the dropdown menu, choose **PUT**.\n\n5. In the path field, enter `namespaces/`\u003cvar translate=\"no\"\u003eNAMESPACE_ID\u003c/var\u003e`/securekeys/`\u003cvar translate=\"no\"\u003ePASSWORD\u003c/var\u003e.\n\n6. In the **Body** field, enter `{\"data\":\"`\u003cvar translate=\"no\"\u003eSQL_SERVER_PASSWORD\u003c/var\u003e`\"}`.\n\n7. Click **Send**.\n\nEnsure that the **Response** you get is status code `200`.\n\nGet the JDBC driver for SQL Server\n----------------------------------\n\n### Using the Hub\n\n1. In the Cloud Data Fusion UI, click **Hub**.\n\n2. In the search bar, enter `Microsoft SQL Server JDBC Driver`.\n\n3. Click **Microsoft SQL Server JDBC Driver**.\n\n4. Click **Download**. Follow the download steps shown.\n\n5. Click **Deploy**. Upload the JAR file from the previous step.\n\n6. Click **Finish**.\n\n### Using Studio\n\n1. Visit [Microsoft.com](https://www.microsoft.com/en-us/download/details.aspx?id=11774).\n\n2. Choose your download and click **Download**.\n\n3. In the Cloud Data Fusion UI, click menu\n **Menu** and navigate to the **Studio** page.\n\n4. Click add **Add**.\n\n5. Under **Driver** , click **Upload**.\n\n6. Upload the JAR file downloaded in step 2.\n\n7. Click **Next**.\n\n8. Configure the driver by entering a **Name**.\n\n9. In the **Class name** field, enter `com.microsoft.sqlserver.jdbc.SQLServerDriver`.\n\n10. Click **Finish**.\n\nDeploy the Multiple Table Plugins\n---------------------------------\n\n1. In the Cloud Data Fusion web UI, click **Hub**.\n\n2. In the search bar, enter `Multiple table plugins`.\n\n3. Click **Multiple Table Plugins**.\n\n4. Click **Deploy**.\n\n5. Click **Finish**.\n\n6. Click **Create a Pipeline**.\n\nConnect to SQL Server\n---------------------\n\n1. In the Cloud Data Fusion UI, click menu\n **Menu** and navigate to the **Studio** page.\n\n2. In **Studio** , expand the **Source** menu.\n\n3. Click **Multiple Database Tables**.\n\n4. Hold the pointer over the **Multiple Database Tables** node and click\n **Properties**.\n\n5. In the **Reference name** field, specify a reference name that will be used to\n identify your SQL Server source.\n\n6. In the **JDBC Connection String** field, enter the JDBC connection string. For\n example, `jdbc:sqlserver://mydbhost:1433`. For more information, see\n [Building the connection URL](https://docs.microsoft.com/en-us/sql/connect/jdbc/building-the-connection-url).\n\n7. Enter the **JDBC Plugin Name** , **Database User Name** , and\n **Database User Password**.\n\n8. Click **Validate**.\n\n9. Click close **Close**.\n\nConnect to BigQuery or Cloud Storage\n------------------------------------\n\n1. In the Cloud Data Fusion UI, click menu\n **Menu** and navigate to the **Studio** page.\n\n2. Expand **Sink**.\n\n3. Click **BigQuery Multi Table** or **GCS Multi File**.\n\n4. Connect the **Multiple Database Tables** node with **BigQuery Multi Table**\n or **GCS Multi File**.\n\n5. Hold the pointer over the **BigQuery Multi Table**\n or **GCS Multi File** node, click **Properties**, and configure the sink.\n\n For more information, see [Google BigQuery Multi Table Sink](https://cdap.atlassian.net/wiki/spaces/DOCS/pages/464912385/Google+BigQuery+Multi+Table+Sink) and [Google Cloud Storage Multi File Sink](https://cdap.atlassian.net/wiki/spaces/DOCS/pages/464945223/Google+Cloud+Storage+Multi+File+Sink).\n6. Click **Validate**.\n\n7. Click close **Close**.\n\nRun preview of the pipeline\n---------------------------\n\n1. In the Cloud Data Fusion UI, click menu\n **Menu** and navigate to the **Studio** page.\n\n2. Click **Preview**.\n\n3. Click **Run**. Wait for the preview to finish successfully.\n\nDeploy the pipeline\n-------------------\n\n1. In the Cloud Data Fusion UI, click menu\n **Menu** and navigate to the **Studio** page.\n\n2. Click **Deploy**.\n\nRun the pipeline\n----------------\n\n1. In the Cloud Data Fusion UI,\n click menu **Menu**.\n\n2. Click **List**.\n\n3. Click the pipeline.\n\n4. On the pipeline details page, click **Run**.\n\nWhat's next\n-----------\n\n- Learn more about [Cloud Data Fusion](/data-fusion/docs/concepts/overview).\n- Follow one of the [tutorials](/data-fusion/docs/tutorials)."]]