本部分介绍在开发阶段和流水线执行阶段用于从私有 Cloud Data Fusion 实例建立出站流量控制的概要架构。
以下系统架构图展示了开发流水线时,私有 Cloud Data Fusion 实例如何与公共互联网连接:
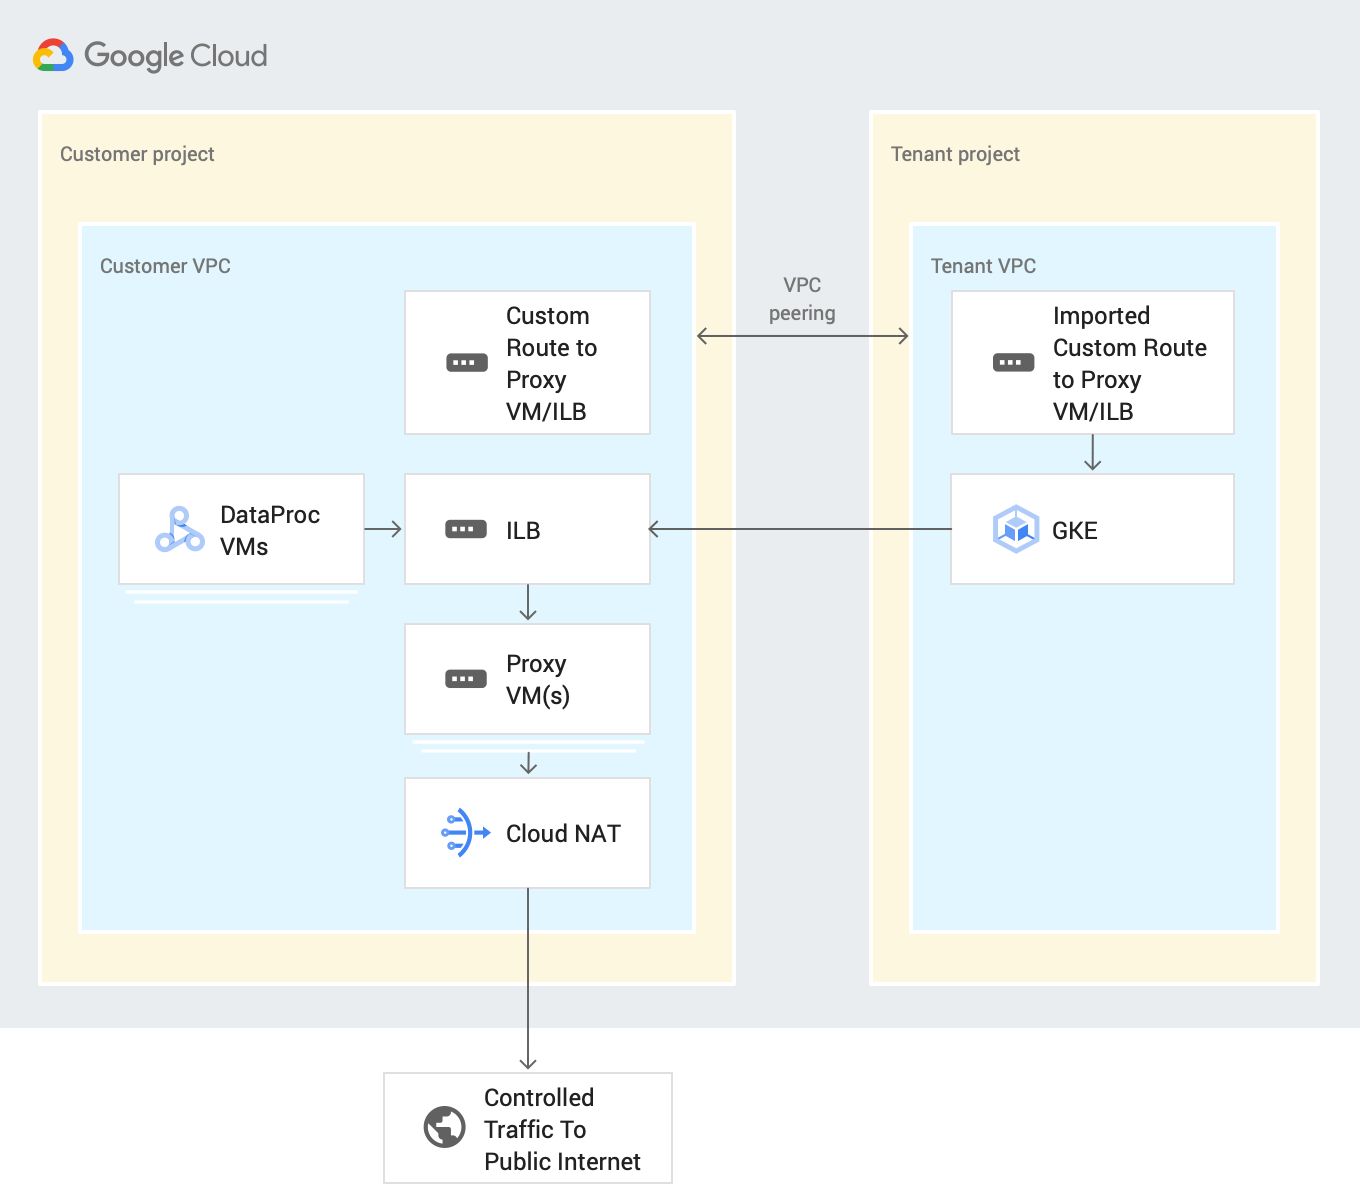
您可以在流水线开发或执行期间控制与 SaaS 应用和第三方公共云服务的连接,具体方法是通过客户项目路由所有出站流量。此过程使用以下资源:
自定义 VPC 网络路由:自定义 VPC 网络通过导入的自定义路由将流量路由到网关虚拟机,这些虚拟机使用 VPC 对等互连导出到租户项目 VPC。
代理虚拟机:代理虚拟机通过公共互联网将来自 Cloud Data Fusion 租户项目的出站流量路由到指定目的地。 Google Cloud 您可以在客户项目中创建和管理网关虚拟机。我们建议您使用内部负载平衡器 (ILB) 在高可用性 (HA) 设置中配置该虚拟机。如果您有多个使用相同 VPC 网络的私有 Cloud Data Fusion 实例,则可以在 VPC 中重复使用同一虚拟机。
准备工作
您可以从 Cloud Data Fusion 6.4 或更高版本中的私有实例连接到公共来源。如需使用这些版本之一,您可以创建新的私有 Cloud Data Fusion 实例,也可以升级现有实例。
为实例创建 VPC 网络对等互连连接时,请选择导出路由。
在流水线开发期间设置出站流量控制
借助出站流量控制,您可以控制或过滤可流出网络的内容,这在 VPC Service Controls 环境中非常有用。没有用于执行此任务的首选网络代理。代理示例包括 Squid 代理、HAProxy 和 Envoy。
本指南中的示例介绍了如何为使用 Debian 映像的虚拟机实例设置用于 HTTP 过滤的 HTTP 代理。这些示例使用 Squid 代理服务器,这是设置代理服务器的方法之一。
创建代理虚拟机
使用以下启动脚本和 IP 转发功能,在与您的私有 Cloud Data Fusion 实例相同的 VPC 中创建虚拟机。
此脚本会安装 Squid 代理,并将其配置为拦截 HTTP 流量并允许 .squid-cache.org 和 .google.com 网域。您可以将这些网域替换为您要连接到 Cloud Data Fusion 实例的网域。
控制台
转到虚拟机实例页面。
点击创建实例。
使用已通过私有 Cloud Data Fusion 实例设置网络对等互连的同一 VPC。如需详细了解在这种情况下的 VPC 网络对等互连,请参阅准备工作。
为与 Cloud Data Fusion 实例位于同一网络中的实例启用 IP 转发。
在启动脚本字段中,输入以下脚本:
#! /bin/bash
apt-get -y install squid3
cat <<EOF > /etc/squid/conf.d/debian.conf
#
# Squid configuration settings for Debian
#
logformat squid %ts.%03tu %6tr %>a %Ss/%03>Hs %<st %rm %ru %ssl::>sni %Sh/%<a %mt
logfile_rotate 10
debug_options rotate=10

# configure intercept port
http_port 3129 intercept

# allow only certain sites
acl allowed_domains dstdomain "/etc/squid/allowed_domains.txt"
http_access allow allowed_domains

# deny all other http requests
http_access deny all
EOF

# Create a file with allowed egress domains
# Replace these example domains with the domains that you want to allow
# egress from in Data Fusion pipelines
cat <<EOF > /etc/squid/allowed_domains.txt
.squid-cache.org
.google.com
EOF

/etc/init.d/squid restart

iptables -t nat -A PREROUTING -p tcp --dport 80 -j REDIRECT --to-port 3129

echo 1 > /proc/sys/net/ipv4/ip_forward
echo net.ipv4.ip_forward=1 > /etc/sysctl.d/11-gce-network-security.conf
iptables -t nat -A POSTROUTING -s 0.0.0.0/0 -p tcp --dport 443 -j MASQUERADE
gcloud
export CDF_PROJECT=<cdf-project>
export PROXY_VM=<proxy-vm>
export ZONE=<vm-zone>
export SUBNET=<subnet>
export VPC_NETWORK=<vpc-network>
export COMPUTE_ENGINE_SA=<compute-engine-sa>

gcloud beta compute --project=$CDF_PROJECT instances create $PROXY_VM --zone=$ZONE --machine-type=e2-medium --subnet=$SUBNET --no-address --metadata=startup-script=\#\!\ /bin/bash$'\n'apt-get\ -y\ install\ squid3$'\n'cat\ \<\<EOF\ \>\ /etc/squid/conf.d/debian.conf$'\n'\#$'\n'\#\ Squid\ configuration\ settings\ for\ Debian$'\n'\#$'\n'logformat\ squid\ \%ts.\%03tu\ \%6tr\ \%\>a\ \%Ss/\%03\>Hs\ \%\<st\ \%rm\ \%ru\ \%ssl::\>sni\ \%Sh/\%\<a\ \%mt$'\n'logfile_rotate\ 10$'\n'debug_options\ rotate=10$'\n'$'\n'\#\ configure\ intercept\ port$'\n'http_port\ 3129\ intercept$'\n'$'\n'\#\ allow\ only\ certain\ sites$'\n'acl\ allowed_domains\ dstdomain\ \"/etc/squid/allowed_domains.txt\"$'\n'http_access\ allow\ allowed_domains$'\n'$'\n'\#\ deny\ all\ other\ http\ requests$'\n'http_access\ deny\ all$'\n'EOF$'\n'$'\n'$'\n'\#\ Create\ a\ file\ with\ allowed\ egress\ domains$'\n'\#\ Replace\ these\ example\ domains\ with\ the\ domains\ that\ you\ want\ to\ allow\ $'\n'\#\ egress\ from\ in\ Data\ Fusion\ pipelines$'\n'cat\ \<\<EOF\ \>\ /etc/squid/allowed_domains.txt$'\n'.squid-cache.org$'\n'.google.com$'\n'EOF$'\n'$'\n'/etc/init.d/squid\ restart$'\n'$'\n'iptables\ -t\ nat\ -A\ PREROUTING\ -p\ tcp\ --dport\ 80\ -j\ REDIRECT\ --to-port\ 3129$'\n'echo\ 1\ \>\ /proc/sys/net/ipv4/ip_forward$'\n'echo\ net.ipv4.ip_forward=1\ \>\ /etc/sysctl.d/11-gce-network-security.conf$'\n'iptables\ -t\ nat\ -A\ POSTROUTING\ -s\ 0.0.0.0/0\ -p\ tcp\ --dport\ 443\ -j\ MASQUERADE --can-ip-forward --maintenance-policy=MIGRATE --service-account=$COMPUTE_ENGINE_SA --scopes=https://www.googleapis.com/auth/devstorage.read_only,https://www.googleapis.com/auth/logging.write,https://www.googleapis.com/auth/monitoring.write,https://www.googleapis.com/auth/servicecontrol,https://www.googleapis.com/auth/service.management.readonly,https://www.googleapis.com/auth/trace.append --tags=http-server,https-server --image=debian-10-buster-v20210420 --image-project=debian-cloud --boot-disk-size=10GB --boot-disk-type=pd-balanced --boot-disk-device-name=instance-1 --no-shielded-secure-boot --shielded-vtpm --shielded-integrity-monitoring --reservation-affinity=any

gcloud compute --project=$CDF_PROJECT firewall-rules create egress-allow-http --direction=INGRESS --priority=1000 --network=$VPC_NETWORK --action=ALLOW --rules=tcp:80 --source-ranges=0.0.0.0/0 --target-tags=https-server

gcloud compute --project=$CDF_PROJECT firewall-rules create egress-allow-https --direction=INGRESS --priority=1000 --network=$VPC_NETWORK --action=ALLOW --rules=tcp:443 --source-ranges=0.0.0.0/0 --target-tags=https-server
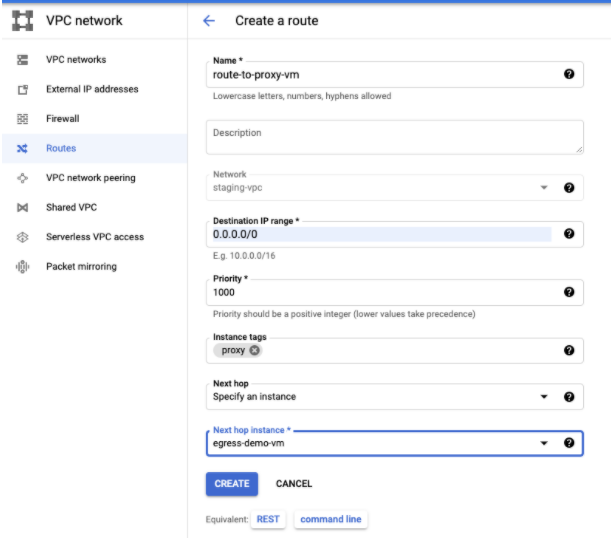
创建自定义路由
创建自定义路由以连接到您创建的网关虚拟机实例。
控制台
如需在 Google Cloud 控制台中创建路由,请参阅添加静态路由。
配置路由时,请执行以下操作:
- 将优先级设置为大于或等于
1001。 - 使用与私有 Cloud Data Fusion 实例相同的项目和 VPC。
- 请确保您的 VPC 网络对等互连配置允许导出路由,以便 Cloud Data Fusion 租户项目 VPC 通过 VPC 网络对等互连导入此自定义路由。
gcloud
如需在 gcloud CLI 中创建路由,请执行以下操作:
gcloud beta compute routes create $ROUTE --project=$CDF_PROJECT \
    --network=$VPC_NETWORK --priority=1001 \
    --destination-range=0.0.0.0/0 \
    --next-hop-instance=$PROXY_VM \
    --next-hop-instance-zone=$ZONE
设置流水线执行的出站流量控制
在您能够在设计环境内在 Preview 和 Wrangler 中通过允许的主机名访问公共互联网时,部署您的流水线。默认情况下,已部署的 Cloud Data Fusion 流水线会在 Dataproc 集群上运行。
为确保来自 Dataproc 集群的所有公共互联网流量都经过一个或多个代理虚拟机,请添加专用 DNS 区域和记录。这是必需操作,因为 Cloud NAT 不支持过滤。
在 DNS 记录中,包括代理虚拟机或 ILB 的 IP 地址。
部署流水线
在设计阶段验证流水线后,部署流水线。默认情况下,已部署的流水线会在 Dataproc 集群上运行。
为确保来自 Dataproc 集群的所有公共互联网流量都经过一个或多个代理虚拟机,请将带有实例标记 proxy 和优先级 1000 的自定义路由添加到与 Dataproc 虚拟机相同的 VPC:
请修改流水线以使用 Dataproc 标记,因为 Cloud NAT 目前不支持任何出站过滤。
后续步骤
- 详细了解 Cloud Data Fusion 中的网络功能。