Cloud Run 서비스 보안 튜토리얼


이 튜토리얼에서는 Cloud Run에서 실행되는 보안 이중 서비스 애플리케이션을 만드는 방법을 설명합니다. 이 애플리케이션은 누구나 마크다운 텍스트를 작성하기 위해 사용할 수 있는 공개 '프런트엔드' 서비스와 마크다운 텍스트를 HTML로 렌더링하는 비공개 '백엔드' 서비스가 포함된 마크다운 편집기입니다.

프런트엔드 '편집기'에서 백엔드 '렌더러'로의 요청 흐름을 보여주는 다이어그램
'렌더러' 백엔드는 비공개 서비스입니다. 이를 사용하면 여러 언어로 라이브러리 간 변경사항을 추적하지 않아도 조직 내 텍스트 변환 표준을 보장할 수 있습니다.

백엔드 서비스는 서비스를 호출할 수 있는 사람을 제한하는 Cloud Run의 기본 제공 IAM 기반 서비스 간 인증 기능을 사용하는 비공개 서비스입니다. 두 서비스 모두 필요한 경우를 제외하고는 다른 Google Cloud에 대한 액세스를 허용하지 않는 최소 권한 원칙에 따라 빌드됩니다.

이 튜토리얼의 제한사항 또는 비목표

  • 이 튜토리얼에서는 Identity Platform 또는 Firebase 인증을 사용하여 사용자 ID 토큰을 생성하고 사용자 ID를 수동으로 확인하는 최종 사용자 인증을 표시하지 않습니다. 최종 사용자 인증에 대한 자세한 내용은 최종 사용자 인증에 대한 Cloud Run 튜토리얼을 참조하세요.

  • 이 튜토리얼은 IAM 기반 인증과 ID 토큰 메서드의 결합이 지원되지 않으므로 이를 표시하지 않습니다.

목표

  • 서비스 간 인증 및 다른 Google Cloud에 대한 서비스 액세스의 최소 권한을 사용하여 전용 서비스 계정을 만듭니다.
  • Cloud Run에 대해 상호작용하는 두 서비스를 작성, 빌드, 배포합니다.
  • 공개 및 비공개 Cloud Run 서비스 간 요청을 수행합니다.

비용

이 문서에서는 비용이 청구될 수 있는 다음과 같은 Google Cloud 구성요소를 사용합니다.

프로젝트 사용량을 기준으로 예상 비용을 산출하려면 가격 계산기를 사용하세요. Google Cloud를 처음 사용하는 사용자는 무료 체험판을 사용할 수 있습니다.

시작하기 전에

  1. Google Cloud 계정에 로그인합니다. Google Cloud를 처음 사용하는 경우 계정을 만들고 Google 제품의 실제 성능을 평가해 보세요. 신규 고객에게는 워크로드를 실행, 테스트, 배포하는 데 사용할 수 있는 $300의 무료 크레딧이 제공됩니다.
  2. Google Cloud Console의 프로젝트 선택기 페이지에서 Google Cloud 프로젝트를 선택하거나 만듭니다.

    프로젝트 선택기로 이동

  3. Google Cloud 프로젝트에 결제가 사용 설정되어 있는지 확인합니다.

  4. Google Cloud Console의 프로젝트 선택기 페이지에서 Google Cloud 프로젝트를 선택하거나 만듭니다.

    프로젝트 선택기로 이동

  5. Google Cloud 프로젝트에 결제가 사용 설정되어 있는지 확인합니다.

  6. Cloud Run API 사용 설정

    API 사용 설정

  7. gcloud CLI를 설치하고 초기화합니다.
  8. curl을 설치하여 서비스를 시도합니다.

필요한 역할

튜토리얼을 완료하는 데 필요한 권한을 얻으려면 관리자에게 프로젝트에 대한 다음 IAM 역할을 부여해 달라고 요청하세요.

역할 부여에 대한 자세한 내용은 액세스 관리를 참조하세요.

커스텀 역할이나 다른 사전 정의된 역할을 통해 필요한 권한을 얻을 수도 있습니다.

gcloud 기본값 설정

Cloud Run 서비스의 기본값으로 gcloud를 구성하려면 다음 안내를 따르세요.

  1. 기본 프로젝트를 설정합니다.

    gcloud config set project PROJECT_ID

    PROJECT_ID를 이 튜토리얼용으로 만든 프로젝트 이름으로 바꿉니다.

  2. 선택한 리전에 맞게 gcloud를 구성합니다.

    gcloud config set run/region REGION

    REGION을 지원되는 Cloud Run 리전 중 원하는 리전으로 바꿉니다.

Cloud Run 위치

Cloud Run은 리전을 기반으로 합니다. 즉, Cloud Run 서비스를 실행하는 인프라가 특정 리전에 위치해 있으며 해당 리전 내의 모든 영역에서 중복으로 사용할 수 있도록 Google이 관리합니다.

Cloud Run 서비스를 실행하는 리전을 선택하는 데 있어 중요한 기준은 지연 시간, 가용성 또는 내구성 요구사항입니다. 일반적으로 사용자와 가장 가까운 리전을 선택할 수 있지만 Cloud Run 서비스에서 사용하는 다른 Google Cloud 제품 위치도 고려해야 합니다. 여러 위치에서 Google Cloud 제품을 함께 사용하면 서비스 지연 시간과 비용에 영향을 미칠 수 있습니다.

Cloud Run은 다음 리전에서 사용할 수 있습니다.

등급 1 가격 적용

  • asia-east1(타이완)
  • asia-northeast1(도쿄)
  • asia-northeast2(오사카)
  • europe-north1(핀란드) 잎 아이콘 낮은 CO2
  • europe-southwest1(마드리드)
  • europe-west1(벨기에) 잎 아이콘 낮은 CO2
  • europe-west4(네덜란드)
  • europe-west8(밀라노)
  • europe-west9(파리) 잎 아이콘 낮은 CO2
  • me-west1(텔아비브)
  • us-central1(아이오와) 잎 아이콘 낮은 CO2
  • us-east1(사우스캐롤라이나)
  • us-east4(북 버지니아)
  • us-east5(콜럼버스)
  • us-south1(댈러스)
  • us-west1(오리건) 잎 아이콘 낮은 CO2

등급 2 가격 적용

  • africa-south1(요하네스버그)
  • asia-east2(홍콩)
  • asia-northeast3(대한민국 서울)
  • asia-southeast1(싱가포르)
  • asia-southeast2 (자카르타)
  • asia-south1(인도 뭄바이)
  • asia-south2(인도 델리)
  • australia-southeast1(시드니)
  • australia-southeast2(멜버른)
  • europe-central2(폴란드 바르샤바)
  • europe-west10(베를린)
  • europe-west12(토리노)
  • europe-west2(영국 런던) 잎 아이콘 낮은 CO2
  • europe-west3(독일 프랑크푸르트) 잎 아이콘 낮은 CO2
  • europe-west6(스위스 취리히) 잎 아이콘 낮은 CO2
  • me-central1(도하)
  • me-central2(담맘)
  • northamerica-northeast1(몬트리올) 잎 아이콘 낮은 CO2
  • northamerica-northeast2(토론토) 잎 아이콘 낮은 CO2
  • southamerica-east1(브라질 상파울루) 잎 아이콘 낮은 CO2
  • southamerica-west1(칠레 산티아고) 잎 아이콘 낮은 CO2
  • us-west2(로스앤젤레스)
  • us-west3(솔트레이크시티)
  • us-west4(라스베이거스)

Cloud Run 서비스를 이미 만들었다면 Google Cloud 콘솔의 Cloud Run 대시보드에서 리전을 확인할 수 있습니다.

코드 샘플 검색

사용할 코드 샘플을 검색하려면 다음 안내를 따르세요.

  1. 샘플 앱 저장소를 Cloud Shell 또는 로컬 머신에 클론합니다.

    Node.js

    git clone https://github.com/GoogleCloudPlatform/nodejs-docs-samples.git

    또는 zip 파일로 샘플을 다운로드하고 압축을 풀 수 있습니다.

    Python

    git clone https://github.com/GoogleCloudPlatform/python-docs-samples.git

    또는 zip 파일로 샘플을 다운로드하고 압축을 풀 수 있습니다.

    Go

    git clone https://github.com/GoogleCloudPlatform/golang-samples.git

    또는 zip 파일로 샘플을 다운로드하고 압축을 풀 수 있습니다.

    Java

    git clone https://github.com/GoogleCloudPlatform/java-docs-samples.git

    또는 zip 파일로 샘플을 다운로드하고 압축을 풀 수 있습니다.

    C#

    git clone https://github.com/GoogleCloudPlatform/dotnet-docs-samples.git

    또는 zip 파일로 샘플을 다운로드하고 압축을 풀 수 있습니다.

  2. Cloud Run 샘플 코드가 포함된 디렉터리로 변경합니다.

    Node.js

    cd nodejs-docs-samples/run/markdown-preview/

    Python

    cd python-docs-samples/run/markdown-preview/

    Go

    cd golang-samples/run/markdown-preview/

    Java

    cd java-docs-samples/run/markdown-preview/

    C#

    cd dotnet-docs-samples/run/markdown-preview/

비공개 마크다운 렌더링 서비스 검토

프런트엔드 측면에서 마크다운 서비스를 위한 간단한 API 사양이 있습니다.

  • /의 한 엔드포인트
  • POST 요청 필요
  • 마크다운 텍스트인 POST 요청 본문

보안 향상을 위해 또는 ./renderer/ 디렉터리 탐색을 통한 심화 학습을 위해 모든 코드를 검토해야 할 수 있습니다. 이 튜토리얼에서는 마크다운 변환 코드에 대해 설명하지 않습니다.

비공개 마크다운 렌더링 서비스 제공

코드를 제공하려면 Cloud Build로 빌드하고, Container Registry에 업로드하고, Cloud Run에 배포합니다.

  1. renderer 디렉터리로 변경합니다.

    Node.js

    cd renderer/

    Python

    cd renderer/

    Go

    cd renderer/

    Java

    cd renderer/

    C#

    cd Samples.Run.MarkdownPreview.Renderer/

  2. 다음 명령어를 실행하여 컨테이너를 빌드하고 Container Registry에 게시합니다.

    Node.js

    gcloud builds submit --tag gcr.io/PROJECT_ID/renderer

    여기서 PROJECT_ID는 Google Cloud 프로젝트 ID이고 renderer는 서비스에 지정할 이름입니다.

    성공하면 ID, 생성 시간, 이미지 이름이 포함된 성공 메시지가 표시됩니다. 이미지는 Container Registry에 저장되며 원하는 경우 다시 사용할 수 있습니다.

    Python

    gcloud builds submit --tag gcr.io/PROJECT_ID/renderer

    여기서 PROJECT_ID는 Google Cloud 프로젝트 ID이고 renderer는 서비스에 지정할 이름입니다.

    성공하면 ID, 생성 시간, 이미지 이름이 포함된 성공 메시지가 표시됩니다. 이미지는 Container Registry에 저장되며 원하는 경우 다시 사용할 수 있습니다.

    Go

    gcloud builds submit --tag gcr.io/PROJECT_ID/renderer

    여기서 PROJECT_ID는 Google Cloud 프로젝트 ID이고 renderer는 서비스에 지정할 이름입니다.

    성공하면 ID, 생성 시간, 이미지 이름이 포함된 성공 메시지가 표시됩니다. 이미지는 Container Registry에 저장되며 원하는 경우 다시 사용할 수 있습니다.

    자바

    이 샘플은 Jib를 사용해서 일반적인 자바 도구로 Docker 이미지를 빌드합니다. Jib는 Dockerfile을 사용하거나 Docker를 설치할 필요 없이 컨테이너 빌드를 최적화합니다. Jib로 자바 컨테이너 빌드에 대해 자세히 알아보세요.

    1. gcloud 사용자 인증 정보 도우미를 사용하여 Docker가 Container Registry로 내보내도록 승인합니다.

      gcloud auth configure-docker

    2. Jib Maven 플러그인을 사용하여 컨테이너를 빌드하고 Container Registry로 내보냅니다.

      mvn compile jib:build -Dimage=gcr.io/PROJECT_ID/renderer

    여기서 PROJECT_ID는 Google Cloud 프로젝트 ID이고 renderer는 서비스에 지정할 이름입니다.

    성공하면 BUILD SUCCESS 메시지가 표시됩니다. 이미지는 Container Registry에 저장되며 원하는 경우 다시 사용할 수 있습니다.

    C#

    gcloud builds submit --tag gcr.io/PROJECT_ID/renderer

    여기서 PROJECT_ID는 Google Cloud 프로젝트 ID이고 renderer는 서비스에 지정할 이름입니다.

    성공하면 ID, 생성 시간, 이미지 이름이 포함된 성공 메시지가 표시됩니다. 이미지는 Container Registry에 저장되며 원하는 경우 다시 사용할 수 있습니다.

  3. 액세스가 제한된 비공개 서비스로 배포합니다.

    Cloud Run은 즉시 사용 가능한 액세스 제어서비스 ID 기능을 제공합니다. 액세스 제어는 사용자 및 다른 서비스가 서비스를 호출하지 못하도록 제한하는 인증 레이어를 제공합니다. 서비스 ID를 사용하면 제한된 권한을 포함하는 전용 서비스 계정을 만들어서 서비스가 다른 Google Cloud 리소스에 액세스하지 못하도록 제한할 수 있습니다.

    1. 렌더링 서비스의 '컴퓨팅 ID'로 사용할 서비스 계정을 만듭니다. 기본적으로 여기에는 프로젝트 멤버쉽 이외의 다른 권한이 포함되지 않습니다.

      명령줄

      gcloud iam service-accounts create renderer-identity

      Terraform

      Terraform 구성을 적용하거나 삭제하는 방법은 기본 Terraform 명령어를 참조하세요.

      resource "google_service_account" "renderer" {
        provider     = google-beta
        account_id   = "renderer-identity"
        display_name = "Service identity of the Renderer (Backend) service."
      }

      마크다운 렌더링 서비스는 Google Cloud의 다른 서비스와 직접 통합되지 않습니다. 추가 권한은 필요하지 않습니다.

    2. renderer-identity 서비스 계정으로 배포하고 인증되지 않은 액세스를 거부합니다.

      명령줄

      gcloud run deploy renderer \
      --image gcr.io/PROJECT_ID/renderer \
      --service-account renderer-identity \
      --no-allow-unauthenticated

      서비스 계정이 동일한 프로젝트에 포함된 경우 Cloud Run이 전체 이메일 주소 대신 짧은 형태의 서비스 계정 이름을 사용할 수 있습니다.

      Terraform

      Terraform 구성을 적용하거나 삭제하는 방법은 기본 Terraform 명령어를 참조하세요.

      resource "google_cloud_run_v2_service" "renderer" {
        provider = google-beta
        name     = "renderer"
        location = "us-central1"
        template {
          containers {
            # Replace with the URL of your Secure Services > Renderer image.
            #   gcr.io/<PROJECT_ID>/renderer
            image = "us-docker.pkg.dev/cloudrun/container/hello"
          }
          service_account = google_service_account.renderer.email
        }
      }

비공개 마크다운 렌더링 서비스 시도

비공개 서비스는 웹브라우저로 직접 로드할 수 없습니다. 대신 curl 또는 유사한 HTTP 요청 CLI 도구를 사용하여 Authorization 헤더를 삽입할 수 있습니다.

굵게 표시된 텍스트를 서비스로 전송하고 마크다운 별표를 HTML <strong> 태그로 변환하는 방법을 보려면 다음 안내를 따르세요.

  1. 배포 출력에서 URL을 가져옵니다.

  2. gcloud를 사용하여 인증에 사용할 특수 개발 전용 ID 토큰을 파생합니다.

    TOKEN=$(gcloud auth print-identity-token)
  3. 원시 마크다운 텍스트를 URL로 이스케이프 처리된 쿼리 문자열 매개변수로 전달하는 curl 요청을 만듭니다.

    curl -H "Authorization: Bearer $TOKEN" \
       -H 'Content-Type: text/plain' \
       -d '**Hello Bold Text**' \
       SERVICE_URL
  4. 응답은 다음 HTML 스니펫입니다.

     <strong>Hello Bold Text</strong>
    

편집기와 렌더링 서비스 간 통합 검토

편집기 서비스는 간단한 텍스트 입력 UI와 HTML 미리보기를 표시하기 위한 공간을 제공합니다. 계속하려면 먼저 ./editor/ 디렉터리를 열어서 앞에서 검색한 코드를 검토합니다.

다음으로 두 서비스를 안전하게 통합하는 다음 일부 코드 섹션을 탐색합니다.

Node.js

render.js 모듈은 비공개 렌더러 서비스에 대한 인증된 요청을 만듭니다. Cloud Run 환경에서 Google Cloud 메타데이터 서버를 사용하여 ID 토큰을 만들고 Authorization 헤더의 일부로 HTTP 요청에 추가합니다.

다른 환경에서 render.js애플리케이션 기본 사용자 인증 정보를 사용하여 Google 서버에서 토큰을 요청합니다.

const {GoogleAuth} = require('google-auth-library');
const got = require('got');
const auth = new GoogleAuth();

let client, serviceUrl;

// renderRequest creates a new HTTP request with IAM ID Token credential.
// This token is automatically handled by private Cloud Run (fully managed) and Cloud Functions.
const renderRequest = async markdown => {
  if (!process.env.EDITOR_UPSTREAM_RENDER_URL)
    throw Error('EDITOR_UPSTREAM_RENDER_URL needs to be set.');
  serviceUrl = process.env.EDITOR_UPSTREAM_RENDER_URL;

  // Build the request to the Renderer receiving service.
  const serviceRequestOptions = {
    method: 'POST',
    headers: {
      'Content-Type': 'text/plain',
    },
    body: markdown,
    timeout: 3000,
  };

  try {
    // Create a Google Auth client with the Renderer service url as the target audience.
    if (!client) client = await auth.getIdTokenClient(serviceUrl);
    // Fetch the client request headers and add them to the service request headers.
    // The client request headers include an ID token that authenticates the request.
    const clientHeaders = await client.getRequestHeaders();
    serviceRequestOptions.headers['Authorization'] =
      clientHeaders['Authorization'];
  } catch (err) {
    throw Error('could not create an identity token: ' + err.message);
  }

  try {
    // serviceResponse converts the Markdown plaintext to HTML.
    const serviceResponse = await got(serviceUrl, serviceRequestOptions);
    return serviceResponse.body;
  } catch (err) {
    throw Error('request to rendering service failed: ' + err.message);
  }
};

JSON에서 마크다운을 파싱하고 렌더기 서비스로 전송하여 HTML로 변환합니다.

app.post('/render', async (req, res) => {
  try {
    const markdown = req.body.data;
    const response = await renderRequest(markdown);
    res.status(200).send(response);
  } catch (err) {
    console.error('Error rendering markdown:', err);
    res.status(500).send(err);
  }
});

Python

new_request 메서드는 비공개 서비스에 인증된 요청을 만듭니다. Cloud Run 환경에서 Google Cloud 메타데이터 서버를 사용하여 ID 토큰을 만들고 Authorization 헤더의 일부로 HTTP 요청에 추가합니다.

다른 환경에서 new_request애플리케이션 기본 사용자 인증 정보로 인증하여 Google 서버에서 ID 토큰을 요청합니다.

import os
import urllib

import google.auth.transport.requests
import google.oauth2.id_token

def new_request(data):
    """Creates a new HTTP request with IAM ID Token credential.

    This token is automatically handled by private Cloud Run and Cloud Functions.

    Args:
        data: data for the authenticated request

    Returns:
        The response from the HTTP request
    """
    url = os.environ.get("EDITOR_UPSTREAM_RENDER_URL")
    if not url:
        raise Exception("EDITOR_UPSTREAM_RENDER_URL missing")

    req = urllib.request.Request(url, data=data.encode())
    auth_req = google.auth.transport.requests.Request()
    target_audience = url

    id_token = google.oauth2.id_token.fetch_id_token(auth_req, target_audience)
    req.add_header("Authorization", f"Bearer {id_token}")

    response = urllib.request.urlopen(req)
    return response.read()

JSON에서 마크다운을 파싱하고 렌더기 서비스로 전송하여 HTML로 변환합니다.

@app.route("/render", methods=["POST"])
def render_handler():
    """Parse the markdown from JSON and send it to the Renderer service to be
    transformed into HTML.
    """
    body = request.get_json(silent=True)
    if not body:
        return "Error rendering markdown: Invalid JSON", 400

    data = body["data"]
    try:
        parsed_markdown = render.new_request(data)
        return parsed_markdown, 200
    except Exception as err:
        return f"Error rendering markdown: {err}", 500

Go

RenderService는 비공개 서비스에 인증된 요청을 만듭니다. Cloud Run 환경에서 Google Cloud 메타데이터 서버를 사용하여 ID 토큰을 만들고 Authorization 헤더의 일부로 HTTP 요청에 추가합니다.

다른 환경에서 RenderService애플리케이션 기본 사용자 인증 정보로 인증하여 Google 서버에서 ID 토큰을 요청합니다.

import (
	"bytes"
	"context"
	"fmt"
	"io/ioutil"
	"net/http"
	"time"

	"golang.org/x/oauth2"
	"google.golang.org/api/idtoken"
)

// RenderService represents our upstream render service.
type RenderService struct {
	// URL is the render service address.
	URL string
	// tokenSource provides an identity token for requests to the Render Service.
	tokenSource oauth2.TokenSource
}

// NewRequest creates a new HTTP request to the Render service.
// If authentication is enabled, an Identity Token is created and added.
func (s *RenderService) NewRequest(method string) (*http.Request, error) {
	req, err := http.NewRequest(method, s.URL, nil)
	if err != nil {
		return nil, fmt.Errorf("http.NewRequest: %w", err)
	}

	ctx, cancel := context.WithTimeout(context.Background(), 30*time.Second)
	defer cancel()

	// Create a TokenSource if none exists.
	if s.tokenSource == nil {
		s.tokenSource, err = idtoken.NewTokenSource(ctx, s.URL)
		if err != nil {
			return nil, fmt.Errorf("idtoken.NewTokenSource: %w", err)
		}
	}

	// Retrieve an identity token. Will reuse tokens until refresh needed.
	token, err := s.tokenSource.Token()
	if err != nil {
		return nil, fmt.Errorf("TokenSource.Token: %w", err)
	}
	token.SetAuthHeader(req)

	return req, nil
}

요청은 HTML로 변환될 마크다운 텍스트를 추가한 후 렌더기 서비스로 전송됩니다. 응답 오류는 통신 문제를 렌더링 기능과 구별하기 위해 처리됩니다.


var renderClient = &http.Client{Timeout: 30 * time.Second}

// Render converts the Markdown plaintext to HTML.
func (s *RenderService) Render(in []byte) ([]byte, error) {
	req, err := s.NewRequest(http.MethodPost)
	if err != nil {
		return nil, fmt.Errorf("RenderService.NewRequest: %w", err)
	}
	req.Body = ioutil.NopCloser(bytes.NewReader(in))
	defer req.Body.Close()

	resp, err := renderClient.Do(req)
	if err != nil {
		return nil, fmt.Errorf("http.Client.Do: %w", err)
	}

	out, err := ioutil.ReadAll(resp.Body)
	if err != nil {
		return nil, fmt.Errorf("ioutil.ReadAll: %w", err)
	}

	if resp.StatusCode != http.StatusOK {
		return out, fmt.Errorf("http.Client.Do: %s (%d): request not OK", http.StatusText(resp.StatusCode), resp.StatusCode)
	}

	return out, nil
}

Java

makeAuthenticatedRequest는 비공개 서비스에 인증된 요청을 만듭니다. Cloud Run 환경에서 Google Cloud 메타데이터 서버를 사용하여 ID 토큰을 만들고 Authorization 헤더의 일부로 HTTP 요청에 추가합니다.

다른 환경에서 makeAuthenticatedRequest애플리케이션 기본 사용자 인증 정보로 인증하여 Google 서버에서 ID 토큰을 요청합니다.

// makeAuthenticatedRequest creates a new HTTP request authenticated by a JSON Web Tokens (JWT)
// retrievd from Application Default Credentials.
public String makeAuthenticatedRequest(String url, String markdown) {
  String html = "";
  try {
    // Retrieve Application Default Credentials
    GoogleCredentials credentials = GoogleCredentials.getApplicationDefault();
    IdTokenCredentials tokenCredentials =
        IdTokenCredentials.newBuilder()
            .setIdTokenProvider((IdTokenProvider) credentials)
            .setTargetAudience(url)
            .build();

    // Create an ID token
    String token = tokenCredentials.refreshAccessToken().getTokenValue();
    // Instantiate HTTP request
    MediaType contentType = MediaType.get("text/plain; charset=utf-8");
    okhttp3.RequestBody body = okhttp3.RequestBody.create(markdown, contentType);
    Request request =
        new Request.Builder()
            .url(url)
            .addHeader("Authorization", "Bearer " + token)
            .post(body)
            .build();

    Response response = ok.newCall(request).execute();
    html = response.body().string();
  } catch (IOException e) {
    logger.error("Unable to get rendered data", e);
  }
  return html;
}

JSON에서 마크다운을 파싱하고 렌더기 서비스로 전송하여 HTML로 변환합니다.

// '/render' expects a JSON body payload with a 'data' property holding plain text
// for rendering.
@PostMapping(value = "/render", consumes = "application/json")
public String render(@RequestBody Data data) {
  String markdown = data.getData();

  String url = System.getenv("EDITOR_UPSTREAM_RENDER_URL");
  if (url == null) {
    String msg =
        "No configuration for upstream render service: "
            + "add EDITOR_UPSTREAM_RENDER_URL environment variable";
    logger.error(msg);
    throw new IllegalStateException(msg);
  }

  String html = makeAuthenticatedRequest(url, markdown);
  return html;
}

C#

GetAuthenticatedPostResponse는 비공개 서비스에 인증된 요청을 만듭니다. Cloud Run 환경에서 Google Cloud 메타데이터 서버를 사용하여 ID 토큰을 만들고 Authorization 헤더의 일부로 HTTP 요청에 추가합니다.

다른 환경에서 GetAuthenticatedPostResponse애플리케이션 기본 사용자 인증 정보로 인증하여 Google 서버에서 ID 토큰을 요청합니다.

private async Task<string> GetAuthenticatedPostResponse(string url, string postBody)
{
    // Get the OIDC access token from the service account via Application Default Credentials
    GoogleCredential credential = await GoogleCredential.GetApplicationDefaultAsync();
    OidcToken token = await credential.GetOidcTokenAsync(OidcTokenOptions.FromTargetAudience(url));
    string accessToken = await token.GetAccessTokenAsync();

    // Create request to the upstream service with the generated OAuth access token in the Authorization header
    var upstreamRequest = new HttpRequestMessage(HttpMethod.Post, url);
    upstreamRequest.Headers.Authorization = new AuthenticationHeaderValue("Bearer", accessToken);
    upstreamRequest.Content = new StringContent(postBody);

    var upstreamResponse = await _httpClient.SendAsync(upstreamRequest);
    upstreamResponse.EnsureSuccessStatusCode();

    return await upstreamResponse.Content.ReadAsStringAsync();
}

JSON에서 마크다운을 파싱하고 렌더기 서비스로 전송하여 HTML로 변환합니다.

public async Task<IActionResult> Index([FromBody] RenderModel model)
{
    var markdown = model.Data ?? string.Empty;
    var renderedHtml = await GetAuthenticatedPostResponse(_editorUpstreamRenderUrl, markdown);
    return Content(renderedHtml);
}

공개 편집기 서비스 제공

코드를 빌드하고 배포하려면 다음 안내를 따르세요.

  1. editor 디렉터리로 변경합니다.

    Node.js

    cd ../editor

    Python

    cd ../editor

    Go

    cd ../editor

    Java

    cd ../editor

    C#

    cd ../Samples.Run.MarkdownPreview.Editor/

  2. 다음 명령어를 실행하여 컨테이너를 빌드하고 Container Registry에 게시합니다.

    Node.js

    gcloud builds submit --tag gcr.io/PROJECT_ID/editor

    여기서 PROJECT_ID는 Google Cloud 프로젝트 ID이고 editor는 서비스에 지정할 이름입니다.

    성공하면 ID, 생성 시간, 이미지 이름이 포함된 성공 메시지가 표시됩니다. 이미지는 Container Registry에 저장되며 원하는 경우 다시 사용할 수 있습니다.

    Python

    gcloud builds submit --tag gcr.io/PROJECT_ID/editor

    여기서 PROJECT_ID는 Google Cloud 프로젝트 ID이고 editor는 서비스에 지정할 이름입니다.

    성공하면 ID, 생성 시간, 이미지 이름이 포함된 성공 메시지가 표시됩니다. 이미지는 Container Registry에 저장되며 원하는 경우 다시 사용할 수 있습니다.

    Go

    gcloud builds submit --tag gcr.io/PROJECT_ID/editor

    여기서 PROJECT_ID는 Google Cloud 프로젝트 ID이고 editor는 서비스에 지정할 이름입니다.

    성공하면 ID, 생성 시간, 이미지 이름이 포함된 성공 메시지가 표시됩니다. 이미지는 Container Registry에 저장되며 원하는 경우 다시 사용할 수 있습니다.

    자바

    이 샘플은 Jib를 사용해서 일반적인 자바 도구로 Docker 이미지를 빌드합니다. Jib는 Dockerfile을 사용하거나 Docker를 설치할 필요 없이 컨테이너 빌드를 최적화합니다. Jib로 자바 컨테이너 빌드에 대해 자세히 알아보세요.

    mvn compile jib:build -Dimage=gcr.io/PROJECT_ID/editor

    여기서 PROJECT_ID는 Google Cloud 프로젝트 ID이고 editor는 서비스에 지정할 이름입니다.

    성공하면 BUILD SUCCESS 메시지가 표시됩니다. 이미지는 Container Registry에 저장되며 원하는 경우 다시 사용할 수 있습니다.

    C#

    gcloud builds submit --tag gcr.io/PROJECT_ID/editor

    여기서 PROJECT_ID는 Google Cloud 프로젝트 ID이고 editor는 서비스에 지정할 이름입니다.

    성공하면 ID, 생성 시간, 이미지 이름이 포함된 성공 메시지가 표시됩니다. 이미지는 Container Registry에 저장되며 원하는 경우 다시 사용할 수 있습니다.

  3. 렌더링 서비스에 대한 특수 액세스 권한으로 비공개 서비스로 배포합니다.

    1. 비공개 서비스의 '컴퓨팅 ID' 역할을 할 서비스 계정을 만듭니다. 기본적으로 여기에는 프로젝트 멤버쉽 이외의 다른 권한이 포함되지 않습니다.

      명령줄

      gcloud iam service-accounts create editor-identity

      Terraform

      Terraform 구성을 적용하거나 삭제하는 방법은 기본 Terraform 명령어를 참조하세요.

      resource "google_service_account" "editor" {
        provider     = google-beta
        account_id   = "editor-identity"
        display_name = "Service identity of the Editor (Frontend) service."
      }

      편집기 서비스는 마크다운 렌더링 서비스 이외의 Google Cloud에 있는 다른 서비스와 상호작용할 필요가 없습니다.

    2. editor-identity 컴퓨팅 ID에 대한 액세스 권한을 부여하여 마크다운 렌더링 서비스를 호출합니다. 이를 컴퓨팅 ID로 사용하는 모든 서비스가 이 권한을 갖습니다.

      명령줄

      gcloud run services add-iam-policy-binding renderer \
      --member serviceAccount:editor-identity@PROJECT_ID.iam.gserviceaccount.com \
      --role roles/run.invoker

      Terraform

      Terraform 구성을 적용하거나 삭제하는 방법은 기본 Terraform 명령어를 참조하세요.

      resource "google_cloud_run_service_iam_member" "editor_invokes_renderer" {
        provider = google-beta
        location = google_cloud_run_v2_service.renderer.location
        service  = google_cloud_run_v2_service.renderer.name
        role     = "roles/run.invoker"
        member   = "serviceAccount:${google_service_account.editor.email}"
      }

      렌더링 서비스의 컨텍스트에서 호출자 역할이 부여되므로 렌더링 서비스는 편집기가 호출할 수 있는 유일한 비공개 Cloud Run 서비스입니다.

    3. editor-identity 서비스 계정으로 배포하고 인증되지 않은 공개 액세스를 허용합니다.

      명령줄

      gcloud run deploy editor --image gcr.io/PROJECT_ID/editor \
      --service-account editor-identity \
      --set-env-vars EDITOR_UPSTREAM_RENDER_URL=RENDERER_SERVICE_URL \
      --allow-unauthenticated

      바꾸기

      • PROJECT_ID를 프로젝트 ID로 바꿉니다.
      • RENDERER_SERVICE_URL을 마크다운 렌더링 서비스 배포 후 제공된 URL로 바꿉니다.

      Terraform

      Terraform 구성을 적용하거나 삭제하는 방법은 기본 Terraform 명령어를 참조하세요.

      편집기 서비스 배포:

      resource "google_cloud_run_v2_service" "editor" {
        provider = google-beta
        name     = "editor"
        location = "us-central1"
        template {
          containers {
            # Replace with the URL of your Secure Services > Editor image.
            #   gcr.io/<PROJECT_ID>/editor
            image = "us-docker.pkg.dev/cloudrun/container/hello"
            env {
              name  = "EDITOR_UPSTREAM_RENDER_URL"
              value = google_cloud_run_v2_service.renderer.uri
            }
          }
          service_account = google_service_account.editor.email
      
        }
      }

      서비스를 호출할 수 있는 allUsers 권한을 부여합니다.

      data "google_iam_policy" "noauth" {
        provider = google-beta
        binding {
          role = "roles/run.invoker"
          members = [
            "allUsers",
          ]
        }
      }
      
      resource "google_cloud_run_service_iam_policy" "noauth" {
        provider = google-beta
        location = google_cloud_run_v2_service.editor.location
        project  = google_cloud_run_v2_service.editor.project
        service  = google_cloud_run_v2_service.editor.name
      
        policy_data = data.google_iam_policy.noauth.policy_data
      }

HTTPS 트래픽 이해

이러한 서비스를 사용하여 마크다운 렌더링하기 위한 세 가지 HTTP 요청이 있습니다.

사용자에서 편집기로의 요청 흐름을 보여주는 다이어그램입니다. 편집기가 메타데이터 서버에서 토큰을 가져오고, 편집기가 렌더링 서비스에 요청을 수행하고, 렌더링 서비스가 편집기로 HTML을 반환합니다.
editor-identity가 있는 프런트엔드 서비스가 렌더링 서비스를 호출합니다. editor-identityrenderer-identity 모두 제한된 권한을 갖기 때문에, 보안 악용 또는 코드 주입이 발생하더라도 다른 Google Cloud 리소스에 대한 액세스가 제한됩니다.

사용해 보기

전체 이중 서비스 애플리케이션을 시도해보려면 다음 안내를 따르세요.

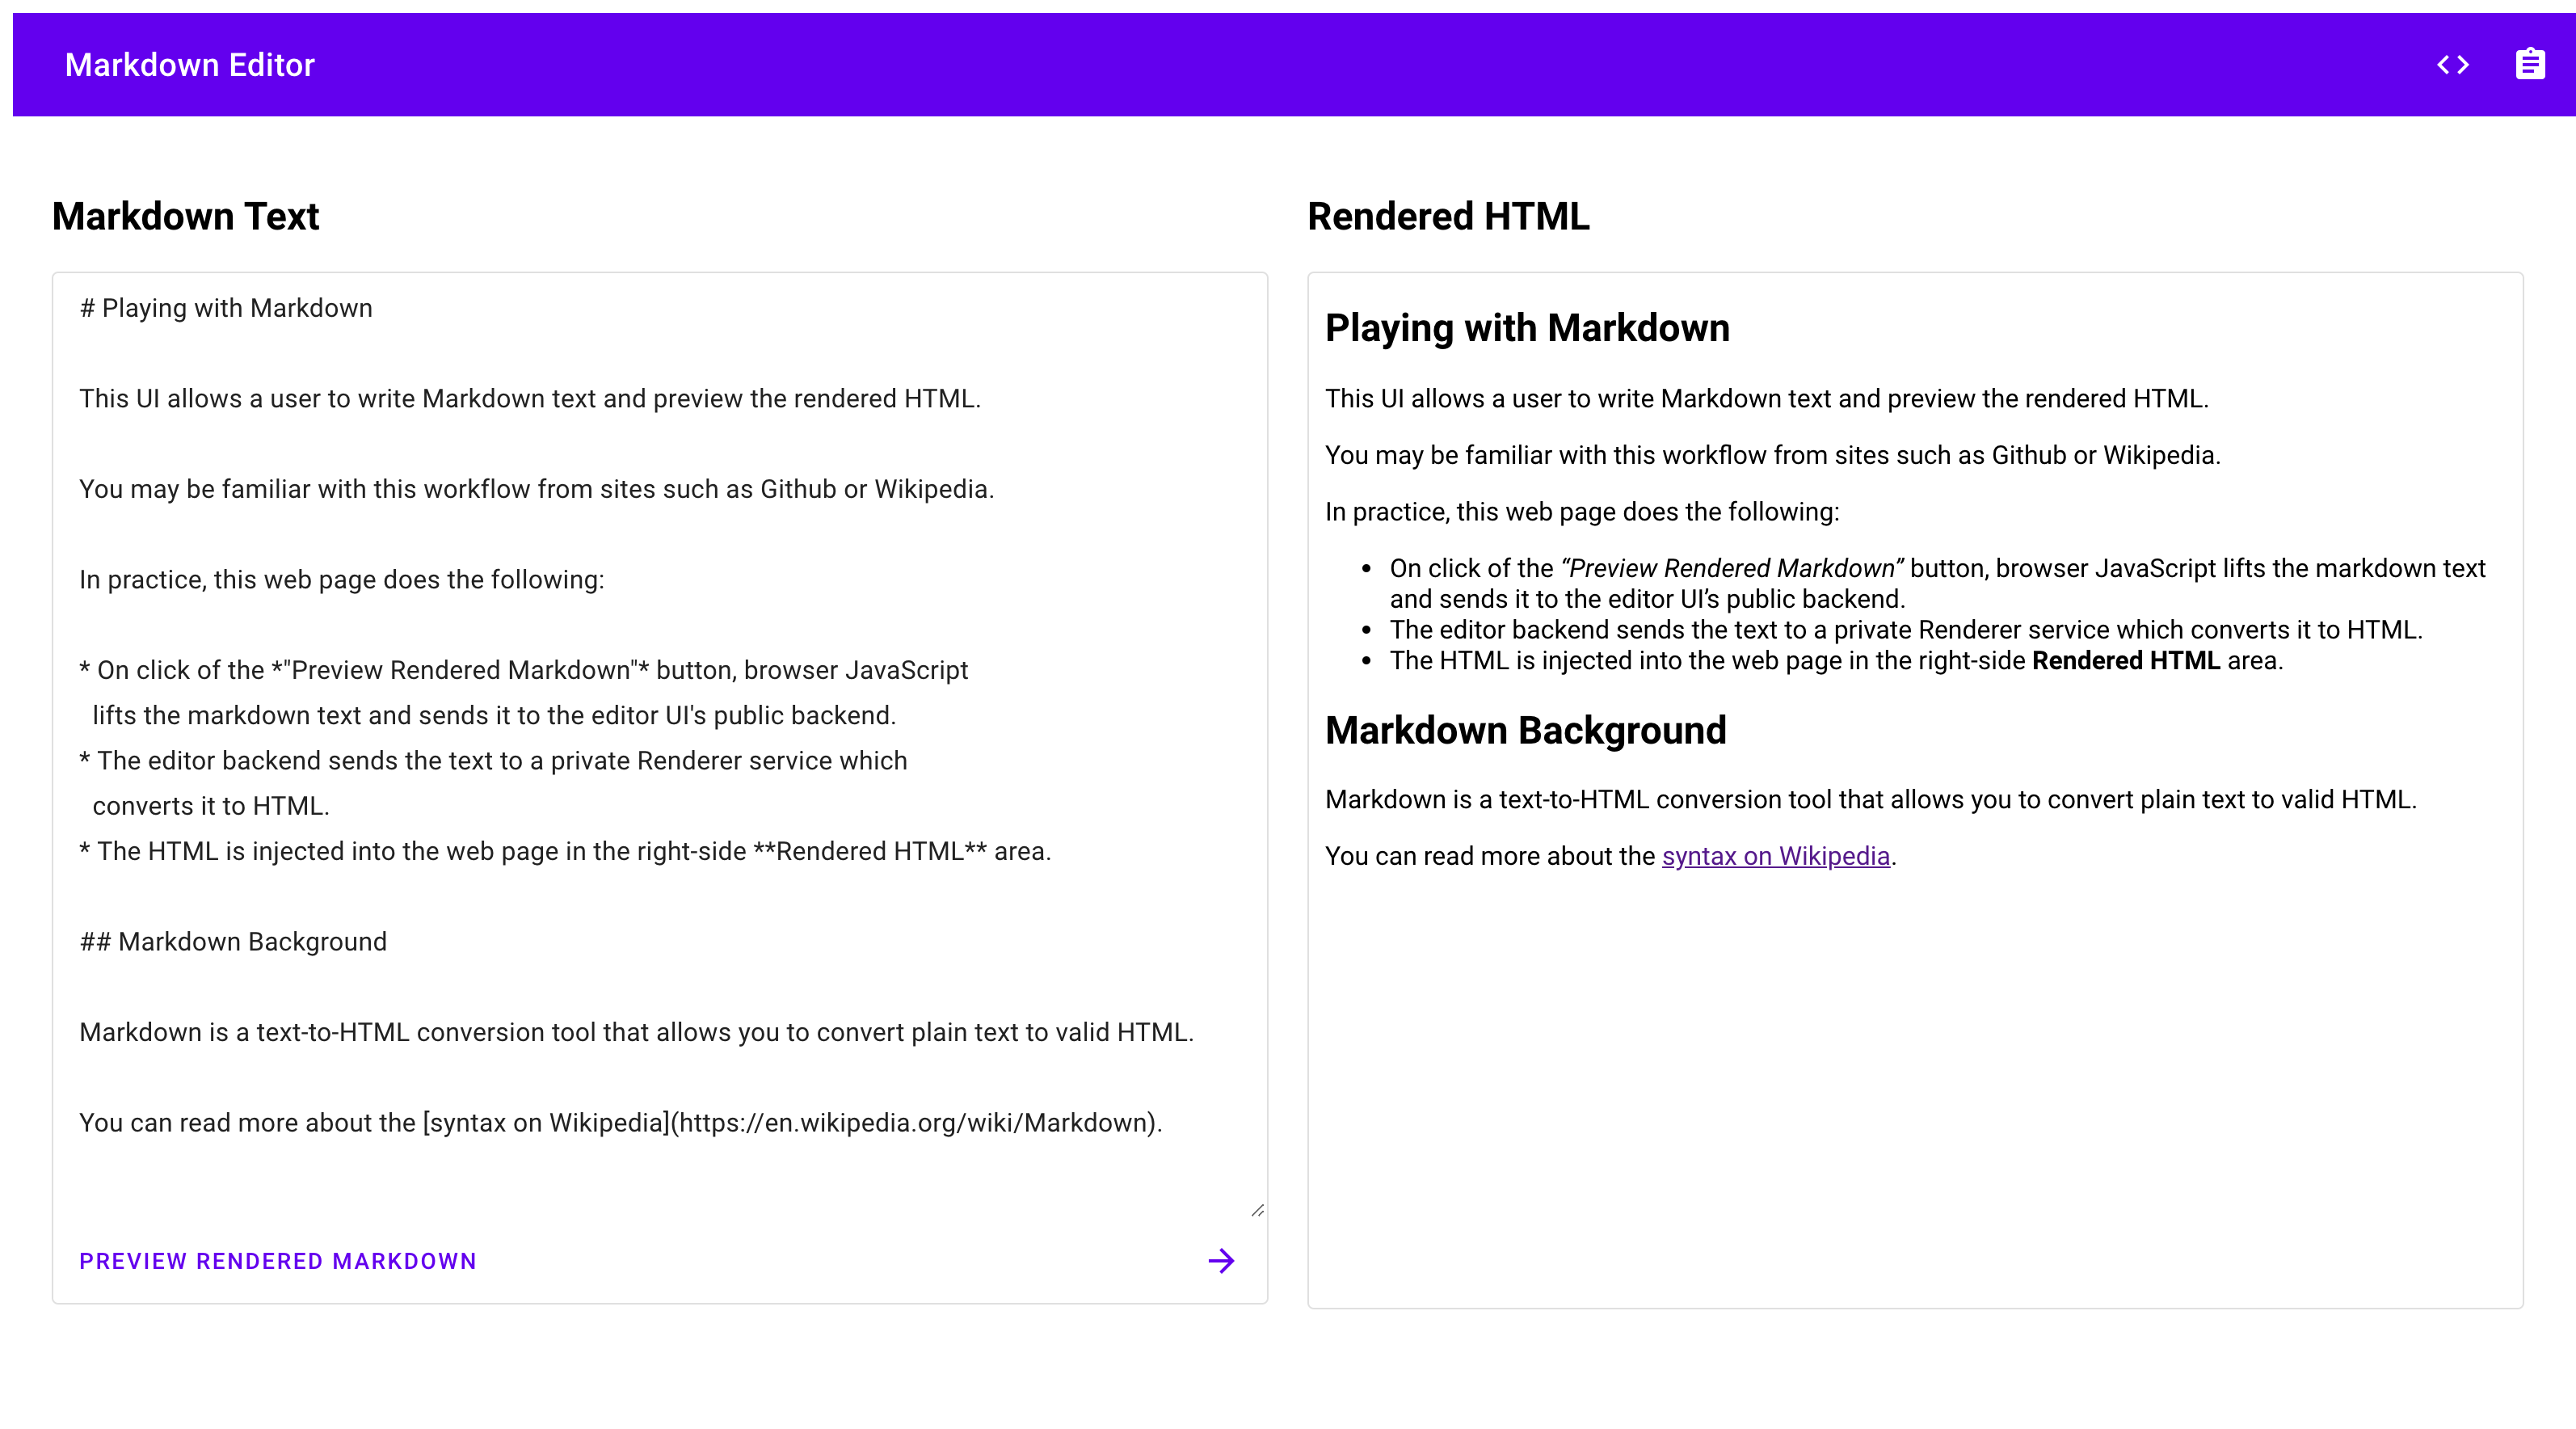
  1. 브라우저에서 위의 배포 단계로 제공된 URL로 이동합니다.

  2. 왼쪽에서 마크다운 텍스트를 편집하고 버튼을 클릭하여 오른쪽에 미리보기를 표시합니다.

    예를 들면 다음과 같습니다.

    마크다운 편집기 사용자 인터페이스 스크린샷

이러한 서비스를 계속 개발하려면 이들 서비스에 다른 Google Cloud 서비스에 대한 제한적인 Identity and Access Management(IAM) 액세스 권한이 있으며 다른 여러 서비스에 액세스하려면 추가 IAM 역할이 부여되어야 합니다.

삭제

이 튜토리얼용으로 새 프로젝트를 만든 경우 이 프로젝트를 삭제합니다. 기존 프로젝트를 사용한 경우 이 튜토리얼에 추가된 변경사항은 제외하고 보존하려면 튜토리얼용으로 만든 리소스를 삭제합니다.

프로젝트 삭제

비용이 청구되지 않도록 하는 가장 쉬운 방법은 튜토리얼에서 만든 프로젝트를 삭제하는 것입니다.

프로젝트를 삭제하려면 다음 안내를 따르세요.

  1. Google Cloud 콘솔에서 리소스 관리 페이지로 이동합니다.

    리소스 관리로 이동

  2. 프로젝트 목록에서 삭제할 프로젝트를 선택하고 삭제를 클릭합니다.
  3. 대화상자에서 프로젝트 ID를 입력한 후 종료를 클릭하여 프로젝트를 삭제합니다.

튜토리얼 리소스 삭제

  1. 이 튜토리얼에서 배포한 Cloud Run 서비스를 삭제합니다.

    명령줄

    gcloud run services delete editor
    gcloud run services delete renderer

    Google Cloud 콘솔에서 Cloud Run 서비스를 삭제할 수도 있습니다.

  2. 가이드 설정 중에 추가한 gcloud 기본 구성을 삭제합니다.

     gcloud config unset run/region
    
  3. 프로젝트 구성을 삭제합니다.

     gcloud config unset project
    
  4. 이 튜토리얼에서 만든 다른 Google Cloud 리소스를 삭제합니다.

다음 단계