本教程演示了服务开发者如何使用用于发现的 Google Cloud Observability 工具和用于调查的本地开发工作流来排查 Cloud Run 服务中断问题。
问题排查指南中随附的逐步“案例研究”使用一个示例项目,部署该项目时会导致运行时错误,您可以通过问题排查来找到并解决问题。
设置 gcloud 默认值
要配置您的 Cloud Run 服务的 gcloud 默认值,请执行以下操作:
设置默认项目:
gcloud config set project PROJECT_ID
将 PROJECT_ID 替换为您在本教程中创建的项目的名称。
为您选择的区域配置 gcloud:
gcloud config set run/region REGION
将 REGION 替换为您选择的受支持的 Cloud Run 区域。
Cloud Run 位置
Cloud Run 是区域级的,这意味着运行 Cloud Run 服务的基础架构位于特定区域,并且由 Google 代管,以便在该区域内的所有可用区以冗余方式提供。
选择用于运行 Cloud Run 服务的区域时,主要考虑该区域能否满足您的延迟时间、可用性或耐用性要求。通常,您可以选择距离用户最近的区域,但除此之外,您还应该考虑 Cloud Run 服务使用的其他 Google Cloud产品的位置。跨多个位置使用 Google Cloud 产品可能会影响服务的延迟时间和费用。
Cloud Run 可在以下区域使用:
基于层级 1 价格
asia-east1(台湾)asia-northeast1(东京)asia-northeast2(大阪)asia-south1(印度孟买)europe-north1(芬兰) 二氧化碳排放量低
europe-north2(斯德哥尔摩) 二氧化碳排放量低
europe-southwest1(马德里) 二氧化碳排放量低
europe-west1(比利时) 二氧化碳排放量低
europe-west4(荷兰) 二氧化碳排放量低
europe-west8(米兰)europe-west9(巴黎) 二氧化碳排放量低
me-west1(特拉维夫)northamerica-south1(墨西哥)us-central1(爱荷华) 二氧化碳排放量低
us-east1(南卡罗来纳)us-east4(北弗吉尼亚)us-east5(哥伦布)us-south1(达拉斯) 二氧化碳排放量低
us-west1(俄勒冈) 二氧化碳排放量低
基于层级 2 价格
africa-south1(约翰内斯堡)asia-east2(香港)asia-northeast3(韩国首尔)asia-southeast1(新加坡)asia-southeast2(雅加达)asia-south2(印度德里)australia-southeast1(悉尼)australia-southeast2(墨尔本)europe-central2(波兰,华沙)europe-west10(柏林)europe-west12(都灵)europe-west2(英国伦敦) 二氧化碳排放量低
europe-west3(德国法兰克福)europe-west6(瑞士苏黎世) 二氧化碳排放量低
me-central1(多哈)me-central2(达曼)northamerica-northeast1(蒙特利尔) 二氧化碳排放量低
northamerica-northeast2(多伦多) 二氧化碳排放量低
southamerica-east1(巴西圣保罗) 二氧化碳排放量低
southamerica-west1(智利圣地亚哥) 二氧化碳排放量低
us-west2(洛杉矶)us-west3(盐湖城)us-west4(拉斯维加斯)
如果您已创建 Cloud Run 服务,可在Google Cloud 控制台的 Cloud Run 信息中心内查看区域。
汇编代码
逐步构建一个新的 Cloud Run Greeter 服务。 请注意,此服务会创建一个运行时错误,以供您进行问题排查练习。
创建新项目:
Node.js
通过定义服务软件包、初始化依赖项和一些常见操作来创建 Node.js 项目。创建一个新的
hello-service目录:mkdir hello-service cd hello-service通过生成
package.json文件来创建新的 Node.js 项目:npm init --yes npm install express@4在编辑器中打开新的
package.json文件,并配置start脚本以运行node index.js。完成后,文件应如下所示:
如果您要在本教程的基础上继续改进该服务,请考虑填写说明、作者并评估许可。如需了解详情,请阅读 package.json 文档。
Python
创建一个新的
hello-service目录:mkdir hello-service cd hello-service创建一个 requirements.txt 文件,并将您的依赖项复制到其中:
Go
创建一个新的
hello-service目录:mkdir hello-service cd hello-service通过初始化新的 go 模块创建 Go 项目:
go mod init example.com/hello-service
您可以根据需要更新特定名称:如果代码已发布到可通过网络访问的代码库,则应更新名称。
Java
创建一个新的 maven 项目:
mvn archetype:generate \
  -DgroupId=com.example.cloudrun \
  -DartifactId=hello-service \
  -DarchetypeArtifactId=maven-archetype-quickstart \
  -DinteractiveMode=false
将依赖项复制到您的
pom.xml依赖项列表中(在<dependencies>元素之间):将构建设置复制到
pom.xml(在<dependencies>元素下方):
创建 HTTP 服务以处理传入请求:
Node.js
Python
Go
Java
创建
Dockerfile来定义用于部署服务的容器映像:Node.js
Python
Go
Java
此示例使用 Jib 利用常见 Java 工具构建 Docker 映像。无需编写 Dockerfile 或安装 Docker,Jib 便可以优化容器构建。详细了解如何使用 Jib 构建 Java 容器。
交付代码
交付代码包括三个步骤:使用 Cloud Build 构建容器映像、将容器映像上传到 Container Registry,以及将容器映像部署到 Cloud Run。
如需交付代码,请执行以下操作:
构建容器并将其发布到 Container Registry 上:
Node.js
gcloud builds submit --tag gcr.io/PROJECT_ID/hello-service
其中 PROJECT_ID 是您的 Google Cloud 项目 ID。 您可以通过
gcloud config get-value project查看当前项目 ID。成功完成后,您应该会看到一条包含 ID、创建时间和映像名称的 SUCCESS 消息。该映像存储在 Container Registry 中,并可根据需要重复使用。
Python
gcloud builds submit --tag gcr.io/PROJECT_ID/hello-service
其中 PROJECT_ID 是您的 Google Cloud 项目 ID。 您可以通过
gcloud config get-value project查看当前项目 ID。成功完成后,您应该会看到一条包含 ID、创建时间和映像名称的 SUCCESS 消息。该映像存储在 Container Registry 中,并可根据需要重复使用。
Go
gcloud builds submit --tag gcr.io/PROJECT_ID/hello-service
其中 PROJECT_ID 是您的 Google Cloud 项目 ID。 您可以通过
gcloud config get-value project查看当前项目 ID。成功完成后,您应该会看到一条包含 ID、创建时间和映像名称的 SUCCESS 消息。该映像存储在 Container Registry 中,并可根据需要重复使用。
Java
- 使用 gcloud 凭据帮助程序,授权 Docker 推送到您的 Container Registry。
gcloud auth configure-docker
- 使用 Jib Maven 插件来构建容器并将其推送到 Container Registry。
mvn compile jib:build -Dimage=gcr.io/PROJECT_ID/hello-service
其中 PROJECT_ID 是您的 Google Cloud 项目 ID。 您可以通过
gcloud config get-value project查看当前项目 ID。成功后,您会看到一条 BUILD SUCCESS 消息。该映像存储在 Container Registry 中,并可根据需要重复使用。
- 使用 gcloud 凭据帮助程序,授权 Docker 推送到您的 Container Registry。
运行以下命令来部署您的应用:
gcloud run deploy hello-service --image gcr.io/PROJECT_ID/hello-service
将 PROJECT_ID 替换为您的 Google Cloud 项目 ID。
hello-service既是容器映像名称,又是 Cloud Run 服务名称。请注意,容器映像会部署到您之前在设置 gcloud 中配置的服务和区域在出现“允许未通过身份验证的调用”提示时回复
y“是”。如需详细了解基于 IAM 的身份验证,请参阅管理访问权限。等待部署完成,这可能需要半分钟左右的时间。 成功完成时,命令行会显示服务网址。
测试
试用该服务,确认您已成功部署该服务。请求应失败并显示 HTTP 500 或 503 错误(5xx 服务器错误类的成员)。下面介绍如何排查此错误响应出现的原因。
系统会自动为该服务分配一个可导航的网址。
使用网络浏览器导航到此网址:
打开网络浏览器。
找到较早部署命令输出的服务网址。
如果部署命令未提供网址,则表示出现问题。 查看错误消息并采取相应措施:如果没有可操作的指南,请查看问题排查指南并尽可能重试部署命令。
导航到此网址,方法是将其复制到浏览器的地址栏中,然后按 ENTER。
查看 HTTP 500 或 HTTP 503 错误。
如果您收到 HTTP 403 错误,则可能是在部署提示时拒绝了
allow unauthenticated invocations。授予服务的公开访问权限,以解决此问题:gcloud run services add-iam-policy-binding hello-service \ --member="allUsers" \ --role="roles/run.invoker"
如需了解详情,请参阅允许公开(未经身份验证)访问。
调查问题
设想上述测试部分遇到的 HTTP 5xx 错误被视为生产运行时错误。本教程介绍处理该错误的正式流程。虽然生产错误解决流程千差万别,但本教程介绍一种具有特定顺序的步骤,以展示实用工具和技术的应用。
如需调查此问题,您需要完成以下阶段:
- 收集有关所报告错误的更多详情,以支持进一步调查问题并设置缓解策略。
- 通过决定推进修复或回滚到已知运行状况良好的版本来缓解用户影响。
- 重现错误来确认已收集到正确的详细信息,以及该错误不是一次性错误
- 根据 Bug 执行根本原因分析,找出造成此错误的代码、配置或流程
在调查开始时,您应具备一个网址、时间戳和“内部服务器错误”消息。
收集更多详细信息
收集有关该问题的更多信息,了解问题原因并确定后续步骤。
使用可用的 Google Cloud Observability 工具收集更多详细信息:
使用 Error Reporting 控制台,该控制台提供一个信息中心,其中包含已识别的堆栈轨迹的错误详情和周期性跟踪。

记录的错误列表。系统会根据消息跨修订版本、服务和平台对错误进行分组。 点击错误即可查看堆栈轨迹详情,其中记录了错误发生前进行的函数调用。
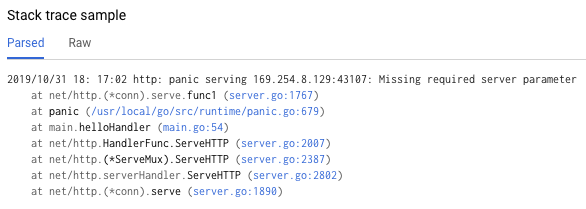
错误详情页面中的“堆栈轨迹示例”会显示错误的一个实例。您可以查看各个实例。 使用 Cloud Logging 查看导致该问题的操作顺序,包括由于缺少可识别的错误堆栈轨迹而未能在 Error Reporting 控制台中显示的错误消息:
从第一个下拉框中选择 Cloud Run 修订版本 > hello-service。此操作会过滤出您的服务生成的日志条目。
详细了解如何在 Cloud Run 中查看日志
回滚到运行状况良好的版本
如果这是一项已建立且已知可运行的服务,则 Cloud Run 上会存在该服务的先前修订版本。本教程使用的是无旧修订版本的新服务,因此您无法回滚。
但是,如果您的服务具有旧修订版本可供回滚,请按照查看修订版本详细信息中的说明,提取创建服务的新工作部署所必需的容器名称和配置详情。
重现错误
使用您之前获得的详细信息,确认问题在测试条件下始终存在。
通过测试再次发送相同的 HTTP 请求,并查看是否报告了相同的错误和详细信息。系统可能需要一段时间才能显示错误详细信息。
由于本教程中的示例服务为只读,不会产生任何复杂的副作用,因此可以安全地重现生产中的错误。但是,对于许多实际服务而言,情况并非如此:您可能需要在测试环境中重现错误,或者将此步骤限制在本地调查中。
重现错误会为后续步骤创建环境。例如,如果开发者无法重现该错误,则进一步调查时可能需要对服务进行额外的插桩测试。
执行根本原因分析
根本原因分析是有效问题排查中的一个重要步骤,可确保您解决问题,而非症状。
在本教程前面部分,您在 Cloud Run 上重现了问题,该操作确认了在 Cloud Run 上托管服务时该问题处于活跃状态。现在,请在本地重现问题,以确定问题是否只与代码有关,或者问题是否仅出现在生产托管中。
如果您尚未在本地将 Dock CLI 与 Container Registry 搭配使用,请使用 gcloud 进行身份验证:
gcloud auth configure-docker
对于其他方法,请参阅 Container Registry 身份验证方法。
如果最近使用的容器映像名称不可用,则服务说明会包含最近部署的容器映像的信息:
gcloud run services describe hello-service
在
spec对象中找到容器映像名称。下面这种更有针对性的命令可以直接检索到该名称:gcloud run services describe hello-service \ --format="value(spec.template.spec.containers.image)"
此命令会显示容器映像名称,例如
gcr.io/PROJECT_ID/hello-service。从 Container Registry 中拉取容器映像到您的环境,此步骤可能需要几分钟时间才能下载容器映像:
docker pull gcr.io/PROJECT_ID/hello-service
您可以使用同一命令检索重用此名称的容器映像的后续更新。如果您跳过此步骤,则当本地计算机上不存在容器映像时,下方显示的
docker run命令会拉取容器映像。在本地运行以确认该问题不是仅存在与 Cloud Run 中:
PORT=8080 && docker run --rm -e PORT=$PORT -p 9000:$PORT \
   gcr.io/PROJECT_ID/hello-service
对上述命令的元素进行细分,
PORT环境变量由服务使用,来确定容器内部要侦听的端口。run命令会启动容器,默认为在 Dockerfile 或父级容器映像中定义的入口点命令。--rm标志表示会在退出时删除容器实例。-e标志表示为环境变量分配值。-e PORT=$PORT将PORT变量从本地系统传递到具有相同变量名称的容器中。-p标志表示用于将容器发布为 localhost(端口为 9000)中的可用服务。发送到 localhost:9000 的请求将路由到端口为 8080 的容器中。这意味着,服务的输出(关于使用中的端口号)与服务的访问方式不匹配。- 最后的参数
gcr.io/PROJECT_ID/hello-service是容器映像tag(一个人类可读的标签,用来标明容器映像的 sha256 哈希标识符)。如果本地不可用,Docker 会尝试从远程注册表检索映像。
在浏览器中,打开 http://localhost:9000。查看终端输出,找出与 {ops_name}} 相关的错误消息。
如果无法在本地重现,则可能是仅存在于 Cloud Run 环境的问题。查看 Cloud Run 问题排查指南,了解需要调查的具体领域。
在此示例中,错误会在本地重现。
经过双重确认后,该错误被认定为由服务代码(而非托管平台)引起的永久性错误,现在可以更密切地调查代码了。
在本教程中,我们可以假设容器内的代码和本地系统中的代码是相同的。
重新访问错误报告的堆栈轨迹,并使用代码进行交叉引用,找到出现错误的特定行。
Node.js
在文件index.js 中找出错误消息来源,具体位置在日志显示的堆栈轨迹中调出的行号附近:
Python
在文件main.py 中找出错误消息来源,具体位置在日志显示的堆栈轨迹中调出的行号附近:
Go
在文件 main.go 中找出错误消息来源,具体位置在日志显示的堆栈轨迹中调出的行号附近:
Java
在文件 App.java 中找出错误消息来源,具体位置在日志显示的堆栈轨迹中调出的行号附近:
检查此代码时,如果未设置 NAME 环境变量,则会执行以下操作:
- 系统会将错误记录到 Google Cloud Observability
- 发送 HTTP 错误响应
问题是由缺少的变量引起的,但根本原因更具体:向环境变量添加硬依赖项的代码更改中没有对部署脚本和运行时要求文档的相关更改。
解决根本原因
既然我们已经收集了代码并确定了潜在的根本原因,现在便可以采取措施解决问题了。
请检查
NAME环境已就绪时,该服务是否可以在本地运行:使用添加的环境变量在本地运行容器:
PORT=8080 && docker run --rm -e PORT=$PORT -p 9000:$PORT \
 -e NAME="Local World!" \
 gcr.io/PROJECT_ID/hello-service
将浏览器导航至 http://localhost:9000
查看网页上显示的“Hello Local World!”
修改正在运行的 Cloud Run 服务环境以包含此变量:
运行服务更新命令以添加环境变量:
gcloud run services update hello-service \
  --set-env-vars NAME=Override
等待几秒钟,Cloud Run 会根据添加了新环境变量的旧修订版本创建新修订版本。
确认现已修复该服务:
- 将浏览器导航到 Cloud Run 服务网址。
- 您将看到网页上显示的“Hello Override!”。
- 验证 Cloud Logging 或 Error Reporting 中是否出现意外消息或错误。
提高今后的问题排查速度
在此示例生产问题中,错误与操作配置有关。我们对代码进行一些更改,以便将来最大限度地减少此问题的影响。
- 改进错误日志,加入更具体的详细信息。
- 让服务回退到安全的默认设置,而不是返回到错误。 如果使用默认值表示对正常功能的更改,请使用警告消息进行监控。
让我们逐步移除作为硬依赖项的 NAME 环境变量。
移除现有的
NAME处理代码:Node.js
Python
Go
Java
添加设置了后备值的新代码:
Node.js
Python
Go
Java
在受影响的配置情况中重新构建并运行容器,以进行本地测试:
Node.js
docker build --tag gcr.io/PROJECT_ID/hello-service .
Python
docker build --tag gcr.io/PROJECT_ID/hello-service .
Go
docker build --tag gcr.io/PROJECT_ID/hello-service .
Java
mvn compile jib:build
确认
NAME环境变量是否仍然有效:PORT=8080 && docker run --rm -e PORT=$PORT -p 9000:$PORT \ -e NAME="Robust World" \ gcr.io/PROJECT_ID/hello-service
确认在没有
NAME变量的情况下,服务是否正常运行:PORT=8080 && docker run --rm -e PORT=$PORT -p 9000:$PORT \ gcr.io/PROJECT_ID/hello-service
如果服务未返回结果,请确认在第一步中移除代码时没有移除多余的行,例如用于写入响应的行。
通过重新访问部署代码部分进行部署。
向服务执行的每次部署都会创建一个新的修订版本,该修订版本准备就绪后会自动开始处理流量。
如需清除先前设置的环境变量:
gcloud run services update hello-service --clear-env-vars
将默认值的新函数添加到服务的自动测试覆盖范围中。
查找日志中的其他问题
您可能会在日志查看器中看到此服务的其他问题。例如,不受支持的系统调用将在日志中显示为“容器沙盒限制”。
例如,Node.js 服务有时会生成以下日志消息:
Container Sandbox Limitation: Unsupported syscall statx(0xffffff9c,0x3e1ba8e86d88,0x0,0xfff,0x3e1ba8e86970,0x3e1ba8e86a90). Please, refer to https://gvisor.dev/c/linux/amd64/statx for more information.
在这种情况下,缺少支持不会影响 hello-service 示例服务。
Terraform 问题排查
如需了解 Terraform 相关问题排查或有疑问,请参阅 Terraform 政策验证问题排查或联系 Terraform 支持。