Overview
Private connectivity is a connection between your Virtual Private Cloud (VPC) network and Datastream's private network, enabling Datastream to communicate with resources by using internal IP addresses. Using private connectivity establishes a dedicated connection on the Datastream network, meaning no other customers can share it.
You can use private connectivity to connect Datastream to any source. However, only VPC networks that are peered directly can communicate with each other.
Transitive peering isn't supported. If the network that Datastream is peered with isn't the network where your source is hosted, then a reverse proxy is required. You need a reverse proxy both if your source is Cloud SQL, and if your source is hosted in another VPC or outside of the Google network.
In this page, you learn how to use proxies to establish private connectivity between Datastream and Cloud SQL, or between Datastream and sources that are hosted either in another VPC or outside of the Google network.
Why do you need a reverse proxy for Cloud SQL?
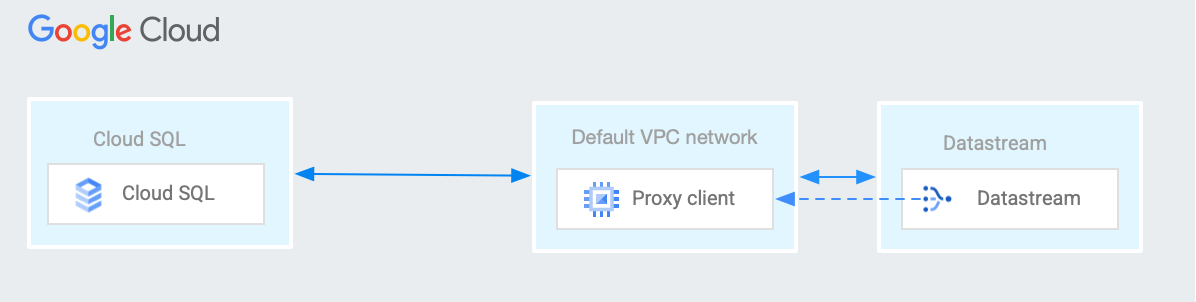
When you configure a Cloud SQL for MySQL or a Cloud SQL for PostgreSQL instance to use private IP addresses, you use a VPC peering connection between your VPC network and the VPC network of the underlying Google services where your Cloud SQL instance resides.
Because Datastream's network can't be peered directly with Cloud SQL's private services network, and because VPC peering isn't transitive, a reverse proxy for Cloud SQL is required to bridge the connection from Datastream to your Cloud SQL instance.
The following diagram illustrates using a reverse proxy to establish a private connection between Datastream and Cloud SQL.
Why do you need a reverse proxy for a source hosted in another VPC?
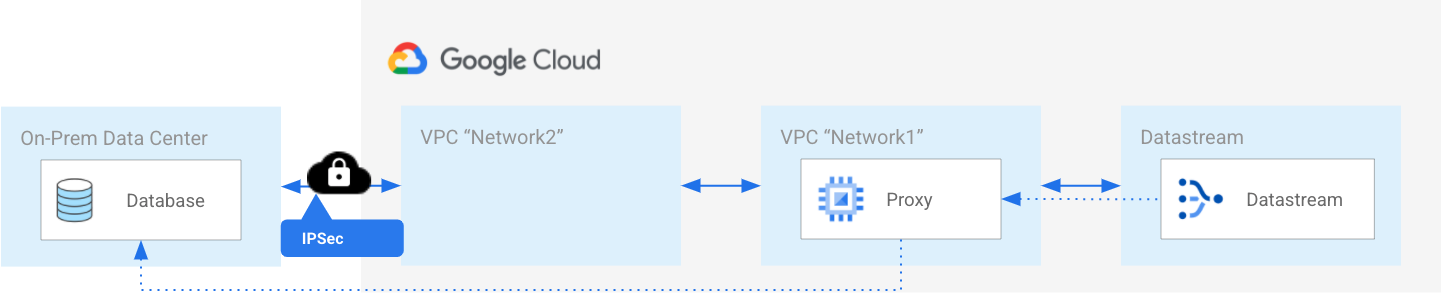
If Datastream's VPC network is peered with your VPC network ("Network1"), and your source is accessible from another VPC network ("Network2"), then Datastream can't use only VPC network peering to communicate with the source. A reverse proxy is also needed to bridge the connection between Datastream and the source.
The following diagram illustrates using a reverse proxy to establish a private connection between Datastream and a source that's hosted outside of the Google network.
Set up a reverse proxy
- Identify the VPC network through which Datastream connects to the source.
- In this VPC network, create a new virtual machine (VM) using the basic Debian or Ubuntu image. This VM will host the reverse proxy.
- Verify that the subnet is in the same region as Datastream, and that the reverse proxy forwards traffic to the source (and not from it).
- Connect to the proxy VM using SSH. For information about SSH connections, see About SSH connections.
- Confirm that your proxy VM can communicate with the source by running a
pingortelnetcommand from the VM to the source's internal IP address and port. On the proxy VM, create a startup script using the following code. For more information about startup scripts, see Using startup scripts on Linux VMs.
#! /bin/bash export DB_ADDR=[IP] export DB_PORT=[PORT] export ETH_NAME=$(ip -o link show | awk -F': ' '{print $2}' | grep -v lo) export LOCAL_IP_ADDR=$(ip -4 addr show $ETH_NAME | grep -Po 'inet \K[\d.]+') echo 1 > /proc/sys/net/ipv4/ip_forward iptables -t nat -A PREROUTING -p tcp -m tcp --dport $DB_PORT -j DNAT \ --to-destination $DB_ADDR:$DB_PORT iptables -t nat -A POSTROUTING -j SNAT --to-source $LOCAL_IP_ADDRThe script runs every time that your VM reboots.
Create a private connectivity configuration in Datastream to establish VPC peering between your VPC and Datastream's VPC.
Verify that your firewall rules allow traffic from the IP address ranges selected for private connectivity.
Create a connection profile in Datastream.
Best practices for setting up a reverse proxy
This section describes best practices to use when you set up your gateway and proxy VMs.
Machine type
To determine what machine type works best for you, start with a simple setup and measure load and throughput. If the usage is low and the throughput peaks are handled without any issues, consider reducing the number of CPUs and the amount of memory. For example, if your throughput is up to 2 GBps, then select an n1-standard-1 machine type. If your throughput is over 2 GBps, then select an e2-standard-2 machine type. The e2-standard-2 type is a cost effective configuration for increased efficiency.
Architecture type
Non-highly available (non-HA) instances
Deploy a single VM with an operating system of your choice. For added resilience, you can use a managed instance group (MIG) with a single VM. If your VM crashes, a MIG automatically repairs the failed instance by recreating it. For more information, see Instance groups.
Highly available (HA) instances
Set up a MIG with two VMs, each in a different region (if applicable), or in a different zone. To create the MIG, you must have an instance template that the group can use. The MIG is created behind an internal Layer 4 load balancer, using an internal next hop IP address.
What's next
- Learn how to create a private connectivity configuration.