将 Apache Beam 交互式运行程序与 JupyterLab 笔记本搭配使用来完成以下任务:
- 迭代开发流水线。
- 检查流水线图。
- 在“读取-求值-输出”循环 (REPL) 工作流中解析单个
PCollections。
这些 Apache Beam 笔记本通过 Vertex AI Workbench提供,后者是一项服务,用于托管预装了最新数据科学和机器学习框架的笔记本虚拟机。Dataflow 仅支持使用 Apache Beam 容器的 Workbench 实例。
本指南重点介绍 Apache Beam 笔记本引入的功能,但未说明如何构建笔记本。如需详细了解 Apache Beam,请参阅 Apache Beam 编程指南。
支持和限制
- Apache Beam 笔记本仅支持 Python。
- 在这些笔记本中运行的 Apache Beam 流水线段在测试环境中运行,而非生产环境 Apache Beam 运行程序。如需在 Dataflow 服务上启动笔记本,请导出在 Apache Beam 笔记本中创建的流水线。如需了解详情,请参阅从笔记本中创建的流水线启动 Dataflow 作业。
准备工作
- Sign in to your Google Cloud Platform account. If you're new to Google Cloud, create an account to evaluate how our products perform in real-world scenarios. New customers also get $300 in free credits to run, test, and deploy workloads.
-
In the Google Cloud console, on the project selector page, select or create a Google Cloud project.
Roles required to select or create a project
- Select a project: Selecting a project doesn't require a specific IAM role—you can select any project that you've been granted a role on.
-
Create a project: To create a project, you need the Project Creator
(
roles/resourcemanager.projectCreator), which contains theresourcemanager.projects.createpermission. Learn how to grant roles.
-
Verify that billing is enabled for your Google Cloud project.
-
Enable the Compute Engine and Notebooks APIs.
Roles required to enable APIs
To enable APIs, you need the Service Usage Admin IAM role (
roles/serviceusage.serviceUsageAdmin), which contains theserviceusage.services.enablepermission. Learn how to grant roles. -
In the Google Cloud console, on the project selector page, select or create a Google Cloud project.
Roles required to select or create a project
- Select a project: Selecting a project doesn't require a specific IAM role—you can select any project that you've been granted a role on.
-
Create a project: To create a project, you need the Project Creator
(
roles/resourcemanager.projectCreator), which contains theresourcemanager.projects.createpermission. Learn how to grant roles.
-
Verify that billing is enabled for your Google Cloud project.
-
Enable the Compute Engine and Notebooks APIs.
Roles required to enable APIs
To enable APIs, you need the Service Usage Admin IAM role (
roles/serviceusage.serviceUsageAdmin), which contains theserviceusage.services.enablepermission. Learn how to grant roles. 在 Google Cloud 控制台中,进入 Dataflow Workbench 页面。
确保您位于实例标签页上。
在工具栏中,点击 新建。
在环境部分的环境中,容器应为 Apache Beam。Apache Beam 笔记本仅支持 JupyterLab 3.x。
可选:如果要在 GPU 上运行笔记本,请在机器类型部分中,选择支持 GPU 的机器类型。如需了解详情,请参阅 GPU 平台。
在网络部分中,选择笔记本虚拟机的子网。
可选:如果您要设置自定义笔记本实例,请参阅使用自定义容器创建实例。
点击创建。Dataflow Workbench 会创建一个新的 Apache Beam 笔记本实例。
创建笔记本实例后,打开 JupyterLab 链接生效。点击打开 JupyterLab。
- 字数统计
- Streaming Word Count
- Streaming NYC Taxi Ride Data
- 笔记本中与流水线进行比较的 Apache Beam SQL
- 具有 Dataflow Runner 的笔记本中的 Apache Beam SQL
- 笔记本中的 Apache Beam SQL
- Dataflow Word Count
- 大规模的交互式 Flink
- RunInference
- 将 GPU 与 Apache Beam 搭配使用
- 直观呈现数据
- 基本运算
- 元素相关操作
- 聚合
- Windows
- I/O 操作
- 流式处理
- 最终练习
- 设置
n以将结果集限制为最多显示n个元素,例如 20。如果未设置n,则默认行为是列出来源记录结束之前捕获的最新元素。 - 设置
duration以将结果集限制为从来源记录开头处开始的指定秒数的数据。如果未设置duration,则默认行为是记录结束之前的所有元素。 点击 JupyterLab 顶部菜单栏中的
Interactive Beam。在下拉列表中,找到Open Inspector并点击它以打开检查器。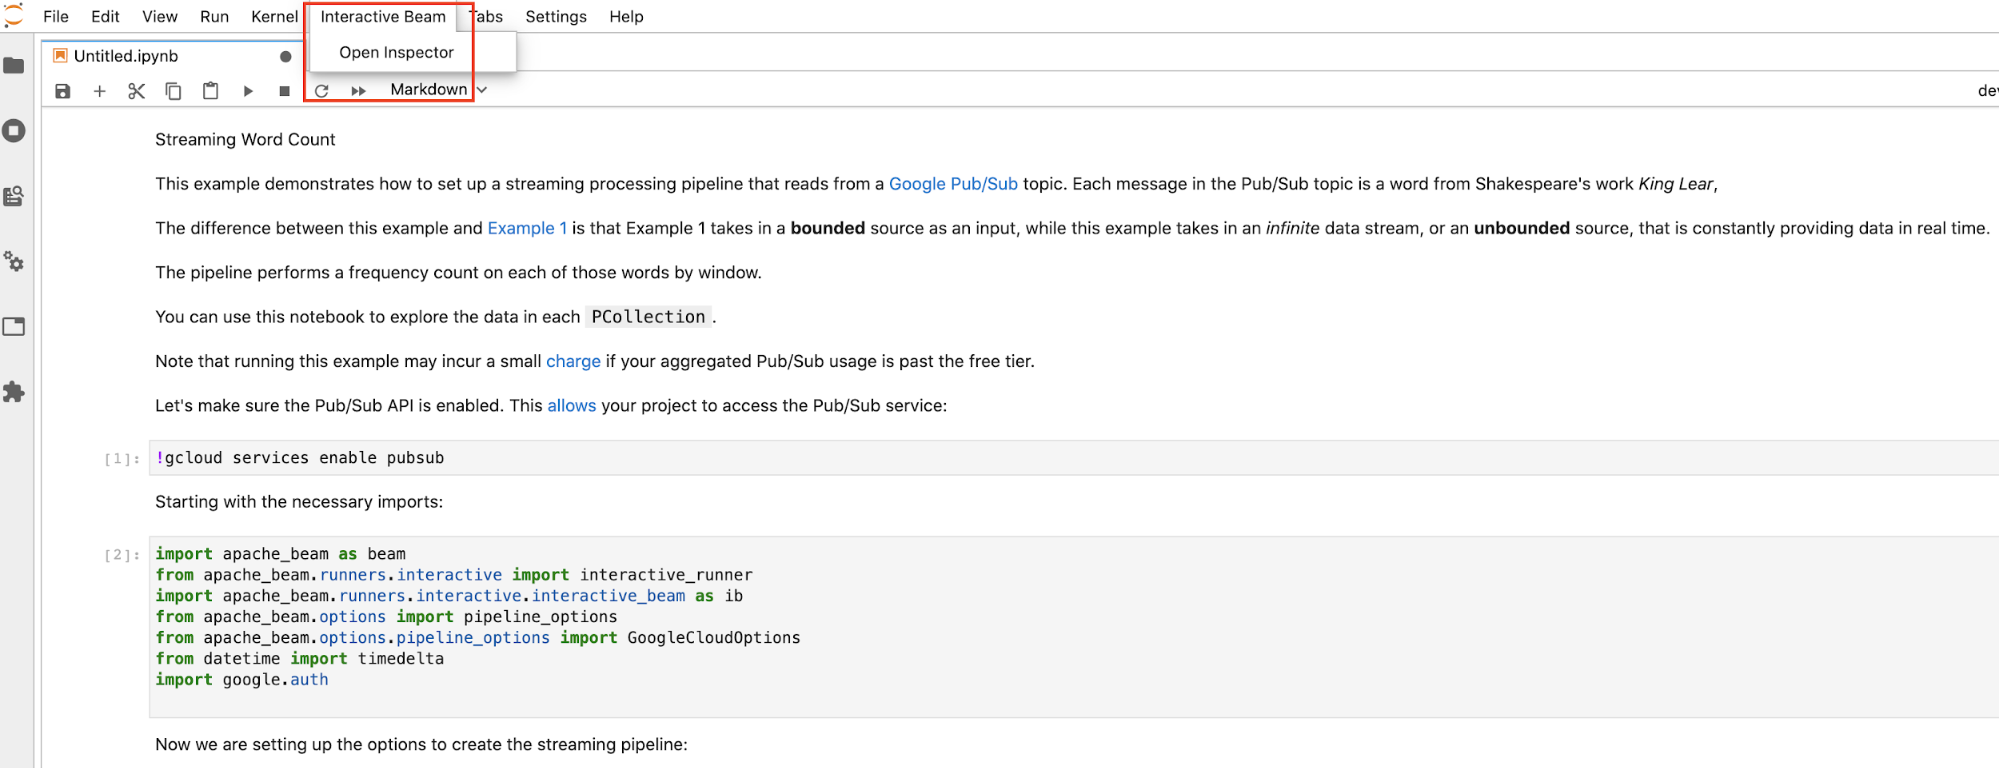
使用启动器页面。如果启动器页面没有打开,请点击
File->New Launcher将其打开。在启动器页面上,找到Interactive Beam并点击Open Inspector以打开检查器。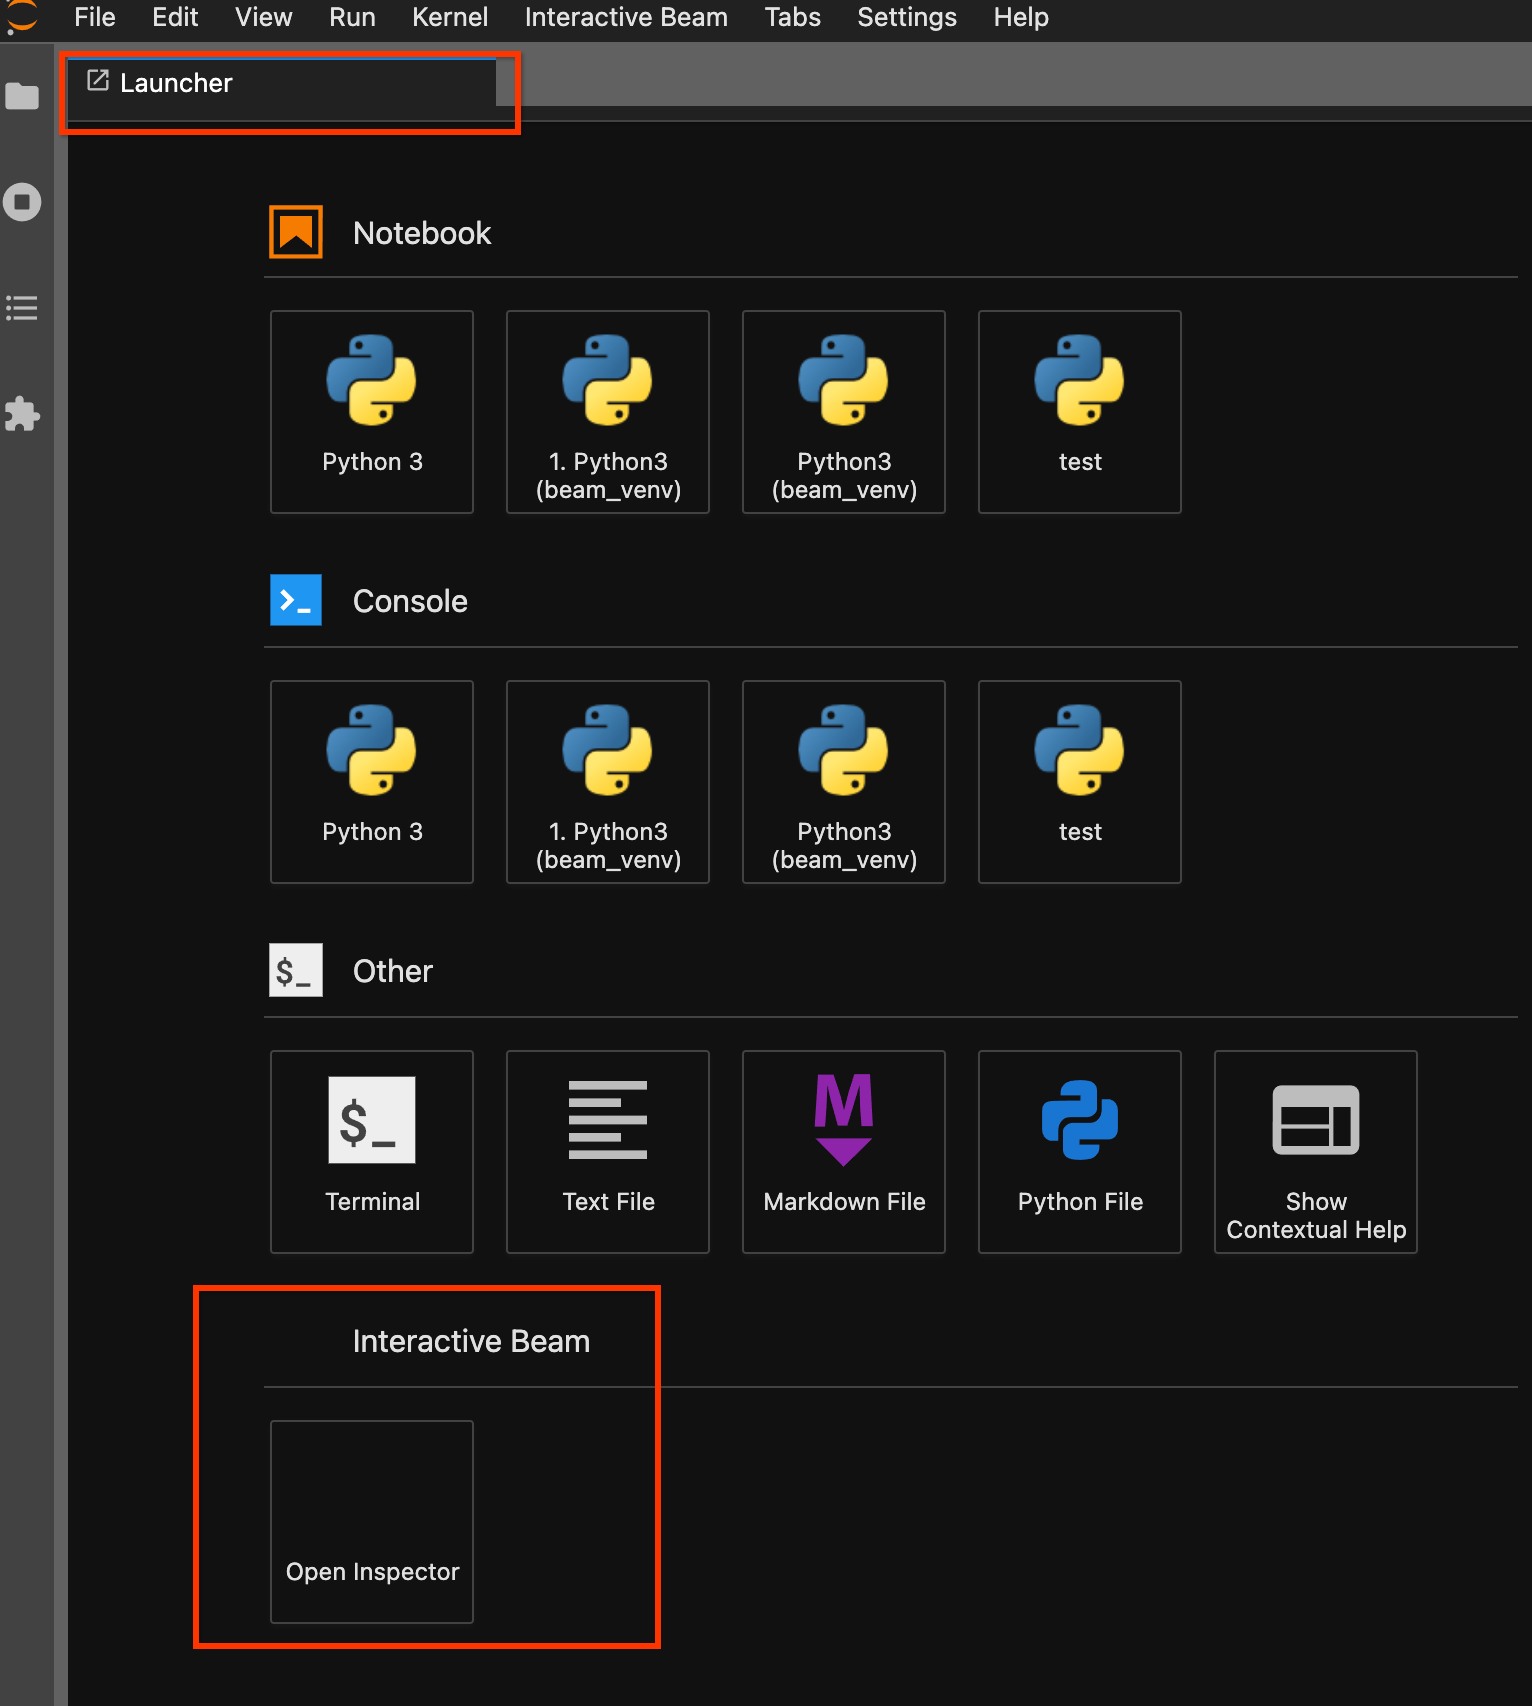
使用命令面板。在 JupyterLab 菜单栏上,点击
View>Activate Command Palette。在对话框中,搜索Interactive Beam以列出扩展程序的所有选项。点击Open Inspector打开检查器。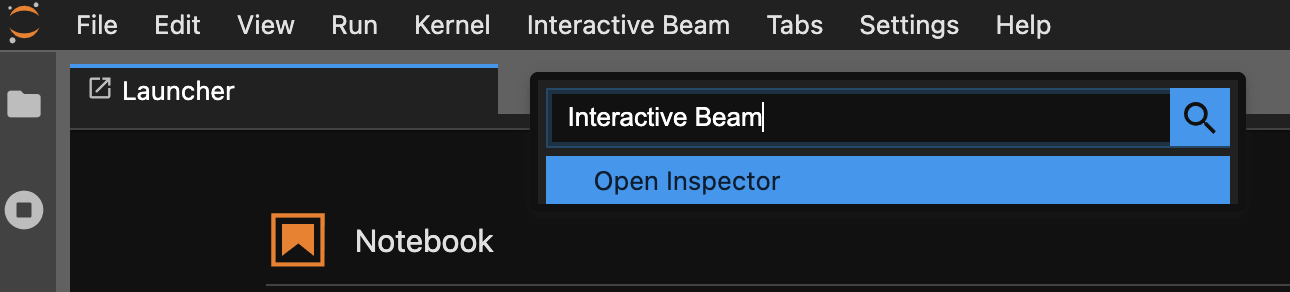
如果只打开了一个笔记本,检查器会自动连接到该笔记本。
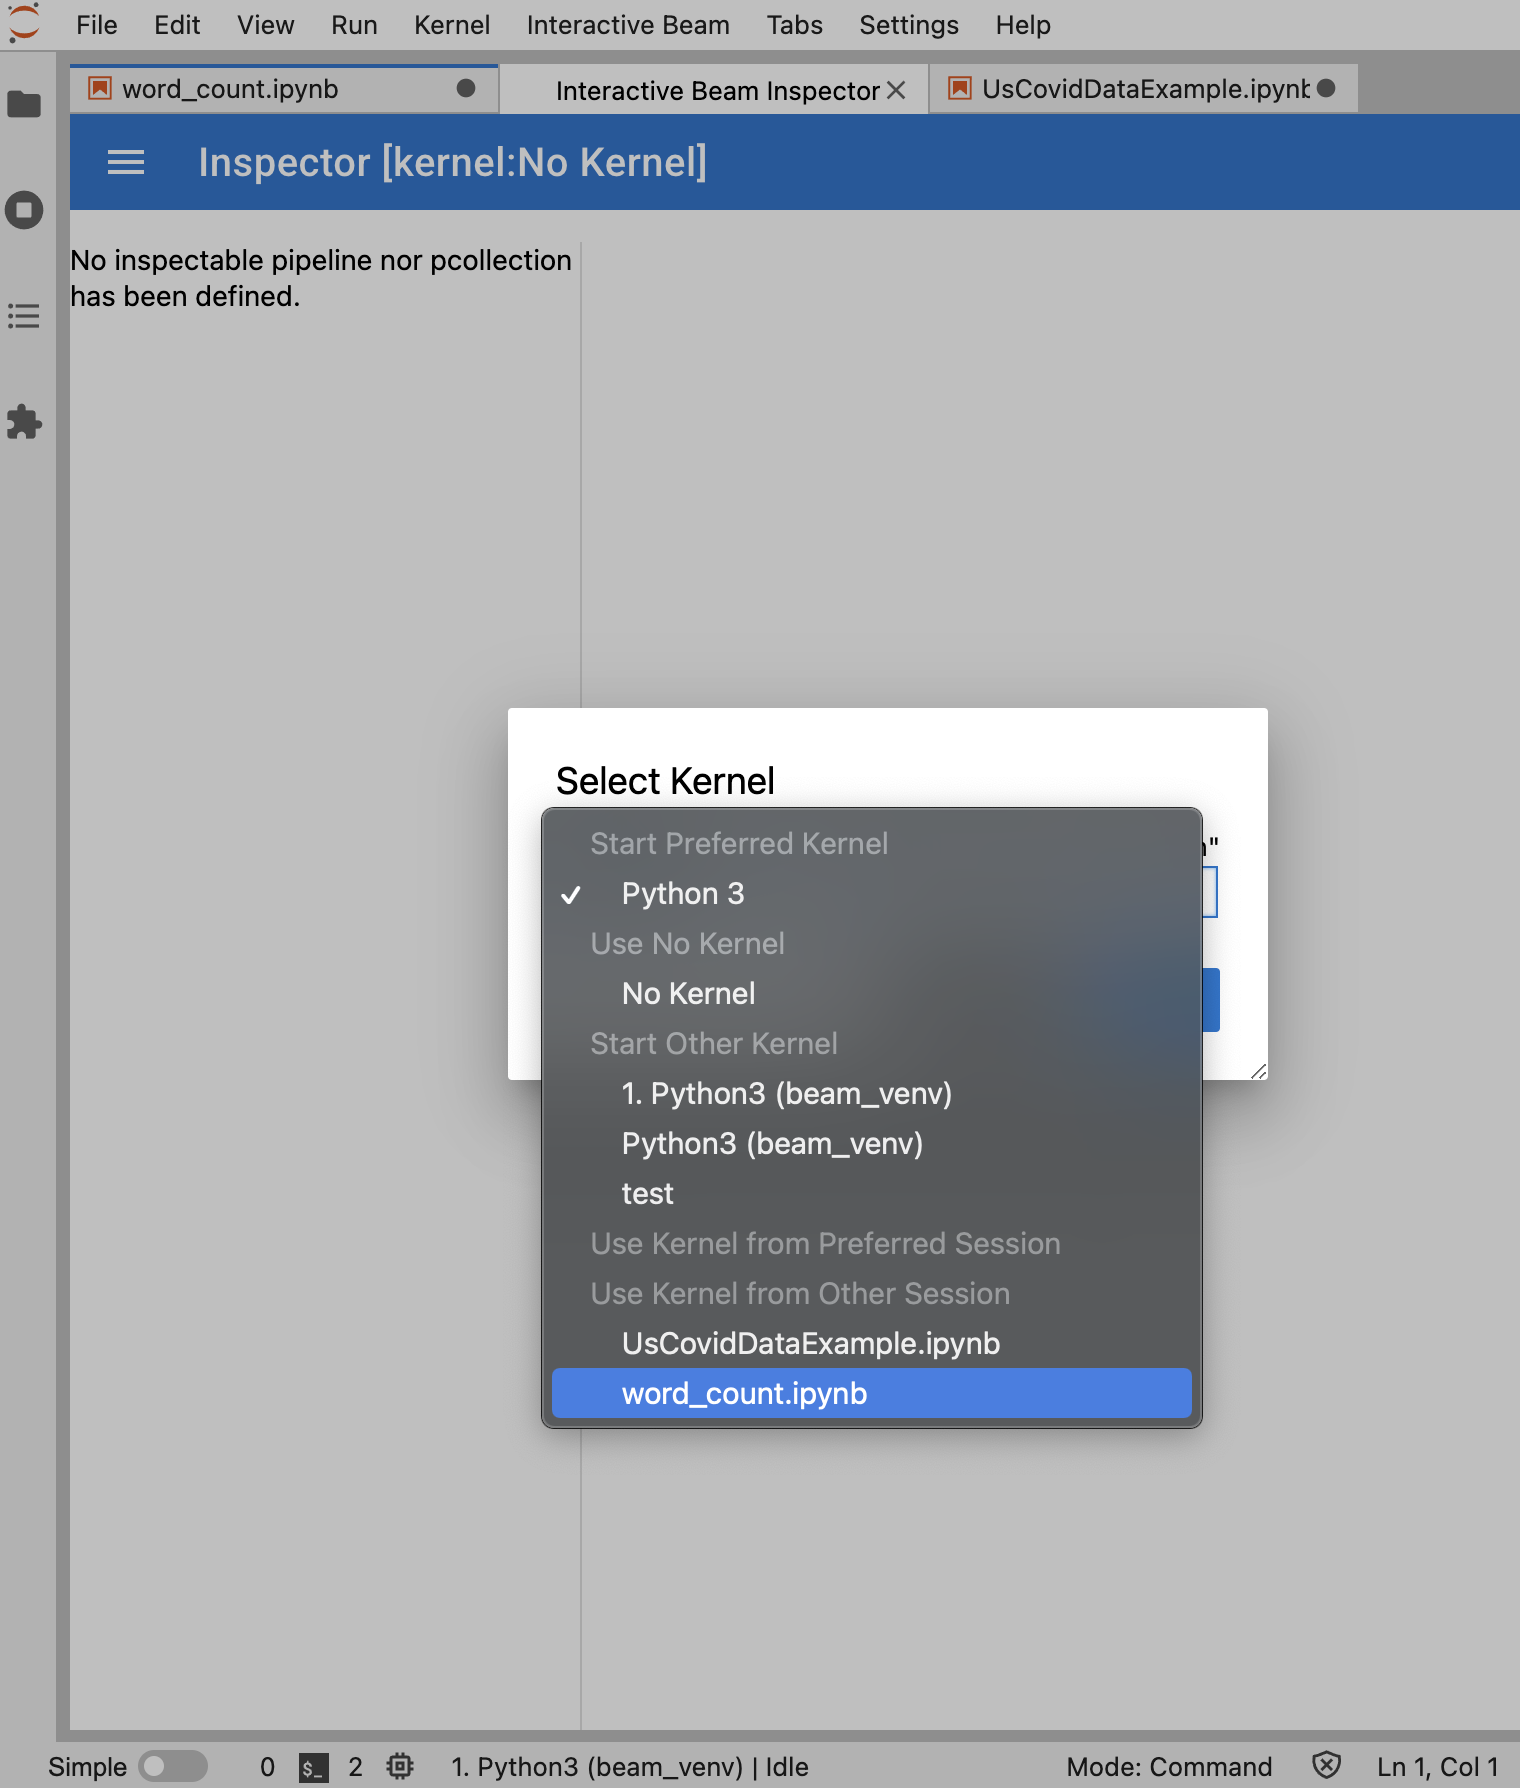
如果没有打开笔记本,系统会显示一个对话框,可让您选择内核。
如果打开了多个笔记本,系统会显示一个对话框,可让您选择笔记本会话。
如果是
PCollection,检查器会呈现其数据(如果数据持续进入无界限PCollections,则动态呈现),并且可以使用更多 widget 通过点击APPLY按钮来调整可视化效果。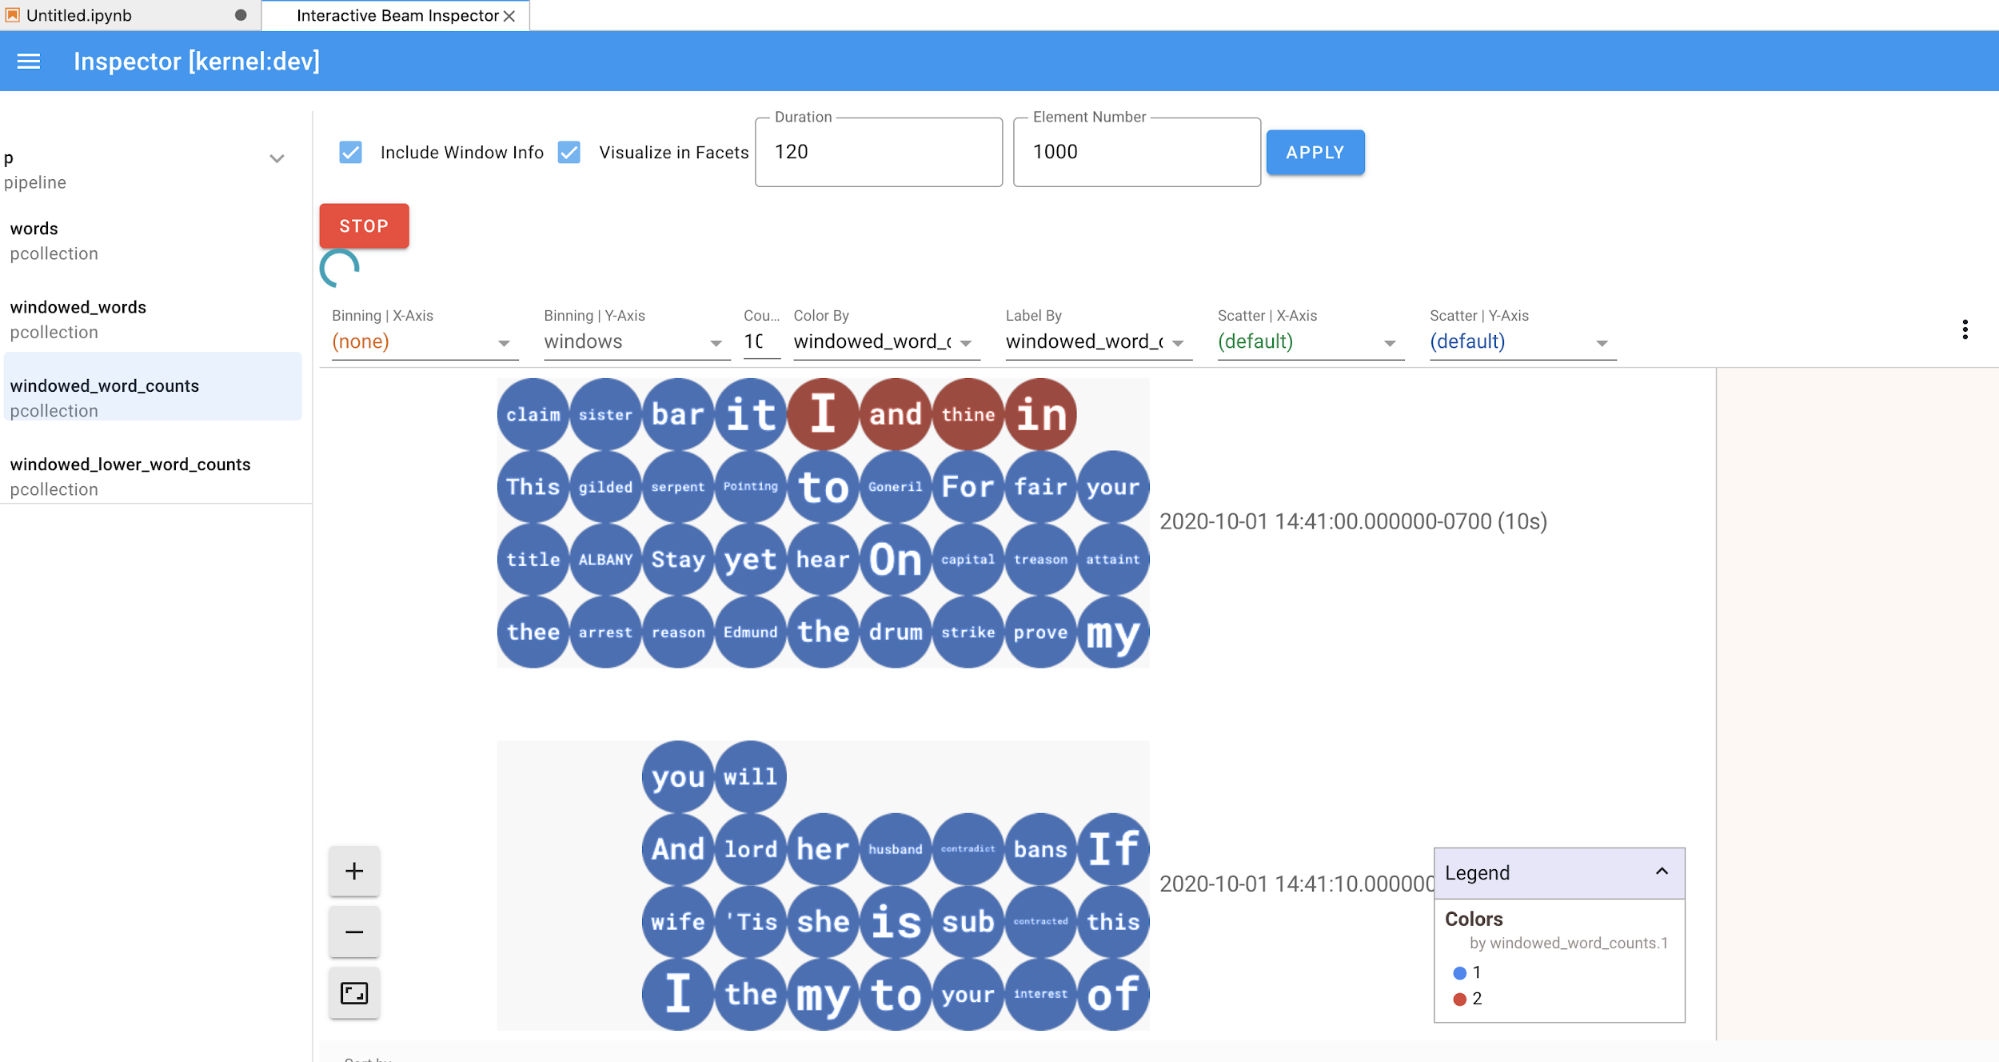
由于检查器和打开的笔记本共享同一内核会话,因此它们会彼此阻止对方运行。例如,如果笔记本正在运行代码,则检查器只有在笔记本完成执行之后才会更新。反之,如果检查器正在动态地直观呈现
PCollection,而您想立即在笔记本中运行代码,则必须点击STOP按钮停止可视化并以抢占方式释放内核供笔记本使用。如果是流水线,则检查器会显示流水线图。
- 磁盘上流水线的所有记录的总大小(以字节为单位)
- 后台记录作业的开始时间(从 Unix 纪元开始计算,以秒为单位)
- 后台记录作业的当前流水线状态
- 流水线的 Python 变量
- 可选:在使用笔记本运行 Dataflow 作业之前,请重启内核、重新运行所有单元并验证输出。如果您跳过此步骤,则笔记本中的隐藏状态可能会影响流水线对象中的作业图。
- 启用 Dataflow API。
添加以下 import 语句:
from apache_beam.runners import DataflowRunner传递您的流水线选项。
# Set up Apache Beam pipeline options. options = pipeline_options.PipelineOptions() # Set the project to the default project in your current Google Cloud # environment. _, options.view_as(GoogleCloudOptions).project = google.auth.default() # Set the Google Cloud region to run Dataflow. options.view_as(GoogleCloudOptions).region = 'us-central1' # Choose a Cloud Storage location. dataflow_gcs_location = 'gs://<change me>/dataflow' # Set the staging location. This location is used to stage the # Dataflow pipeline and SDK binary. options.view_as(GoogleCloudOptions).staging_location = '%s/staging' % dataflow_gcs_location # Set the temporary location. This location is used to store temporary files # or intermediate results before outputting to the sink. options.view_as(GoogleCloudOptions).temp_location = '%s/temp' % dataflow_gcs_location # If and only if you are using Apache Beam SDK built from source code, set # the SDK location. This is used by Dataflow to locate the SDK # needed to run the pipeline. options.view_as(pipeline_options.SetupOptions).sdk_location = ( '/root/apache-beam-custom/packages/beam/sdks/python/dist/apache-beam-%s0.tar.gz' % beam.version.__version__)您可以调整参数值。例如,您可以从
us-central1更改region值。使用
DataflowRunner运行流水线。此步骤将在 Dataflow 服务上运行作业。runner = DataflowRunner() runner.run_pipeline(p, options=options)p是创建流水线中的流水线对象。创建或挂接一个永久性磁盘。按照说明使用
ssh连接到笔记本实例的虚拟机,并在打开的 Cloud Shell 中发出命令。记下装载了 Persistent Disk 的目录,例如
/mnt/myDisk。修改笔记本实例的虚拟机详细信息,以将条目添加到
Custom metadata:键 -container-custom-params;值 --v /mnt/myDisk:/mnt/myDisk。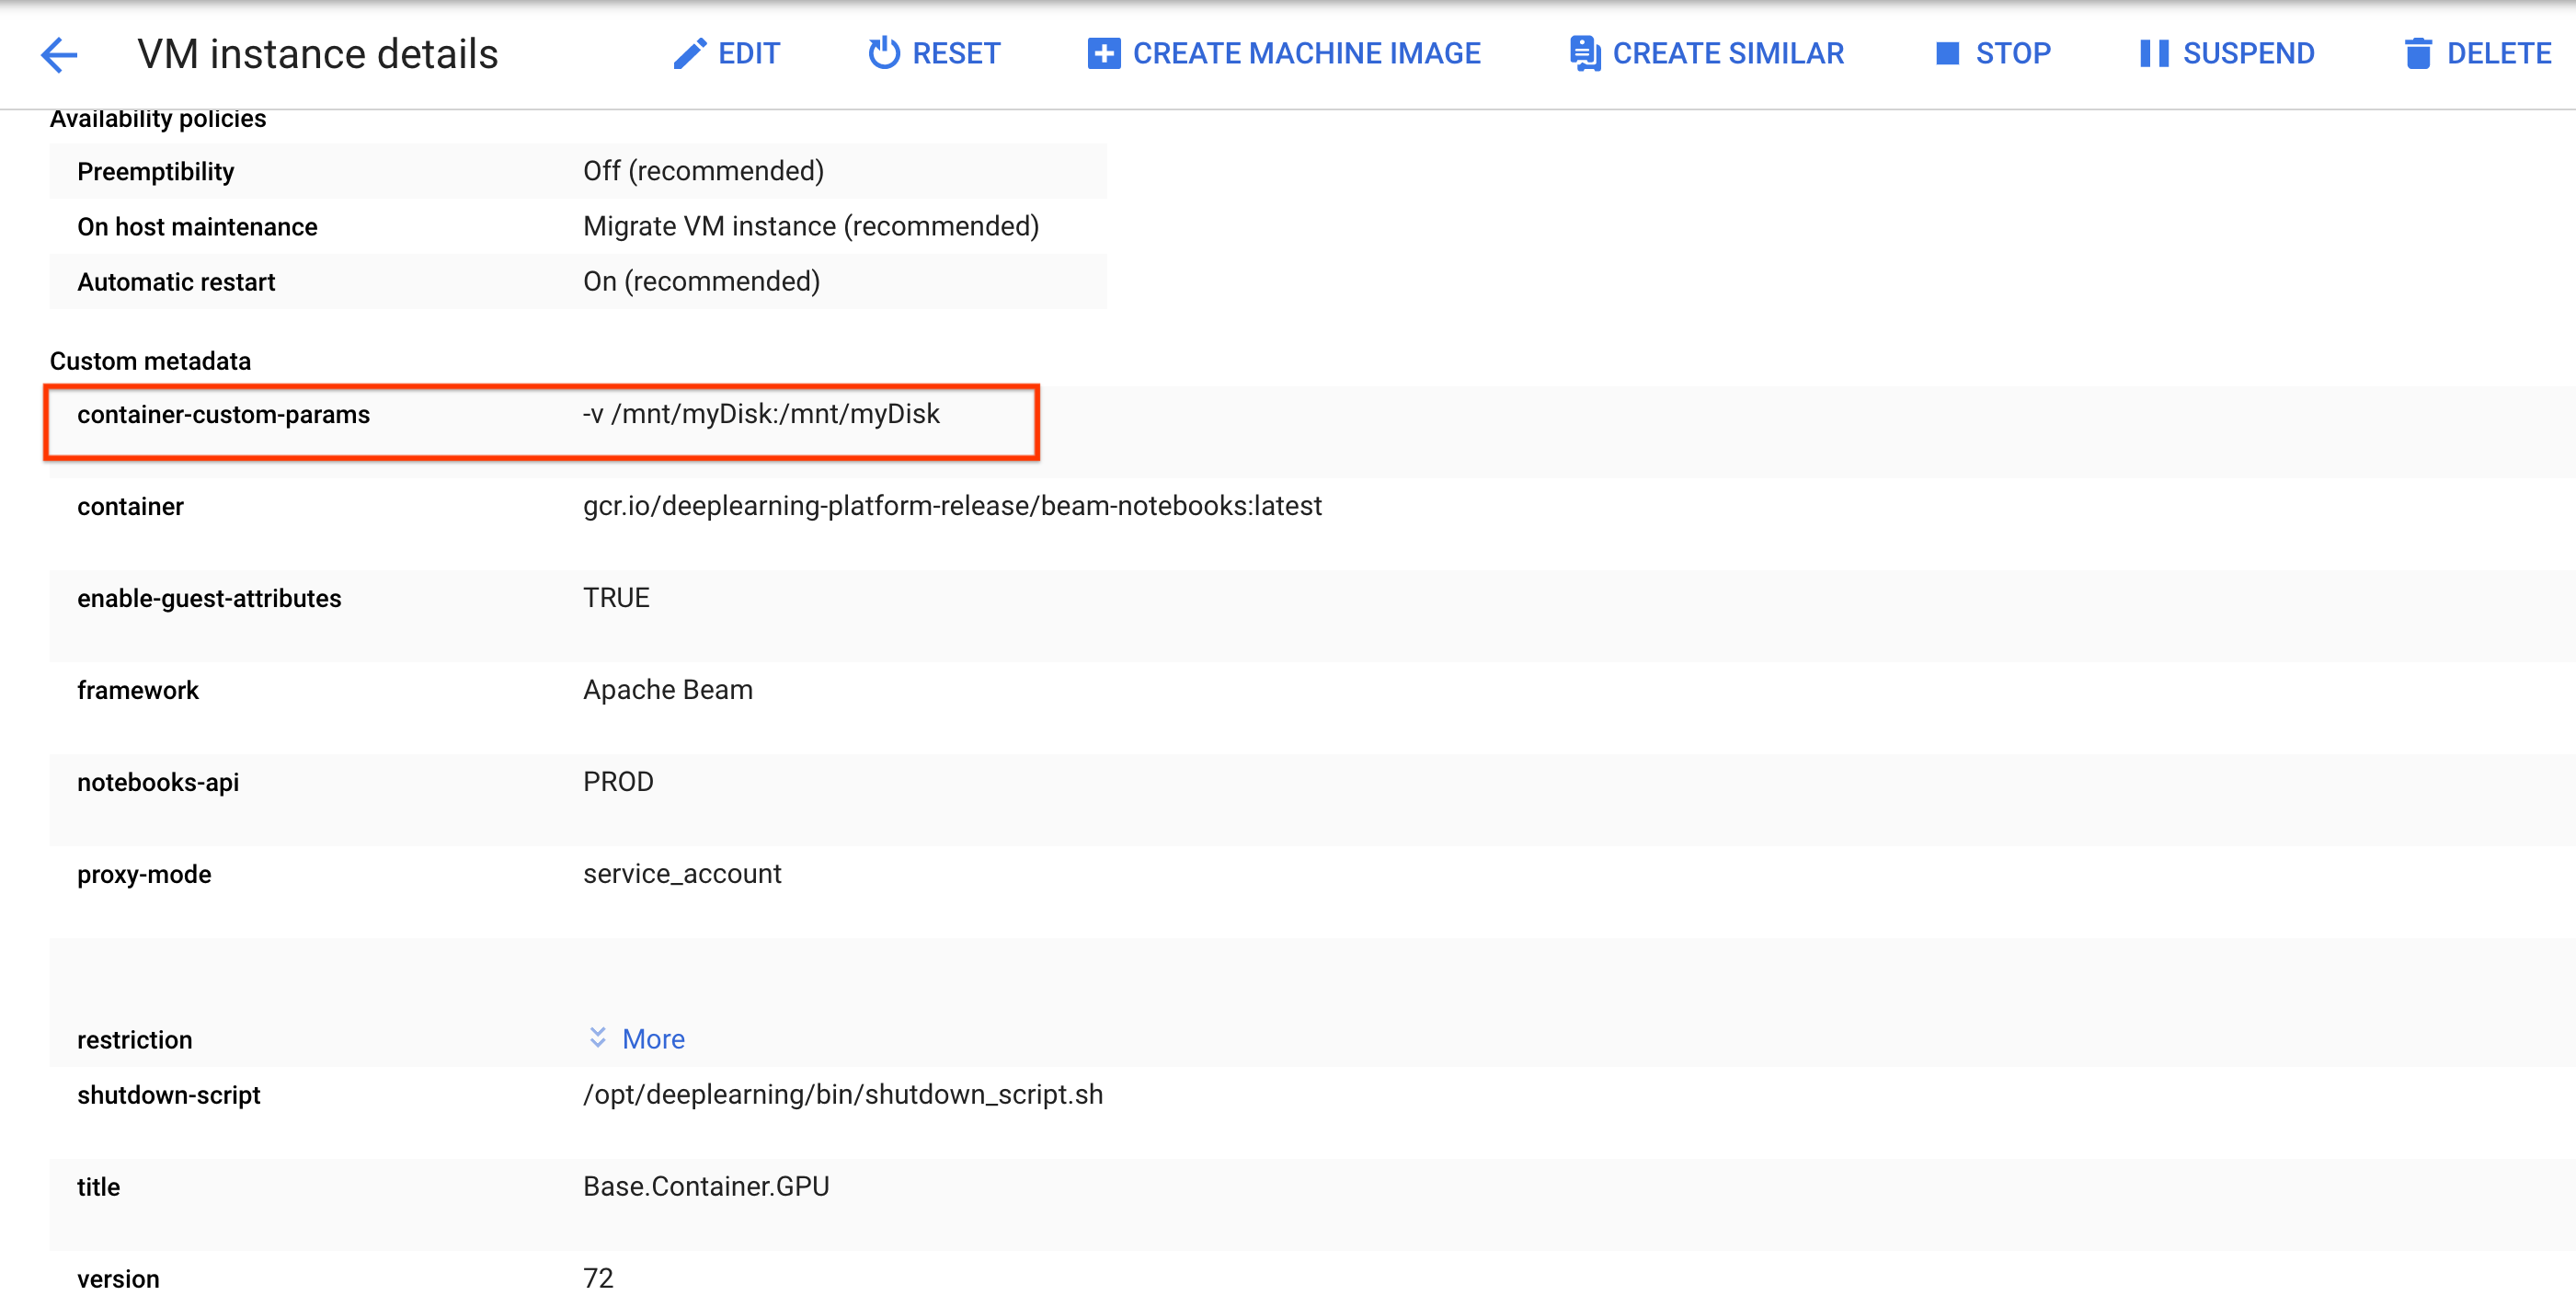
点击保存。
要更新这些更改,请重置笔记本实例。
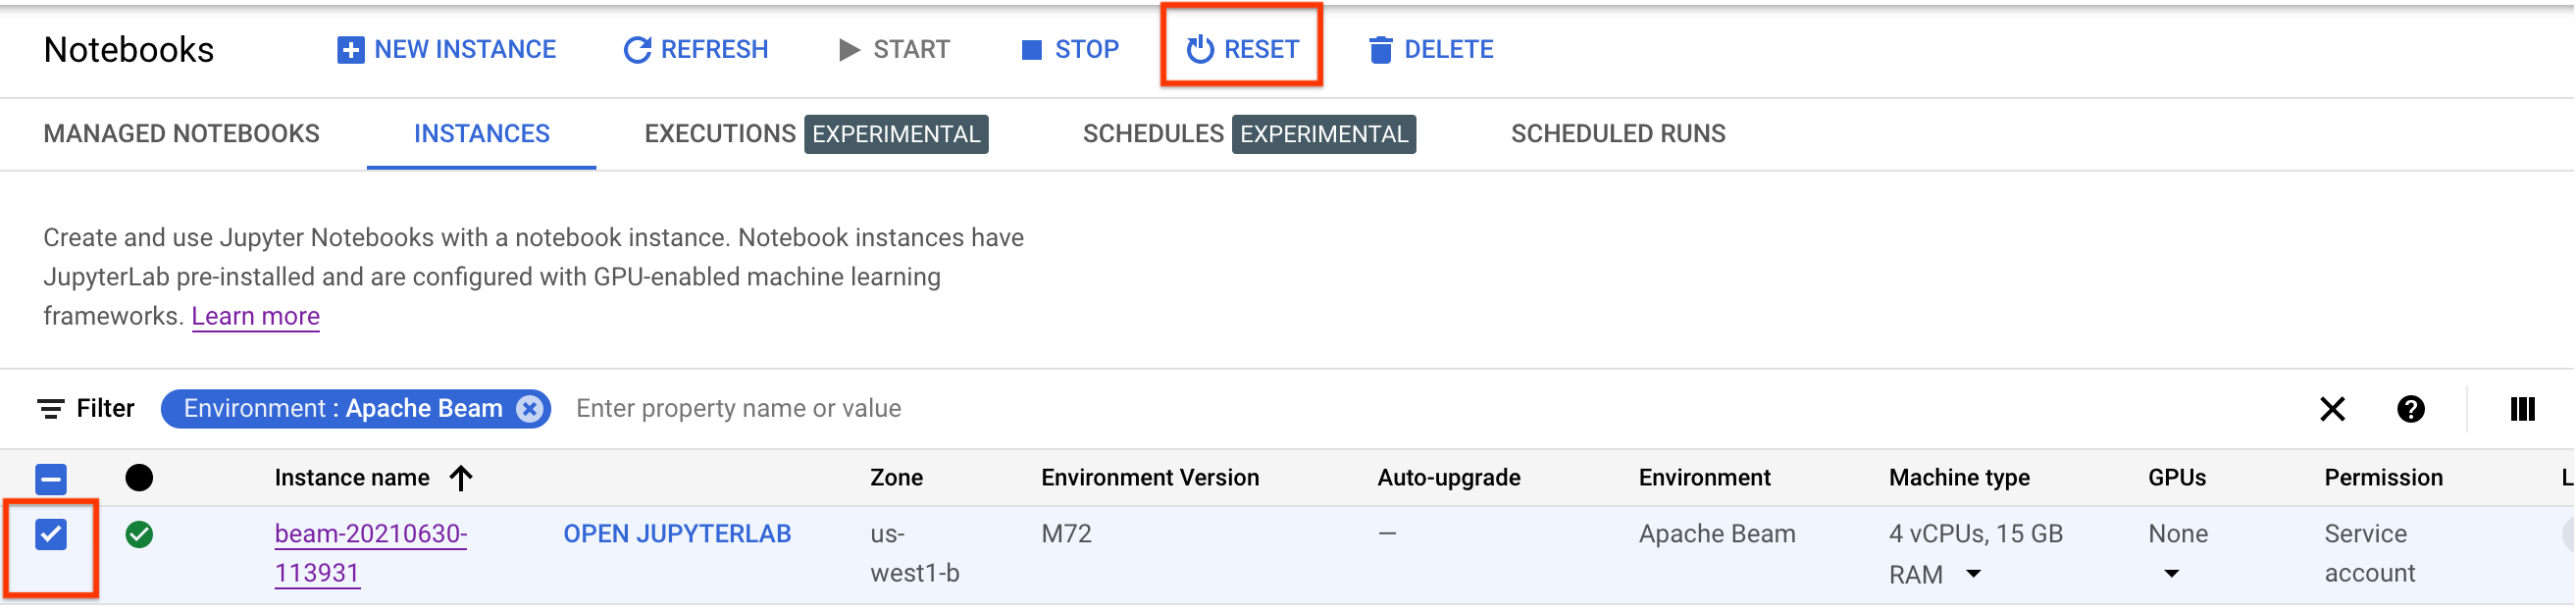
重置后,点击打开 JupyterLab。JupyterLab 界面可能需要一段时间才能使用。该界面显示后,打开终端并运行以下命令:
ls -al /mnt。系统应该会列出/mnt/myDisk目录。
- 了解您可以在 Apache Beam 笔记本中使用的高级功能。高级功能包括以下工作流:
创建 Apache Beam 笔记本实例之前,请为使用其他服务(如 Pub/Sub)的流水线启用其他 API。
如果未指定,则笔记本实例由具有 IAM Project Editor 角色的默认 Compute Engine 服务账号执行。如果项目明确限制了服务账号的角色,请确保它仍然有足够的权限来运行笔记本。例如,读取 Pub/Sub 主题会隐式创建订阅,服务账号需要 IAM Pub/Sub Editor 角色。相比之下,读取 Pub/Sub 订阅只需要 IAM Pub/Sub Subscriber 角色。
完成本指南后,为避免继续计费,请删除您创建的资源。如需了解详情,请参阅清理。
启动 Apache Beam 笔记本实例
可选:安装依赖项
Apache Beam 笔记本已经预装了 Apache Beam 和Google Cloud 连接器依赖项。如果您的流水线包含依赖于第三方库的自定义连接器或自定义 PTransforms,请在创建笔记本实例后进行安装。
Apache Beam 笔记本示例
创建笔记本实例后,在 JupyterLab 中打开该实例。 在 JupyterLab 边栏的文件标签页中,示例文件夹包含示例笔记本。如需详细了解如何使用 JupyterLab 文件,请参阅 JupyterLab 用户指南中的使用文件。
以下笔记本可用:
教程文件夹包含介绍 Apache Beam 基础知识的其他教程。以下教程可用:
这些笔记本包含说明性文字和注释代码块,可帮助您了解 Apache Beam 概念和 API 使用情况。 教程还提供一些练习,供您练习学到的概念。
以下部分使用 Streaming Word Count 笔记本中的示例代码。本指南中的代码段与 Streaming Word Count 笔记本中的代码段可能存在细微差异。
创建笔记本实例
导航到文件 > 新建 > 笔记本,然后选择 Apache Beam 2.22 或更高版本的内核。
Apache Beam 笔记本是在 Apache Beam SDK 主分支的基础上构建的。这意味着笔记本界面中显示的最新内核版本可能会比最新发布的 SDK 版本旧。
Apache Beam 安装到您的笔记本实例后,在笔记本中加入 interactive_runner 和 interactive_beam 模块。
import apache_beam as beam
from apache_beam.runners.interactive.interactive_runner import InteractiveRunner
import apache_beam.runners.interactive.interactive_beam as ib
如果您的笔记本使用其他 Google API,请添加以下 import 语句:
from apache_beam.options import pipeline_options
from apache_beam.options.pipeline_options import GoogleCloudOptions
import google.auth
设置交互选项
以下代码行会设置 InteractiveRunner 记录无界限来源中的数据的时间量。在此示例中,时长设置为 10 分钟。
ib.options.recording_duration = '10m'
您还可以使用 recording_size_limit 属性来更改无界限来源的记录大小限制(以字节为单位)。
# Set the recording size limit to 1 GB.
ib.options.recording_size_limit = 1e9
如需了解其他交互选项,请参阅 interactive_beam.options 类。
创建流水线
使用 InteractiveRunner 对象初始化流水线。
options = pipeline_options.PipelineOptions(flags={})

# Set the pipeline mode to stream the data from Pub/Sub.
options.view_as(pipeline_options.StandardOptions).streaming = True

# Set the project to the default project in your current Google Cloud Platform environment.
# The project is used to create a subscription to the Pub/Sub topic.
_, options.view_as(GoogleCloudOptions).project = google.auth.default()

p = beam.Pipeline(InteractiveRunner(), options=options)
读取和直观呈现数据
以下示例展示了一个 Apache Beam 流水线,该流水线会创建对指定 Pub/Sub 主题的订阅,并读取订阅。
words = p | "read" >> beam.io.ReadFromPubSub(topic="projects/pubsub-public-data/topics/shakespeare-kinglear")
流水线按窗口对来源的字词进行统计。它会创建固定窗口,每个窗口的时长均为 10 秒。
windowed_words = (words
   | "window" >> beam.WindowInto(beam.window.FixedWindows(10)))
在将数据划分窗口后,系统会按窗口统计字词。
windowed_word_counts = (windowed_words
   | "count" >> beam.combiners.Count.PerElement())
show() 方法会直观呈现笔记本中生成的 PCollection。
ib.show(windowed_word_counts, include_window_info=True)
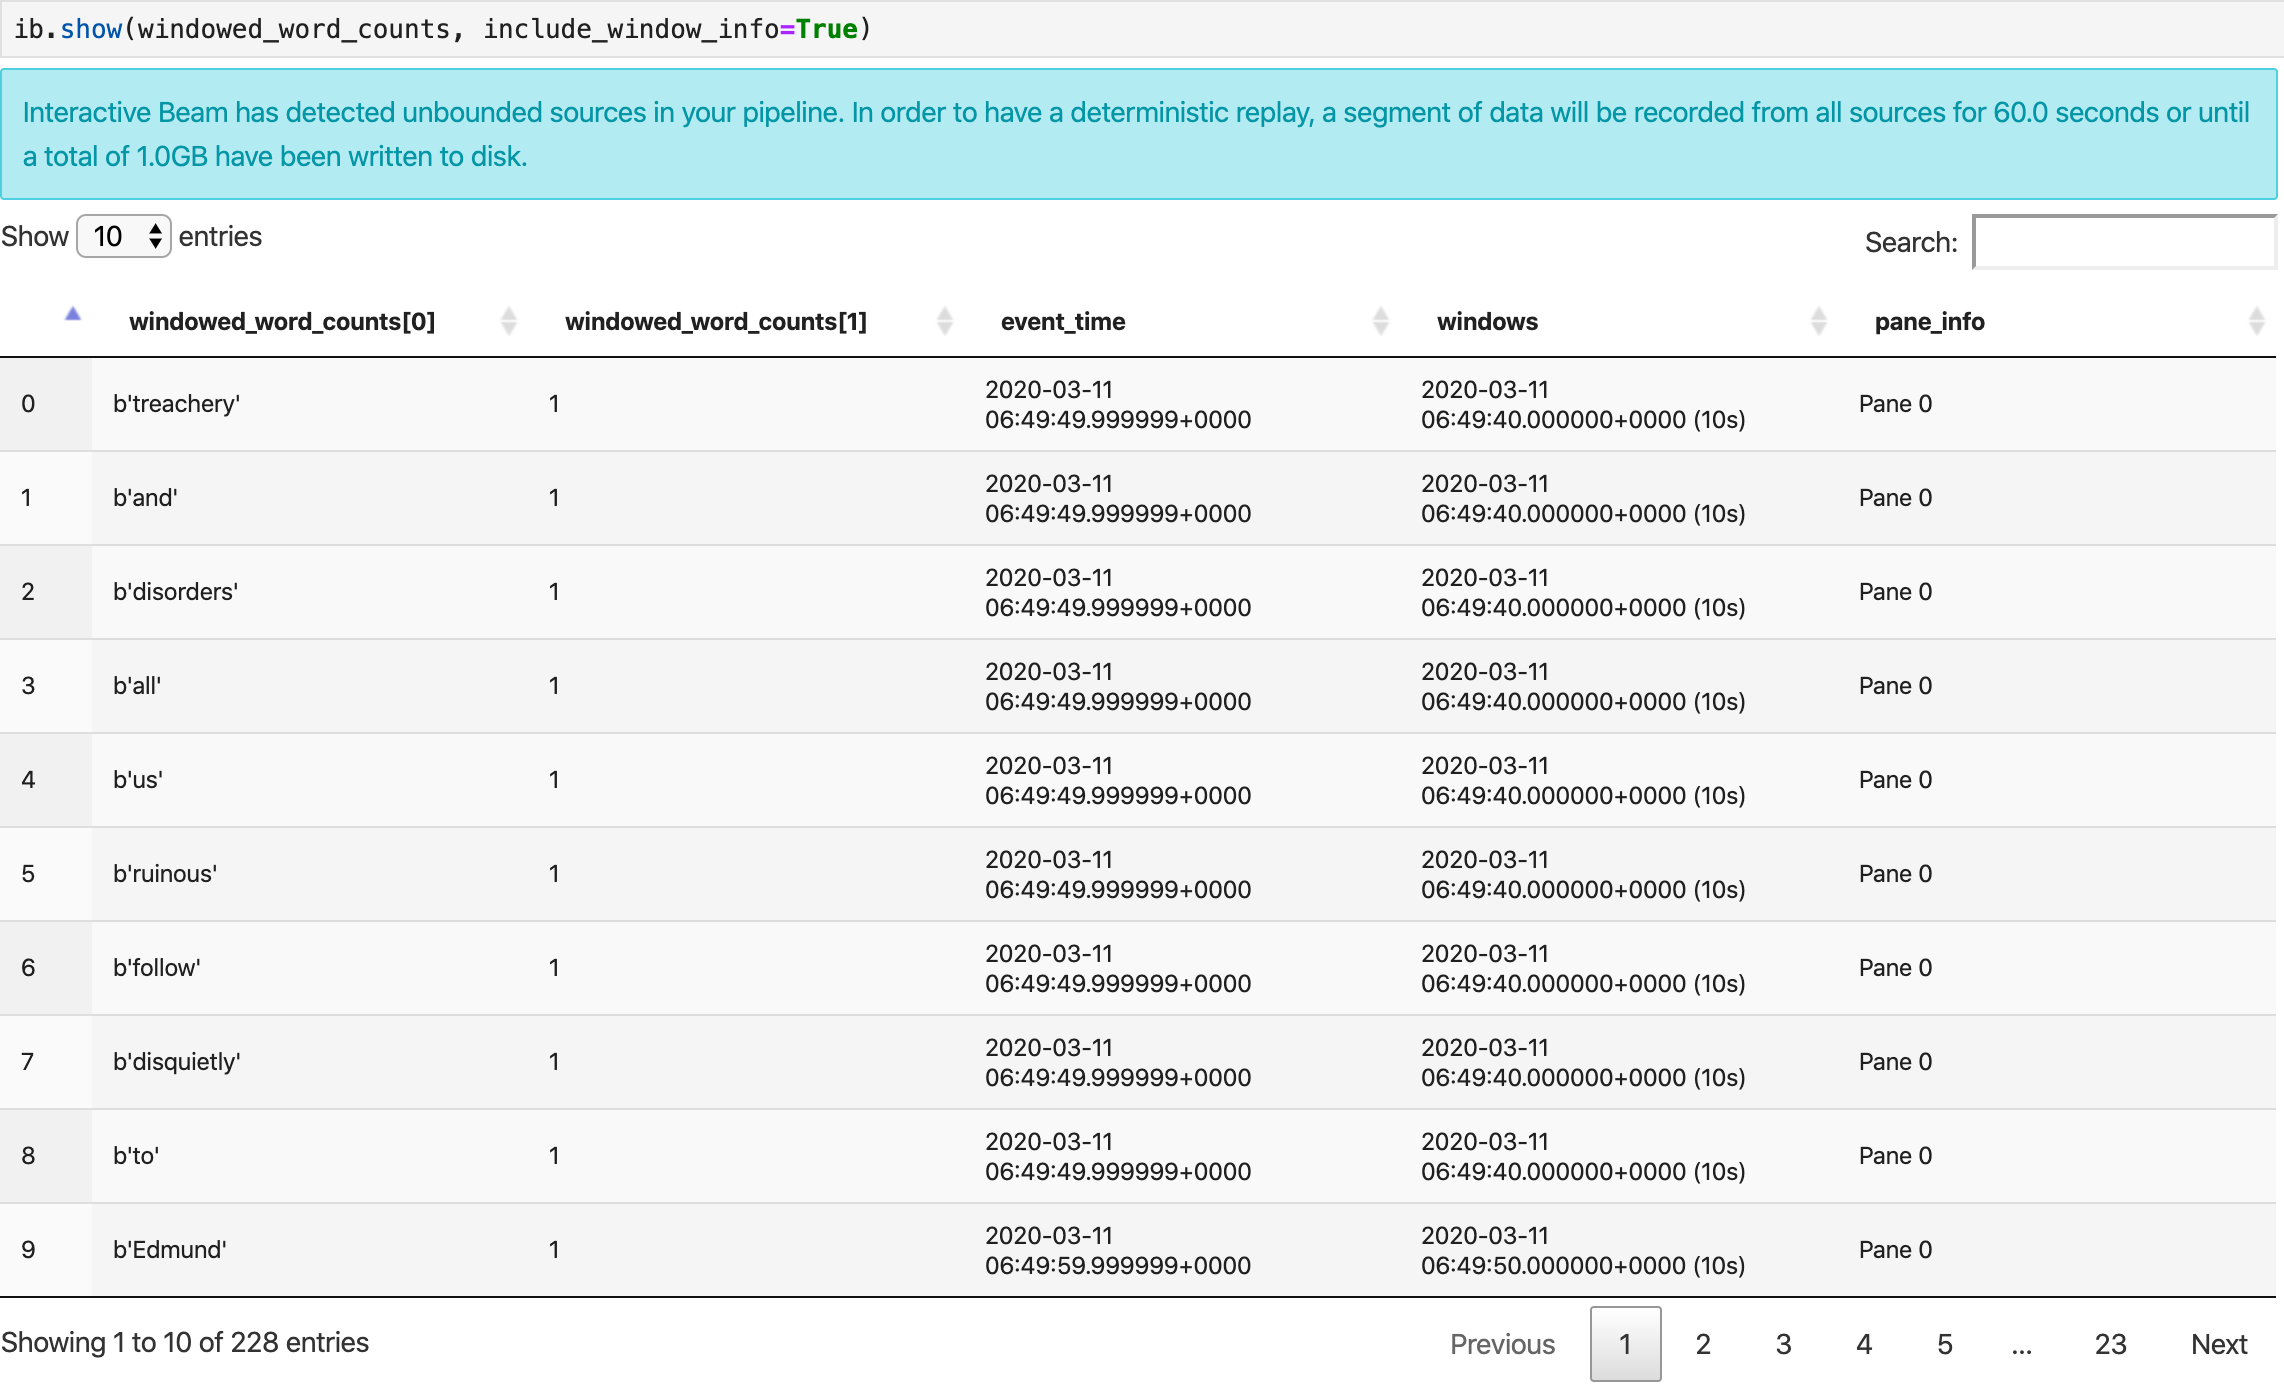
您可以通过设置两个可选参数 n 和 duration 从 show() 重新限制结果集范围。
如果同时设置了这两个可选参数,则只要达到任一阈值,show() 就会停止。在以下示例中,show() 最多返回 20 个元素,这些元素根据记录的来源中首个 30 秒的数据进行计算。
ib.show(windowed_word_counts, include_window_info=True, n=20, duration=30)
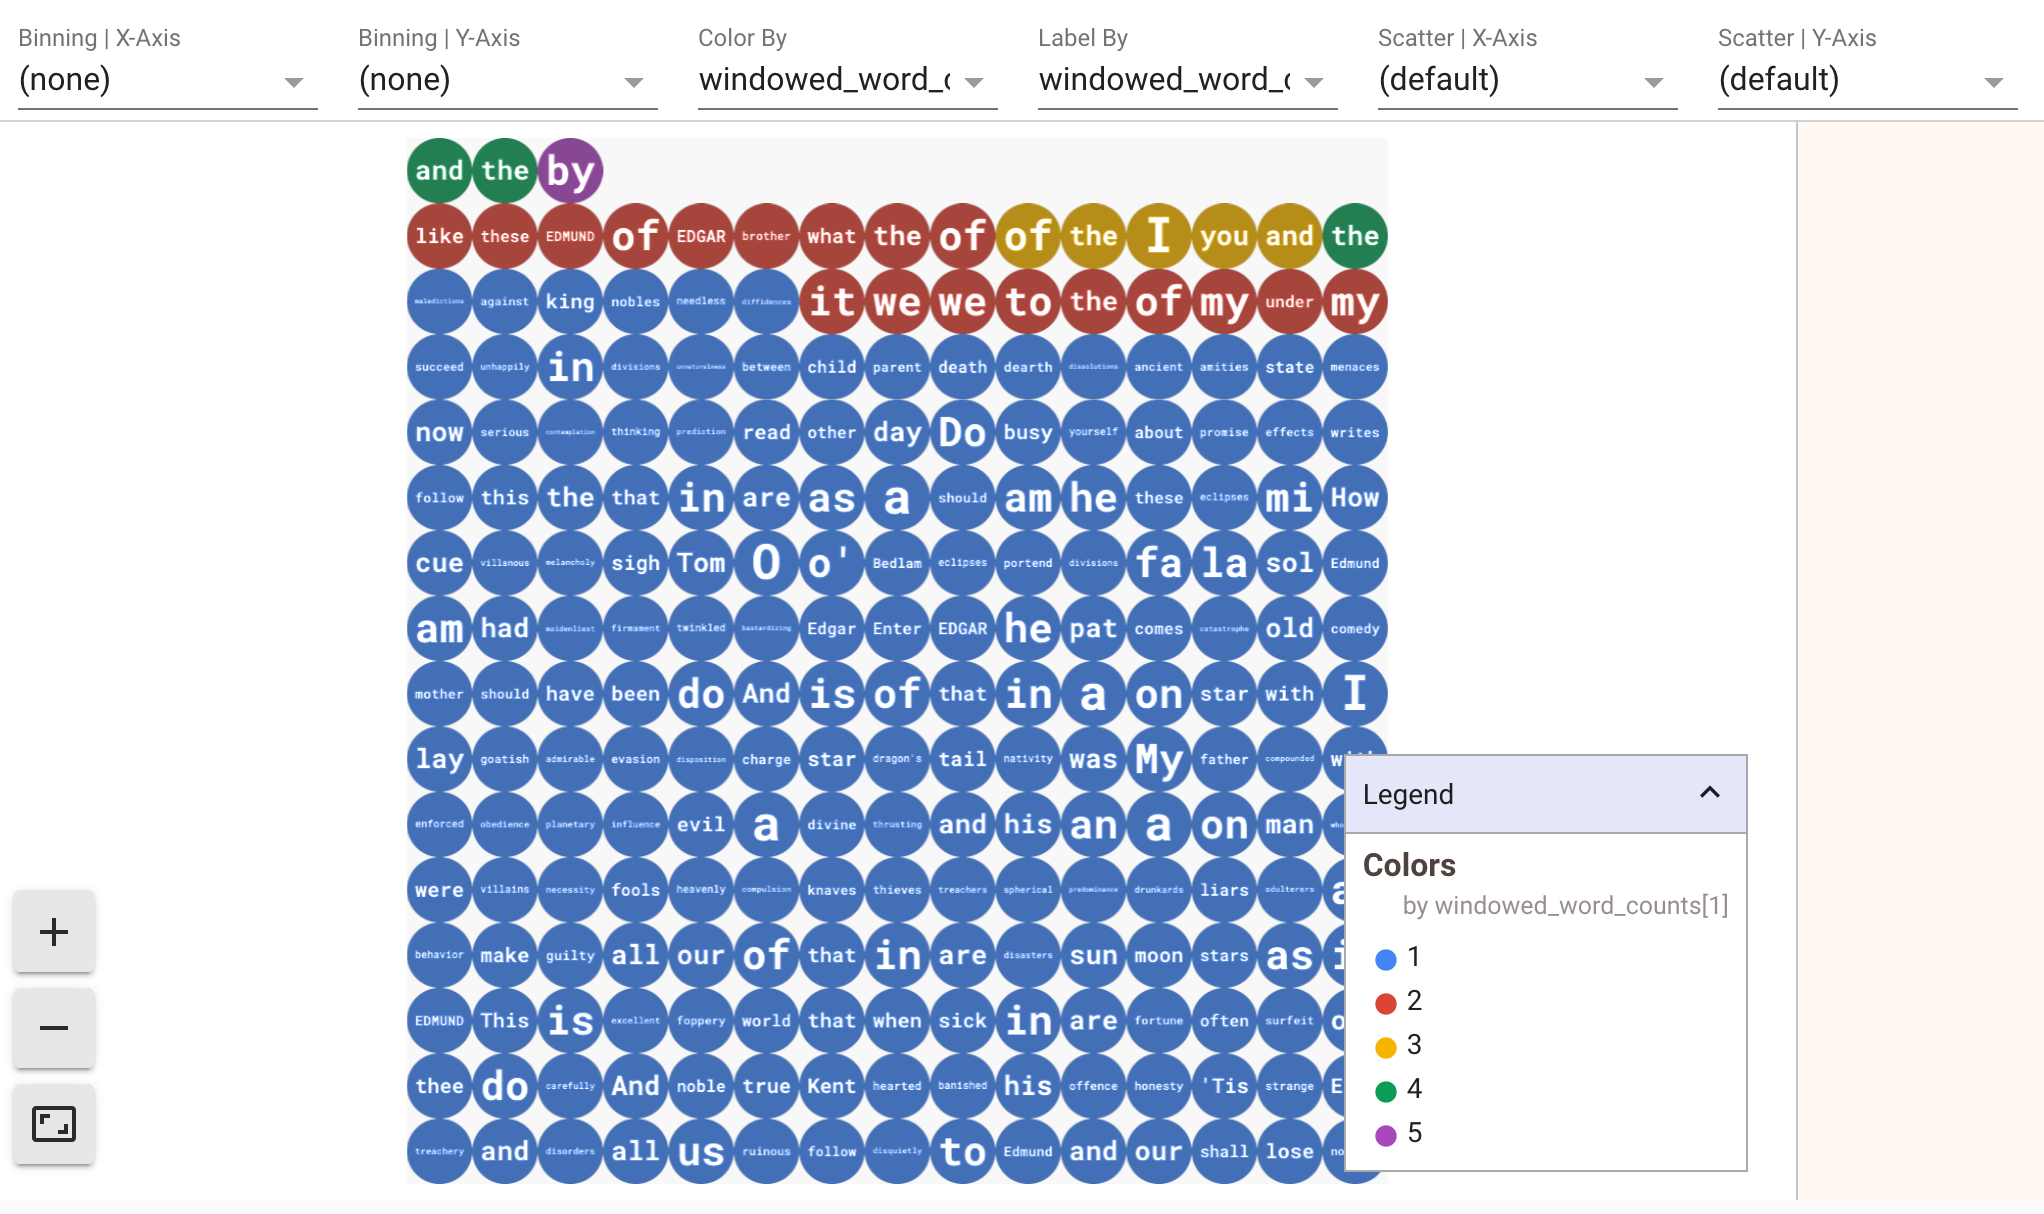
如需以可视化效果显示数据,请向 show() 方法传递 visualize_data=True。您可以对可视化数据应用多个过滤条件。以下可视化数据允许您按标签和坐标轴进行过滤:
为确保流处理流水线的原型设计可重复使用,show() 方法调用会默认重复使用捕获的数据。如需更改此行为,使 show() 方法始终提取新数据,请设置 interactive_beam.options.enable_capture_replay = False。此外,如果您向笔记本添加第二个无界限来源,则前一个无界限来源中的数据将被舍弃。
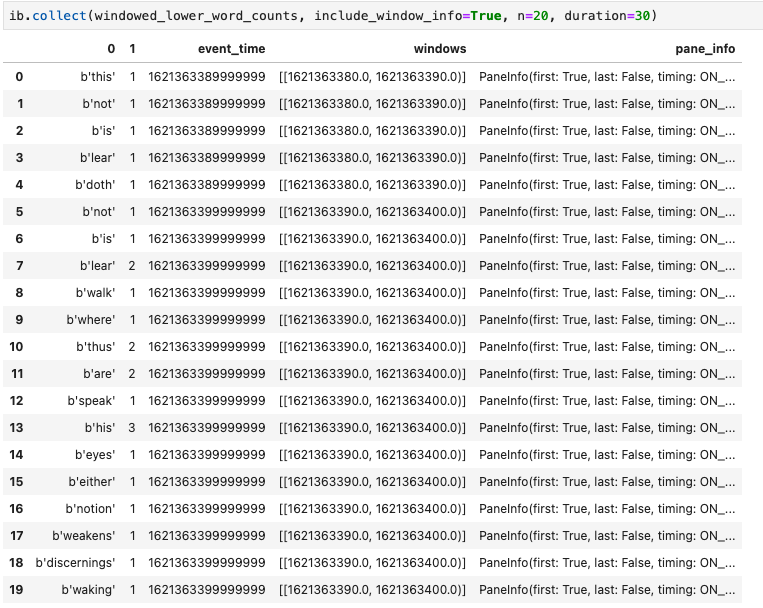
Apache Beam 笔记本中另一个实用的可视化工具是 Pandas DataFrame。以下示例首先将字词转换为小写,然后计算每个字词的频率。
windowed_lower_word_counts = (windowed_words
   | beam.Map(lambda word: word.lower())
   | "count" >> beam.combiners.Count.PerElement())
collect() 方法在 Pandas DataFrame 中提供输出。
ib.collect(windowed_lower_word_counts, include_window_info=True)
修改和重新运行单元是笔记本开发中的一种常见做法。在 Apache Beam 笔记本中修改和重新运行单元时,此单元不会撤消原始单元中代码的预期操作。例如,如果一个单元向流水线添加一个 PTransform,则重新运行该单元会向流水线额外添加一个 PTransform。如果要清除状态,请重启内核并重新运行单元。
通过交互式 Beam 检查器直观呈现数据
您可能会发现,通过不断调用 show() 和 collect() 检查 PCollection 的数据很容易令人分心,当输出占据了大量屏幕空间并导致难以通过笔记本导航的时候尤为如此。在某些情况下,您还可能需要并排比较多个 PCollections 以检查转换是否按预期进行。例如,一个 PCollection 完成了转换并生成另一个 PCollection。对于这些使用场景,交互式 Beam 检查器是一种方便的解决方案。
交互式 Beam 检查器以 JupyterLab 扩展程序 apache-beam-jupyterlab-sidepanel 的形式提供,已预安装在 Apache Beam 笔记本中。您可以使用此扩展程序以交互方式检查流水线的状态以及与每个 PCollection 关联的数据,而无需显式调用 show() 或 collect()。
您可以通过以下三种方式打开检查器:
当检查器即将打开时:
建议先打开至少 1 个笔记本,并为其选择内核,然后再打开检查器。如果您在打开任何笔记本之前使用内核打开了检查器,那么在稍后打开笔记本以连接到检查器时,您必须从 Use
Kernel from Preferred Session 中选择 Interactive Beam Inspector Session。当检查器和笔记本共享同一个会话(而不是从同一内核创建的不同会话)时,两者是连接的。从 Start Preferred Kernel 中选择同一个内核会创建一个新会话,该会话与打开的笔记本或检查器的现有会话无关。
您可以为一个打开的笔记本打开多个检查器,并通过在工作区中自由拖放检查器的标签页来排放它们。
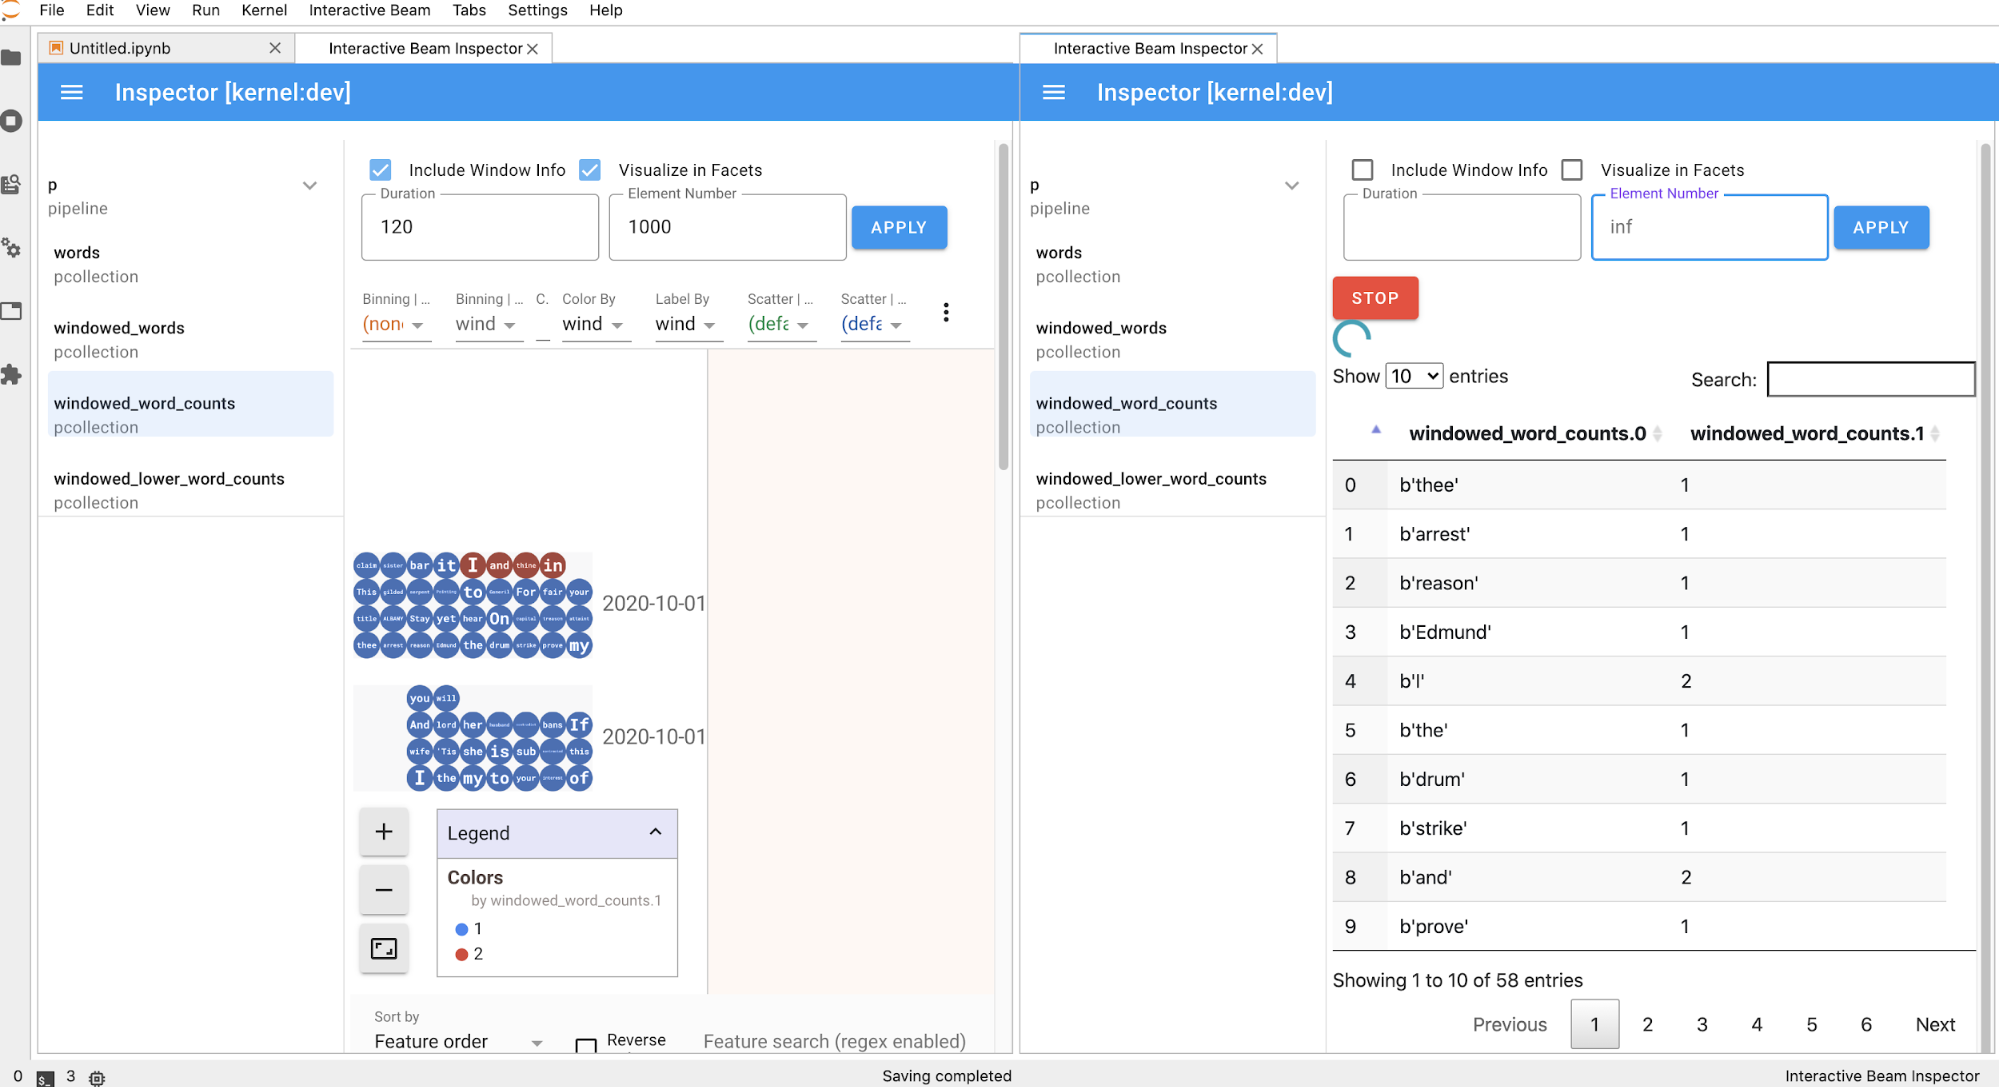
当您在笔记本中运行单元时,检查器页面会自动刷新。该页面列出了连接的笔记本中定义的流水线和 PCollections。PCollections 按所属的流水线排列,点击标题流水线可以收起。
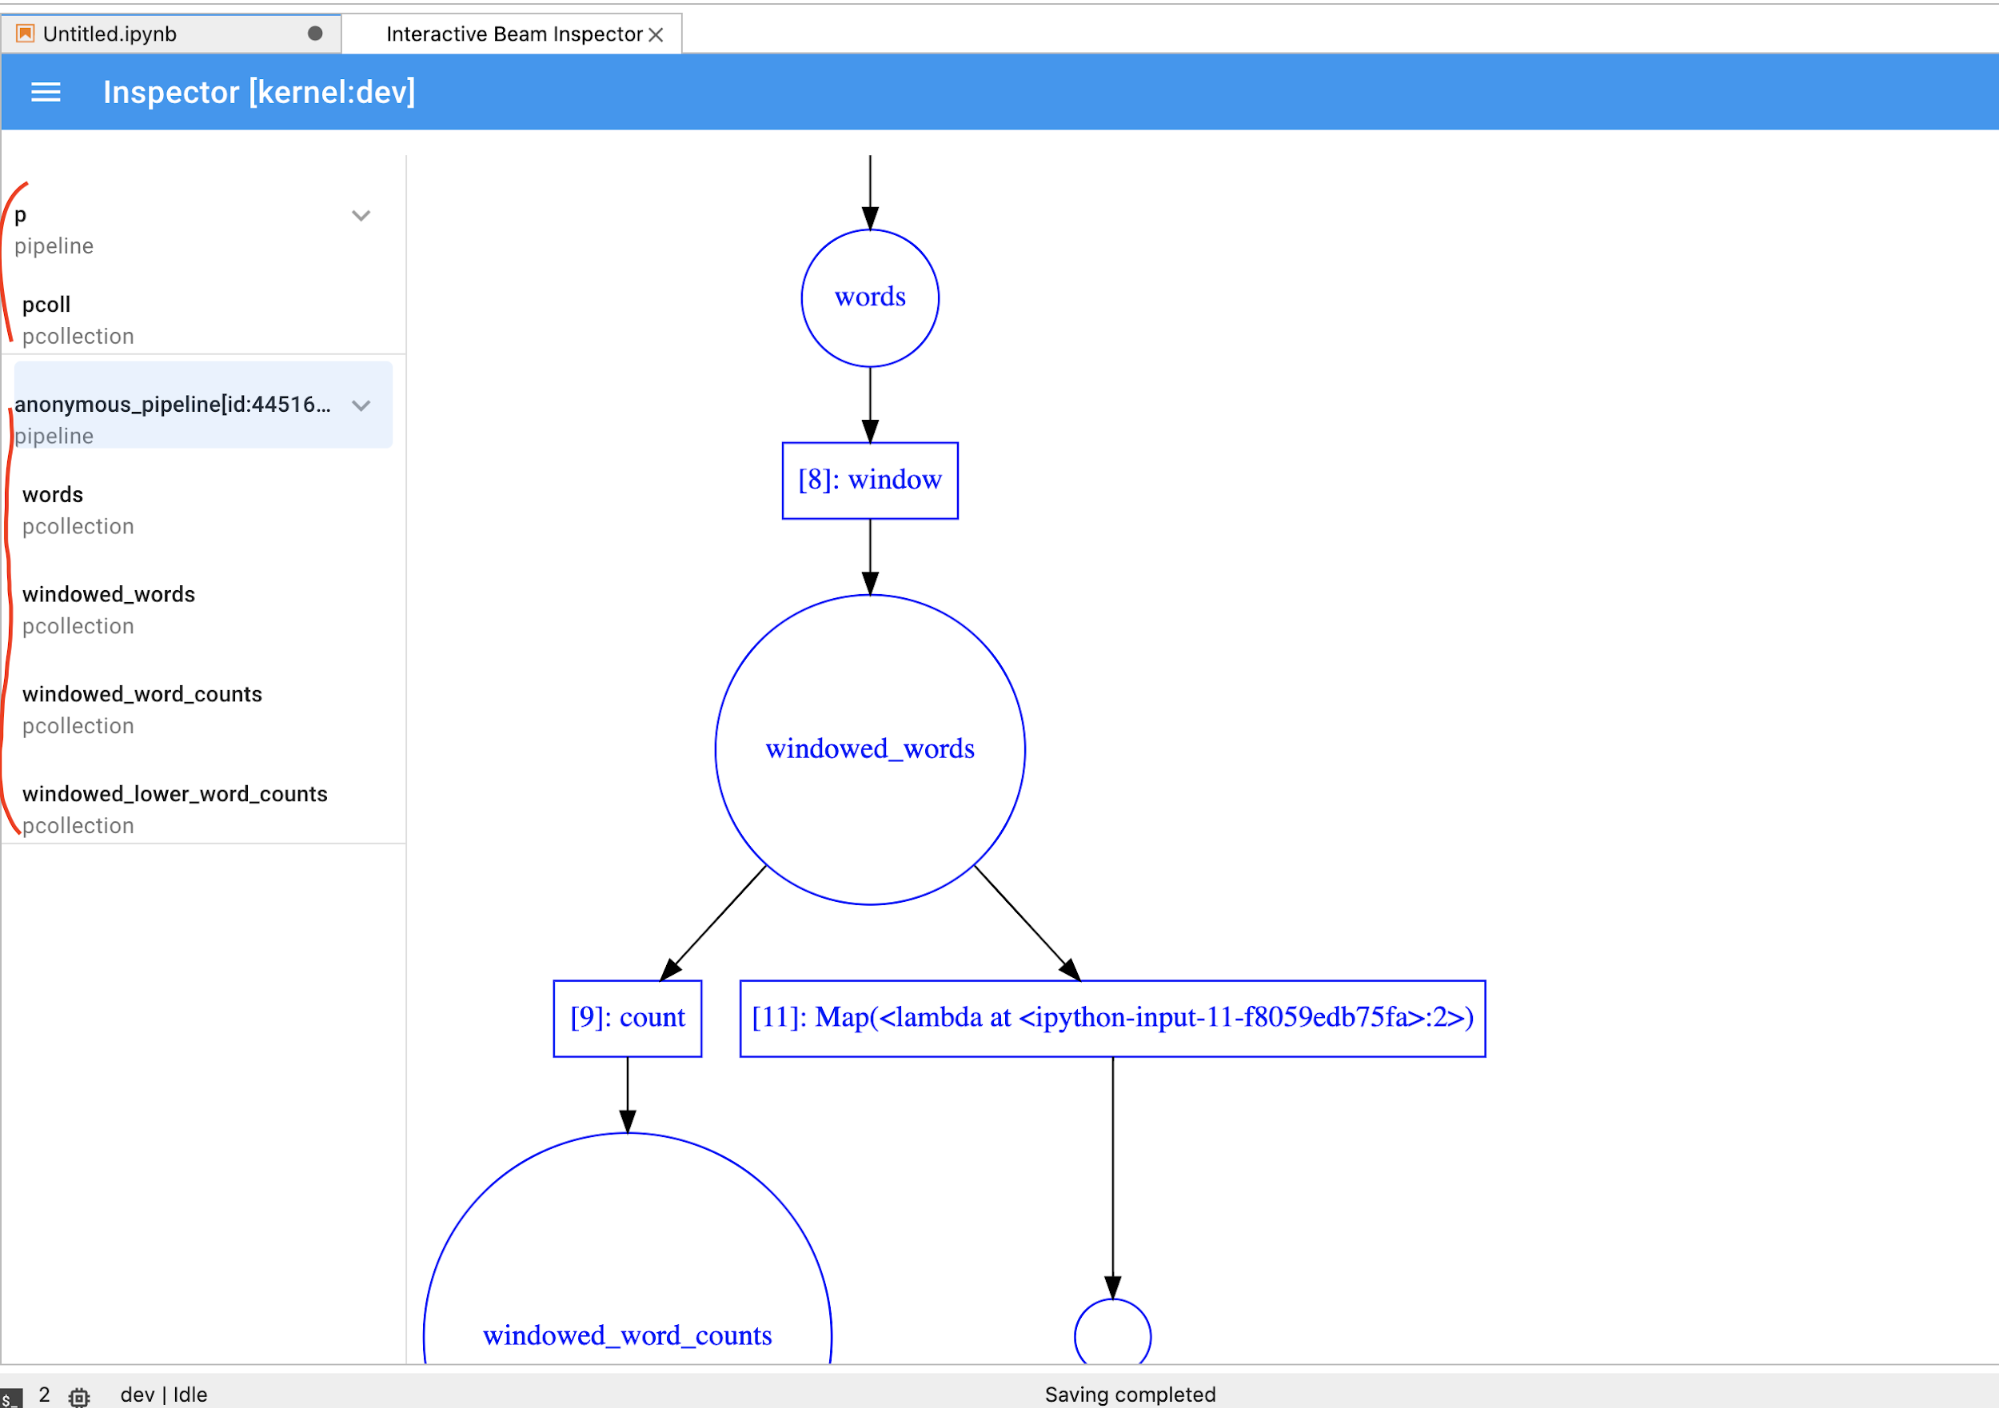
点击流水线和 PCollections 列表中的项时,检查器会在右侧呈现相应的可视化效果:
您可能会注意到匿名流水线。这些流水线具有您可以访问的 PCollections,但它们不再被主会话引用。例如:
p = beam.Pipeline()
pcoll = p | beam.Create([1, 2, 3])

p = beam.Pipeline()
上面的示例创建了空流水线 p 和包含一个 PCollection pcoll 的匿名流水线。您可以使用 pcoll.pipeline 访问匿名流水线。
您可以切换流水线和 PCollection 列表以便为大型可视化节省空间。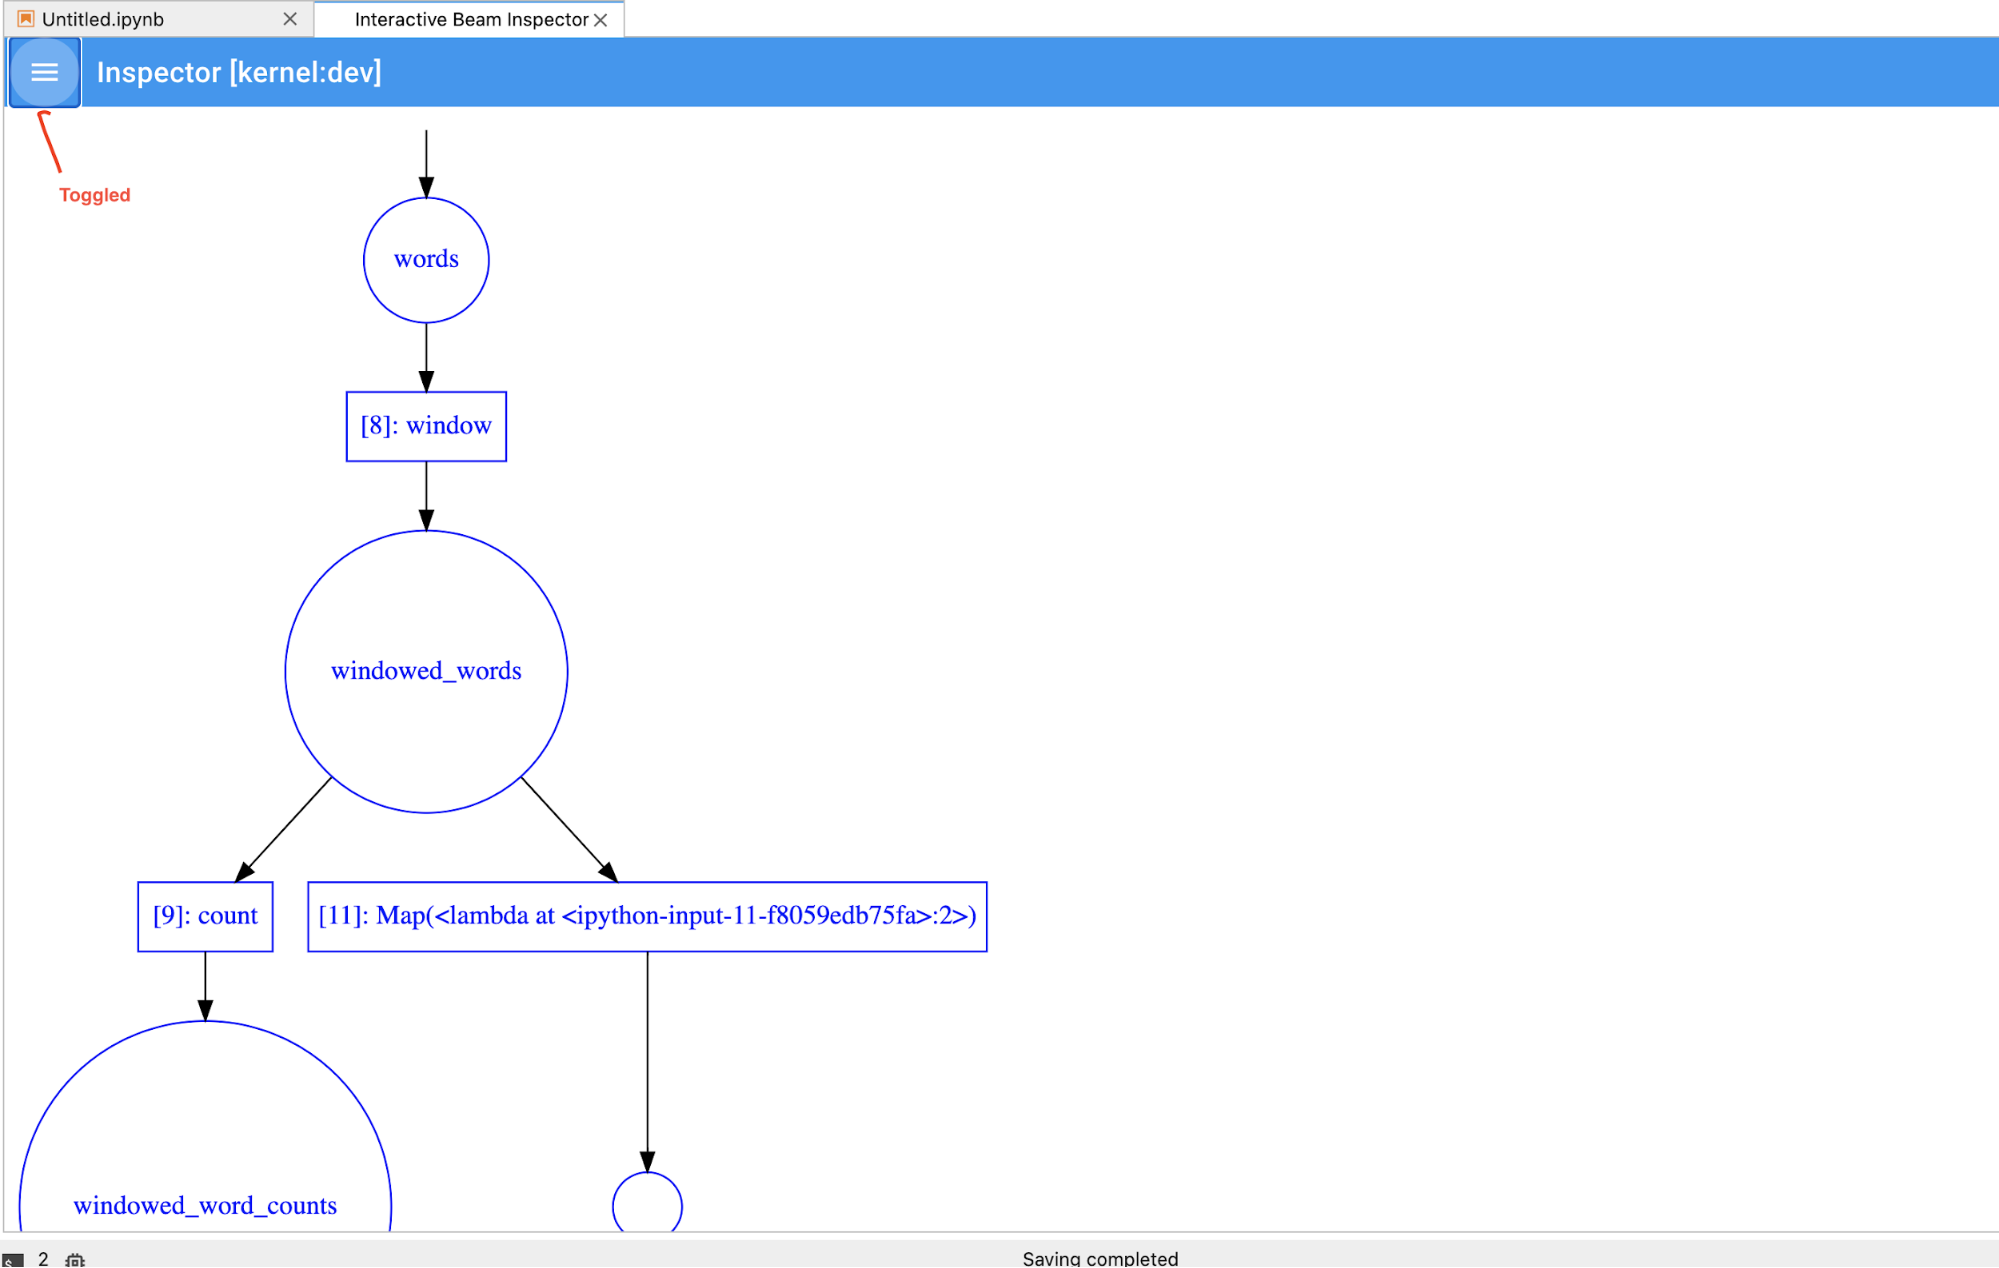
了解流水线的记录状态
除了可视化之外,您还可以通过调用 describe 检查笔记本实例中一个或所有流水线的记录状态。
# Return the recording status of a specific pipeline. Leave the parameter list empty to return
# the recording status of all pipelines.
ib.recordings.describe(p)
describe() 方法可提供以下详细信息:
从笔记本中创建的流水线启动 Dataflow 作业
如需查看如何在交互式笔记本上执行此转换的示例,请参阅笔记本实例中的 Dataflow Word Count 笔记本。
或者,您也可以将笔记本导出为可执行脚本,按照上述步骤修改生成的 .py 文件,然后将流水线部署到 Dataflow 服务。
保存笔记本
您创建的笔记本将本地保存到正在运行的笔记本实例中。如果您在开发期间重置或关停笔记本实例,只要这些新笔记本是在 /home/jupyter 目录下创建,就会永久保留。但是,如果删除笔记本实例,则这些笔记本也会被删除。
如需保留笔记本以供将来使用,请将它们本地下载到您的工作站,将其保存到 GitHub 或以其他文件格式导出。
将笔记本保存到其他永久性磁盘
如果您要将笔记本和脚本等工作保留在各个笔记本实例中,请将它们存储在 Persistent Disk 中。
现在,您可以将工作保存到 /mnt/myDisk 目录。即使笔记本实例被删除,永久性磁盘仍存在于您的项目中。然后,您可以将此永久性磁盘挂接到其他笔记本实例。
清理
使用完 Apache Beam 笔记本实例后,请关停笔记本实例以清理您在 Google Cloud 上创建的资源。