摘要
此教程将引导您完成在 Vertex AI 中使用 vLLM 部署和提供 Llama 3.1 和 3.2 模型的过程。它旨在与两个单独的笔记本搭配使用:使用 vLLM 提供 Llama 3.1,用于部署纯文本 Llama 3.1 模型;使用 vLLM 提供多模态 Llama 3.2,用于部署同时处理文本和图片输入的多模态 Llama 3.2 模型。此页面上概述的步骤展示了如何在 GPU 上高效地处理模型推理,以及如何针对各种应用自定义模型,让您能运用工具将高级语言模型集成到项目中。
在本指南结束之后,您将了解如何执行以下操作:
- 使用 vLLM 容器从 Hugging Face 下载预构建的 Llama 模型。
- 使用 vLLM 在 Google CloudVertex AI Model Garden 中的 GPU 实例上部署这些模型。
- 高效地提供模型,以大规模处理推理请求。
- 对纯文本请求和文本 + 图片请求运行推理。
- 清理。
- 调试部署。
vLLM 主要功能
| 功能 | 说明 |
|---|---|
| PagedAttention | 经过优化的注意力机制,可在推理期间高效地管理内存。通过动态分配内存资源来支持高吞吐量的文本生成,从而实现适用于多个并发请求的可伸缩性。 |
| 连续批处理 | 将多个输入请求合并到一个批次中进行并行处理,从而最大限度地提高 GPU 利用率和吞吐量。 |
| 令牌流式处理 | 在文本生成期间启用实时逐个 token 输出。非常适合需要低延迟的应用,例如聊天机器人或互动式 AI 系统。 |
| 模型兼容性 | 在热门框架(例如 Hugging Face Transformers)间支持各种预训练模型。更轻松地集成和试验不同的 LLM。 |
| 多 GPU 和多主机 | 通过在单台机器中的多个 GPU 和集群中的多台机器之间分配工作负载,实现高效的模型部署,从而显著提高吞吐量和可扩缩性。 |
| 高效部署 | 提供与 API 的无缝集成(例如 OpenAI Chat Completions),以便在生产应用场景中轻松部署。 |
| 与 Hugging Face 模型无缝集成 | vLLM 与 Hugging Face 模型制品格式兼容,并支持从 HF 加载,因此您可以轻松地在优化设置中将 Llama 模型与 Gemma、Phi 和 Qwen 等其他热门模型一起部署。 |
| 社区驱动型开源项目 | vLLM 是开源的,鼓励社区贡献,从而促使不断提高 LLM 服务效率。 |
Google Vertex AI vLLM 自定义:增强性能和集成
Google Vertex AI Model Garden 中的 vLLM 实现并非开源库的直接集成。Vertex AI 维护一个经过自定义和优化的 vLLM 版本,该版本进行了专门定制,可增强 Google Cloud中的性能、可靠性和无缝集成。
- 性能优化:
- 从 Cloud Storage 并行下载数据:可实现从 Cloud Storage 并行检索数据,减少延迟时间并提高启动速度,从而显著缩短模型加载和部署时间。
- 增强功能:
- 具有增强缓存和 Cloud Storage 支持的动态 LoRA:通过本地磁盘缓存机制和强大的错误处理扩展动态 LoRA 功能,同时支持直接从 Cloud Storage 路径和签名网址加载 LoRA 权重。这简化了自定义模型的管理和部署。
- Llama 3.1/3.2 函数调用解析:针对 Llama 3.1/3.2 函数调用实现专门的解析,从而提高解析的稳健性。
- 主机内存前缀缓存:外部 vLLM 仅支持 GPU 内存前缀缓存。
- 推测解码:这是一项现有的 vLLM 功能,但 Vertex AI 运行了实验以找到高性能模型设置。
这些特定于 Vertex AI 的自定义功能通常对最终用户是透明的,可让您在 Vertex AI Model Garden 上最大限度地提高 Llama 3.1 部署的性能和效率。
- Vertex AI 生态集成:
- Vertex AI 预测输入/输出格式支持:确保与 Vertex AI 预测输入和输出格式无缝兼容,从而简化数据处理以及与其他 Vertex AI 服务的集成。
- Vertex 环境变量感知:遵循并利用 Vertex AI 环境变量 (
AIP_*) 进行配置和资源管理,从而简化部署并确保 Vertex AI 环境中的行为一致性。 - 增强的错误处理和稳健性:实现全面的错误处理、输入/输出验证和服务器终止机制,以确保在托管式 Vertex AI 环境中实现稳定性、可靠性和无缝操作。
- 用于实现功能的 Nginx 服务器:在 vLLM 服务器上集成 Nginx 服务器,以便于部署多个副本,并增强服务基础设施的可伸缩性和高可用性。
vLLM 的其他优势
- 基准性能:与 Hugging Face 文本生成推理和 NVIDIA 的 FasterTransformer 等其他服务系统相比,vLLM 可在吞吐量和延迟时间方面提供具有竞争力的性能。
- 易用性:该库提供了一个简单的 API,用于与现有工作流集成,让您只需进行最少的设置即可部署 Llama 3.1 和 3.2 模型。
- 高级功能:vLLM 支持流式输出(逐个生成回答 token),并可高效处理长度可变的提示,从而增强应用的可交互性和回答速度。
如需大致了解 vLLM 系统,请参阅这篇论文。
支持的模型
vLLM 支持各种先进的模型,让您可以选择最能满足您需求的模型。下表列出了这些模型的一部分。不过,如需查看支持的模型的完整列表(包括用于纯文本和多模态推理的模型),您可以访问官方 vLLM 网站。
| 类别 | 模型 |
|---|---|
| Meta AI | Llama 3.3、Llama 3.2、Llama 3.1、Llama 3、Llama 2、Code Llama |
| Mistral AI | Mistral 7B、Mixtral 8x7B、Mixtral 8x22B 及其变体(Instruct、Chat)、Mistral-tiny、Mistral-small、Mistral-medium |
| DeepSeek AI | DeepSeek-V3、DeepSeek-R1、DeepSeek-R1-Distill-Qwen-1.5B、DeepSeek-R1-Distill-Qwen-7B、DeepSeek-R1-Distill-Llama-8B、DeepSeek-R1-Distill-Qwen-14B、DeepSeek-R1-Distill-Qwen-32B、DeepSeek-R1-Distill-Llama-70B、Deepseek-vl2-tiny、Deepseek-vl2-small、Deepseek-vl2 |
| MosaicML | MPT(7B、30B)及变体(Instruct、Chat)、MPT-7B-StoryWriter-65k |
| OpenAI | GPT-2、GPT-3、GPT-4、GPT-NeoX |
| Together AI | RedPajama、Pythia |
| Stability AI | StableLM(3B、7B)、StableLM-Alpha-3B、StableLM-Base-Alpha-7B、StableLM-Instruct-Alpha-7B |
| TII(技术创新研究所) | Falcon 7B、Falcon 40B 及变体(Instruct、Chat)、Falcon-RW-1B、Falcon-RW-7B |
| BigScience | BLOOM、BLOOMZ |
| FLAN-T5、UL2、Gemma(2B、7B)、PaLM 2、 | |
| Salesforce | CodeT5、CodeT5+ |
| LightOn | Persimmon-8B-base, Persimmon-8B-chat |
| EleutherAI | GPT-Neo、Pythia |
| AI21 Labs | Jamba |
| Cerebras | Cerebras-GPT |
| Intel | Intel-NeuralChat-7B |
| 其他知名模型 | StarCoder、OPT、Baichuan、Aquila、Qwen、InternLM、XGen、OpenLLaMA、Phi-2、Yi、OpenCodeInterpreter、Nous-Hermes、Gemma-it、Mistral-Instruct-v0.2-7B-Zeus |
开始使用 Model Garden
vLLM Cloud GPU 服务容器已集成到 Model Garden 的 Playground、一键式部署和 Colab Enterprise 笔记本示例中。本教程将 Meta AI 的 Llama 模型系列作为示例来重点介绍。
使用 Colab Enterprise 笔记本
Playground 和一键式部署也是可用的,但本教程未对其进行说明。
- 前往模型卡片页面,然后点击打开笔记本。
- 选择 Vertex Serving 笔记本。该笔记本随即会在 Colab Enterprise 中打开。
- 运行该笔记本,以使用 vLLM 部署模型,并将预测请求发送到端点。
设置和要求
本部分概述了设置 Google Cloud项目所需的步骤,以及确保您拥有部署和提供 vLLM 模型所需的资源。
1. 结算
- 启用结算功能:确保您的项目已启用结算功能。您可以参阅为项目启用、停用或更改结算功能。
2. GPU 可用性和配额
- 如需使用高性能 GPU(NVIDIA A100 80GB 或 H100 80GB)运行预测,请务必查看您所选区域中这些 GPU 的配额:
| 机器类型 | 加速器类型 | 建议的区域 |
|---|---|---|
| a2-ultragpu-1g | 1 NVIDIA_A100_80GB | us-central1、us-east4、europe-west4、asia-southeast1 |
| a3-highgpu-8g | 8 NVIDIA_H100_80GB | us-central1、us-west1、europe-west4、asia-southeast1 |
3. 设置 Google Cloud 项目
运行以下代码示例,确保您的 Google Cloud 环境设置正确无误。此步骤会安装必要的 Python 库,并设置对 Google Cloud 资源的访问权限。操作包括:
- 安装:升级
google-cloud-aiplatform库并克隆包含实用函数的仓库。 - 环境设置:为 Google Cloud 项目 ID、区域以及用于存储模型制品的唯一 Cloud Storage 存储桶定义变量。
- API 激活:启用 Vertex AI 和 Compute Engine API,它们对于部署和管理 AI 模型至关重要。
- 存储桶配置:创建新的 Cloud Storage 存储桶或检查现有存储桶,确保它位于正确的区域。
- Vertex AI 初始化:使用项目、位置和暂存存储桶设置初始化 Vertex AI 客户端库。
- 服务账号设置:确定用于运行 Vertex AI 作业的默认服务账号,并向其授予必要的权限。
BUCKET_URI = "gs://"

REGION = ""

! pip3 install --upgrade --quiet 'google-cloud-aiplatform>=1.64.0'
! git clone https://github.com/GoogleCloudPlatform/vertex-ai-samples.git

import datetime
import importlib
import os
import uuid
from typing import Tuple

import requests
from google.cloud import aiplatform

common_util = importlib.import_module(
    "vertex-ai-samples.community-content.vertex_model_garden.model_oss.notebook_util.common_util"
)

models, endpoints = {}, {}

PROJECT_ID = os.environ["GOOGLE_CLOUD_PROJECT"]

if not REGION:
    REGION = os.environ["GOOGLE_CLOUD_REGION"]

print("Enabling Vertex AI API and Compute Engine API.")
! gcloud services enable aiplatform.googleapis.com compute.googleapis.com

now = datetime.datetime.now().strftime("%Y%m%d%H%M%S")
BUCKET_NAME = "/".join(BUCKET_URI.split("/")[:3])

if BUCKET_URI is None or BUCKET_URI.strip() == "" or BUCKET_URI == "gs://":
    BUCKET_URI = f"gs://{PROJECT_ID}-tmp-{now}-{str(uuid.uuid4())[:4]}"
    BUCKET_NAME = "/".join(BUCKET_URI.split("/")[:3])
    ! gsutil mb -l {REGION} {BUCKET_URI}
else:
    assert BUCKET_URI.startswith("gs://"), "BUCKET_URI must start with `gs://`."
    shell_output = ! gsutil ls -Lb {BUCKET_NAME} | grep "Location constraint:" | sed "s/Location constraint://"
    bucket_region = shell_output[0].strip().lower()
    if bucket_region != REGION:
        raise ValueError(
            "Bucket region %s is different from notebook region %s"
            % (bucket_region, REGION)
        )
print(f"Using this Bucket: {BUCKET_URI}")

STAGING_BUCKET = os.path.join(BUCKET_URI, "temporal")
MODEL_BUCKET = os.path.join(BUCKET_URI, "llama3_1")

print("Initializing Vertex AI API.")
aiplatform.init(project=PROJECT_ID, location=REGION, staging_bucket=STAGING_BUCKET)

shell_output = ! gcloud projects describe $PROJECT_ID
project_number = shell_output[-1].split(":")[1].strip().replace("'", "")
SERVICE_ACCOUNT = "your service account email"
print("Using this default Service Account:", SERVICE_ACCOUNT)

! gsutil iam ch serviceAccount:{SERVICE_ACCOUNT}:roles/storage.admin $BUCKET_NAME

! gcloud config set project $PROJECT_ID
! gcloud projects add-iam-policy-binding --no-user-output-enabled {PROJECT_ID} --member=serviceAccount:{SERVICE_ACCOUNT} --role="roles/storage.admin"
! gcloud projects add-iam-policy-binding --no-user-output-enabled {PROJECT_ID} --member=serviceAccount:{SERVICE_ACCOUNT} --role="roles/aiplatform.user"
将 Hugging Face 与 Meta Llama 3.1、3.2 和 vLLM 搭配使用
Meta 的 Llama 3.1 和 3.2 集合提供了一系列多语言大语言模型 (LLM),这些模型专为在各种应用场景中生成高质量文本而设计。这些模型经过预训练和指令调优,在多语言对话、摘要和代理检索等任务中表现出色。在使用 Llama 3.1 和 3.2 模型之前,您必须同意其使用条款,如屏幕截图中所示。vLLM 库提供开源的简化服务环境,并针对延迟时间、内存效率和可伸缩性进行了优化。
 图 1:Meta Llama 3 社区许可协议
Meta Llama 3.1 和 3.2 集合概览
Llama 3.1 和 3.2 集合各自适用于不同的部署规模和模型大小,可为您提供灵活的选项,以便处理多语言对话任务及其他任务。如需了解详情,请参阅 Llama 概览页面。
- 纯文本:Llama 3.2 多语言大语言模型 (LLM) 集合是一组经过预训练和指令调优的生成模型,大小为 1B 和 3B(文本输入、文本输出)。
- Vision 和 Vision Instruct:Llama 3.2-Vision 多模态大语言模型 (LLM) 集合是一组经过预训练和指令调优的图片推理生成模型,大小为 11B 和 90B(文本 + 图片输入、文本输出)。优化:与 Llama 3.1 一样,3.2 模型专为多语言对话而量身打造,在检索和摘要任务中表现出色,在标准基准测试中实现了卓越结果。
- 模型架构:Llama 3.2 还具有自动回归 Transformer 框架,并应用 SFT 和 RLHF 来调整模型以提高实用性和安全性。
Hugging Face 用户访问令牌
本教程需要来自 Hugging Face Hub 的读取访问令牌才能访问必要的资源。请按照以下步骤设置身份验证:
 图 2:Hugging Face 访问令牌设置
生成读取访问令牌:
- 前往 Hugging Face 账号设置。
- 创建新令牌,为其分配“读取”角色,然后安全地保存令牌。
使用令牌:
- 使用生成的令牌根据教程需要进行身份验证以及访问公共或私有仓库。
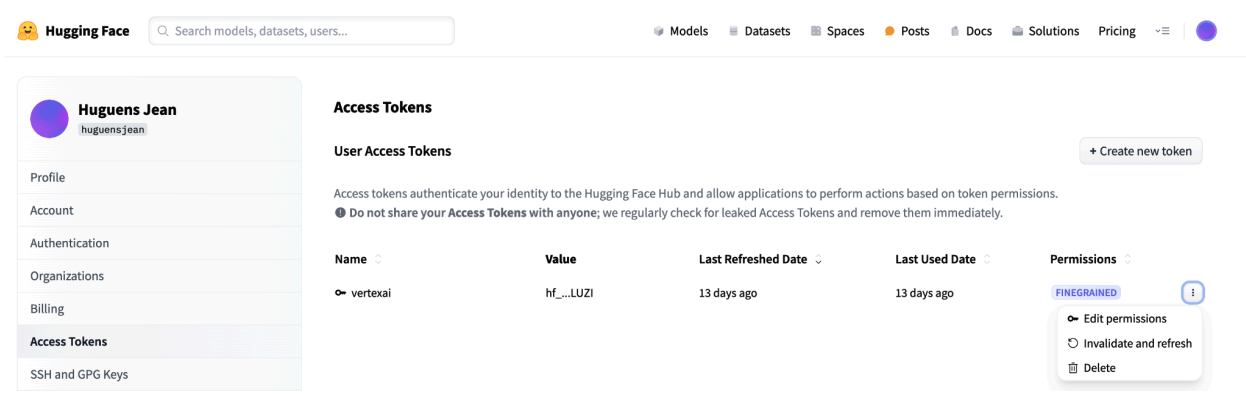 图 3:管理 Hugging Face 访问令牌
这种设置可确保您获得适当的访问权限级别,而无需不必要的权限。这些做法可提高安全性并防止令牌意外泄露。如需详细了解如何设置访问令牌,请访问 Hugging Face 访问令牌页面。
避免以公开方式或在网络上分享或公开您的令牌。如果您在部署期间将令牌设置为环境变量,则令牌将保持为项目专用。Vertex AI 通过阻止其他用户访问您的模型和端点来确保安全性。
如需详细了解如何保护访问令牌,请参阅 Hugging Face 访问令牌 - 最佳实践。
使用 vLLM 部署纯文本 Llama 3.1 模型
对于大语言模型的生产级部署,vLLM 提供了一种高效的服务解决方案,可优化内存用量、降低延迟时间并提高吞吐量。这使得它特别适合处理较大的 Llama 3.1 模型以及多模态 Llama 3.2 模型。
第 1 步:选择要部署的模型
选择要部署的 Llama 3.1 模型变体。可用选项包括各种大小和指令调优版本:
base_model_name = "Meta-Llama-3.1-8B"  # @param ["Meta-Llama-3.1-8B", "Meta-Llama-3.1-8B-Instruct", "Meta-Llama-3.1-70B", "Meta-Llama-3.1-70B-Instruct", "Meta-Llama-3.1-405B-FP8", "Meta-Llama-3.1-405B-Instruct-FP8"]
hf_model_id = "meta-Llama/" + base_model_name
第 2 步:检查部署硬件和配额
部署函数会根据模型大小设置适当的 GPU 和机器类型,并检查特定项目在该区域的配额:
if "8b" in base_model_name.lower():
    accelerator_type = "NVIDIA_L4"
    machine_type = "g2-standard-12"
    accelerator_count = 1
elif "70b" in base_model_name.lower():
    accelerator_type = "NVIDIA_L4"
    machine_type = "g2-standard-96"
    accelerator_count = 8
elif "405b" in base_model_name.lower():
    accelerator_type = "NVIDIA_H100_80GB"
    machine_type = "a3-highgpu-8g"
    accelerator_count = 8
else:
    raise ValueError(f"Recommended GPU setting not found for: {accelerator_type} and {base_model_name}.")
验证指定区域的 GPU 配额是否可用:
common_util.check_quota(
    project_id=PROJECT_ID,
    region=REGION,
    accelerator_type=accelerator_type,
    accelerator_count=accelerator_count,
    is_for_training=False,
)
第 3 步:使用 vLLM 检查模型
以下函数会将模型上传到 Vertex AI,配置部署设置,然后使用 vLLM 将其部署到端点。
- Docker 映像:部署使用预构建的 vLLM Docker 映像来实现高效服务。
- 配置:配置内存利用率、模型长度和其他 vLLM 设置。如需详细了解服务器支持的参数,请访问官方 vLLM 文档页面。
- 环境变量:为身份验证和部署来源设置环境变量。
def deploy_model_vllm(
    model_name: str,
    model_id: str,
    service_account: str,
    base_model_id: str = None,
    machine_type: str = "g2-standard-8",
    accelerator_type: str = "NVIDIA_L4",
    accelerator_count: int = 1,
    gpu_memory_utilization: float = 0.9,
    max_model_len: int = 4096,
    dtype: str = "auto",
    enable_trust_remote_code: bool = False,
    enforce_eager: bool = False,
    enable_lora: bool = False,
    max_loras: int = 1,
    max_cpu_loras: int = 8,
    use_dedicated_endpoint: bool = False,
    max_num_seqs: int = 256,
) -> Tuple[aiplatform.Model, aiplatform.Endpoint]:
    """Deploys trained models with vLLM into Vertex AI."""
    endpoint = aiplatform.Endpoint.create(
        display_name=f"{model_name}-endpoint",
        dedicated_endpoint_enabled=use_dedicated_endpoint,
    )

    if "8b" in base_model_name.lower():
        accelerator_type = "NVIDIA_L4"
        machine_type = "g2-standard-12"
        accelerator_count = 1
    elif "70b" in base_model_name.lower():
        accelerator_type = "NVIDIA_L4"
        machine_type = "g2-standard-96"
        accelerator_count = 8
    elif "405b" in base_model_name.lower():
        accelerator_type = "NVIDIA_H100_80GB"
        machine_type = "a3-highgpu-8g"
        accelerator_count = 8
    else:
        raise ValueError(f"Recommended GPU setting not found for: {accelerator_type} and {base_model_name}.")

    common_util.check_quota(
        project_id=PROJECT_ID,
        region=REGION,
        accelerator_type=accelerator_type,
        accelerator_count=accelerator_count,
        is_for_training=False,
    )

    vllm_args = [
        "python", "-m", "vllm.entrypoints.api_server",
        "--host=0.0.0.0",
        "--port=8080",
        f"--model={model_id}",
        f"--tensor-parallel-size={accelerator_count}",
        "--swap-space=16",
        f"--gpu-memory-utilization={gpu_memory_utilization}",
        f"--max-model-len={max_model_len}", f"--dtype={dtype}",
        f"--max-loras={max_loras}", f"--max-cpu-loras={max_cpu_loras}",
        f"--max-num-seqs={max_num_seqs}", "--disable-log-stats"
    ]

    if enable_trust_remote_code:
        vllm_args.append("--trust-remote-code")
    if enforce_eager:
        vllm_args.append("--enforce-eager")
    if enable_lora:
        vllm_args.append("--enable-lora")
    if model_type:
        vllm_args.append(f"--model-type={model_type}")

    env_vars = {
        "MODEL_ID": model_id,
        "DEPLOY_SOURCE": "notebook",
        "HF_TOKEN": HF_TOKEN
    }

    model = aiplatform.Model.upload(
        display_name=model_name,
        serving_container_image_uri=VLLM_DOCKER_URI,
        serving_container_args=vllm_args,
        serving_container_ports=[8080],
        serving_container_predict_route="/generate",
        serving_container_health_route="/ping",
        serving_container_environment_variables=env_vars,
        serving_container_shared_memory_size_mb=(16 * 1024),
        serving_container_deployment_timeout=7200,
    )
    print(f"Deploying {model_name} on {machine_type} with {accelerator_count} {accelerator_type} GPU(s).")

    model.deploy(
        endpoint=endpoint,
        machine_type=machine_type,
        accelerator_type=accelerator_type,
        accelerator_count=accelerator_count,
        deploy_request_timeout=1800,
        service_account=service_account,
    )
    print("endpoint_name:", endpoint.name)

    return model, endpoint
第 4 步:执行部署
使用所选模型和配置运行部署函数。此步骤会部署模型并返回模型和端点实例:
HF_TOKEN = ""

VLLM_DOCKER_URI = "us-docker.pkg.dev/vertex-ai/vertex-vision-model-garden-dockers/pytorch-vllm-serve:20241001_0916_RC00"

model_name = common_util.get_job_name_with_datetime(prefix=f"{base_model_name}-serve-vllm")
gpu_memory_utilization = 0.9
max_model_len = 4096
max_loras = 1

models["vllm_gpu"], endpoints["vllm_gpu"] = deploy_model_vllm(
    model_name=common_util.get_job_name_with_datetime(prefix=f"{base_model_name}-serve"),
    model_id=hf_model_id,
    service_account=SERVICE_ACCOUNT,
    machine_type=machine_type,
    accelerator_type=accelerator_type,
    accelerator_count=accelerator_count,
    gpu_memory_utilization=gpu_memory_utilization,
    max_model_len=max_model_len,
    max_loras=max_loras,
    enforce_eager=True,
    enable_lora=True,
    use_dedicated_endpoint=use_dedicated_endpoint,
)
运行此代码示例后,您的 Llama 3.1 模型将部署在 Vertex AI 上,并且可通过指定端点进行访问。您可以与它互动,以执行文本生成、摘要和对话等推理任务。部署新模型最多可能需要一个小时,具体取决于模型的大小。 您可以通过在线预测查看进度。
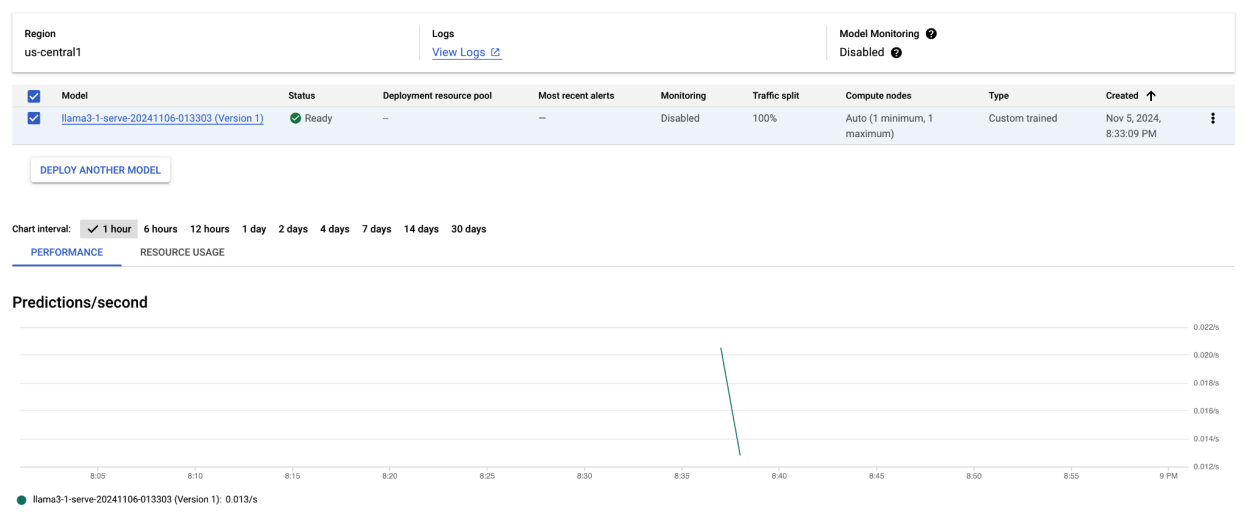 图 4:Vertex 信息中心中的 Llama 3.1 部署端点
在 Vertex AI 上使用 Llama 3.1 进行预测
将 Llama 3.1 模型成功部署到 Vertex AI 后,您可以通过向端点发送文本提示来开始进行预测。本部分提供了一个示例,该示例使用各种可自定义的参数来生成回答,以便控制输出。
第 1 步:定义提示和参数
首先,设置文本提示和采样参数,以引导模型的回答。以下是关键参数:
prompt:您希望模型为其生成回答的输入文本。例如,prompt = "What is a car?"。max_tokens:生成的输出内容中的 token 数上限。 降低此值有助于避免超时问题。temperature:控制预测的随机程度。值越高(例如 1.0),多样性程度越高;值越低(例如 0.5),输出就越有针对性。top_p:将采样池限制为最高累积概率。例如,设置 top_p = 0.9 将仅考虑最高 90% 概率范围内的 token。top_k:将采样限制为最可能的 k 个 token。例如,设置 top_k = 50 将仅从前 50 个 token 中进行采样。raw_response:如果为 True,则返回原始模型输出。如果为 False,请使用“Prompt:\n{prompt}\nOutput:\n{output}”结构应用额外格式。lora_id(可选):用于应用低秩自适应 (LoRA) 权重的 LoRA 权重文件的路径。这可以是 Cloud Storage 存储桶或 Hugging Face 仓库网址。请注意,只有在部署参数中设置--enable-lora时,此参数才有效。多模态模型不支持动态 LoRA。
prompt = "What is a car?"
max_tokens = 50
temperature = 1.0
top_p = 1.0
top_k = 1
raw_response = False
lora_id = ""
第 2 步:发送预测请求
现在,实例已配置完毕,您可以将预测请求发送到已部署的 Vertex AI 端点。以下示例展示了如何进行预测并输出结果:
response = endpoints["vllm_gpu"].predict(
    instances=instances, use_dedicated_endpoint=use_dedicated_endpoint
)

for prediction in response.predictions:
    print(prediction)
输出示例
以下示例展示了模型可能会如何回答提示“What is a car?”:
Human: What is a car?
Assistant: A car, or a motor car, is a road-connected human-transportation system
used to move people or goods from one place to another.
补充说明
- 审核:如需确保内容安全,您可以使用 Vertex AI 的文本审核功能对生成的文本进行审核。
- 处理超时:如果您遇到
ServiceUnavailable: 503等问题,请尝试减小max_tokens参数。
这种方法提供了一种灵活的方式,可使用不同的采样技术和 LoRA 适配器与 Llama 3.1 模型进行互动,使其适用于各种应用场景(从通用文本生成到特定于任务的回答)。
使用 vLLM 部署多模态 Llama 3.2 模型
本部分将引导您完成将预构建 Llama 3.2 模型上传到 Model Registry 并将其部署到 Vertex AI 端点的过程。部署时间最长可能需要一个小时,具体取决于模型的大小。Llama 3.2 模型提供同时支持文本和图片输入的多模态版本。vLLM 支持:
- 纯文本格式
- 单张图片 + 文本格式
这些格式使 Llama 3.2 适合需要同时进行图片和文本处理的应用。
第 1 步:选择要部署的模型
指定您要部署的 Llama 3.2 模型变体。以下示例使用 Llama-3.2-11B-Vision 作为所选模型,但您可以根据自己的要求从其他可用选项中进行选择。
base_model_name = "Llama-3.2-11B-Vision"  # @param ["Llama-3.2-1B", "Llama-3.2-1B-Instruct", "Llama-3.2-3B", "Llama-3.2-3B-Instruct", "Llama-3.2-11B-Vision", "Llama-3.2-11B-Vision-Instruct", "Llama-3.2-90B-Vision", "Llama-3.2-90B-Vision-Instruct"]
hf_model_id = "meta-Llama/" + base_model_name
第 2 步:配置硬件和资源
根据模型大小选择合适的硬件。vLLM 可以根据模型的计算需求使用不同的 GPU:
- 1B 和 3B 模型:使用 NVIDIA L4 GPU。
- 11B 模型:使用 NVIDIA A100 GPU。
- 90B 模型:使用 NVIDIA H100 GPU。
以下示例根据模型选择配置部署:
if "3.2-1B" in base_model_name or "3.2-3B" in base_model_name:
    accelerator_type = "NVIDIA_L4"
    machine_type = "g2-standard-8"
    accelerator_count = 1
elif "3.2-11B" in base_model_name:
    accelerator_type = "NVIDIA_TESLA_A100"
    machine_type = "a2-highgpu-1g"
    accelerator_count = 1
elif "3.2-90B" in base_model_name:
    accelerator_type = "NVIDIA_H100_80GB"
    machine_type = "a3-highgpu-8g"
    accelerator_count = 8
else:
    raise ValueError(f"Recommended GPU setting not found for: {base_model_name}.")
确保您拥有所需的 GPU 配额:
common_util.check_quota(
    project_id=PROJECT_ID,
    region=REGION,
    accelerator_type=accelerator_type,
    accelerator_count=accelerator_count,
    is_for_training=False,
)
第 3 步:使用 vLLM 部署模型
以下函数可处理 Vertex AI 上的 Llama 3.2 模型部署。它会配置模型的环境、内存利用率和 vLLM 设置,以实现高效服务。
def deploy_model_vllm(
    model_name: str,
    model_id: str,
    service_account: str,
    base_model_id: str = None,
    machine_type: str = "g2-standard-8",
    accelerator_type: str = "NVIDIA_L4",
    accelerator_count: int = 1,
    gpu_memory_utilization: float = 0.9,
    max_model_len: int = 4096,
    dtype: str = "auto",
    enable_trust_remote_code: bool = False,
    enforce_eager: bool = False,
    enable_lora: bool = False,
    max_loras: int = 1,
    max_cpu_loras: int = 8,
    use_dedicated_endpoint: bool = False,
    max_num_seqs: int = 12,
    model_type: str = None,
) -> Tuple[aiplatform.Model, aiplatform.Endpoint]:
    """Deploys trained models with vLLM into Vertex AI."""
    endpoint = aiplatform.Endpoint.create(
        display_name=f"{model_name}-endpoint",
        dedicated_endpoint_enabled=use_dedicated_endpoint,
    )

    if not base_model_id:
        base_model_id = model_id

    vllm_args = [
        "python",
        "-m",
        "vllm.entrypoints.api_server",
        "--host=0.0.0.0",
        "--port=8080",
        f"--model={model_id}",
        f"--tensor-parallel-size={accelerator_count}",
        "--swap-space=16",
        f"--gpu-memory-utilization={gpu_memory_utilization}",
        f"--max-model-len={max_model_len}",
        f"--dtype={dtype}",
        f"--max-loras={max_loras}",
        f"--max-cpu-loras={max_cpu_loras}",
        f"--max-num-seqs={max_num_seqs}",
        "--disable-log-stats",
    ]

    if enable_trust_remote_code:
        vllm_args.append("--trust-remote-code")
    if enforce_eager:
        vllm_args.append("--enforce-eager")
    if enable_lora:
        vllm_args.append("--enable-lora")
    if model_type:
        vllm_args.append(f"--model-type={model_type}")

    env_vars = {
        "MODEL_ID": base_model_id,
        "DEPLOY_SOURCE": "notebook",
    }

    # HF_TOKEN is not a compulsory field and may not be defined.
    try:
        if HF_TOKEN:
            env_vars["HF_TOKEN"] = HF_TOKEN
    except NameError:
        pass

    model = aiplatform.Model.upload(
        display_name=model_name,
        serving_container_image_uri=VLLM_DOCKER_URI,
        serving_container_args=vllm_args,
        serving_container_ports=[8080],
        serving_container_predict_route="/generate",
        serving_container_health_route="/ping",
        serving_container_environment_variables=env_vars,
        serving_container_shared_memory_size_mb=(16 * 1024),
        serving_container_deployment_timeout=7200,
    )
    print(f"Deploying {model_name} on {machine_type} with {accelerator_count} {accelerator_type} GPU(s).")

    model.deploy(
        endpoint=endpoint,
        machine_type=machine_type,
        accelerator_type=accelerator_type,
        accelerator_count=accelerator_count,
        deploy_request_timeout=1800,
        service_account=service_account,
    )
    print("endpoint_name:", endpoint.name)

    return model, endpoint
第 4 步:执行部署
使用已配置的模型和设置运行部署函数。该函数将返回模型和端点实例,您可以将它们用于推理。
model_name = common_util.get_job_name_with_datetime(prefix=f"{base_model_name}-serve-vllm")
models["vllm_gpu"], endpoints["vllm_gpu"] = deploy_model_vllm(
    model_name=model_name
    model_id=hf_model_id,
    base_model_id=hf_model_id,
    service_account=SERVICE_ACCOUNT,
    machine_type=machine_type,
    accelerator_type=accelerator_type,
    accelerator_count=accelerator_count,
    gpu_memory_utilization=gpu_memory_utilization,
    max_model_len=max_model_len,
    enforce_eager=True,
    use_dedicated_endpoint=use_dedicated_endpoint,
    max_num_seqs=max_num_seqs,
)
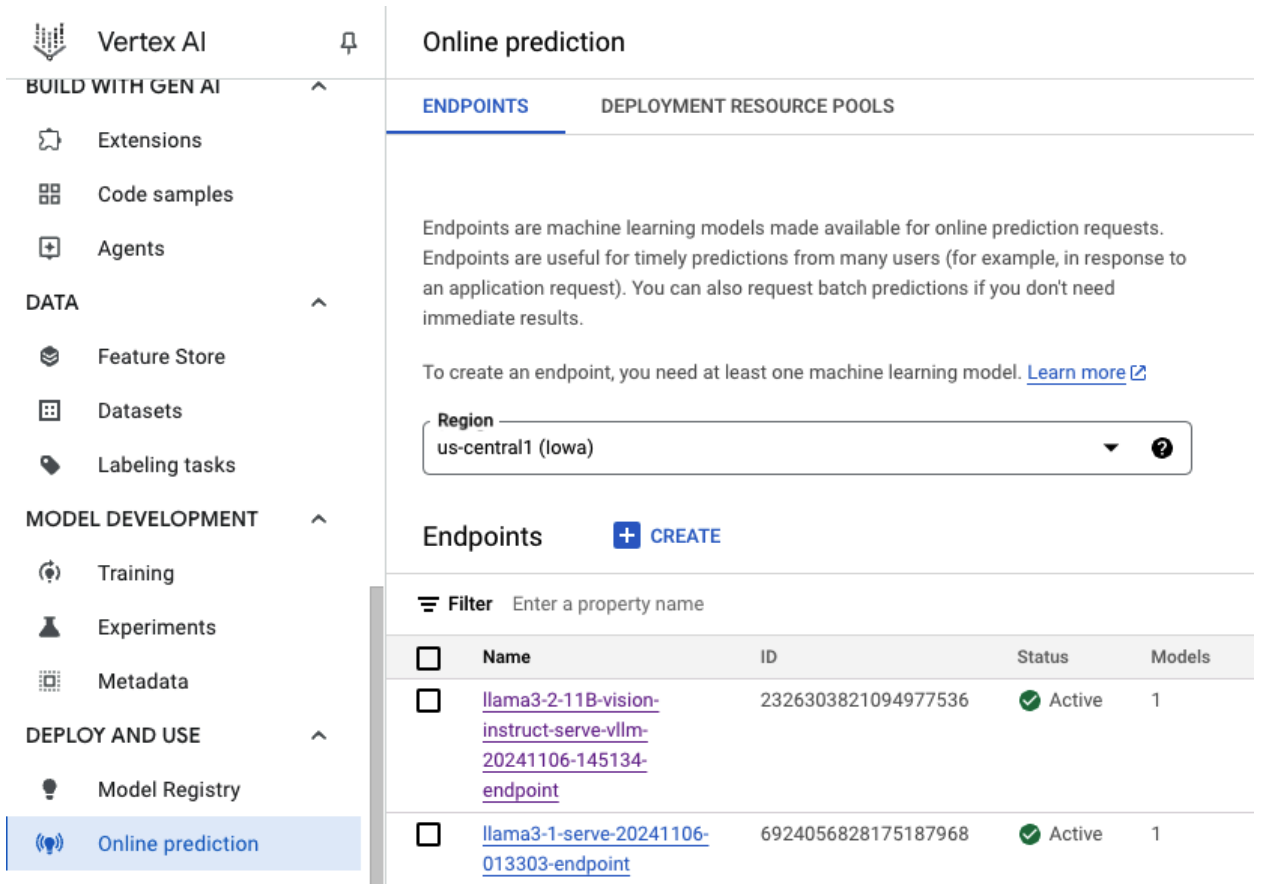 图 5:Vertex 信息中心中的 Llama 3.2 部署端点
部署新模型最多可能需要一个小时才能完成,具体取决于模型的大小。您可以通过在线预测查看进度。
使用默认预测路由在 Vertex AI 上借助 vLLM 进行推理
本部分将引导您使用默认预测路由为 Vertex AI 上的 Llama 3.2 Vision 模型设置推理。您将使用 vLLM 库实现高效服务,并通过发送图片提示和文本的组合与模型进行互动。
首先,请确保您的模型端点已部署并已准备好进行预测。
第 1 步:定义提示和参数
此示例提供了图片网址和文本提示,模型将对其进行处理以生成回答。
 图 6:用于提示 Llama 3.2 的示例图片输入
image_url = "https://images.pexels.com/photos/1254140/pexels-photo-1254140.jpeg"

raw_prompt = "This is a picture of"

# Reference prompt formatting guidelines here: https://www.Llama.com/docs/model-cards-and-prompt-formats/Llama3_2/#-base-model-prompt
prompt = f"<|begin_of_text|><|image|>{raw_prompt}"
第 2 步:配置预测参数
调整以下参数以控制模型的回答:
max_tokens = 64

temperature = 0.5

top_p = 0.95
第 3 步:准备预测请求
使用图片网址、提示和其他参数设置预测请求。
instances = [
    {
        "prompt": prompt,
        "multi_modal_data": {"image": image_url},
        "max_tokens": max_tokens,
        "temperature": temperature,
        "top_p": top_p,
    },
]
第 4 步:进行预测
将请求发送到 Vertex AI 端点并处理回答:
response = endpoints["vllm_gpu"].predict(instances=instances)

for raw_prediction in response.predictions:
    prediction = raw_prediction.split("Output:")
    print(prediction[1])
如果您遇到超时问题(例如 ServiceUnavailable: 503 Took too
long to respond when processing),请尝试将 max_tokens 值减小到较低的数字(例如 20),以缩短回答时间。
使用 OpenAI Chat Completion 在 Vertex AI 上借助 vLLM 进行推理
本部分介绍如何在 Vertex AI 上使用 OpenAI Chat Completions API 对 Llama 3.2 Vision 模型执行推理。借助这种方法,您可以通过向模型发送图片和文本提示来使用多模态功能,以便获得更具互动性的回答。
第 1 步:执行 Llama 3.2 Vision Instruct 模型的部署
使用已配置的模型和设置运行部署函数。该函数将返回模型和端点实例,您可以将它们用于推理。
base_model_name = "Llama-3.2-11B-Vision-Instruct"
hf_model_id = f"meta-llama/{base_model_name}"
model_name = common_util.get_job_name_with_datetime(prefix=f"{base_model_name}-serve-vllm")
model, endpoint = deploy_model_vllm(
    model_name=model_name
    model_id=hf_model_id,
    base_model_id=hf_model_id,
    service_account=SERVICE_ACCOUNT,
    machine_type="a2-highgpu-1g",
    accelerator_type="NVIDIA_TESLA_A100",
    accelerator_count=1,
    gpu_memory_utilization=0.9,
    max_model_len=4096,
    enforce_eager=True,
    max_num_seqs=12,
)
第 2 步:配置端点资源
首先,为 Vertex AI 部署设置端点资源名称。
ENDPOINT_RESOURCE_NAME = "projects/{}/locations/{}/endpoints/{}".format(
    PROJECT_ID, REGION, endpoint.name
)
第 3 步:安装 OpenAI SDK 和身份验证库
如需使用 OpenAI 的 SDK 发送请求,请确保安装了必要的库:
!pip install -qU openai google-auth requests
第 4 步:为 Chat Completion 定义输入参数
设置要发送到模型的图片网址和文本提示。调整 max_tokens 和 temperature 以分别控制回答长度和随机性。
user_image = "https://images.freeimages.com/images/large-previews/ab3/puppy-2-1404644.jpg"
user_message = "Describe this image?"
max_tokens = 50
temperature = 1.0
第 5 步:设置身份验证和基础网址
检索您的凭据并设置 API 请求的基础网址。
import google.auth
import openai

creds, project = google.auth.default()
auth_req = google.auth.transport.requests.Request()
creds.refresh(auth_req)

BASE_URL = (
    f"https://{REGION}-aiplatform.googleapis.com/v1beta1/{ENDPOINT_RESOURCE_NAME}"
)
try:
    if use_dedicated_endpoint:
        BASE_URL = f"https://{DEDICATED_ENDPOINT_DNS}/v1beta1/{ENDPOINT_RESOURCE_NAME}"
except NameError:
    pass
第 6 步:发送 Chat Completion 请求
使用 OpenAI 的 Chat Completions API,将图片和文本提示发送到 Vertex AI 端点:
client = openai.OpenAI(base_url=BASE_URL, api_key=creds.token)

model_response = client.chat.completions.create(
    model="",
    messages=[
        {
            "role": "user",
            "content": [
                {"type": "image_url", "image_url": {"url": user_image}},
                {"type": "text", "text": user_message},
            ],
        }
    ],
    temperature=temperature,
    max_tokens=max_tokens,
)

print(model_response)
(可选)第 7 步:重新连接到现有端点
如需重新连接到之前创建的端点,请使用端点 ID。如果您想重复使用端点,而不是创建新端点,此步骤会非常有用。
endpoint_name = ""
aip_endpoint_name = (
     f"projects/{PROJECT_ID}/locations/{REGION}/endpoints/{endpoint_name}"
)
endpoint = aiplatform.Endpoint(aip_endpoint_name)
这种设置可让您根据需要灵活地在新创建的端点和现有端点之间切换,从而简化测试和部署。
清理
为避免持续产生费用并释放资源,请务必删除部署的模型、端点,并可选择性地删除用于此实验的存储桶。
第 1 步:删除端点和模型
以下代码将取消部署每个模型并删除关联的端点:
# Undeploy model and delete endpoint
for endpoint in endpoints.values():
    endpoint.delete(force=True)

# Delete models
for model in models.values():
    model.delete()
第 2 步:(可选)删除 Cloud Storage 存储桶
如果您专门为此实验创建了 Cloud Storage 存储桶,可以通过将 delete_bucket 设置为 True 来将其删除。此步骤不是必须执行的步骤,但如果您不再需要存储桶,建议您执行此步骤。
delete_bucket = False
if delete_bucket:
    ! gsutil -m rm -r $BUCKET_NAME
按照这些步骤操作,您可以确保清理本教程中使用的所有资源,从而减少与实验关联的所有不必要费用。
调试常见问题
本部分提供了有关如何确定和解决在 Vertex AI 上部署 vLLM 模型和执行推理时遇到的常见问题的指南。
查看日志
检查日志以确定部署失败或意外行为的根本原因:
- 前往 Vertex AI Prediction 控制台:前往 Google Cloud 控制台中的 Vertex AI Prediction 控制台。
- 选择端点:点击遇到问题的端点。状态应指明部署是否失败。
- 查看日志:点击相应端点,然后前往日志标签页或点击查看日志。这会将您定向到 Cloud Logging,其中的内容会进行过滤以显示特定于该端点和模型部署的日志。您也可以直接通过 Cloud Logging 服务访问日志。
- 分析日志:查看日志条目,了解错误消息、警告和其他相关信息。查看时间戳,以便将日志条目与特定操作相关联。查找与资源限制条件(内存和 CPU)相关的问题、身份验证问题或配置错误。
常见问题 1:部署期间 CUDA 内存不足 (OOM)
当模型的内存用量超过可用 GPU 容量时,就会发生 CUDA 内存不足 (OOM) 错误。
对于纯文本模型,我们使用了以下引擎参数:
base_model_name = "Meta-Llama-3.1-8B"
hf_model_id = f"meta-llama/{base_model_name}"
accelerator_type = "NVIDIA_L4"
accelerator_count = 1
machine_type = "g2-standard-12"
accelerator_count: int = 1
gpu_memory_utilization = 0.9
max_model_len = 4096
dtype = "auto"
max_num_seqs = 256
对于多模态模型,我们使用了以下引擎参数:
base_model_name = "Llama-3.2-11B-Vision-Instruct"
hf_model_id = f"meta-llama/{base_model_name}"
accelerator_type = "NVIDIA_L4"
accelerator_count = 1
machine_type = "g2-standard-12"
accelerator_count: int = 1
gpu_memory_utilization = 0.9
max_model_len = 4096
dtype = "auto"
max_num_seqs = 12
在部署多模态模型时设置 max_num_seqs = 256(如同纯文本模型情况下的操作)可能会导致以下错误:
[rank0]: torch.OutOfMemoryError: CUDA out of memory. Tried to allocate 3.91 GiB. GPU 0 has a total capacity of 39.38 GiB of which 3.76 GiB is free. Including non-PyTorch memory, this process has 0 bytes memory in use. Of the allocated memory 34.94 GiB is allocated by PyTorch, and 175.15 MiB is reserved by PyTorch but unallocated. If reserved but unallocated memory is large try setting PYTORCH_CUDA_ALLOC_CONF=expandable_segments:True to avoid fragmentation. See documentation for Memory Management (https://pytorch.org/docs/stable/notes/cuda.html#environment-variables)
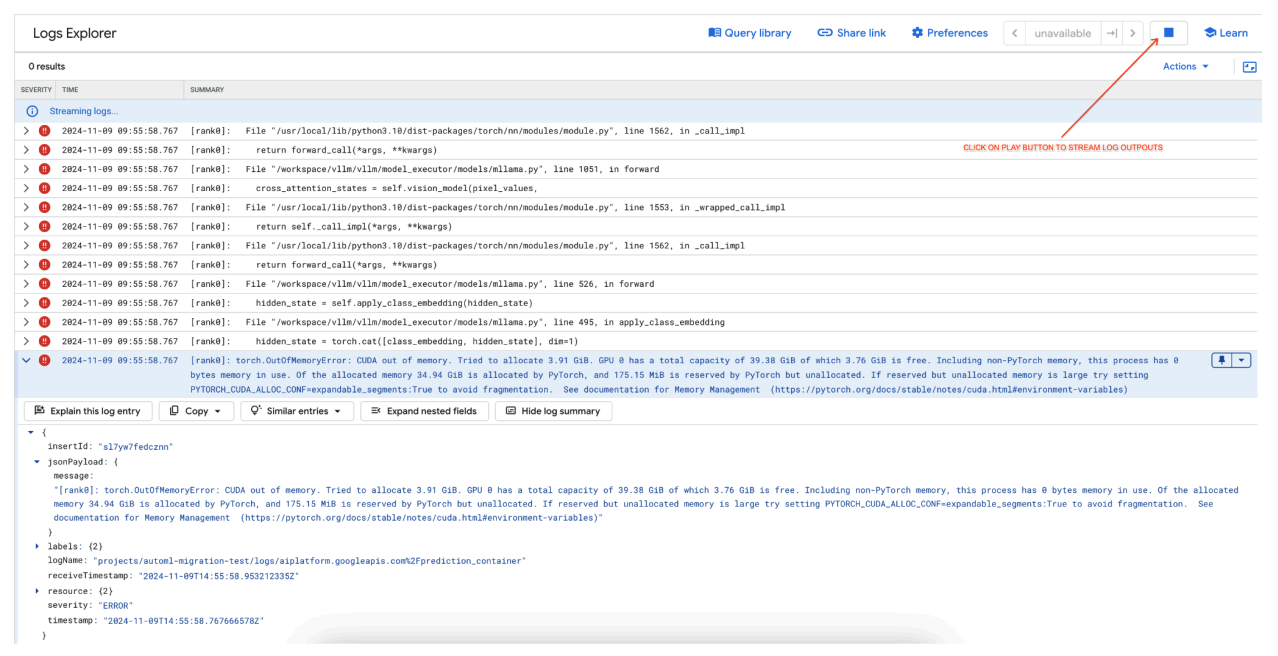 图 7:内存不足 (OOM) GPU 错误日志
了解 max_num_seqs 和 GPU 内存:
max_num_seqs参数定义了模型可以处理的并发请求数量上限。- 模型处理的每个序列都会消耗 GPU 内存。总内存用量与
max_num_seqs和每个序列内存用量的乘积成正比。 - 纯文本模型(例如 Meta-Llama-3.1-8B)对每个序列消耗的内存通常比同时处理文本和图片的多模态模型(例如 Llama-3.2-11B-Vision-Instruct)更少。
查看错误日志(图 8):
- 尝试在 GPU 上分配内存时,日志会显示
torch.OutOfMemoryError。 - 发生此错误是因为模型的内存用量超过了可用 GPU 容量。NVIDIA L4 GPU 有 24 GB,如果为多模态模型设置的
max_num_seqs参数过高,会导致溢出。 - 日志建议设置
PYTORCH_CUDA_ALLOC_CONF=expandable_segments:True以改进内存管理,尽管此处的主要问题是内存用量较高。
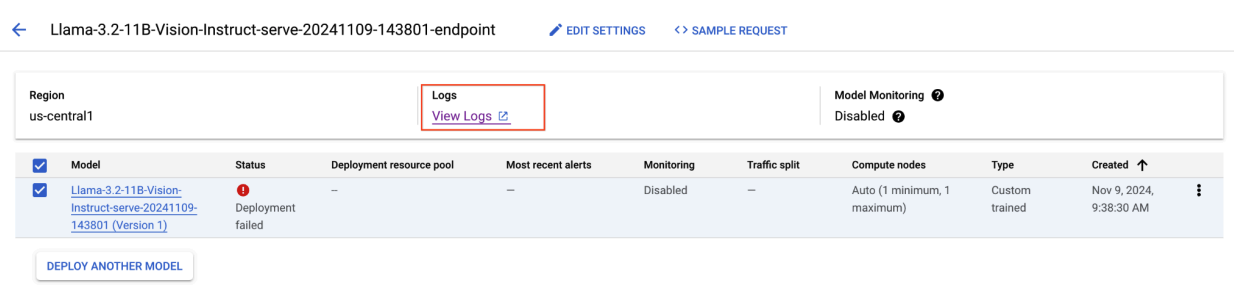 图 8:Llama 3.2 部署失败
 图 9:模型版本详情面板
如需解决此问题,请前往 Vertex AI Prediction 控制台,然后点击相应端点。状态应指明部署失败。 点击以查看日志。验证是否有 max-num-seqs = 256。对于 Llama-3.2-11B-Vision-Instruct,此值过高。更合适的值应为 12。
常见问题 2:需要 Hugging Face 令牌
当模型受限且需要适当的身份验证凭证才能访问时,就会发生 Hugging Face 令牌错误。
以下屏幕截图显示了 Google Cloud Logs Explorer 中的一个日志条目,其中显示了与访问 Hugging Face 上托管的 Meta LLaMA-3.2-11B-Vision 模型相关的错误消息。此错误表示对该模型的访问受到限制,需要进行身份验证才能继续操作。消息中明确指出“Cannot access gated repository for URL”(无法访问网址的受限仓库),并强调模型受限,需要使用适当的身份验证凭证才能访问。此日志条目可帮助排查在使用外部仓库中的受限资源时出现的身份验证问题。
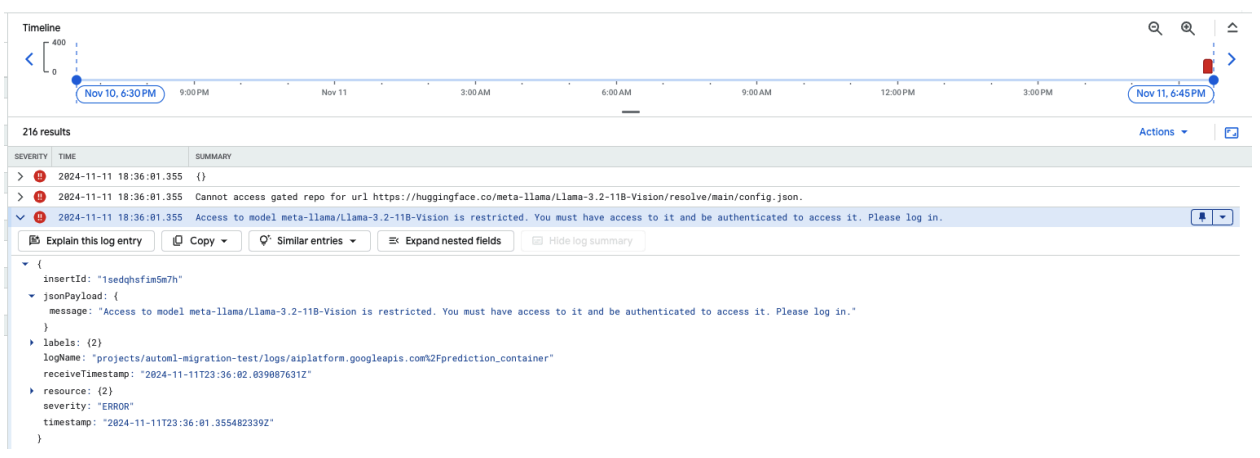 图 10:Hugging Face 令牌错误
如需解决此问题,请验证您的 Hugging Face 访问令牌的权限。 复制最新令牌并部署新端点。
常见问题 3:需要聊天模板
当系统不再允许使用默认聊天模板时,会发生聊天模板错误,并且如果词元化器未定义聊天模板,则必须提供自定义聊天模板。
此屏幕截图显示了 Google Cloud 日志浏览器中的一个日志条目,其中由于 Transformer 库版本 4.44 中缺少聊天模板而发生 ValueError。错误消息表明,默认聊天模板不再受支持,如果词元化器未定义聊天模板,则必须提供自定义聊天模板。此错误突出显示了库中最近的更改,要求明确定义聊天模板,这对于在部署基于聊天的应用时调试问题非常有用。
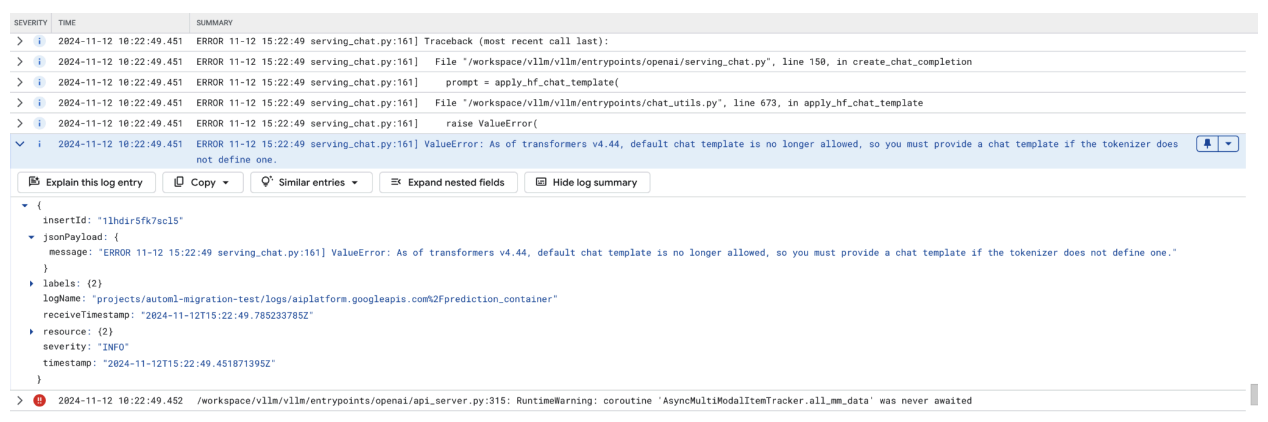 图 11:需要聊天模板
如需绕过此问题,请务必在部署期间使用 --chat-template 输入参数提供聊天模板。您可以在 vLLM 示例仓库中找到示例模板。
常见问题 4:模型最大序列长度
如果模型的最大序列长度 (4096) 大于可存储在 KV 缓存中的最大 token 数量 (2256),就会发生模型最大序列长度错误。
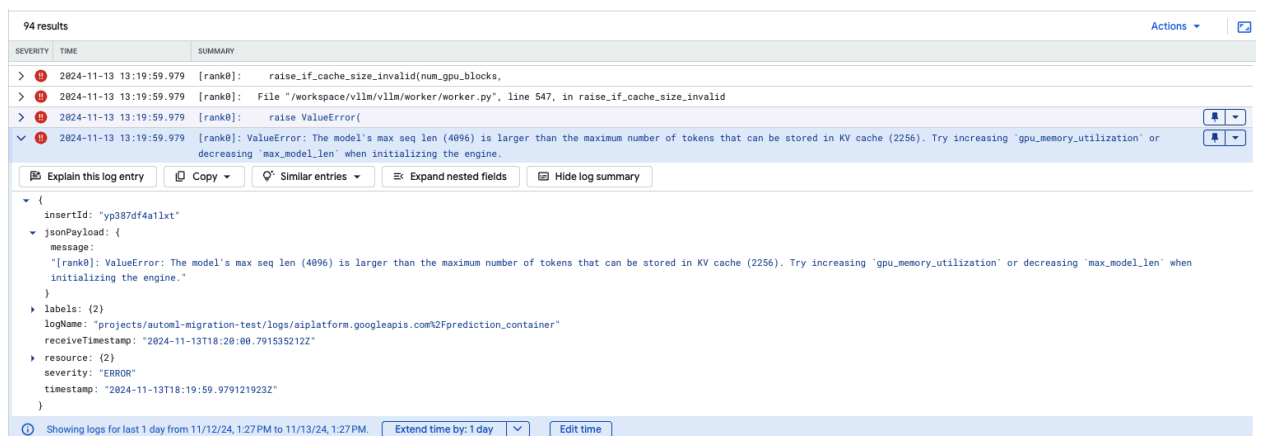 图 12:最大序列长度过长
ValueError:模型的最大序列长度 (4096) 大于可存储在 KV 缓存中的最大 token 数量 (2256)。尝试在初始化引擎时增加 gpu_memory_utilization 或减少 max_model_len。
如需解决此问题,请将 max_model_len 设置为 2048,该值小于 2256。 解决此问题的另一种方法是使用更多或更大的 GPU。如果选择使用更多 GPU,则需要适当设置 tensor-parallel-size。
Model Garden vLLM 容器版本说明
主要版本
标准 vLLM
发布日期 |
架构 |
vLLM 版本 |
容器 URI |
|---|---|---|---|
| 2025 年 7 月 17 日 | ARM |
v0.9.2 |
us-docker.pkg.dev/vertex-ai/vertex-vision-model-garden-dockers/pytorch-vllm-serve:20250717_0916_arm_RC01 |
| 2025 年 7 月 10 日 | x86 |
v0.9.2 |
us-docker.pkg.dev/vertex-ai/vertex-vision-model-garden-dockers/pytorch-vllm-serve:20250710_0916_RC01 |
| 2025 年 6 月 20 日 | x86 |
v0.9.1 之后的版本,提交 |
us-docker.pkg.dev/vertex-ai/vertex-vision-model-garden-dockers/pytorch-vllm-serve:20250620_0916_RC01 |
| 2025 年 6 月 11 日 | x86 |
v0.9.1 |
us-docker.pkg.dev/vertex-ai/vertex-vision-model-garden-dockers/pytorch-vllm-serve:20250611_0916_RC01 |
| 2025 年 6 月 2 日 | x86 |
v0.9.0 |
us-docker.pkg.dev/vertex-ai/vertex-vision-model-garden-dockers/pytorch-vllm-serve:20250601_0916_RC01 |
| 2025 年 5 月 6 日 | x86 |
v0.8.5.post1 |
us-docker.pkg.dev/vertex-ai/vertex-vision-model-garden-dockers/pytorch-vllm-serve:20250506_0916_RC01 |
| 2025 年 4 月 29 日 | x86 |
v0.8.4 |
us-docker.pkg.dev/vertex-ai/vertex-vision-model-garden-dockers/pytorch-vllm-serve:20250429_0916_RC01, 20250430_0916_RC00_maas |
| 2025 年 4 月 17 日 | x86 |
v0.8.4 |
us-docker.pkg.dev/vertex-ai/vertex-vision-model-garden-dockers/pytorch-vllm-serve:20250417_0916_RC01 |
| Apr 10, 2025 | x86 |
v0.8.3 之后的版本,提交 |
us-docker.pkg.dev/vertex-ai/vertex-vision-model-garden-dockers/pytorch-vllm-serve:20250410_0917_RC01 |
| 2025 年 4 月 7 日 | x86 |
v0.8.3 |
us-docker.pkg.dev/vertex-ai/vertex-vision-model-garden-dockers/pytorch-vllm-serve:20250407_0917_RC01, 20250407_0917_RC0120250429_0916_RC00_maas |
| 2025 年 4 月 7 日 | x86 |
v0.8.1 |
us-docker.pkg.dev/vertex-ai/vertex-vision-model-garden-dockers/pytorch-vllm-serve:20250404_0916_RC01 |
| 2025 年 4 月 5 日 | x86 |
v0.8.2 之后的版本,提交 |
us-docker.pkg.dev/vertex-ai/vertex-vision-model-garden-dockers/pytorch-vllm-serve:20250405_1205_RC01 |
| 2025 年 3 月 31 日 | x86 |
v0.8.1 |
us-docker.pkg.dev/vertex-ai/vertex-vision-model-garden-dockers/pytorch-vllm-serve:20250401_0916_RC01 |
| 2025 年 3 月 26 日 | x86 |
v0.8.1 |
us-docker.pkg.dev/vertex-ai/vertex-vision-model-garden-dockers/pytorch-vllm-serve:20250327_0916_RC01 |
| 2025 年 3 月 23 日 | x86 |
v0.8.1 |
us-docker.pkg.dev/vertex-ai/vertex-vision-model-garden-dockers/pytorch-vllm-serve:20250324_0916_RC01 |
| 2025 年 3 月 21 日 | x86 |
v0.8.1 |
us-docker.pkg.dev/vertex-ai/vertex-vision-model-garden-dockers/pytorch-vllm-serve:20250321_0916_RC01 |
| 2025 年 3 月 11 日 | x86 |
v0.7.3 之后的版本,提交 |
us-docker.pkg.dev/vertex-ai/vertex-vision-model-garden-dockers/pytorch-vllm-serve:20250312_0916_RC01 |
| 2025 年 3 月 3 日 | x86 |
v0.7.2 |
us-docker.pkg.dev/vertex-ai/vertex-vision-model-garden-dockers/pytorch-vllm-serve:20250304_0916_RC01 |
| 2025 年 1 月 14 日 | x86 |
v0.6.4.post1 |
us-docker.pkg.dev/vertex-ai/vertex-vision-model-garden-dockers/pytorch-vllm-serve:20250114_0916_RC00_maas |
| 2024 年 12 月 2 日 | x86 |
v0.6.4.post1 |
us-docker.pkg.dev/vertex-ai/vertex-vision-model-garden-dockers/pytorch-vllm-serve:20241202_0916_RC00_maas |
| 2024 年 11 月 12 日 | x86 |
v0.6.2 |
us-docker.pkg.dev/vertex-ai/vertex-vision-model-garden-dockers/pytorch-vllm-serve:20241112_0916_RC00_maas |
| 2024 年 10 月 16 日 | x86 |
v0.6.2 |
us-docker.pkg.dev/vertex-ai/vertex-vision-model-garden-dockers/pytorch-vllm-serve:20241016_0916_RC00_maas |
优化版 vLLM
发布日期 |
架构 |
容器 URI |
|---|---|---|
| Jan 21, 2025 | x86 |
us-docker.pkg.dev/vertex-ai-restricted/vertex-vision-model-garden-dockers/pytorch-vllm-optimized-serve:20250121_0835_RC00 |
| 2024 年 10 月 29 日 | x86 |
us-docker.pkg.dev/vertex-ai-restricted/vertex-vision-model-garden-dockers/pytorch-vllm-optimized-serve:20241029_0835_RC00 |
其他版本
如需查看 VMG 标准 vLLM 容器版本的完整列表,请访问 Artifact Registry 页面。
处于实验状态的 vLLM-TPU 版本会标记为 <yyyymmdd_hhmm_tpu_experimental_RC00>。