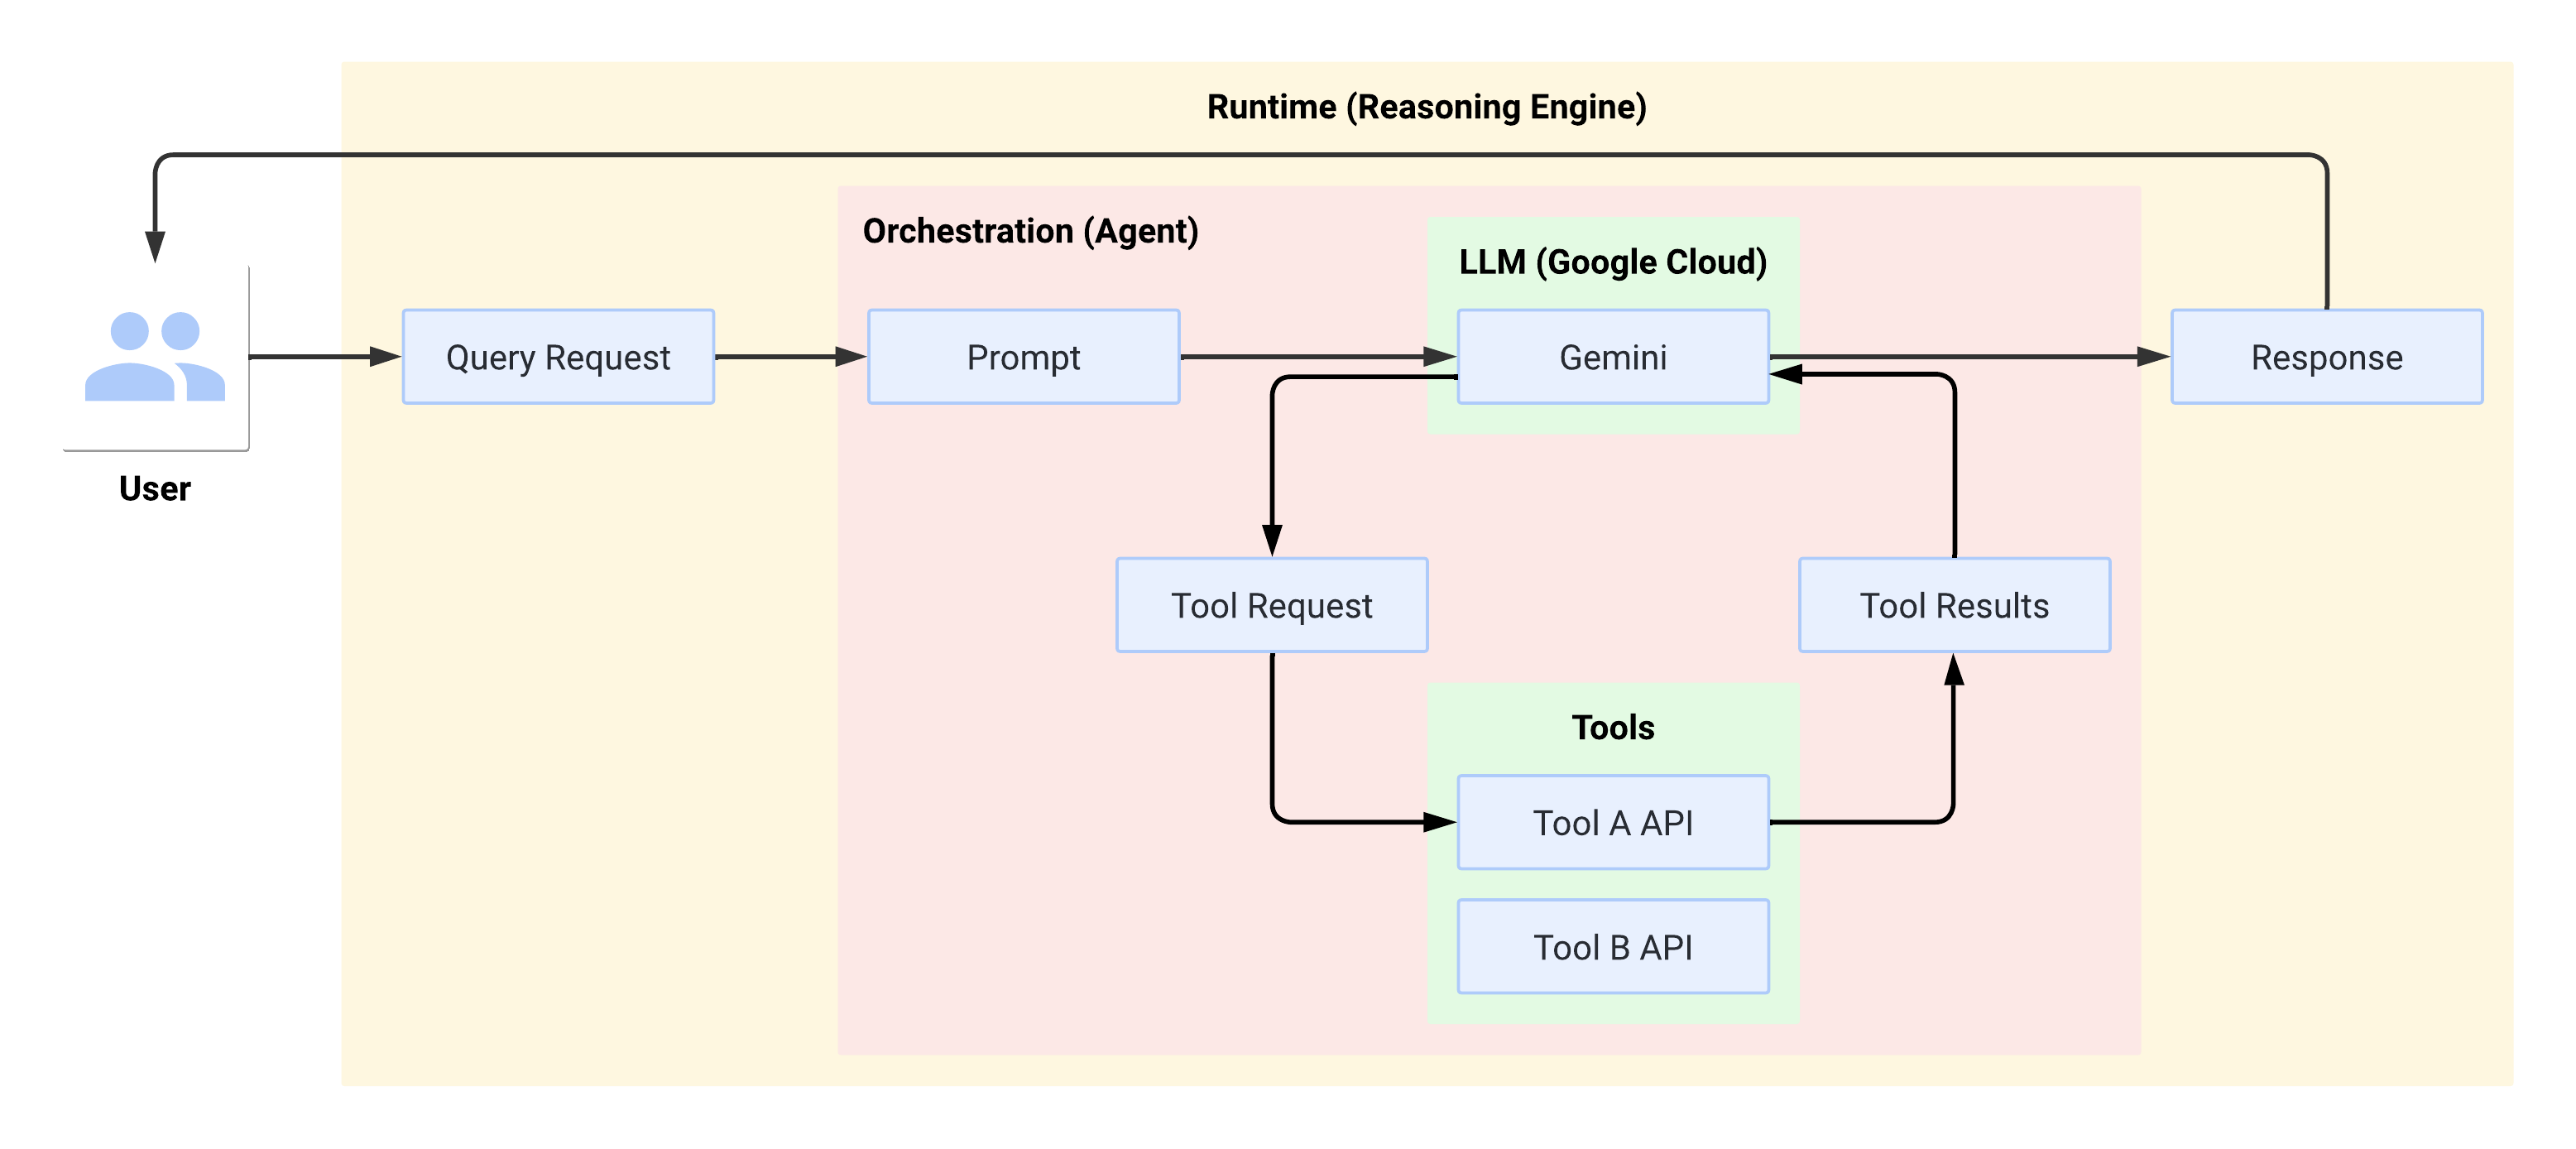
借助 LangChain on Vertex AI(预览版),您可以使用 LangChain 开源库构建自定义的生成式 AI 应用,并将 Vertex AI 用于模型、工具和部署。借助 LangChain on Vertex AI(预览版),您可以执行以下操作:
选择要使用的大型语言模型 (LLM)。
定义用于访问外部 API 的工具。
在编排框架中构建用户与系统组件之间的接口。
将框架部署到托管式运行时。
优势
可自定义:利用 LangChain 的标准化接口,可以采用 LangChain on Vertex AI 来构建不同类型的应用。您可以自定义应用的逻辑并整合任何框架,从而提供高度的灵活性。
简化部署:LangChain on Vertex AI 使用与 LangChain 相同的 API 与 LLM 进行交互和构建应用。Reasoning Engine 运行时支持一键部署,可根据您的库生成合规的 API,因此 Vertex AI 上的 LangChain 可简化并加快使用 Vertex AI LLM 的部署。
与 Vertex AI 生态系统集成:Vertex AI 上的 LangChain 的 Reasoning Engine 使用 Vertex AI 的基础设施和预构建容器来帮助您部署 LLM 应用。您可以使用 Vertex AI API 与 Gemini 模型、函数调用和扩展程序集成。
安全、隐私且可扩缩:您可以使用单个 SDK 调用,而无需自行管理开发流程。利用 Reasoning Engine 托管运行时,您无需执行应用服务器开发、容器创建以及身份验证、IAM 和扩缩配置等任务。Vertex AI 会处理自动扩缩、区域扩展和容器漏洞。
通过 LangChain on Vertex AI,您可以将应用部署到 Reasoning Engine 管理的运行时。此运行时是一项 Vertex AI 服务,具有 Vertex AI 集成的所有优势:安全性、隐私性、可观测性和可伸缩性。您可以通过 API 调用对应用进行生产化和扩容,快速将经过本地测试的原型转换为企业级部署。如需了解详情,请参阅部署应用。
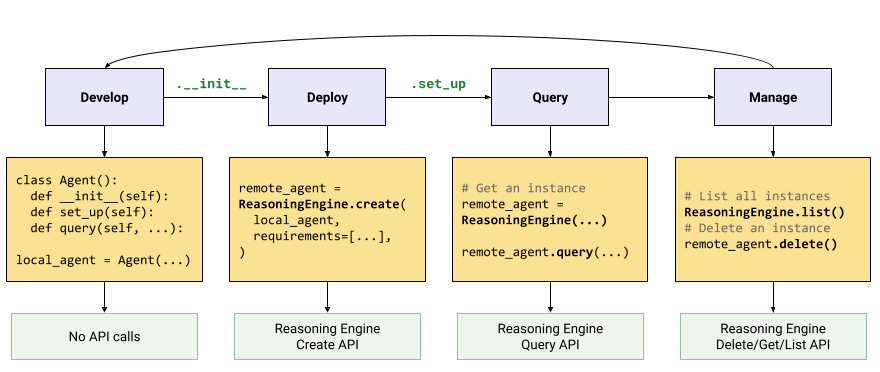
您可以通过多种不同方式开发自定义生成式 AI 应用的原型并进行构建,这些应用通过基于 Gemini 等模型对工具和自定义函数进行分层,从而使用代理功能。当应用迁移到生产环境时,您需要考虑如何部署和管理代理及其底层组件。
LangChain on Vertex AI 组件的目的是帮助您专注于并自定义您最关注的代理功能的各个方面,例如自定义函数、代理行为和模型参数,而 Google 负责部署、扩缩打包和版本。如果您在堆栈中的较低级别工作,则可能需要管理超出您的预期的内容。如果您在堆栈中的较高级别工作,则可能无法获得足够的开发者控制权。
[[["易于理解","easyToUnderstand","thumb-up"],["解决了我的问题","solvedMyProblem","thumb-up"],["其他","otherUp","thumb-up"]],[["很难理解","hardToUnderstand","thumb-down"],["信息或示例代码不正确","incorrectInformationOrSampleCode","thumb-down"],["没有我需要的信息/示例","missingTheInformationSamplesINeed","thumb-down"],["翻译问题","translationIssue","thumb-down"],["其他","otherDown","thumb-down"]],["最后更新时间 (UTC):2025-09-04。"],[],[],null,["# Vertex AI Agent Engine overview\n\n| [VPC-SC security controls](/vertex-ai/docs/general/vpc-service-controls)\n| and [Customer-managed encryption keys (CMEK)](/vertex-ai/docs/general/cmek) are\n| supported by Vertex AI Agent Engine. Data residency (DRZ) and Access Transparency (AXT)\nsecurity controls aren't supported. \n| To see an example of getting started with Vertex AI Agent Engine,\n| run the \"Building and Deploying an Agent with \" notebook in one of the following\n| environments:\n|\n| [Open in Colab](https://colab.research.google.com/github/GoogleCloudPlatform/generative-ai/blob/main/gemini/agent-engine/intro_agent_engine.ipynb)\n|\n|\n| \\|\n|\n| [Open in Colab Enterprise](https://console.cloud.google.com/vertex-ai/colab/import/https%3A%2F%2Fraw.githubusercontent.com%2FGoogleCloudPlatform%2Fgenerative-ai%2Fmain%2Fgemini%2Fagent-engine%2Fintro_agent_engine.ipynb)\n|\n|\n| \\|\n|\n| [Open\n| in Vertex AI Workbench](https://console.cloud.google.com/vertex-ai/workbench/deploy-notebook?download_url=https%3A%2F%2Fraw.githubusercontent.com%2FGoogleCloudPlatform%2Fgenerative-ai%2Fmain%2Fgemini%2Fagent-engine%2Fintro_agent_engine.ipynb)\n|\n|\n| \\|\n|\n| [View on GitHub](https://github.com/GoogleCloudPlatform/generative-ai/blob/main/gemini/agent-engine/intro_agent_engine.ipynb)\n\nVertex AI Agent Engine, a part of the Vertex AI Platform, is a\nset of services that enables developers to deploy, manage, and scale AI agents\nin production. Agent Engine handles the infrastructure to scale agents in\nproduction so you can focus on creating applications.\nVertex AI Agent Engine offers the following services that you can\nuse individually or in combination:\n\n- **Runtime**:\n\n - [Deploy](/vertex-ai/generative-ai/docs/agent-engine/deploy) and scale agents with a managed runtime and end-to-end management capabilities.\n - Customize the agent's container image with build-time installation scripts for system dependencies.\n - Use security features including VPC-SC compliance and configuration of authentication and IAM.\n - Access models and tools such as [function calling](/vertex-ai/generative-ai/docs/multimodal/function-calling).\n - Deploy agents built using [different Python frameworks](#supported-frameworks):\n - Understand agent behavior with [Google\n Cloud Trace](/vertex-ai/generative-ai/docs/agent-engine/manage/tracing) (supporting [OpenTelemetry](https://opentelemetry.io/)), [Cloud Monitoring](/vertex-ai/generative-ai/docs/agent-engine/manage/monitoring), and [Cloud Logging](/vertex-ai/generative-ai/docs/agent-engine/manage/logging).\n- **Quality and evaluation** (Preview): Evaluate agent quality with the integrated\n [Gen AI Evaluation service](/vertex-ai/generative-ai/docs/agent-engine/evaluate) and optimize agents with Gemini model training runs.\n\n- [**Example Store**](/vertex-ai/generative-ai/docs/example-store/overview) (Preview): Store and dynamically retrieve few-shot examples to improve agent performance.\n\n- [**Sessions**](/vertex-ai/generative-ai/docs/agent-engine/sessions/overview) (Preview): Agent Engine Sessions lets you store individual interactions between users and agents, providing definitive sources for conversation context.\n\n- [**Memory Bank**](/vertex-ai/generative-ai/docs/agent-engine/memory-bank/overview) (Preview): Agent Engine Memory Bank lets you store and retrieve information from sessions to personalize agent interactions.\n\nVertex AI Agent Engine is part of [Vertex AI Agent Builder](/vertex-ai/generative-ai/docs/agent-builder/overview), a suite of features for discovering, building, and deploying AI agents.\n| **Note:** Because the name of Vertex AI Agent Engine changed over time, the name of the resource in the API reference is [`ReasoningEngine`](/vertex-ai/generative-ai/docs/reference/rest/v1/projects.locations.reasoningEngines) to maintain backwards compatibility.\n\nCreate and deploy on Vertex AI Agent Engine\n-------------------------------------------\n\n**Note:** For a streamlined, *IDE-based* development and deployment experience with Vertex AI Agent Engine, consider the [agent-starter-pack](https://github.com/GoogleCloudPlatform/agent-starter-pack). It provides ready-to-use templates, a built-in UI for experimentation, and simplifies deployment, operations, evaluation, customization, and observability.\n\nThe workflow for building an agent on Vertex AI Agent Engine is:\n\nThe steps are illustrated by the following diagram:\n\n\u003cbr /\u003e\n\nSupported frameworks\n--------------------\n\nThe following table describes the level of support Vertex AI Agent Engine provides for various agent frameworks:\n\nDeploy in production with Agent Starter Pack\n--------------------------------------------\n\nThe [Agent Starter Pack](https://github.com/GoogleCloudPlatform/agent-starter-pack) is a collection of production-ready generative AI agent templates built for Vertex AI Agent Engine. The Agent Starter Pack provides the following:\n\n- **Pre-built agent templates:** ReAct, RAG, multi-agent, and other templates.\n- **Interactive playground**: Test and interact with your agent.\n- **Automated infrastructure** : Uses [Terraform](https://cloud.google.com/docs/terraform) for streamlined resource management.\n- **CI/CD pipelines**: Automated deployment workflows leveraging Cloud Build.\n- **Observability**: Built-in support for Cloud Trace and Cloud Logging.\n\nTo get started, see the [Quickstart](https://github.com/GoogleCloudPlatform/agent-starter-pack?tab=readme-ov-file#-get-started-in-1-minute).\n\nUse cases\n---------\n\nTo learn about Vertex AI Agent Engine with end-to-end examples, see the following\nresources:\n\nEnterprise security\n-------------------\n\nVertex AI Agent Engine supports several features to help you meet\nenterprise security requirements, adhere to your organization's security\npolicies, and follow security best practices. The following features are\nsupported:\n\n- **Customer-managed encryption keys (CMEK)** : Vertex AI Agent Engine\n supports [CMEK](/kms/docs/cmek) to protect your data with your own encryption keys,\n which gives you ownership and full control of the keys that protect your data at\n rest in Google Cloud. For more information, see\n [Agent Engine CMEK](/vertex-ai/generative-ai/docs/agent-engine/manage/access#cmek).\n\n- **VPC Service Controls** : Vertex AI Agent Engine supports\n [VPC Service Controls](/vertex-ai/docs/general/vpc-service-controls) to strengthen data\n security and mitigate the risks of data exfiltration. When VPC Service Controls\n is configured, the deployed agent retains secure access to Google APIs and\n services, such as BigQuery API, Cloud SQL Admin API, and Vertex AI API,\n verifying seamless operation within your defined perimeter. Critically,\n VPC Service Controls effectively blocks all public internet access, confining\n data movement to your authorized network boundaries and significantly\n enhancing your enterprise security posture.\n\n | **Note:** If you use Vertex AI Agent Engine in a VPC-SC environment, you must create an ingress rule in your perimeter to allow ingress from the Reasoning Engine Service Agent (`service-`\u003cvar translate=\"no\"\u003ePROJECT_NUMBER\u003c/var\u003e`@gcp-sa-aiplatform-re.iam.gserviceaccount.com`) to `storage.googleapis.com` service and `artifactregistry.googleapis.com` service.\n- **Private Service Connect interface** : [PSC-I](/vpc/docs/about-private-service-connect-interfaces)\n lets your agents interact with privately hosted services in user's VPC. For\n more information, see [Configure VPC Service Controls interface](/vertex-ai/generative-ai/docs/agent-engine/deploy#psc-i).\n\n- **HIPAA** : As a part of Vertex AI Platform,\n Vertex AI Agent Engine supports [HIPAA](/security/compliance/hipaa)\n workloads.\n\nSupported regions\n-----------------\n\nVertex AI Agent Engine is supported in the following regions:\n\nFor [Agent Engine Memory Bank](/vertex-ai/generative-ai/docs/agent-engine/memory-bank/overview) (Preview), the following regions are supported:\n\nQuota\n-----\n\nThe following limits apply to [Vertex AI Agent Engine](/vertex-ai/generative-ai/docs/agent-engine/overview) for a given project in each region: \n\nPricing\n-------\n\nThe pricing for the Agent Engine Runtime is based on\nthe compute (vCPU hours) and memory (GiB hours) your agent uses to process\nrequests. There is no charge for the time a deployed agent is idle.\n\nFor more information, see [pricing](/vertex-ai/pricing#agent_engine).\n\nWhat's next\n-----------\n\n- [Set up the environment](/vertex-ai/generative-ai/docs/agent-engine/set-up).\n- [Get support](/vertex-ai/generative-ai/docs/agent-engine/support)."]]