本頁說明如何從圖片中移除物件。Vertex AI 的 Imagen 可讓您指定遮罩區域 (稱為「修復」),從圖片中移除物件。您可以自行提供遮罩,也可以讓 Vertex AI 的 Imagen 為您生成遮罩。
移除內容範例
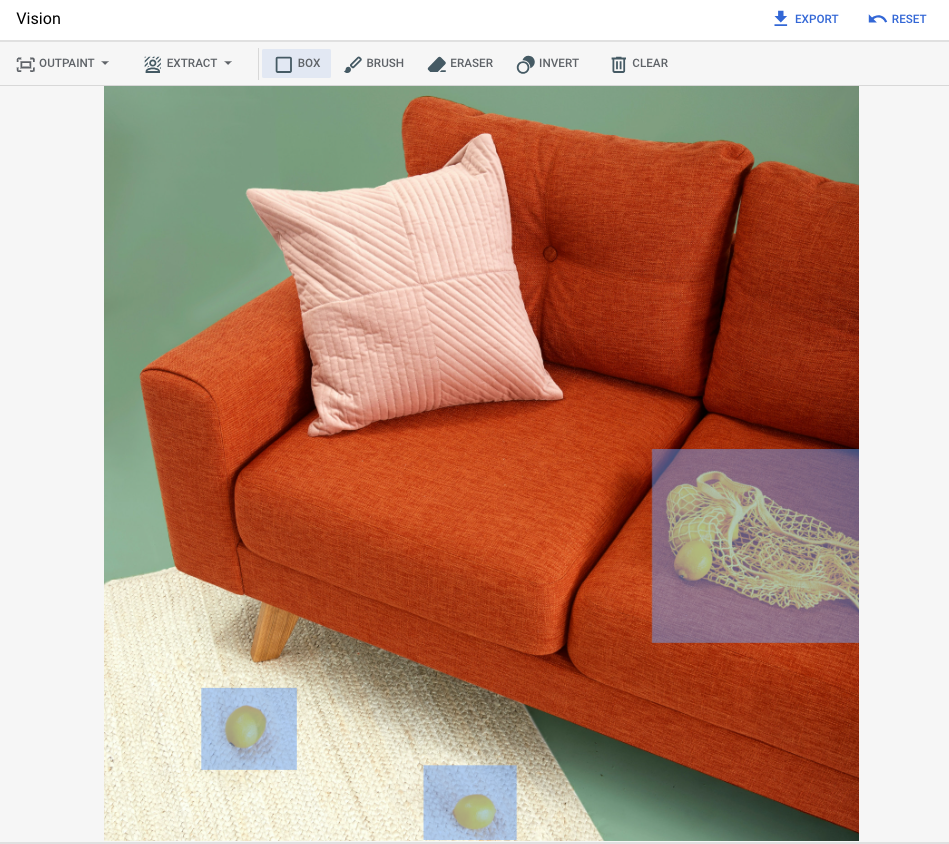
以下範例使用修復功能,透過圖片遮罩從現有圖片中移除內容:
輸入
要編輯的基礎圖片* |
使用 Google Cloud 控制台中的工具指定遮罩區域 |
文字提示 |
|---|---|---|

|
|
提示:從圖片中移除所選物件 |
* 圖片來源:Inside Weather on Unsplash。
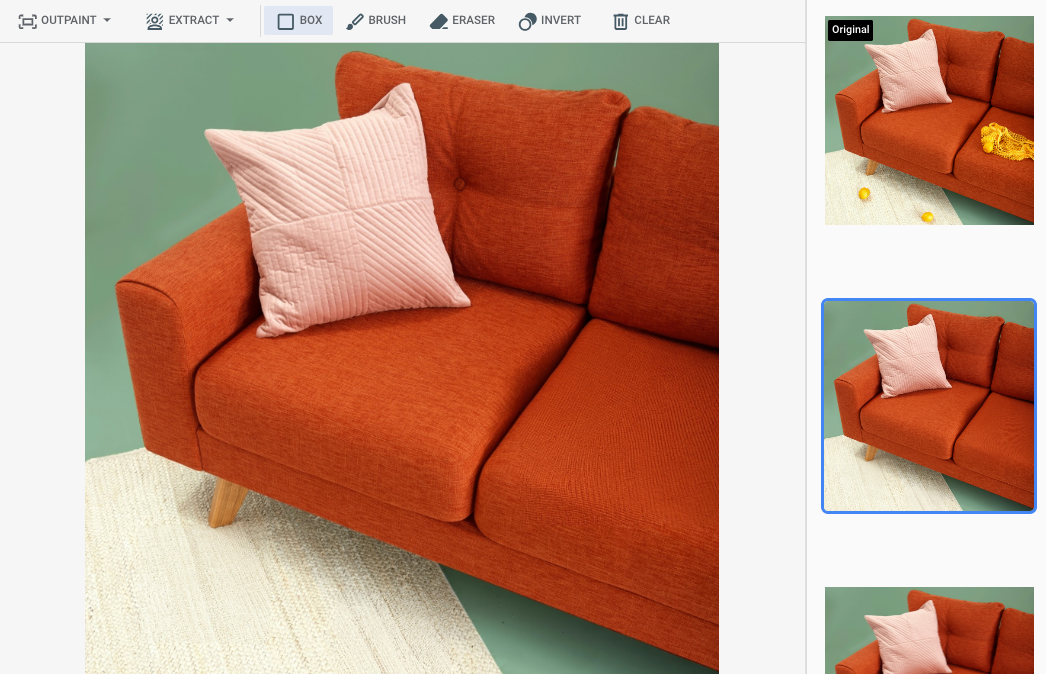
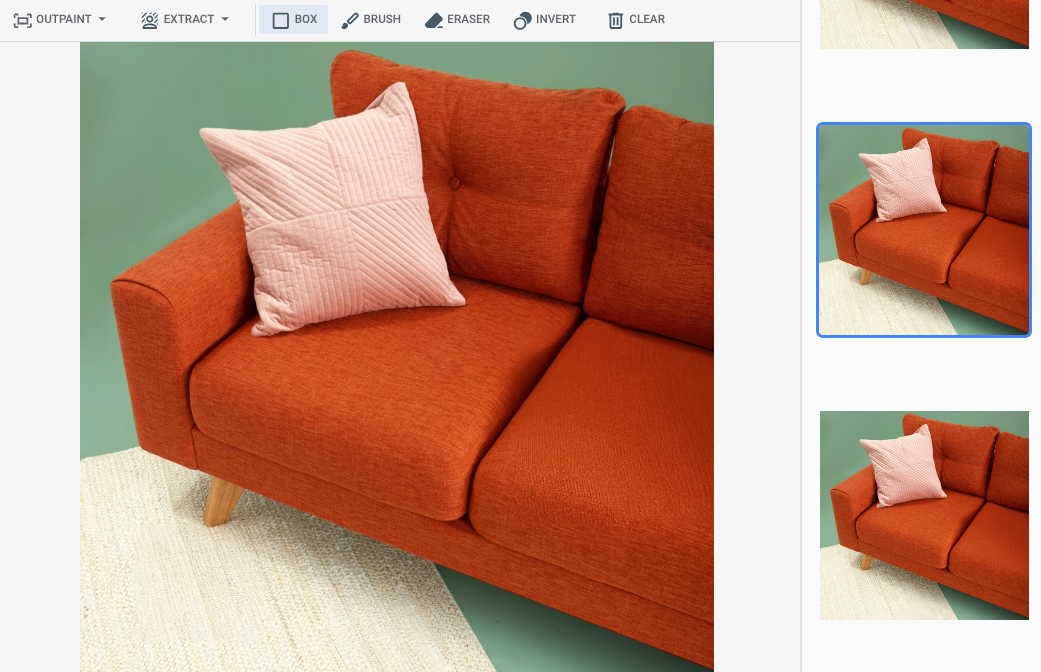
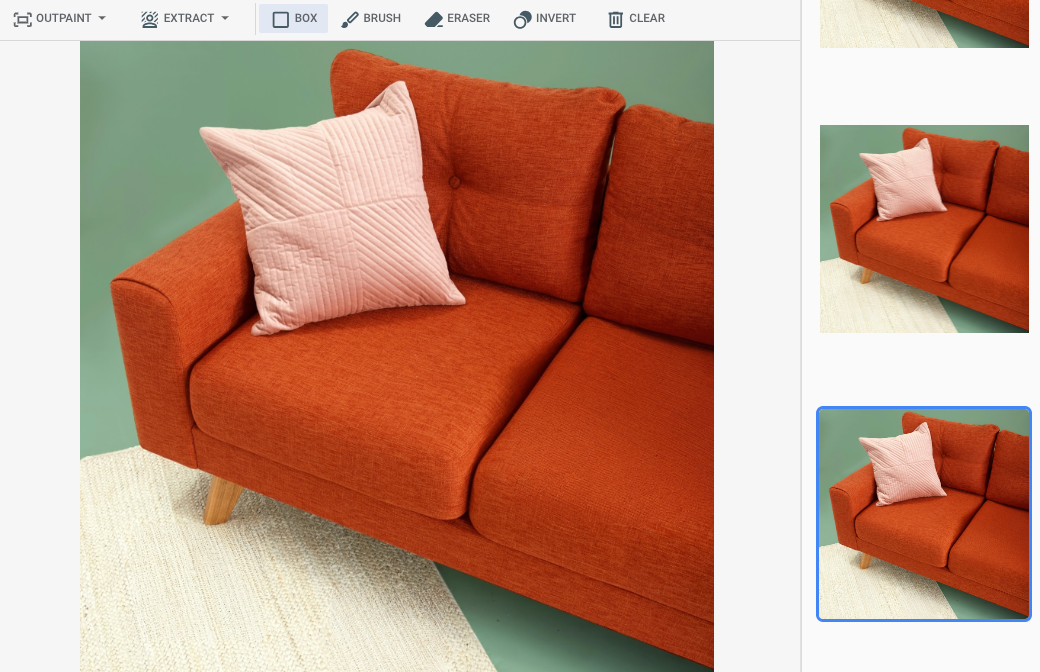
在 Google Cloud 控制台中指定遮罩區域後的輸出內容
|
|
|
查看「Imagen for Editing and Customization」模型資訊卡
事前準備
- Sign in to your Google Cloud account. If you're new to Google Cloud, create an account to evaluate how our products perform in real-world scenarios. New customers also get $300 in free credits to run, test, and deploy workloads.
-
In the Google Cloud console, on the project selector page, select or create a Google Cloud project.
Roles required to select or create a project
- Select a project: Selecting a project doesn't require a specific IAM role—you can select any project that you've been granted a role on.
-
Create a project: To create a project, you need the Project Creator
(
roles/resourcemanager.projectCreator), which contains theresourcemanager.projects.createpermission. Learn how to grant roles.
-
Verify that billing is enabled for your Google Cloud project.
-
Enable the Vertex AI API.
Roles required to enable APIs
To enable APIs, you need the Service Usage Admin IAM role (
roles/serviceusage.serviceUsageAdmin), which contains theserviceusage.services.enablepermission. Learn how to grant roles. -
為環境設定驗證方法。
Select the tab for how you plan to use the samples on this page:
Console
When you use the Google Cloud console to access Google Cloud services and APIs, you don't need to set up authentication.
Java
如要在本機開發環境中使用本頁的 Java 範例,請安裝並初始化 gcloud CLI,然後使用使用者憑證設定應用程式預設憑證。
安裝 Google Cloud CLI。
如果您使用外部識別資訊提供者 (IdP),請先 使用聯合身分登入 gcloud CLI。
If you're using a local shell, then create local authentication credentials for your user account:
gcloud auth application-default login
You don't need to do this if you're using Cloud Shell.
If an authentication error is returned, and you are using an external identity provider (IdP), confirm that you have signed in to the gcloud CLI with your federated identity.
詳情請參閱 Google Cloud 驗證說明文件中的「 為本機開發環境設定 ADC」。
Node.js
如要在本機開發環境中使用本頁的 Node.js 範例,請安裝並初始化 gcloud CLI,然後使用使用者憑證設定應用程式預設憑證。
安裝 Google Cloud CLI。
如果您使用外部識別資訊提供者 (IdP),請先 使用聯合身分登入 gcloud CLI。
If you're using a local shell, then create local authentication credentials for your user account:
gcloud auth application-default login
You don't need to do this if you're using Cloud Shell.
If an authentication error is returned, and you are using an external identity provider (IdP), confirm that you have signed in to the gcloud CLI with your federated identity.
詳情請參閱 Google Cloud 驗證說明文件中的「 為本機開發環境設定 ADC」。
Python
如要在本機開發環境中使用本頁的 Python 範例,請安裝並初始化 gcloud CLI,然後使用使用者憑證設定應用程式預設憑證。
安裝 Google Cloud CLI。
如果您使用外部識別資訊提供者 (IdP),請先 使用聯合身分登入 gcloud CLI。
If you're using a local shell, then create local authentication credentials for your user account:
gcloud auth application-default login
You don't need to do this if you're using Cloud Shell.
If an authentication error is returned, and you are using an external identity provider (IdP), confirm that you have signed in to the gcloud CLI with your federated identity.
詳情請參閱 Google Cloud 驗證說明文件中的「 為本機開發環境設定 ADC」。
REST
如要在本機開發環境中使用本頁的 REST API 範例,請使用您提供給 gcloud CLI 的憑證。
安裝 Google Cloud CLI。
如果您使用外部識別資訊提供者 (IdP),請先 使用聯合身分登入 gcloud CLI。
詳情請參閱 Google Cloud 驗證說明文件中的「Authenticate for using REST」。
使用定義的遮罩區域移除
請使用下列範例指定修復功能來移除內容。在這些範例中,您會指定基本圖片、文字提示和遮罩區域,藉此修改基本圖片。
Imagen 3
使用下列範例,透過 Imagen 3 模型傳送修復要求。
控制台
-
在 Google Cloud 控制台中,前往「Vertex AI」 >「Media Studio」頁面。
- 按一下 [上傳]。在顯示的檔案對話方塊中,選取要上傳的檔案。
- 按一下「Inpaint」(修復)。
- 在「參數」面板中,按一下「修復 (移除)」。
-
執行下列其中一個步驟:
- 上傳自己的遮罩:
- 在電腦上建立遮罩。
- 按一下「上傳遮罩」。在顯示的對話方塊中,選取要上傳的遮罩。
- 自行定義遮罩:在編輯工具列中,使用遮罩工具 (方塊、筆刷或 masked_transitions 反轉工具),指定要新增內容的區域。
- 上傳自己的遮罩:
-
選用步驟:在「參數」面板中調整下列選項:
- 模型:要使用的 Imagen 模型
- 結果數量:要生成的結果數量
- 負面提示:避免生成的項目
- 在提示欄位中輸入提示,修改圖像。
- 按一下「生成」。
Python
安裝
pip install --upgrade google-genai
詳情請參閱 SDK 參考說明文件。
設定環境變數,透過 Vertex AI 使用 Gen AI SDK:
# Replace the `GOOGLE_CLOUD_PROJECT` and `GOOGLE_CLOUD_LOCATION` values
# with appropriate values for your project.
export GOOGLE_CLOUD_PROJECT=GOOGLE_CLOUD_PROJECT
export GOOGLE_CLOUD_LOCATION=us-central1
export GOOGLE_GENAI_USE_VERTEXAI=True
REST
詳情請參閱「編輯圖片」API 參考資料。
使用任何要求資料之前,請先替換以下項目:
- PROJECT_ID:您的 Google Cloud 專案 ID。
- LOCATION:專案的區域。例如
us-central1、europe-west2或asia-northeast3。如需可用區域的清單,請參閱「Vertex AI 的生成式 AI 服務地區」。 prompt:如要獲得最佳效果,使用修復功能移除物件時,請省略提示和negativePrompt。- B64_BASE_IMAGE:要編輯或放大畫質的基礎圖片。圖片必須指定為 base64 編碼的位元組字串。大小限制:10 MB。
- B64_MASK_IMAGE:要用做遮罩圖層的黑白圖片,可編輯原始圖片。圖片必須指定為 base64 編碼的位元組字串。大小限制:10 MB。
- MASK_DILATION - float。這個遮罩要擴張的圖片寬度百分比。建議使用
0.01的值,補償不完美的輸入遮罩。 - EDIT_STEPS - 整數。基礎模型的取樣步驟數。如要移除修復內容,請從步驟
12開始。如果品質不符合需求,請將步驟數調高至上限75。增加步驟也會增加要求延遲時間。 - EDIT_IMAGE_COUNT - 編輯過的圖片數量。接受的整數值:1 到 4。 預設值:4。
HTTP 方法和網址:
POST https://LOCATION-aiplatform.googleapis.com/v1/projects/PROJECT_ID/locations/LOCATION/publishers/google/models/imagen-3.0-capability-001:predict
JSON 要求主體:
{
  "instances": [
    {
      "prompt": "",
      "referenceImages": [
        {
          "referenceType": "REFERENCE_TYPE_RAW",
          "referenceId": 1,
          "referenceImage": {
            "bytesBase64Encoded": "B64_BASE_IMAGE"
          }
        },
        {
          "referenceType": "REFERENCE_TYPE_MASK",
          "referenceId": 2,
          "referenceImage": {
            "bytesBase64Encoded": "B64_MASK_IMAGE"
          },
          "maskImageConfig": {
            "maskMode": "MASK_MODE_USER_PROVIDED",
            "dilation": MASK_DILATION
          }
        }
      ]
    }
  ],
  "parameters": {
    "editConfig": {
      "baseSteps": EDIT_STEPS
    },
    "editMode": "EDIT_MODE_INPAINT_REMOVAL",
    "sampleCount": EDIT_IMAGE_COUNT
  }
}
如要傳送要求,請選擇以下其中一個選項:
以下是含有curl
將要求主體儲存在名為
request.json的檔案中,然後執行下列指令:curl -X POST \
-H "Authorization: Bearer $(gcloud auth print-access-token)" \
-H "Content-Type: application/json; charset=utf-8" \
-d @request.json \
"https://LOCATION-aiplatform.googleapis.com/v1/projects/PROJECT_ID/locations/LOCATION/publishers/google/models/imagen-3.0-capability-001:predict"PowerShell
將要求主體儲存在名為
request.json的檔案中,然後執行下列指令:$cred = gcloud auth print-access-token
$headers = @{ "Authorization" = "Bearer $cred" }
Invoke-WebRequest `
-Method POST `
-Headers $headers `
-ContentType: "application/json; charset=utf-8" `
-InFile request.json `
-Uri "https://LOCATION-aiplatform.googleapis.com/v1/projects/PROJECT_ID/locations/LOCATION/publishers/google/models/imagen-3.0-capability-001:predict" | Select-Object -Expand Content"sampleCount": 2的要求範例回應。回應會傳回兩個預測物件,其中包含以 base64 編碼產生的圖片位元組。{ "predictions": [ { "bytesBase64Encoded": "BASE64_IMG_BYTES", "mimeType": "image/png" }, { "mimeType": "image/png", "bytesBase64Encoded": "BASE64_IMG_BYTES" } ] }Imagen 2
使用下列範例,透過 Imagen 2 模型傳送修復要求。
控制台
-
在 Google Cloud 控制台中,前往「Vertex AI」 >「Media Studio」頁面。
-
在下方工作面板中,按一下「編輯圖片」。
-
按一下「上傳」,選取要編輯的本機產品圖片。
-
在編輯工具列中,使用遮罩工具 (方塊、筆刷或masked_transitions反轉工具) 指定要移除內容的區域。
-
(選用步驟) 在「參數」面板中,調整「結果數量」、「負面提示」 (可選,用於移除內容)、「文字提示指引」或其他參數。
-
將提示欄位留空。
-
按一下「生成」。
REST
使用任何要求資料之前,請先替換以下項目:
- PROJECT_ID:您的 Google Cloud 專案 ID。
- LOCATION:專案的區域。例如
us-central1、europe-west2或asia-northeast3。如需可用區域的清單,請參閱「Vertex AI 的生成式 AI 服務地區」。 - B64_BASE_IMAGE:要編輯或放大畫質的基礎圖片。圖片必須指定為 base64 編碼的位元組字串。大小限制:10 MB。
- B64_MASK_IMAGE:要用做遮罩圖層的黑白圖片,可編輯原始圖片。圖片必須指定為 base64 編碼的位元組字串。大小限制:10 MB。
- EDIT_IMAGE_COUNT:編輯的圖片數量。預設值: 4。
HTTP 方法和網址:
POST https://LOCATION-aiplatform.googleapis.com/v1/projects/PROJECT_ID/locations/LOCATION/publishers/google/models/imagegeneration@006:predict
JSON 要求主體:
{
  "instances": [
    {
      "prompt": "",
      "image": {
          "bytesBase64Encoded": "B64_BASE_IMAGE"
      },
      "mask": {
        "image": {
          "bytesBase64Encoded": "B64_MASK_IMAGE"
        }
      }
    }
  ],
  "parameters": {
    "sampleCount": EDIT_IMAGE_COUNT,
    "editConfig": {
      "editMode": "inpainting-remove"
    }
  }
}
如要傳送要求,請選擇以下其中一個選項:
以下是含有curl
將要求主體儲存在名為
request.json的檔案中,然後執行下列指令:curl -X POST \
-H "Authorization: Bearer $(gcloud auth print-access-token)" \
-H "Content-Type: application/json; charset=utf-8" \
-d @request.json \
"https://LOCATION-aiplatform.googleapis.com/v1/projects/PROJECT_ID/locations/LOCATION/publishers/google/models/imagegeneration@006:predict"PowerShell
將要求主體儲存在名為
request.json的檔案中,然後執行下列指令:$cred = gcloud auth print-access-token
$headers = @{ "Authorization" = "Bearer $cred" }
Invoke-WebRequest `
-Method POST `
-Headers $headers `
-ContentType: "application/json; charset=utf-8" `
-InFile request.json `
-Uri "https://LOCATION-aiplatform.googleapis.com/v1/projects/PROJECT_ID/locations/LOCATION/publishers/google/models/imagegeneration@006:predict" | Select-Object -Expand Content"sampleCount": 2的要求範例回應。回應會傳回兩個預測物件,其中包含以 base64 編碼產生的圖片位元組。{ "predictions": [ { "bytesBase64Encoded": "BASE64_IMG_BYTES", "mimeType": "image/png" }, { "mimeType": "image/png", "bytesBase64Encoded": "BASE64_IMG_BYTES" } ] }Python
如要瞭解如何安裝或更新 Python 適用的 Vertex AI SDK,請參閱「安裝 Python 適用的 Vertex AI SDK」。 詳情請參閱 Python API 參考說明文件。
Java
在試用這個範例之前,請先按照Java使用用戶端程式庫的 Vertex AI 快速入門中的操作說明進行設定。 詳情請參閱 Vertex AI Java API 參考說明文件。
如要向 Vertex AI 進行驗證,請設定應用程式預設憑證。 詳情請參閱「為本機開發環境設定驗證」。
在本範例中,您會將模型指定為
EndpointName的一部分。EndpointName會傳遞至predict方法,該方法會在PredictionServiceClient上呼叫。服務會傳回編輯後的圖片版本,然後儲存在本機。如要進一步瞭解模型版本和功能,請參閱 Imagen 模型。
Node.js
在試用這個範例之前,請先按照Node.js使用用戶端程式庫的 Vertex AI 快速入門中的操作說明進行設定。 詳情請參閱 Vertex AI Node.js API 參考說明文件。
如要向 Vertex AI 進行驗證,請設定應用程式預設憑證。 詳情請參閱「為本機開發環境設定驗證」。
在本範例中,您會在PredictionServiceClient上呼叫predict方法。 這項服務會生成圖片,然後儲存在本機。如要進一步瞭解模型版本和功能,請參閱 Imagen 模型。使用自動遮罩偵測功能移除
請使用下列範例指定修復功能來移除內容。在這些範例中,您會指定基礎圖片和文字提示。Imagen 會自動偵測並建立遮罩區域,以修改基本圖片。
Imagen 3
使用下列範例,透過 Imagen 3 模型傳送修復要求。
控制台
-
在 Google Cloud 控制台中,前往「Vertex AI」 >「Media Studio」頁面。
- 按一下 [上傳]。在顯示的檔案對話方塊中,選取要上傳的檔案。
- 按一下「Inpaint」(修復)。
- 在「參數」面板中選取「修復 (移除)」
- 在編輯工具列中,按一下 background_replace「擷取」。
-
選取其中一個遮罩擷取選項:
- 背景元素:偵測背景元素,並在周圍建立遮罩。
- 前景元素:偵測前景物件,並在周圍建立遮罩。
- background_replacePeople: 偵測人物並建立遮罩。
-
選用步驟:在「參數」面板中調整下列選項:
- 模型:要使用的 Imagen 模型
- 結果數量:要生成的結果數量
- 負面提示:避免生成的項目
- 在提示欄位中輸入新提示,修改圖片。
- 按一下「傳送」生成。
Python
安裝
pip install --upgrade google-genai
詳情請參閱 SDK 參考說明文件。
設定環境變數,透過 Vertex AI 使用 Gen AI SDK:
# Replace the `GOOGLE_CLOUD_PROJECT` and `GOOGLE_CLOUD_LOCATION` values
# with appropriate values for your project.
export GOOGLE_CLOUD_PROJECT=GOOGLE_CLOUD_PROJECT
export GOOGLE_CLOUD_LOCATION=us-central1
export GOOGLE_GENAI_USE_VERTEXAI=True
REST
詳情請參閱「編輯圖片」API 參考資料。
使用任何要求資料之前,請先替換以下項目:
- PROJECT_ID:您的 Google Cloud 專案 ID。
- LOCATION:專案的區域。例如
us-central1、europe-west2或asia-northeast3。如需可用區域的清單,請參閱「Vertex AI 的生成式 AI 服務地區」。 prompt:如要獲得最佳效果,使用修復功能移除物件時,請省略提示和negativePrompt。- B64_BASE_IMAGE:要編輯或放大畫質的基礎圖片。圖片必須指定為 base64 編碼的位元組字串。大小限制:10 MB。
- MASK_MODE - 字串,用於設定模型使用的自動遮罩建立類型。
可用值:
MASK_MODE_BACKGROUND:使用背景區隔自動生成遮罩。使用這項設定修改背景內容。MASK_MODE_FOREGROUND:使用前景分割功能自動生成遮罩。使用這項設定修改前景內容,例如移除這些前景物件 (使用修復功能移除)。MASK_MODE_SEMANTIC:根據您在maskImageConfig.maskClasses陣列中指定的區隔類別,使用語意區隔自動產生遮罩。例如:"maskImageConfig": { "maskMode": "MASK_MODE_SEMANTIC", "maskClasses": [175, 176], // bicycle, car "dilation": 0.01 }
- MASK_DILATION - float。這個遮罩要擴張的圖片寬度百分比。建議使用
0.01的值,補償不完美的輸入遮罩。 - EDIT_STEPS - 整數。基礎模型的取樣步驟數。如要移除修復內容,請從步驟
12開始。如果品質不符合需求,請將步驟數調高至上限75。增加步驟也會增加要求延遲時間。 - EDIT_IMAGE_COUNT - 編輯過的圖片數量。接受的整數值:1 到 4。 預設值:4。
HTTP 方法和網址:
POST https://LOCATION-aiplatform.googleapis.com/v1/projects/PROJECT_ID/locations/LOCATION/publishers/google/models/imagen-3.0-capability-001:predict
JSON 要求主體:
{
  "instances": [
    {
      "prompt": "",
      "referenceImages": [
        {
          "referenceType": "REFERENCE_TYPE_RAW",
          "referenceId": 1,
          "referenceImage": {
            "bytesBase64Encoded": "B64_BASE_IMAGE"
          }
        },
        {
          "referenceType": "REFERENCE_TYPE_MASK",
          "referenceId": 2,
          "maskImageConfig": {
            "maskMode": "MASK_MODE",
            "dilation": MASK_DILATION
          }
        }
      ]
    }
  ],
  "parameters": {
    "editConfig": {
      "baseSteps": EDIT_STEPS
    },
    "editMode": "EDIT_MODE_INPAINT_REMOVAL",
    "sampleCount": EDIT_IMAGE_COUNT
  }
}
如要傳送要求,請選擇以下其中一個選項:
以下是含有curl
將要求主體儲存在名為
request.json的檔案中,然後執行下列指令:curl -X POST \
-H "Authorization: Bearer $(gcloud auth print-access-token)" \
-H "Content-Type: application/json; charset=utf-8" \
-d @request.json \
"https://LOCATION-aiplatform.googleapis.com/v1/projects/PROJECT_ID/locations/LOCATION/publishers/google/models/imagen-3.0-capability-001:predict"PowerShell
將要求主體儲存在名為
request.json的檔案中,然後執行下列指令:$cred = gcloud auth print-access-token
$headers = @{ "Authorization" = "Bearer $cred" }
Invoke-WebRequest `
-Method POST `
-Headers $headers `
-ContentType: "application/json; charset=utf-8" `
-InFile request.json `
-Uri "https://LOCATION-aiplatform.googleapis.com/v1/projects/PROJECT_ID/locations/LOCATION/publishers/google/models/imagen-3.0-capability-001:predict" | Select-Object -Expand Content"sampleCount": 2的要求範例回應。回應會傳回兩個預測物件,其中包含以 base64 編碼產生的圖片位元組。{ "predictions": [ { "bytesBase64Encoded": "BASE64_IMG_BYTES", "mimeType": "image/png" }, { "mimeType": "image/png", "bytesBase64Encoded": "BASE64_IMG_BYTES" } ] }Imagen 2
使用下列範例,透過 Imagen 2 模型傳送修復要求。
控制台
-
在 Google Cloud 控制台中,前往「Vertex AI」 >「Media Studio」頁面。
-
在下方工作面板中,按一下「編輯圖片」。
-
按一下「上傳」,選取要編輯的本機產品圖片。
-
在編輯工具列中,按一下 background_replace 「擷取」。
-
選取其中一個遮罩擷取選項:
- 背景元素:偵測背景元素,並在周圍建立遮罩。
- 前景元素:偵測前景物件,並在周圍建立遮罩。
- background_replace People - Detects people and creates a mask around them.
-
(選用步驟) 在「參數」面板中,調整「結果數量」、「負面提示」、「文字提示指引」或其他參數。
-
將提示欄位留空。
-
按一下「生成」。
REST
使用任何要求資料之前,請先替換以下項目:
- PROJECT_ID:您的 Google Cloud 專案 ID。
- LOCATION:專案的區域。例如
us-central1、europe-west2或asia-northeast3。如需可用區域的清單,請參閱「Vertex AI 的生成式 AI 服務地區」。 - B64_BASE_IMAGE:要編輯或放大畫質的基礎圖片。圖片必須指定為 base64 編碼的位元組字串。大小限制:10 MB。
- EDIT_IMAGE_COUNT:編輯的圖片數量。預設值: 4。
- MASK_TYPE:提示模型生成遮罩,不必由您提供。因此,提供這個參數時,請省略
mask物件。可用值:background:自動為圖片中主要物件、人物或主體以外的所有區域生成遮罩。foreground:自動為圖片中的主要物體、人物或主題生成遮罩。semantic:使用自動區隔功能,為一或多個區隔類別建立遮罩區域。使用classes參數和對應的class_id值設定區隔類別。最多可指定 5 個類別。使用語意遮罩類型時,maskMode物件應如下所示:"maskMode": { "maskType": "semantic", "classes": [class_id1, class_id2] }
HTTP 方法和網址:
POST https://LOCATION-aiplatform.googleapis.com/v1/projects/PROJECT_ID/locations/LOCATION/publishers/google/models/imagegeneration@006:predict
JSON 要求主體:
{
  "instances": [
    {
      "prompt": "",
      "image": {
        "bytesBase64Encoded": "B64_BASE_IMAGE"
      }
    }
  ],
  "parameters": {
    "sampleCount": EDIT_IMAGE_COUNT,
    "editConfig": {
      "editMode": "inpainting-remove",
      "maskMode": {
        "maskType": "MASK_TYPE"
      }
    }
  }
}
如要傳送要求,請選擇以下其中一個選項:
以下是含有curl
將要求主體儲存在名為
request.json的檔案中,然後執行下列指令:curl -X POST \
-H "Authorization: Bearer $(gcloud auth print-access-token)" \
-H "Content-Type: application/json; charset=utf-8" \
-d @request.json \
"https://LOCATION-aiplatform.googleapis.com/v1/projects/PROJECT_ID/locations/LOCATION/publishers/google/models/imagegeneration@006:predict"PowerShell
將要求主體儲存在名為
request.json的檔案中,然後執行下列指令:$cred = gcloud auth print-access-token
$headers = @{ "Authorization" = "Bearer $cred" }
Invoke-WebRequest `
-Method POST `
-Headers $headers `
-ContentType: "application/json; charset=utf-8" `
-InFile request.json `
-Uri "https://LOCATION-aiplatform.googleapis.com/v1/projects/PROJECT_ID/locations/LOCATION/publishers/google/models/imagegeneration@006:predict" | Select-Object -Expand Content"sampleCount": 2的要求範例回應。回應會傳回兩個預測物件,其中包含以 base64 編碼產生的圖片位元組。{ "predictions": [ { "bytesBase64Encoded": "BASE64_IMG_BYTES", "mimeType": "image/png" }, { "mimeType": "image/png", "bytesBase64Encoded": "BASE64_IMG_BYTES" } ] }Python
如要瞭解如何安裝或更新 Python 適用的 Vertex AI SDK,請參閱「安裝 Python 適用的 Vertex AI SDK」。 詳情請參閱 Python API 參考說明文件。
限制
以下各節說明 Imagen 物件移除功能的限制。
修改過的像素
模型生成的像素不一定與遮罩外的輸入內容相同,且會以模型解析度 (例如 1024x1024) 生成。生成的圖片可能會有極細微的變化。
如要完美保留圖片,建議使用遮罩將生成的圖片與輸入圖片混合。一般來說,如果輸入圖片解析度為 2K 以上,就必須混合生成的圖片和輸入圖片。
移除限制
遮罩旁邊的小物件也可能會移除。建議您盡可能精確地製作遮罩。
如果移除室外圖像天空區域的大面積部分,可能會產生不想要的影像瑕疵。建議您提供提示,這是最佳做法。
後續步驟
閱讀有關 Imagen 和其他 Vertex AI 生成式 AI 產品的文章:
- 開發人員指南:開始使用 Vertex AI 中的 Imagen 3
- 專為創作者打造的全新生成式媒體模型和工具
- Gemini 新功能:自訂 Gem 和 Imagen 3 強化圖像生成功能
- Google DeepMind:Imagen 3 - 品質最高的文字轉圖像模型
除非另有註明,否則本頁面中的內容是採用創用 CC 姓名標示 4.0 授權,程式碼範例則為阿帕契 2.0 授權。詳情請參閱《Google Developers 網站政策》。Java 是 Oracle 和/或其關聯企業的註冊商標。
上次更新時間:2025-10-19 (世界標準時間)。
-