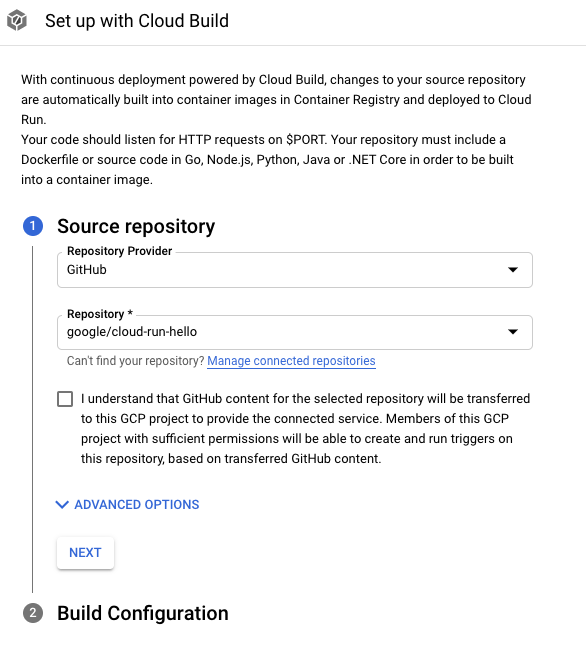
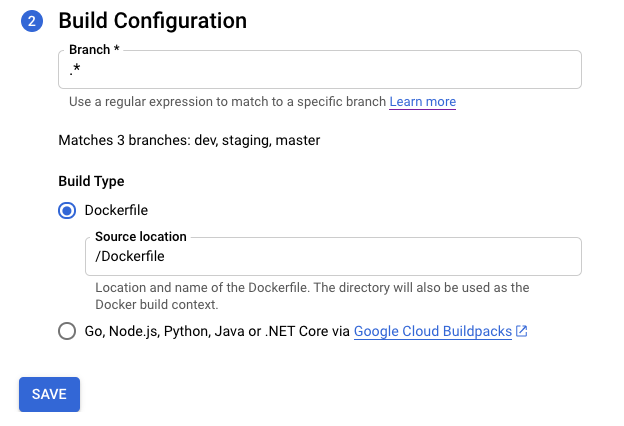
[[["容易理解","easyToUnderstand","thumb-up"],["確實解決了我的問題","solvedMyProblem","thumb-up"],["其他","otherUp","thumb-up"]],[["難以理解","hardToUnderstand","thumb-down"],["資訊或程式碼範例有誤","incorrectInformationOrSampleCode","thumb-down"],["缺少我需要的資訊/範例","missingTheInformationSamplesINeed","thumb-down"],["翻譯問題","translationIssue","thumb-down"],["其他","otherDown","thumb-down"]],["上次更新時間:2025-08-21 (世界標準時間)。"],[],[],null,["# Continuous deployment from Git using Cloud Build\n\nYou can use Cloud Build to automate builds and deployments to\nCloud Run by using [Cloud Build trigger](/build/docs/running-builds/automate-builds)\nto automatically build and deploy your code whenever new commits are pushed to\na given branch of a Git repository. For an example, see the\nquickstart for [creating a template repository and deploying continuously from\ngit](/run/docs/quickstarts/deploy-continuously).\n\nWhen you use a Cloud Build trigger to build containers, the\n[source repository information is displayed](/run/docs/managing/revisions#build-source)\nin the Google Cloud console for your service after you deploy to\nCloud Run.\n\nAlternatively, you can use [Cloud Deploy](/deploy/docs/deploy-app-run) to set up a continuous-delivery\npipeline to deploy Cloud Run services to multiple environments.\n\nBefore you begin\n----------------\n\n- You either have a git repository with a `Dockerfile` or your codebase is written in one of the languages supported by [Google Cloud's buildpacks](/docs/buildpacks/builders).\n-\n\n\n Enable the Cloud Build\n API.\n\n\n [Enable the API](https://console.cloud.google.com/flows/enableapi?apiid=cloudbuild.googleapis.com)\n\n### Required roles\n\n\nTo get the permissions that\nyou need to deploy Cloud Run services from Git using Cloud Build,\n\nask your administrator to grant you the\nfollowing IAM roles on your project:\n\n- [Artifact Registry Administrator](/iam/docs/roles-permissions/artifactregistry#artifactregistry.admin) (`roles/artifactregistry.admin`)\n- [Cloud Build Editor](/iam/docs/roles-permissions/cloudbuild#cloudbuild.builds.editor) (`roles/cloudbuild.builds.editor`)\n- [Cloud Run Developer](/iam/docs/roles-permissions/run#run.developer) (`roles/run.developer`)\n- [Service Account User](/iam/docs/roles-permissions/iam#iam.serviceAccountUser) (`roles/iam.serviceAccountUser`)\n- [Service Usage Admin](/iam/docs/roles-permissions/serviceusage#serviceusage.serviceUsageAdmin) (`roles/serviceusage.serviceUsageAdmin`)\n\n\nThe service account running the build must have the following roles:\n\n- [Cloud Build Service Account](/iam/docs/understanding-roles#cloudbuild.builds.builder) (`roles/cloudbuild.builds.builder`)\n- [Cloud Run Admin](/iam/docs/understanding-roles#run.admin) (`roles/run.admin`)\n- [Service Account User](/iam/docs/understanding-roles#iam.serviceAccountUser) (`roles/iam.serviceAccountUser`)\n\nFor a list of IAM roles and permissions that are associated with\nCloud Run, see\n[Cloud Run IAM roles](/run/docs/reference/iam/roles)\nand [Cloud Run IAM permissions](/run/docs/reference/iam/permissions).\nIf your Cloud Run service interfaces with\nGoogle Cloud APIs, such as Cloud Client Libraries, see the\n[service identity configuration guide](/run/docs/configuring/services/service-identity).\nFor more information about granting roles, see\n[deployment permissions](/run/docs/reference/iam/roles#additional-configuration)\nand [manage access](/iam/docs/granting-changing-revoking-access).\n\nSet up continuous deployment from the Cloud Run user interface\n--------------------------------------------------------------\n\nThe setup procedure varies slightly depending on whether you are setting up\ncontinuous deployment on a new service or on an existing service. Click the\nappropriate tab to learn more. \n\n### New service\n\n1. Create a new service as described in [Deploy a new service](/run/docs/deploying#service),\n making sure you select **Continuously deploy new revisions from a source repository**\n in the *Service settings* page.\n\n2. In the *Service settings* page, click **Set up with Cloud Build**.\n\n3. GitHub is the default repository provider. If you are not yet\n authenticated, click **Authenticate** and follow the instructions.\n Connecting a repository is done using the Cloud Build GitHub app.\n\n4. Click **Next**.\n\n5. Fill the options in Build Configuration step:\n\n - *Branch* - indicates what source should be used when running the trigger. You can put the [regex](https://github.com/google/re2/wiki/Syntax) here. Matched branches are automatically verified: you can see them below the input. Note that if exactly one branch is matched, the trigger will be automatically executed after the creation.\n - *Build Type*\n\n - If your repository should be built using Docker and it contains a\n Dockerfile, select **Dockerfile** . **Source location** indicates the\n location and name of the Dockerfile. This directory will be used as the\n Docker build context. All paths should be relative to the current\n directory.\n\n - Otherwise, select **Google Cloud Buildpacks** . Use\n **Buildpack context** to specify the directory and **Entrypoint**\n (optional) to provide the command to start the server. Example:\n `gunicorn -p :8080 main:app` for Python,\n `java -jar target/myjar.jar` for Java. Leave it blank to use\n [default behavior](/docs/buildpacks/service-specific-configs#google_entrypoint).\n\n6. Click **Save**.\n\n7. Verify the selected settings.\n\n8. Click **Create**.\n\n9. Note that you are redirected to the *Service Details* page, where you can\n track the progress of your Continuous Deployment set up.\n\n10. Once all steps are completed, note additional options:\n\n - Edit Continuous Deployment.\n - Build History.\n - Source details in the [*Revision Details* section](/run/docs/managing/revisions#viewing_revision_details).\n\n### Existing service\n\n1. [Go to Cloud Run](https://console.cloud.google.com/run)\n\n2. Locate the service in the services list, and click it.\n\n3. Click **Set up Continuous Deployment**.\n\n4. GitHub is the default repository provider. If you are not yet\n authenticated, click **Authenticate** and follow the instructions.\n Connecting a repository is done using the Cloud Build GitHub app.\n\n5. Click **Next**.\n\n6. Fill the options in Build Configuration step:\n\n - *Branch* - indicates what source should be used when running the trigger. You can put the [regex](https://github.com/google/re2/wiki/Syntax) here. Matched branches are automatically verified: you can see them below the input. Note that if exactly one branch is matched, the trigger will be automatically executed after the creation.\n - *Build Type*\n\n - If your repository should be built using Docker and it contains a\n Dockerfile, select **Dockerfile** . **Source location** indicates the\n location and name of the Dockerfile. This directory will be used as the\n Docker build context. All paths should be relative to the current\n directory.\n\n - Otherwise, select **Google Cloud Buildpacks** . Use\n **Buildpack context** to specify the directory and **Entrypoint**\n (optional) to provide the command to start the server. Example:\n `gunicorn -p :8080 main:app` for Python,\n `java -jar target/myjar.jar` for Java. Leave it blank to use\n [default behavior](/docs/buildpacks/service-specific-configs#google_entrypoint).\n\n7. Click **Save**.\n\n8. The page reloads and displays the progress of the\n Continuous Deployment setup.\n\n9. Once all steps are completed, note additional options:\n\n - Edit Continuous Deployment.\n - Build History.\n - Source details in the [*Revision Details* section](/run/docs/managing/revisions#viewing_revision_details).\n\nSet up continuous deployment manually\n-------------------------------------\n\nRefer to [Setting up continuous deployment manually](/build/docs/deploying-builds/deploy-cloud-run) if you\nneed to use a manual procedure and not the UI.\n\nAttach existing Cloud Build trigger to Cloud Run service.\n---------------------------------------------------------\n\nIf you already have an existing Cloud Build trigger, you can attach it to\nthe service and take advantage of Google Cloud console features in the Service\nDetails page: *Edit Continuous Deployment* button and *Build History* chart.\n\nTo do this, add a label with \u003cvar translate=\"no\"\u003egcb-trigger-id\u003c/var\u003e as a key and\nthe unique identifier of the Cloud Build trigger as value (not the trigger\nname). See [Set or modify labels](/run/docs/configuring/services/labels#set-labels) for\nsetting up the label."]]