Para receber as permissões necessárias para implantar os serviços do Cloud Run a partir do Git usando o Cloud Build,
peça ao administrador para conceder a você os
seguintes papéis do IAM no seu projeto:
Configurar a implantação contínua na interface do usuário do Cloud Run
O procedimento varia um pouco quando você está configurando
a implantação contínua em um novo serviço ou em um atual. Clique na
guia apropriada para saber mais.
Novo serviço
Crie um novo serviço, conforme descrito em Implantar um novo serviço,
garantindo que você selecione Implantar continuamente novas revisões a partir de um repositório de origem
na página Configurações do serviço.
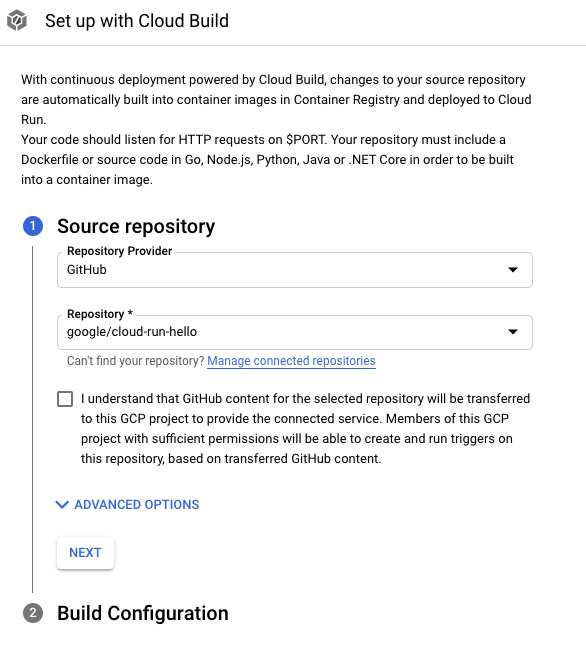
Na página Configurações do serviço, clique em Configurar com o Cloud Build.
O GitHub é o provedor de repositório padrão. Se você ainda tiver feito sua autenticação, clique em Autenticar e siga as instruções.
Para conectar um repositório, use o aplicativo GitHub do Cloud Build.
Clique em Próxima.
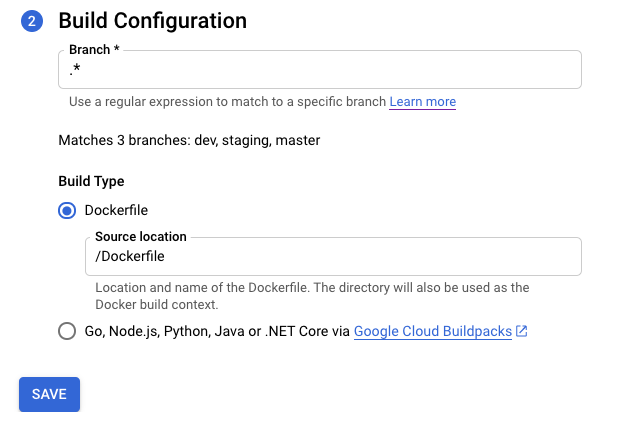
Preencha as opções na etapa "Configuração do build":
Ramificação: indica qual código-fonte precisa ser usado ao executar o
gatilho. É possível colocar o regex
aqui. As ramificações correspondidas são verificadas automaticamente e podem ser vistas
abaixo da entrada. Se houver correspondência exata de uma
ramificação, o gatilho será executado automaticamente após a
criação.
Tipo de build
Se o repositório precisar ser criado com o Docker e ele contiver um
Dockerfile, selecione Dockerfile. Local de origem: indica o
local e o nome do Dockerfile. O diretório será usado como o
contexto de build do Docker. Todos os caminhos precisam estar relacionados ao diretório
atual.
Caso contrário, selecione Google Cloud Buildpacks. Use o
contexto de Buildpack para especificar o diretório e o Ponto de entrada
(opcional) para fornecer o comando que inicia o servidor. Por exemplo:
gunicorn -p :8080 main:app para Python,
java -jar target/myjar.jar para Java. Deixe em branco para usar
o comportamento padrão.
Clique em Salvar.
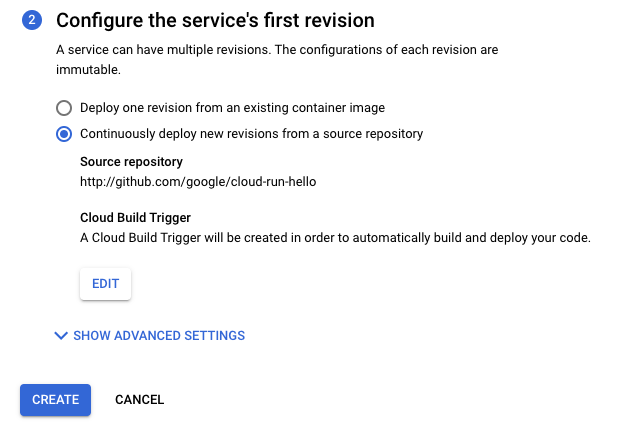
Verifique as configurações selecionadas.
Clique em Criar.
Você será redirecionado para a página Detalhes do serviço, em que poderá
acompanhar o progresso da configuração da implantação contínua.
Quando todas as etapas forem concluídas, observe as opções adicionais:
O GitHub é o provedor de repositório padrão. Se você ainda tiver feito sua autenticação, clique em Autenticar e siga as instruções.
Para conectar um repositório, use o aplicativo GitHub do Cloud Build.
Clique em Próxima.
Preencha as opções na etapa "Configuração do build":
Ramificação: indica qual código-fonte precisa ser usado ao executar o
gatilho. É possível colocar o regex
aqui. As ramificações correspondidas são verificadas automaticamente e podem ser vistas
abaixo da entrada. Se houver correspondência exata de uma
ramificação, o gatilho será executado automaticamente após a
criação.
Tipo de build
Se o repositório precisar ser criado com o Docker e ele contiver um
Dockerfile, selecione Dockerfile. Local de origem: indica o
local e o nome do Dockerfile. O diretório será usado como o
contexto de build do Docker. Todos os caminhos precisam estar relacionados ao diretório
atual.
Caso contrário, selecione Google Cloud Buildpacks. Use o
contexto de Buildpack para especificar o diretório e o Ponto de entrada
(opcional) para fornecer o comando que inicia o servidor. Por exemplo:
gunicorn -p :8080 main:app para Python,
java -jar target/myjar.jar para Java. Deixe em branco para usar
o comportamento padrão.
Clique em Salvar.
A página é recarregada e exibe o progresso da
configuração da implantação contínua.
Quando todas as etapas forem concluídas, observe as opções adicionais:
Anexe o gatilho existente do Cloud Build ao serviço do Cloud Run.
Se você já tiver um gatilho do Cloud Build, poderá anexá-lo ao
serviço e aproveitar os recursos do console Google Cloud na página "Detalhes
do serviço": botão Editar implantação contínua e gráfico Histórico de builds.
Para fazer isso, adicione um rótulo com gcb-trigger-id como chave e
o identificador exclusivo do gatilho do Cloud Build como valor, não o nome
do acionador. Consulte Definir ou modificar rótulos
para configurar o rótulo.
[[["Fácil de entender","easyToUnderstand","thumb-up"],["Meu problema foi resolvido","solvedMyProblem","thumb-up"],["Outro","otherUp","thumb-up"]],[["Difícil de entender","hardToUnderstand","thumb-down"],["Informações incorretas ou exemplo de código","incorrectInformationOrSampleCode","thumb-down"],["Não contém as informações/amostras de que eu preciso","missingTheInformationSamplesINeed","thumb-down"],["Problema na tradução","translationIssue","thumb-down"],["Outro","otherDown","thumb-down"]],["Última atualização 2025-09-04 UTC."],[],[],null,["# Continuous deployment from Git using Cloud Build\n\nYou can use Cloud Build to automate builds and deployments to\nCloud Run by using [Cloud Build trigger](/build/docs/running-builds/automate-builds)\nto automatically build and deploy your code whenever new commits are pushed to\na given branch of a Git repository. For an example, see the\nquickstart for [creating a template repository and deploying continuously from\ngit](/run/docs/quickstarts/deploy-continuously).\n\nWhen you use a Cloud Build trigger to build containers, the\n[source repository information is displayed](/run/docs/managing/revisions#build-source)\nin the Google Cloud console for your service after you deploy to\nCloud Run.\n\nAlternatively, you can use [Cloud Deploy](/deploy/docs/deploy-app-run) to set up a continuous-delivery\npipeline to deploy Cloud Run services to multiple environments.\n\nBefore you begin\n----------------\n\n- You either have a git repository with a `Dockerfile` or your codebase is written in one of the languages supported by [Google Cloud's buildpacks](/docs/buildpacks/builders).\n-\n\n\n Enable the Cloud Build\n API.\n\n\n [Enable the API](https://console.cloud.google.com/flows/enableapi?apiid=cloudbuild.googleapis.com)\n\n### Required roles\n\n\nTo get the permissions that\nyou need to deploy Cloud Run services from Git using Cloud Build,\n\nask your administrator to grant you the\nfollowing IAM roles on your project:\n\n- [Artifact Registry Administrator](/iam/docs/roles-permissions/artifactregistry#artifactregistry.admin) (`roles/artifactregistry.admin`)\n- [Cloud Build Editor](/iam/docs/roles-permissions/cloudbuild#cloudbuild.builds.editor) (`roles/cloudbuild.builds.editor`)\n- [Cloud Run Developer](/iam/docs/roles-permissions/run#run.developer) (`roles/run.developer`)\n- [Service Account User](/iam/docs/roles-permissions/iam#iam.serviceAccountUser) (`roles/iam.serviceAccountUser`)\n- [Service Usage Admin](/iam/docs/roles-permissions/serviceusage#serviceusage.serviceUsageAdmin) (`roles/serviceusage.serviceUsageAdmin`)\n\n\nThe service account running the build must have the following roles:\n\n- [Cloud Build Service Account](/iam/docs/understanding-roles#cloudbuild.builds.builder) (`roles/cloudbuild.builds.builder`)\n- [Cloud Run Admin](/iam/docs/understanding-roles#run.admin) (`roles/run.admin`)\n- [Service Account User](/iam/docs/understanding-roles#iam.serviceAccountUser) (`roles/iam.serviceAccountUser`)\n\nFor a list of IAM roles and permissions that are associated with\nCloud Run, see\n[Cloud Run IAM roles](/run/docs/reference/iam/roles)\nand [Cloud Run IAM permissions](/run/docs/reference/iam/permissions).\nIf your Cloud Run service interfaces with\nGoogle Cloud APIs, such as Cloud Client Libraries, see the\n[service identity configuration guide](/run/docs/configuring/services/service-identity).\nFor more information about granting roles, see\n[deployment permissions](/run/docs/reference/iam/roles#additional-configuration)\nand [manage access](/iam/docs/granting-changing-revoking-access).\n\nSet up continuous deployment from the Cloud Run user interface\n--------------------------------------------------------------\n\nThe setup procedure varies slightly depending on whether you are setting up\ncontinuous deployment on a new service or on an existing service. Click the\nappropriate tab to learn more. \n\n### New service\n\n1. Create a new service as described in [Deploy a new service](/run/docs/deploying#service),\n making sure you select **Continuously deploy new revisions from a source repository**\n in the *Service settings* page.\n\n2. In the *Service settings* page, click **Set up with Cloud Build**.\n\n3. GitHub is the default repository provider. If you are not yet\n authenticated, click **Authenticate** and follow the instructions.\n Connecting a repository is done using the Cloud Build GitHub app.\n\n4. Click **Next**.\n\n5. Fill the options in Build Configuration step:\n\n - *Branch* - indicates what source should be used when running the trigger. You can put the [regex](https://github.com/google/re2/wiki/Syntax) here. Matched branches are automatically verified: you can see them below the input. Note that if exactly one branch is matched, the trigger will be automatically executed after the creation.\n - *Build Type*\n\n - If your repository should be built using Docker and it contains a\n Dockerfile, select **Dockerfile** . **Source location** indicates the\n location and name of the Dockerfile. This directory will be used as the\n Docker build context. All paths should be relative to the current\n directory.\n\n - Otherwise, select **Google Cloud Buildpacks** . Use\n **Buildpack context** to specify the directory and **Entrypoint**\n (optional) to provide the command to start the server. Example:\n `gunicorn -p :8080 main:app` for Python,\n `java -jar target/myjar.jar` for Java. Leave it blank to use\n [default behavior](/docs/buildpacks/service-specific-configs#google_entrypoint).\n\n6. Click **Save**.\n\n7. Verify the selected settings.\n\n8. Click **Create**.\n\n9. Note that you are redirected to the *Service Details* page, where you can\n track the progress of your Continuous Deployment set up.\n\n10. Once all steps are completed, note additional options:\n\n - Edit Continuous Deployment.\n - Build History.\n - Source details in the [*Revision Details* section](/run/docs/managing/revisions#viewing_revision_details).\n\n### Existing service\n\n1. [Go to Cloud Run](https://console.cloud.google.com/run)\n\n2. Locate the service in the services list, and click it.\n\n3. Click **Set up Continuous Deployment**.\n\n4. GitHub is the default repository provider. If you are not yet\n authenticated, click **Authenticate** and follow the instructions.\n Connecting a repository is done using the Cloud Build GitHub app.\n\n5. Click **Next**.\n\n6. Fill the options in Build Configuration step:\n\n - *Branch* - indicates what source should be used when running the trigger. You can put the [regex](https://github.com/google/re2/wiki/Syntax) here. Matched branches are automatically verified: you can see them below the input. Note that if exactly one branch is matched, the trigger will be automatically executed after the creation.\n - *Build Type*\n\n - If your repository should be built using Docker and it contains a\n Dockerfile, select **Dockerfile** . **Source location** indicates the\n location and name of the Dockerfile. This directory will be used as the\n Docker build context. All paths should be relative to the current\n directory.\n\n - Otherwise, select **Google Cloud Buildpacks** . Use\n **Buildpack context** to specify the directory and **Entrypoint**\n (optional) to provide the command to start the server. Example:\n `gunicorn -p :8080 main:app` for Python,\n `java -jar target/myjar.jar` for Java. Leave it blank to use\n [default behavior](/docs/buildpacks/service-specific-configs#google_entrypoint).\n\n7. Click **Save**.\n\n8. The page reloads and displays the progress of the\n Continuous Deployment setup.\n\n9. Once all steps are completed, note additional options:\n\n - Edit Continuous Deployment.\n - Build History.\n - Source details in the [*Revision Details* section](/run/docs/managing/revisions#viewing_revision_details).\n\nSet up continuous deployment manually\n-------------------------------------\n\nRefer to [Setting up continuous deployment manually](/build/docs/deploying-builds/deploy-cloud-run) if you\nneed to use a manual procedure and not the UI.\n\nAttach existing Cloud Build trigger to Cloud Run service.\n---------------------------------------------------------\n\nIf you already have an existing Cloud Build trigger, you can attach it to\nthe service and take advantage of Google Cloud console features in the Service\nDetails page: *Edit Continuous Deployment* button and *Build History* chart.\n\nTo do this, add a label with \u003cvar translate=\"no\"\u003egcb-trigger-id\u003c/var\u003e as a key and\nthe unique identifier of the Cloud Build trigger as value (not the trigger\nname). See [Set or modify labels](/run/docs/configuring/services/labels#set-labels) for\nsetting up the label."]]