本番環境システムでフルフィルメントを使用するには、Webhook サービスを実装してデプロイする必要があります。フルフィルメントを処理するには、このガイドで指定されているように、Webhook サービスが JSON リクエストを受け入れ、JSON レスポンスを返す必要があります。フルフィルメントと Webhook の詳細な処理フローについては、フルフィルメントの概要ドキュメントをご覧ください。
Webhook サービスの要件
webhook サービスは、次の要件を満たす必要があります。
- HTTPS リクエストを処理する必要があります。HTTP はサポートされていません。コンピューティングまたはサーバーレス コンピューティング ソリューションを使用して Google Cloud Platform で Webhook サービスをホストしている場合は、HTTPS によるサービス提供に関するドキュメントをご覧ください。その他のホスティング オプションについては、ドメインの SSL 証明書を取得するをご覧ください。
- リクエストの URL は公開アクセス可能ではなくてはなりません。
- JSON
WebhookRequest本文を含む POST リクエストを処理する必要があります。 - JSON
WebhookResponse本文でWebhookRequestリクエストに応答する必要があります。
認証
Dialogflow エージェントまたはその所有者のみがリクエスト作成認証を持つように、Webhook サービスを保護することが重要です。Dialogflow は次の認証メカニズムをサポートしています。
| 用語 | 定義 |
|---|---|
| ログイン ユーザー名とパスワード | Webhook の設定では、ログイン ユーザー名とパスワードの値を指定できます。指定された場合、Dialogflow は webhook リクエストに認証 HTTP ヘッダーを追加します。このヘッダーの形式は "authorization: Basic <base 64 encoding of the string username:password>" です。 |
| 認証ヘッダー | Webhook 設定では、オプションの HTTP ヘッダーの Key-Value ペアを指定できます。指定した場合、Dialogflow によって Webhook リクエストに HTTP ヘッダーが追加されます。通常は、authorization のキーを持つ単一のペアを指定します。 |
| Cloud Functions の組み込み認証 | Cloud Functions を使用する際に組み込み認証を使用できます。このタイプの認証を使用するためには、ログイン ユーザー名、ログイン パスワード、認証ヘッダーを入力しないでください。これらのフィールドのいずれかを指定した場合、これらのフィールドは組み込み認証ではなく認証に使用されます。 |
| サービス ID トークン | 認証にはサービス ID トークンを使用できます。ログイン ユーザー名、ログイン パスワード、または authorization を含むヘッダーを指定しない場合、Dialogflow ではサービス ID トークンを使用することを自動的に想定し、Webhook HTTP リクエストに承認 HTTP ヘッダーを追加します。このヘッダーの形式は "authorization: Bearer <identity token>" です。 |
| 相互 TLS 認証 | 相互 TLS 認証のドキュメントをご覧ください。 |
Webhook リクエスト
フルフィルメント用に構成されたインテントが一致すると、Dialogflow は HTTPS POST Webhook リクエストを Webhook サービスに送信します。このリクエストの本文は、一致したインテントに関する情報を含む JSON オブジェクトです。
多くの統合では、エンドユーザー クエリに加えて、エンドユーザーに関する情報も送信されます。たとえば、ユーザーを一意に識別する ID です。この情報は、Webhook リクエストの originalDetectIntentRequest フィールドを介してアクセスできます。これには、統合プラットフォームから送信された情報が含まれます。
詳しくは、WebhookRequest のリファレンス ドキュメントをご覧ください。
以下はリクエストのサンプルです。
{
  "responseId": "response-id",
  "session": "projects/project-id/agent/sessions/session-id",
  "queryResult": {
    "queryText": "End-user expression",
    "parameters": {
      "param-name": "param-value"
    },
    "allRequiredParamsPresent": true,
    "fulfillmentText": "Response configured for matched intent",
    "fulfillmentMessages": [
      {
        "text": {
          "text": [
            "Response configured for matched intent"
          ]
        }
      }
    ],
    "outputContexts": [
      {
        "name": "projects/project-id/agent/sessions/session-id/contexts/context-name",
        "lifespanCount": 5,
        "parameters": {
          "param-name": "param-value"
        }
      }
    ],
    "intent": {
      "name": "projects/project-id/agent/intents/intent-id",
      "displayName": "matched-intent-name"
    },
    "intentDetectionConfidence": 1,
    "diagnosticInfo": {},
    "languageCode": "en"
  },
  "originalDetectIntentRequest": {}
}
Webhook レスポンス
Webhook は Webhook リクエストを受け取ると、Webhook レスポンスを送信する必要があります。このレスポンスの本文は、次の情報を含む JSON オブジェクトです。
- Dialogflow がエンドユーザーに返すレスポンス。
- 会話でアクティブなコンテキストの更新。
- インテント一致をトリガーするフォローアップ イベント。
- 統合またはインテント検出クライアントに送信されるカスタム ペイロード
回答には次の制限が適用されます。
- レスポンスを返すまでの制限時間は、Google アシスタント アプリケーションの場合は 10 秒以内、その他すべてのアプリケーションの場合は 5 秒以内です。この制限時間を超えると、リクエストがタイムアウトになります。
- レスポンスのサイズは 64 KiB 以下でなければなりません。
詳しくは、WebhookResponse のリファレンス ドキュメントをご覧ください。
テキスト返信
テキスト レスポンスの例:
{
  "fulfillmentMessages": [
    {
      "text": {
        "text": [
          "Text response from webhook"
        ]
      }
    }
  ]
}
カード レスポンス
カード レスポンスの例:
{
  "fulfillmentMessages": [
    {
      "card": {
        "title": "card title",
        "subtitle": "card text",
        "imageUri": "https://example.com/images/example.png",
        "buttons": [
          {
            "text": "button text",
            "postback": "https://example.com/path/for/end-user/to/follow"
          }
        ]
      }
    }
  ]
}
Google アシスタント レスポンス
{
  "payload": {
    "google": {
      "expectUserResponse": true,
      "richResponse": {
        "items": [
          {
            "simpleResponse": {
              "textToSpeech": "this is a Google Assistant response"
            }
          }
        ]
      }
    }
  }
}
コンテキスト
出力コンテキストを設定する例:
{
  "fulfillmentMessages": [
    {
      "text": {
        "text": [
          "Text response from webhook"
        ]
      }
    }
  ],
  "outputContexts": [
    {
      "name": "projects/project-id/agent/sessions/session-id/contexts/context-name",
      "lifespanCount": 5,
      "parameters": {
        "param-name": "param-value"
      }
    }
  ]
}
イベント
カスタム イベントを呼び出す例:
{
  "followupEventInput": {
    "name": "event-name",
    "languageCode": "en-US",
    "parameters": {
      "param-name": "param-value"
    }
  }
}
セッション エンティティ
セッション エンティティを設定する例:
{
  "fulfillmentMessages": [
    {
      "text": {
        "text": [
          "Choose apple or orange"
        ]
      }
    }
  ],
  "sessionEntityTypes":[
    {
      "name":"projects/project-id/agent/sessions/session-id/entityTypes/fruit",
      "entities":[
        {
          "value":"APPLE_KEY",
          "synonyms":[
            "apple",
            "green apple",
            "crabapple"
          ]
        },
        {
          "value":"ORANGE_KEY",
          "synonyms":[
            "orange"
          ]
        }
      ],
      "entityOverrideMode":"ENTITY_OVERRIDE_MODE_OVERRIDE"
    }
  ]
}
カスタム ペイロード
カスタム ペイロードを指定する例:
{
  "fulfillmentMessages": [
    {
      "payload": {
        "facebook": { // for Facebook Messenger integration
          "attachment": {
            "type": "",
            "payload": {}
          }
        },
        "slack": { // for Slack integration
          "text": "",
          "attachments": []
        },
        "richContent": [ // for Dialogflow Messenger integration
          [
            {
              "type": "image",
              "rawUrl": "https://example.com/images/logo.png",
              "accessibilityText": "Example logo"
            }
          ]
        ],
        // custom integration payload here
      }
    }
  ]
}
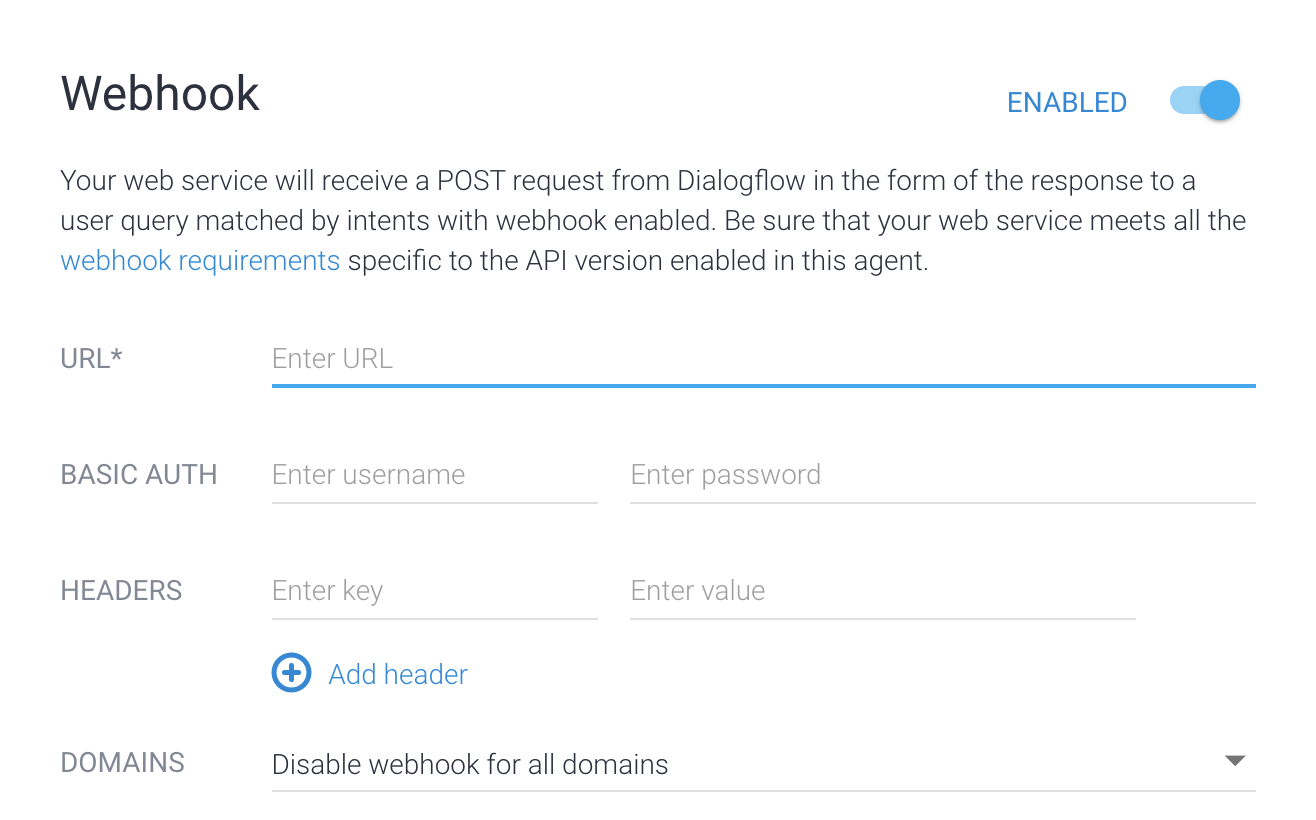
フルフィルメントの有効化と管理
コンソールでエージェントのフルフィルメントを有効化および管理するには、次の手順に従います。
- Dialogflow ES コンソールに移動します。
- エージェントを選択します。
- 左側のサイドバー メニューで [Fulfillment] を選択します。
- [Webhook] フィールドを [Enabled] に切り替えます。
- フォームに Webhook サービスの詳細を入力します。Webhook に認証が不要な場合は、認証フィールドを空白のままにします。
- ページの下部にある [Save] をクリックします。
API を使用してエージェントのフルフィルメントを有効にして管理するには、エージェントのリファレンスをご覧ください。getFulfillment メソッドと updateFulfillment メソッドを使用して、フルフィルメント設定を管理できます。
コンソールでインテントのフルフィルメントを有効にするには、次の手順に従います。
- 左側のサイドバーのメニューで [Intents] を選択します。
- インテントを選択します。
- [Fulfillment] セクションまで下にスクロールします。
- [Enable webhook call for this intent] をオンにします。
- [保存] をクリックします。
API でインテントのフルフィルメントを有効にするには、インテントのリファレンスをご覧ください。webhookState フィールドを WEBHOOK_STATE_ENABLED に設定します。
Webhook エラー
Webhook サービスでエラーが発生した場合は、次のいずれかの HTTP ステータス コードが返されます。
400Bad Request(不正なリクエスト)401Unauthorized(未承認)403Forbidden(禁止)404Not found(未検出)500Server fault(サーバーエラー)503Service Unavailable(サービス利用不可)
エラー状況が次のいずれかの場合、Dialogflow は、現在一致しているインテント用に構成された組み込みレスポンスでエンドユーザーに応答します。
- レスポンスのタイムアウトを超過しました。
- エラー ステータス コードを受信しました。
- レスポンスが無効です。
- Webhook サービスを利用できません。
また、インテント検出 API 呼び出しによってインテント一致がトリガーされた場合、インテント検出レスポンスの status フィールドには Webhook エラーの情報が含まれます。次に例を示します。
"status": {
    "code": 206,
    "message": "Webhook call failed. <details of the error...>"
}
自動再試行
Dialogflow ES には、特定の Webhook エラーに対して自動的に再試行して堅牢性を高める内部メカニズムが含まれています。再試行されるのは、終了エラー以外のエラー(タイムアウトや接続エラーなど)のみです。
重複する呼び出しの可能性を低減するには:
- Webhook タイムアウトのしきい値を長く設定します。
- Webhook ロジックでべき等性をサポートするか、重複除去します。
Cloud Functions の使用
フルフィルメントに Cloud Functions を使用する方法はいくつかあります。Dialogflow インライン エディタは Cloud Functions と統合されています。インライン エディタを使用して Webhook コードを作成および編集すると、Dialogflow が Cloud Functions の関数との安全な接続を確立します。
インライン エディタ以外で作成された Cloud Functions の関数を使用することもできます(Node.js 以外の言語を使用する必要がある場合など)。その Cloud Functions の関数がエージェントと同じプロジェクトにある場合、エージェントは特別な構成なしで Webhook を呼び出すことができます。
ただし、次の 2 つの状況では、この統合を手動で設定する必要があります。
- 次のアドレスを含む Dialogflow Service Agent サービス アカウントが、エージェント プロジェクト用に存在している必要があります。
service-agent-project-number@gcp-sa-dialogflow.iam.gserviceaccount.com
- プロジェクトの新しいエージェントを作成します。
- 次のコマンドを実行します。
gcloud beta services identity create --service=dialogflow.googleapis.com --project=agent-project-id
- Webhook 関数がエージェントとは異なるプロジェクトにある場合は、関数のプロジェクトのDialogflow Service Agent サービス アカウントに Cloud Functions 起動元の IAM のロールを提供する必要があります。
サービス ID トークン
Dialogflow は Webhook を呼び出すときに、リクエストで Google ID トークンを指定します。Webhook は、必要に応じて Google クライアント ライブラリまたは github.com/googleapis/google-auth-library-nodejs などのオープンソース ライブラリを使用してトークンを検証できます。
たとえば、次のような ID トークンの email を検証します。
service-agent-project-number@gcp-sa-dialogflow.iam.gserviceaccount.com
サンプル
次のサンプルは、WebhookRequest を受信して WebhookResponse を送信する方法を示しています。このサンプルは、クイックスタートで作成されたインテントを参照します。
Go
Dialogflow への認証を行うには、アプリケーションのデフォルト認証情報を設定します。詳細については、ローカル開発環境の認証の設定をご覧ください。
import (
	"encoding/json"
	"fmt"
	"log"
	"net/http"
)

type intent struct {
	DisplayName string `json:"displayName"`
}

type queryResult struct {
	Intent intent `json:"intent"`
}

type text struct {
	Text []string `json:"text"`
}

type message struct {
	Text text `json:"text"`
}

// webhookRequest is used to unmarshal a WebhookRequest JSON object. Note that
// not all members need to be defined--just those that you need to process.
// As an alternative, you could use the types provided by
// the Dialogflow protocol buffers:
// https://godoc.org/google.golang.org/genproto/googleapis/cloud/dialogflow/v2#WebhookRequest
type webhookRequest struct {
	Session     string      `json:"session"`
	ResponseID  string      `json:"responseId"`
	QueryResult queryResult `json:"queryResult"`
}

// webhookResponse is used to marshal a WebhookResponse JSON object. Note that
// not all members need to be defined--just those that you need to process.
// As an alternative, you could use the types provided by
// the Dialogflow protocol buffers:
// https://godoc.org/google.golang.org/genproto/googleapis/cloud/dialogflow/v2#WebhookResponse
type webhookResponse struct {
	FulfillmentMessages []message `json:"fulfillmentMessages"`
}

// welcome creates a response for the welcome intent.
func welcome(request webhookRequest) (webhookResponse, error) {
	response := webhookResponse{
		FulfillmentMessages: []message{
			{
				Text: text{
					Text: []string{"Welcome from Dialogflow Go Webhook"},
				},
			},
		},
	}
	return response, nil
}

// getAgentName creates a response for the get-agent-name intent.
func getAgentName(request webhookRequest) (webhookResponse, error) {
	response := webhookResponse{
		FulfillmentMessages: []message{
			{
				Text: text{
					Text: []string{"My name is Dialogflow Go Webhook"},
				},
			},
		},
	}
	return response, nil
}

// handleError handles internal errors.
func handleError(w http.ResponseWriter, err error) {
	w.WriteHeader(http.StatusInternalServerError)
	fmt.Fprintf(w, "ERROR: %v", err)
}

// HandleWebhookRequest handles WebhookRequest and sends the WebhookResponse.
func HandleWebhookRequest(w http.ResponseWriter, r *http.Request) {
	var request webhookRequest
	var response webhookResponse
	var err error

	// Read input JSON
	if err = json.NewDecoder(r.Body).Decode(&request); err != nil {
		handleError(w, err)
		return
	}
	log.Printf("Request: %+v", request)

	// Call intent handler
	switch intent := request.QueryResult.Intent.DisplayName; intent {
	case "Default Welcome Intent":
		response, err = welcome(request)
	case "get-agent-name":
		response, err = getAgentName(request)
	default:
		err = fmt.Errorf("Unknown intent: %s", intent)
	}
	if err != nil {
		handleError(w, err)
		return
	}
	log.Printf("Response: %+v", response)

	// Send response
	if err = json.NewEncoder(w).Encode(&response); err != nil {
		handleError(w, err)
		return
	}
}
Java
Dialogflow への認証を行うには、アプリケーションのデフォルト認証情報を設定します。詳細については、ローカル開発環境の認証の設定をご覧ください。
Node.js
Dialogflow への認証を行うには、アプリケーションのデフォルト認証情報を設定します。詳細については、ローカル開発環境の認証の設定をご覧ください。
Python
Dialogflow への認証を行うには、アプリケーションのデフォルト認証情報を設定します。詳細については、ローカル開発環境の認証の設定をご覧ください。