Deploy an app to multiple targets at the same time
This page shows you how to use Cloud Deploy to deliver a sample application to two targets at the same time—a parallel deployment.
In this quickstart, you'll do the following:
Create two GKE clusters or two Cloud Run services.
You can deploy in parallel to GKE Enterprise clusters too, but this quickstart uses GKE and Cloud Run only.
Create a Skaffold configuration and either a Kubernetes manifest or a Cloud Run service definition.
Define your Cloud Deploy delivery pipeline and deployment targets.
This pipeline will have only one target, but that target will be a multi-target—a target that represents more than one deployment target. This multi-target will comprise two actual targets, delivering your app to the two clusters or services.
Instantiate your delivery pipeline by creating a release, which automatically deploys to the two targets in parallel.
View the "controller rollout" and child rollouts in Google Cloud console.
Before you begin
- Sign in to your Google Cloud account. If you're new to Google Cloud, create an account to evaluate how our products perform in real-world scenarios. New customers also get $300 in free credits to run, test, and deploy workloads.
-
In the Google Cloud console, on the project selector page, select or create a Google Cloud project.
Roles required to select or create a project
- Select a project: Selecting a project doesn't require a specific IAM role—you can select any project that you've been granted a role on.
-
Create a project: To create a project, you need the Project Creator
(
roles/resourcemanager.projectCreator), which contains theresourcemanager.projects.createpermission. Learn how to grant roles.
-
Verify that billing is enabled for your Google Cloud project.
-
Enable the Cloud Deploy, Cloud Build, GKE, Cloud Run, and Cloud Storage APIs.
Roles required to enable APIs
To enable APIs, you need the Service Usage Admin IAM role (
roles/serviceusage.serviceUsageAdmin), which contains theserviceusage.services.enablepermission. Learn how to grant roles. -
Install the Google Cloud CLI.
-
If you're using an external identity provider (IdP), you must first sign in to the gcloud CLI with your federated identity.
-
To initialize the gcloud CLI, run the following command:
gcloud init -
In the Google Cloud console, on the project selector page, select or create a Google Cloud project.
Roles required to select or create a project
- Select a project: Selecting a project doesn't require a specific IAM role—you can select any project that you've been granted a role on.
-
Create a project: To create a project, you need the Project Creator
(
roles/resourcemanager.projectCreator), which contains theresourcemanager.projects.createpermission. Learn how to grant roles.
-
Verify that billing is enabled for your Google Cloud project.
-
Enable the Cloud Deploy, Cloud Build, GKE, Cloud Run, and Cloud Storage APIs.
Roles required to enable APIs
To enable APIs, you need the Service Usage Admin IAM role (
roles/serviceusage.serviceUsageAdmin), which contains theserviceusage.services.enablepermission. Learn how to grant roles. -
Install the Google Cloud CLI.
-
If you're using an external identity provider (IdP), you must first sign in to the gcloud CLI with your federated identity.
-
To initialize the gcloud CLI, run the following command:
gcloud init - Make sure the default Compute Engine service account has sufficient permissions.
The service account might already have the necessary permissions. These steps are included for projects that disable automatic role grants for default service accounts.
- First add the
clouddeploy.jobRunnerrole:gcloud projects add-iam-policy-binding PROJECT_ID \ --member=serviceAccount:$(gcloud projects describe PROJECT_ID \ --format="value(projectNumber)")-compute@developer.gserviceaccount.com \ --role="roles/clouddeploy.jobRunner" - Add the developer role for your specific runtime.
- For GKE:
gcloud projects add-iam-policy-binding PROJECT_ID \ --member=serviceAccount:$(gcloud projects describe PROJECT_ID \ --format="value(projectNumber)")-compute@developer.gserviceaccount.com \ --role="roles/container.developer" - For Cloud Run:
gcloud projects add-iam-policy-binding PROJECT_ID \ --member=serviceAccount:$(gcloud projects describe PROJECT_ID \ --format="value(projectNumber)")-compute@developer.gserviceaccount.com \ --role="roles/run.developer" -
Add the
iam.serviceAccountUserrole, which includes theactAspermission to deploy to the runtime:gcloud iam service-accounts add-iam-policy-binding $(gcloud projects describe PROJECT_ID \ --format="value(projectNumber)")-compute@developer.gserviceaccount.com \ --member=serviceAccount:$(gcloud projects describe PROJECT_ID \ --format="value(projectNumber)")-compute@developer.gserviceaccount.com \ --role="roles/iam.serviceAccountUser" \ --project=PROJECT_ID
- First add the
If you already have the CLI installed, make sure you're running the latest version:
gcloud components update
Create your runtime environments
If you're deploying to Cloud Run, you can skip this command.
For GKE, create two clusters: quickstart-cluster-qsprod1
and quickstart-cluster-qsprod2, with default settings. The
clusters' Kubernetes API endpoints must be network-reachable from the public
internet. GKE clusters are externally accessible by
default.
gcloud container clusters create-auto quickstart-cluster-qsprod1 \
                 --project=PROJECT_ID \
                 --region=us-central1 \
                 && gcloud container clusters create-auto quickstart-cluster-qsprod2 \
                 --project=PROJECT_ID \
                 --region=us-west1
Prepare your Skaffold configuration and application manifest
Cloud Deploy uses Skaffold to provide the details for what to deploy and how to deploy it properly for your separate targets.
In this quickstart, you create a skaffold.yaml file, which identifies the
application manifest to be used to deploy the sample app.
Open a terminal window.
Create a new directory and navigate into it.
GKE
mkdir deploy-gke-parallel-quickstart
cd deploy-gke-parallel-quickstart
Cloud Run
mkdir deploy-run-parallel-quickstart
cd deploy-run-parallel-quickstart
Create a file named
skaffold.yamlwith the following contents:GKE
apiVersion: skaffold/v4beta1
kind: Config
manifests:
  rawYaml:
  - k8s-deployment.yaml
deploy:
  kubectl: {}
Cloud Run
apiVersion: skaffold/v4beta1
kind: Config
manifests:
  rawYaml:
  - service.yaml
deploy:
  cloudrun: {}
This file is a minimal Skaffold config. For this quickstart, you create the file. But you can also have Cloud Deploy create one for you, for simple, non-production applications.
See the
skaffold.yamlreference for more information about this file.Create the definition for your application—a service definition for Cloud Run or a Kubernetes manifest for GKE.
GKE
Create a file named
k8s-deployment.yaml, with the following contents:apiVersion: apps/v1 kind: Deployment metadata: name: my-deployment labels: app: my-app namespace: default spec: replicas: 1 # from-param: ${replicaCount} selector: matchLabels: app: my-app template: metadata: labels: app: my-app spec: containers: - name: nginx image: my-app-imageThis file is a simple Kubernetes manifest, which is applied to the cluster to deploy the application. The container image to deploy is set here as a placeholder,
my-app-image, which is replaced with the specific image when you create the release.Cloud Run
Create a file named
service.yaml, with the following contents:apiVersion: serving.knative.dev/v1 kind: Service metadata: name: my-parallel-run-service spec: template: metadata: annotations: autoscaling.knative.dev/minScale: 1 # from-param: ${minInstances} spec: containers: - image: my-app-imageThis file is a simple Cloud Run service definition, which is used at deploy time to create your Cloud Run service. The container image to deploy is set here as a placeholder,
my-app-image, which is replaced with the specific image when you create the release.
Create your delivery pipeline and targets
You can define your pipeline and targets in one file or in separate files. In this quickstart, you create a single file.
Create your delivery pipeline and target definition:
GKE
In the
deploy-gke-parallel-quickstartdirectory, create a new file:clouddeploy.yaml, with the following contents:apiVersion: deploy.cloud.google.com/v1 kind: DeliveryPipeline metadata: name: my-parallel-demo-app-1 description: main application pipeline serialPipeline: stages: - targetId: qsprod-multi profiles: [] deployParameters: - values: replicaCount: "1" matchTargetLabels: label1: label1 - values: replicaCount: "2" matchTargetLabels: label2: label2 --- apiVersion: deploy.cloud.google.com/v1 kind: Target metadata: name: qsprod-multi description: production clusters multiTarget: targetIds: [qsprod-a, qsprod-b] --- apiVersion: deploy.cloud.google.com/v1 kind: Target metadata: name: qsprod-a labels: label1: label1 description: production cluster 2 gke: cluster: projects/PROJECT_ID/locations/us-central1/clusters/quickstart-cluster-qsprod1 --- apiVersion: deploy.cloud.google.com/v1 kind: Target metadata: name: qsprod-b labels: label2: label2 description: production cluster 3 gke: cluster: projects/PROJECT_ID/locations/us-west1/clusters/quickstart-cluster-qsprod2Cloud Run
In the
deploy-run-parallel-quickstartdirectory, create a new file:clouddeploy.yaml, with the following contents:apiVersion: deploy.cloud.google.com/v1 kind: DeliveryPipeline metadata: name: my-parallel-demo-app-1 description: main application pipeline serialPipeline: stages: - targetId: qsprod-multi profiles: [] deployParameters: - values: minInstances: "2" matchTargetLabels: label1: label1 - values: minInstances: "3" matchTargetLabels: label2: label2 --- apiVersion: deploy.cloud.google.com/v1 kind: Target metadata: name: qsprod-multi description: production multiTarget: targetIds: [qsprod-a, qsprod-b] --- apiVersion: deploy.cloud.google.com/v1 kind: Target metadata: name: qsprod-a labels: label1: label1 description: production us-central1 run: location: projects/PROJECT_ID/locations/us-central1 --- apiVersion: deploy.cloud.google.com/v1 kind: Target metadata: name: qsprod-b labels: label2: label2 description: production us-west1 run: location: projects/PROJECT_ID/locations/us-west1Notice that this file includes three targets: a multi-target and two child targets. You can also configure targets in separate file, rather than with your delivery pipeline.
Notice also that the delivery pipeline includes
deployParameters, with labels, and the child targets include labels to match those parameters. This allows you to pass separate values to separate child targets, if you want. Learn more.Register your pipeline and targets with the Cloud Deploy service:
gcloud deploy apply --file=clouddeploy.yaml --region=us-central1 --project=PROJECT_IDYou now have a pipeline, with one multi-target comprising two GKE or Cloud Run targets, ready to deploy your application.
Confirm your pipeline and targets:
In the Google Cloud console, navigate to the Cloud Deploy Delivery pipelines page to view of list of your available delivery pipelines.
Open the Delivery pipelines page
The delivery pipeline you just created is shown. Notice that there is one target listed in the Targets column even though you configured three targets (one multi-target and two child targets) in your
clouddeploy.yamlfile.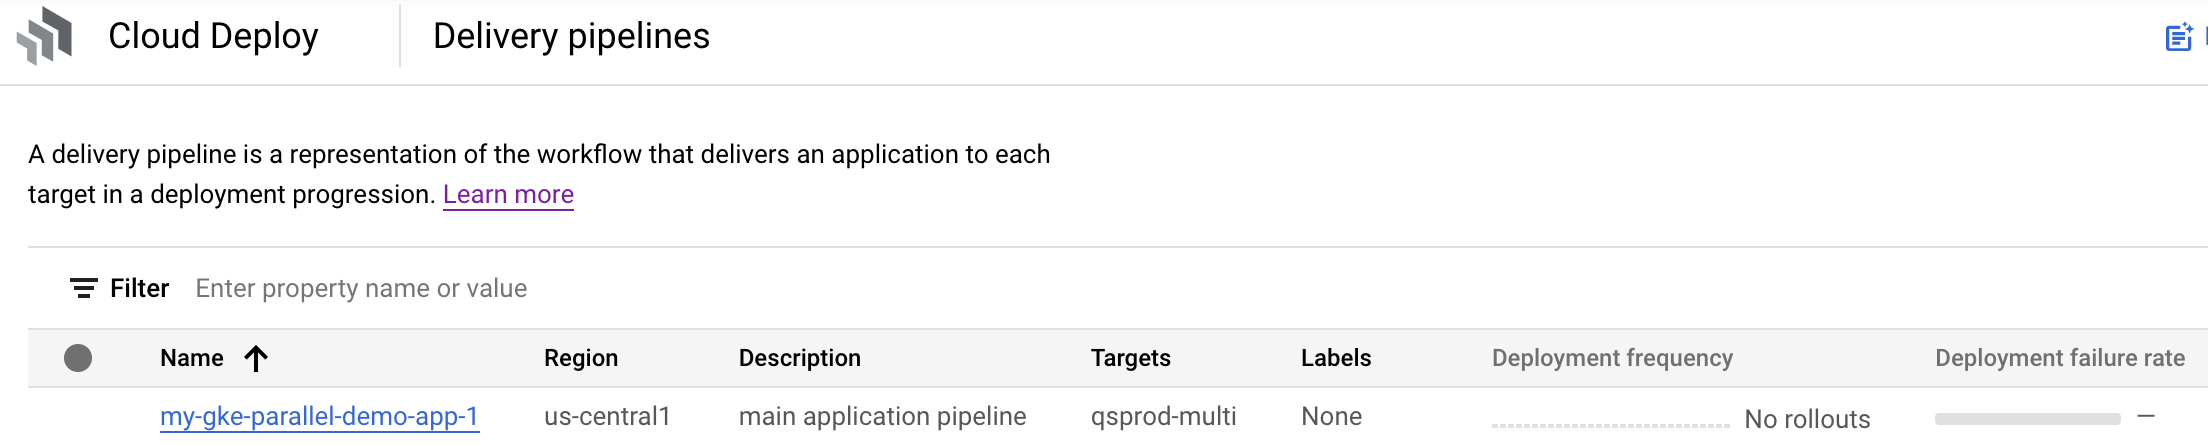
Notice that the only target listed is the multi-target
qsprod-multi. Child targets are not shown.
Create a release
A release is the central Cloud Deploy resource representing the changes being deployed. The delivery pipeline defines the lifecycle of that release. See Cloud Deploy service architecture for details about that lifecycle.
GKE
Run the following command from the deploy-gke-parallel-quickstart
directory to create a release resource that represents the container
image to deploy:
 gcloud deploy releases create test-release-001 \
   --project=PROJECT_ID \
   --region=us-central1 \
   --delivery-pipeline=my-parallel-demo-app-1 \
   --images=my-app-image=gcr.io/google-containers/nginx@sha256:f49a843c290594dcf4d193535d1f4ba8af7d56cea2cf79d1e9554f077f1e7aaa \
   --to-target=qsprod-multi
Cloud Run
Run the following command from the deploy-run-parallel-quickstart
directory to create a release resource that represents the container
image to deploy:
 gcloud deploy releases create test-release-001 \
   --project=PROJECT_ID \
   --region=us-central1 \
   --delivery-pipeline=my-parallel-demo-app-1 \
   --images=my-app-image=us-docker.pkg.dev/cloudrun/container/hello@sha256:95ade4b17adcd07623b0a0c68359e344fe54e65d0cb01b989e24c39f2fcd296a \
   --to-target=qsprod-multi
Notice the
--images= flag, which
you use to replace the placeholder (my-app-image) in the
manifest or service definition
with the specific, SHA-qualified image. Google recommends that you templatize your
manifests this way, and that you use SHA-qualified image names at release
creation.
As always, when you create a release, a rollout is created automatically for the
first target in your pipeline (or, as in this case, a specific target specified
using --to-target=). In this quickstart, this target is a multi-target, so the
rollout is a "controller rollout" for two
child targets, and there are no subsequent targets in the delivery pipeline.
This means that your application is deployed everywhere upon rollout creation.
View the results in Google Cloud console
Now that you've created the release, and the controller rollout and child rollouts are created, those child rollouts are now deployed (or are in the process of being deployed) to their respective GKE clusters or Cloud Run services.
In the Google Cloud console, navigate to the Cloud Deploy Delivery pipelines page to view your my-parallel-demo-app-1 delivery pipeline.
Click the name of your delivery pipeline "my-parallel-demo-app-1".
The pipeline visualization shows the app's deployment status. Because there's only one stage in the pipeline, the visualization shows only one node.
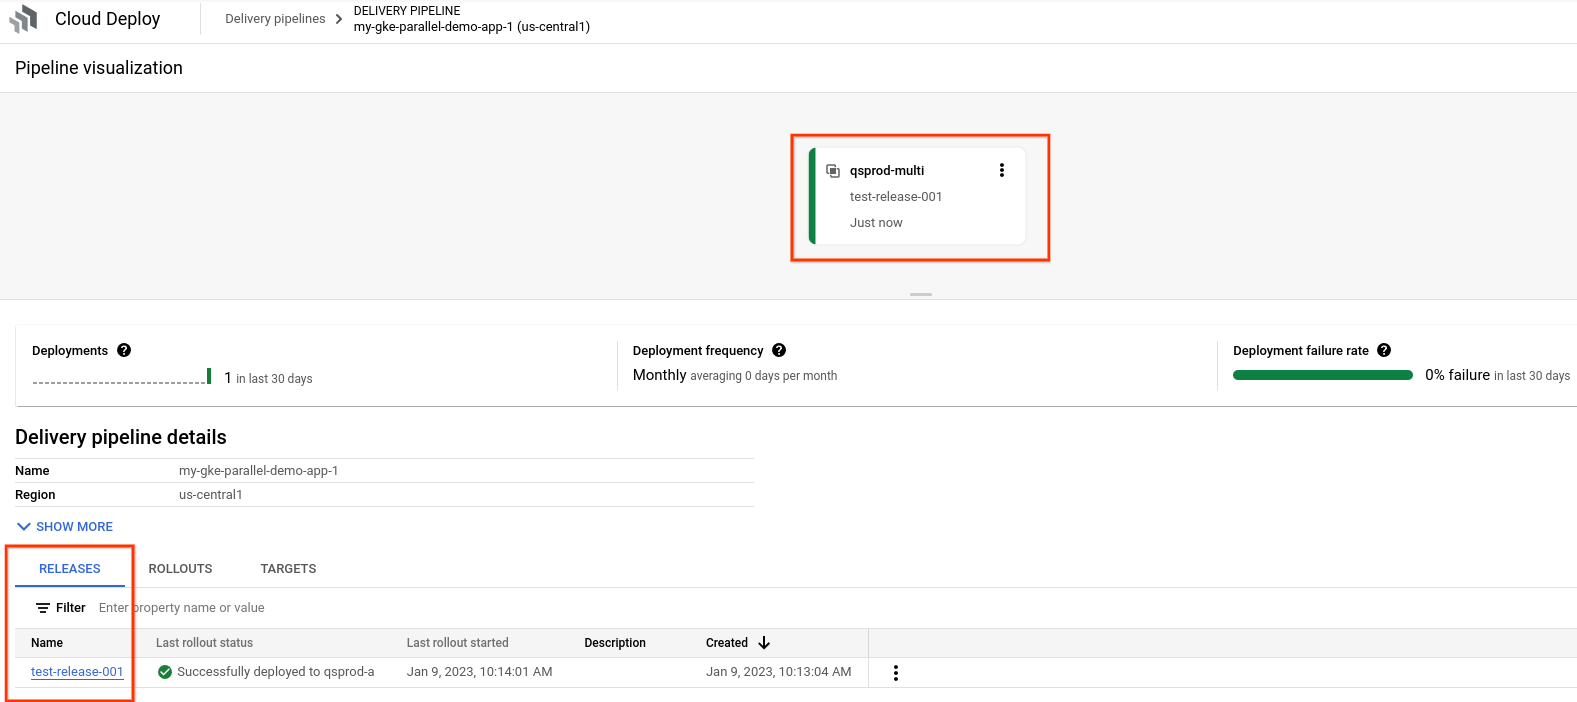
And your release is listed on the Releases tab under Delivery pipeline details.
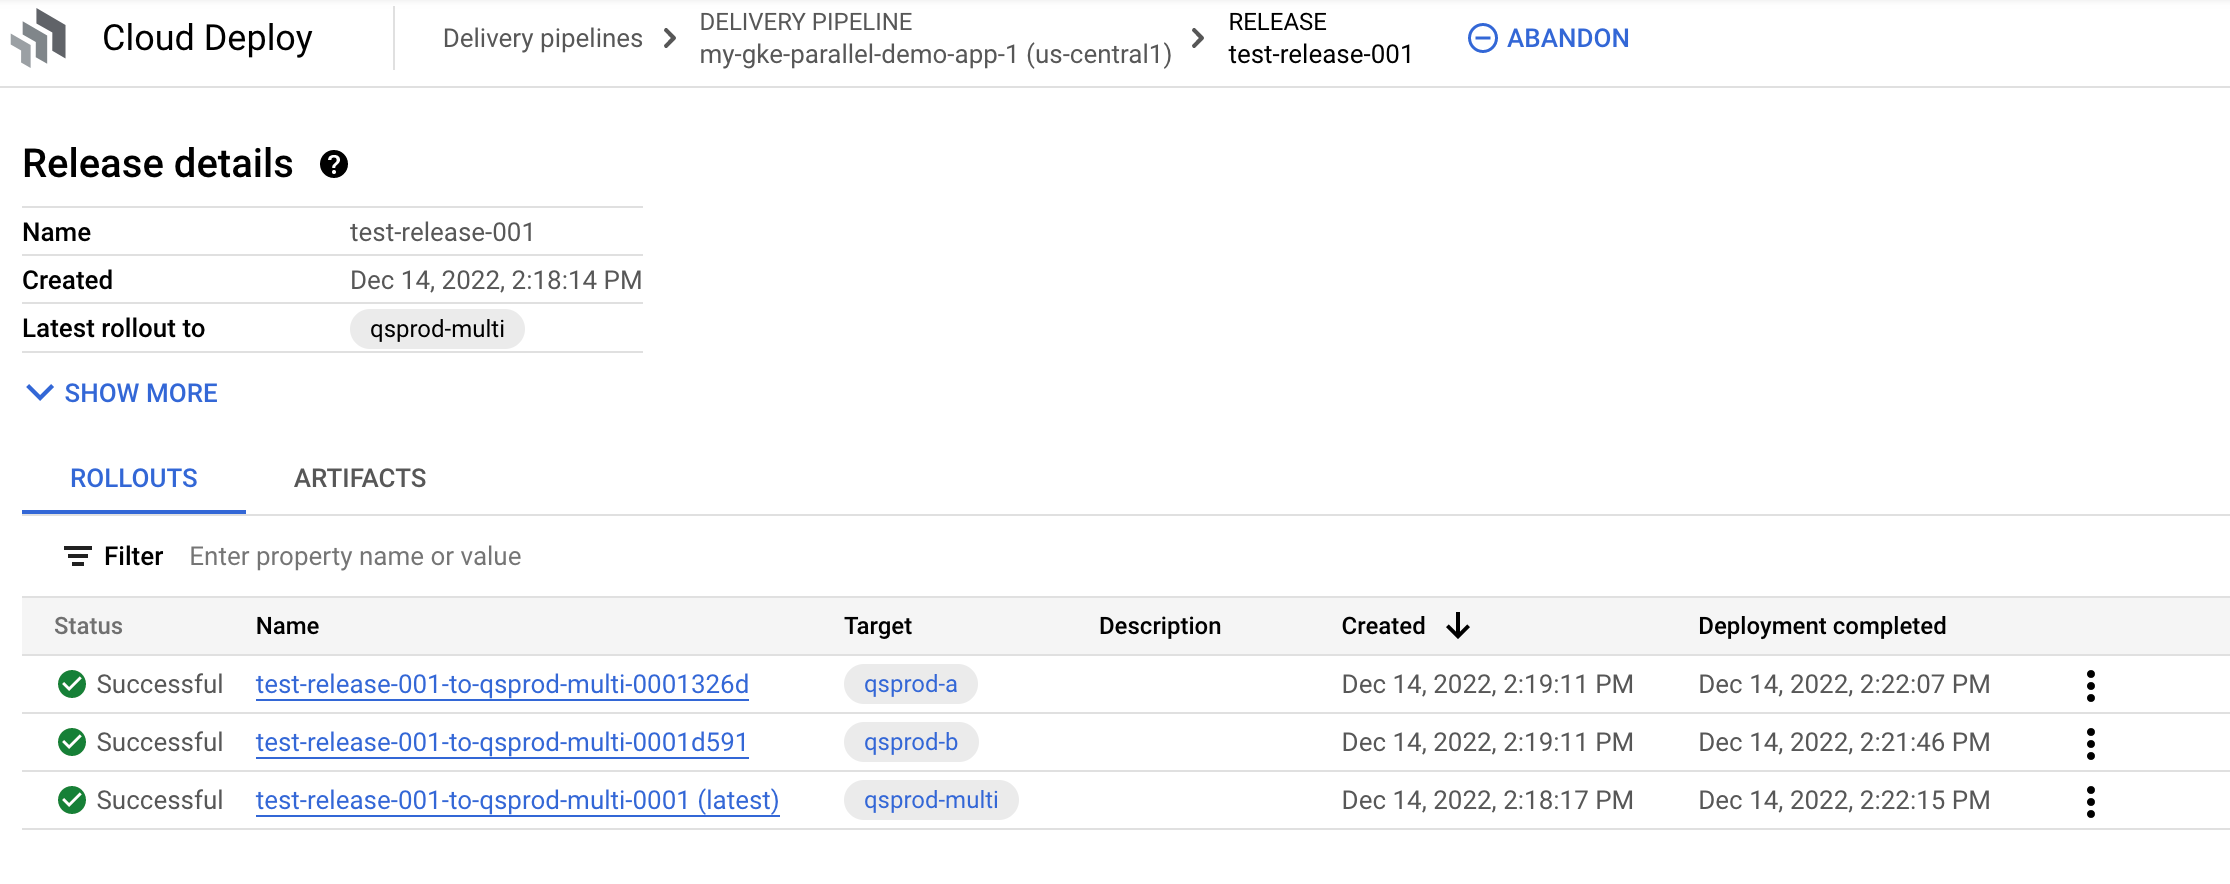
Click the release name,
test-release-001.Your rollouts appear under Rollouts. You can click a rollout to view its details, including the deployment log.
Clean up
To avoid incurring charges to your Google Cloud account for the resources used on this page, follow these steps.
Delete the GKE clusters or Cloud Run services:
GKE
gcloud container clusters delete quickstart-cluster-qsprod1 --region=us-central1 --project=PROJECT_ID \
&& gcloud container clusters delete quickstart-cluster-qsprod2 --region=us-west1 --project=PROJECT_ID
Cloud Run
gcloud run services delete my-parallel-run-service --region=us-central1 --project=PROJECT_ID \
&& gcloud run services delete my-parallel-run-service --region=us-west1 --project=PROJECT_ID
Delete the delivery pipeline, multi-target, child targets, release, and rollouts:
gcloud deploy delete --file=clouddeploy.yaml --force --region=us-central1 --project=PROJECT_IDDelete the Cloud Storage buckets that Cloud Deploy created.
One ends with
_clouddeploy, and the other is[region].deploy-artifacts.[project].appspot.com.
That's it, you completed this quickstart!
What's next
Read more about how to deploy to multiple targets at the same time.
Learn how to manage your manifests.
Learn how to combine Google Cloud CI/CD tools to develop and deliver software effectively to GKE.