Executar um pipeline usando o criador de jobs
Neste guia de início rápido, mostramos como executar um job do Dataflow usando o criador de jobs do Dataflow. A criador de jobs é uma IU visual para criar e executar pipelines do Dataflow no console do Google Cloud, sem escrever códigos.
Neste guia de início rápido, você vai carregar um pipeline de exemplo no criador de jobs, executar um job e verificar se ele criou a saída.
Antes de começar
- Sign in to your Google Cloud account. If you're new to Google Cloud, create an account to evaluate how our products perform in real-world scenarios. New customers also get $300 in free credits to run, test, and deploy workloads.
-
In the Google Cloud console, on the project selector page, select or create a Google Cloud project.
Roles required to select or create a project
- Select a project: Selecting a project doesn't require a specific IAM role—you can select any project that you've been granted a role on.
-
Create a project: To create a project, you need the Project Creator
(
roles/resourcemanager.projectCreator), which contains theresourcemanager.projects.createpermission. Learn how to grant roles.
-
Verify that billing is enabled for your Google Cloud project.
-
Enable the Dataflow, Compute Engine, Cloud Logging, Cloud Storage, Google Cloud Storage JSON, and Resource Manager APIs.
Roles required to enable APIs
To enable APIs, you need the Service Usage Admin IAM role (
roles/serviceusage.serviceUsageAdmin), which contains theserviceusage.services.enablepermission. Learn how to grant roles. -
In the Google Cloud console, on the project selector page, select or create a Google Cloud project.
Roles required to select or create a project
- Select a project: Selecting a project doesn't require a specific IAM role—you can select any project that you've been granted a role on.
-
Create a project: To create a project, you need the Project Creator
(
roles/resourcemanager.projectCreator), which contains theresourcemanager.projects.createpermission. Learn how to grant roles.
-
Verify that billing is enabled for your Google Cloud project.
-
Enable the Dataflow, Compute Engine, Cloud Logging, Cloud Storage, Google Cloud Storage JSON, and Resource Manager APIs.
Roles required to enable APIs
To enable APIs, you need the Service Usage Admin IAM role (
roles/serviceusage.serviceUsageAdmin), which contains theserviceusage.services.enablepermission. Learn how to grant roles. - Crie um bucket do Cloud Storage:
- In the Google Cloud console, go to the Cloud Storage Buckets page.
- Click Create.
- On the Create a bucket page, enter your bucket information. To go to the next
step, click Continue.
- For Name your bucket, enter a unique bucket name. Don't include sensitive information in the bucket name, because the bucket namespace is global and publicly visible.
-
In the Choose where to store your data section, do the following:
- Select a Location type.
- Choose a location where your bucket's data is permanently stored from the Location type drop-down menu.
- If you select the dual-region location type, you can also choose to enable turbo replication by using the relevant checkbox.
- To set up cross-bucket replication, select
Add cross-bucket replication via Storage Transfer Service and
follow these steps:
Set up cross-bucket replication
- In the Bucket menu, select a bucket.
In the Replication settings section, click Configure to configure settings for the replication job.
The Configure cross-bucket replication pane appears.
- To filter objects to replicate by object name prefix, enter a prefix that you want to include or exclude objects from, then click Add a prefix.
- To set a storage class for the replicated objects, select a storage class from the Storage class menu. If you skip this step, the replicated objects will use the destination bucket's storage class by default.
- Click Done.
-
In the Choose how to store your data section, do the following:
- In the Set a default class section, select the following: Standard.
- To enable hierarchical namespace, in the Optimize storage for data-intensive workloads section, select Enable hierarchical namespace on this bucket.
- In the Choose how to control access to objects section, select whether or not your bucket enforces public access prevention, and select an access control method for your bucket's objects.
-
In the Choose how to protect object data section, do the
following:
- Select any of the options under Data protection that you
want to set for your bucket.
- To enable soft delete, click the Soft delete policy (For data recovery) checkbox, and specify the number of days you want to retain objects after deletion.
- To set Object Versioning, click the Object versioning (For version control) checkbox, and specify the maximum number of versions per object and the number of days after which the noncurrent versions expire.
- To enable the retention policy on objects and buckets, click the Retention (For compliance) checkbox, and then do the following:
- To enable Object Retention Lock, click the Enable object retention checkbox.
- To enable Bucket Lock, click the Set bucket retention policy checkbox, and choose a unit of time and a length of time for your retention period.
- To choose how your object data will be encrypted, expand the Data encryption section (), and select a Data encryption method.
- Select any of the options under Data protection that you
want to set for your bucket.
- Click Create.
Para concluir as etapas neste guia de início rápido, sua conta de usuário precisa ter os papéis de Administrador do Dataflow e Usuário da conta de serviço. A conta de serviço padrão do Compute Engine precisa ter o papel de worker do Dataflow. Para adicionar os papéis necessários no console do Google Cloud, siga estas etapas:
- Acessar a página IAM
Acesse o IAM - Selecione o projeto.
- Na linha que contém sua conta de usuário, clique em Editar principal
- Clique em Adicionar outro papel e, na lista suspensa, selecione Administrador do Dataflow.
- Clique em Adicionar outro papel e, na lista suspensa, selecione Usuário da conta de serviço.
- Clique em Salvar.
- Na linha que contém a conta de serviço padrão do Compute Engine, clique em Editar principal.
- Clique em Adicionar outro papel e, na lista suspensa, selecione Worker do Dataflow.
- Clique em Adicionar outro papel e, Na lista suspensa, selecione Administrador de objetos do Storage.
Clique em Salvar.
Para mais informações sobre como conceder papéis, consulte Conceder um papel do IAM usando o console.
- Acessar a página IAM
- Por padrão, cada novo projeto começa com uma
rede padrão.
Se a rede padrão do projeto estiver desativada
ou tiver sido excluída, você precisará ter uma rede no projeto em que sua conta de usuário tem o
Papel de usuário de rede do Compute
(
roles/compute.networkUser).
Carregar o pipeline de exemplo
Nesta etapa, você carrega um pipeline de exemplo que conta as palavras em Rei Lear, de Shakespeare.
Acesse a página Jobs no console do Google Cloud.
Clique em Criar job a partir do modelo.
Clique em Criador de jobs.
Clique em Carregar.
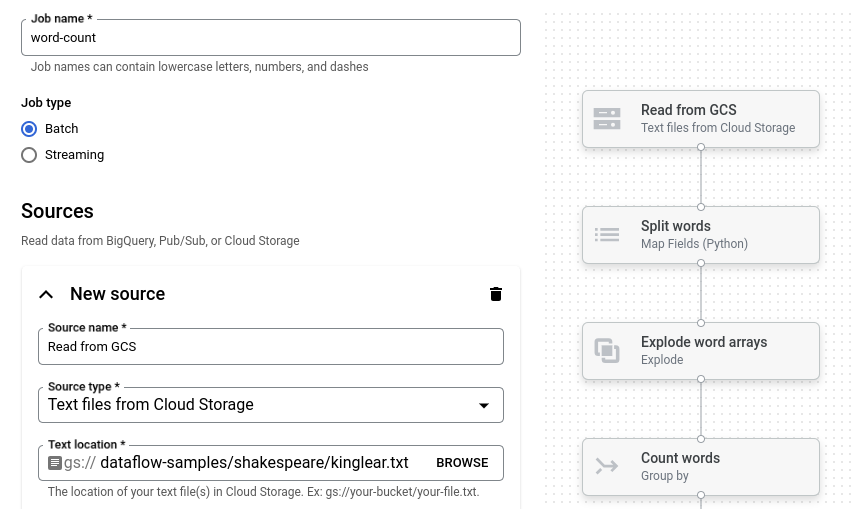
Clique em Contagem de palavras. O criador de jobs é preenchido com uma representação gráfica do pipeline.
Para cada etapa do pipeline, o criador de jobs exibe um cartão que especifica os parâmetros de configuração correspondentes para essa etapa. Por exemplo, a primeira etapa lê arquivos de textos do Cloud Storage. O local dos dados de origem é preenchido automaticamente na caixa Local do texto.
Definir o local de saída
Nesta etapa, você especifica um bucket do Cloud Storage em que o pipeline grava a saída.
Localize o cartão intitulado Novo coletor. Talvez seja necessário rolar a tela.
Na caixa Local do texto, clique em Procurar.
Selecione o nome do bucket do Cloud Storage que você criou Antes de começar.
Clique em Ver recursos filhos.
Na caixa Nome do arquivo, digite
words.Clique em Selecionar.
Execute o job
Cliquem em Executar job. O criador de jobs cria um job do Dataflow e depois navega até o gráfico do job. Quando o job é iniciado, o gráfico do job mostra uma representação gráfica do pipeline, semelhante à mostrada no criador de jobs. À medida que cada etapa do pipeline é executada, o status é atualizado no gráfico do job.
O painel Informações do job mostra o status geral dele. Se o job for concluído
com sucesso, o campo Status do job será atualizado para Succeeded.
Examinar a saída do job
Quando o job for concluído, siga estas etapas para conferir a saída do pipeline:
No console do Google Cloud, acesse a página Buckets do Cloud Storage.
Na lista de buckets, clique no nome do bucket que você criou Antes de começar.
Clique no arquivo chamado
words-00000-of-00001.Na página Detalhes do objeto, clique no URL autenticado para visualizar a saída do pipeline.
A saída será parecida com esta:
brother: 20
deeper: 1
wrinkles: 1
'alack: 1
territory: 1
dismiss'd: 1
[....]
Limpar
Para evitar cobranças na conta do Google Cloud pelos recursos usados nesta página, siga estas etapas.
Exclua o projeto
A maneira mais fácil de eliminar o faturamento é excluir o projeto do Google Cloud que você criou para o guia de início rápido.
- In the Google Cloud console, go to the Manage resources page.
- In the project list, select the project that you want to delete, and then click Delete.
- In the dialog, type the project ID, and then click Shut down to delete the project.
Excluir recursos individuais
Se você quiser manter o projeto do Google Cloud usado neste guia de início rápido, exclua o bucket do Cloud Storage:
- In the Google Cloud console, go to the Cloud Storage Buckets page.
- Click the checkbox for the bucket that you want to delete.
- To delete the bucket, click Delete, and then follow the instructions.