Agent statuses, also referred to as Aux codes, are used to track time spent on different tasks, make agents available for calls or chats, and are used extensively in Workforce Management reporting. CCAI Platform has default statuses and the ability to create custom statuses to fit a variety of processes and needs.
All statuses are available for all agents in your environment with the exception of Special Task, which is only available to Managers.
With the exception of Available and In-chat, all default and custom statuses will be considered. "unavailable" states so calls and chats won't be routed to agents while in that status.
The Agent Monitoring page shows agent statuses.
Default status and changing statuses.
The system maintains your last status: when putting the computer to sleep or logging out, in most cases the status you're in will be saved when you come back to your computer or sign in.
Admins can set the default status on login in Settings > Operation Management.
See Auto Answer - Calls for default status setting specifics.
Agents can change their status while not on a call or chat, OR
When enabled, Agents can have the ability to choose which status to go into after their current call or chat to go on break.
Managers and Admins can update Agent's statuses. See Admin or Manager - Updating an Agent's Status for details.
With the exception of Available and In-chat, all default and custom statuses will be considered "unavailable" states and calls or chats won't be routed to agents. If an agent is in In-Chat status and has not reached the max chat threshold, they will be routed new chats until the threshold is met. See Chat Settings for further information regarding maximum chats.
| Status name | Color | Set by | Meaning | Notes |
|---|---|---|---|---|
| Available | Green | System/Agent | Calls and chats will be routed to agents | |
| Unavailable | Red | System/Agent | Calls and chats won't be routed to agents | |
| Break | Yellow | System/Agent | Calls and chats won't be routed to agents | |
| Special Task | Pink | Manager Only | Calls and chats won't be routed to agents | Agents cannot put themselves in this status, it must be assigned by a manager from the Agents page. |
| Meal | Brown | Agent | Calls and chats won't be routed to agents | |
| Missed Call | Purple | System | If using Deltacast, this status will show after an agent misses a set amount of calls. | When a call gets put into Missed Call status, the agent then has to put themselves back into Available status. See Call Multicast and deltacast for more details. |
| Missed Chat | Grey | System | If using Deltacast, this status will show after an agent misses a set amount of chats. | See Call Multicast and deltacast for more details. |
| Unresponsive | Lime | System | A system status an agent is put into if our system registers more than x (a configurable number) consecutive skipped calls. |
This status is indicative of an agent unable to receive calls, due to the hardware, software, networks, or combination of these factors. |
| Wrap-up | Purple | System/Agent | Calls and chats won't be routed to agents. This status is either system-set based on automatic wrap-up settings, or can be selected manually by the agent. | Wrap-up status set manually shows the same in reports as when agents are placed in Wrap-up automatically. To differentiate, we suggest creating a custom status for Wrap up called "Manual Wrap-up" or "Excess Wrap-up" and train agents to use this instead when using the status manually. |
| Wrap-up Exceeded | Light Grey | System | Calls and chats won't be routed to agents. | This status is system-set and cannot be selected by a manager or agent. Once it is on, the transition from wrap-up status to wrap-up exceeded is automatic. |
| In-call | Light Blue | System | Agents are automatically placed in this status when on a call | Agents cannot log out during this status |
| In-chat | Indigo | System | Agents are automatically placed in this status when in a chat | Agents cannot log out during this status |
| Offline | Grey | System/Agent | When an agent logs out or the Timeout limit is met, an agent will be considered offline |
Agent status configuration
This section shows you how to configure and manage agents statuses.
Create a custom agent status
You can create a custom agent status if the default and system statuses don't
meet your needs. Custom agent statuses are designated Unavailable. That is,
agents that are in one of your custom statuses won't receive calls or chats.
To create a custom agent status, follow these steps:
- In the CCAI Platform portal, click Settings > Operation Management. If you don't see the Settings menu, click Menu.
- Go to the Agent Status pane, and then click View agent status list. The Agent Status list appears.
- Click Add Status. The Add Agent Status dialog appears.
- In the Status name field, enter a name for your custom agent status. This name appears in the Agent Status list.
- Click the Status color field. A list of colors appears.
- Click a color. The color appears next to your status name in the Agent Status list.
- To prevent users from selecting this agent status, do the following:
- Under Status access, click Restrict agent status.
- Do one of the following:
- To prevent all users (regardless of their roles) from selecting this agent status, click To all roles.
- To prevent users with specific roles from selecting this agent status, do the following:
- Click To specific roles.
- Click the List of restricted roles is required field. A list of available roles appears.
- Click a role that you want to prevent from selecting this agent status. The role appears in the field.
- To add additional roles, repeat these steps.
- If you want calls to break through to an agent in this status, click Allow calls to breakthrough this agent status. For more information, see Agent status breakthrough.
- To add translations, follow these steps:
- Click Add Translation. The Add a translation dialog appears.
- Click the Language field. A list of languages appears. Languages for which you already have a translation are not in this list.
- Click a language for which you want to add a translation.
- In the Translation field, enter your translation, and then click Add. Your new translation appears in the table under Translations.
- To add another translation, click Add Translation and repeat these steps.
- Click Add.
Edit a custom agent status
To edit a custom agent status, follow these steps:
In the CCAI Platform portal, click Settings > Operation Management. If you don't see the Settings menu, click Menu.
Go to the Agent Status pane, and then click View agent status list. The Agent Status list appears.
For the agent status that you want edit, click More, and then click Edit agent status.
Make your edits, and then click Save.
Agent status on login
Go to Settings > Operation Management.
Navigate to the Agent Status section.
Select one option:
Same status before logout: assigns the last status of that specific agent before the last logout.
Specific status: select from the list of available statuses to always assign the same status at login.
Click Set Agent Status.
Allow agents to set their next status while on a call or chat
By default, the status selector is only available to agents when not in In-call or In-chat status. When the Set agent status option is enabled, the agent is presented with a menu to change their "next status" so that once they are off their current call/chats, they won't be placed into Available.
Go to Settings > Operation Management.
Navigate to the Agent Status section.
Mark the checkbox to enable.
Click Set Agent Status.
Availability preferences
Sometimes agents who are skilled for voice and chat need the flexibility to take only chats or only voice calls. You can use availability preferences to receive only certain types of contacts to meet the needs of the customer, prioritizing what is most needed at the time.
This feature is enabled at the global level by administrators, and can be enabled for agents so they can change their own availability preferences without the need for a manager or administrator to be available to do it for them. This page discusses the steps required to enable this feature, and links to other articles which explain how the feature will be used by agents.
Let agents change their own availability preferences
To let agents change their own availability preferences, follow these steps:
Go to Settings > Operation Management > Agent Status.
Check the box next to Allow agents to change Availability preferences to allow agents to change their own availability preferences. If you only want for administrators or managers to be able to do this, leave this checkbox unchecked.
Check the box next to Allow agents to select to receive calls on their mobile phone to allow Either to the phone number specified in their user profile, or the Agent App if given the correct permission.
Select Save Agent Status.
Create an availability preferences filter
You can create multiple preset filters to apply to agents as needed. Follow these steps to create a filter:
Go to Settings > Users & Teams > Availability Preferences.
Click + Add Preferences.
A new window appears, make your selections:
Name the filter.
Add a description (optional).
Check the boxes next to the filters you would like to apply. You can create multiple filters.
Once you have selected all the filters you want to allow for this configuration, click Save.

You will then see the new filter in the list on the availability preferences page.
If you need to edit or delete a preset filter, you can go back to the availability preferences page where the Actions column can be found on the right side of the screen on the row containing the filter you want to change.
Once you have created a set of filters, you can update existing users or teams to include these availability preferences.
Add availability preferences to a user
Availability preferences can be added to an agent's profile in the Users & Teams settings menu. For information about how to add, view, and edit users, see Add, view and edit users.
Go to Settings > Users & Teams > Manage Users & Teams.
Select Add a User to add a new user, or select the Edit button (pencil icon) next to an existing user to open the Add User / Edit User menu.
- If you need to create a new user, fill in all the other required fields.
At the bottom of the menu there is an Availability Preferences drop-down list, select the preferred filter from the options in the list.
Select Save.
Add availability preferences to a team
Availability preferences can be added to a team's profile in the Users & Teams settings menu. For information about how to add and edit teams, see Add, view, and edit teams.
Go to Settings > Users & Teams > Manage Users & Teams.
Select Add a Team to add a new team, or click the Edit button (pencil icon) next to an existing team to open the Add Team / Edit Team menu.
- If you need to create a new team, fill in all the other required fields.
At the bottom of the menu, there will be an Availability Preferences field with a search bar. Start typing the preferred filter keyword and choose from the options presented in the list.
Select Save.
Enable transfers to all logged in agents
When this setting is enabled, agents can transfer a call or chat to another agent, regardless of their current status. This is useful for escalations and allowing consumers to work with the same agent without having to call back when they are busy.
Go to Settings > Operation Management.
Navigate to the Agent Status section.
Mark the checkbox to enable call or chat transfers to all logged in agents.
Click Set Agent Status.
Agent experience

Agent status lists
You can use agent status lists to set custom agent statuses for queues and teams. This grants customers the flexibility to choose which statuses the members of specific queues and teams can have access to by assigning a list of custom statuses to them. The agents of these queues and teams will not be able to see any other statuses (except the default statuses and system list) in the status selectors of their call and chat adapters.
Creating, editing and deleting an agent status list
Create
To create an agent status list, follow these steps:
Go to Settings > Operation Management > Agent Status > Manage Agent Statuses.
Select Agent Status Lists.
Select Create agent status list.
Enter a name for your list in the Agent status list name text field.
Select Create. You will be returned to the Agent Status Lists page where you will see your newly created list.
Custom statuses or optional default statuses must be added to the list. Select the new list to open it.
From here you can:
Import agent status (See Bulk Status Management)
Add agent status
Create agent status (See Create a custom agent status for this process.)
Select Add agent status.
A drop-down menu appears from which you can multi-select all statuses you wish to assign to this list.
When all statuses are chosen, select Add.
Statuses will be added to the Agent Status List.
Edit
To edit a agent status list, follow these steps:
Go to Settings > Operation Management > Agent Status > Manage Agent Statuses.
Select Agent Status Lists.
Select the list to edit.
Select the Options Button (ellipsis) and choose Edit agent status list.
Make all changes in the Edit Agent Status List page.
Select Save to implement changes, or Cancel to discard changes made.
Delete
To delete an agent status list, follow these steps:
Go to Settings > Operation Management > Agent Status > Manage Agent Statuses.
Select Agent Status Lists.
Select the list to delete it.
Select the Options Button (ellipsis) and choose Delete agent status list.
A pop up window appears asking you to confirm your decision. Select Delete to remove the status, or Cancel.
Assign an agent status list to a queue
When an agent status list is assigned to a queue, all agents operating within that queue will see only the statuses of that list available to them, as well as the statuses in the System List (see Default Statuses). All other custom statuses that are not part of the assigned list will be hidden.
One agent can be a member of multiple queues, which may have different agent status lists assigned to them. In this case the agent will see a union set of all of their queues' available custom statuses.
Go to Settings > Queue > IVR/Mobile/Web.
Select the queue to add an Agent Status List to.
Scroll to Agent Status List.
Select Configure.
Select an agent status list from the drop-down menu. The System List and Global Agent Status list won't be shown as they are always available to all agents, as well as the status list assigned to the queue.
Select Save.
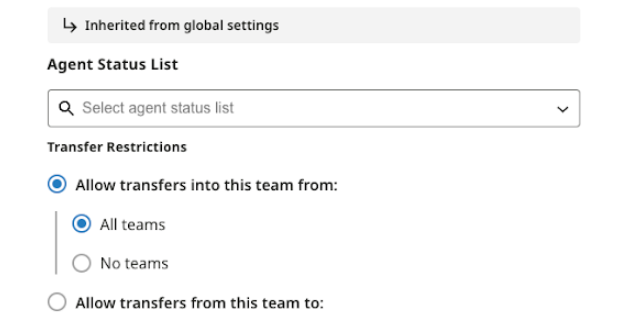
Assign an agent status list to a team
When an agent status list is assigned to a team, all agents operating within that team, regardless of the queue they are assigned to, will see only the statuses of that list available to them, as well as the System List and Global Agent Status List, and the status list assigned to the queue. All other custom statuses that are not part of the assigned lists will be hidden.
One agent can be a member of multiple teams, which may have different agent status lists assigned to them. In this case the agent will see a union set of all of their teams' available custom statuses.
Go to Settings > Users & Teams.
Choose the team to assign an agent status list to.
Select the Edit button (pencil icon) next to the team name in the menu bar. Agent status lists can also be assigned to teams when they are created.
Go to the Agent status list section.
Select the agent status list to assign the status to the team from the drop-down menu.
Select Save.
Bulk status management
Bulk status management lets you use the contents of a .CSV file to create or modify large numbers of statuses simultaneously.
Go to Settings > Operation management > Agent status > Manage agent statuses.
Go to Bulk Status Management.
If there has been a previous import, the page will show the latest status of the latest import. If there has been a previous import, select Upload statuses.
On the Import statuses page, use the buttons in the Step 1: Download template section to download a file to use for adding or modifying statuses. Only custom statuses will be created and edited. If the uploaded file includes default or system statuses, it will generate an error.
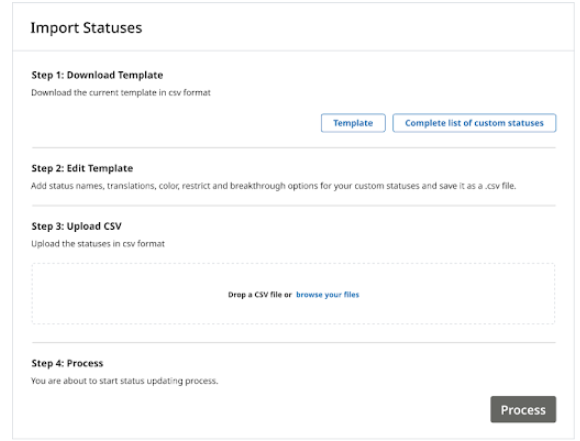
To add new statuses, click the Template button to download a sample CSV file that you can populate with the information for the statuses being added.
To modify existing statuses, click the Complete list of statuses to download the information for all current statuses as a CSV file. You can then make any necessary changes to modify existing statuses in this file.
Once the CSV file has been updated, proceed to the Step 3: Upload CSV section and either drag-and-drop the updated CSV file into the space provided or click the Browse your files button to manually select the file to upload.
Click Process. The Import Statuses pane indicates when the import is complete. In addition, Contact Center AI Platform sends a confirmation email indicating that the import is complete.
Import agent statuses
When creating a new Agent Status List, the option is presented to Import Agent Statuses. This option will trigger the same bulk status import flow. However, since it is occurring within the list creation page, all imported statuses will automatically be assigned to the list being created. If there are new statuses being imported that have not been previously created they will be automatically added to the Agent Statuses list.
Agent status in reporting
For a summary of time spent in each status, pull the Agent Activity Summary Report (Reports > Agent & Team > Agent Activity - Summary Report).
For a detailed timeline view of when and for how long an agent was in each status, as well as other detailed actions, pull the Agent Activity Timeline Report (Reports > Agent & Team > Agent Activity -Timeline Report).
Agent status names appear in English (US) in reports.
Agent status translation
CCAI Platform translates default and system agent statuses into a specific set of languages. The agent adapter displays these agent statuses according to the location that is assigned to the agent. If an agent isn't assigned a location, agent statuses appears in English (US).
Custom agent status translation
When you create custom agent statuses, you can provide your own translations for them in any of the languages that CCAI Platform supports. You can provide translations for only the languages that you need. If there isn't an agent status translation available for the location assigned to an agent, the status appears in English (US) in the agent adapter.
You can only add translations for custom agent statuses. Default and system statuses are translated by default and these translations are not editable.
View translations for default and system agent statuses
You can view the translations that are available for default and system agent statuses. These translations are not editable.
To view translations for default and system agent statuses, follow these steps:
In the CCAI Platform portal, click Settings > Operation Management. If you don't see the Settings menu, click Menu.
Go to the Agent Status pane, and then click View agent status list. The Agent Status list appears.
For any default or system agent status, click More, and then Edit agent status. Under Translations, a table appears that shows the agent status translations for each available language.
Create a custom agent status with translations
To create a custom agent status with translations, follow these steps:
- In the CCAI Platform portal, click Settings > Operation Management. If you don't see the Settings menu, click Menu.
- Go to the Agent Status pane, and then click View agent status list. The Agent Status list appears.
- Click Add Status. The Add Agent Status dialog appears.
- In the Status name field, enter a name for your custom agent status. This name appears in the Agent Status list.
- Click the Status color field. A list of colors appears.
- Click a color. The color appears next to your status name in the Agent Status list.
- To prevent users from selecting this agent status, do the following:
- Under Status access, click Restrict agent status.
- Do one of the following:
- To prevent all users (regardless of their roles) from selecting this agent status, click To all roles.
- To prevent users with specific roles from selecting this agent status, do the following:
- Click To specific roles.
- Click the List of restricted roles is required field. A list of available roles appears.
- Click a role that you want to prevent from selecting this agent status. The role appears in the field.
- To add additional roles, repeat these steps.
- If you want calls to break through to an agent in this status, click Allow calls to breakthrough this agent status. For more information, see Agent status breakthrough.
- To add translations, follow these steps:
- Click Add Translation. The Add a translation dialog appears.
- Click the Language field. A list of languages appears. Languages for which you already have a translation are not in this list.
- Click a language for which you want to add a translation.
- In the Translation field, enter your translation, and then click Add. Your new translation appears in the table under Translations.
- To add another translation, click Add Translation and repeat these steps.
- Click Add.
Add translations to an existing custom agent status
To add translations to an existing custom agent status, follow these steps:
In the CCAI Platform portal, click Settings > Operation Management. If you don't see the Settings menu, click Menu.
Go to the Agent Status pane, and then click View agent status list. The Agent Status list appears.
For the custom agent status that you want to edit, click More, and then click Edit agent status.
- To add translations, follow these steps:
- Click Add Translation. The Add a translation dialog appears.
- Click the Language field. A list of languages appears. Languages for which you already have a translation are not in this list.
- Click a language for which you want to add a translation.
- In the Translation field, enter your translation, and then click Add. Your new translation appears in the table under Translations.
- To add another translation, click Add Translation and repeat these steps.
Click Save.
Agent status breakthrough
Agent status breakthrough allows incoming calls to be routed to agents even when
they are in a specific status, such as Unavailable`. This feature provides
greater flexibility in managing call routing and agent availability.
Statuses that you can breakthrough
Default statuses:
- Unavailable
- Break
- Special task
- Meal
- Wrap-up
System:
- Missed Call
- Missed Chat
- In-chat
- Wrap-up Exceeded (if enabled)
Custom:
- Any custom status.
Enable agent status breakthrough
Go to Settings > Operation Management > Agent Status > Agent Status Breakthrough.
Check the checkbox Allow incoming calls to be routed to agents while on breakthrough status.
Click Save.
Set an agent status as breakthrough
In Settings > Operations Management > Agent Status, click View Agent Status List.
Go to the chosen status and select the pencil icon to edit it.
In the pop up window, under Breakthrough Status, check the Allow calls to breakthrough the agent status checkbox.
Select Okay.
Select a queue for breakthrough
Go to Settings > Queue and select the chosen queue.
In the side panel queue level menu settings, go to Agent Status Breakthrough.
Select Configure.
Toggle the switch to On to enable agent breakthrough status.
Configure breakthrough for certain DAPs
In the queue level Agent Breakthrough Status settings, check the Allow calls to breakthrough agent status only when received through certain DAPs checkbox. When checked, a Select DAP drop-down is available.
Select your chosen DAP.
Click Add DAP.
Click Save.
Agent experience: Breakthrough status
After the status is set, the call announcement will be available to the agent in
the Agent Adapter. For example, the Unavailable status can be configured to
allow calls to breakthrough the Unavailable agent status.
Wrap-up exceeded status
Wrap-up Exceeded is a system-set status that lets you transition agents into a Wrap-up Exceeded Status once they have gone beyond a wrap-up threshold time and have cleared all ongoing sessions. When an agents transitions to Wrap-up Exceeded status, an agent-level notification appears:

For more information, see Agent Statuses.
Enable Wrap-up Exceeded
In the CCAI Platform portal, go to Settings Operation Management > Wrap-up.
Turn on the Wrap-up Exceeded status.
Agent Status Transition Examples
The following are common scenarios from the agent's perspective demonstrating how the Wrap-up Exceeded status transitions based on the adapter activity.
The Wrap-up Exceeded status is impacted by the following configuration considerations:
The Wrap-up Exceeded status functions as a single configuration for calls and chats. Once enabled, agents can transition to Wrap-up Exceeded after a call or chat session.
Once the agent exceeds wrap-up time on a communication, and have cleared all ongoing sessions, they transition into Wrap-up Exceeded status. While in this status, or when Wrap-up Exceeded is their next status, the agent cannot receive new communication and won't be able to manually change their next status. However, the agent is not taken away from the wrap-up screen and still can enter disposition codes/ notes. See Scenarios 2 and 3 for examples.
Once the agent is in Wrap-up Exceeded status and is not handling any calls or chats, they can switch to their next status and still can enter disposition codes/notes, depending on configuration.
Scenario 1: Call Adapter is Active / Chat Adapter is off
An active call ends and goes to the wrap-up screen.
The agent status moves from In-call to Wrap-up.
The agent exceeds the wrap-up time.
The agent is moved to Wrap-up Exceeded status, where the agent can still work on the wrap-up screen.
The agent completes the wrap-up work in the notes and disposition screen, then clicks Save.
The agent stays in the Wrap-up Exceeded status and the wrap-up screen closes.
The agent selects a new status.
The agent successfully moves to the newly selected status.
Scenario 2: Call Adapter is off / Chat Adapter is active
There are two active chats: one chat ends and goes to the wrap-up screen (Chat A), and the second chat (Chat B) is still ongoing.
The agent status stays in In-chat status (Chat A wrap-up is in progress, Chat B is in progress).
The agent exceeds wrap-up time on Chat A.
A Wrap-up Exceeded banner displays on the call and agent adapter since Chat A Wrap-up exceeded and Chat B is in progress. This alerts the agent that the next status is Wrap-up Exceeded.
The agent stays in In-chat status (the agent is still working on Chat B). The agent still can work on the wrap-up screen of Chat A.
The agent finishes Chat B and goes to wrap-up for Chat B.
The agent stays in the In-chat status.
The agent exceeds the wrap-up time on Chat B.
The agent is moved to the Wrap-up Exceeded status, where the agent can still work on the wrap-up for both chats (A and B). The agent still can't move into a new status while they are working on the wrap-up.
The agent completes the wrap-up work and clicks Save & Close on both chats.
The agent stays in Wrap-up Exceeded status (no communications are active or in wrap-up state).
The agent chooses a new status.
The agent successfully moves to the newly selected status.
Scenario 3: Call Adapter is active / Chat Adapter is active
There is an active call and an active chat. The agent finishes the call, and the chat is still in progress (active).
The agent status changes from In-call to Wrap-up status.
The agent exceeds call wrap-up time.
The agent stays in Wrap-up status because there is still an active chat in progress.
A Wrap-up Exceeded banner displays on the call and agent adapter, which alerts the agent that the next status is Wrap-up Exceeded.
The agent finishes call wrap-up and clicks Save on the wrap-up screen.
The agent moves from Wrap-up status to In-chat status, because there is still an active chat in progress.
The agent finishes the chat wrap-up in the chat allotted wrap-up time.
The agent moves from In-chat status to Wrap-up Exceeded status since the prior call wrap-up time was exceeded.
The agent chooses a new status.
The agent successfully moves to the newly selected status.
Reporting
Wrap-up Exceeded can be found in the following standard reports:
Agents & Teams
Interactions Summary by Agent Report
- Wrap-up Exceeded: (Count) The total number of times the agent goes into Wrap-up Exceeded status.
Agent Activity Summary Report
- Total Exceeded Wrap-up (Calls/Chats) - The total time the agent(s) was in Wrap-up Exceeded status. This is calculated as the time from when the wrap-up timer elapses to when the agent submits the wrap-up.
Individual Call or Chat History Report
- Wrap-up Exceeded: Indicates whether a wrap-up exceeded status occurred. This formats as a True or False.
Activity Timeline Report
- Wrap-up Exceeded appears as a status under Activity log.