Cloud Composer 3 | Cloud Composer 2 | Cloud Composer 1
このページでは、KubernetesPodOperator を使用して、Cloud Composer から Cloud Composer 環境の一部である Google Kubernetes Engine クラスタに Kubernetes Pod をデプロイする方法について説明します。
KubernetesPodOperator は、使用中の環境のクラスタで Kubernetes Pod を起動します。これに対し、Google Kubernetes Engine 演算子は、指定されたクラスタ内で Kubernetes Pod を実行します。このクラスタは、使用中の環境とは関係がない別のクラスタであっても構いません。Google Kubernetes Engine 演算子を使用してクラスタを作成、削除することもできます。
KubernetesPodOperator は、以下を必要とする場合に適しています。
- 公開 PyPI リポジトリでは使用できないカスタム Python 依存関係。
- Cloud Composer ワーカーのストック画像では使用できないバイナリ依存関係。
始める前に
CNCF Kubernetes プロバイダのバージョン 5.0.0 を使用している場合は、CNCF Kubernetes プロバイダのセクションに記載されている手順に沿って操作します。
Pod アフィニティの構成は Cloud Composer 2 では使用できません。Pod アフィニティを使用する場合は、GKE オペレーターを使用して、別のクラスタで Pod を起動します。
Cloud Composer 2 の KubernetesPodOperator について
このセクションでは、Cloud Composer 2 で KubernetesPodOperator がどのように機能するかについて説明します。
リソースの使用量
Cloud Composer 2 では、お使いの環境のクラスタは自動的にスケーリングされます。KubernetesPodOperator を使用して実行する追加のワークロードは、環境とは独立してスケーリングされます。
環境は、リソース需要の増加による影響を受けませんが、環境のクラスタは、リソース需要に応じてスケールアップおよびスケールダウンされます。
環境のクラスタで実行する追加のワークロードの料金は Cloud Composer 2 料金モデルに従い、Cloud Composer Compute SKU を使用します。
Cloud Composer 2 では、コンピューティング クラスの概念が導入されている Autopilot クラスタを使用します。
Cloud Composer は、
general-purposeコンピューティング クラスのみをサポートしています。デフォルトでは、クラスが選択されていない場合、KubernetesPodOperator を使用して Pod を作成する際には
general-purposeクラスが想定されます。各クラスは特定のプロパティとリソース制限に関連付けられています。それらの詳細については、Autopilot のドキュメントをご覧ください。 たとえば、
general-purposeクラス内で実行される Pod は、最大 110 GiB のメモリを使用できます。
プロジェクトのリソースへのアクセス
Cloud Composer 2 は、Workload Identity Federation for GKE で GKE クラスタを使用します。composer-user-workloads 名前空間で実行される Pod は、追加の構成なしでプロジェクト内の Google Cloud リソースにアクセスできます。これらのリソースへのアクセスには、環境のサービス アカウントが使用されます。
カスタム名前空間を使用する場合は、この名前空間に関連付けられた Kubernetes サービス アカウントを Google Cloud サービス アカウントにマッピングして、Google API やその他のサービスへのリクエストに対してサービス ID の承認を有効にする必要があります。環境のクラスタ内のカスタム名前空間で Pod を実行すると、Kubernetes とGoogle Cloud サービス アカウント間の IAM バインディングが作成されず、これらの Pod は Google Cloud プロジェクトのリソースにアクセスできません。
カスタム名前空間を使用していて、Pod がGoogle Cloud リソースにアクセスできるようにするには、Workload Identity Federation for GKE のガイダンスに沿って、カスタム名前空間のバインディングを設定します。
- 環境のクラスタに別の名前空間を作成します。
- カスタム名前空間の Kubernetes サービス アカウントと環境のサービス アカウントの間にバインディングを作成します。
- 環境のサービス アカウント アノテーションを Kubernetes サービス アカウントに追加します。
- KubernetesPodOperator を使用する場合は、
namespaceパラメータとservice_account_nameパラメータで名前空間と Kubernetes サービス アカウントを指定します。
構成を最小限にしたい
KubernetesPodOperator の作成に必要になるのは、Pod の name、使用する image、task_id パラメータのみです。/home/airflow/composer_kube_config には、GKE に対する認証に必要な認証情報が含まれています。
追加構成
この例では、KubernetesPodOperator で構成できる追加のパラメータを示します。
詳細については、以下のリソースをご覧ください。
Kubernetes Secret と ConfigMap の使用方法については、Kubernetes Secret と ConfigMap を使用するをご覧ください。
KubernetesPodOperator で Jinja テンプレートを使用する方法については、Jinja テンプレートを使用するをご覧ください。
KubernetesPodOperator パラメータの詳細については、Airflow ドキュメントのオペレーターのリファレンスをご覧ください。
Jinja テンプレートを使用する
Airflow は、DAG で Jinja テンプレートをサポートしています。
必要な Airflow パラメータ(task_id、name、image)を演算子で宣言する必要があります。次の例で示すように、Jinja を使用してその他のすべてのパラメータ(cmds、arguments、env_vars、config_file など)をテンプレート化できます。
この例の env_vars パラメータは、my_value という名前の Airflow 変数から設定されます。例の DAG は、Airflow の vars テンプレート変数から値を取得します。Airflow には、さまざまな種類の情報にアクセスできる変数が他にもあります。たとえば、conf テンプレート変数を使用して、Airflow 構成オプションの値にアクセスできます。詳細と Airflow で使用可能な変数のリストについては、Airflow ドキュメントのテンプレート リファレンスをご覧ください。
DAG を変更するか env_vars 変数を作成しないと、変数が存在しないため、例の ex-kube-templates タスクは失敗します。この変数は、Airflow UI または Google Cloud CLI で作成します。
Airflow UI
Airflow UI に移動します。
ツールバーで、[管理者] > [変数] を選択します。
[List Variable] ページで、[新しいレコードを追加する] をクリックします。
[Add Variable] ページで、次の情報を入力します。
- Key:
my_value - Val:
example_value
- Key:
[保存] をクリックします。
gcloud
次のコマンドを入力します。
gcloud composer environments run ENVIRONMENT \
    --location LOCATION \
    variables set -- \
    my_value example_value
以下のように置き換えます。
ENVIRONMENTを環境の名前に置き換えます。LOCATIONは、環境が配置されているリージョン。
次の例では、KubernetesPodOperator で Jinja テンプレートを使用する方法を示します。
Kubernetes Secret と ConfigMap を使用する
Kubernetes Secret は、センシティブ データを含むオブジェクトです。Kubernetes ConfigMap は、Key-Value ペアに非機密データを含むオブジェクトです。
Cloud Composer 2 では、Google Cloud CLI、API、Terraform を使用して Secret と ConfigMap を作成し、KubernetesPodOperator からそれらにアクセスできます。
YAML 構成ファイルについて
Google Cloud CLI と API を使用して Kubernetes Secret または ConfigMap を作成する場合は、YAML 形式のファイルを指定します。このファイルは、Kubernetes Secret と ConfigMap で使用される形式と同じ形式にする必要があります。Kubernetes ドキュメントには、ConfigMap と Secret の多くのコードサンプルが用意されています。使用を開始するには、Secret を使用して安全に認証情報を配布するページと ConfigMaps をご覧ください。
Kubernetes Secret の場合と同じように、Secret で値を定義する場合は base64 表現を使用します。
値をエンコードするには、次のコマンドを使用します(これは、Base64 でエンコードされた値を取得する多くの方法の一つです)。
echo "postgresql+psycopg2://root:example-password@127.0.0.1:3306/example-db" -n | base64
出力:
cG9zdGdyZXNxbCtwc3ljb3BnMjovL3Jvb3Q6ZXhhbXBsZS1wYXNzd29yZEAxMjcuMC4wLjE6MzMwNi9leGFtcGxlLWRiIC1uCg==
次の 2 つの YAML ファイルの例は、このガイドの後半のサンプルで使用されます。Kubernetes Secret の YAML 構成ファイルの例:
apiVersion: v1
kind: Secret
metadata:
  name: airflow-secrets
data:
  sql_alchemy_conn: cG9zdGdyZXNxbCtwc3ljb3BnMjovL3Jvb3Q6ZXhhbXBsZS1wYXNzd29yZEAxMjcuMC4wLjE6MzMwNi9leGFtcGxlLWRiIC1uCg==
ファイルを含める方法を示す別の例。前の例と同様に、まずファイルの内容(cat ./key.json | base64)をエンコードしてから、YAML ファイルでこの値を指定します。
apiVersion: v1
kind: Secret
metadata:
  name: service-account
data:
  service-account.json: |
    ewogICJ0eXBl...mdzZXJ2aWNlYWNjb3VudC5jb20iCn0K
ConfigMap の YAML 構成ファイルの例。ConfigMap で base64 表現を使用する必要はありません。
apiVersion: v1
kind: ConfigMap
metadata:
  name: example-configmap
data:
  example_key: example_value
Kubernetes Secret を管理する
Cloud Composer 2 では、Google Cloud CLI と kubectl を使用して Secret を作成します。
環境のクラスタに関する情報を取得する
次のコマンドを実行します。
gcloud composer environments describe ENVIRONMENT \
    --location LOCATION \
    --format="value(config.gkeCluster)"
以下のように置き換えます。
ENVIRONMENTは、環境の名前です。LOCATIONは、Cloud Composer 環境が配置されているリージョンです。
このコマンドの出力では、
projects/<your-project-id>/locations/<location-of-composer-env>/clusters/<your-cluster-id>の形式が使用されます。GKE クラスタ ID を取得するには、
/clusters/の後の出力(文末は-gke)をコピーします。
次のコマンドを使用して GKE クラスタに接続します。
gcloud container clusters get-credentials CLUSTER_ID \
  --project PROJECT \
  --region LOCATION
以下を置き換えます。
CLUSTER_ID: 環境のクラスタ ID。PROJECT_ID: プロジェクト IDLOCATION: 環境が配置されているリージョン。
Kubernetes Secret を作成します。
次のコマンドは、Kubernetes Secret を作成するための 2 つの方法を示しています。
--from-literalの方法では、Key-Value ペアを使用します。--from-fileの方法では、ファイルの内容を使用します。Key-Value ペアを指定して Kubernetes Secret を作成するには、次のコマンドを実行します。この例では、
test_valueの値を持つsql_alchemy_connフィールドがあるairflow-secretsという名前の Secret を作成します。kubectl create secret generic airflow-secrets \ --from-literal sql_alchemy_conn=test_value -n composer-user-workloadsファイルの内容を指定して Kubernetes Secret を作成するには、次のコマンドを実行します。この例では、ローカル
./key.jsonファイルの内容から取得した値を持つservice-account.jsonフィールドがあるservice-accountという名前の Secret を作成します。kubectl create secret generic service-account \ --from-file service-account.json=./key.json -n composer-user-workloads
DAG で Kubernetes Secret を使用する
この例では、Kubernetes Secret を使用する 2 つの方法を紹介します。環境変数としての方法と、Pod によってマウントされたボリュームによる方法です。
最初の Secret である airflow-secrets は、SQL_CONN という名前の Kubernetes の環境変数に設定されます(Airflow の環境変数や Cloud Composer の環境変数とは異なります)。
2 番目の Secret である service-account は、サービス アカウント トークンを含むファイルである service-account.json を /var/secrets/google にマウントします。
Secret オブジェクトは次のようになります。
最初の Kubernetes Secret の名前は、secret_env 変数で定義されます。この Secret の名前は airflow-secrets です。deploy_type パラメータでは、環境変数として公開する必要があることを指定します。環境変数の名前は SQL_CONN で、deploy_target パラメータで指定されます。最後に、SQL_CONN 環境変数の値が sql_alchemy_conn キーの値に設定されます。
2 番目の Kubernetes Secret の名前は、secret_volume 変数で定義されています。この Secret の名前は service-account です。deploy_type で指定されるように、ボリュームとして公開されます。マウントするファイルのパス deploy_target は /var/secrets/google です。最後に、deploy_target に保管される Secret の key は service-account.json です。
演算子の構成は、次のようになります。
CNCF Kubernetes プロバイダに関する情報
KubernetesPodOperator は apache-airflow-providers-cncf-kubernetes プロバイダに実装されています。
CNCF Kubernetes プロバイダ向けの詳細なリリースノートについては、CNCF Kubernetes プロバイダのウェブサイトをご覧ください。
バージョン 6.0.0
CNCF Kubernetes プロバイダ パッケージ バージョン 6.0.0 では、KubernetesPodOperator で kubernetes_default 接続がデフォルトで使用されます。
バージョン 5.0.0 でカスタム接続を指定した場合も、このカスタム接続はオペレータによって引き続き使用されます。kubernetes_default 接続を使用するように戻すには、DAG を適宜調整しなければならない場合があります。
バージョン 5.0.0
このバージョンでは、バージョン 4.4.0 と比較して下位互換性のない変更がいくつか導入されています。最も重要なのは、バージョン 5.0.0 で使用されない kubernetes_default 接続に関連した変更です。
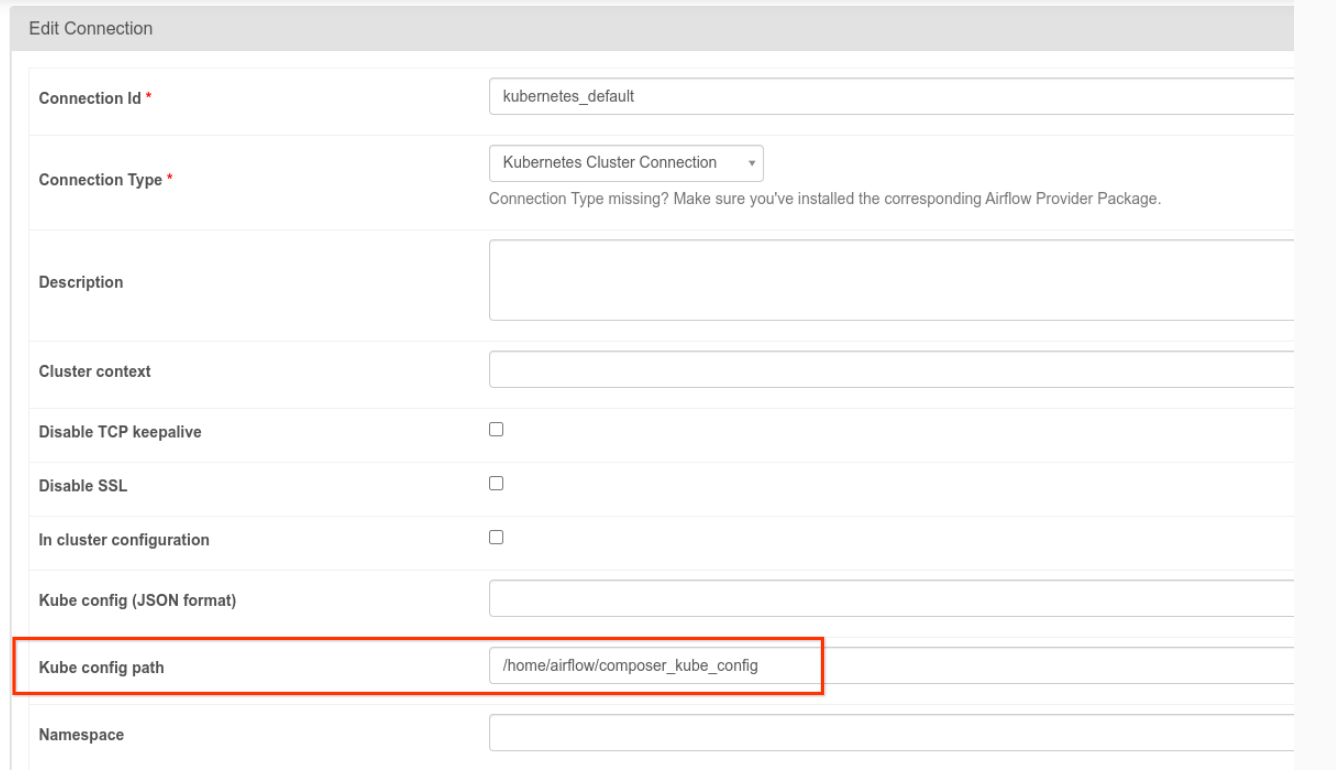
kubernetes_default接続を変更する必要があります。Kubernetes 構成パスは/home/airflow/composer_kube_configに設定する必要があります(次の図を参照)。または、config_fileを KubernetesPodOperator 構成に追加する必要があります(次のコード例を参照)。
- 次の方法で KubernetesPodOperator を使用してタスクのコードを変更します。
KubernetesPodOperator(
  # config_file parameter - can be skipped if connection contains this setting
  config_file="/home/airflow/composer_kube_config",
  # definition of connection to be used by the operator
  kubernetes_conn_id='kubernetes_default',
  ...
)
バージョン 5.0.0 の詳細については、CNCF Kubernetes プロバイダ リリースノートをご覧ください。
トラブルシューティング
このセクションでは、KubernetesPodOperator の一般的な問題のトラブルシューティングに関するアドバイスを提供します。
ログを表示
問題のトラブルシューティング時には、次の順序でログを確認できます。
Airflow タスクログ:
Google Cloud コンソールで [環境] ページに移動します。
環境のリストで、ご利用の環境の名前をクリックします。[環境の詳細] ページが開きます。
[DAG] タブに移動します。
DAG の名前をクリックし、DAG 実行をクリックして詳細とログを表示します。
Airflow スケジューラ ログ:
[環境の詳細] ページに移動します。
[ログ] タブに移動します。
Airflow スケジューラ ログを調べます。
Google Cloud コンソールで GKE ワークロードの下にある Pod ログ。これらのログには、Pod 定義 YAML ファイル、Pod イベント、および Pod の詳細が含まれます。
ゼロ以外の戻りコード
KubernetesPodOperator(および GKEStartPodOperator)を使用する場合、コンテナのエントリ ポイントの戻りコードから、タスクが成功したかどうかを判断できます。ゼロ以外の戻りコードは失敗を示します。
一般的なパターンは、コンテナのエントリ ポイントとしてシェル スクリプトを実行して、コンテナ内の複数のオペレーションをグループ化することです。
このようなスクリプトを記述する場合は、スクリプト内のコマンドが失敗した場合にスクリプトを終了し Airflow タスク インスタンスに失敗を伝播させるために、スクリプトの先頭に set -e コマンドを含めることをおすすめします。
Pod のタイムアウト
KubernetesPodOperator のデフォルトのタイムアウトは 120 秒であるため、サイズの大きなイメージをダウンロードする前にタイムアウトが発生する場合があります。タイムアウトの時間を長くするには、KubernetesPodOperator を作成する際に startup_timeout_seconds パラメータを変更します。
Pod がタイムアウトすると、Airflow UI にタスク固有のログが表示されます。例:
Executing <Task(KubernetesPodOperator): ex-all-configs> on 2018-07-23 19:06:58.133811
Running: ['bash', '-c', u'airflow run kubernetes-pod-example ex-all-configs 2018-07-23T19:06:58.133811 --job_id 726 --raw -sd DAGS_FOLDER/kubernetes_pod_operator_sample.py']
Event: pod-name-9a8e9d06 had an event of type Pending
...
...
Event: pod-name-9a8e9d06 had an event of type Pending
Traceback (most recent call last):
  File "/usr/local/bin/airflow", line 27, in <module>
    args.func(args)
  File "/usr/local/lib/python2.7/site-packages/airflow/bin/cli.py", line 392, in run
    pool=args.pool,
  File "/usr/local/lib/python2.7/site-packages/airflow/utils/db.py", line 50, in wrapper
    result = func(*args, **kwargs)
  File "/usr/local/lib/python2.7/site-packages/airflow/models.py", line 1492, in _run_raw_task
    result = task_copy.execute(context=context)
  File "/usr/local/lib/python2.7/site-packages/airflow/contrib/operators/kubernetes_pod_operator.py", line 123, in execute
    raise AirflowException('Pod Launching failed: {error}'.format(error=ex))
airflow.exceptions.AirflowException: Pod Launching failed: Pod took too long to start
手元のタスクを実行するために Cloud Composer サービス アカウントに必要な IAM 権限がない場合でも、Pod のタイムアウトは発生する場合があります。この状態を確認するには、GKE ダッシュボードで特定のワークロードのログを調べて Pod レベルのエラーを確認するか、Cloud Logging を使用します。
新しい接続の確立に失敗した
GKE クラスタでは、自動アップグレードがデフォルトで有効になっています。 アップグレード中のクラスタにノードプールが存在する場合、次のエラーが表示される場合があります。
<Task(KubernetesPodOperator): gke-upgrade> Failed to establish a new
connection: [Errno 111] Connection refused
クラスタがアップグレードされているかどうかを確認するには、Google Cloud コンソールで [Kubernetes クラスタ] ページに移動し、環境のクラスタ名の横にある読み込みアイコンを確認します。