This tutorial shows you how to set up Config Sync for Google Kubernetes Engine across two environments, one for development and one for production, using best practices for Config Sync.
In this scenario, you're part of a platform admin team at Foo Corp. The Foo Corp
applications are deployed to GKE, with resources divided across
two projects, dev and prod. The dev project contains a development
GKE cluster, and the prod project contains the production
GKE cluster. Your goal as the platform admin is to ensure that
both environments stay within compliance of Foo Corp's policies, and that base
level resources, like Kubernetes namespaces and service accounts, remain
consistent across both environments.
The following diagram shows you an overview of the environments that you set up in this tutorial:
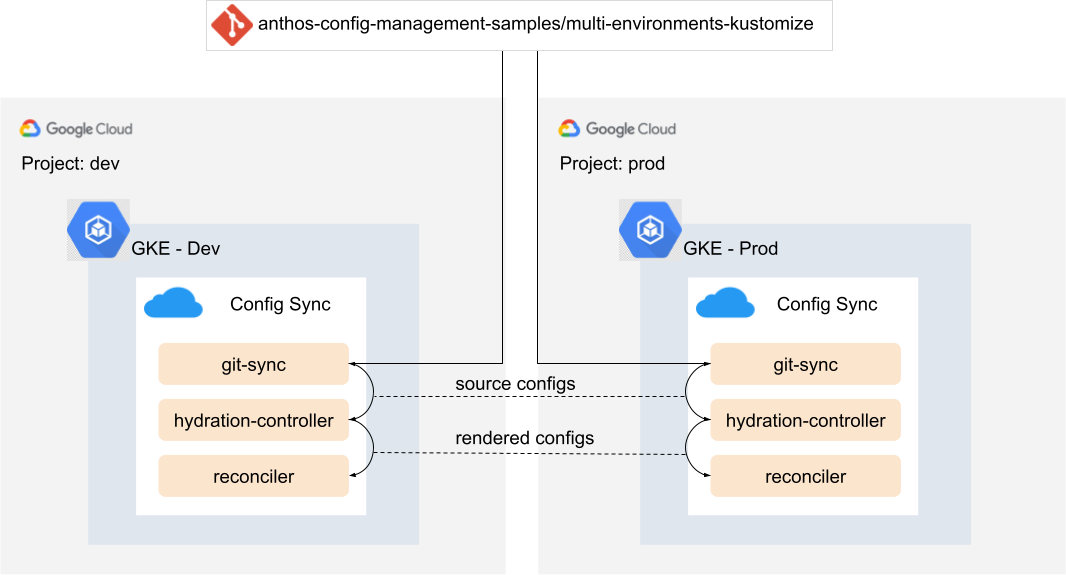
This tutorial leverages the automated rendering feature in Config Sync to render the resources on the cluster. Each of the clusters is configured to sync from a directory that contains a Kustomization config file, which triggers the rendering process automatically in Config Sync. For more details, see Use a repo with Kustomize configurations and Helm charts.
As shown in the preceding diagram, in this tutorial you create the following resources:
- Two Google Cloud projects representing the development and production environments.
- Two GKE clusters,
devandprod, in the separate projects, with Config Sync installed.
Repository architecture
In this tutorial, you configure Config Sync to sync to the configs in the
config-source/ directory
of the samples repository. This directory contains
the following directories and files:
config-source/
├── base
│   ├── foo
│   │   ├── kustomization.yaml
│   │   ├── namespace.yaml
│   │   └── serviceaccount.yaml
│   ├── kustomization.yaml
│   ├── pod-creator-clusterrole.yaml
│   └── pod-creator-rolebinding.yaml
├── cloudbuild.yaml
├── overlays
│   ├── dev
│   │   └── kustomization.yaml
│   └── prod
│       └── kustomization.yaml
└── README.md
The config-source directory includes the base/ manifests and the dev/ and
prod/ Kustomize overlays. Each directory contains a kustomization.yaml file,
which lists the files Kustomize should manage and apply to the cluster.
In dev/kustomization.yaml and prod/kustomization.yaml a series of patches
are defined. These patches manipulate the base/ resources for that specific
environment.
For example, the dev RoleBinding allows all Foo Corp developers deploy Pods to
the dev cluster, whereas the prod RoleBinding only allows a Continuous
Deployment agent, deploy-bot@foo-corp.com, to deploy Pods into production:
apiVersion: kustomize.config.k8s.io/v1beta1
kind: Kustomization
resources:
- ../../base
patches:
# ServiceAccount - make name unique per environ
- target:
    kind: ServiceAccount
    name: foo-ksa
  patch: |-
    - op: replace
      path: /metadata/name
      value: foo-ksa-dev
    - op: replace
      path: /metadata/namespace
      value: foo-dev
# Pod creators - give all Foo Corp developers access
- target:
    kind: RoleBinding
    name: pod-creators
  patch: |-
    - op: replace
      path: /subjects/0/name
      value: developers-all@foo-corp.com
commonLabels:
  environment: dev
Objectives
- Set up Config Sync to automatically render and sync the configuration for the two separate environments.
Costs
In this document, you use the following billable components of Google Cloud:
To generate a cost estimate based on your projected usage,
use the pricing calculator.
When you finish the tasks that are described in this document, you can avoid continued billing by deleting the resources that you created. For more information, see Clean up.
Before you begin
Before you begin this tutorial, make sure that you have completed the following steps:
In the Google Cloud console, on the project selector page, choose or create two Google Cloud projects.
-
Verify that billing is enabled for your Google Cloud project.
Upgrade your Google Cloud CLI to the latest version.
Install or upgrade the
nomoscommand
Create and register your clusters
To let you focus on the workflow that you need to use when you configure
Config Sync for multiple environments, the
multi-environments-kustomize
directory contains scripts that you can use to automate the configuration of
Config Sync.
Clone the sample repository:
git clone https://github.com/GoogleCloudPlatform/anthos-config-management-samples.gitNavigate to the folder that contains the resources that you need for this tutorial:
cd anthos-config-management-samples/multi-environments-kustomize/To run the scripts used in this tutorial, set the following variables:
export DEV_PROJECT="DEV_PROJECT_ID"
export PROD_PROJECT="PROD_PROJECT_ID"
export DEV_CLUSTER_ZONE="DEV_CLUSTER_ZONE"
export PROD_CLUSTER_ZONE="PROD_CLUSTER_ZONE"
export CM_CONFIG_DIR="config-sync-rendering"
Replace the following:
DEV_PROJECT_ID: the project ID from the Google Cloud project that you want you use as your dev projectPROD_PROJECT_ID: the project ID from the Google Cloud project that you want you use as your prod projectDEV_CLUSTER_ZONE: the Compute Engine zone that you want to create your dev cluster in. For example,us-central1-c.PROD_CLUSTER_ZONE: the Compute Engine zone that you want to create your prod cluster in
To create two clusters, run the
./create-clusters.shscript:./create-clusters.shThis script creates one GKE cluster named
devin the dev project and one GKE cluster namedprodin the prod project. This script also enables the GKE API and connects to yourdevandprodclusters so that you can access their APIs withkubectl.Example output:
kubeconfig entry generated for dev.
Fetching cluster endpoint and auth data.
kubeconfig entry generated for prod.
⭐️ Done creating clusters.
To register your clusters to two separate fleets, run the
register-clusters.shscript:./register-clusters.shThis script creates a Google Cloud service account and key for GKE cluster registration, then uses the
gcloud container fleet memberships registercommand to register thedevandprodclusters to GKE in their own projects.Example output:
Waiting for Feature Config Management to be created...done.
⭐️ Done registering clusters.
Setting up Config Sync
Now that you have created and registered your clusters, you can install Config Sync and verify the installation.
Install Config Sync
To install Config Sync, on the dev and prod cluster, run the
install-config-sync.sh script:
./install-config-sync.sh
Expected output:
🔁 Installing ConfigSync on the dev cluster...
Updated property [core/project].
Switched to context "DEV_CLUSTER".
Waiting for Feature Config Management to be updated...done.
🔁 Installing ConfigSync on the prod cluster...
Updated property [core/project].
Switched to context "PROD_CLUSTER".
Waiting for Feature Config Management to be updated...done.
Config Sync is now syncing to the configs in your repositories.
Verify your configuration
In this section you check to make sure that your clusters are syncing to the configs in your repository:
To check the state of your Config Sync installation, run the
nomos statuscommand:nomos statusYou should see that both your dev and prod clusters are now synced to their respective repos:
gke_DEV_PROJECT_ID_us-central1-c_dev
  --------------------
  <root>   https://github.com/GoogleCloudPlatform/anthos-config-management-samples/multi-environments-kustomize/config-source/overlays/dev@main
  SYNCED   8f2e196f
  Managed resources:
     NAMESPACE   NAME                                                 STATUS
                 clusterrole.rbac.authorization.k8s.io/pod-creator    Current
                 namespace/default                                    Current
                 namespace/foo                                        Current
     default     rolebinding.rbac.authorization.k8s.io/pod-creators   Current
     foo         serviceaccount/foo-ksa-dev                           Current

*gke_PROD_PROJECT_ID_us-central1-c_prod
   --------------------
   <root>   https://github.com/GoogleCloudPlatform/anthos-config-management-samples/multi-environments-kustomize/config-source/overlays/prod@main
   SYNCED   c91502ee
   Managed resources:
      NAMESPACE   NAME                                                 STATUS
                  clusterrole.rbac.authorization.k8s.io/pod-creator    Current
                  namespace/default                                    Current
                  namespace/foo                                        Current
      default     rolebinding.rbac.authorization.k8s.io/pod-creators   Current
      foo         serviceaccount/foo-ksa-prod                          Current

  ```
Use
kubectlto switch to the dev cluster:kubectl config use-context "gke_${DEV_PROJECT}_${DEV_CLUSTER_ZONE}_dev"To verify that the resources are synced, get namespaces. You should see the
foonamespace appear.kubectl get namespaceExample output:
NAME                           STATUS   AGE
config-management-monitoring   Active   9m38s
config-management-system       Active   9m38s
default                        Active   47h
foo                            Active   9m5s
kube-node-lease                Active   47h
kube-public                    Active   47h
kube-system                    Active   47h
resource-group-system          Active   9m30s
You have now set up automated config rendering for a dev and prod environment, across multiple Google Cloud projects and environments.
Clean up
To avoid incurring charges to your Google Cloud account for the resources used in this tutorial, either delete the project that contains the resources, or keep the project and delete the individual resources.
Delete all resources
To delete the resources that you created in this tutorial, but to keep both the dev and prod projects intact, run the cleanup script:
./cleanup.sh
Delete the projects
- In the Google Cloud console, go to the Manage resources page.
- In the project list, select the project that you want to delete, and then click Delete.
- In the dialog, type the project ID, and then click Shut down to delete the project.
What's next
- Learn about Safe rollouts with Config Sync