- Scheduling automatic Quick start pool size increases and decreases.
- Automatically starting workstations on a regular schedule.
This tutorial helps you increase and decrease Quick start pool size to match typical business hours.
Objectives
- Write and deploy a Cloud Run Service that updates the Quick start pool size for a workstation configuration.
- Configure a Cloud Scheduler job that schedules the service created in Step 1 to run 09:00-17:00, Monday-Friday to match PST business hours.
Costs
In this document, you use the following billable components of Google Cloud:
- Cloud Scheduler
- Cloud Run
To generate a cost estimate based on your projected usage,
use the pricing calculator.
When you finish the tasks that are described in this document, you can avoid continued billing by deleting the resources that you created. For more information, see Clean up.
Before you begin
- Sign in to your Google Cloud account. If you're new to Google Cloud, create an account to evaluate how our products perform in real-world scenarios. New customers also get $300 in free credits to run, test, and deploy workloads.
-
In the Google Cloud console, on the project selector page, select or create a Google Cloud project.
Roles required to select or create a project
- Select a project: Selecting a project doesn't require a specific IAM role—you can select any project that you've been granted a role on.
-
Create a project: To create a project, you need the Project Creator
(
roles/resourcemanager.projectCreator), which contains theresourcemanager.projects.createpermission. Learn how to grant roles.
-
Verify that billing is enabled for your Google Cloud project.
-
Enable the Cloud Run, Cloud Scheduler, Cloud Workstations APIs.
Roles required to enable APIs
To enable APIs, you need the Service Usage Admin IAM role (
roles/serviceusage.serviceUsageAdmin), which contains theserviceusage.services.enablepermission. Learn how to grant roles. -
Install the Google Cloud CLI.
-
If you're using an external identity provider (IdP), you must first sign in to the
gcloudCLI with your federated identity. -
To initialize the
gcloudCLI, run the following command:gcloud init -
In the Google Cloud console, on the project selector page, select or create a Google Cloud project.
Roles required to select or create a project
- Select a project: Selecting a project doesn't require a specific IAM role—you can select any project that you've been granted a role on.
-
Create a project: To create a project, you need the Project Creator
(
roles/resourcemanager.projectCreator), which contains theresourcemanager.projects.createpermission. Learn how to grant roles.
-
Verify that billing is enabled for your Google Cloud project.
-
Enable the Cloud Run, Cloud Scheduler, Cloud Workstations APIs.
Roles required to enable APIs
To enable APIs, you need the Service Usage Admin IAM role (
roles/serviceusage.serviceUsageAdmin), which contains theserviceusage.services.enablepermission. Learn how to grant roles. -
Install the Google Cloud CLI.
-
If you're using an external identity provider (IdP), you must first sign in to the
gcloudCLI with your federated identity. -
To initialize the
gcloudCLI, run the following command:gcloud init
Prepare the environment
Set the following environment variables, which are used by the automated scripts that you create later.
Set the
PROJECT_IDandREGIONvariables you plan to use:PROJECT_ID=$PROJECT_ID REGION=$REGIONReplace $REGION with the region name that you plan to use—for example,
us-central1.For more information about available regions, see Cloud Workstations locations.
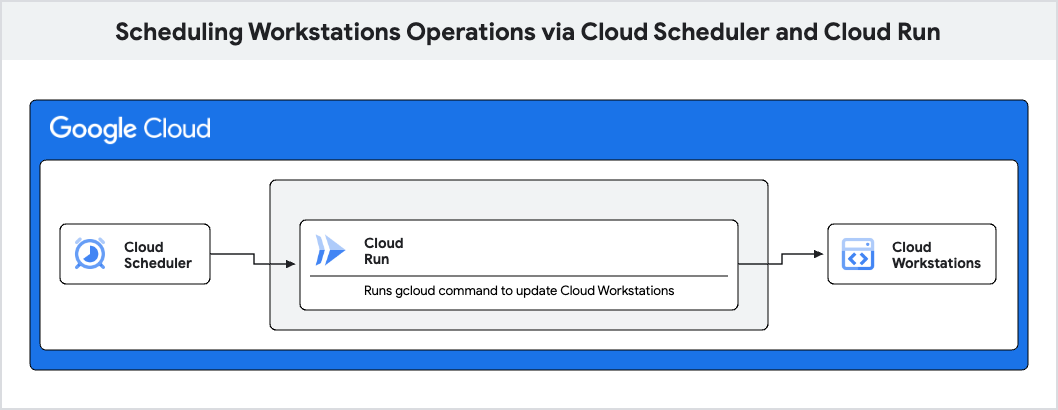
Application architecture
This solution includes the following Google Cloud components:
- Cloud Run
to update the Quick start pool size of the
WorkstationConfig. - Cloud Scheduler jobs
to make calls on a set schedule to update the
WorkstationConfig.
Create a Cloud Run service
This first step is to set up a simple web server to listen to the HTTP requests you receive on port 8080. Since the application is containerized, you can write your server in any language.
To write the web server listener application in Python, do the following:
Create a new directory named
workstation-config-updaterand change directory into it:mkdir workstation-config-updater cd workstation-config-updaterCreate a file named
app.pyand paste the following code into it:import os, subprocess from flask import Flask, request, abort app = Flask(__name__) @app.route("/", methods=["POST"]) def update(): app.logger.info("Update request received.") data = request.json cluster = data["cluster"] region = data["region"] pool_size = data["pool-size"] path = os.path.join(app.root_path, "update_config.sh") o = subprocess.run( [path, cluster, region, pool_size], stdout=subprocess.PIPE, stderr=subprocess.STDOUT, text=True ) app.logger.info("Sending response:", o.stdout) return o.stdout if __name__ == "__main__": app.run(host="0.0.0.0", port=8080, debug=True)This code creates a basic web server that listens on the port defined by the
PORTenvironment variable and executes the scriptupdate_config.sh.Create a file named
update_config.shand paste the following code into it:#!/bin/bash set -e if [ $# -ne 3 ] then echo "Usage: update_config.sh CLUSTER REGION POOL_SIZE" exit 1 fi CLUSTER=$1 REGION=$2 POOL_SIZE=$3 # list workstation configs echo "Attempting to list workstation configs in cluster $CLUSTER and region $REGION ..." for CONFIG in $(gcloud workstations configs list --cluster $CLUSTER --region $REGION --format="value(NAME)"); do echo "Attempting to update Quick Pool Size to $POOL_SIZE for config $CONFIG ..." # update the workstation config pool-size RET=$(gcloud workstations configs update $CONFIG --cluster $CLUSTER --region $REGION --pool-size=$POOL_SIZE) if [[ $RET -eq 0 ]]; then echo "Workstation config $CONFIG updated." else echo "Workstation config $CONFIG update failed." fi doneThis script uses
gcloudcommands to list allWorkstationConfigin a given cluster and update its Quick start Pool Size toPOOL_SIZE.Create a file named
Dockerfileand paste the following code into it:FROM google/cloud-sdk RUN apt-get update && apt-get install -y python3-pip python3 # Copy local code to the container image. ENV APP_HOME /app WORKDIR $APP_HOME COPY . ./ RUN /bin/bash -c 'ls -la; chmod +x ./update_config.sh' # Install production dependencies. RUN pip3 install Flask gunicorn # Run the web service on container startup CMD exec gunicorn --bind :8080 --workers 1 --threads 8 app:appThis code containerizes the application to make it ready to be deployed on Cloud Run.
Deploy to Cloud Run
To deploy to Cloud Run, run the following command:
gcloud run deploy --source . --project $PROJECT_ID --region $REGIONWhen you are prompted for the service name, press Enter to accept the default name
workstation-config-updater.If you are prompted to enable the Artifact Registry API or to allow creation of Artifact Registry repository, press y.
When you're prompted to allow unauthenticated invocations, press n.
Wait until the deployment is complete.
When the service URL is displayed in the following format, copy it:
SERVICE_URL=$SERVICE_URL
Configure service account to invoke Cloud Run
The workstation-config-updater service that you deployed does not allow unauthenticated invocations.
Cloud Scheduler requires a service account that has the appropriate credentials to call the workstation-config-updater service.
Set up the service account
If you don't already have a service account that you want to use for Cloud Scheduler jobs, create a new service account.
gcloud iam service-accounts create $SERVICE_ACCOUNT_NAME \
    --description="$DESCRIPTION" \
    --display-name="$DISPLAY_NAME"
Add the requisite IAM role binding to allow your service account to invoke Cloud Run.
gcloud run services add-iam-policy-binding workstation-config-updater \
    --member=serviceAccount:$SERVICE_ACCOUNT_NAME@$PROJECT_ID.iam.gserviceaccount.com \
    --region $REGION \
    --role=roles/run.invoker
Create a Cloud Scheduler configuration with authentication
Create a job and specify the
URLthat you copied from Deploy to Cloud Run:gcloud scheduler jobs create http workstation-pool-increaser-cron \ --http-method=POST \ --location=us-central1 \ --schedule="0 9 * * 1-5" \ --time-zone="America/Los_Angeles" \ --headers "Content-Type=application/json" \ --message-body='{"cluster":"$CLUSTER", "region":"$REGION", "pool-size": "2"}' \ --uri=$SERVICE_URL \ --oidc-service-account-email=$SERVICE_ACCOUNT_NAME@$PROJECT_ID.iam.gserviceaccount.comThis command schedules a job to increase the Quick start pool size for all
WorkstationConfigsinWorkstationCluster$CLUSTER to 2 at 9 am PST from Monday to Friday.For more information, see Configuring Job Schedules.
Similarly, to reduce the pool size for your workstation configuration to 0 at the end of a work day run the following
gcloud scheduler jobs create http workstation-pool-decreaser-cron \
    --http-method=POST \
    --location=$REGION \
    --schedule="0 17 * * 1-5" \
    --time-zone="America/Los_Angeles" \
    --headers "Content-Type=application/json" \
    --message-body='{"cluster":"$CLUSTER", "region":"$REGION", "pool-size": "0"}' \
    --uri=$SERVICE_URL \
    --oidc-service-account-email=$SERVICE-ACCOUNT@$PROJECT_ID.iam.gserviceaccount.com
Optional: Verify the jobs
To make sure that your jobs are working as expected, you can verify the jobs.
Go to the Cloud Scheduler page in the Google Cloud console.
workstation-pool-increaser-cronshould appear on the list of jobs.In the row for
workstation-pool-increaser-cronjob, click Actions > Force a job run.The first job created in a project can take a few minutes to run.
In the Status of last execution column, a
Successstatus indicates that you have successfully run your job.
To verify that the Workstation configurations are updated, do the following:
Go to the Workstation Configurations page in the Google Cloud console.
Verify the Quick start pool size is 2.
View logs for your Cloud Run service.
Clean up
To avoid incurring charges to your Google Cloud account for the resources used in this tutorial, either delete the project that contains the resources, or keep the project and delete the individual resources.
Remove your test project
To avoid additional charges to your Google Cloud account, delete all the resources you deployed with this quickstart.
Delete your repository
Cloud Run doesn't charge you when your deployed service isn't in use. However, you might still be charged for storing the container image in Artifact Registry. To delete Artifact Registry repositories, follow the steps in Delete repositories in the Artifact Registry documentation.
Delete your service
Cloud Run services don't incur costs until they receive requests. To delete your Cloud Run service, follow one of these steps:
Console
To delete a service:
In the Google Cloud console, go to the Cloud Run Services page:
Locate the service you want to delete in the services list, and click its checkbox to select it.
Click Delete. This deletes all revisions of the service.
gcloud
To delete a service, run the following command:
gcloud run services delete SERVICE --region REGION
Replace the following:
- SERVICE: name of your service.
- REGION: Google Cloud region of the service.
Delete your test project
Deleting your Google Cloud project stops billing for all resources in that project. To release all Google Cloud resources in your project, follow these steps:
- In the Google Cloud console, go to the Manage resources page.
- In the project list, select the project that you want to delete, and then click Delete.
- In the dialog, type the project ID, and then click Shut down to delete the project.
Delete Cloud Scheduler jobs
To delete individual Cloud Scheduler resources,
Go to the Cloud Scheduler page in the Google Cloud console.
Click the checkboxes next to your jobs.
Click the Delete button at the top of the page and confirm your delete.
What's next
- Explore reference architectures, diagrams, and best practices about Google Cloud. Take a look at our Cloud Architecture Center.