Modelle trainieren

Wenn Sie ein benutzerdefiniertes Modell erstellen möchten, trainieren Sie es mithilfe eines vorbereiteten Datasets. Das Modell wird in der AutoML Vision API mithilfe der Bilder des Datasets trainiert, getestet und hinsichtlich seiner Leistung bewertet. Sie prüfen die Ergebnisse, passen das Trainings-Dataset nach Bedarf an und trainieren ein neues Modell mithilfe des verbesserten Datasets.

Das Trainieren eines Modells kann mehrere Stunden dauern. Mit der AutoML Vision API haben Sie die Möglichkeit, den Status des Trainings zu prüfen.

Modelle trainieren

Wenn Sie ein Dataset mit einem Satz von annotierten Trainingsbildern mit Begrenzungsrahmen und Labels haben, können Sie das benutzerdefinierte Modell erstellen und trainieren.

Web-UI

  1. Öffnen Sie die AutoML Vision Object Detection UI.

    Auf der Seite Datasets werden die verfügbaren Datasets für das aktuelle Projekt angezeigt.

    Seite mit den aufgelisteten Datasets

  2. Wählen Sie das Dataset aus, das Sie zum Trainieren des benutzerdefinierten Modells verwenden möchten.

  3. Wenn das Dataset bereit ist, wählen Sie den Tab Trainieren und die Schaltfläche Neues Modell trainieren aus.

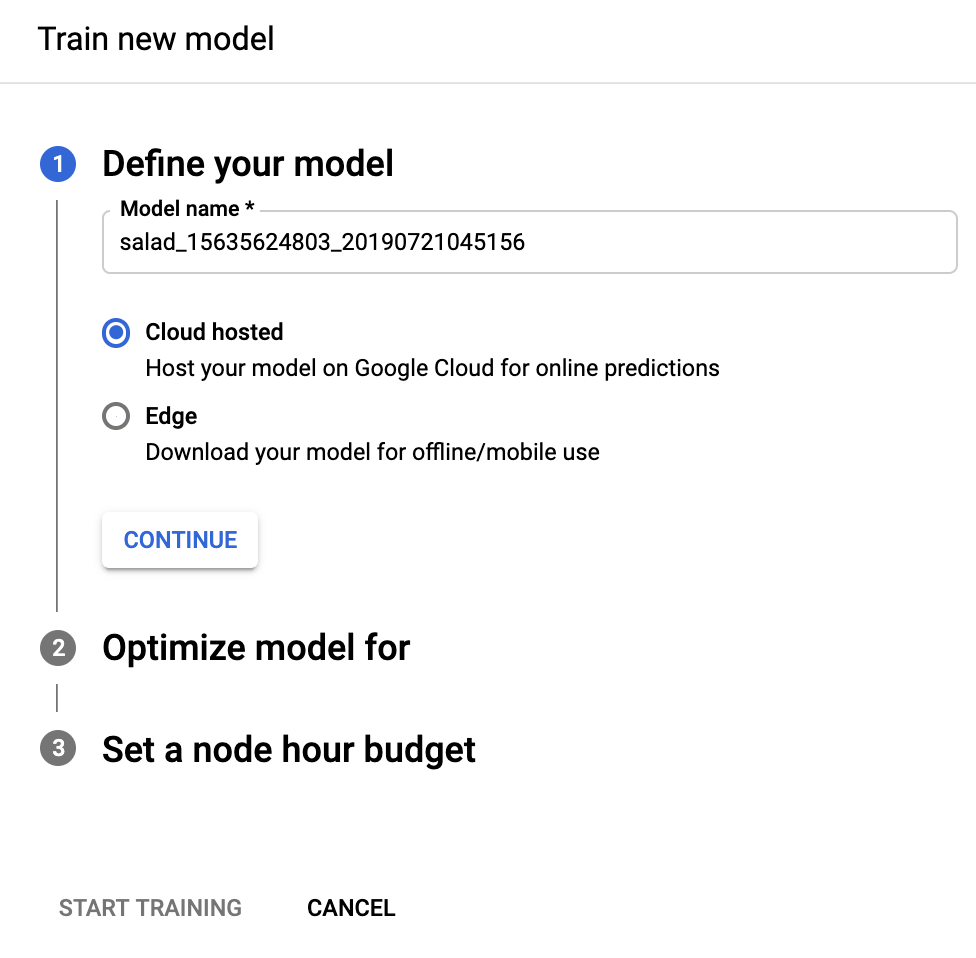
    Dadurch wird ein Seitenfenster Neues Modell trainieren mit Trainingsoptionen geöffnet.

  4. Geben Sie im Bereich Modell definieren einen Modellnamen an oder übernehmen Sie den Standardnamen. Wählen Sie  In der Cloud gehostet als Modelltyp aus, falls dies nicht bereits festgelegt ist. Nachdem Sie die Option zum Trainieren eines Edge-Modells ausgewählt haben, klicken Sie auf Weiter.

    Abbildung des Optionsfelds zum Trainieren eines Cloud-Modells

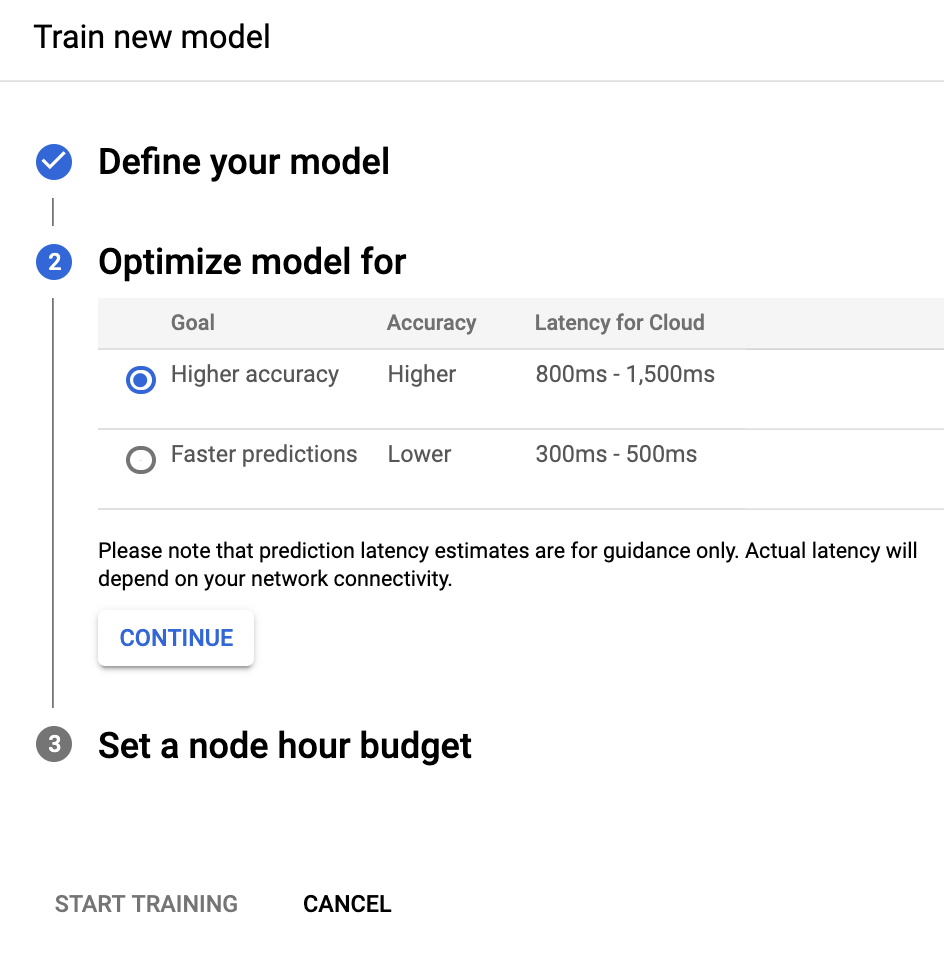
  5. Wählen Sie im folgenden Bereich Modell optimieren für das gewünschte Optimierungskriterium aus: Höhere Genauigkeit oder Schnellere Vorhersage. Wählen Sie anschließend Weiter aus.

    Abbildung des Optionsfelds "Best Trade-Off"

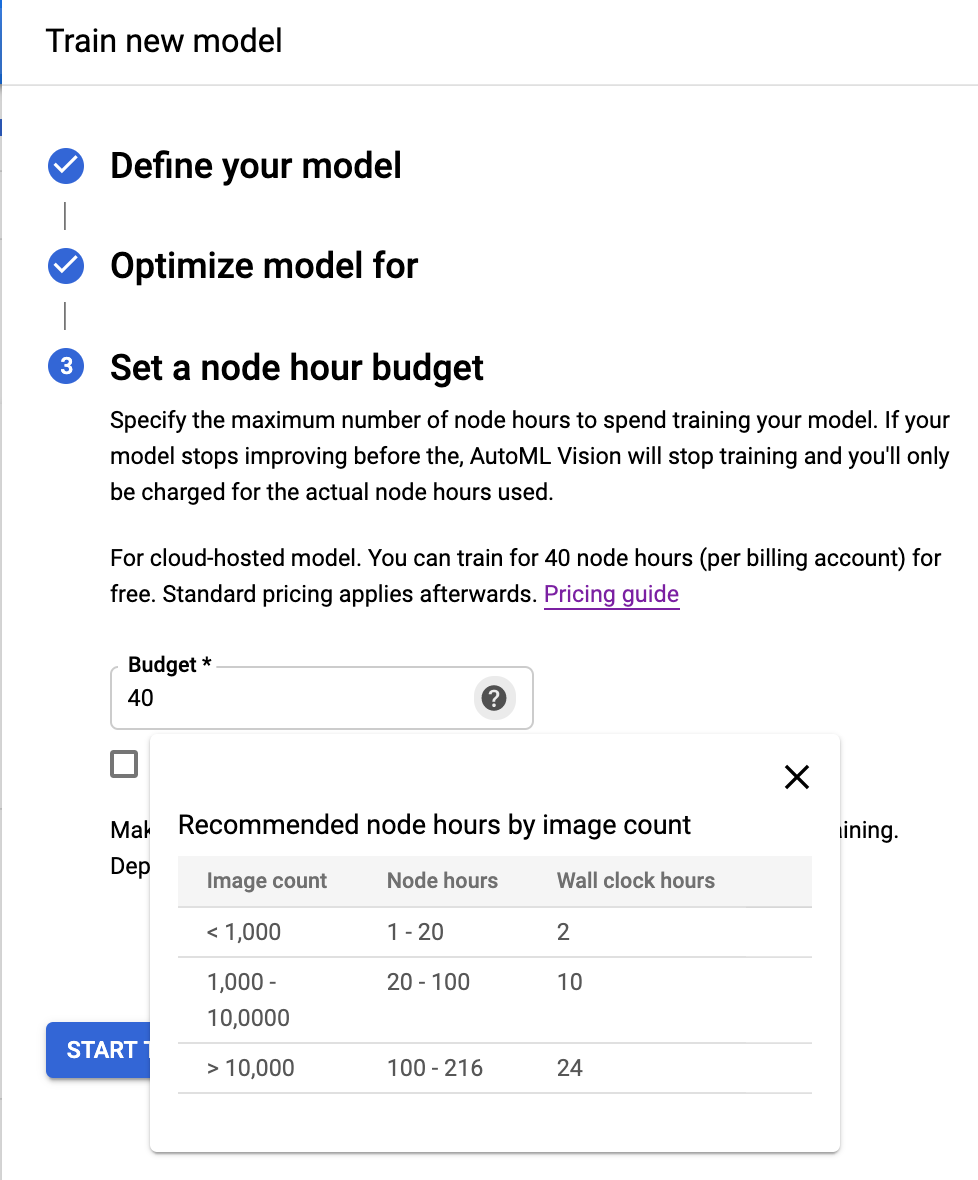
  6. Geben Sie im folgenden Bereich Knotenstundenbudget festlegen das gewünschte Knotenbudget an.

    Standardmäßig sollten 24 Knotenstunden ausreichen, damit die meisten Datasets Ihr Modell trainieren können. Dieser empfohlene Wert ist eine Schätzung, mit der das Modell vollständig konvergent wird. Sie können jedoch einen anderen Betrag auswählen. Die Knotenstundenzahl für die Objekterkennung beträgt mindestens 20 Stunden. Für die Bildklassifizierung beträgt der Mindestbetrag 8.

    In diesem Bereich können Sie auch die automatische Bereitstellung Ihres Modells nach dem Training aktivieren, wenn Sie  Modell nach dem Training auf 1 Knoten bereitstellen auswählen. Andernfalls müssen Sie Ihr Modell nach Abschluss des Trainings manuell bereitstellen.

    Knotenstundenbudget wird festgelegt

  7. Wählen Sie Start training (Training starten), um mit dem Modelltraining zu beginnen.

Das Trainieren eines Modells kann mehrere Stunden dauern. Nachdem das Modell erfolgreich trainiert wurde, erhalten Sie eine Nachricht an die E-Mail-Adresse, die Sie für Ihr Google Cloud Platform-Projekt verwendet haben.

REST

Ersetzen Sie dabei folgende Werte für die Anfragedaten:

  • project-id: die ID Ihres GCP-Projekts.
  • dataset-id: die ID Ihres Datasets. Die ID ist das letzte Element des Dataset-Namens. Beispiel:
    • Dataset-Name: projects/project-id/locations/location-id/datasets/3104518874390609379
    • Dataset-ID: 3104518874390609379
  • display-name: Ein anzuzeigender Stringname Ihrer Wahl.

Überlegungen zu bestimmten Feldern:

  • imageObjectDetectionModelMetadata.modelType gibt eine von zwei verfügbaren Optionen für die Optimierung des Modells an:
    • Mit cloud-low-latency-1 optimieren Sie das Training hinsichtlich der Latenz.
    • Mit cloud-high-accuracy-1 optimieren Sie das Training hinsichtlich der Genauigkeit.
  • imageObjectDetectionModelMetadata.trainBudgetMilliNodeHours: Das Trainingsbudget zur Erstellung dieses Modells, ausgedrückt in Milli-Knotenstunden (der Wert 1.000 in diesem Feld bedeutet 1 Knotenstunde). Der tatsächliche Wert von trainCostMilliNodeHours ist gleich oder kleiner als dieser Wert. Wenn das weitere Modelltraining keine Verbesserungen mehr bietet, wird es ohne Verwendung des vollen Budgets beendet und der Wert für stopReason ist MODEL_CONVERGED.

    Hinweis: Knotenstunde = tatsächliche Stunden * Anzahl der beteiligten Knoten.

    Für den Modelltyp cloud-high-accuracy-1 (Standard) und cloud-low-latency-1 muss das Trainingsbudget zwischen 20.000 und 2.000.000 Millionen Knotenstunden (einschließlich) liegen. Der Standardwert ist 216.000, was einem tatsächlich verstrichenen Tag entspricht.

HTTP-Methode und URL:

POST https://automl.googleapis.com/v1/projects/PROJECT_ID/locations/us-central1/models

JSON-Text der Anfrage:

{
  "displayName": "DISPLAY_NAME",
  "datasetId": "DATASET_ID",
  "imageObjectDetectionModelMetadata": {
    "modelType": "cloud-low-latency-1",
    "trainBudgetMilliNodeHours": "216000"
  }
}

Wenn Sie die Anfrage senden möchten, wählen Sie eine der folgenden Optionen aus:

curl

Speichern Sie den Anfragetext in einer Datei mit dem Namen request.json und führen Sie den folgenden Befehl aus:

curl -X POST \
-H "Authorization: Bearer $(gcloud auth print-access-token)" \
-H "x-goog-user-project: project-id" \
-H "Content-Type: application/json; charset=utf-8" \
-d @request.json \
"https://automl.googleapis.com/v1/projects/PROJECT_ID/locations/us-central1/models"

PowerShell

Speichern Sie den Anfragetext in einer Datei mit dem Namen request.json und führen Sie den folgenden Befehl aus:

$cred = gcloud auth print-access-token
$headers = @{ "Authorization" = "Bearer $cred"; "x-goog-user-project" = "project-id" }

Invoke-WebRequest `
-Method POST `
-Headers $headers `
-ContentType: "application/json; charset=utf-8" `
-InFile request.json `
-Uri "https://automl.googleapis.com/v1/projects/PROJECT_ID/locations/us-central1/models" | Select-Object -Expand Content

Die Ausgabe sieht in etwa so aus: Sie können den Status der Aufgabe anhand der Vorgangs-ID abrufen (in diesem Fall IOD3074819451447675546). Ein Beispiel finden Sie unter Mit Vorgängen mit langer Ausführungszeit arbeiten.

{
  "name": "projects/PROJECT_ID/locations/us-central1/operations/IOD3074819451447675546",
  "metadata": {
    "@type": "type.googleapis.com/google.cloud.automl.v1.OperationMetadata",
    "createTime": "2019-07-26T21:10:18.338846Z",
    "updateTime": "2019-07-26T21:10:18.338846Z",
    "createModelDetails": {}
  }
}

Go

Bevor Sie dieses Beispiel ausprobieren, folgen Sie der Einrichtungsanleitung für diese Sprache auf der Seite Clientbibliotheken.

import (
	"context"
	"fmt"
	"io"

	automl "cloud.google.com/go/automl/apiv1"
	"cloud.google.com/go/automl/apiv1/automlpb"
)

// visionObjectDetectionCreateModel creates a model for image object detection.
func visionObjectDetectionCreateModel(w io.Writer, projectID string, location string, datasetID string, modelName string) error {
	// projectID := "my-project-id"
	// location := "us-central1"
	// datasetID := "IOD123456789..."
	// modelName := "model_display_name"

	ctx := context.Background()
	client, err := automl.NewClient(ctx)
	if err != nil {
		return fmt.Errorf("NewClient: %w", err)
	}
	defer client.Close()

	req := &automlpb.CreateModelRequest{
		Parent: fmt.Sprintf("projects/%s/locations/%s", projectID, location),
		Model: &automlpb.Model{
			DisplayName: modelName,
			DatasetId:   datasetID,
			ModelMetadata: &automlpb.Model_ImageObjectDetectionModelMetadata{
				ImageObjectDetectionModelMetadata: &automlpb.ImageObjectDetectionModelMetadata{},
			},
		},
	}

	op, err := client.CreateModel(ctx, req)
	if err != nil {
		return fmt.Errorf("CreateModel: %w", err)
	}
	fmt.Fprintf(w, "Processing operation name: %q\n", op.Name())
	fmt.Fprintf(w, "Training started...\n")

	return nil
}

Java

Bevor Sie dieses Beispiel ausprobieren, folgen Sie der Einrichtungsanleitung für diese Sprache auf der Seite Clientbibliotheken.

import com.google.api.gax.longrunning.OperationFuture;
import com.google.cloud.automl.v1.AutoMlClient;
import com.google.cloud.automl.v1.ImageObjectDetectionModelMetadata;
import com.google.cloud.automl.v1.LocationName;
import com.google.cloud.automl.v1.Model;
import com.google.cloud.automl.v1.OperationMetadata;
import java.io.IOException;
import java.util.concurrent.ExecutionException;

class VisionObjectDetectionCreateModel {

  static void createModel() throws IOException, ExecutionException, InterruptedException {
    // TODO(developer): Replace these variables before running the sample.
    String projectId = "YOUR_PROJECT_ID";
    String datasetId = "YOUR_DATASET_ID";
    String displayName = "YOUR_DATASET_NAME";
    createModel(projectId, datasetId, displayName);
  }

  // Create a model
  static void createModel(String projectId, String datasetId, String displayName)
      throws IOException, ExecutionException, InterruptedException {
    // Initialize client that will be used to send requests. This client only needs to be created
    // once, and can be reused for multiple requests. After completing all of your requests, call
    // the "close" method on the client to safely clean up any remaining background resources.
    try (AutoMlClient client = AutoMlClient.create()) {
      // A resource that represents Google Cloud Platform location.
      LocationName projectLocation = LocationName.of(projectId, "us-central1");
      // Set model metadata.
      ImageObjectDetectionModelMetadata metadata =
          ImageObjectDetectionModelMetadata.newBuilder().build();
      Model model =
          Model.newBuilder()
              .setDisplayName(displayName)
              .setDatasetId(datasetId)
              .setImageObjectDetectionModelMetadata(metadata)
              .build();

      // Create a model with the model metadata in the region.
      OperationFuture<Model, OperationMetadata> future =
          client.createModelAsync(projectLocation, model);
      // OperationFuture.get() will block until the model is created, which may take several hours.
      // You can use OperationFuture.getInitialFuture to get a future representing the initial
      // response to the request, which contains information while the operation is in progress.
      System.out.format("Training operation name: %s\n", future.getInitialFuture().get().getName());
      System.out.println("Training started...");
    }
  }
}

Node.js

Bevor Sie dieses Beispiel ausprobieren, folgen Sie der Einrichtungsanleitung für diese Sprache auf der Seite Clientbibliotheken.

/**
 * TODO(developer): Uncomment these variables before running the sample.
 */
// const projectId = 'YOUR_PROJECT_ID';
// const location = 'us-central1';
// const dataset_id = 'YOUR_DATASET_ID';
// const displayName = 'YOUR_DISPLAY_NAME';

// Imports the Google Cloud AutoML library
const {AutoMlClient} = require('@google-cloud/automl').v1;

// Instantiates a client
const client = new AutoMlClient();

async function createModel() {
  // Construct request
  const request = {
    parent: client.locationPath(projectId, location),
    model: {
      displayName: displayName,
      datasetId: datasetId,
      imageObjectDetectionModelMetadata: {},
    },
  };

  // Don't wait for the LRO
  const [operation] = await client.createModel(request);
  console.log(`Training started... ${operation}`);
  console.log(`Training operation name: ${operation.name}`);
}

createModel();

Python

Bevor Sie dieses Beispiel ausprobieren, folgen Sie der Einrichtungsanleitung für diese Sprache auf der Seite Clientbibliotheken.

from google.cloud import automl

# TODO(developer): Uncomment and set the following variables
# project_id = "YOUR_PROJECT_ID"
# dataset_id = "YOUR_DATASET_ID"
# display_name = "your_models_display_name"

client = automl.AutoMlClient()

# A resource that represents Google Cloud Platform location.
project_location = f"projects/{project_id}/locations/us-central1"
# Leave model unset to use the default base model provided by Google
# train_budget_milli_node_hours: The actual train_cost will be equal or
# less than this value.
# https://cloud.google.com/automl/docs/reference/rpc/google.cloud.automl.v1#imageobjectdetectionmodelmetadata
metadata = automl.ImageObjectDetectionModelMetadata(
    train_budget_milli_node_hours=24000
)
model = automl.Model(
    display_name=display_name,
    dataset_id=dataset_id,
    image_object_detection_model_metadata=metadata,
)

# Create a model with the model metadata in the region.
response = client.create_model(parent=project_location, model=model)

print(f"Training operation name: {response.operation.name}")
print("Training started...")

Weitere Sprachen

C#: Folgen Sie der Anleitung zur Einrichtung von C# auf der Seite der Clientbibliotheken und rufen Sie dann die AutoML Vision Object Detection-Referenzdokumentation für .NET auf.

PHP: Folgen Sie der Anleitung zur Einrichtung von PHP auf der Seite der Clientbibliotheken und rufen Sie dann die AutoML Vision Object Detection-Referenzdokumentation für PHP auf.

Ruby: Folgen Sie der Anleitung zur Einrichtung von Ruby auf der Seite der Clientbibliotheken und rufen Sie dann die AutoML Vision Object Detection-Referenzdokumentation für Ruby auf.

Vorgänge auflisten

Verwenden Sie die folgenden Codebeispiele, um die Vorgänge Ihres Projekts aufzulisten und die Ergebnisse zu filtern.

REST

Ersetzen Sie dabei folgende Werte für die Anfragedaten:

  • project-id: die ID Ihres GCP-Projekts.

HTTP-Methode und URL:

GET https://automl.googleapis.com/v1/projects/PROJECT_ID/locations/us-central1/operations

Senden Sie die Anfrage mithilfe einer der folgenden Optionen:

curl

Führen Sie folgenden Befehl aus:

curl -X GET \
-H "Authorization: Bearer $(gcloud auth print-access-token)" \
-H "x-goog-user-project: project-id" \
"https://automl.googleapis.com/v1/projects/PROJECT_ID/locations/us-central1/operations"

PowerShell

Führen Sie folgenden Befehl aus:

$cred = gcloud auth print-access-token
$headers = @{ "Authorization" = "Bearer $cred"; "x-goog-user-project" = "project-id" }

Invoke-WebRequest `
-Method GET `
-Headers $headers `
-Uri "https://automl.googleapis.com/v1/projects/PROJECT_ID/locations/us-central1/operations" | Select-Object -Expand Content

Welche Ausgabe angezeigt wird, hängt von den angefragten Vorgängen ab.

Sie können die zurückgegebenen Vorgänge auch filtern. Verwenden Sie dafür ausgewählte Suchparameter wie operationId, done und worksOn. Wenn Sie beispielsweise eine Liste der Vorgänge, die bereits ausgeführt wurden, zurückgeben möchten, ändern Sie die URL:

GET https://automl.googleapis.com/v1/projects/PROJECT_ID/locations/us-central1/operations?filter="done=true"

Go

Bevor Sie dieses Beispiel ausprobieren, folgen Sie der Einrichtungsanleitung für diese Sprache auf der Seite APIs und Referenz > Clientbibliotheken.

import (
	"context"
	"fmt"
	"io"

	automl "cloud.google.com/go/automl/apiv1"
	longrunning "cloud.google.com/go/longrunning/autogen/longrunningpb"
	"google.golang.org/api/iterator"
)

// listOperationStatus lists existing operations' status.
func listOperationStatus(w io.Writer, projectID string, location string) error {
	// projectID := "my-project-id"
	// location := "us-central1"

	ctx := context.Background()
	client, err := automl.NewClient(ctx)
	if err != nil {
		return fmt.Errorf("NewClient: %w", err)
	}
	defer client.Close()

	req := &longrunning.ListOperationsRequest{
		Name: fmt.Sprintf("projects/%s/locations/%s", projectID, location),
	}

	it := client.LROClient.ListOperations(ctx, req)

	// Iterate over all results
	for {
		op, err := it.Next()
		if err == iterator.Done {
			break
		}
		if err != nil {
			return fmt.Errorf("ListOperations.Next: %w", err)
		}

		fmt.Fprintf(w, "Name: %v\n", op.GetName())
		fmt.Fprintf(w, "Operation details:\n")
		fmt.Fprintf(w, "%v", op)
	}

	return nil
}

Java

Bevor Sie dieses Beispiel ausprobieren, folgen Sie der Einrichtungsanleitung für diese Sprache auf der Seite APIs und Referenz > Clientbibliotheken.

import com.google.cloud.automl.v1.AutoMlClient;
import com.google.cloud.automl.v1.LocationName;
import com.google.longrunning.ListOperationsRequest;
import com.google.longrunning.Operation;
import java.io.IOException;

class ListOperationStatus {

  static void listOperationStatus() throws IOException {
    // TODO(developer): Replace these variables before running the sample.
    String projectId = "YOUR_PROJECT_ID";
    listOperationStatus(projectId);
  }

  // Get the status of an operation
  static void listOperationStatus(String projectId) throws IOException {
    // Initialize client that will be used to send requests. This client only needs to be created
    // once, and can be reused for multiple requests. After completing all of your requests, call
    // the "close" method on the client to safely clean up any remaining background resources.
    try (AutoMlClient client = AutoMlClient.create()) {
      // A resource that represents Google Cloud Platform location.
      LocationName projectLocation = LocationName.of(projectId, "us-central1");

      // Create list operations request.
      ListOperationsRequest listrequest =
          ListOperationsRequest.newBuilder().setName(projectLocation.toString()).build();

      // List all the operations names available in the region by applying filter.
      for (Operation operation :
          client.getOperationsClient().listOperations(listrequest).iterateAll()) {
        System.out.println("Operation details:");
        System.out.format("\tName: %s\n", operation.getName());
        System.out.format("\tMetadata Type Url: %s\n", operation.getMetadata().getTypeUrl());
        System.out.format("\tDone: %s\n", operation.getDone());
        if (operation.hasResponse()) {
          System.out.format("\tResponse Type Url: %s\n", operation.getResponse().getTypeUrl());
        }
        if (operation.hasError()) {
          System.out.println("\tResponse:");
          System.out.format("\t\tError code: %s\n", operation.getError().getCode());
          System.out.format("\t\tError message: %s\n\n", operation.getError().getMessage());
        }
      }
    }
  }
}

Node.js

Bevor Sie dieses Beispiel ausprobieren, folgen Sie der Einrichtungsanleitung für diese Sprache auf der Seite APIs und Referenz > Clientbibliotheken.

/**
 * TODO(developer): Uncomment these variables before running the sample.
 */
// const projectId = 'YOUR_PROJECT_ID';
// const location = 'us-central1';

// Imports the Google Cloud AutoML library
const {AutoMlClient} = require('@google-cloud/automl').v1;

// Instantiates a client
const client = new AutoMlClient();

async function listOperationStatus() {
  // Construct request
  const request = {
    name: client.locationPath(projectId, location),
    filter: `worksOn=projects/${projectId}/locations/${location}/models/*`,
  };

  const [response] = await client.operationsClient.listOperations(request);

  console.log('List of operation status:');
  for (const operation of response) {
    console.log(`Name: ${operation.name}`);
    console.log('Operation details:');
    console.log(`${operation}`);
  }
}

listOperationStatus();

Python

Bevor Sie dieses Beispiel ausprobieren, folgen Sie der Einrichtungsanleitung für diese Sprache auf der Seite APIs und Referenz > Clientbibliotheken.

from google.cloud import automl

# TODO(developer): Uncomment and set the following variables
# project_id = "YOUR_PROJECT_ID"

client = automl.AutoMlClient()
# A resource that represents Google Cloud Platform location.
project_location = f"projects/{project_id}/locations/us-central1"
# List all the operations names available in the region.
response = client._transport.operations_client.list_operations(
    name=project_location, filter_="", timeout=5
)

print("List of operations:")
for operation in response:
    print(f"Name: {operation.name}")
    print("Operation details:")
    print(operation)

Weitere Sprachen

C#: Folgen Sie der Anleitung zur Einrichtung von C# auf der Seite der Clientbibliotheken und rufen Sie dann die AutoML Vision Object Detection-Referenzdokumentation für .NET auf.

PHP: Folgen Sie der Anleitung zur Einrichtung von PHP auf der Seite der Clientbibliotheken und rufen Sie dann die AutoML Vision Object Detection-Referenzdokumentation für PHP auf.

Ruby: Folgen Sie der Anleitung zur Einrichtung von Ruby auf der Seite der Clientbibliotheken und rufen Sie dann die AutoML Vision Object Detection-Referenzdokumentation für Ruby auf.

Mit lang andauernden Vorgängen arbeiten

REST

Ersetzen Sie dabei folgende Werte für die Anfragedaten:

  • project-id: die ID Ihres GCP-Projekts.
  • operation-id: ID des Vorgangs. Die ID ist das letzte Element des Vorgangsnamens. Beispiel:
    • Name des Vorgangs: projects/project-id/locations/location-id/operations/IOD5281059901324392598
    • Vorgangs-ID: IOD5281059901324392598

HTTP-Methode und URL:

GET https://automl.googleapis.com/v1/projects/PROJECT_ID/locations/us-central1/operations/OPERATION_ID

Senden Sie die Anfrage mithilfe einer der folgenden Optionen:

curl

Führen Sie folgenden Befehl aus:

curl -X GET \
-H "Authorization: Bearer $(gcloud auth print-access-token)" \
-H "x-goog-user-project: project-id" \
"https://automl.googleapis.com/v1/projects/PROJECT_ID/locations/us-central1/operations/OPERATION_ID"

PowerShell

Führen Sie folgenden Befehl aus:

$cred = gcloud auth print-access-token
$headers = @{ "Authorization" = "Bearer $cred"; "x-goog-user-project" = "project-id" }

Invoke-WebRequest `
-Method GET `
-Headers $headers `
-Uri "https://automl.googleapis.com/v1/projects/PROJECT_ID/locations/us-central1/operations/OPERATION_ID" | Select-Object -Expand Content
Die Ausgabe für einen abgeschlossenen Importvorgang sollte in etwa so aussehen:
{
  "name": "projects/PROJECT_ID/locations/us-central1/operations/OPERATION_ID",
  "metadata": {
    "@type": "type.googleapis.com/google.cloud.automl.v1.OperationMetadata",
    "createTime": "2018-10-29T15:56:29.176485Z",
    "updateTime": "2018-10-29T16:10:41.326614Z",
    "importDataDetails": {}
  },
  "done": true,
  "response": {
    "@type": "type.googleapis.com/google.protobuf.Empty"
  }
}

Die Ausgabe für einen abgeschlossenen -Vorgang zum Erstellen eines Modells sollte in etwa so aussehen:

{
  "name": "projects/PROJECT_ID/locations/us-central1/operations/OPERATION_ID",
  "metadata": {
    "@type": "type.googleapis.com/google.cloud.automl.v1.OperationMetadata",
    "createTime": "2019-07-22T18:35:06.881193Z",
    "updateTime": "2019-07-22T19:58:44.972235Z",
    "createModelDetails": {}
  },
  "done": true,
  "response": {
    "@type": "type.googleapis.com/google.cloud.automl.v1.Model",
    "name": "projects/PROJECT_ID/locations/us-central1/models/MODEL_ID"
  }
}

Go

Bevor Sie dieses Beispiel ausprobieren, folgen Sie der Einrichtungsanleitung für diese Sprache auf der Seite Clientbibliotheken.

import (
	"context"
	"fmt"
	"io"

	automl "cloud.google.com/go/automl/apiv1"
	"cloud.google.com/go/automl/apiv1/automlpb"
)

// getOperationStatus gets an operation's status.
func getOperationStatus(w io.Writer, projectID string, location string, datasetID string, modelName string) error {
	// projectID := "my-project-id"
	// location := "us-central1"
	// datasetID := "ICN123456789..."
	// modelName := "model_display_name"

	ctx := context.Background()
	client, err := automl.NewClient(ctx)
	if err != nil {
		return fmt.Errorf("NewClient: %w", err)
	}
	defer client.Close()

	req := &automlpb.CreateModelRequest{
		Parent: fmt.Sprintf("projects/%s/locations/%s", projectID, location),
		Model: &automlpb.Model{
			DisplayName: modelName,
			DatasetId:   datasetID,
			ModelMetadata: &automlpb.Model_ImageClassificationModelMetadata{
				ImageClassificationModelMetadata: &automlpb.ImageClassificationModelMetadata{
					TrainBudgetMilliNodeHours: 1000, // 1000 milli-node hours are 1 hour
				},
			},
		},
	}

	op, err := client.CreateModel(ctx, req)
	if err != nil {
		return err
	}
	fmt.Fprintf(w, "Name: %v\n", op.Name())

	// Wait for the longrunning operation complete.
	resp, err := op.Wait(ctx)
	if err != nil && !op.Done() {
		fmt.Println("failed to fetch operation status", err)
		return err
	}
	if err != nil && op.Done() {
		fmt.Println("operation completed with error", err)
		return err
	}
	fmt.Fprintf(w, "Response: %v\n", resp)

	return nil
}

Java

Bevor Sie dieses Beispiel ausprobieren, folgen Sie der Einrichtungsanleitung für diese Sprache auf der Seite Clientbibliotheken.

import com.google.cloud.automl.v1.AutoMlClient;
import com.google.longrunning.Operation;
import java.io.IOException;

class GetOperationStatus {

  static void getOperationStatus() throws IOException {
    // TODO(developer): Replace these variables before running the sample.
    String operationFullId = "projects/[projectId]/locations/us-central1/operations/[operationId]";
    getOperationStatus(operationFullId);
  }

  // Get the status of an operation
  static void getOperationStatus(String operationFullId) throws IOException {
    // Initialize client that will be used to send requests. This client only needs to be created
    // once, and can be reused for multiple requests. After completing all of your requests, call
    // the "close" method on the client to safely clean up any remaining background resources.
    try (AutoMlClient client = AutoMlClient.create()) {
      // Get the latest state of a long-running operation.
      Operation operation = client.getOperationsClient().getOperation(operationFullId);

      // Display operation details.
      System.out.println("Operation details:");
      System.out.format("\tName: %s\n", operation.getName());
      System.out.format("\tMetadata Type Url: %s\n", operation.getMetadata().getTypeUrl());
      System.out.format("\tDone: %s\n", operation.getDone());
      if (operation.hasResponse()) {
        System.out.format("\tResponse Type Url: %s\n", operation.getResponse().getTypeUrl());
      }
      if (operation.hasError()) {
        System.out.println("\tResponse:");
        System.out.format("\t\tError code: %s\n", operation.getError().getCode());
        System.out.format("\t\tError message: %s\n", operation.getError().getMessage());
      }
    }
  }
}

Node.js

Bevor Sie dieses Beispiel ausprobieren, folgen Sie der Einrichtungsanleitung für diese Sprache auf der Seite Clientbibliotheken.

/**
 * TODO(developer): Uncomment these variables before running the sample.
 */
// const projectId = 'YOUR_PROJECT_ID';
// const location = 'us-central1';
// const operationId = 'YOUR_OPERATION_ID';

// Imports the Google Cloud AutoML library
const {AutoMlClient} = require('@google-cloud/automl').v1;

// Instantiates a client
const client = new AutoMlClient();

async function getOperationStatus() {
  // Construct request
  const request = {
    name: `projects/${projectId}/locations/${location}/operations/${operationId}`,
  };

  const [response] = await client.operationsClient.getOperation(request);

  console.log(`Name: ${response.name}`);
  console.log('Operation details:');
  console.log(`${response}`);
}

getOperationStatus();

Python

Bevor Sie dieses Beispiel ausprobieren, folgen Sie der Einrichtungsanleitung für diese Sprache auf der Seite Clientbibliotheken.

from google.cloud import automl

# TODO(developer): Uncomment and set the following variables
# operation_full_id = \
#     "projects/[projectId]/locations/us-central1/operations/[operationId]"

client = automl.AutoMlClient()
# Get the latest state of a long-running operation.
response = client._transport.operations_client.get_operation(operation_full_id)

print(f"Name: {response.name}")
print("Operation details:")
print(response)

Weitere Sprachen

C#: Folgen Sie der Anleitung zur Einrichtung von C# auf der Seite der Clientbibliotheken und rufen Sie dann die AutoML Vision Object Detection-Referenzdokumentation für .NET auf.

PHP: Folgen Sie der Anleitung zur Einrichtung von PHP auf der Seite der Clientbibliotheken und rufen Sie dann die AutoML Vision Object Detection-Referenzdokumentation für PHP auf.

Ruby: Folgen Sie der Anleitung zur Einrichtung von Ruby auf der Seite der Clientbibliotheken und rufen Sie dann die AutoML Vision Object Detection-Referenzdokumentation für Ruby auf.

Vorgang abbrechen

Sie können eine Import- oder Trainingsaufgabe mit der Vorgangs-ID abbrechen.

REST

Bevor Sie dieses Beispiel ausprobieren, folgen Sie der Einrichtungsanleitung für diese Sprache auf der Seite Clientbibliotheken.

Ersetzen Sie diese Werte in den folgenden Anfragedaten:

  • project-id: die ID Ihres GCP-Projekts.
  • operation-id: ID des Vorgangs. Die ID ist das letzte Element des Vorgangsnamens. Beispiel:
    • Name des Vorgangs: projects/project-id/locations/location-id/operations/IOD5281059901324392598
    • Vorgangs-ID: IOD5281059901324392598

HTTP-Methode und URL:

POST https://automl.googleapis.com/v1/projects/PROJECT_ID/locations/us-central1/operations/OPERATION_ID:cancel

Senden Sie die Anfrage mithilfe einer der folgenden Optionen:

curl

Führen Sie folgenden Befehl aus:

curl -X POST \
-H "Authorization: Bearer $(gcloud auth print-access-token)" \
-H "x-goog-user-project: project-id" \
-H "Content-Type: application/json; charset=utf-8" \
-d "" \
"https://automl.googleapis.com/v1/projects/PROJECT_ID/locations/us-central1/operations/OPERATION_ID:cancel"

PowerShell

Führen Sie folgenden Befehl aus:

$cred = gcloud auth print-access-token
$headers = @{ "Authorization" = "Bearer $cred"; "x-goog-user-project" = "project-id" }

Invoke-WebRequest `
-Method POST `
-Headers $headers `
-Uri "https://automl.googleapis.com/v1/projects/PROJECT_ID/locations/us-central1/operations/OPERATION_ID:cancel" | Select-Object -Expand Content
Es wird angezeigt, dass ein leeres JSON-Objekt von einer erfolgreichen Anfrage zurückgegeben wurde:
{}

Informationen zu einem Modell abrufen

Verwenden Sie die folgenden Codebeispiele, um Informationen zu einem bestimmten trainierten Modell abzurufen. Sie können die von dieser Anfrage zurückgegebenen Informationen verwenden, um den Modus zu ändern oder eine Vorhersageanfrage zu senden.

REST

Ersetzen Sie dabei folgende Werte für die Anfragedaten:

  • project-id: die ID Ihres GCP-Projekts.
  • model-id: die ID Ihres Modells aus der Antwort beim Erstellen des Modells. Sie ist das letzte Element des Modellnamens. Beispiel:
    • Modellname: projects/project-id/locations/location-id/models/IOD4412217016962778756
    • Modell-ID: IOD4412217016962778756

HTTP-Methode und URL:

GET https://automl.googleapis.com/v1/projects/project-id/locations/us-central1/models/model-id

Senden Sie die Anfrage mithilfe einer der folgenden Optionen:

curl

Führen Sie folgenden Befehl aus:

curl -X GET \
-H "Authorization: Bearer $(gcloud auth print-access-token)" \
-H "x-goog-user-project: project-id" \
"https://automl.googleapis.com/v1/projects/project-id/locations/us-central1/models/model-id"

PowerShell

Führen Sie folgenden Befehl aus:

$cred = gcloud auth print-access-token
$headers = @{ "Authorization" = "Bearer $cred"; "x-goog-user-project" = "project-id" }

Invoke-WebRequest `
-Method GET `
-Headers $headers `
-Uri "https://automl.googleapis.com/v1/projects/project-id/locations/us-central1/models/model-id" | Select-Object -Expand Content

Sie sollten eine JSON-Antwort ähnlich wie diese erhalten:


    {
  "name": "projects/project-id/locations/us-central1/models/model-id",
  "displayName": "display-name",
  "datasetId": "dataset-id",
  "createTime": "2019-07-26T21:10:18.338846Z",
  "deploymentState": "UNDEPLOYED",
  "updateTime": "2019-07-26T22:28:57.464076Z",
  "imageObjectDetectionModelMetadata": {
    "modelType": "cloud-low-latency-1",
    "nodeQps": 1.2987012987012987,
    "stopReason": "MODEL_CONVERGED",
    "trainBudgetMilliNodeHours": "216000",
    "trainCostMilliNodeHours": "8230"
  }
}

Go

Bevor Sie dieses Beispiel ausprobieren, folgen Sie der Einrichtungsanleitung für diese Sprache auf der Seite Clientbibliotheken.

import (
	"context"
	"fmt"
	"io"

	automl "cloud.google.com/go/automl/apiv1"
	"cloud.google.com/go/automl/apiv1/automlpb"
)

// getModel gets a model.
func getModel(w io.Writer, projectID string, location string, modelID string) error {
	// projectID := "my-project-id"
	// location := "us-central1"
	// modelID := "TRL123456789..."

	ctx := context.Background()
	client, err := automl.NewClient(ctx)
	if err != nil {
		return fmt.Errorf("NewClient: %w", err)
	}
	defer client.Close()

	req := &automlpb.GetModelRequest{
		Name: fmt.Sprintf("projects/%s/locations/%s/models/%s", projectID, location, modelID),
	}

	model, err := client.GetModel(ctx, req)
	if err != nil {
		return fmt.Errorf("GetModel: %w", err)
	}

	// Retrieve deployment state.
	deploymentState := "undeployed"
	if model.GetDeploymentState() == automlpb.Model_DEPLOYED {
		deploymentState = "deployed"
	}

	// Display the model information.
	fmt.Fprintf(w, "Model name: %v\n", model.GetName())
	fmt.Fprintf(w, "Model display name: %v\n", model.GetDisplayName())
	fmt.Fprintf(w, "Model create time:\n")
	fmt.Fprintf(w, "\tseconds: %v\n", model.GetCreateTime().GetSeconds())
	fmt.Fprintf(w, "\tnanos: %v\n", model.GetCreateTime().GetNanos())
	fmt.Fprintf(w, "Model deployment state: %v\n", deploymentState)

	return nil
}

Java

Bevor Sie dieses Beispiel ausprobieren, folgen Sie der Einrichtungsanleitung für diese Sprache auf der Seite Clientbibliotheken.

import com.google.cloud.automl.v1.AutoMlClient;
import com.google.cloud.automl.v1.Model;
import com.google.cloud.automl.v1.ModelName;
import java.io.IOException;

class GetModel {

  static void getModel() throws IOException {
    // TODO(developer): Replace these variables before running the sample.
    String projectId = "YOUR_PROJECT_ID";
    String modelId = "YOUR_MODEL_ID";
    getModel(projectId, modelId);
  }

  // Get a model
  static void getModel(String projectId, String modelId) throws IOException {
    // Initialize client that will be used to send requests. This client only needs to be created
    // once, and can be reused for multiple requests. After completing all of your requests, call
    // the "close" method on the client to safely clean up any remaining background resources.
    try (AutoMlClient client = AutoMlClient.create()) {
      // Get the full path of the model.
      ModelName modelFullId = ModelName.of(projectId, "us-central1", modelId);
      Model model = client.getModel(modelFullId);

      // Display the model information.
      System.out.format("Model name: %s\n", model.getName());
      // To get the model id, you have to parse it out of the `name` field. As models Ids are
      // required for other methods.
      // Name Format: `projects/{project_id}/locations/{location_id}/models/{model_id}`
      String[] names = model.getName().split("/");
      String retrievedModelId = names[names.length - 1];
      System.out.format("Model id: %s\n", retrievedModelId);
      System.out.format("Model display name: %s\n", model.getDisplayName());
      System.out.println("Model create time:");
      System.out.format("\tseconds: %s\n", model.getCreateTime().getSeconds());
      System.out.format("\tnanos: %s\n", model.getCreateTime().getNanos());
      System.out.format("Model deployment state: %s\n", model.getDeploymentState());
    }
  }
}

Node.js

Bevor Sie dieses Beispiel ausprobieren, folgen Sie der Einrichtungsanleitung für diese Sprache auf der Seite Clientbibliotheken.

/**
 * TODO(developer): Uncomment these variables before running the sample.
 */
// const projectId = 'YOUR_PROJECT_ID';
// const location = 'us-central1';
// const modelId = 'YOUR_MODEL_ID';

// Imports the Google Cloud AutoML library
const {AutoMlClient} = require('@google-cloud/automl').v1;

// Instantiates a client
const client = new AutoMlClient();

async function getModel() {
  // Construct request
  const request = {
    name: client.modelPath(projectId, location, modelId),
  };

  const [response] = await client.getModel(request);

  console.log(`Model name: ${response.name}`);
  console.log(
    `Model id: ${
      response.name.split('/')[response.name.split('/').length - 1]
    }`
  );
  console.log(`Model display name: ${response.displayName}`);
  console.log('Model create time');
  console.log(`\tseconds ${response.createTime.seconds}`);
  console.log(`\tnanos ${response.createTime.nanos / 1e9}`);
  console.log(`Model deployment state: ${response.deploymentState}`);
}

getModel();

Python

Bevor Sie dieses Beispiel ausprobieren, folgen Sie der Einrichtungsanleitung für diese Sprache auf der Seite Clientbibliotheken.

from google.cloud import automl

# TODO(developer): Uncomment and set the following variables
# project_id = "YOUR_PROJECT_ID"
# model_id = "YOUR_MODEL_ID"

client = automl.AutoMlClient()
# Get the full path of the model.
model_full_id = client.model_path(project_id, "us-central1", model_id)
model = client.get_model(name=model_full_id)

# Retrieve deployment state.
if model.deployment_state == automl.Model.DeploymentState.DEPLOYED:
    deployment_state = "deployed"
else:
    deployment_state = "undeployed"

# Display the model information.
print(f"Model name: {model.name}")
print("Model id: {}".format(model.name.split("/")[-1]))
print(f"Model display name: {model.display_name}")
print(f"Model create time: {model.create_time}")
print(f"Model deployment state: {deployment_state}")

Weitere Sprachen

C#: Folgen Sie der Anleitung zur Einrichtung von C# auf der Seite der Clientbibliotheken und rufen Sie dann die AutoML Vision Object Detection-Referenzdokumentation für .NET auf.

PHP: Folgen Sie der Anleitung zur Einrichtung von PHP auf der Seite der Clientbibliotheken und rufen Sie dann die AutoML Vision Object Detection-Referenzdokumentation für PHP auf.

Ruby: Folgen Sie der Anleitung zur Einrichtung von Ruby auf der Seite der Clientbibliotheken und rufen Sie dann die AutoML Vision Object Detection-Referenzdokumentation für Ruby auf.

.