Individuelle Vorhersagen treffen

Sobald Sie ein Modell erstellt (trainiert) und bereitgestellt haben, können Sie Online-Vorhersageanfragen (synchrone Anfragen) an dieses senden.

Beispiel für eine Onlinevorhersage (Einzelvorhersage)

Nachdem Sie Ihr trainiertes Modell bereitgestellt haben, können Sie mithilfe der Methode predict eine Vorhersage für ein Bild anfordern oder die Benutzeroberfläche zum Abrufen von Vorhersage-Annotationen verwenden. Die predict-Methode wendet Labels auf die Objektbegrenzungsrahmen in Ihrem Bild an.

Während der Bereitstellung fallen für das Modell Gebühren an. Nachdem Sie mit dem trainierten Modell Vorhersagen getroffen haben, können Sie dessen Bereitstellung aufheben, wenn Sie weitere Gebühren für das Modellhosting vermeiden möchten.

Web-UI

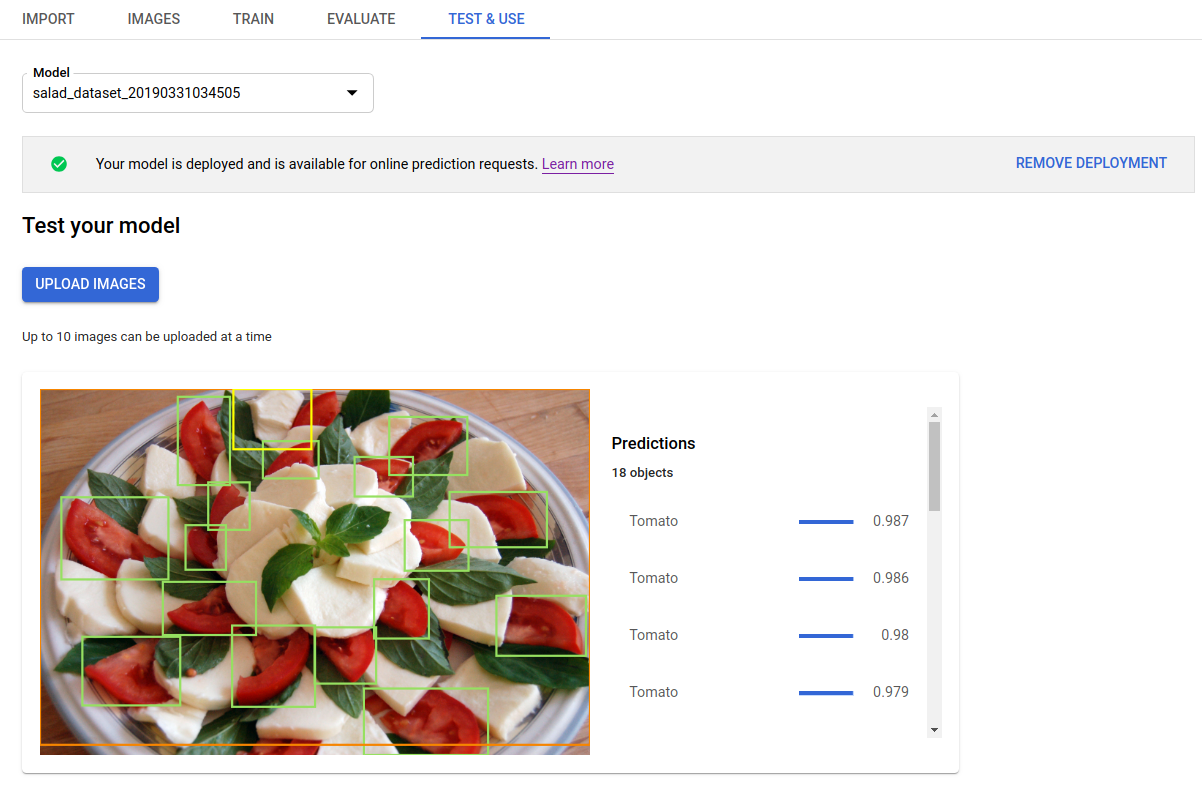
  1. Öffnen Sie die AutoML Vision-Benutzeroberfläche für die Objekterkennung und klicken Sie in der linken Navigationsleiste auf den Tab Modelle mit dem Glühbirnensymbol, um die verfügbaren Modelle aufzurufen.

    Wenn Sie die Modelle für ein anderes Projekt ansehen möchten, wählen Sie das Projekt in der Dropdown-Liste rechts oben in der Titelleiste aus.

  2. Klicken Sie auf die Zeile für das Modell, das Sie verwenden möchten, um die Bilder mit Labels zu versehen.

  3. Wenn Ihr Modell noch nicht bereitgestellt wurde, klicken Sie jetzt auf Modell bereitstellen.

    Das Modell muss bereitgestellt werden, um Onlinevorhersagen verwenden zu können. Für das Bereitstellen des Modells fallen Gebühren an. Weitere Informationen finden Sie in der Preisübersicht.

  4. Klicken Sie auf den Tab Testen und verwenden direkt unter der Titelleiste.

    Seite zum Testen und Verwenden des Modells

  5. Klicken Sie auf Bilder hochladen, um die Bilder hochzuladen, die Sie mit Labels versehen möchten.

    Seite mit der Vorhersage auf hochgeladenem Bild

REST

Damit Sie die Vorhersage testen können, müssen Sie zuerst Ihr in der Cloud gehostetes Modell bereitstellen.

Ersetzen Sie diese Werte in den folgenden Anfragedaten:

  • project-id: die ID Ihres GCP-Projekts.
  • model-id: die ID Ihres Modells aus der Antwort beim Erstellen des Modells. Sie ist das letzte Element des Modellnamens. Beispiel:
    • Modellname: projects/project-id/locations/location-id/models/IOD4412217016962778756
    • model id: IOD4412217016962778756
  • base64-encoded-image: die Base64-Darstellung (ASCII-String) der Binärbilddaten. Dieser String sollte in etwa so aussehen: /9j/4QAYRXhpZgAA...9tAVx/zDQDlGxn//2Q==. Weitere Informationen erhalten Sie unter Base64-Codierung.

Feldspezifische Hinweise:

  • scoreThreshold: ein Wert zwischen 0 und 1. Es werden nur Werte mit Konfidenzwert-Schwellenwerten von mindestens diesem Wert angezeigt. Der Standardwert ist 0,5.
  • maxBoundingBoxCount: die Höchstzahl (Obergrenze) von Begrenzungsrahmen, die in einer Antwort zurückgegeben werden sollen. Der Standardwert ist 100 und der Höchstwert ist 500. Dieser Wert unterliegt Ressourcenlimits und kann durch den Server beschränkt sein.

HTTP-Methode und URL:

POST https://automl.googleapis.com/v1/projects/PROJECT_ID/locations/us-central1/models/MODEL_ID:predict

JSON-Text der Anfrage:

{
  "payload": {
    "image": {
      "imageBytes": "BASE64_ENCODED_IMAGE"
    }
  },
  "params": {
    "scoreThreshold": "0.5",
    "maxBoundingBoxCount": "100"
  }
}

Wenn Sie die Anfrage senden möchten, wählen Sie eine der folgenden Optionen aus:

curl

Speichern Sie den Anfragetext in einer Datei mit dem Namen request.json und führen Sie den folgenden Befehl aus:

curl -X POST \
-H "Authorization: Bearer $(gcloud auth print-access-token)" \
-H "x-goog-user-project: project-id" \
-H "Content-Type: application/json; charset=utf-8" \
-d @request.json \
"https://automl.googleapis.com/v1/projects/PROJECT_ID/locations/us-central1/models/MODEL_ID:predict"

PowerShell

Speichern Sie den Anfragetext in einer Datei mit dem Namen request.json und führen Sie den folgenden Befehl aus:

$cred = gcloud auth print-access-token
$headers = @{ "Authorization" = "Bearer $cred"; "x-goog-user-project" = "project-id" }

Invoke-WebRequest `
-Method POST `
-Headers $headers `
-ContentType: "application/json; charset=utf-8" `
-InFile request.json `
-Uri "https://automl.googleapis.com/v1/projects/PROJECT_ID/locations/us-central1/models/MODEL_ID:predict" | Select-Object -Expand Content

Die Ausgabe wird im JSON-Format zurückgegeben. Die Vorhersagen aus dem AutoML Vision-Objekterkennungsmodell sind im Feld payload enthalten:

  • Der boundingBox eines Objekts wird durch diagonal gegenüberliegende Eckpunkte angegeben.
  • displayName ist das Label des Objekts, das vom AutoML Vision-Objekterkennungsmodell vorhergesagt wurde.
  • score steht für das Konfidenzniveau, das das angegebene Label auf das Bild anwendet. Das Konfidenzniveau reicht von 0 (keine Konfidenz) bis 1 (hohe Konfidenz).

{
  "payload": [
    {
      "imageObjectDetection": {
        "boundingBox": {
          "normalizedVertices": [
            {
              "x": 0.034553755,
              "y": 0.015524037
            },
            {
              "x": 0.941527,
              "y": 0.9912563
            }
          ]
        },
        "score": 0.9997793
      },
      "displayName": "Salad"
    },
    {
      "imageObjectDetection": {
        "boundingBox": {
          "normalizedVertices": [
            {
              "x": 0.11737197,
              "y": 0.7098793
            },
            {
              "x": 0.510878,
              "y": 0.87987
            }
          ]
        },
        "score": 0.63219965
      },
      "displayName": "Tomato"
    }
  ]
}

Go

Bevor Sie dieses Beispiel ausprobieren, folgen Sie der Einrichtungsanleitung für diese Sprache auf der Seite Clientbibliotheken.

import (
	"context"
	"fmt"
	"io"
	"io/ioutil"
	"os"

	automl "cloud.google.com/go/automl/apiv1"
	"cloud.google.com/go/automl/apiv1/automlpb"
)

// visionObjectDetectionPredict does a prediction for image classification.
func visionObjectDetectionPredict(w io.Writer, projectID string, location string, modelID string, filePath string) error {
	// projectID := "my-project-id"
	// location := "us-central1"
	// modelID := "IOD123456789..."
	// filePath := "path/to/image.jpg"

	ctx := context.Background()
	client, err := automl.NewPredictionClient(ctx)
	if err != nil {
		return fmt.Errorf("NewPredictionClient: %w", err)
	}
	defer client.Close()

	file, err := os.Open(filePath)
	if err != nil {
		return fmt.Errorf("Open: %w", err)
	}
	defer file.Close()
	bytes, err := ioutil.ReadAll(file)
	if err != nil {
		return fmt.Errorf("ReadAll: %w", err)
	}

	req := &automlpb.PredictRequest{
		Name: fmt.Sprintf("projects/%s/locations/%s/models/%s", projectID, location, modelID),
		Payload: &automlpb.ExamplePayload{
			Payload: &automlpb.ExamplePayload_Image{
				Image: &automlpb.Image{
					Data: &automlpb.Image_ImageBytes{
						ImageBytes: bytes,
					},
				},
			},
		},
		// Params is additional domain-specific parameters.
		Params: map[string]string{
			// score_threshold is used to filter the result.
			"score_threshold": "0.8",
		},
	}

	resp, err := client.Predict(ctx, req)
	if err != nil {
		return fmt.Errorf("Predict: %w", err)
	}

	for _, payload := range resp.GetPayload() {
		fmt.Fprintf(w, "Predicted class name: %v\n", payload.GetDisplayName())
		fmt.Fprintf(w, "Predicted class score: %v\n", payload.GetImageObjectDetection().GetScore())
		boundingBox := payload.GetImageObjectDetection().GetBoundingBox()
		fmt.Fprintf(w, "Normalized vertices:\n")
		for _, vertex := range boundingBox.GetNormalizedVertices() {
			fmt.Fprintf(w, "\tX: %v, Y: %v\n", vertex.GetX(), vertex.GetY())
		}
	}

	return nil
}

Java

Bevor Sie dieses Beispiel ausprobieren, folgen Sie der Einrichtungsanleitung für diese Sprache auf der Seite Clientbibliotheken.

import com.google.cloud.automl.v1.AnnotationPayload;
import com.google.cloud.automl.v1.BoundingPoly;
import com.google.cloud.automl.v1.ExamplePayload;
import com.google.cloud.automl.v1.Image;
import com.google.cloud.automl.v1.ModelName;
import com.google.cloud.automl.v1.NormalizedVertex;
import com.google.cloud.automl.v1.PredictRequest;
import com.google.cloud.automl.v1.PredictResponse;
import com.google.cloud.automl.v1.PredictionServiceClient;
import com.google.protobuf.ByteString;
import java.io.IOException;
import java.nio.file.Files;
import java.nio.file.Paths;

class VisionObjectDetectionPredict {

  static void predict() throws IOException {
    // TODO(developer): Replace these variables before running the sample.
    String projectId = "YOUR_PROJECT_ID";
    String modelId = "YOUR_MODEL_ID";
    String filePath = "path_to_local_file.jpg";
    predict(projectId, modelId, filePath);
  }

  static void predict(String projectId, String modelId, String filePath) throws IOException {
    // Initialize client that will be used to send requests. This client only needs to be created
    // once, and can be reused for multiple requests. After completing all of your requests, call
    // the "close" method on the client to safely clean up any remaining background resources.
    try (PredictionServiceClient client = PredictionServiceClient.create()) {
      // Get the full path of the model.
      ModelName name = ModelName.of(projectId, "us-central1", modelId);
      ByteString content = ByteString.copyFrom(Files.readAllBytes(Paths.get(filePath)));
      Image image = Image.newBuilder().setImageBytes(content).build();
      ExamplePayload payload = ExamplePayload.newBuilder().setImage(image).build();
      PredictRequest predictRequest =
          PredictRequest.newBuilder()
              .setName(name.toString())
              .setPayload(payload)
              .putParams(
                  "score_threshold", "0.5") // [0.0-1.0] Only produce results higher than this value
              .build();

      PredictResponse response = client.predict(predictRequest);
      for (AnnotationPayload annotationPayload : response.getPayloadList()) {
        System.out.format("Predicted class name: %s\n", annotationPayload.getDisplayName());
        System.out.format(
            "Predicted class score: %.2f\n",
            annotationPayload.getImageObjectDetection().getScore());
        BoundingPoly boundingPoly = annotationPayload.getImageObjectDetection().getBoundingBox();
        System.out.println("Normalized Vertices:");
        for (NormalizedVertex vertex : boundingPoly.getNormalizedVerticesList()) {
          System.out.format("\tX: %.2f, Y: %.2f\n", vertex.getX(), vertex.getY());
        }
      }
    }
  }
}

Node.js

Bevor Sie dieses Beispiel ausprobieren, folgen Sie der Einrichtungsanleitung für diese Sprache auf der Seite Clientbibliotheken.

/**
 * TODO(developer): Uncomment these variables before running the sample.
 */
// const projectId = 'YOUR_PROJECT_ID';
// const location = 'us-central1';
// const modelId = 'YOUR_MODEL_ID';
// const filePath = 'path_to_local_file.jpg';

// Imports the Google Cloud AutoML library
const {PredictionServiceClient} = require('@google-cloud/automl').v1;
const fs = require('fs');

// Instantiates a client
const client = new PredictionServiceClient();

// Read the file content for translation.
const content = fs.readFileSync(filePath);

async function predict() {
  // Construct request
  // params is additional domain-specific parameters.
  // score_threshold is used to filter the result
  const request = {
    name: client.modelPath(projectId, location, modelId),
    payload: {
      image: {
        imageBytes: content,
      },
    },
    params: {
      score_threshold: '0.8',
    },
  };

  const [response] = await client.predict(request);

  for (const annotationPayload of response.payload) {
    console.log(`Predicted class name: ${annotationPayload.displayName}`);
    console.log(
      `Predicted class score: ${annotationPayload.imageObjectDetection.score}`
    );
    console.log('Normalized vertices:');
    for (const vertex of annotationPayload.imageObjectDetection.boundingBox
      .normalizedVertices) {
      console.log(`\tX: ${vertex.x}, Y: ${vertex.y}`);
    }
  }
}

predict();

Python

Bevor Sie dieses Beispiel ausprobieren, folgen Sie der Einrichtungsanleitung für diese Sprache auf der Seite Clientbibliotheken.

from google.cloud import automl

# TODO(developer): Uncomment and set the following variables
# project_id = "YOUR_PROJECT_ID"
# model_id = "YOUR_MODEL_ID"
# file_path = "path_to_local_file.jpg"

prediction_client = automl.PredictionServiceClient()

# Get the full path of the model.
model_full_id = automl.AutoMlClient.model_path(project_id, "us-central1", model_id)

# Read the file.
with open(file_path, "rb") as content_file:
    content = content_file.read()

image = automl.Image(image_bytes=content)
payload = automl.ExamplePayload(image=image)

# params is additional domain-specific parameters.
# score_threshold is used to filter the result
# https://cloud.google.com/automl/docs/reference/rpc/google.cloud.automl.v1#predictrequest
params = {"score_threshold": "0.8"}

request = automl.PredictRequest(name=model_full_id, payload=payload, params=params)

response = prediction_client.predict(request=request)
print("Prediction results:")
for result in response.payload:
    print(f"Predicted class name: {result.display_name}")
    print(f"Predicted class score: {result.image_object_detection.score}")
    bounding_box = result.image_object_detection.bounding_box
    print("Normalized Vertices:")
    for vertex in bounding_box.normalized_vertices:
        print(f"\tX: {vertex.x}, Y: {vertex.y}")

Weitere Sprachen

C#: Folgen Sie der Anleitung zur Einrichtung von C# auf der Seite der Clientbibliotheken und rufen Sie dann die AutoML Vision Object Detection-Referenzdokumentation für .NET auf.

PHP: Folgen Sie der Anleitung zur Einrichtung von PHP auf der Seite der Clientbibliotheken und rufen Sie dann die AutoML Vision Object Detection-Referenzdokumentation für PHP auf.

Ruby: Folgen Sie der Anleitung zur Einrichtung von Ruby auf der Seite der Clientbibliotheken und rufen Sie dann die AutoML Vision Object Detection-Referenzdokumentation für Ruby auf.