Modelle verwalten

Wenn Sie ein benutzerdefiniertes Modell erstellen möchten, trainieren Sie es mithilfe eines vorbereiteten Datasets. AutoML Vision mithilfe der Elemente des Datasets trainiert, getestet und hinsichtlich seiner Leistung bewertet . Sie überprüfen die Ergebnisse, passen das Trainings-Dataset nach Bedarf an und trainieren ein neues Modell mithilfe des verbesserten Datasets.

Das Trainieren eines Modells kann mehrere Stunden dauern. Mit der AutoML API haben Sie die Möglichkeit, den Status des Trainings zu prüfen.

Die AutoML Vision erstellt jedes Mal ein neues Modell, wenn Sie mit dem Training beginnen. Daher kann das Projekt zahlreiche Modelle enthalten. Sie können eine Liste der Modelle in Ihrem Projekt abrufen und nicht mehr benötigte Modelle löschen.

Modelle auflisten

In diesem Abschnitt wird beschrieben, wie Sie eine Liste der verfügbaren Modelle für ein Projekt abrufen können.

Web-UI

Wenn Sie mit der Vision Dashboard eine Liste der verfügbaren Modelle aufrufen möchten, klicken Sie in der linken Navigationsleiste auf das Glühbirnensymbol.

Eine Liste mit Modellen

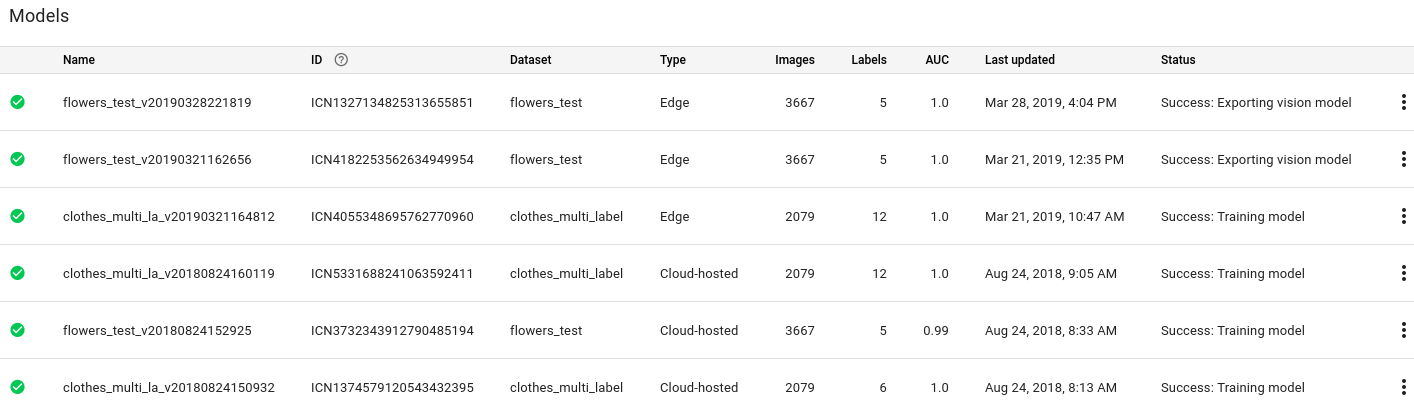
Wenn Sie die Modelle für ein anderes Projekt anzeigen möchten, wählen Sie das Projekt in der Drop-down-Liste oben rechts in der Titelleiste aus.

REST

Ersetzen Sie dabei folgende Werte für die Anfragedaten:

  • project-id: die ID Ihres GCP-Projekts.

HTTP-Methode und URL:

GET https://automl.googleapis.com/v1/projects/PROJECT_ID/locations/us-central1/models

Senden Sie die Anfrage mithilfe einer der folgenden Optionen:

curl

Führen Sie folgenden Befehl aus:

curl -X GET \
-H "Authorization: Bearer $(gcloud auth print-access-token)" \
-H "x-goog-user-project: project-id" \
"https://automl.googleapis.com/v1/projects/PROJECT_ID/locations/us-central1/models"

PowerShell

Führen Sie folgenden Befehl aus:

$cred = gcloud auth print-access-token
$headers = @{ "Authorization" = "Bearer $cred"; "x-goog-user-project" = "project-id" }

Invoke-WebRequest `
-Method GET `
-Headers $headers `
-Uri "https://automl.googleapis.com/v1/projects/PROJECT_ID/locations/us-central1/models" | Select-Object -Expand Content

Sie sollten eine JSON-Antwort ähnlich wie folgende erhalten. Diese Antwort enthält Informationen zu zwei in der Cloud gehosteten Modellen.


    {
  "model": [
    {
      "name": "projects/project-id/locations/us-central1/models/model-id-1",
      "displayName": "display-name-1",
      "datasetId": "dataset-id",
      "createTime": "2019-10-30T20:06:08.253243Z",
      "deploymentState": "UNDEPLOYED",
      "updateTime": "2019-10-30T20:54:50.472328Z",
      "imageClassificationModelMetadata": {
        "trainBudget": "1",
        "modelType": "mobile-low-latency-1",
        "nodeQps": 3.2
      }
    },
    {
      "name": "projects/project-id/locations/us-central1/models/model-id-2",
      "displayName": "display-name-2",
      "datasetId": "dataset-id",
      "createTime": "2019-10-29T19:06:38.048492Z",
      "deploymentState": "UNDEPLOYED",
      "updateTime": "2019-10-29T19:35:19.104716Z",
      "imageClassificationModelMetadata": {
        "trainBudget": "1",
        "modelType": "cloud",
        "nodeQps": 3.2
      }
    }
  ]
}

Go

Bevor Sie dieses Beispiel ausprobieren, folgen Sie der Einrichtungsanleitung für diese Sprache auf der Seite Clientbibliotheken.

import (
	"context"
	"fmt"
	"io"

	automl "cloud.google.com/go/automl/apiv1"
	"cloud.google.com/go/automl/apiv1/automlpb"
	"google.golang.org/api/iterator"
)

// listModels lists existing models.
func listModels(w io.Writer, projectID string, location string) error {
	// projectID := "my-project-id"
	// location := "us-central1"

	ctx := context.Background()
	client, err := automl.NewClient(ctx)
	if err != nil {
		return fmt.Errorf("NewClient: %w", err)
	}
	defer client.Close()

	req := &automlpb.ListModelsRequest{
		Parent: fmt.Sprintf("projects/%s/locations/%s", projectID, location),
	}

	it := client.ListModels(ctx, req)

	// Iterate over all results
	for {
		model, err := it.Next()
		if err == iterator.Done {
			break
		}
		if err != nil {
			return fmt.Errorf("ListModels.Next: %w", err)
		}

		// Retrieve deployment state.
		deploymentState := "undeployed"
		if model.GetDeploymentState() == automlpb.Model_DEPLOYED {
			deploymentState = "deployed"
		}

		// Display the model information.
		fmt.Fprintf(w, "Model name: %v\n", model.GetName())
		fmt.Fprintf(w, "Model display name: %v\n", model.GetDisplayName())
		fmt.Fprintf(w, "Model create time:\n")
		fmt.Fprintf(w, "\tseconds: %v\n", model.GetCreateTime().GetSeconds())
		fmt.Fprintf(w, "\tnanos: %v\n", model.GetCreateTime().GetNanos())
		fmt.Fprintf(w, "Model deployment state: %v\n", deploymentState)
	}

	return nil
}

Java

Bevor Sie dieses Beispiel ausprobieren, folgen Sie der Einrichtungsanleitung für diese Sprache auf der Seite Clientbibliotheken.

import com.google.cloud.automl.v1.AutoMlClient;
import com.google.cloud.automl.v1.ListModelsRequest;
import com.google.cloud.automl.v1.LocationName;
import com.google.cloud.automl.v1.Model;
import java.io.IOException;

class ListModels {

  static void listModels() throws IOException {
    // TODO(developer): Replace these variables before running the sample.
    String projectId = "YOUR_PROJECT_ID";
    listModels(projectId);
  }

  // List the models available in the specified location
  static void listModels(String projectId) throws IOException {
    // Initialize client that will be used to send requests. This client only needs to be created
    // once, and can be reused for multiple requests. After completing all of your requests, call
    // the "close" method on the client to safely clean up any remaining background resources.
    try (AutoMlClient client = AutoMlClient.create()) {
      // A resource that represents Google Cloud Platform location.
      LocationName projectLocation = LocationName.of(projectId, "us-central1");

      // Create list models request.
      ListModelsRequest listModelsRequest =
          ListModelsRequest.newBuilder()
              .setParent(projectLocation.toString())
              .setFilter("")
              .build();

      // List all the models available in the region by applying filter.
      System.out.println("List of models:");
      for (Model model : client.listModels(listModelsRequest).iterateAll()) {
        // Display the model information.
        System.out.format("Model name: %s\n", model.getName());
        // To get the model id, you have to parse it out of the `name` field. As models Ids are
        // required for other methods.
        // Name Format: `projects/{project_id}/locations/{location_id}/models/{model_id}`
        String[] names = model.getName().split("/");
        String retrievedModelId = names[names.length - 1];
        System.out.format("Model id: %s\n", retrievedModelId);
        System.out.format("Model display name: %s\n", model.getDisplayName());
        System.out.println("Model create time:");
        System.out.format("\tseconds: %s\n", model.getCreateTime().getSeconds());
        System.out.format("\tnanos: %s\n", model.getCreateTime().getNanos());
        System.out.format("Model deployment state: %s\n", model.getDeploymentState());
      }
    }
  }
}

Node.js

Bevor Sie dieses Beispiel ausprobieren, folgen Sie der Einrichtungsanleitung für diese Sprache auf der Seite Clientbibliotheken.

/**
 * TODO(developer): Uncomment these variables before running the sample.
 */
// const projectId = 'YOUR_PROJECT_ID';
// const location = 'us-central1';

// Imports the Google Cloud AutoML library
const {AutoMlClient} = require('@google-cloud/automl').v1;

// Instantiates a client
const client = new AutoMlClient();

async function listModels() {
  // Construct request
  const request = {
    parent: client.locationPath(projectId, location),
    filter: 'translation_model_metadata:*',
  };

  const [response] = await client.listModels(request);

  console.log('List of models:');
  for (const model of response) {
    console.log(`Model name: ${model.name}`);
    console.log(`
      Model id: ${model.name.split('/')[model.name.split('/').length - 1]}`);
    console.log(`Model display name: ${model.displayName}`);
    console.log('Model create time');
    console.log(`\tseconds ${model.createTime.seconds}`);
    console.log(`\tnanos ${model.createTime.nanos / 1e9}`);
    console.log(`Model deployment state: ${model.deploymentState}`);
  }
}

listModels();

Python

Bevor Sie dieses Beispiel ausprobieren, folgen Sie der Einrichtungsanleitung für diese Sprache auf der Seite Clientbibliotheken.

from google.cloud import automl

# TODO(developer): Uncomment and set the following variables
# project_id = "YOUR_PROJECT_ID"

client = automl.AutoMlClient()
# A resource that represents Google Cloud Platform location.
project_location = f"projects/{project_id}/locations/us-central1"

request = automl.ListModelsRequest(parent=project_location, filter="")
response = client.list_models(request=request)

print("List of models:")
for model in response:
    # Display the model information.
    if model.deployment_state == automl.Model.DeploymentState.DEPLOYED:
        deployment_state = "deployed"
    else:
        deployment_state = "undeployed"

    print(f"Model name: {model.name}")
    print("Model id: {}".format(model.name.split("/")[-1]))
    print(f"Model display name: {model.display_name}")
    print(f"Model create time: {model.create_time}")
    print(f"Model deployment state: {deployment_state}")

Weitere Sprachen

C#: Folgen Sie der Anleitung zur Einrichtung von C# auf der Seite der Clientbibliotheken und rufen Sie dann die AutoML Vision-Referenzdokumentation für .NET auf.

PHP: Folgen Sie der Anleitung zur Einrichtung von PHP auf der Seite der Clientbibliotheken und rufen Sie dann die AutoML Vision-Referenzdokumentation für PHP auf.

Ruby: Folgen Sie der Anleitung zur Einrichtung von Ruby auf der Seite der Clientbibliotheken und rufen Sie dann die AutoML Vision-Referenzdokumentation für Ruby auf.

Informationen zu einem Modell abrufen

Verwenden Sie die folgenden Codebeispiele, um Informationen zu einem bestimmten trainierten Modell abzurufen. Sie können die von dieser Anfrage zurückgegebenen Informationen verwenden, um den Modus zu ändern oder eine Vorhersageanfrage zu senden.

REST

Ersetzen Sie dabei folgende Werte für die Anfragedaten:

  • project-id: die ID Ihres GCP-Projekts.
  • model-id: die ID Ihres Modells aus der Antwort beim Erstellen des Modells. Sie ist das letzte Element des Modellnamens. Beispiel:
    • Modellname: projects/project-id/locations/location-id/models/IOD4412217016962778756
    • Modell-ID: IOD4412217016962778756

HTTP-Methode und URL:

GET https://automl.googleapis.com/v1/projects/project-id/locations/us-central1/models/model-id

Senden Sie die Anfrage mithilfe einer der folgenden Optionen:

curl

Führen Sie folgenden Befehl aus:

curl -X GET \
-H "Authorization: Bearer $(gcloud auth print-access-token)" \
-H "x-goog-user-project: project-id" \
"https://automl.googleapis.com/v1/projects/project-id/locations/us-central1/models/model-id"

PowerShell

Führen Sie folgenden Befehl aus:

$cred = gcloud auth print-access-token
$headers = @{ "Authorization" = "Bearer $cred"; "x-goog-user-project" = "project-id" }

Invoke-WebRequest `
-Method GET `
-Headers $headers `
-Uri "https://automl.googleapis.com/v1/projects/project-id/locations/us-central1/models/model-id" | Select-Object -Expand Content

Sie sollten eine JSON-Antwort ähnlich wie diese erhalten:


    {
  "name": "projects/project-id/locations/us-central1/models/model-id",
  "displayName": "display-name",
  "datasetId": "dataset-id",
  "createTime": "2019-10-29T19:06:38.048492Z",
  "deploymentState": "UNDEPLOYED",
  "updateTime": "2019-10-29T19:35:19.104716Z",
  "imageClassificationModelMetadata": {
    "trainBudget": "1",
    "modelType": "cloud",
    "nodeQps": 3.2
  }
}

Go

Bevor Sie dieses Beispiel ausprobieren, folgen Sie der Einrichtungsanleitung für diese Sprache auf der Seite Clientbibliotheken.

import (
	"context"
	"fmt"
	"io"

	automl "cloud.google.com/go/automl/apiv1"
	"cloud.google.com/go/automl/apiv1/automlpb"
)

// getModel gets a model.
func getModel(w io.Writer, projectID string, location string, modelID string) error {
	// projectID := "my-project-id"
	// location := "us-central1"
	// modelID := "TRL123456789..."

	ctx := context.Background()
	client, err := automl.NewClient(ctx)
	if err != nil {
		return fmt.Errorf("NewClient: %w", err)
	}
	defer client.Close()

	req := &automlpb.GetModelRequest{
		Name: fmt.Sprintf("projects/%s/locations/%s/models/%s", projectID, location, modelID),
	}

	model, err := client.GetModel(ctx, req)
	if err != nil {
		return fmt.Errorf("GetModel: %w", err)
	}

	// Retrieve deployment state.
	deploymentState := "undeployed"
	if model.GetDeploymentState() == automlpb.Model_DEPLOYED {
		deploymentState = "deployed"
	}

	// Display the model information.
	fmt.Fprintf(w, "Model name: %v\n", model.GetName())
	fmt.Fprintf(w, "Model display name: %v\n", model.GetDisplayName())
	fmt.Fprintf(w, "Model create time:\n")
	fmt.Fprintf(w, "\tseconds: %v\n", model.GetCreateTime().GetSeconds())
	fmt.Fprintf(w, "\tnanos: %v\n", model.GetCreateTime().GetNanos())
	fmt.Fprintf(w, "Model deployment state: %v\n", deploymentState)

	return nil
}

Java

Bevor Sie dieses Beispiel ausprobieren, folgen Sie der Einrichtungsanleitung für diese Sprache auf der Seite Clientbibliotheken.

import com.google.cloud.automl.v1.AutoMlClient;
import com.google.cloud.automl.v1.Model;
import com.google.cloud.automl.v1.ModelName;
import java.io.IOException;

class GetModel {

  static void getModel() throws IOException {
    // TODO(developer): Replace these variables before running the sample.
    String projectId = "YOUR_PROJECT_ID";
    String modelId = "YOUR_MODEL_ID";
    getModel(projectId, modelId);
  }

  // Get a model
  static void getModel(String projectId, String modelId) throws IOException {
    // Initialize client that will be used to send requests. This client only needs to be created
    // once, and can be reused for multiple requests. After completing all of your requests, call
    // the "close" method on the client to safely clean up any remaining background resources.
    try (AutoMlClient client = AutoMlClient.create()) {
      // Get the full path of the model.
      ModelName modelFullId = ModelName.of(projectId, "us-central1", modelId);
      Model model = client.getModel(modelFullId);

      // Display the model information.
      System.out.format("Model name: %s\n", model.getName());
      // To get the model id, you have to parse it out of the `name` field. As models Ids are
      // required for other methods.
      // Name Format: `projects/{project_id}/locations/{location_id}/models/{model_id}`
      String[] names = model.getName().split("/");
      String retrievedModelId = names[names.length - 1];
      System.out.format("Model id: %s\n", retrievedModelId);
      System.out.format("Model display name: %s\n", model.getDisplayName());
      System.out.println("Model create time:");
      System.out.format("\tseconds: %s\n", model.getCreateTime().getSeconds());
      System.out.format("\tnanos: %s\n", model.getCreateTime().getNanos());
      System.out.format("Model deployment state: %s\n", model.getDeploymentState());
    }
  }
}

Node.js

Bevor Sie dieses Beispiel ausprobieren, folgen Sie der Einrichtungsanleitung für diese Sprache auf der Seite Clientbibliotheken.

/**
 * TODO(developer): Uncomment these variables before running the sample.
 */
// const projectId = 'YOUR_PROJECT_ID';
// const location = 'us-central1';
// const modelId = 'YOUR_MODEL_ID';

// Imports the Google Cloud AutoML library
const {AutoMlClient} = require('@google-cloud/automl').v1;

// Instantiates a client
const client = new AutoMlClient();

async function getModel() {
  // Construct request
  const request = {
    name: client.modelPath(projectId, location, modelId),
  };

  const [response] = await client.getModel(request);

  console.log(`Model name: ${response.name}`);
  console.log(
    `Model id: ${
      response.name.split('/')[response.name.split('/').length - 1]
    }`
  );
  console.log(`Model display name: ${response.displayName}`);
  console.log('Model create time');
  console.log(`\tseconds ${response.createTime.seconds}`);
  console.log(`\tnanos ${response.createTime.nanos / 1e9}`);
  console.log(`Model deployment state: ${response.deploymentState}`);
}

getModel();

Python

Bevor Sie dieses Beispiel ausprobieren, folgen Sie der Einrichtungsanleitung für diese Sprache auf der Seite Clientbibliotheken.

from google.cloud import automl

# TODO(developer): Uncomment and set the following variables
# project_id = "YOUR_PROJECT_ID"
# model_id = "YOUR_MODEL_ID"

client = automl.AutoMlClient()
# Get the full path of the model.
model_full_id = client.model_path(project_id, "us-central1", model_id)
model = client.get_model(name=model_full_id)

# Retrieve deployment state.
if model.deployment_state == automl.Model.DeploymentState.DEPLOYED:
    deployment_state = "deployed"
else:
    deployment_state = "undeployed"

# Display the model information.
print(f"Model name: {model.name}")
print("Model id: {}".format(model.name.split("/")[-1]))
print(f"Model display name: {model.display_name}")
print(f"Model create time: {model.create_time}")
print(f"Model deployment state: {deployment_state}")

Weitere Sprachen

C#: Folgen Sie der Anleitung zur Einrichtung von C# auf der Seite der Clientbibliotheken und rufen Sie dann die AutoML Vision Object Detection-Referenzdokumentation für .NET auf.

PHP: Folgen Sie der Anleitung zur Einrichtung von PHP auf der Seite der Clientbibliotheken und rufen Sie dann die AutoML Vision Object Detection-Referenzdokumentation für PHP auf.

Ruby: Folgen Sie der Anleitung zur Einrichtung von Ruby auf der Seite der Clientbibliotheken und rufen Sie dann die AutoML Vision Object Detection-Referenzdokumentation für Ruby auf.

Knotenzahl eines Modells aktualisieren

Sobald ein bereitgestelltes Modell trainiert ist, können Sie die Anzahl der Knoten aktualisieren, auf denen das Modell bereitgestellt wird. So können Sie auf die spezifische Menge an Traffic reagieren. Das ist zum Beispiel nützlich, wenn Sie eine höhere Anzahl von Abfragen pro Sekunde als erwartet erhalten.

Sie können die Anzahl der Knoten ändern, ohne erst das Modell zurücksetzen zu müssen. Wenn Sie die Bereitstellung aktualisieren, ändert sich die Knotenanzahl, ohne dass der bereitgestellte Vorhersage-Traffic unterbrochen wird.

Web-UI

  1. Öffnen Sie Vision Dashboard und wählen Sie in der linken Navigationsleiste den Tab Modelle aus, um die verfügbaren Modelle aufzurufen.

    Wenn Sie die Modelle für ein anderes Projekt ansehen möchten, wählen Sie das Projekt in der Drop-down-Liste rechts oben in der Titelleiste aus.

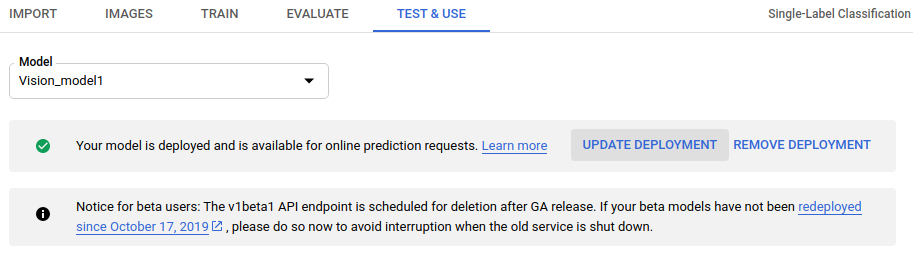
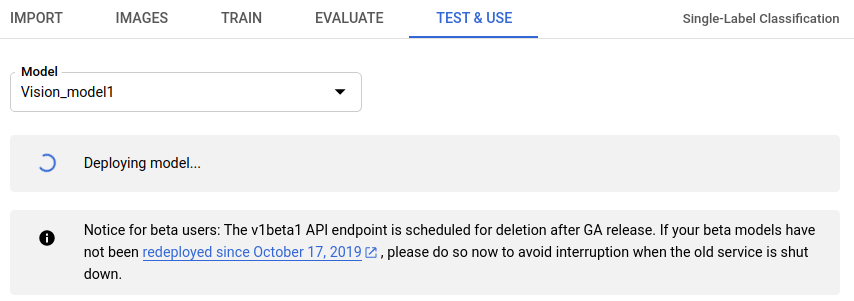
  2. Wählen Sie Ihr trainiertes Modell aus.
  3. Wählen Sie den Tab Test und Nutzung direkt unter der Titelleiste aus.
  4. Oben auf der Seite wird in einem Feld eine Nachricht mit dem Text „Ihr Modell wurde bereitgestellt und ist für Online-Vorhersageanfragen verfügbar” angezeigt. Wählen Sie neben dem Text die Option Deployment aktualisieren aus.

    Abbildung der Schaltfläche "Update deployment" (Bereitstellung aktualisieren)
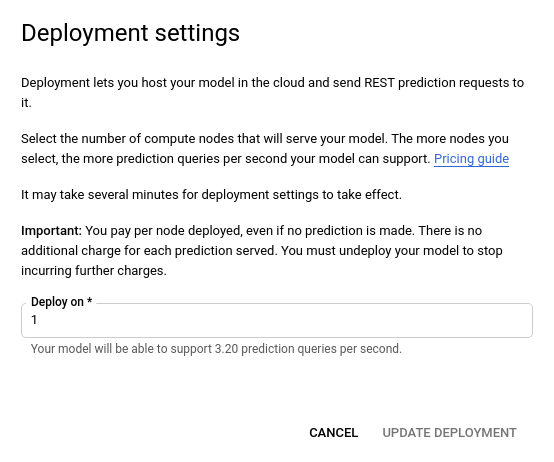
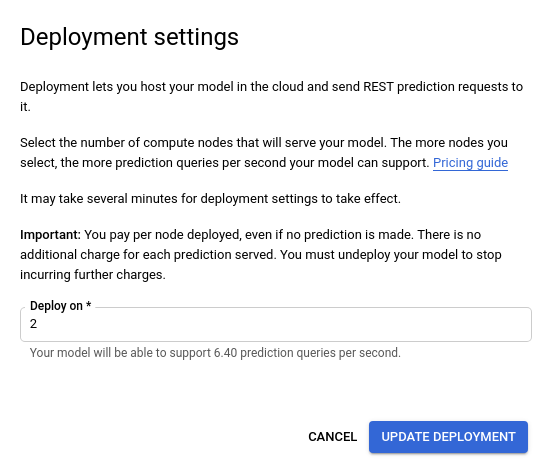
  5. Wählen Sie im angezeigten Fenster Deployment aktualisieren aus der Liste die neue Knotennummer aus, auf der das Modell bereitgestellt werden soll. Mit den Knotennummern wird die Anzahl der geschätzten Vorhersageabfragen pro Sekunde angegeben. Abbildung des Pop-up-Fensters "Deployment aktualisieren"
  6. Wenn Sie eine neue Knotennummer aus der Liste ausgewählt haben, wählen Sie Deployment aktualisieren aus, um die Knotennummer zu aktualisieren, auf der das Modell bereitgestellt wird.

    Fenster "Deployment aktualisieren" nach Auswahl einer neuen Knotennummer
  7. Es wird wieder das Fenster Test und Nutzung aufgerufen, in dem jetzt das Textfeld „Modell wird bereitgestellt” angezeigt wird. Modell wird bereitgestellt
  8. Wenn Ihr Modell erfolgreich auf der neuen Knotennummer bereitgestellt wurde, erhalten Sie eine E-Mail an die mit Ihrem Projekt verknüpfte Adresse.

REST

Die Methode, mit der Sie anfänglich ein Modell bereitstellen, wird auch zum Ändern der Knotennummer des bereitgestellten Modells verwendet.

Ersetzen Sie diese Werte in den folgenden Anfragedaten:

  • project-id: die ID Ihres GCP-Projekts.
  • model-id: die ID Ihres Modells aus der Antwort beim Erstellen des Modells. Sie ist das letzte Element des Modellnamens. Beispiel:
    • Modellname: projects/project-id/locations/location-id/models/IOD4412217016962778756
    • model id: IOD4412217016962778756

Hinweise zu bestimmten Feldern:

  • nodeCount: die Anzahl der Knoten, auf denen das Modell bereitgestellt werden soll. Der Wert muss zwischen 1 und 100 (beide einschließlich) liegen. Ein Knoten ist eine Abstraktion einer Maschinenressource, die so viele Online-Vorhersageabfragen pro Sekunde (Queries per second, QPS) verarbeiten kann, wie im Modell in qps_per_node angegeben.

HTTP-Methode und URL:

POST https://automl.googleapis.com/v1/projects/PROJECT_ID/locations/us-central1/models/MODEL_ID:deploy

JSON-Text der Anfrage:

{
  "imageClassificationModelDeploymentMetadata": {
    "nodeCount": 2
  }
}

Wenn Sie die Anfrage senden möchten, wählen Sie eine der folgenden Optionen aus:

curl

Speichern Sie den Anfragetext in einer Datei mit dem Namen request.json und führen Sie den folgenden Befehl aus:

curl -X POST \
-H "Authorization: Bearer $(gcloud auth print-access-token)" \
-H "x-goog-user-project: project-id" \
-H "Content-Type: application/json; charset=utf-8" \
-d @request.json \
"https://automl.googleapis.com/v1/projects/PROJECT_ID/locations/us-central1/models/MODEL_ID:deploy"

PowerShell

Speichern Sie den Anfragetext in einer Datei mit dem Namen request.json und führen Sie den folgenden Befehl aus:

$cred = gcloud auth print-access-token
$headers = @{ "Authorization" = "Bearer $cred"; "x-goog-user-project" = "project-id" }

Invoke-WebRequest `
-Method POST `
-Headers $headers `
-ContentType: "application/json; charset=utf-8" `
-InFile request.json `
-Uri "https://automl.googleapis.com/v1/projects/PROJECT_ID/locations/us-central1/models/MODEL_ID:deploy" | Select-Object -Expand Content

Die Ausgabe sieht in etwa so aus: Sie können den Status der Aufgabe anhand der Vorgangs-ID abrufen. Ein Beispiel finden Sie unter Mit lang andauernden Vorgängen arbeiten.

{
  "name": "projects/PROJECT_ID/locations/us-central1/operations/OPERATION_ID",
  "metadata": {
    "@type": "type.googleapis.com/google.cloud.automl.v1.OperationMetadata",
    "createTime": "2019-08-07T22:00:20.692109Z",
    "updateTime": "2019-08-07T22:00:20.692109Z",
    "deployModelDetails": {}
  }
}

Sie können den Status eines Vorgangs mit der folgenden HTTP-Methode und URL abrufen:

GET https://automl.googleapis.com/v1/projects/PROJECT_ID/locations/us-central1/operations/OPERATION_ID

Der Status eines abgeschlossenen Vorgangs sieht ungefähr so aus:

{
  "name": "projects/PROJECT_ID/locations/us-central1/operations/OPERATION_ID",
  "metadata": {
    "@type": "type.googleapis.com/google.cloud.automl.v1.OperationMetadata",
    "createTime": "2019-06-21T16:47:21.704674Z",
    "updateTime": "2019-06-21T17:01:00.802505Z",
    "deployModelDetails": {}
  },
  "done": true,
  "response": {
    "@type": "type.googleapis.com/google.protobuf.Empty"
  }
}

Go

Bevor Sie dieses Beispiel ausprobieren, folgen Sie der Einrichtungsanleitung für diese Sprache auf der Seite Clientbibliotheken.

import (
	"context"
	"fmt"
	"io"

	automl "cloud.google.com/go/automl/apiv1"
	"cloud.google.com/go/automl/apiv1/automlpb"
)

// visionClassificationDeployModelWithNodeCount deploys a model with node count.
func visionClassificationDeployModelWithNodeCount(w io.Writer, projectID string, location string, modelID string) error {
	// projectID := "my-project-id"
	// location := "us-central1"
	// modelID := "ICN123456789..."

	ctx := context.Background()
	client, err := automl.NewClient(ctx)
	if err != nil {
		return fmt.Errorf("NewClient: %w", err)
	}
	defer client.Close()

	req := &automlpb.DeployModelRequest{
		Name: fmt.Sprintf("projects/%s/locations/%s/models/%s", projectID, location, modelID),
		ModelDeploymentMetadata: &automlpb.DeployModelRequest_ImageClassificationModelDeploymentMetadata{
			ImageClassificationModelDeploymentMetadata: &automlpb.ImageClassificationModelDeploymentMetadata{
				NodeCount: 2,
			},
		},
	}

	op, err := client.DeployModel(ctx, req)
	if err != nil {
		return fmt.Errorf("DeployModel: %w", err)
	}
	fmt.Fprintf(w, "Processing operation name: %q\n", op.Name())

	if err := op.Wait(ctx); err != nil {
		return fmt.Errorf("Wait: %w", err)
	}

	fmt.Fprintf(w, "Model deployed.\n")

	return nil
}

Java

Bevor Sie dieses Beispiel ausprobieren, folgen Sie der Einrichtungsanleitung für diese Sprache auf der Seite Clientbibliotheken.

import com.google.api.gax.longrunning.OperationFuture;
import com.google.cloud.automl.v1.AutoMlClient;
import com.google.cloud.automl.v1.DeployModelRequest;
import com.google.cloud.automl.v1.ImageClassificationModelDeploymentMetadata;
import com.google.cloud.automl.v1.ModelName;
import com.google.cloud.automl.v1.OperationMetadata;
import com.google.protobuf.Empty;
import java.io.IOException;
import java.util.concurrent.ExecutionException;

class VisionClassificationDeployModelNodeCount {

  static void visionClassificationDeployModelNodeCount()
      throws InterruptedException, ExecutionException, IOException {
    // TODO(developer): Replace these variables before running the sample.
    String projectId = "YOUR_PROJECT_ID";
    String modelId = "YOUR_MODEL_ID";
    visionClassificationDeployModelNodeCount(projectId, modelId);
  }

  // Deploy a model for prediction with a specified node count (can be used to redeploy a model)
  static void visionClassificationDeployModelNodeCount(String projectId, String modelId)
      throws IOException, ExecutionException, InterruptedException {
    // Initialize client that will be used to send requests. This client only needs to be created
    // once, and can be reused for multiple requests. After completing all of your requests, call
    // the "close" method on the client to safely clean up any remaining background resources.
    try (AutoMlClient client = AutoMlClient.create()) {
      // Get the full path of the model.
      ModelName modelFullId = ModelName.of(projectId, "us-central1", modelId);
      ImageClassificationModelDeploymentMetadata metadata =
          ImageClassificationModelDeploymentMetadata.newBuilder().setNodeCount(2).build();
      DeployModelRequest request =
          DeployModelRequest.newBuilder()
              .setName(modelFullId.toString())
              .setImageClassificationModelDeploymentMetadata(metadata)
              .build();
      OperationFuture<Empty, OperationMetadata> future = client.deployModelAsync(request);

      future.get();
      System.out.println("Model deployment finished");
    }
  }
}

Node.js

Bevor Sie dieses Beispiel ausprobieren, folgen Sie der Einrichtungsanleitung für diese Sprache auf der Seite Clientbibliotheken.

/**
 * TODO(developer): Uncomment these variables before running the sample.
 */
// const projectId = 'YOUR_PROJECT_ID';
// const location = 'us-central1';
// const modelId = 'YOUR_MODEL_ID';

// Imports the Google Cloud AutoML library
const {AutoMlClient} = require('@google-cloud/automl').v1;

// Instantiates a client
const client = new AutoMlClient();

async function deployModelWithNodeCount() {
  // Construct request
  const request = {
    name: client.modelPath(projectId, location, modelId),
    imageClassificationModelDeploymentMetadata: {
      nodeCount: 2,
    },
  };

  const [operation] = await client.deployModel(request);

  // Wait for operation to complete.
  const [response] = await operation.promise();
  console.log(`Model deployment finished. ${response}`);
}

deployModelWithNodeCount();

Python

Bevor Sie dieses Beispiel ausprobieren, folgen Sie der Einrichtungsanleitung für diese Sprache auf der Seite Clientbibliotheken.

from google.cloud import automl

# TODO(developer): Uncomment and set the following variables
# project_id = "YOUR_PROJECT_ID"
# model_id = "YOUR_MODEL_ID"

client = automl.AutoMlClient()
# Get the full path of the model.
model_full_id = client.model_path(project_id, "us-central1", model_id)

# node count determines the number of nodes to deploy the model on.
# https://cloud.google.com/automl/docs/reference/rpc/google.cloud.automl.v1#imageclassificationmodeldeploymentmetadata
metadata = automl.ImageClassificationModelDeploymentMetadata(node_count=2)

request = automl.DeployModelRequest(
    name=model_full_id, image_classification_model_deployment_metadata=metadata
)
response = client.deploy_model(request=request)

print(f"Model deployment finished. {response.result()}")

Weitere Sprachen

C#: Folgen Sie der Anleitung zur Einrichtung von C# auf der Seite der Clientbibliotheken und rufen Sie dann die AutoML Vision-Referenzdokumentation für .NET auf.

PHP: Folgen Sie der Anleitung zur Einrichtung von PHP auf der Seite der Clientbibliotheken und rufen Sie dann die AutoML Vision-Referenzdokumentation für PHP auf.

Ruby: Folgen Sie der Anleitung zur Einrichtung von Ruby auf der Seite der Clientbibliotheken und rufen Sie dann die AutoML Vision-Referenzdokumentation für Ruby auf.

Löschen eines Modells

Im folgenden Beispiel wird ein Modell gelöscht.

Web-UI

  1. Klicken Sie in der Vision Dashboard auf das Glühbirnensymbol im linken Navigationsmenü, um die Liste der verfügbaren Modelle aufzurufen.

  2. Klicken Sie auf das Dreipunkt-Menü ganz rechts in der Zeile, die Sie löschen möchten, und wählen Sie Modell löschen.

  3. Klicken Sie im Dialogfeld zur Bestätigung auf Löschen.

    Modell löschen

REST

Ersetzen Sie dabei folgende Werte für die Anfragedaten:

  • project-id: die ID Ihres GCP-Projekts.
  • model-id: die ID Ihres Modells aus der Antwort beim Erstellen des Modells. Sie ist das letzte Element des Modellnamens. Beispiel:
    • Modellname: projects/project-id/locations/location-id/models/IOD4412217016962778756
    • Modell-ID: IOD4412217016962778756

HTTP-Methode und URL:

DELETE https://automl.googleapis.com/v1/projects/PROJECT_ID/locations/us-
central1/models/MODEL_ID

Senden Sie die Anfrage mithilfe einer der folgenden Optionen:

curl

Führen Sie folgenden Befehl aus:

curl -X DELETE \
-H "Authorization: Bearer $(gcloud auth print-access-token)" \
-H "x-goog-user-project: project-id" \
"https://automl.googleapis.com/v1/projects/PROJECT_ID/locations/us- central1/models/MODEL_ID"

PowerShell

Führen Sie folgenden Befehl aus:

$cred = gcloud auth print-access-token
$headers = @{ "Authorization" = "Bearer $cred"; "x-goog-user-project" = "project-id" }

Invoke-WebRequest `
-Method DELETE `
-Headers $headers `
-Uri "https://automl.googleapis.com/v1/projects/PROJECT_ID/locations/us- central1/models/MODEL_ID" | Select-Object -Expand Content

Die Ausgabe sieht in etwa so aus: Sie können den Status der Aufgabe anhand der Vorgangs-ID abrufen. Ein Beispiel finden Sie unter Mit lang andauernden Vorgängen arbeiten.

{
  "name": "projects/PROJECT_ID/locations/us-central1/operations/OPERATION_ID",
  "metadata": {
    "@type": "type.googleapis.com/google.cloud.automl.v1.OperationMetadata",
    "createTime": "2018-11-01T15:59:36.196506Z",
    "updateTime": "2018-11-01T15:59:36.196506Z",
    "deleteDetails": {}
  }
}

Go

Bevor Sie dieses Beispiel ausprobieren, folgen Sie der Einrichtungsanleitung für diese Sprache auf der Seite Clientbibliotheken.

import (
	"context"
	"fmt"
	"io"

	automl "cloud.google.com/go/automl/apiv1"
	"cloud.google.com/go/automl/apiv1/automlpb"
)

// deleteModel deletes a model.
func deleteModel(w io.Writer, projectID string, location string, modelID string) error {
	// projectID := "my-project-id"
	// location := "us-central1"
	// modelID := "TRL123456789..."

	ctx := context.Background()
	client, err := automl.NewClient(ctx)
	if err != nil {
		return fmt.Errorf("NewClient: %w", err)
	}
	defer client.Close()

	req := &automlpb.DeleteModelRequest{
		Name: fmt.Sprintf("projects/%s/locations/%s/models/%s", projectID, location, modelID),
	}

	op, err := client.DeleteModel(ctx, req)
	if err != nil {
		return fmt.Errorf("DeleteModel: %w", err)
	}
	fmt.Fprintf(w, "Processing operation name: %q\n", op.Name())

	if err := op.Wait(ctx); err != nil {
		return fmt.Errorf("Wait: %w", err)
	}

	fmt.Fprintf(w, "Model deleted.\n")

	return nil
}

Java

Bevor Sie dieses Beispiel ausprobieren, folgen Sie der Einrichtungsanleitung für diese Sprache auf der Seite Clientbibliotheken.

import com.google.cloud.automl.v1.AutoMlClient;
import com.google.cloud.automl.v1.ModelName;
import com.google.protobuf.Empty;
import java.io.IOException;
import java.util.concurrent.ExecutionException;

class DeleteModel {

  public static void main(String[] args)
      throws IOException, ExecutionException, InterruptedException {
    // TODO(developer): Replace these variables before running the sample.
    String projectId = "YOUR_PROJECT_ID";
    String modelId = "YOUR_MODEL_ID";
    deleteModel(projectId, modelId);
  }

  // Delete a model
  static void deleteModel(String projectId, String modelId)
      throws IOException, ExecutionException, InterruptedException {
    // Initialize client that will be used to send requests. This client only needs to be created
    // once, and can be reused for multiple requests. After completing all of your requests, call
    // the "close" method on the client to safely clean up any remaining background resources.
    try (AutoMlClient client = AutoMlClient.create()) {
      // Get the full path of the model.
      ModelName modelFullId = ModelName.of(projectId, "us-central1", modelId);

      // Delete a model.
      Empty response = client.deleteModelAsync(modelFullId).get();

      System.out.println("Model deletion started...");
      System.out.println(String.format("Model deleted. %s", response));
    }
  }
}

Node.js

Bevor Sie dieses Beispiel ausprobieren, folgen Sie der Einrichtungsanleitung für diese Sprache auf der Seite Clientbibliotheken.

/**
 * TODO(developer): Uncomment these variables before running the sample.
 */
// const projectId = 'YOUR_PROJECT_ID';
// const location = 'us-central1';
// const modelId = 'YOUR_MODEL_ID';

// Imports the Google Cloud AutoML library
const {AutoMlClient} = require('@google-cloud/automl').v1;

// Instantiates a client
const client = new AutoMlClient();

async function deleteModel() {
  // Construct request
  const request = {
    name: client.modelPath(projectId, location, modelId),
  };

  const [response] = await client.deleteModel(request);
  console.log(`Model deleted: ${response}`);
}

deleteModel();

Python

Bevor Sie dieses Beispiel ausprobieren, folgen Sie der Einrichtungsanleitung für diese Sprache auf der Seite Clientbibliotheken.

from google.cloud import automl

# TODO(developer): Uncomment and set the following variables
# project_id = "YOUR_PROJECT_ID"
# model_id = "YOUR_MODEL_ID"

client = automl.AutoMlClient()
# Get the full path of the model.
model_full_id = client.model_path(project_id, "us-central1", model_id)
response = client.delete_model(name=model_full_id)

print(f"Model deleted. {response.result()}")