When you add a BigQuery connector to your Vertex AI Vision app all the connected app model outputs will be ingested to the target table.
You can either create your own BigQuery table and specify that table when you add a BigQuery connector to the app, or let the Vertex AI Vision app platform automatically create the table.
Automatic table creation
If you let Vertex AI Vision app platform automatically create the table, you can specify this option when you add the BigQuery connector node.
The following dataset and table conditions apply if you want to use automatic table creation:
- Dataset: The automatically created dataset name is
visionai_dataset. - Table: The automatically created table name is
visionai_dataset.APPLICATION_ID. Error handling:
- If the table with the same name under the same dataset exists, no automatic creation happens.
Console
Open the Applications tab of the Vertex AI Vision dashboard.
Select View app next to the name of your application from the list.
On the application builder page select BigQuery from the Connectors section.
Leave the BigQuery path field empty.
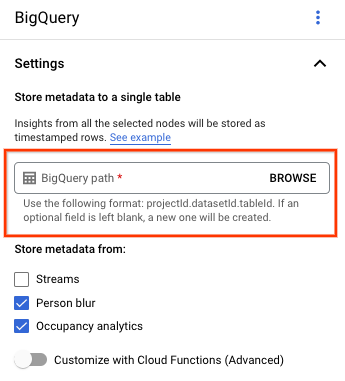
Change any other settings.
REST & CMD LINE
To let the app platform infer a table schema, use the
createDefaultTableIfNotExists field of the BigQueryConfig
when you create or update an app.
Manually create and specify a table
If you want to manage your output table manually, the table must have the required schema as a subset of the table schema.
If the existing table has incompatible schemas, the deployment is rejected.
Use the default schema
If you use the default schema for model output tables, make sure your table only contains the following required columns in the table. You can directly copy the following schema text when you create the BigQuery table. For more detailed information about creating a BigQuery table, see Create and use tables. For more information about schema specification when you create a table, see Specifying a schema.
Use the following text to describe the schema when you create a table. For
information on using the JSON column type
("type": "JSON"), see Working with JSON data in Standard SQL.
The JSON column type is recommended for annotation query. You can also use
"type" : "STRING".
[
  {
    "name": "ingestion_time",
    "type": "TIMESTAMP",
    "mode": "REQUIRED"
  },
 {
   "name": "application",
   "type": "STRING",
   "mode": "REQUIRED"
 },
 {
   "name": "instance",
   "type": "STRING",
   "mode": "REQUIRED"
 },
 {
   "name": "node",
   "type": "STRING",
   "mode": "REQUIRED"
 },
 {
   "name": "annotation",
   "type": "JSON",
   "mode": "REQUIRED"
 }
]
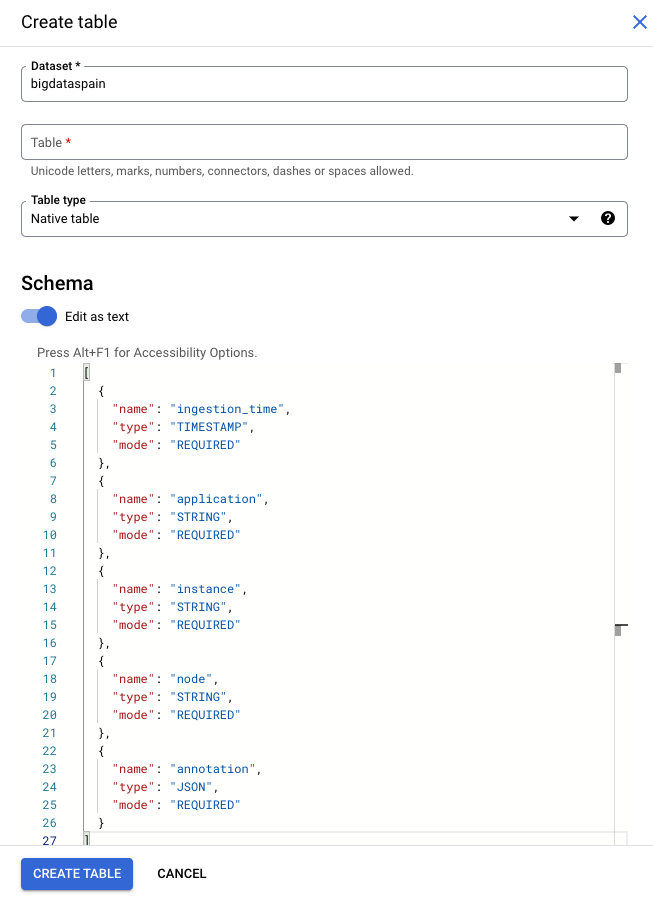
Google Cloud console
In the Google Cloud console, go to the BigQuery page.
Select your project.
Select more options .
Click Create table.
In the "Schema" section, enable Edit as text.
gcloud
The following example first creates the request JSON file, then uses the
gcloud alpha bq tables create command.
First create the request JSON file:
echo "{
\"schema\": [
    {
      \"name\": \"ingestion_time\",
      \"type\": \"TIMESTAMP\",
      \"mode\": \"REQUIRED\"
    },
    {
      \"name\": \"application\",
      \"type\": \"STRING\",
      \"mode\": \"REQUIRED\"
    },
    {
      \"name\": \"instance\",
      \"type\": \"STRING\",
      \"mode\": \"REQUIRED\"
    },
    {
      \"name\": \"node\",
      \"type\": \"STRING\",
      \"mode\": \"REQUIRED\"
    },
    {
      \"name\": \"annotation\",
      \"type\": \"JSON\",
      \"mode\": \"REQUIRED\"
    }
]
}
" >> bigquery_schema.json
Send the
gcloudcommand. Make the following replacements:TABLE_NAME: The ID of the table or fully qualified identifier for the table.
DATASET: The id of the BigQuery dataset.
gcloud alpha bq tables create TABLE_NAME \
--dataset=DATASET \
--schema-file=./bigquery_schema.json
Sample BigQuery rows generated by a Vertex AI Vision app:
| ingestion_time | application | instance | node | annotation |
|---|---|---|---|---|
| 2022-05-11 23:3211.911378 UTC | my_application | 5 | just-one-node | {"bytesFields": ["Ig1qdXN0LW9uZS1ub2RIGgE1Eg5teV9hcHBsaWNhdGlvbgjS+YnOzdj3Ag=="],"displayNames":["hello","world"],"ids":["12345","34567"]} |
| 2022-05-11 23:3211.911338 UTC | my_application | 1 | just-one-node | {"bytesFields": ["Ig1qdXN0LW9uZS1ub2RIGgExEg5teV9hcHBsaWNhdGlvbgiq+YnOzdj3Ag=="],"displayNames":["hello","world"],"ids":["12345","34567"]} |
| 2022-05-11 23:3211.911313 UTC | my_application | 4 | just-one-node | {"bytesFields": ["Ig1qdXN0LW9uZS1ub2RIGgE0Eg5teV9hcHBsaWNhdGlvbgiR+YnOzdj3Ag=="],"displayNames":["hello","world"],"ids":["12345","34567"]} |
| 2022-05-11 23:3212.235327 UTC | my_application | 4 | just-one-node | {"bytesFields": ["Ig1qdXN0LW9uZS1ub2RIGgE0Eg5teV9hcHBsaWNhdGlvbgi/3J3Ozdj3Ag=="],"displayNames":["hello","world"],"ids":["12345","34567"]} |
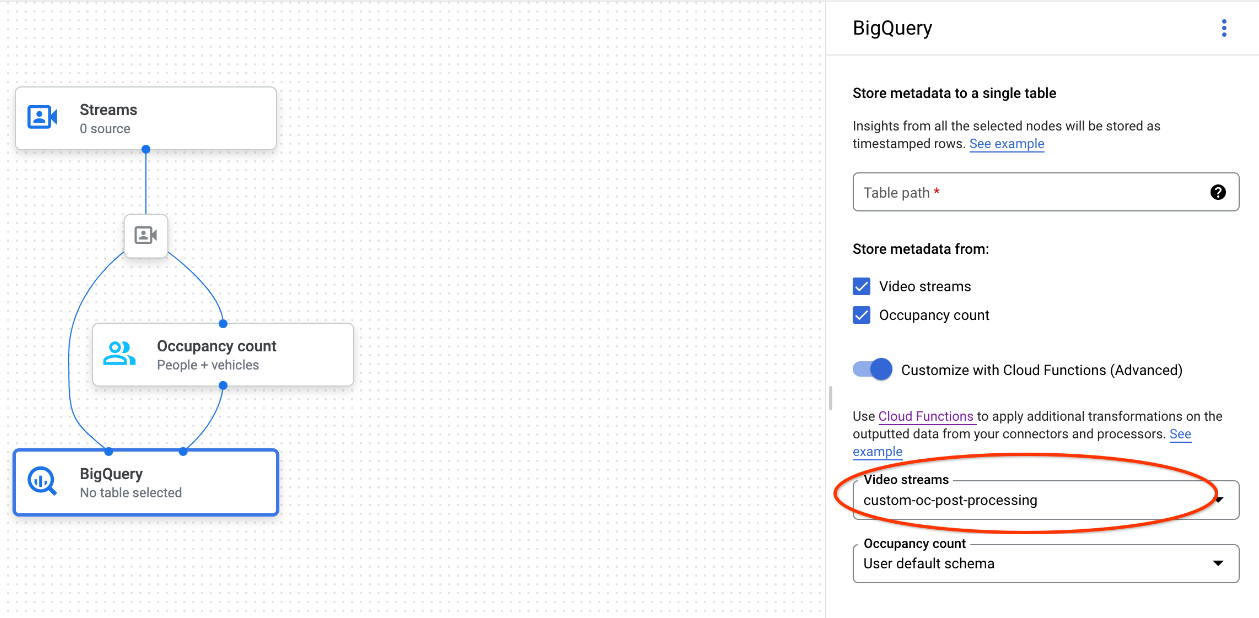
Use a customized schema
If the default schema doesn't work for your use case, you can use Cloud Run functions to generate BigQuery rows with a user-defined schema. If you use a custom schema there is no prerequisite for the BigQuery table schema.
App graph with BigQuery node selected
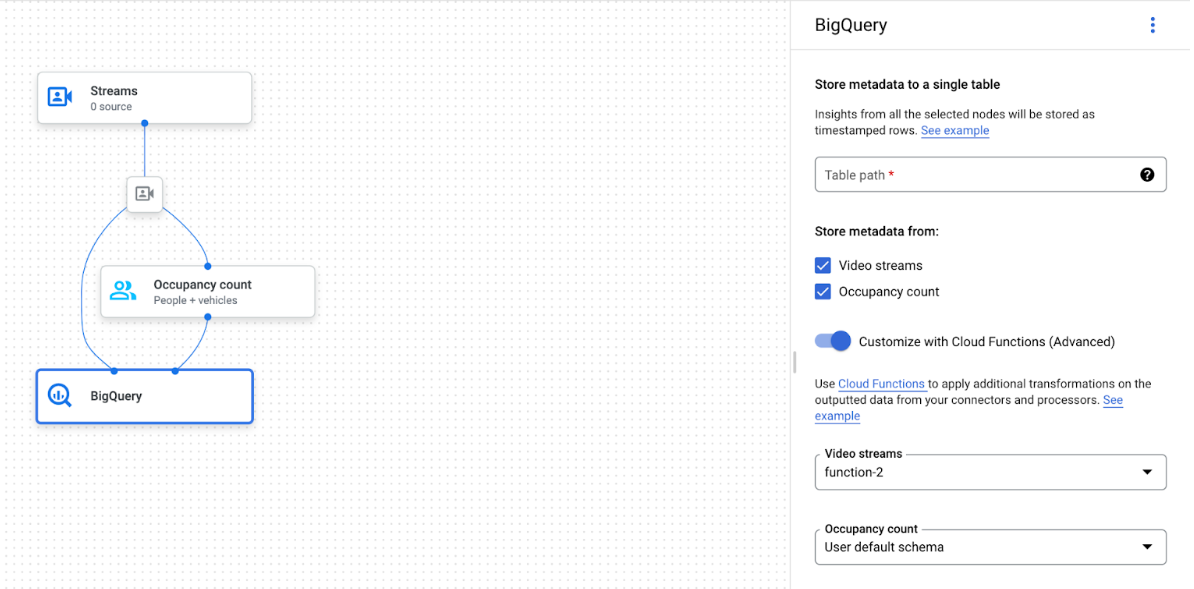
The BigQuery connector can be connected to any model that outputs video or proto-based annotation:
- For video input, the BigQuery connector only extracts the metadata data stored in the stream header and ingests this data to BigQuery as other model annotation outputs. The video itself is not stored.
- If your stream contains no metadata, nothing will be stored to BigQuery.
Query table data
With the default BigQuery table schema, you can perform powerful analysis after the table is populated with data.
Sample queries
You can use the following sample queries in BigQuery to gain insight from Vertex AI Vision models.
For example, you can use BigQuery to draw a time-based curve for maximum number of detected people per minute using data from the Person / vehicle detector model with the following query:
WITH
 nested3 AS(
 WITH
   nested2 AS (
   WITH
     nested AS (
     SELECT
       t.ingestion_time AS ingestion_time,
       JSON_QUERY_ARRAY(t.annotation.stats["fullFrameCount"]) AS counts
     FROM
       `PROJECT_ID.DATASET_NAME.TABLE_NAME` AS t)
   SELECT
     ingestion_time,
     e
   FROM
     nested,
     UNNEST(nested.counts) AS e)
 SELECT
   STRING(TIMESTAMP_TRUNC(nested2.ingestion_time, MINUTE, "America/Los_Angeles"),"America/Los_Angeles") AS time,
   IFNULL(INT64(nested2.e["count"]), 0) AS person_count
 FROM
   nested2
 WHERE
   JSON_VALUE(nested2.e["entity"]["labelString"])="Person")
SELECT
 time,
 MAX(person_count)
FROM
 nested3
GROUP BY
 time
Similarly, you can use BigQuery and the crossing line count feature of the Occupancy analytics model to create a query that counts the total number of vehicles that pass the crossing line per minute:
WITH
 nested4 AS (
 WITH
   nested3 AS (
   WITH
     nested2 AS (
     WITH
       nested AS (
       SELECT
         t.ingestion_time AS ingestion_time,
         JSON_QUERY_ARRAY(t.annotation.stats["crossingLineCounts"]) AS lines
       FROM
         `PROJECT_ID.DATASET_NAME.TABLE_NAME` AS t)
     SELECT
       nested.ingestion_time,
       JSON_QUERY_ARRAY(line["positiveDirectionCounts"]) AS entities
     FROM
       nested,
       UNNEST(nested.lines) AS line
     WHERE
       JSON_VALUE(line.annotation.id) = "LINE_ANNOTATION_ID")
   SELECT
     ingestion_time,
     entity
   FROM
     nested2,
     UNNEST(nested2.entities) AS entity )
 SELECT
   STRING(TIMESTAMP_TRUNC(nested3.ingestion_time, MINUTE, "America/Los_Angeles"),"America/Los_Angeles") AS time,
   IFNULL(INT64(nested3.entity["count"]), 0) AS vehicle_count
 FROM
   nested3
 WHERE
   JSON_VALUE(nested3.entity["entity"]["labelString"])="Vehicle" )
SELECT
 time,
 SUM(vehicle_count)
FROM
 nested4
GROUP BY
 time
Run your query
After you format your Google Standard SQL query, you can use the console to run your query:
Console
In the Google Cloud console, open the BigQuery page.
Select Expand next to you dataset name, and select your table name.
In the table detail view, click Compose new query.

Enter a Google Standard SQL query in the Query editor text area. For example queries, see sample queries.
Optional: To change the data processing location, click More, then Query settings. Under Processing location, click Auto-select and choose your data's location. Finally, click Save to update the query settings.
Click Run.
This creates a query job that writes the output to a temporary table.
Cloud Run functions integration
You can use Cloud Run functions triggering additional data processing with your customized BigQuery ingestion. To use Cloud Run functions for your customized BigQuery ingestion, do the following:
When using the Google Cloud console, select the corresponding cloud function from the dropdown menu of each connected model.
When using the Vertex AI Vision API, add one key-value pair to the
cloud_function_mappingfield ofBigQueryConfigin the BigQuery node. The key is the BigQuery node name and value is the http trigger of the target function.
To use Cloud Run functions with your customized BigQuery ingestion, the function must meet the following requirements:
- The Cloud Run functions instance has to be created before you create the BigQuery node.
- Vertex AI Vision API expects to receive an
AppendRowsRequestannotation returned from Cloud Run functions. - You must set the
proto_rows.writer_schemafield for allCloudFunctionresponses ;write_streamcan be ignored.
Cloud Run functions integration example
The following example shows how to parse occupancy count node output
(OccupancyCountPredictionResult), and
extract from it an ingestion_time, person_count, and vehicle_count table
schema.
The result of the following sample is a BigQuery table with the schema:
[
  {
    "name": "ingestion_time",
    "type": "TIMESTAMP",
    "mode": "REQUIRED"
  },
  {
    "name": "person_count",
    "type": "INTEGER",
    "mode": "NULLABLE"
  },
      {
    "name": "vehicle_count",
    "type": "INTEGER",
    "mode": "NULLABLE"
  },
]
Use the following code to create this table:
Define a proto (for example,
test_table_schema.proto) for table fields you want to write:syntax = "proto3"; package visionai.testing; message TestTableSchema { int64 ingestion_time = 1; int32 person_count = 2; int32 vehicle_count = 3; }Compile the proto file to generate the protocol buffer Python file:
protoc -I=./ --python_out=./ ./test_table_schema.protoImport the generated Python file and write the cloud function.
Python
import base64
import sys

from flask import jsonify
import functions_framework
from google.protobuf import descriptor_pb2
from google.protobuf.json_format import MessageToDict
import test_table_schema_pb2

def table_schema():
  schema = descriptor_pb2.DescriptorProto()
  test_table_schema_pb2.DESCRIPTOR.message_types_by_name[
      'TestTableSchema'].CopyToProto(schema)
  return schema

def bigquery_append_row_request(row):
  append_row_request = {}
  append_row_request['protoRows'] = {
      'writerSchema': {
          'protoDescriptor': MessageToDict(table_schema())
      },
      'rows': {
          'serializedRows':
              base64.b64encode(row.SerializeToString()).decode('utf-8')
      }
  }
  return append_row_request

@functions_framework.http
def hello_http(request):
  request_json = request.get_json(silent=False)
  annotations = []
  payloads = []
  if request_json and 'annotations' in request_json:
    for annotation_with_timestamp in request_json['annotations']:
      row = test_table_schema_pb2.TestTableSchema()
      row.person_count = 0
      row.vehicle_count = 0
      if 'ingestionTimeMicros' in annotation_with_timestamp:
        row.ingestion_time = int(
            annotation_with_timestamp['ingestionTimeMicros'])
      if 'annotation' in annotation_with_timestamp:
        annotation = annotation_with_timestamp['annotation']
        if 'stats' in annotation:
          stats = annotation['stats']
          for count in stats['fullFrameCount']:
            if count['entity']['labelString'] == 'Person':
              if 'count' in count:
                row.person_count = count['count']
            elif count['entity']['labelString'] == 'Vehicle':
              if 'count' in count:
                row.vehicle_count = count['count']
      payloads.append(bigquery_append_row_request(row))
  for payload in payloads:
    annotations.append({'annotation': payload})
  return jsonify(annotations=annotations)
To include your dependencies in Cloud Run functions, you must also upload the generated
test_table_schema_pb2.pyfile and specifyrequirements.txtsimilar to the following:functions-framework==3.* click==7.1.2 cloudevents==1.2.0 deprecation==2.1.0 Flask==1.1.2 gunicorn==20.0.4 itsdangerous==1.1.0 Jinja2==2.11.2 MarkupSafe==1.1.1 pathtools==0.1.2 watchdog==1.0.2 Werkzeug==1.0.1 protobuf==3.12.2Deploy the cloud function and set the corresponding http trigger in the
BigQueryConfig.