Per utilizzare l'evasione in un sistema di produzione, devi implementare e distribuire un servizio webhook. Per gestire l'evasione, il tuo servizio webhook deve accettare richieste JSON e restituire risposte JSON come specificato in questa guida. Il flusso di elaborazione dettagliato per l'evasione e i webhook è descritto nel documento di panoramica dell'evasione.
Requisiti del servizio webhook
Il servizio webhook deve soddisfare i seguenti requisiti:
- Deve gestire le richieste HTTPS. HTTP non è supportato. Se ospiti il servizio webhook su Google Cloud Platform utilizzando una soluzione Compute o Serverless Computing, consulta la documentazione del prodotto per la pubblicazione con HTTPS. Per altre opzioni di hosting, consulta Ottenere un certificato SSL per il tuo dominio.
- Il suo URL per le richieste deve essere accessibile pubblicamente.
- Deve gestire le richieste POST con un corpo JSON
WebhookRequest. - Deve rispondere alle richieste
WebhookRequestcon un corpo JSONWebhookResponse.
Autenticazione
È importante proteggere il servizio webhook, in modo che solo tu o il tuo agente Dialogflow siate autorizzati a effettuare richieste. Dialogflow supporta i seguenti meccanismi di autenticazione:
| Termine | Definizione |
|---|---|
| Nome utente e password di accesso | Per le impostazioni del webhook, puoi specificare valori facoltativi per nome utente e password di accesso. Se fornita, Dialogflow aggiunge un'intestazione HTTP di autorizzazione alle richieste webhook. Questa intestazione ha il formato: "authorization: Basic <base 64 encoding of the string username:password>". |
| Intestazioni di autenticazione | Per le impostazioni del webhook, puoi specificare coppie chiave-valore di intestazione HTTP facoltative. Se fornite, Dialogflow aggiunge queste intestazioni HTTP alle richieste webhook. È comune fornire una singola coppia con una chiave di authorization. |
| Autenticazione integrata di Cloud Functions | Puoi utilizzare l'autenticazione integrata quando utilizzi Cloud Functions. Per utilizzare questo tipo di autenticazione, non fornire il nome utente di accesso, la password di accesso o le intestazioni di autorizzazione. Se fornisci uno di questi campi, questi verranno utilizzati per l'autenticazione anziché l'autenticazione integrata. |
| Token di identità del servizio | Puoi utilizzare i token di identità del servizio per l'autenticazione. Se non fornisci il nome utente di accesso, la password di accesso o un'intestazione con una chiave di authorization, Dialogflow presuppone automaticamente che debbano essere utilizzati i token di identità del servizio e aggiunge un'intestazione HTTP di autorizzazione alle richieste webhook. Questa intestazione ha il formato: "authorization: Bearer <identity token>". |
| Autenticazione TLS reciproca | Consulta la documentazione relativa all'autenticazione TLS reciproca. |
Richiesta webhook
Quando viene trovata una corrispondenza per un intent configurato per l'evasione, Dialogflow invia una richiesta webhook POST HTTPS al tuo servizio webhook. Il corpo di questa richiesta è un oggetto JSON con informazioni sull'intent corrispondente.
Oltre alla query dell'utente finale, molte integrazioni inviano anche alcune
informazioni sull'utente finale. Ad esempio, un ID per identificare in modo univoco
l'utente. Queste informazioni sono accessibili tramite il campo originalDetectIntentRequest
nella richiesta webhook, che conterrà le informazioni inviate dalla
piattaforma di integrazione.
Per informazioni dettagliate, consulta la documentazione di riferimento di
WebhookRequest.
Ecco una richiesta di esempio:
{
  "responseId": "response-id",
  "session": "projects/project-id/agent/sessions/session-id",
  "queryResult": {
    "queryText": "End-user expression",
    "parameters": {
      "param-name": "param-value"
    },
    "allRequiredParamsPresent": true,
    "fulfillmentText": "Response configured for matched intent",
    "fulfillmentMessages": [
      {
        "text": {
          "text": [
            "Response configured for matched intent"
          ]
        }
      }
    ],
    "outputContexts": [
      {
        "name": "projects/project-id/agent/sessions/session-id/contexts/context-name",
        "lifespanCount": 5,
        "parameters": {
          "param-name": "param-value"
        }
      }
    ],
    "intent": {
      "name": "projects/project-id/agent/intents/intent-id",
      "displayName": "matched-intent-name"
    },
    "intentDetectionConfidence": 1,
    "diagnosticInfo": {},
    "languageCode": "en"
  },
  "originalDetectIntentRequest": {}
}
Risposta del webhook
Una volta che il webhook riceve una richiesta webhook, deve inviare una risposta webhook. Il corpo di questa risposta è un oggetto JSON con le seguenti informazioni:
- La risposta che Dialogflow restituisce all'utente finale.
- Aggiornamenti ai contesti attivi per la conversazione.
- Un evento di follow-up per attivare una corrispondenza di intent.
- Un payload personalizzato da inviare all'integrazione o al client di rilevamento dell'intent
Alla tua risposta si applicano le seguenti limitazioni:
- La risposta deve avvenire entro 10 secondi per le applicazioni Assistente Google o 5 secondi per tutte le altre applicazioni, altrimenti la richiesta scadrà.
- La risposta deve avere una dimensione inferiore o uguale a 64 KiB.
Per informazioni dettagliate, consulta la documentazione di riferimento di
WebhookResponse.
Messaggio di risposta
Esempio per una risposta di testo:
{
  "fulfillmentMessages": [
    {
      "text": {
        "text": [
          "Text response from webhook"
        ]
      }
    }
  ]
}
Risposta della carta
Esempio di una risposta con scheda:
{
  "fulfillmentMessages": [
    {
      "card": {
        "title": "card title",
        "subtitle": "card text",
        "imageUri": "https://example.com/images/example.png",
        "buttons": [
          {
            "text": "button text",
            "postback": "https://example.com/path/for/end-user/to/follow"
          }
        ]
      }
    }
  ]
}
Risposta dell'Assistente Google
Esempio di una risposta dell'Assistente Google:
{
  "payload": {
    "google": {
      "expectUserResponse": true,
      "richResponse": {
        "items": [
          {
            "simpleResponse": {
              "textToSpeech": "this is a Google Assistant response"
            }
          }
        ]
      }
    }
  }
}
Contesto
Esempio che imposta il contesto di output:
{
  "fulfillmentMessages": [
    {
      "text": {
        "text": [
          "Text response from webhook"
        ]
      }
    }
  ],
  "outputContexts": [
    {
      "name": "projects/project-id/agent/sessions/session-id/contexts/context-name",
      "lifespanCount": 5,
      "parameters": {
        "param-name": "param-value"
      }
    }
  ]
}
Evento
Esempio che richiama un evento personalizzato:
{
  "followupEventInput": {
    "name": "event-name",
    "languageCode": "en-US",
    "parameters": {
      "param-name": "param-value"
    }
  }
}
Entità di sessione
Esempio che imposta un'entità sessione:
{
  "fulfillmentMessages": [
    {
      "text": {
        "text": [
          "Choose apple or orange"
        ]
      }
    }
  ],
  "sessionEntityTypes":[
    {
      "name":"projects/project-id/agent/sessions/session-id/entityTypes/fruit",
      "entities":[
        {
          "value":"APPLE_KEY",
          "synonyms":[
            "apple",
            "green apple",
            "crabapple"
          ]
        },
        {
          "value":"ORANGE_KEY",
          "synonyms":[
            "orange"
          ]
        }
      ],
      "entityOverrideMode":"ENTITY_OVERRIDE_MODE_OVERRIDE"
    }
  ]
}
Payload personalizzato
Esempio che fornisce un payload personalizzato:
{
  "fulfillmentMessages": [
    {
      "payload": {
        "facebook": { // for Facebook Messenger integration
          "attachment": {
            "type": "",
            "payload": {}
          }
        },
        "slack": { // for Slack integration
          "text": "",
          "attachments": []
        },
        "richContent": [ // for Dialogflow Messenger integration
          [
            {
              "type": "image",
              "rawUrl": "https://example.com/images/logo.png",
              "accessibilityText": "Example logo"
            }
          ]
        ],
        // custom integration payload here
      }
    }
  ]
}
Attivare e gestire l'evasione ordini
Per attivare e gestire l'evasione per il tuo agente con la console:
- Vai alla console Dialogflow ES.
- Seleziona un agente.
- Seleziona Fulfillment nel menu della barra laterale a sinistra.
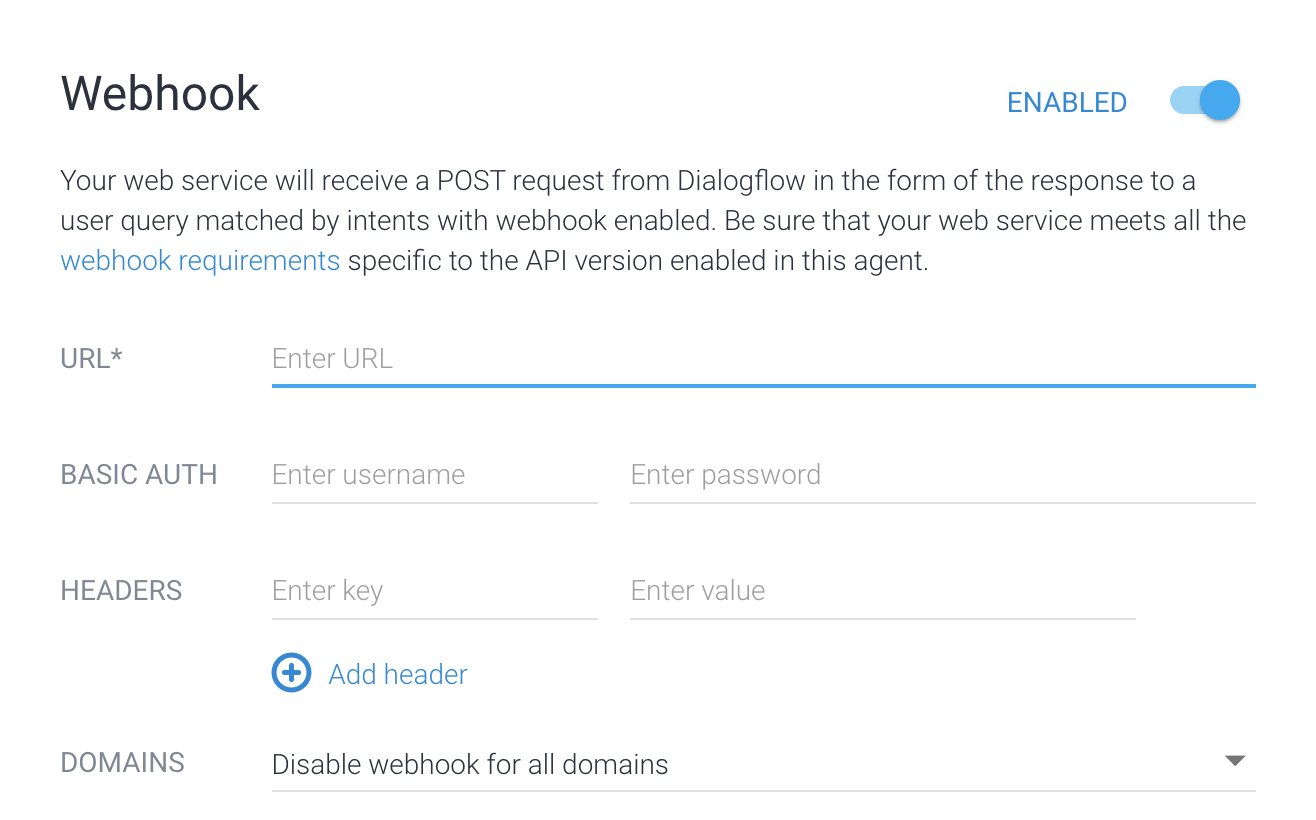
- Imposta il campo Webhook su Abilitato.
- Fornisci i dettagli del servizio webhook nel modulo. Se il webhook non richiede l'autenticazione, lascia vuoti i campi di autenticazione.
- Fai clic su Salva nella parte inferiore della pagina.
Per abilitare e gestire l'evasione per il tuo agente con l'API,
consulta il
riferimento dell'agente.
I metodi getFulfillment e updateFulfillment possono
essere utilizzati per gestire le impostazioni di evasione.
Per attivare l'evasione per un intent con la console:
- Seleziona Intent nel menu della barra laterale a sinistra.
- Seleziona un intento.
- Scorri verso il basso fino alla sezione Fulfillment.
- Attiva l'opzione Abilita chiamata webhook per questo intent.
- Fai clic su Salva.
Per abilitare l'evasione per un intent con l'API,
consulta il
riferimento agli intent.
Imposta il campo webhookState su WEBHOOK_STATE_ENABLED.
Errori webhook
Se il servizio webhook rileva un errore, deve restituire uno dei seguenti codici di stato HTTP:
400Richiesta errata401Non autorizzato403Vietato404non trovato500Errore del server503Servizio non disponibile
In una delle seguenti situazioni di errore, Dialogflow risponde all'utente finale con la risposta integrata configurata per l'intent attualmente corrispondente:
- Timeout della risposta superato.
- Ricevuto codice di stato di errore.
- La risposta non è valida.
- Il servizio webhook non è disponibile.
Inoltre, se la corrispondenza dell'intent è stata attivata da una
chiamata API detect intent,
il campo status nella risposta detect intent contiene le informazioni sull'errore del webhook. Ad esempio:
"status": {
    "code": 206,
    "message": "Webhook call failed. <details of the error...>"
}
Nuovi tentativi automatici
Dialogflow ES include meccanismi interni che eseguono automaticamente nuovi tentativi in caso di determinati errori webhook per migliorare la robustezza. Vengono ritentati solo gli errori non terminali (ad esempio, errori di timeout o di connessione).
Per ridurre la probabilità di chiamate duplicate:
- Imposta soglie di timeout del webhook più lunghe.
- Supporta l'idempotenza nella logica del webhook o deduplica.
Utilizzo di Cloud Functions
Esistono diversi modi per utilizzare Cloud Functions per l'evasione. L'editor in linea di Dialogflow si integra con Cloud Functions. Quando utilizzi l'editor in linea per creare e modificare il codice webhook, Dialogflow stabilisce una connessione sicura alla tua Cloud Function.
Hai anche la possibilità di utilizzare una Cloud Function non creata dall'editor incorporato (ad esempio perché vuoi utilizzare un linguaggio diverso da Node.js). Se la Cloud Function risiede nello stesso progetto dell'agente, quest'ultimo può chiamare il webhook senza richiedere alcuna configurazione speciale.
Tuttavia, ci sono due situazioni in cui devi configurare manualmente questa integrazione:
- Per il progetto dell'agente deve esistere l'account di servizio
agente di servizio Dialogflow
con il seguente indirizzo:
service-agent-project-number@gcp-sa-dialogflow.iam.gserviceaccount.com
- Crea un nuovo agente per il progetto.
- Esegui questo comando:
gcloud beta services identity create --service=dialogflow.googleapis.com --project=agent-project-id
- Se la funzione webhook si trova in un progetto diverso da quello dell'agente, devi fornire il ruolo IAM Invoker Cloud Functions all'account di servizio agente di servizio Dialogflow nel progetto della funzione.
Token di identità del servizio
Quando Dialogflow chiama un webhook, fornisce un
token ID Google
con la richiesta.
Qualsiasi webhook può facoltativamente convalidare il token
utilizzando le librerie client Google o librerie open source come
github.com/googleapis/google-auth-library-nodejs.
Ad esempio, puoi verificare il email del token ID come segue:
service-agent-project-number@gcp-sa-dialogflow.iam.gserviceaccount.com
Esempi
Gli esempi riportati di seguito mostrano come ricevere un WebhookRequest e inviare un WebhookResponse.
Questi esempi fanno riferimento agli intent creati nella
guida rapida.
Go
Per eseguire l'autenticazione in Dialogflow, configura le Credenziali predefinite dell'applicazione. Per ulteriori informazioni, consulta Configura l'autenticazione per un ambiente di sviluppo locale.
import (
	"encoding/json"
	"fmt"
	"log"
	"net/http"
)

type intent struct {
	DisplayName string `json:"displayName"`
}

type queryResult struct {
	Intent intent `json:"intent"`
}

type text struct {
	Text []string `json:"text"`
}

type message struct {
	Text text `json:"text"`
}

// webhookRequest is used to unmarshal a WebhookRequest JSON object. Note that
// not all members need to be defined--just those that you need to process.
// As an alternative, you could use the types provided by
// the Dialogflow protocol buffers:
// https://godoc.org/google.golang.org/genproto/googleapis/cloud/dialogflow/v2#WebhookRequest
type webhookRequest struct {
	Session     string      `json:"session"`
	ResponseID  string      `json:"responseId"`
	QueryResult queryResult `json:"queryResult"`
}

// webhookResponse is used to marshal a WebhookResponse JSON object. Note that
// not all members need to be defined--just those that you need to process.
// As an alternative, you could use the types provided by
// the Dialogflow protocol buffers:
// https://godoc.org/google.golang.org/genproto/googleapis/cloud/dialogflow/v2#WebhookResponse
type webhookResponse struct {
	FulfillmentMessages []message `json:"fulfillmentMessages"`
}

// welcome creates a response for the welcome intent.
func welcome(request webhookRequest) (webhookResponse, error) {
	response := webhookResponse{
		FulfillmentMessages: []message{
			{
				Text: text{
					Text: []string{"Welcome from Dialogflow Go Webhook"},
				},
			},
		},
	}
	return response, nil
}

// getAgentName creates a response for the get-agent-name intent.
func getAgentName(request webhookRequest) (webhookResponse, error) {
	response := webhookResponse{
		FulfillmentMessages: []message{
			{
				Text: text{
					Text: []string{"My name is Dialogflow Go Webhook"},
				},
			},
		},
	}
	return response, nil
}

// handleError handles internal errors.
func handleError(w http.ResponseWriter, err error) {
	w.WriteHeader(http.StatusInternalServerError)
	fmt.Fprintf(w, "ERROR: %v", err)
}

// HandleWebhookRequest handles WebhookRequest and sends the WebhookResponse.
func HandleWebhookRequest(w http.ResponseWriter, r *http.Request) {
	var request webhookRequest
	var response webhookResponse
	var err error

	// Read input JSON
	if err = json.NewDecoder(r.Body).Decode(&request); err != nil {
		handleError(w, err)
		return
	}
	log.Printf("Request: %+v", request)

	// Call intent handler
	switch intent := request.QueryResult.Intent.DisplayName; intent {
	case "Default Welcome Intent":
		response, err = welcome(request)
	case "get-agent-name":
		response, err = getAgentName(request)
	default:
		err = fmt.Errorf("Unknown intent: %s", intent)
	}
	if err != nil {
		handleError(w, err)
		return
	}
	log.Printf("Response: %+v", response)

	// Send response
	if err = json.NewEncoder(w).Encode(&response); err != nil {
		handleError(w, err)
		return
	}
}
Java
Per eseguire l'autenticazione in Dialogflow, configura le Credenziali predefinite dell'applicazione. Per ulteriori informazioni, consulta Configura l'autenticazione per un ambiente di sviluppo locale.
Node.js
Per eseguire l'autenticazione in Dialogflow, configura le Credenziali predefinite dell'applicazione. Per ulteriori informazioni, consulta Configura l'autenticazione per un ambiente di sviluppo locale.
Python
Per eseguire l'autenticazione in Dialogflow, configura le Credenziali predefinite dell'applicazione. Per ulteriori informazioni, consulta Configura l'autenticazione per un ambiente di sviluppo locale.