Contact Center AI Platform (CCAI Platform) provides the ability to perform outbound calling campaigns. A campaign includes a list of customers that should be contacted and are managed through the CCAI Platform campaign manager.
Campaign manager
Users with administrator role can set up the outbound dialer using campaign manager.
The campaign manager allows for the manual control of campaigns (start and pause buttons in the Action column).
Creates campaigns in the campaign manager by:
Uploading a contact list.
Setting the dialing mode.
Selecting the target queue.
When a campaign starts, it reserves available agents in the selected target queue and sends them contacts from the campaign contact list, following the flow defined for the selected dialing mode.
To access the campaign manager, go to Campaigns in the CCAI Platform portal.
The campaign manager includes the following columns:
Campaign name
Assigned queue
Mode: the type of campaign:
Preview: a preview campaign has the agent manually dial the contact.
Predictive: a predictive campaign predicts how many contacts need to be dialed.
Progressive: a progressive campaign uses reserved agents.
Status: the current status of the campaign:
Ready: the campaign is ready to be started
Running: the campaign is being executed
Paused: the campaign has been paused, and execution is halted
Completed: the campaign has completed execution
Action: change the status of the campaign:
Play: pause the execution of the campaign
Pause: temporarily halt the execution of the campaign
Total Volume
Progress
Start a campaign
To get a campaign to progress, be sure that the following requirements are met.
Queue: One queue must be built. See IVR: Add and edit queues menus.
Agent: One agent must be in Available status. See Agent statuses.
Action column
The Action column is used to start, pause, or restart campaigns. The action buttons available are based on the current execution status of the campaign.
For a new campaign, click Play to begin the campaign. The status for this campaign will be updated to Running and the refresh cycle for the progress bar will begin.
If the campaign execution needs to be placed on hold, click Pause in the action column. The execution status is set to paused and the progress bar will stop refreshing.
To resume the execution of a paused campaign, click Play again to restart execution of the campaign. The execution status will return to Running and the refresh cycle for the progress bar will be reset.
Once a campaign has completed, no buttons will be displayed in the Action column for that campaign.
Progress column
The progress column indicates the list position of the next contact to be called.
When the green progress bar is full, the campaign has reached the end of the list and the campaign execution status is updated to Completed. If the campaign execution is manually paused, the progress bar will also be paused until the campaign is restarted.
Campaign data is processed in real-time and automatically updates the progress bar, the campaign metrics, campaign status, and the action buttons as calls are made.
You can also click the Refresh icon to see new campaigns that have been added since your last refresh.
Outbound dialer campaign call status window
The call status window shows the number of calls from the campaign that fall into each of the various statuses. These metrics provide real-time feedback that allows managers to quickly adjust their strategies for upcoming campaigns and ensure agent productivity. These metrics also provide insight into any data quality issues in their campaign file.
To access the call status window, click the campaign for which you want to view statistics and click the External link icon adjacent to the progress bar.
Call status window
In the call status window you can see call volumes by status for various metrics. The metrics available in this window will vary by campaign type.
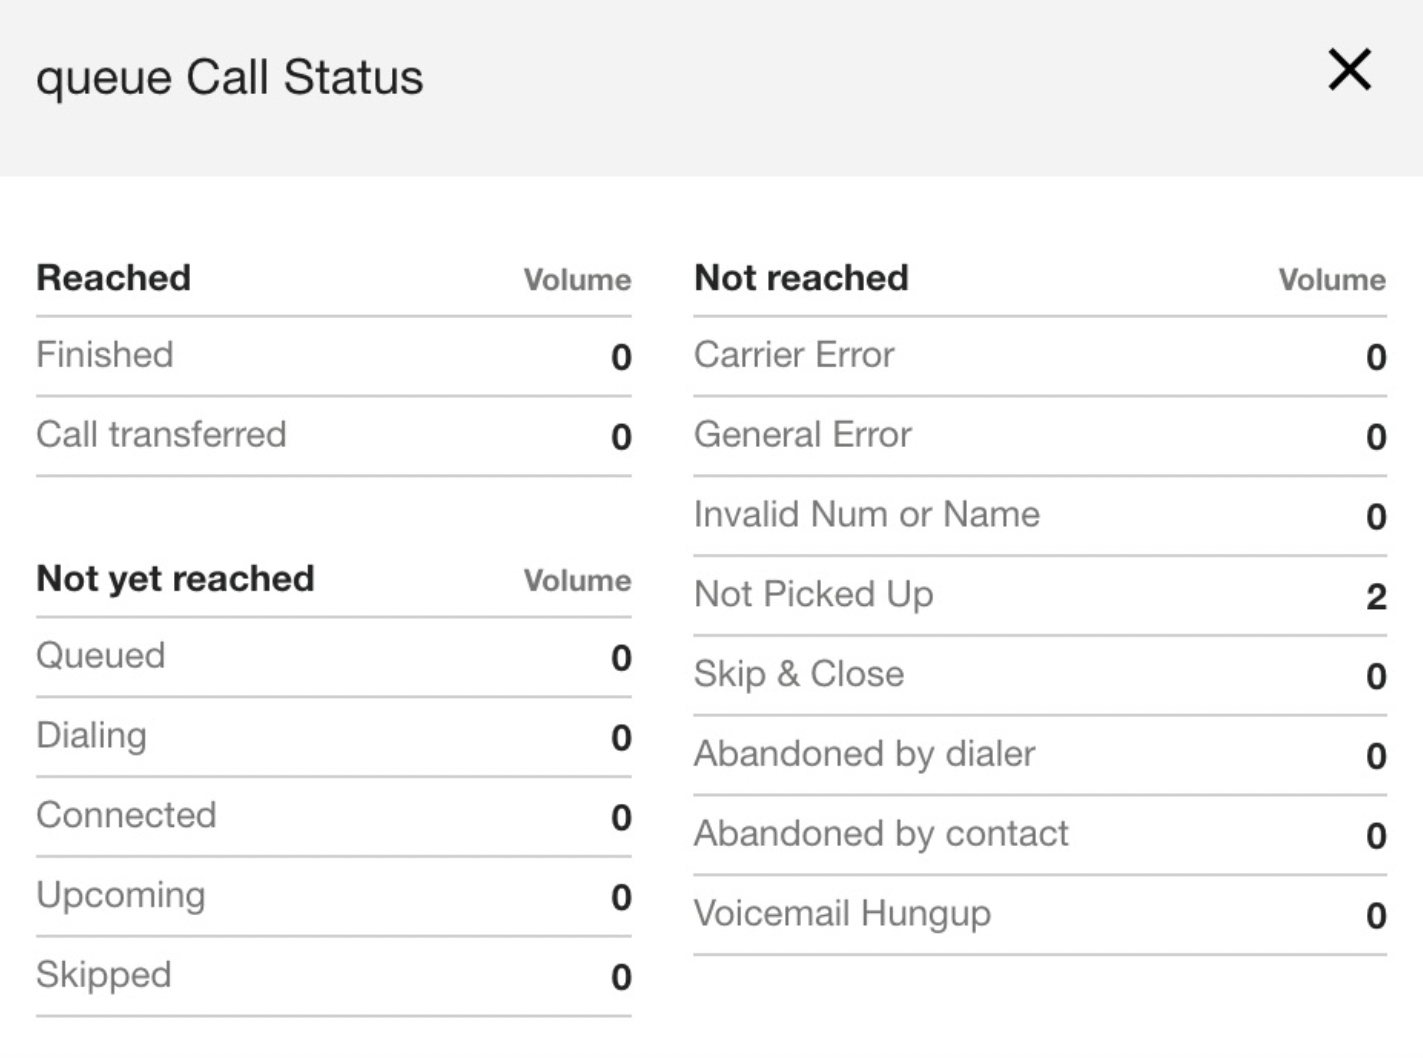
Reached
Finished: Agent connected to end-user.
Call transferred: Agent connected to end-user, then transferred the end-user to another agent.
Not Yet Reached
Queued: Calls in a queue waiting to be called.
Dialing: Contacts that are being dialed.
Connected: Connected calls.
Upcoming: Number has not yet been called.
Skipped: The agent clicked Skip, which keeps the contact in the campaign (Preview campaigns only).
Not Reached
Carrier Error: Dialer experienced a call error, such as prolonged ringing with no pickup.
General Error: Any error that does not fall into another error category.
Invalid Number or Name: Number from the CSV file is in an unsupported format, isn't the right number of digits, is a duplicate within the campaign, or is missing a name.
Not Picked Up: Calls that were not answered by the end-user.
Skip & Close: Agent clicked Skip & close to take the contact out of the campaign (preview campaigns only).
Abandon by Contact: The end-user answered, but hung up (for example, a short abandon).
Voicemail Hung Up: The dialer encountered a voicemail and the agent hung up without leaving a message.
Click Close to close the call status window.
Outbound number
Outbound number is a feature of the outbound dialer that provides the ability to specify which outbound number to use when dialing out for each contact. With this feature, you can rotate outbound phone numbers for more control over the outbound phone numbers you use to make your outbound calls.
You can specify which outbound number to use when dialing out for each contact by adding a new column named outbound number to your campaign management CSV. If the outbound number column is missing or the value is not committed, the default outbound phone number will be used.
The dialer will use this number when dialing out if it has been validated on the CCAI Platform. If the outbound number is not validated, the contact will fail and log an error. The outbound number is displayed in the CCAI Platform agent adapter.
Outbound dialer campaign mode global settings
To enable Campaign Mode at the global settings:
In the CCAI Platform portal, go to Settings > Campaign.
On the panel, turn on the campaign by clicking the switch next to the campaign you would like to enable.
Click Save.
Add a Unique ID for campaign reporting
The following instructions outline how to add a Unique ID column to a campaign management CSV file for reporting purposes.
The process includes adding a Unique ID column to a CSV file using spreadsheet software, uploading the file to a campaign, running the campaign to populate the data, and viewing the Unique ID in the reporting data.
The Unique ID column in the CSV file has no restrictions on formatting. It accepts both alphanumeric and special characters, with no maximum length enforced. You can use Unique ID to represent any relevant identifier such as a customer ID in another CRM, a SKU, or any other identifier.
Add a Unique ID column and upload the CSV file to a campaign
Open the campaign CSV file that you want to upload and add a column called
Unique ID. Save the changes to the CSV file.In the CCAI Platform portal, go to the campaign manager.
Click +Add campaign. A campaign settings dialogue will display.
Click choose file and select the file with the Unique ID column added.
Click open to upload the file.
Select the queue.
Click Save.
Populate data through the campaign for reporting purposes
After the CSV file has been uploaded, the campaign execution status will progress to Ready.
Click *Start to start the execution of the campaign.
Wait for the status of the file to change to Ready.
Click Start to begin the execution of the campaign. Allow the campaign to run for a while.
View the Unique ID results in detailed campaign reporting
Go to Reports > Campaigns.
Under Step 1: Select Campaign Mode, choose which type of campaign you want to generate reports on.
Under Step 2: Select Campaigns, choose the campaign associated with the CSV file containing a Unique ID.
In Step 3: Select Reports Desired, choose the reports you would like to download by checking the box next to the report (options appear based on campaign type selected in Step 1). Be sure to select a detailed report.
In Step 4: Choose Filters, configure the filter the reports by timeframe or time zone.
Click Download.
After the file is downloaded, open it to view the Unique ID column.
Company DNC list
CCAI Platform provides the ability to create your own DNC registry for campaign calls at the Company level. You can configure the DNC list th block direct, manual, and outbound calls, as well as outbound and scheduled calls created by the Apps API. If an agent attempts to contact an end-user on the list, they will receive a message "This call cannot be placed because the phone number is on the Company DNC list".
The dialer checks the DNC list before dialing each number, and skips blocked numbers. Configured emergency numbers cannot be added to the Company DNC list or blocked from outbound calls.
Automated callback scenarios won't be blocked (such as during a dropped call).
For outbound calls in Preview mode, the contact is presented to the agent only if it's not on the DNC list.
Third party additions are blocked if the third party number is on the Company DNC.
Enable the DNC list
Go to Settings > Campaigns > Company Do Not Call (DNC) List and toggle the switch to ON. When toggle is set to ON, additional menu options will appear.
(Optional) Check the box to apply the DNC list check to direct, manual outbound calls made by agents in addition to outbound and scheduled calls created by the Apps API.
(Optional) Enable the Do Not Call Again disposition code to use this code to add end-users to the DNC list. Both the disposition code and the DNC list itself must be enabled in order for the DNC list to work in conjunction with the disposition code.
After both the DNC feature and Do Not Call Again disposition code are enabled, the DNC list will be continually updated with new contacts tagged with the disposition code. The DNC list contains contact entries with the following fields:
Note: A string of up to 200 characters.Phone number: A phone number to not call.Timestamp: The time when the contact was added to the list.Expires at: A date and time when the number can be removed from the DNC list.
Contacts are removed from the DNC list within an hour of the expiration time. If this parameter is not set, the number remains on the list indefinitely.
View the DNC and blocked numbers in Reporting
Attempted calls to a blocked number are included in the real-time metrics display.
Attempted calls that were blocked by the DNC are included as
dnc_abandonedwith the reason: Company DNC.Numbers on the DNC list are reported in the campaign summary report.
API commands for the company DNC list
The Company DNC API endpoints allow you to:
Add multiple phone numbers to the DNC list simultaneously.
Remove phone numbers from the DNC list.
Check whether a phone number is on the DNC list.
See the Apps API documentation for complete details.
Time zone list management
Time zone management simplifies managing different time zones and call time regulations. For example, some regions have strict rules for when telemarketing calls are allowed. You can use time zone management settings to configure only calling authorized numbers during permitted time frames.
Time zone management is based on creating rules and organizing them into schemas:
Time zone rule: A rule specifying when an outbound call can be placed. Includes the time zone, code, and time span.
Time zone schema: A set of time zone rules with a unique name, used to organize and manage time zone settings.
You can access time zone management settings under Settings > Campaigns. Click Manage setting to open the time zone management settings menu.
Time zone rules
The Time zone rules tab provides the ability to create, edit, and delete time zone rules. Rules can be grouped together to create a time zone schema.
Time zone rules consist of the following parts:
Code: A label for the time zone rule.
Time zone: Each rule can only contain one time zone.
Time span: A list of which times apply to which days.
Create a time zone rule
Click Add time zone rule.
Select a time zone from the drop-down menu in the Time zone field. The time zones in the list align with the time zones of the existing hours of operation.
Enter a name for your time zone rule in the Code field.
Select a time span option:
Default time span: This option chooses every weekday by default. You just need to specify the time span for the rule (in 24 hour time).
Custom time span: This option provides the ability to adjust the hours for each day of the week individually (in 24 hour time).
- Click Save. The new rule appears in the Time zone rules tab.
Edit or delete a time zone rule
Select the Options menu (3 horizontal dots) on the right-hand side of the time zone rules list. You will see the option to delete or edit each rule.
If you choose to edit the rule, a box will pop up that provides the ability to make changes.
If you delete a rule, the rule will be removed from all schemas that contain it.
Time zone schemas
A time zone schema is made up of one or more time zone rules. You can create up to 100 different schemas.
Create new time zone schema
In the CCAI Platform portal, go to the time zone schema tab.
Click Add time zone schema.
Enter a name for the new schema in the Name field. Names must be unique and no longer than 64 alphanumeric characters.
Select a time zone from the drop-down list in the time zone field.
Select a time zone option to create a default time zone rule. You must create a default rule for each new schema before you can add additional rules.
- Default time span: This option chooses every weekday by default. Adjust the time span for the rule (in 24 hour time format).
- Custom time span: This option provides the ability to adjust the hours for each day of the week individually (in 24 hour time format).
Click Save to save the schema. You can now add additional rules to the schema as needed.
Add new rules to an existing time zone schema
In the CCAI Platform portal, go to the Campaign management > Time zone schema tab.
Select the name of the time zone schema you want to add a rule to. You will see a list of all the rules contained within the schema. Click add time zone rule to add an existing rule or create time zone rule to create a new rule.
Edit rules of a time zone schema
To edit the time zone schema rule:
In the CCAI Platform portal, go to Campaign management > Time zone schema tab.
Select the menu (3 horizontal lines) adjacent to the schema you want to edit. You will see the option to delete or edit the schema.
Select edit schema. A new box appears where you can change the name of the schema and the time zone associated with the default rule.
Make your selections and click save. The default rule for the schema is now changed.
To edit a non-default rule in the schema:
In the CCAI Platform portal, navigate to the Campaign Management > Time zone schema tab and click the time zone schema you want to change. You will see the full list of rules contained in the schema.
Select the options menu menu icon adjacent to the rule you want to change. You will see the option to delete or edit each rule.
If you choose to edit a rule, a box pops up that provides the ability to make changes. Changes are applied to all schemas that contain the same rule.
If you choose to delete a rule, the rule is removed from all schemas that contain it.
Apply time zone schema to an existing campaign
To apply a time zone schema to an existing campaign, follow these steps:
Access the campaign manager by clicking Campaigns.
Click the campaign you want to add a schema to. A edit icon will appear adjacent to the entry. Click the icon to bring up the edit campaign window.
In the Assign time zone schema section, select your schema from the drop-down list.
Click Save to apply changes.
Apply a schema to a new campaign
In order to be able to apply a time zone schema to a new campaign, follow these steps:
In the CCAI Platform portal, access the campaign manager by clicking on Campaigns.
Click Create campaign to open the add campaign window.
In the Assign time zone schema, select your schema from the drop-down list.
Click Save to apply changes.
Expected behavior for campaigns with assigned time zone schemas
When you upload a campaign CSV file, the time zone must be included as its own value. The following is an example of a CSV file containing the time zone field:
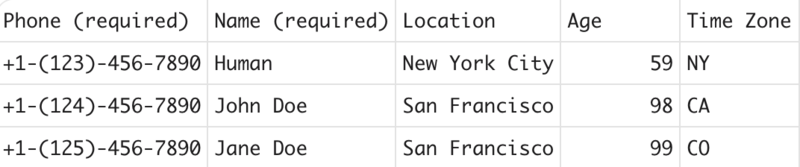
Time zone schemas are not applied by default. If none is assigned, the dialer will call all contacts in the list as usual.
Time zone schemas apply to all dialer modes.
The dialer compares the value from the contact's time zone field against the name of each rule in the assigned schema. If the values match, the relevant time zone rule is applied, and the dialer will only place a call during the time span in the related rule.
If the time zone field of a contact does not match any of the time zone rules in the schema, or is not set, then the default time zone rule for that schema is used.
The dialer will skip any over any contacts that the schema prevents it from dialing.
After all the contacts in the list have been processed, the dialer will begin the process again to see if there are any skipped calls it can now make.
New contacts are added to the list without triggering a list review.
Edit a campaign
To edit a campaign that has already been created, follow these steps:
In the CCAI Platform portal, go to Campaigns.
Click the campaign you want to update and select the Edit icon.
In the Edit campaign window, make any necessary changes to the current settings.
Click Set.
Delete a campaign
To delete a campaign, follow these steps:
Select Campaigns in the CCAI Platform portal.
Select the campaign you want to delete.
Click Delete in the far right column.
The selected campaign is removed.
Call blending
Call blending lets agents automatically transition between handling inbound and outbound calls based on real-time call volume and user-defined conditions. This optimizes agent utilization and ensures timely handling of inbound calls. Potential benefits of using this configuration include:
Optimized agent utilization: efficiently manage both inbound and outbound calls with the same pool of agents
Improved customer service: prioritize inbound call handling during peak periods to reduce wait times and abandoned calls
Enhanced operational flexibility: adapt to fluctuating call volumes and adjust agent allocation in real-time
Call blending uses a queue-level condition configuration to determine when agents should be pulled away from outbound campaigns to handle inbound calls.
The following conditions can be set:
Minimum number of available assigned agents
Queue length
SLA threshold
All conditions can be combined using AND or OR operators.
When the blending condition is met, the system temporarily removes agents from outbound campaigns after they complete their ongoing calls. If agents are assigned to multiple campaigns, the system prohibits all campaign calls from all campaigns. These agents are then allocated to handle inbound calls until the queue no longer meets the blending condition. At that point, agents resume receiving new outbound call connections.
Permissions
Any administrator with Settings > Queue > All other features permission can configure these settings. No new permissions are needed.
Configuring call blending at the queue level
The call blending feature can be configured on a queue-by-queue basis. There's no global setting for this feature.
The blending condition can be enabled and configured from the queue settings menu by following these steps:
Go to Settings > Queue Menu Settings > IVR > {Queue}
From the queue settings menu, select Configure next to Call blending.
- This opens a configuration menu where you can enable call blending and select the Blending condition options you want to include.
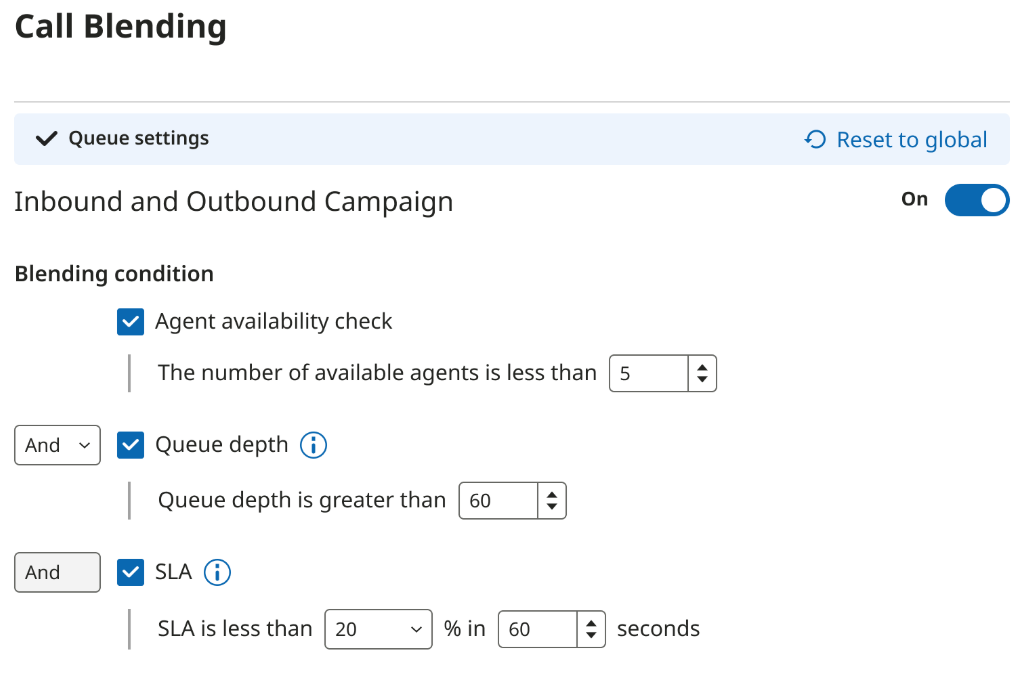
Toggle the switch to ON to enable call blending for the queue.
Once enabled, you will see the following options: Agent availability check, Queue depth, and SLA. These boxes are unchecked by default.
Check the box next to the options you want to include.
For each box checked, a secondary option will appear to allow you to set the thresholds for each condition.
When 2 or more options are selected, the operator field will appear (AND is selected by default). You can use the drop-down to change this to OR if required.
When using an AND operator, all selected blending conditions must be met before the blending behavior will trigger.
When using an OR operator, at least one of the blending conditions must be met before the blending behavior will trigger.