Build an app in the console
Learn how to create a simple Vertex AI Vision object detector app in the Google Cloud console.
To follow step-by-step guidance for this task directly in the Google Cloud console, click Guide me:
Before you begin
- Sign in to your Google Cloud account. If you're new to Google Cloud, create an account to evaluate how our products perform in real-world scenarios. New customers also get $300 in free credits to run, test, and deploy workloads.
-
In the Google Cloud console, on the project selector page, select or create a Google Cloud project.
Roles required to select or create a project
- Select a project: Selecting a project doesn't require a specific IAM role—you can select any project that you've been granted a role on.
-
Create a project: To create a project, you need the Project Creator
(
roles/resourcemanager.projectCreator), which contains theresourcemanager.projects.createpermission. Learn how to grant roles.
-
Verify that billing is enabled for your Google Cloud project.
-
Enable the Vision AI API.
Roles required to enable APIs
To enable APIs, you need the Service Usage Admin IAM role (
roles/serviceusage.serviceUsageAdmin), which contains theserviceusage.services.enablepermission. Learn how to grant roles. -
In the Google Cloud console, on the project selector page, select or create a Google Cloud project.
Roles required to select or create a project
- Select a project: Selecting a project doesn't require a specific IAM role—you can select any project that you've been granted a role on.
-
Create a project: To create a project, you need the Project Creator
(
roles/resourcemanager.projectCreator), which contains theresourcemanager.projects.createpermission. Learn how to grant roles.
-
Verify that billing is enabled for your Google Cloud project.
-
Enable the Vision AI API.
Roles required to enable APIs
To enable APIs, you need the Service Usage Admin IAM role (
roles/serviceusage.serviceUsageAdmin), which contains theserviceusage.services.enablepermission. Learn how to grant roles.
Create an object detector application
After you have set up your environment, you can create your app.
In the Google Cloud console, an app is represented as a graph. Additionally, in Vertex AI Vision, an app graph must have at least two nodes: a video source node (stream), and at least one more node (a processing model or output destination).
Create an empty app
Before you can populate the app graph, you must first create an empty app.
Console
Create an app in the Google Cloud console.
Open the Applications tab of the Vertex AI Vision dashboard.
Click the Create button.
Enter
quickstart-appas the app name and choose your region.Click Create.
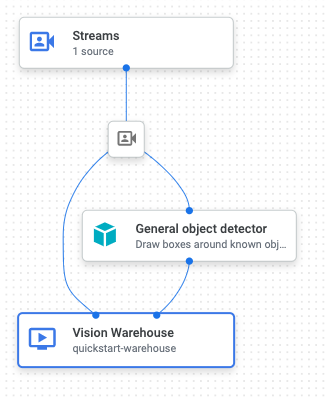
Add app component nodes
After you have created the empty application, you can then add the three nodes to the app graph: the ingestion node that can receive stream data, the processing node that performs a computer image task on data, and a data destination node, a warehouse storage destination in this example.
Console
Add component nodes to your app in the console.
Open the Applications tab of the Vertex AI Vision dashboard.
In the
quickstart-appline, select View graph. This takes you to the graph visualization of the processing pipeline.
Add a data ingestion node
To add an input stream node, select the Streams option in the Connectors section of the side menu.
In the Source section of the Stream menu that opens, select Add streams.
In the Add streams menu, choose Register new streams and add
quickstart-streamas the stream name.To add the stream to the app graph, click Add streams.
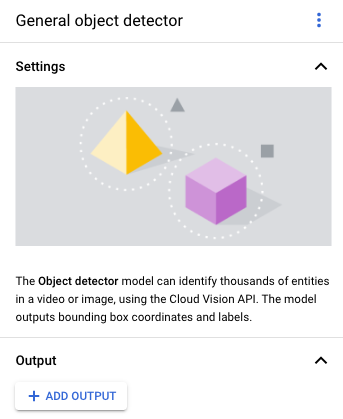
Add a data processing node
To add the object detector model node, select the Object detector option in the Pre-trained models section of the side menu.
Add a data storage node
To add the output destination (storage) node, select the Vertex AI Vision's Media Warehouse option in the Connectors section of the side menu.
In the Vertex AI Vision's Media Warehouse menu, click Connect warehouse.
In the Connect warehouse menu, select Create new warehouse. Name the warehouse
quickstart-warehouse, and leave the TTL duration at 14 days.Click the Create button to add the warehouse.
Deploy your app for use
After you have built your end-to-end app with all the necessary components, the last step to using the app is to deploy it.Console
Open the Applications tab of the Vertex AI Vision dashboard.
Select View graph next to the
quickstart-appapp in the list.From the application graph builder page, click the Deploy button.
In the following confirmation dialog, select Deploy.
The deploy operation might take several minutes to complete. After deployment finishes, green check marks appear next to the nodes.
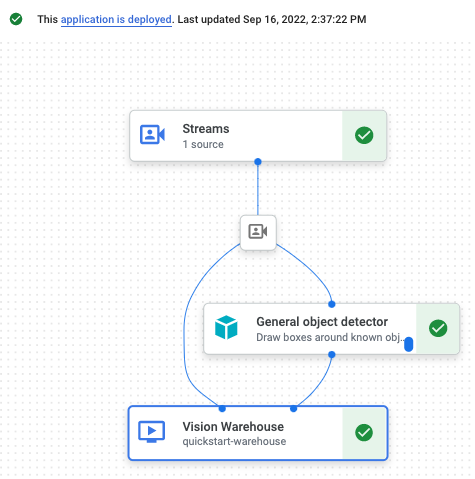
Congratulations! You've just created and deployed your first Vertex AI Vision app. Creating and deploying an app are the first steps in ingesting and using processed media data with Vertex AI Vision.
Clean up
To avoid incurring charges to your Google Cloud account for the resources used in this quickstart, either delete the project that contains the resources, or keep the project and delete the individual resources.
Delete the project
- In the Google Cloud console, go to the Manage resources page.
- In the project list, select the project that you want to delete, and then click Delete.
- In the dialog, type the project ID, and then click Shut down to delete the project.
Delete individual resources
Delete a warehouse
- In the Google Cloud console, go to the Warehouses page.
-
Locate
your
quickstart-warehousewarehouse. - To delete the warehouse, click Actions, click Delete warehouse, and then follow the instructions.
Delete a stream
- In the Google Cloud console, go to the Streams page.
-
Locate
your
quickstart-streamstream. - To delete the stream, click Actions, click Delete stream, and then follow the instructions.
Delete an app
- In the Google Cloud console, go to the Applications page.
-
Locate
your
quickstart-appapp. - To delete the app, click Actions, click Delete application, and then follow the instructions.
What's next
- Read Set up a project and a development environment before you use the command line tools.
- Learn how to ingest data into your new app and read about other components you can add in Build an app.
- Learn about other output storage and processing options in Connect app output to a data destination .
- Read about how to Search Warehouse data in the console.
- Read more about Responsible AI practices.