マルチモーダル エンベディング モデルは、提供された入力に基づいて 1,408 次元のベクトル* を生成します。これには、画像、テキスト、動画データの組み合わせが含まれます。エンベディング ベクトルは、画像分類や動画コンテンツのモデレーションなどの後続のタスクに使用できます。
画像エンベディング ベクトルとテキスト エンベディング ベクトルは、同じ次元を持つ同じセマンティック空間にあります。そのため、これらのベクトルは、テキストによる画像の検索や画像による動画の検索などのユースケースでも使用できます。
テキストのみのエンベディングでは、Vertex AI Text-embeddings API を使用することをおすすめします。たとえば、Text-embeddings API は、テキストベースのセマンティック検索、クラスタリング、長時間のドキュメント分析、その他のテキスト取得や質問応答のユースケースに適しています。詳細については、テキスト エンベディングを取得するをご覧ください。
サポートされているモデル
次のモデルを使用して、マルチモーダル エンベディングを取得できます。
multimodalembedding
ベスト プラクティス
マルチモーダル エンベディング モデルを使用する場合は、入力時の次のことを考慮してください。
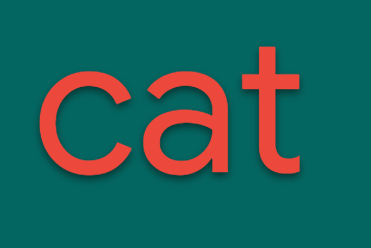
- 画像内のテキスト - このモデルは、光学式文字認識(OCR)と同様に、画像内のテキストを認識できます。画像コンテンツの説明と画像内のテキストを区別する必要がある場合は、プロンプト エンジニアリングを使用してターゲット コンテンツを指定することを検討してください。たとえば、ユースケースに応じて単に「cat」ではなく「picture of a cat」または「the text 'cat'」と指定します。
テキスト「cat」
猫の写真
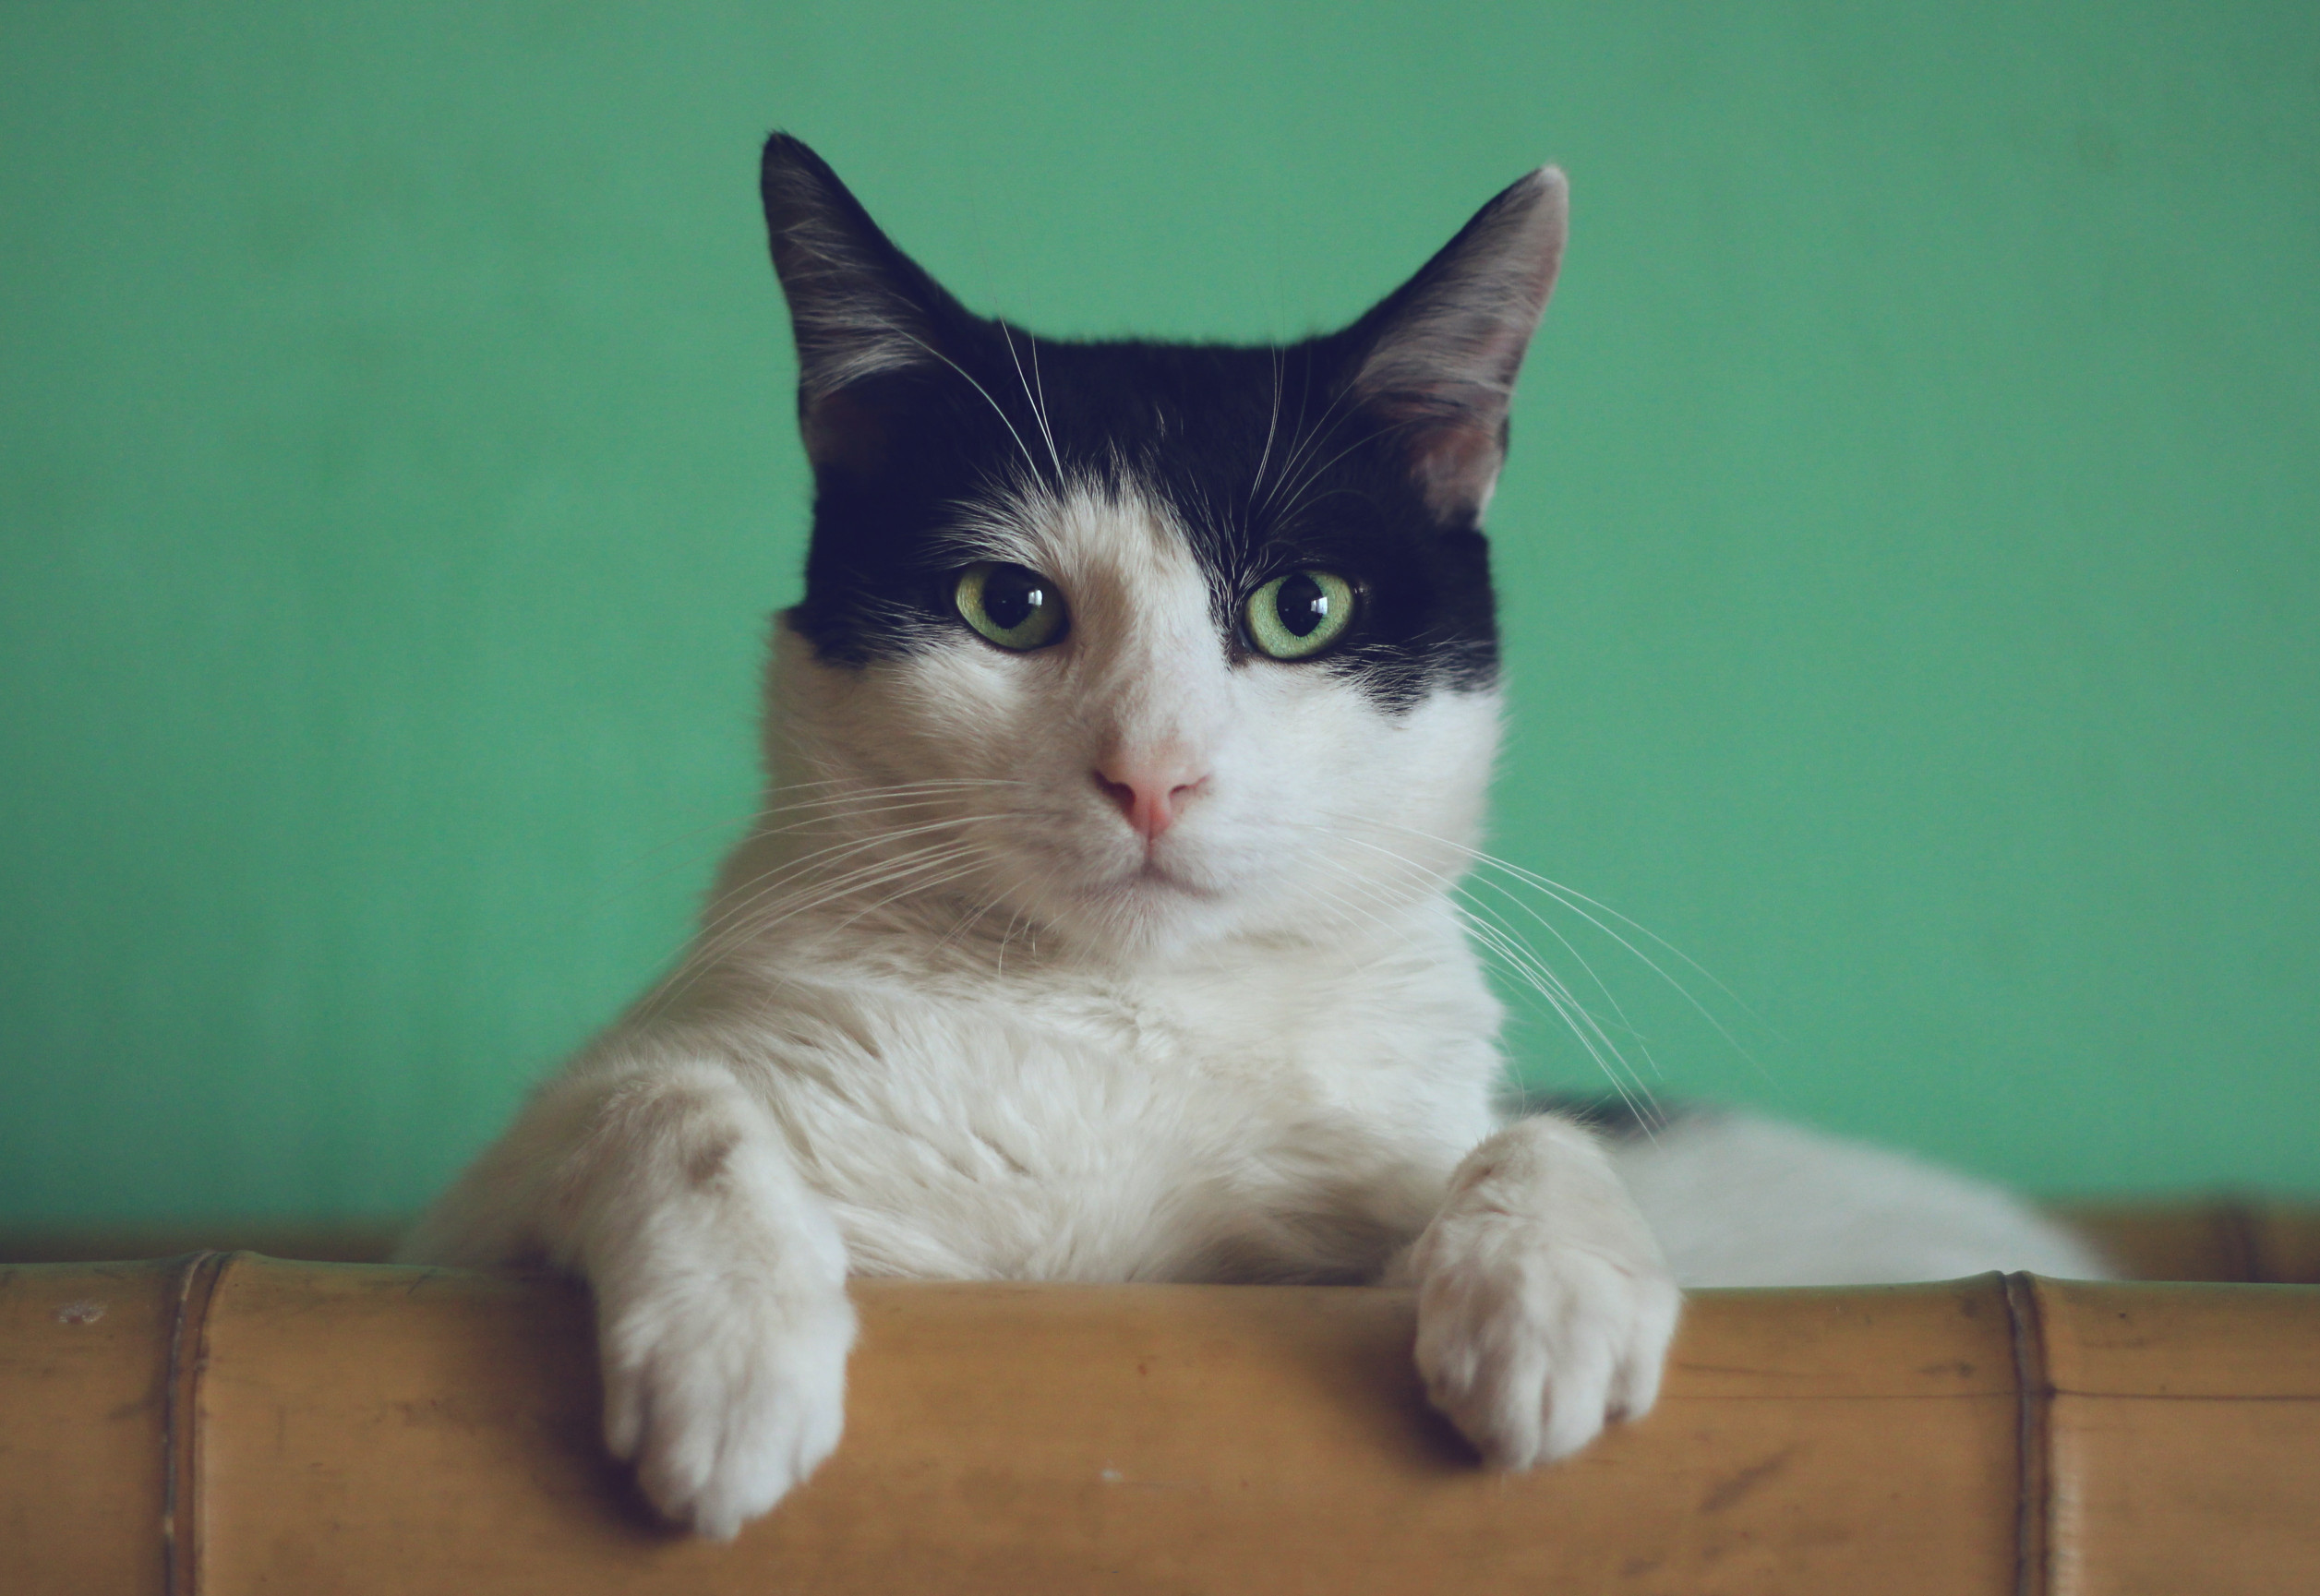
画像クレジット: Manja Vitolic、Unsplash。 - エンベディングの類似度 - エンベディングのドット積は、調整された確率ではありません。ドット積は類似度指標であり、ユースケースによってスコア分布が異なる場合があります。品質を測定するために固定値のしきい値を使用することは避けてください。代わりに、取得にランキング アプローチを使用するか、分類にシグモイドを使用します。
API の使用
API の上限
テキストと画像のエンベディングに multimodalembedding モデルを使用する場合は、次の上限が適用されます。
| 上限 | 値と説明 |
|---|---|
| テキストと画像のデータ | |
| 各プロジェクト 1 分あたりの最大 API リクエスト数 | 120 |
| テキストの最大長 | 32 トークン(約 32 ワード) テキストの最大長は 32 トークン(約 32 ワード)です。入力が 32 トークンを超える場合、この長さになるまで内部で入力が短縮されます。 |
| 言語 | 英語 |
| 画像形式 | BMP、GIF、JPG、PNG |
| イメージサイズ | Base64 エンコード画像: 20 MB(PNG にコード変換する場合) Cloud Storage 画像: 20 MB(元のファイル形式) 使用できる画像サイズは最大 20 MB です。ネットワークのレイテンシの増加を回避するには、より小さいイメージを使用してください。さらに、このモデルは画像を 512 x 512 ピクセルの解像度に変更します。そのため、より高い解像度の画像を用意する必要はありません。 |
| 動画データ | |
| 音声対応 | なし - このモデルでは、動画エンベディングの生成時に音声コンテンツが考慮されません |
| 動画フォーマット | AVI、FLV、MKV、MOV、MP4、MPEG、MPG、WEBM、WMV |
| 動画の最大長(Cloud Storage) | 上限なし。ただし、一度に分析できるコンテンツは 2 分間のみです。 |
始める前に
- Sign in to your Google Cloud account. If you're new to Google Cloud, create an account to evaluate how our products perform in real-world scenarios. New customers also get $300 in free credits to run, test, and deploy workloads.
-
In the Google Cloud console, on the project selector page, select or create a Google Cloud project.
-
Verify that billing is enabled for your Google Cloud project.
-
Enable the Vertex AI API.
-
In the Google Cloud console, on the project selector page, select or create a Google Cloud project.
-
Verify that billing is enabled for your Google Cloud project.
-
Enable the Vertex AI API.
-
環境の認証を設定します。
Select the tab for how you plan to use the samples on this page:
Java
ローカル開発環境でこのページの Java サンプルを使用するには、gcloud CLI をインストールして初期化し、ユーザー認証情報を使用してアプリケーションのデフォルト認証情報を設定します。
-
Install the Google Cloud CLI.
-
If you're using an external identity provider (IdP), you must first sign in to the gcloud CLI with your federated identity.
-
After initializing the gcloud CLI, update it and install the required components:
gcloud components update
gcloud components install beta
-
If you're using a local shell, then create local authentication credentials for your user account:
gcloud auth application-default login
You don't need to do this if you're using Cloud Shell.
If an authentication error is returned, and you are using an external identity provider (IdP), confirm that you have signed in to the gcloud CLI with your federated identity.
詳細については、 Google Cloud 認証ドキュメントのローカル開発環境の ADC の設定をご覧ください。
Node.js
ローカル開発環境でこのページの Node.js サンプルを使用するには、gcloud CLI をインストールして初期化し、ユーザー認証情報を使用してアプリケーションのデフォルト認証情報を設定します。
-
Install the Google Cloud CLI.
-
If you're using an external identity provider (IdP), you must first sign in to the gcloud CLI with your federated identity.
-
After initializing the gcloud CLI, update it and install the required components:
gcloud components update
gcloud components install beta
-
If you're using a local shell, then create local authentication credentials for your user account:
gcloud auth application-default login
You don't need to do this if you're using Cloud Shell.
If an authentication error is returned, and you are using an external identity provider (IdP), confirm that you have signed in to the gcloud CLI with your federated identity.
詳細については、 Google Cloud 認証ドキュメントのローカル開発環境の ADC の設定をご覧ください。
Python
ローカル開発環境でこのページの Python サンプルを使用するには、gcloud CLI をインストールして初期化し、ユーザー認証情報を使用してアプリケーションのデフォルト認証情報を設定します。
-
Install the Google Cloud CLI.
-
If you're using an external identity provider (IdP), you must first sign in to the gcloud CLI with your federated identity.
-
After initializing the gcloud CLI, update it and install the required components:
gcloud components update
gcloud components install beta
-
If you're using a local shell, then create local authentication credentials for your user account:
gcloud auth application-default login
You don't need to do this if you're using Cloud Shell.
If an authentication error is returned, and you are using an external identity provider (IdP), confirm that you have signed in to the gcloud CLI with your federated identity.
詳細については、 Google Cloud 認証ドキュメントのローカル開発環境の ADC の設定をご覧ください。
REST
このページの REST API サンプルをローカル開発環境で使用するには、gcloud CLI に指定した認証情報を使用します。
-
Install the Google Cloud CLI.
-
If you're using an external identity provider (IdP), you must first sign in to the gcloud CLI with your federated identity.
-
After initializing the gcloud CLI, update it and install the required components:
gcloud components update
gcloud components install beta
詳細については、 Google Cloud 認証ドキュメントの REST を使用して認証するをご覧ください。
- Python SDK を使用するには、Vertex AI SDK for Python をインストールするの手順に沿って操作します。詳細については、Vertex AI SDK for Python API のリファレンス ドキュメントをご覧ください。
- 省略可。この機能の料金を確認します。エンベディングの料金は、送信するデータの種類(画像やテキストなど)によって異なります。また、特定のデータタイプ(Video Plus、Video Standard、Video Essentials など)で使用するモードによっても異なります。
ロケーション
ロケーションは、データの保存場所を制御するためにリクエストで指定できるリージョンです。使用可能なリージョンの一覧については、Vertex AI の生成 AI のロケーションをご覧ください。
エラー メッセージ
割り当て超過エラー
google.api_core.exceptions.ResourceExhausted: 429 Quota exceeded for
aiplatform.googleapis.com/online_prediction_requests_per_base_model with base
model: multimodalembedding. Please submit a quota increase request.
このエラーが初めて表示された場合は、Google Cloud コンソールでプロジェクトの割り当ての増加をリクエストします。増加をリクエストする前に、次のフィルタを使用します。
Service ID: aiplatform.googleapis.commetric: aiplatform.googleapis.com/online_prediction_requests_per_base_modelbase_model:multimodalembedding
割り当て増加リクエストをすでに送信している場合は、しばらく待ってから次のリクエストを送信してください。さらに割り当てを増やす必要がある場合は、割り当てリクエストの正当性を示しながら、割り当て増加リクエストを繰り返します。
低ディメンションのエンベディングを指定する
デフォルトでは、エンベディング リクエストはデータ型の 1,408 浮動小数点ベクトルを返します。テキストデータと画像データには、低次元のエンベディング(128、256、512 の浮動小数点ベクトル)を指定することもできます。このオプションを使用すると、エンベディングの使用方法に基づいてレイテンシ、ストレージ、品質を最適化できます。低ディメンションのエンベディングでは、後続のエンベディング タスク(検索やレコメンデーションなど)でストレージ ニーズが減少し、レイテンシが低くなります。また、高ディメンションのエンベディングでは、同じタスクに対して高い精度が実現されます。
REST
低ディメンションにアクセスするには、
parameters.dimensionフィールドを追加します。このパラメータは、128、256、512、1408のいずれかの値を受け入れます。レスポンスには、そのディメンションのエンベディングが含まれます。リクエストのデータを使用する前に、次のように置き換えます。
- LOCATION: プロジェクトのリージョン。たとえば、
us-central1、europe-west2、asia-northeast3です。使用可能なリージョンの一覧については、Vertex AI の生成 AI のロケーションをご覧ください。 - PROJECT_ID: 実際の Google Cloud プロジェクト ID。
- IMAGE_URI: エンベディングを取得するターゲット画像の Cloud Storage URI。例:
gs://my-bucket/embeddings/supermarket-img.pngまた、画像を base64 エンコードのバイト文字列として指定することもできます。
[...] "image": { "bytesBase64Encoded": "B64_ENCODED_IMAGE" } [...] - TEXT: エンベディングを取得するターゲット テキスト。例:
a cat - EMBEDDING_DIMENSION: エンベディング ディメンションの数。値を小さくすると、後続のタスクでこれらのエンベディングを使用する際のレイテンシが低くなります。値が高いほど、精度が向上します。使用可能な値:
128、256、512、1408(デフォルト)。
HTTP メソッドと URL:
POST https://LOCATION-aiplatform.googleapis.com/v1/projects/PROJECT_ID/locations/LOCATION/publishers/google/models/multimodalembedding@001:predict
リクエストの本文(JSON):
{
  "instances": [
    {
      "image": {
        "gcsUri": "IMAGE_URI"
      },
      "text": "TEXT"
    }
  ],
  "parameters": {
    "dimension": EMBEDDING_DIMENSION
  }
}
リクエストを送信するには、次のいずれかのオプションを選択します。
curl
リクエスト本文を
request.jsonという名前のファイルに保存して、次のコマンドを実行します。curl -X POST \
-H "Authorization: Bearer $(gcloud auth print-access-token)" \
-H "Content-Type: application/json; charset=utf-8" \
-d @request.json \
"https://LOCATION-aiplatform.googleapis.com/v1/projects/PROJECT_ID/locations/LOCATION/publishers/google/models/multimodalembedding@001:predict"PowerShell
リクエスト本文を
request.jsonという名前のファイルに保存して、次のコマンドを実行します。$cred = gcloud auth print-access-token
$headers = @{ "Authorization" = "Bearer $cred" }
Invoke-WebRequest `
-Method POST `
-Headers $headers `
-ContentType: "application/json; charset=utf-8" `
-InFile request.json `
-Uri "https://LOCATION-aiplatform.googleapis.com/v1/projects/PROJECT_ID/locations/LOCATION/publishers/google/models/multimodalembedding@001:predict" | Select-Object -Expand Contentモデルのエンベディングは、指定したディメンションの浮動小数点ベクトルを返します。スペースの関係上、次のサンプル レスポンスは短縮されています。 128 ディメンション:
{
  "predictions": [
    {
      "imageEmbedding": [
        0.0279239565,
        [...128 dimension vector...]
        0.00403284049
      ],
      "textEmbedding": [
        0.202921599,
        [...128 dimension vector...]
        -0.0365431122
      ]
    }
  ],
  "deployedModelId": "DEPLOYED_MODEL_ID"
}
256 ディメンション:
{
  "predictions": [
    {
      "imageEmbedding": [
        0.248620048,
        [...256 dimension vector...]
        -0.0646447465
      ],
      "textEmbedding": [
        0.0757875815,
        [...256 dimension vector...]
        -0.02749932
      ]
    }
  ],
  "deployedModelId": "DEPLOYED_MODEL_ID"
}
512 ディメンション:
{
  "predictions": [
    {
      "imageEmbedding": [
        -0.0523675755,
        [...512 dimension vector...]
        -0.0444030389
      ],
      "textEmbedding": [
        -0.0592851527,
        [...512 dimension vector...]
        0.0350437127
      ]
    }
  ],
  "deployedModelId": "DEPLOYED_MODEL_ID"
}
Python
Go
エンベディング リクエストを送信する(画像とテキスト)
次のコードサンプルを使用して、画像データとテキストデータのエンベディング リクエストを送信します。サンプルでは、両方のデータ型でリクエストを送信する方法を示していますが、データ型別にサービスを使用することもできます。
テキストと画像のエンベディングを取得する
REST
multimodalembeddingモデル リクエストの詳細については、multimodalembeddingモデル API リファレンスをご覧ください。リクエストのデータを使用する前に、次のように置き換えます。
- LOCATION: プロジェクトのリージョン。たとえば、
us-central1、europe-west2、asia-northeast3です。使用可能なリージョンの一覧については、Vertex AI の生成 AI のロケーションをご覧ください。 - PROJECT_ID: 実際の Google Cloud プロジェクト ID。
- TEXT: エンベディングを取得するターゲット テキスト。例:
a cat - B64_ENCODED_IMG: エンベディングを取得するターゲット画像。画像は base64 でエンコードされたバイト文字列として指定する必要があります。
HTTP メソッドと URL:
POST https://LOCATION-aiplatform.googleapis.com/v1/projects/PROJECT_ID/locations/LOCATION/publishers/google/models/multimodalembedding@001:predict
リクエストの本文(JSON):
{
  "instances": [
    {
      "text": "TEXT",
      "image": {
        "bytesBase64Encoded": "B64_ENCODED_IMG"
      }
    }
  ]
}
リクエストを送信するには、次のいずれかのオプションを選択します。
モデルが返すエンベディングは、1,408 個の浮動小数点ベクトルです。スペースの関係上、次のサンプル レスポンスの一部は表示されていません。curl
リクエスト本文を
request.jsonという名前のファイルに保存して、次のコマンドを実行します。curl -X POST \
-H "Authorization: Bearer $(gcloud auth print-access-token)" \
-H "Content-Type: application/json; charset=utf-8" \
-d @request.json \
"https://LOCATION-aiplatform.googleapis.com/v1/projects/PROJECT_ID/locations/LOCATION/publishers/google/models/multimodalembedding@001:predict"PowerShell
リクエスト本文を
request.jsonという名前のファイルに保存して、次のコマンドを実行します。$cred = gcloud auth print-access-token
$headers = @{ "Authorization" = "Bearer $cred" }
Invoke-WebRequest `
-Method POST `
-Headers $headers `
-ContentType: "application/json; charset=utf-8" `
-InFile request.json `
-Uri "https://LOCATION-aiplatform.googleapis.com/v1/projects/PROJECT_ID/locations/LOCATION/publishers/google/models/multimodalembedding@001:predict" | Select-Object -Expand Content{ "predictions": [ { "textEmbedding": [ 0.010477379, -0.00399621, 0.00576670747, [...] -0.00823613815, -0.0169572588, -0.00472954148 ], "imageEmbedding": [ 0.00262696808, -0.00198890246, 0.0152047109, -0.0103145819, [...] 0.0324628279, 0.0284924973, 0.011650892, -0.00452344026 ] } ], "deployedModelId": "DEPLOYED_MODEL_ID" }Vertex AI SDK for Python
Vertex AI SDK for Python のインストールまたは更新の方法については、Vertex AI SDK for Python をインストールするをご覧ください。 詳細については、Vertex AI SDK for Python API のリファレンス ドキュメントをご覧ください。
Node.js
このサンプルを試す前に、Vertex AI クイックスタート: クライアント ライブラリの使用にある Node.js の設定手順を完了してください。詳細については、Vertex AI Node.js API のリファレンス ドキュメントをご覧ください。
Vertex AI に対する認証を行うには、アプリケーションのデフォルト認証情報を設定します。詳細については、ローカル開発環境の認証を設定するをご覧ください。
Java
このサンプルを試す前に、Vertex AI クイックスタート: クライアント ライブラリの使用にある Java の設定手順を完了してください。詳細については、Vertex AI Java API のリファレンス ドキュメントをご覧ください。
Vertex AI に対する認証を行うには、アプリケーションのデフォルト認証情報を設定します。詳細については、ローカル開発環境の認証を設定するをご覧ください。
Go
このサンプルを試す前に、Vertex AI クイックスタート: クライアント ライブラリの使用にある Go の設定手順を完了してください。詳細については、Vertex AI Go API のリファレンス ドキュメントをご覧ください。
Vertex AI に対する認証を行うには、アプリケーションのデフォルト認証情報を設定します。詳細については、ローカル開発環境の認証を設定するをご覧ください。
エンベディング リクエストを送信する(動画、画像、テキスト)
エンベディング リクエストを送信するときに、入力動画のみを指定することも、動画、画像、テキストデータの組み合わせを指定することもできます。
動画エンベディング モード
動画エンベディングでは、Essentials、Standard、Plus の 3 つのモードを使用できます。モードは、生成されるエンベディングの密度に対応します。これは、リクエストの
interval_sec構成で指定できます。動画の間隔(interval_sec)ごとにエンベディングが生成されます。動画の最小間隔は 4 秒です。間隔が 120 秒を超えると、生成されたエンベディングの品質に悪影響を及ぼす可能性があります。動画エンベディングの料金は、使用するモードによって異なります。詳細は、料金をご覧ください。
次の表に、動画のエンベディングに使用できる 3 つのモードをまとめます。
モード 1 分あたりの最大エンベディング数 動画のエンベディング間隔(最小値) Essential 4 15
これはintervalSec>= 15 に対応しますStandard 8 8
これは 8 <=intervalSec< 15 に対応しますPlus 15 4
これは 4 <=intervalSec< 8 に対応します。動画エンベディングのベスト プラクティス
動画エンベディングのリクエストを送信する場合は、次の点を考慮してください。
任意の長さの入力動画の最初の 2 分間に単一のエンベディングを生成するには、次の
videoSegmentConfig設定を使用します。request.json:// other request body content "videoSegmentConfig": { "intervalSec": 120 } // other request body content長さが 2 分を超える動画のエンベディングを生成するには、
videoSegmentConfigで開始時間と終了時間を指定する複数のリクエストを送信します。request1.json:// other request body content "videoSegmentConfig": { "startOffsetSec": 0, "endOffsetSec": 120 } // other request body contentrequest2.json:// other request body content "videoSegmentConfig": { "startOffsetSec": 120, "endOffsetSec": 240 } // other request body content
動画のエンベディングを取得する
動画コンテンツのみのエンベディングを取得するには、次のサンプルを使用します。
REST
multimodalembeddingモデル リクエストの詳細については、multimodalembeddingモデル API リファレンスをご覧ください。次の例では、Cloud Storage にある動画を使用します。
video.bytesBase64Encodedフィールドを使用して、動画の base64 エンコード文字列表現を指定することもできます。リクエストのデータを使用する前に、次のように置き換えます。
- LOCATION: プロジェクトのリージョン。たとえば、
us-central1、europe-west2、asia-northeast3です。使用可能なリージョンの一覧については、Vertex AI の生成 AI のロケーションをご覧ください。 - PROJECT_ID: 実際の Google Cloud プロジェクト ID。
- VIDEO_URI: エンベディングを取得するターゲット動画の Cloud Storage URI。例:
gs://my-bucket/embeddings/supermarket-video.mp4また、動画を base64 エンコードのバイト文字列として指定することもできます。
[...] "video": { "bytesBase64Encoded": "B64_ENCODED_VIDEO" } [...] videoSegmentConfig(START_SECOND, END_SECOND, INTERVAL_SECONDS)。省略可。エンベディングが生成される特定の動画セグメント(秒単位)。例:
[...]
"videoSegmentConfig": {
  "startOffsetSec": 10,
  "endOffsetSec": 60,
  "intervalSec": 10
}
[...]
この構成を使用して、10 秒から 60 秒までの動画データを指定し、[10, 20), [20, 30), [30, 40), [40, 50), [50, 60) の 10 秒の動画間隔のエンベディングを生成します。この動画間隔(
"intervalSec": 10)は、Standard 動画エンベディング モードになり、ユーザーには Standard モードの料金レートで請求されます。videoSegmentConfigを省略すると、サービスはデフォルト値の"videoSegmentConfig": { "startOffsetSec": 0, "endOffsetSec": 120, "intervalSec": 16 }を使用します。この動画間隔("intervalSec": 16)は、Essential 動画エンベディング モードになり、ユーザーには Essential モードの料金レートで請求されます。
HTTP メソッドと URL:
POST https://LOCATION-aiplatform.googleapis.com/v1/projects/PROJECT_ID/locations/LOCATION/publishers/google/models/multimodalembedding@001:predict
リクエストの本文(JSON):
{
  "instances": [
    {
      "video": {
        "gcsUri": "VIDEO_URI",
        "videoSegmentConfig": {
          "startOffsetSec": START_SECOND,
          "endOffsetSec": END_SECOND,
          "intervalSec": INTERVAL_SECONDS
        }
      }
    }
  ]
}
リクエストを送信するには、次のいずれかのオプションを選択します。
モデルが返すエンベディングは、1,408 個の浮動小数点ベクトルです。スペースの関係上、次のサンプル レスポンスは短縮されています。curl
リクエスト本文を
request.jsonという名前のファイルに保存して、次のコマンドを実行します。curl -X POST \
-H "Authorization: Bearer $(gcloud auth print-access-token)" \
-H "Content-Type: application/json; charset=utf-8" \
-d @request.json \
"https://LOCATION-aiplatform.googleapis.com/v1/projects/PROJECT_ID/locations/LOCATION/publishers/google/models/multimodalembedding@001:predict"PowerShell
リクエスト本文を
request.jsonという名前のファイルに保存して、次のコマンドを実行します。$cred = gcloud auth print-access-token
$headers = @{ "Authorization" = "Bearer $cred" }
Invoke-WebRequest `
-Method POST `
-Headers $headers `
-ContentType: "application/json; charset=utf-8" `
-InFile request.json `
-Uri "https://LOCATION-aiplatform.googleapis.com/v1/projects/PROJECT_ID/locations/LOCATION/publishers/google/models/multimodalembedding@001:predict" | Select-Object -Expand Contentレスポンス(7 秒の動画、
videoSegmentConfigの指定なし):{ "predictions": [ { "videoEmbeddings": [ { "endOffsetSec": 7, "embedding": [ -0.0045467657, 0.0258095954, 0.0146885719, 0.00945400633, [...] -0.0023291884, -0.00493789, 0.00975185353, 0.0168156829 ], "startOffsetSec": 0 } ] } ], "deployedModelId": "DEPLOYED_MODEL_ID" }レスポンス(59 秒の動画、動画セグメントの構成:
"videoSegmentConfig": { "startOffsetSec": 0, "endOffsetSec": 60, "intervalSec": 10 }):{ "predictions": [ { "videoEmbeddings": [ { "endOffsetSec": 10, "startOffsetSec": 0, "embedding": [ -0.00683252793, 0.0390476175, [...] 0.00657121744, 0.013023301 ] }, { "startOffsetSec": 10, "endOffsetSec": 20, "embedding": [ -0.0104404651, 0.0357737206, [...] 0.00509833824, 0.0131902946 ] }, { "startOffsetSec": 20, "embedding": [ -0.0113538112, 0.0305239167, [...] -0.00195809244, 0.00941874553 ], "endOffsetSec": 30 }, { "embedding": [ -0.00299320649, 0.0322436653, [...] -0.00993082579, 0.00968887936 ], "startOffsetSec": 30, "endOffsetSec": 40 }, { "endOffsetSec": 50, "startOffsetSec": 40, "embedding": [ -0.00591270532, 0.0368893594, [...] -0.00219071587, 0.0042470959 ] }, { "embedding": [ -0.00458270218, 0.0368121453, [...] -0.00317760976, 0.00595594104 ], "endOffsetSec": 59, "startOffsetSec": 50 } ] } ], "deployedModelId": "DEPLOYED_MODEL_ID" }Vertex AI SDK for Python
Vertex AI SDK for Python のインストールまたは更新の方法については、Vertex AI SDK for Python をインストールするをご覧ください。 詳細については、Vertex AI SDK for Python API のリファレンス ドキュメントをご覧ください。
Go
このサンプルを試す前に、Vertex AI クイックスタート: クライアント ライブラリの使用にある Go の設定手順を完了してください。詳細については、Vertex AI Go API のリファレンス ドキュメントをご覧ください。
Vertex AI に対する認証を行うには、アプリケーションのデフォルト認証情報を設定します。詳細については、ローカル開発環境の認証を設定するをご覧ください。
画像、テキスト、動画のエンベディングを取得する
次のサンプルを使用して、動画、テキスト、画像コンテンツのエンベディングを取得します。
REST
multimodalembeddingモデル リクエストの詳細については、multimodalembeddingモデル API リファレンスをご覧ください。次の例では、画像、テキスト、動画のデータを使用します。リクエストの本文で、これらのデータ型を任意に組み合わせて使用できます。
また、このサンプルでは Cloud Storage にある動画を使用しています。
video.bytesBase64Encodedフィールドを使用して、動画の base64 エンコード文字列表現を指定することもできます。リクエストのデータを使用する前に、次のように置き換えます。
- LOCATION: プロジェクトのリージョン。たとえば、
us-central1、europe-west2、asia-northeast3です。使用可能なリージョンの一覧については、Vertex AI の生成 AI のロケーションをご覧ください。 - PROJECT_ID: 実際の Google Cloud プロジェクト ID。
- TEXT: エンベディングを取得するターゲット テキスト。例:
a cat - IMAGE_URI: エンベディングを取得するターゲット画像の Cloud Storage URI。例:
gs://my-bucket/embeddings/supermarket-img.pngまた、画像を base64 エンコードのバイト文字列として指定することもできます。
[...] "image": { "bytesBase64Encoded": "B64_ENCODED_IMAGE" } [...] - VIDEO_URI: エンベディングを取得するターゲット動画の Cloud Storage URI。例:
gs://my-bucket/embeddings/supermarket-video.mp4また、動画を base64 エンコードのバイト文字列として指定することもできます。
[...] "video": { "bytesBase64Encoded": "B64_ENCODED_VIDEO" } [...] videoSegmentConfig(START_SECOND, END_SECOND, INTERVAL_SECONDS)。省略可。エンベディングが生成される特定の動画セグメント(秒単位)。例:
[...]
"videoSegmentConfig": {
  "startOffsetSec": 10,
  "endOffsetSec": 60,
  "intervalSec": 10
}
[...]
この構成を使用して、10 秒から 60 秒までの動画データを指定し、[10, 20), [20, 30), [30, 40), [40, 50), [50, 60) の 10 秒の動画間隔のエンベディングを生成します。この動画間隔(
"intervalSec": 10)は、Standard 動画エンベディング モードになり、ユーザーには Standard モードの料金レートで請求されます。videoSegmentConfigを省略すると、サービスはデフォルト値の"videoSegmentConfig": { "startOffsetSec": 0, "endOffsetSec": 120, "intervalSec": 16 }を使用します。この動画間隔("intervalSec": 16)は、Essential 動画エンベディング モードになり、ユーザーには Essential モードの料金レートで請求されます。
HTTP メソッドと URL:
POST https://LOCATION-aiplatform.googleapis.com/v1/projects/PROJECT_ID/locations/LOCATION/publishers/google/models/multimodalembedding@001:predict
リクエストの本文(JSON):
{
  "instances": [
    {
      "text": "TEXT",
      "image": {
        "gcsUri": "IMAGE_URI"
      },
      "video": {
        "gcsUri": "VIDEO_URI",
        "videoSegmentConfig": {
          "startOffsetSec": START_SECOND,
          "endOffsetSec": END_SECOND,
          "intervalSec": INTERVAL_SECONDS
        }
      }
    }
  ]
}
リクエストを送信するには、次のいずれかのオプションを選択します。
モデルが返すエンベディングは、1,408 個の浮動小数点ベクトルです。スペースの関係上、次のサンプル レスポンスの一部は表示されていません。curl
リクエスト本文を
request.jsonという名前のファイルに保存して、次のコマンドを実行します。curl -X POST \
-H "Authorization: Bearer $(gcloud auth print-access-token)" \
-H "Content-Type: application/json; charset=utf-8" \
-d @request.json \
"https://LOCATION-aiplatform.googleapis.com/v1/projects/PROJECT_ID/locations/LOCATION/publishers/google/models/multimodalembedding@001:predict"PowerShell
リクエスト本文を
request.jsonという名前のファイルに保存して、次のコマンドを実行します。$cred = gcloud auth print-access-token
$headers = @{ "Authorization" = "Bearer $cred" }
Invoke-WebRequest `
-Method POST `
-Headers $headers `
-ContentType: "application/json; charset=utf-8" `
-InFile request.json `
-Uri "https://LOCATION-aiplatform.googleapis.com/v1/projects/PROJECT_ID/locations/LOCATION/publishers/google/models/multimodalembedding@001:predict" | Select-Object -Expand Content{ "predictions": [ { "textEmbedding": [ 0.0105433334, -0.00302835181, 0.00656806398, 0.00603460241, [...] 0.00445805816, 0.0139605571, -0.00170318608, -0.00490092579 ], "videoEmbeddings": [ { "startOffsetSec": 0, "endOffsetSec": 7, "embedding": [ -0.00673126569, 0.0248149596, 0.0128901172, 0.0107588246, [...] -0.00180952181, -0.0054573305, 0.0117037306, 0.0169312079 ] } ], "imageEmbedding": [ -0.00728622358, 0.031021487, -0.00206603738, 0.0273937676, [...] -0.00204976718, 0.00321615417, 0.0121978866, 0.0193375275 ] } ], "deployedModelId": "DEPLOYED_MODEL_ID" }Vertex AI SDK for Python
Vertex AI SDK for Python のインストールまたは更新の方法については、Vertex AI SDK for Python をインストールするをご覧ください。 詳細については、Vertex AI SDK for Python API のリファレンス ドキュメントをご覧ください。
Go
このサンプルを試す前に、Vertex AI クイックスタート: クライアント ライブラリの使用にある Go の設定手順を完了してください。詳細については、Vertex AI Go API のリファレンス ドキュメントをご覧ください。
Vertex AI に対する認証を行うには、アプリケーションのデフォルト認証情報を設定します。詳細については、ローカル開発環境の認証を設定するをご覧ください。
次のステップ
- ブログ「マルチモーダル検索とは: ビジョンを持つ LLM によるビジネスの変更」を読む。
- テキスト エンベディングを取得するで、テキストのみのユースケース(テキストベースのセマンティック検索、クラスタリング、長時間のドキュメント分析、その他のテキスト取得や質問応答のユースケース)を確認する。
- Vertex AI のイメージの概要で、Vertex AI のすべての画像生成 AI サービスを確認する。
- Model Garden で、その他の事前トレーニング済みモデルを確認する。
- Vertex AI での責任ある AI のベスト プラクティスと安全フィルタについて学習する。
特に記載のない限り、このページのコンテンツはクリエイティブ・コモンズの表示 4.0 ライセンスにより使用許諾されます。コードサンプルは Apache 2.0 ライセンスにより使用許諾されます。詳しくは、Google Developers サイトのポリシーをご覧ください。Java は Oracle および関連会社の登録商標です。
最終更新日 2025-09-04 UTC。
-