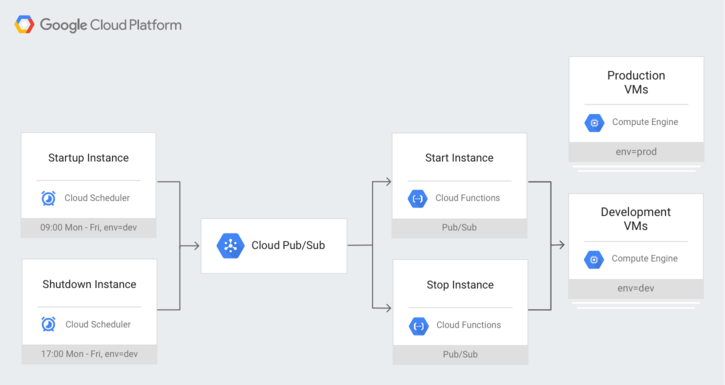
このチュートリアルでは、Cloud Scheduler と Cloud Run 関数で、リソースラベルを使用して定期的に Compute Engine インスタンスを起動および停止する方法を説明します。
アプリケーション アーキテクチャ
このソリューションには、次の Google Cloud コンポーネントが含まれています。
- スケジュールどおりに実行する Compute Engine インスタンス。
- スケジュールを設定する対象のインスタンスを起動および停止する Cloud Run 関数。
- 起動イベントおよび停止イベントごとに送受信される Pub/Sub メッセージ。
- スケジュールに従ってインスタンスを起動および停止する呼び出しを行う Cloud Scheduler ジョブ。

ロケーションの要件
一部のコンポーネントは特定のリージョンでのみサポートされています。
- Compute Engine インスタンス: リージョンとゾーンにリストされているすべてのリージョンでサポートされます。
- Cloud Run 関数: ロケーションにリストされているリージョンでサポートされます。
- Pub/Sub メッセージ: Pub/Sub はグローバル サービスであるため、グローバルでサポートされます。
- Pub/Sub ターゲットを含む Cloud Scheduler ジョブ: すべての Google Cloud ロケーションでサポートされます。
HTTP ではなく Pub/Sub を使用する理由
Pub/Sub トリガーの代わりに Cloud Run 関数の HTTP トリガーを使用して、このアーキテクチャをシンプルにしたいと考えるかもしれません。
この方法が以前は HTTP を使用するよりも安全であったため、このチュートリアルでは、Cloud Run 関数のトリガーとして Pub/Sub を使用します。ただし、HTTP も有効な選択肢であり、認証を要求することで保護できるようになりました。
Cloud Run functions の保護については、Cloud Run functions のセキュリティの概要をご覧ください。HTTP トリガーと Pub/Sub トリガーの比較については、Cloud Run 関数トリガーのドキュメントをご覧ください。
Compute Engine インスタンスを設定する
コンソール
- Google Cloud コンソールの [VM インスタンス] ページに移動します。
[VM インスタンス] ページに移動 - [インスタンスを作成] をクリックします。
- [名前] を
dev-instanceに設定します。 - [ラベル] で [ラベルを追加] をクリックします。
- [ラベルを追加] をクリックします。
- [キー] には「
env」、[値] には「dev」と入力します。 - [リージョン] で [us-west1] を選択します。
- [ゾーン] で [us-west1-b] を選択します。
- [保存] をクリックします。
- ページの下部にある [作成] をクリックします。
gcloud
gcloud compute instances create dev-instance \
    --network default \
    --zone us-west1-b \
    --labels=env=dev
Cloud Run 関数を介して Pub/Sub によってトリガーされる関数をデプロイする
関数を作成してデプロイする
Console
起動の関数を作成する
- Google Cloud コンソールの [Cloud Run functions] ページに移動します。
[Cloud Run 関数] ページに移動します。 - [ファンクションを作成] をクリックします。
- [環境] には、[第 1 世代] を選択します。
- [関数名] を
startInstancePubSubに設定します。 - [リージョン] はデフォルト値のままにします。
- [トリガーのタイプ] で、[Cloud Pub/Sub] を選択します。
- [Cloud Pub/Sub トピックを選択してください] で、[トピックを作成する] をクリックします。
- [トピックの作成] ダイアログが表示されます。
- [トピック ID] には「
start-instance-event」と入力します。 - [作成] をクリックしてダイアログを終了します。
- [トピック ID] には「
- [トリガー] ボックスの下部にある [保存] をクリックします。
- ページの下部にある [次へ] をクリックします。
- [ランタイム] で [Node.js 16] 以降を選択します。
- [エントリ ポイント] に「
startInstancePubSub」と入力します。 - コードエディタの左側にある [index.js] を選択します。
スターター コードを次のコードに置き換えます。
コードエディタの左側にある [package.json] を選択します。
スターター コードを次のコードに置き換えます。
ページの下部にある [Deploy] をクリックします。
停止の関数を作成する
- Google Cloud コンソールで [Cloud Run functions] ページが表示されているはずです。
- [関数を作成] をクリックします。
- [環境] には、[第 1 世代] を選択します。
- [関数名] を
stopInstancePubSubに設定します。 - [リージョン] はデフォルト値のままにします。
- [トリガーのタイプ] で、[Cloud Pub/Sub] を選択します。
- [Cloud Pub/Sub トピックを選択してください] で、[トピックを作成する] をクリックします。
- [トピックの作成] ダイアログが表示されます。
- [トピック ID] には「
stop-instance-event」と入力します。 - [作成] をクリックしてダイアログを終了します。
- [トピック ID] には「
- [トリガー] ボックスの下部にある [保存] をクリックします。
- ページの下部にある [次へ] をクリックします。
- [ランタイム] で [Node.js 16] 以降を選択します。
- [エントリ ポイント] に「
stopInstancePubSub」と入力します。 - コードエディタの左側にある [index.js] を選択します。
スターター コードを次のコードに置き換えます。
コードエディタの左側にある [package.json] を選択します。
スターター コードを次のコードに置き換えます。
ページの下部にある [Deploy] をクリックします。
gcloud
Pub/Sub トピックを作成する
gcloud pubsub topics create start-instance-event
gcloud pubsub topics create stop-instance-event
コードを取得
コードをダウンロードします。
git clone https://github.com/GoogleCloudPlatform/nodejs-docs-samples.git
または、zip 形式のサンプルをダウンロードし、ファイルを抽出してもかまいません。
適切なディレクトリに移動します。
cd nodejs-docs-samples/functions/scheduleinstance/
起動の関数と停止の関数を作成する
nodejs-docs-samples/functions/scheduleinstance/ ディレクトリにいるはずです。
gcloud functions deploy startInstancePubSub \
    --trigger-topic start-instance-event \
    --runtime nodejs18 \
    --allow-unauthenticated
gcloud functions deploy stopInstancePubSub \
    --trigger-topic stop-instance-event \
    --runtime nodejs18 \
    --allow-unauthenticated
(省略可)ファンクションが動作することを確認する
Console
インスタンスを停止する
- Google Cloud コンソールの [Cloud Run functions] ページに移動します。
[Cloud Run 関数] ページに移動します。 stopInstancePubSubという名前の関数をクリックします。- 複数のタブ([全般]、[トリガー]、[ソース]、[権限]、[テスト])が表示されます。[テスト] タブをクリックします。
[トリガーとなるイベント] に、次のテキストを入力します。
{"data":"eyJ6b25lIjoidXMtd2VzdDEtYiIsICJsYWJlbCI6ImVudj1kZXYifQo="}これは、
{"zone":"us-west1-b", "label":"env=dev"}を base64 でエンコードした文字列です。独自の文字列をエンコードするには、任意のオンライン base64 エンコード ツールを使用してください。
[関数をテスト] ボタンをクリックします。
実行が完了すると、[出力] の下に「
Successfully stopped instance dev-instance」と表示されます。実行の終了までに最長で 60 秒かかります。代わりに「
error: 'Error: function failed to load.'」が表示される場合は、関数のデプロイが完了するまで 10 秒ほど待ってから、もう一度お試しください。代わりに「
error: 'Error: function execution attempt timed out.'」が表示される場合は、次の手順に進んで、インスタンスのシャットダウンに時間がかかっているだけかどうかを確認してください。実行が終了しても何も表示されない場合は、タイムアウトになっただけの可能性もあります。次のステップに進んで、インスタンスのシャットダウンに時間がかかっているだけかどうかを確認してください。
Google Cloud コンソールの [VM インスタンス] ページに移動します。
[VM インスタンス] ページに移動dev-instanceという名前のインスタンスの横に灰色の四角が表示されていることを確認します。これは、停止中であることを示しています。シャットダウンが完了するまでに最長で 30 秒かかります。- 停止が完了していない場合は、ページの上部にある [更新] をクリックしてみてください。
インスタンスを起動する
- Google Cloud コンソールの [Cloud Run functions] ページに移動します。
[Cloud Run 関数] ページに移動します。 startInstancePubSubという名前の関数をクリックします。- 複数のタブ([全般]、[トリガー]、[ソース]、[権限]、[テスト])が表示されます。[テスト] タブをクリックします。
[トリガーとなるイベント] に、次のテキストを入力します。
{"data":"eyJ6b25lIjoidXMtd2VzdDEtYiIsICJsYWJlbCI6ImVudj1kZXYifQo="}- これも
{"zone":"us-west1-b", "label":"env=dev"}を base64 でエンコードした文字列です。
- これも
[関数をテスト] ボタンをクリックします。
実行が完了すると、[出力] の下に「
Successfully started instance dev-instance」と表示されます。Google Cloud コンソールの [VM インスタンス] ページに移動します。
[VM インスタンス] ページに移動dev-instanceという名前のインスタンスの名前の横に緑色のチェックマークが表示されていることを確認します。これは実行中であることを湿しています。起動処理が完了するまでに最長で 30 秒かかります。
gcloud
インスタンスを停止する
関数を呼び出してインスタンスを停止します。
gcloud functions call stopInstancePubSub \
    --data '{"data":"eyJ6b25lIjoidXMtd2VzdDEtYiIsICJsYWJlbCI6ImVudj1kZXYifQo="}'
これは、
{"zone":"us-west1-b", "label":"env=dev"}を base64 でエンコードした文字列です。独自の文字列をエンコードするには、任意のツールを使用してください。
base64コマンドライン ツールを使用する場合の例を次に示します。echo '{"zone":"us-west1-b", "label":"env=dev"}' | base64eyJ6b25lIjoidXMtd2VzdDEtYiIsICJsYWJlbCI6ImVudj1kZXYifQo=
関数が終了すると、次のように表示されます。
result: Successfully stopped instance dev-instance
実行の終了までに最長で 60 秒かかります。
次のエラーが出力されることがあります。
error: 'Error: function failed to load.`
この場合は、関数のデプロイが完了するまで 10 秒ほど待ってからやり直してください。
次のエラーが出力されることがあります。
error: `Error: function execution attempt timed out.`
この場合は、次のステップに進んで、インスタンスのシャットダウンに時間がかかっているだけかどうかを確認してください。
何も表示されない場合は、関数がタイムアウトになっただけの可能性もあります。 この場合は、次のステップに進んで、インスタンスのシャットダウンに時間がかかっているだけかどうかを確認してください。
インスタンスのステータスが
TERMINATEDであることを確認します。シャットダウンが完了するまでに最長で 30 秒かかります。gcloud compute instances describe dev-instance \ --zone us-west1-b \ | grep statusstatus: TERMINATED
インスタンスを起動する
関数を呼び出してインスタンスを起動します。
gcloud functions call startInstancePubSub \ --data '{"data":"eyJ6b25lIjoidXMtd2VzdDEtYiIsICJsYWJlbCI6ImVudj1kZXYifQo="}'- これも
{"zone":"us-west1-b", "label":"env=dev"}を base64 でエンコードした文字列です。
関数が終了すると、次のように表示されます。
result: Successfully started instance dev-instance
- これも
インスタンスのステータスが
RUNNINGであることを確認します。起動処理が完了するまでに最長で 30 秒かかります。gcloud compute instances describe dev-instance \ --zone us-west1-b \ | grep statusstatus: RUNNING
Pub/Sub を呼び出すように Cloud Scheduler ジョブを設定する
ジョブを作成する
Console
起動ジョブを作成する
- Google Cloud コンソールで [Cloud Scheduler] ページに移動します。
[Cloud Scheduler] ページに移動 - [ジョブを作成] をクリックします。
- デフォルト リージョンのままにします。
- [名前] を
startup-dev-instancesに設定します。 - [頻度] に「
0 9 * * 1-5」と入力します。- 毎週平日午前 9 時に実行されます。
- [タイムゾーン] で、目的の国とタイムゾーンを選択します。この例では、
United StatesとLos Angelesを使用します。 - [続行] をクリックします。
- [ターゲット タイプ] で、
Pub/Subを選択します。 - トピックのプルダウンから
start-instance-eventを選択します。 - [メッセージ] に次の情報を入力します。
{"zone":"us-west1-b","label":"env=dev"} - [作成] をクリックします。
停止ジョブを作成する
- Google Cloud コンソールの [Cloud Scheduler] ページに移動します。
- [ジョブを作成] をクリックします。
- [リージョン] はデフォルト値のままにして、ページの下部にある [次へ] をクリックします。
- [名前] を
shutdown-dev-instancesに設定します。 - [頻度] に「
0 17 * * 1-5」と入力します。- 毎週平日午後 5 時に実行されます。
- [タイムゾーン] で、目的の国とタイムゾーンを選択します。この例では、
United StatesとLos Angelesを使用します。 - [続行] をクリックします。
- [ターゲット タイプ] で、
Pub/Subを選択します。 - トピックのプルダウンから
stop-instance-eventを選択します。 - [メッセージ] に次の情報を入力します。
{"zone":"us-west1-b","label":"env=dev"} - [作成] をクリックします。
gcloud
起動ジョブを作成する
gcloud scheduler jobs create pubsub startup-dev-instances \
    --schedule '0 9 * * 1-5' \
    --topic start-instance-event \
    --message-body '{"zone":"us-west1-b", "label":"env=dev"}' \
    --time-zone 'America/Los_Angeles' \
    --location us-central1
停止ジョブを作成する
gcloud scheduler jobs create pubsub shutdown-dev-instances \
    --schedule '0 17 * * 1-5' \
    --topic stop-instance-event \
    --message-body '{"zone":"us-west1-b", "label":"env=dev"}' \
    --time-zone 'America/Los_Angeles' \
    --location us-central1
(省略可)ジョブが動作することを確認する
Console
インスタンスを停止する
- Google Cloud コンソールで [Cloud Scheduler] ページに移動します。
[Cloud Scheduler] ページに移動 shutdown-dev-instancesという名前のジョブで、ページの右端にある [今すぐ実行]ボタンをクリックします。- Google Cloud コンソールの [VM インスタンス] ページに移動します。
[VM インスタンス] ページに移動 dev-instanceという名前のインスタンスの横に灰色の四角が表示されていることを確認します。これは、停止中であることを示しています。シャットダウンが完了するまでに最長で 30 秒かかります。
インスタンスを起動する
- Google Cloud コンソールで [Cloud Scheduler] ページに移動します。
[Cloud Scheduler] ページに移動 startup-dev-instancesという名前のジョブで、ページの右端にある [今すぐ実行]ボタンをクリックします。- Google Cloud コンソールの [VM インスタンス] ページに移動します。
[VM インスタンス] ページに移動 dev-instanceという名前のインスタンスの名前の横に緑色のチェックマークが表示されていることを確認します。これは実行中であることを湿しています。起動処理が完了するまでに最長で 30 秒かかります。
gcloud
インスタンスを停止する
スケジューラ ジョブを実行してインスタンスを停止します。
gcloud beta scheduler jobs run shutdown-dev-instances
インスタンスのステータスが
TERMINATEDであることを確認します。シャットダウンが完了するまでに最長で 30 秒かかります。gcloud compute instances describe dev-instance \ --zone us-west1-b \ | grep statusstatus: TERMINATED
インスタンスを起動する
スケジューラ ジョブを実行してインスタンスを起動します。
gcloud beta scheduler jobs run startup-dev-instances
インスタンスのステータスが
RUNNINGであることを確認します。起動処理が完了するまでに最長で 30 秒かかります。gcloud compute instances describe dev-instance \ --zone us-west1-b \ | grep statusstatus: RUNNING

