创建数据集并导入数据

数据集包含要分类的各种内容的代表性样本,以您希望自定义模型使用的类别标签进行标记。数据集用作训练模型的输入。

构建数据集的主要步骤如下:

  1. 创建数据集资源
  2. 将训练数据导入到数据集中
  3. 为文档添加标签标识实体

对于分类和情感分析,第 2 步和第 3 步通常合并完成:您可以导入已分配标签的文档。

创建数据集

如要创建自定义模型,首先需要创建一个空数据集,该数据集最终用于保存模型的训练数据。在您导入文档之前,新创建的数据集不包含任何数据。

网页界面

要创建数据集,请执行以下操作:

  1. 打开 AutoML Natural Language 界面,然后在与您计划训练的模型类型对应的框中选择开始使用

    此时会出现数据集页面,其中显示了之前为当前项目创建的数据集的状态。

    如需为其他项目添加数据集,请从标题栏右上角的下拉列表中选择项目。

  2. 点击标题栏中的新建数据集按钮。

  3. 输入数据集的名称,然后指定要在其中存储数据集的地理位置

    如需了解详情,请参阅位置

  4. 选择模型目标,该目标指定您将借助模型(您使用此数据集训练的模型)执行的分析类型。

    • 单标签分类为每个分类的文档分配一个标签
    • 多标签分类可以为某个文档分配多个标签
    • 实体提取识别文档中的实体
    • 情感分析可以分析文档中的态度
  5. 点击创建数据集

    此时会出现新数据集的导入页面。 请参阅将数据导入到数据集中

代码示例

分类

REST

在使用任何请求数据之前,请先进行以下替换:

  • project-id:您的项目 ID
  • location-id:资源的位置,全球位置为 us-central1,欧盟位置为 eu

HTTP 方法和网址:

POST https://automl.googleapis.com/v1/projects/project-id/locations/location-id/datasets

请求 JSON 正文:

{
  "displayName": "test_dataset",
  "textClassificationDatasetMetadata": {
    "classificationType": "MULTICLASS"
  }
}

如需发送您的请求,请展开以下选项之一:

您应该收到类似以下内容的 JSON 响应:

{
  "name": "projects/434039606874/locations/us-central1/datasets/356587829854924648",
  "displayName": "test_dataset",
  "createTime": "2018-04-26T18:02:59.825060Z",
  "textClassificationDatasetMetadata": {
    "classificationType": "MULTICLASS"
  }
}

Python

如需了解如何安装和使用 AutoML Natural Language 的客户端库,请参阅 AutoML Natural Language 客户端库。 如需了解详情,请参阅 AutoML Natural Language Python API 参考文档

如需向 AutoML Natural Language 进行身份验证,请设置应用默认凭据。如需了解详情,请参阅为本地开发环境设置身份验证

from google.cloud import automl

# TODO(developer): Uncomment and set the following variables
# project_id = "YOUR_PROJECT_ID"
# display_name = "YOUR_DATASET_NAME"

client = automl.AutoMlClient()

# A resource that represents Google Cloud Platform location.
project_location = f"projects/{project_id}/locations/us-central1"
# Specify the classification type
# Types:
# MultiLabel: Multiple labels are allowed for one example.
# MultiClass: At most one label is allowed per example.
metadata = automl.TextClassificationDatasetMetadata(
    classification_type=automl.ClassificationType.MULTICLASS
)
dataset = automl.Dataset(
    display_name=display_name,
    text_classification_dataset_metadata=metadata,
)

# Create a dataset with the dataset metadata in the region.
response = client.create_dataset(parent=project_location, dataset=dataset)

created_dataset = response.result()

# Display the dataset information
print(f"Dataset name: {created_dataset.name}")
print("Dataset id: {}".format(created_dataset.name.split("/")[-1]))

Java

如需了解如何安装和使用 AutoML Natural Language 的客户端库,请参阅 AutoML Natural Language 客户端库。 如需了解详情,请参阅 AutoML Natural Language Java API 参考文档

如需向 AutoML Natural Language 进行身份验证,请设置应用默认凭据。如需了解详情,请参阅为本地开发环境设置身份验证

import com.google.api.gax.longrunning.OperationFuture;
import com.google.cloud.automl.v1.AutoMlClient;
import com.google.cloud.automl.v1.ClassificationType;
import com.google.cloud.automl.v1.Dataset;
import com.google.cloud.automl.v1.LocationName;
import com.google.cloud.automl.v1.OperationMetadata;
import com.google.cloud.automl.v1.TextClassificationDatasetMetadata;
import java.io.IOException;
import java.util.concurrent.ExecutionException;

class LanguageTextClassificationCreateDataset {

  public static void main(String[] args)
      throws IOException, ExecutionException, InterruptedException {
    // TODO(developer): Replace these variables before running the sample.
    String projectId = "YOUR_PROJECT_ID";
    String displayName = "YOUR_DATASET_NAME";
    createDataset(projectId, displayName);
  }

  // Create a dataset
  static void createDataset(String projectId, String displayName)
      throws IOException, ExecutionException, InterruptedException {
    // Initialize client that will be used to send requests. This client only needs to be created
    // once, and can be reused for multiple requests. After completing all of your requests, call
    // the "close" method on the client to safely clean up any remaining background resources.
    try (AutoMlClient client = AutoMlClient.create()) {
      // A resource that represents Google Cloud Platform location.
      LocationName projectLocation = LocationName.of(projectId, "us-central1");

      // Specify the classification type
      // Types:
      // MultiLabel: Multiple labels are allowed for one example.
      // MultiClass: At most one label is allowed per example.
      ClassificationType classificationType = ClassificationType.MULTILABEL;

      // Specify the text classification type for the dataset.
      TextClassificationDatasetMetadata metadata =
          TextClassificationDatasetMetadata.newBuilder()
              .setClassificationType(classificationType)
              .build();
      Dataset dataset =
          Dataset.newBuilder()
              .setDisplayName(displayName)
              .setTextClassificationDatasetMetadata(metadata)
              .build();
      OperationFuture<Dataset, OperationMetadata> future =
          client.createDatasetAsync(projectLocation, dataset);

      Dataset createdDataset = future.get();

      // Display the dataset information.
      System.out.format("Dataset name: %s\n", createdDataset.getName());
      // To get the dataset id, you have to parse it out of the `name` field. As dataset Ids are
      // required for other methods.
      // Name Form: `projects/{project_id}/locations/{location_id}/datasets/{dataset_id}`
      String[] names = createdDataset.getName().split("/");
      String datasetId = names[names.length - 1];
      System.out.format("Dataset id: %s\n", datasetId);
    }
  }
}

Node.js

如需了解如何安装和使用 AutoML Natural Language 的客户端库,请参阅 AutoML Natural Language 客户端库。 如需了解详情,请参阅 AutoML Natural Language Node.js API 参考文档

如需向 AutoML Natural Language 进行身份验证,请设置应用默认凭据。如需了解详情,请参阅为本地开发环境设置身份验证

/**
 * TODO(developer): Uncomment these variables before running the sample.
 */
// const projectId = 'YOUR_PROJECT_ID';
// const location = 'us-central1';
// const displayName = 'YOUR_DISPLAY_NAME';

// Imports the Google Cloud AutoML library
const {AutoMlClient} = require('@google-cloud/automl').v1;

// Instantiates a client
const client = new AutoMlClient();

async function createDataset() {
  // Construct request
  const request = {
    parent: client.locationPath(projectId, location),
    dataset: {
      displayName: displayName,
      textClassificationDatasetMetadata: {
        classificationType: 'MULTICLASS',
      },
    },
  };

  // Create dataset
  const [operation] = await client.createDataset(request);

  // Wait for operation to complete.
  const [response] = await operation.promise();

  console.log(`Dataset name: ${response.name}`);
  console.log(`
    Dataset id: ${
      response.name
        .split('/')
        [response.name.split('/').length - 1].split('\n')[0]
    }`);
}

createDataset();

Go

如需了解如何安装和使用 AutoML Natural Language 的客户端库,请参阅 AutoML Natural Language 客户端库。 如需了解详情,请参阅 AutoML Natural Language Go API 参考文档

如需向 AutoML Natural Language 进行身份验证,请设置应用默认凭据。如需了解详情,请参阅为本地开发环境设置身份验证

import (
	"context"
	"fmt"
	"io"

	automl "cloud.google.com/go/automl/apiv1"
	"cloud.google.com/go/automl/apiv1/automlpb"
)

// languageTextClassificationCreateDataset creates a dataset for text classification.
func languageTextClassificationCreateDataset(w io.Writer, projectID string, location string, datasetName string) error {
	// projectID := "my-project-id"
	// location := "us-central1"
	// datasetName := "dataset_display_name"

	ctx := context.Background()
	client, err := automl.NewClient(ctx)
	if err != nil {
		return fmt.Errorf("NewClient: %w", err)
	}
	defer client.Close()

	req := &automlpb.CreateDatasetRequest{
		Parent: fmt.Sprintf("projects/%s/locations/%s", projectID, location),
		Dataset: &automlpb.Dataset{
			DisplayName: datasetName,
			DatasetMetadata: &automlpb.Dataset_TextClassificationDatasetMetadata{
				TextClassificationDatasetMetadata: &automlpb.TextClassificationDatasetMetadata{
					// Specify the classification type:
					// - MULTILABEL: Multiple labels are allowed for one example.
					// - MULTICLASS: At most one label is allowed per example.
					ClassificationType: automlpb.ClassificationType_MULTICLASS,
				},
			},
		},
	}

	op, err := client.CreateDataset(ctx, req)
	if err != nil {
		return fmt.Errorf("CreateDataset: %w", err)
	}
	fmt.Fprintf(w, "Processing operation name: %q\n", op.Name())

	dataset, err := op.Wait(ctx)
	if err != nil {
		return fmt.Errorf("Wait: %w", err)
	}

	fmt.Fprintf(w, "Dataset name: %v\n", dataset.GetName())

	return nil
}

其他语言

C#: 请按照客户端库页面上的 C# 设置说明操作,然后访问 .NET 版 AutoML Natural Language 参考文档。

PHP: 请按照客户端库页面上的 PHP 设置说明操作,然后访问 PHP 版 AutoML Natural Language 参考文档。

Ruby: 请按照客户端库页面上的 Ruby 设置说明操作,然后访问 Ruby 版 AutoML Natural Language 参考文档。

实体提取

REST

在使用任何请求数据之前,请先进行以下替换:

  • project-id:您的项目 ID
  • location-id:资源的位置,全球位置为 us-central1,欧盟位置为 eu

HTTP 方法和网址:

POST https://automl.googleapis.com/v1/projects/project-id/locations/location-id/datasets

请求 JSON 正文:

{
  "displayName": "test_dataset",
  "textExtractionDatasetMetadata": {
   }
}

如需发送您的请求,请展开以下选项之一:

您应该收到类似以下内容的 JSON 响应:

{
  name: "projects/000000000000/locations/us-central1/datasets/TEN5582774688079151104"
  display_name: "test_dataset"
  create_time {
     seconds: 1539886451
     nanos: 757650000
   }
   text_extraction_dataset_metadata {
   }
}

Python

如需了解如何安装和使用 AutoML Natural Language 的客户端库,请参阅 AutoML Natural Language 客户端库。 如需了解详情,请参阅 AutoML Natural Language Python API 参考文档

如需向 AutoML Natural Language 进行身份验证,请设置应用默认凭据。如需了解详情,请参阅为本地开发环境设置身份验证

from google.cloud import automl

# TODO(developer): Uncomment and set the following variables
# project_id = "YOUR_PROJECT_ID"
# display_name = "YOUR_DATASET_NAME"

client = automl.AutoMlClient()

# A resource that represents Google Cloud Platform location.
project_location = f"projects/{project_id}/locations/us-central1"
metadata = automl.TextExtractionDatasetMetadata()
dataset = automl.Dataset(
    display_name=display_name, text_extraction_dataset_metadata=metadata
)

# Create a dataset with the dataset metadata in the region.
response = client.create_dataset(parent=project_location, dataset=dataset)

created_dataset = response.result()

# Display the dataset information
print(f"Dataset name: {created_dataset.name}")
print("Dataset id: {}".format(created_dataset.name.split("/")[-1]))

Java

如需了解如何安装和使用 AutoML Natural Language 的客户端库,请参阅 AutoML Natural Language 客户端库。 如需了解详情,请参阅 AutoML Natural Language Java API 参考文档

如需向 AutoML Natural Language 进行身份验证,请设置应用默认凭据。如需了解详情,请参阅为本地开发环境设置身份验证

import com.google.api.gax.longrunning.OperationFuture;
import com.google.cloud.automl.v1.AutoMlClient;
import com.google.cloud.automl.v1.Dataset;
import com.google.cloud.automl.v1.LocationName;
import com.google.cloud.automl.v1.OperationMetadata;
import com.google.cloud.automl.v1.TextExtractionDatasetMetadata;
import java.io.IOException;
import java.util.concurrent.ExecutionException;

class LanguageEntityExtractionCreateDataset {

  static void createDataset() throws IOException, ExecutionException, InterruptedException {
    // TODO(developer): Replace these variables before running the sample.
    String projectId = "YOUR_PROJECT_ID";
    String displayName = "YOUR_DATASET_NAME";
    createDataset(projectId, displayName);
  }

  // Create a dataset
  static void createDataset(String projectId, String displayName)
      throws IOException, ExecutionException, InterruptedException {
    // Initialize client that will be used to send requests. This client only needs to be created
    // once, and can be reused for multiple requests. After completing all of your requests, call
    // the "close" method on the client to safely clean up any remaining background resources.
    try (AutoMlClient client = AutoMlClient.create()) {
      // A resource that represents Google Cloud Platform location.
      LocationName projectLocation = LocationName.of(projectId, "us-central1");

      TextExtractionDatasetMetadata metadata = TextExtractionDatasetMetadata.newBuilder().build();
      Dataset dataset =
          Dataset.newBuilder()
              .setDisplayName(displayName)
              .setTextExtractionDatasetMetadata(metadata)
              .build();
      OperationFuture<Dataset, OperationMetadata> future =
          client.createDatasetAsync(projectLocation, dataset);

      Dataset createdDataset = future.get();

      // Display the dataset information.
      System.out.format("Dataset name: %s\n", createdDataset.getName());
      // To get the dataset id, you have to parse it out of the `name` field. As dataset Ids are
      // required for other methods.
      // Name Form: `projects/{project_id}/locations/{location_id}/datasets/{dataset_id}`
      String[] names = createdDataset.getName().split("/");
      String datasetId = names[names.length - 1];
      System.out.format("Dataset id: %s\n", datasetId);
    }
  }
}

Node.js

如需了解如何安装和使用 AutoML Natural Language 的客户端库,请参阅 AutoML Natural Language 客户端库。 如需了解详情,请参阅 AutoML Natural Language Node.js API 参考文档

如需向 AutoML Natural Language 进行身份验证,请设置应用默认凭据。如需了解详情,请参阅为本地开发环境设置身份验证

/**
 * TODO(developer): Uncomment these variables before running the sample.
 */
// const projectId = 'YOUR_PROJECT_ID';
// const location = 'us-central1';
// const displayName = 'YOUR_DISPLAY_NAME';

// Imports the Google Cloud AutoML library
const {AutoMlClient} = require('@google-cloud/automl').v1;

// Instantiates a client
const client = new AutoMlClient();

async function createDataset() {
  // Construct request
  const request = {
    parent: client.locationPath(projectId, location),
    dataset: {
      displayName: displayName,
      textExtractionDatasetMetadata: {},
    },
  };

  // Create dataset
  const [operation] = await client.createDataset(request);

  // Wait for operation to complete.
  const [response] = await operation.promise();

  console.log(`Dataset name: ${response.name}`);
  console.log(`
    Dataset id: ${
      response.name
        .split('/')
        [response.name.split('/').length - 1].split('\n')[0]
    }`);
}

createDataset();

Go

如需了解如何安装和使用 AutoML Natural Language 的客户端库,请参阅 AutoML Natural Language 客户端库。 如需了解详情,请参阅 AutoML Natural Language Go API 参考文档

如需向 AutoML Natural Language 进行身份验证,请设置应用默认凭据。如需了解详情,请参阅为本地开发环境设置身份验证

import (
	"context"
	"fmt"
	"io"

	automl "cloud.google.com/go/automl/apiv1"
	"cloud.google.com/go/automl/apiv1/automlpb"
)

// languageEntityExtractionCreateDataset creates a dataset for text entity extraction.
func languageEntityExtractionCreateDataset(w io.Writer, projectID string, location string, datasetName string) error {
	// projectID := "my-project-id"
	// location := "us-central1"
	// datasetName := "dataset_display_name"

	ctx := context.Background()
	client, err := automl.NewClient(ctx)
	if err != nil {
		return fmt.Errorf("NewClient: %w", err)
	}
	defer client.Close()

	req := &automlpb.CreateDatasetRequest{
		Parent: fmt.Sprintf("projects/%s/locations/%s", projectID, location),
		Dataset: &automlpb.Dataset{
			DisplayName: datasetName,
			DatasetMetadata: &automlpb.Dataset_TextExtractionDatasetMetadata{
				TextExtractionDatasetMetadata: &automlpb.TextExtractionDatasetMetadata{},
			},
		},
	}

	op, err := client.CreateDataset(ctx, req)
	if err != nil {
		return fmt.Errorf("CreateDataset: %w", err)
	}
	fmt.Fprintf(w, "Processing operation name: %q\n", op.Name())

	dataset, err := op.Wait(ctx)
	if err != nil {
		return fmt.Errorf("Wait: %w", err)
	}

	fmt.Fprintf(w, "Dataset name: %v\n", dataset.GetName())

	return nil
}

其他语言

C#: 请按照客户端库页面上的 C# 设置说明操作,然后访问 .NET 版 AutoML Natural Language 参考文档。

PHP: 请按照客户端库页面上的 PHP 设置说明操作,然后访问 PHP 版 AutoML Natural Language 参考文档。

Ruby: 请按照客户端库页面上的 Ruby 设置说明操作,然后访问 Ruby 版 AutoML Natural Language 参考文档。

情感分析

REST

在使用任何请求数据之前,请先进行以下替换:

  • project-id:您的项目 ID
  • location-id:资源的位置,全球位置为 us-central1,欧盟位置为 eu

HTTP 方法和网址:

POST https://automl.googleapis.com/v1/projects/project-id/locations/location-id/datasets

请求 JSON 正文:

{
  "displayName": "test_dataset",
  "textSentimentDatasetMetadata": {
    "sentimentMax": 4
  }
}

如需发送您的请求,请展开以下选项之一:

您应该收到类似以下内容的 JSON 响应:

{
  name: "projects/000000000000/locations/us-central1/datasets/TST8962998974766436002"
  display_name: "test_dataset_name"
  create_time {
    seconds: 1538855662
    nanos: 51542000
  }
  text_sentiment_dataset_metadata {
    sentiment_max: 7
  }
}

Python

如需了解如何安装和使用 AutoML Natural Language 的客户端库,请参阅 AutoML Natural Language 客户端库。 如需了解详情,请参阅 AutoML Natural Language Python API 参考文档

如需向 AutoML Natural Language 进行身份验证,请设置应用默认凭据。如需了解详情,请参阅为本地开发环境设置身份验证

from google.cloud import automl

# TODO(developer): Uncomment and set the following variables
# project_id = "YOUR_PROJECT_ID"
# display_name = "YOUR_DATASET_NAME"

client = automl.AutoMlClient()

# A resource that represents Google Cloud Platform location.
project_location = f"projects/{project_id}/locations/us-central1"

# Each dataset requires a sentiment score with a defined sentiment_max
# value, for more information on TextSentimentDatasetMetadata, see:
# https://cloud.google.com/natural-language/automl/docs/prepare#sentiment-analysis
# https://cloud.google.com/automl/docs/reference/rpc/google.cloud.automl.v1#textsentimentdatasetmetadata
metadata = automl.TextSentimentDatasetMetadata(
    sentiment_max=4
)  # Possible max sentiment score: 1-10

dataset = automl.Dataset(
    display_name=display_name, text_sentiment_dataset_metadata=metadata
)

# Create a dataset with the dataset metadata in the region.
response = client.create_dataset(parent=project_location, dataset=dataset)

created_dataset = response.result()

# Display the dataset information
print(f"Dataset name: {created_dataset.name}")
print("Dataset id: {}".format(created_dataset.name.split("/")[-1]))

Java

如需了解如何安装和使用 AutoML Natural Language 的客户端库,请参阅 AutoML Natural Language 客户端库。 如需了解详情,请参阅 AutoML Natural Language Java API 参考文档

如需向 AutoML Natural Language 进行身份验证,请设置应用默认凭据。如需了解详情,请参阅为本地开发环境设置身份验证

import com.google.api.gax.longrunning.OperationFuture;
import com.google.cloud.automl.v1.AutoMlClient;
import com.google.cloud.automl.v1.Dataset;
import com.google.cloud.automl.v1.LocationName;
import com.google.cloud.automl.v1.OperationMetadata;
import com.google.cloud.automl.v1.TextSentimentDatasetMetadata;
import java.io.IOException;
import java.util.concurrent.ExecutionException;

class LanguageSentimentAnalysisCreateDataset {

  static void createDataset() throws IOException, ExecutionException, InterruptedException {
    // TODO(developer): Replace these variables before running the sample.
    String projectId = "YOUR_PROJECT_ID";
    String displayName = "YOUR_DATASET_NAME";
    createDataset(projectId, displayName);
  }

  // Create a dataset
  static void createDataset(String projectId, String displayName)
      throws IOException, ExecutionException, InterruptedException {
    // Initialize client that will be used to send requests. This client only needs to be created
    // once, and can be reused for multiple requests. After completing all of your requests, call
    // the "close" method on the client to safely clean up any remaining background resources.
    try (AutoMlClient client = AutoMlClient.create()) {
      // A resource that represents Google Cloud Platform location.
      LocationName projectLocation = LocationName.of(projectId, "us-central1");
      // Specify the text classification type for the dataset.
      TextSentimentDatasetMetadata metadata =
          TextSentimentDatasetMetadata.newBuilder()
              .setSentimentMax(4) // Possible max sentiment score: 1-10
              .build();
      Dataset dataset =
          Dataset.newBuilder()
              .setDisplayName(displayName)
              .setTextSentimentDatasetMetadata(metadata)
              .build();
      OperationFuture<Dataset, OperationMetadata> future =
          client.createDatasetAsync(projectLocation, dataset);

      Dataset createdDataset = future.get();

      // Display the dataset information.
      System.out.format("Dataset name: %s\n", createdDataset.getName());
      // To get the dataset id, you have to parse it out of the `name` field. As dataset Ids are
      // required for other methods.
      // Name Form: `projects/{project_id}/locations/{location_id}/datasets/{dataset_id}`
      String[] names = createdDataset.getName().split("/");
      String datasetId = names[names.length - 1];
      System.out.format("Dataset id: %s\n", datasetId);
    }
  }
}

Node.js

如需了解如何安装和使用 AutoML Natural Language 的客户端库,请参阅 AutoML Natural Language 客户端库。 如需了解详情,请参阅 AutoML Natural Language Node.js API 参考文档

如需向 AutoML Natural Language 进行身份验证,请设置应用默认凭据。如需了解详情,请参阅为本地开发环境设置身份验证

/**
 * TODO(developer): Uncomment these variables before running the sample.
 */
// const projectId = 'YOUR_PROJECT_ID';
// const location = 'us-central1';
// const displayName = 'YOUR_DISPLAY_NAME';

// Imports the Google Cloud AutoML library
const {AutoMlClient} = require('@google-cloud/automl').v1;

// Instantiates a client
const client = new AutoMlClient();

async function createDataset() {
  // Construct request
  const request = {
    parent: client.locationPath(projectId, location),
    dataset: {
      displayName: displayName,
      textSentimentDatasetMetadata: {
        sentimentMax: 4, // Possible max sentiment score: 1-10
      },
    },
  };

  // Create dataset
  const [operation] = await client.createDataset(request);

  // Wait for operation to complete.
  const [response] = await operation.promise();

  console.log(`Dataset name: ${response.name}`);
  console.log(`
    Dataset id: ${
      response.name
        .split('/')
        [response.name.split('/').length - 1].split('\n')[0]
    }`);
}

createDataset();

Go

如需了解如何安装和使用 AutoML Natural Language 的客户端库,请参阅 AutoML Natural Language 客户端库。 如需了解详情,请参阅 AutoML Natural Language Go API 参考文档

如需向 AutoML Natural Language 进行身份验证,请设置应用默认凭据。如需了解详情,请参阅为本地开发环境设置身份验证

import (
	"context"
	"fmt"
	"io"

	automl "cloud.google.com/go/automl/apiv1"
	"cloud.google.com/go/automl/apiv1/automlpb"
)

// languageSentimentAnalysisCreateDataset creates a dataset for text sentiment analysis.
func languageSentimentAnalysisCreateDataset(w io.Writer, projectID string, location string, datasetName string) error {
	// projectID := "my-project-id"
	// location := "us-central1"
	// datasetName := "dataset_display_name"

	ctx := context.Background()
	client, err := automl.NewClient(ctx)
	if err != nil {
		return fmt.Errorf("NewClient: %w", err)
	}
	defer client.Close()

	req := &automlpb.CreateDatasetRequest{
		Parent: fmt.Sprintf("projects/%s/locations/%s", projectID, location),
		Dataset: &automlpb.Dataset{
			DisplayName: datasetName,
			DatasetMetadata: &automlpb.Dataset_TextSentimentDatasetMetadata{
				TextSentimentDatasetMetadata: &automlpb.TextSentimentDatasetMetadata{
					SentimentMax: 4, // Possible max sentiment score: 1-10
				},
			},
		},
	}

	op, err := client.CreateDataset(ctx, req)
	if err != nil {
		return fmt.Errorf("CreateDataset: %w", err)
	}
	fmt.Fprintf(w, "Processing operation name: %q\n", op.Name())

	dataset, err := op.Wait(ctx)
	if err != nil {
		return fmt.Errorf("Wait: %w", err)
	}

	fmt.Fprintf(w, "Dataset name: %v\n", dataset.GetName())

	return nil
}

其他语言

C#: 请按照客户端库页面上的 C# 设置说明操作,然后访问 .NET 版 AutoML Natural Language 参考文档。

PHP: 请按照客户端库页面上的 PHP 设置说明操作,然后访问 PHP 版 AutoML Natural Language 参考文档。

Ruby: 请按照客户端库页面上的 Ruby 设置说明操作,然后访问 Ruby 版 AutoML Natural Language 参考文档。

将训练数据导入数据集

创建数据集后,您可以从 Cloud Storage 存储桶中存储的 CSV 文件导入文档 URI 和文档标签。如需详细了解如何准备数据并创建 CSV 文件以供导入,请参阅准备训练数据

您可以将文档导入到空数据集中,也可以将其他文档导入到现有数据集中。

网页界面

如需将文档导入到数据集中,请执行以下操作:

  1. 数据集页面选择要向其中导入文档的数据集。

  2. 导入标签页上,指定查找训练文档的位置。

    您可以:

    • 从本地计算机或 Cloud Storage 上传包含培训文档及其相关类别标签的.csv 文件。

    • 从本地计算机上传一个包含训练文档的 .txt、.pdf、tif 或 .zip 文件集合。

  3. 选择要导入的文件以及导入文档的 Cloud Storage 路径。

  4. 点击导入

代码示例

REST

在使用任何请求数据之前,请先进行以下替换:

  • project-id:您的项目 ID
  • location-id:资源的位置,全球位置为 us-central1,欧盟位置为 eu
  • dataset-id:您的数据集 ID
  • bucket-name:您的 Cloud Storage 存储桶
  • csv-file-name:您的 CSV 训练数据文件

HTTP 方法和网址:

POST https://automl.googleapis.com/v1/projects/project-id/locations/location-id/datasets/dataset-id:importData

请求 JSON 正文:

{
  "inputConfig": {
    "gcsSource": {
      "inputUris": ["gs://bucket-name/csv-file-name.csv"]
      }
  }
}

如需发送您的请求,请展开以下选项之一:

您应该会看到类似如下所示的输出。可以使用操作 ID 来获取任务的状态。如需示例,请参阅获取操作状态

{
  "name": "projects/434039606874/locations/us-central1/operations/1979469554520650937",
  "metadata": {
    "@type": "type.googleapis.com/google.cloud.automl.v1beta1.OperationMetadata",
    "createTime": "2018-04-27T01:28:36.128120Z",
    "updateTime": "2018-04-27T01:28:36.128150Z",
    "cancellable": true
  }
}

Python

如需了解如何安装和使用 AutoML Natural Language 的客户端库,请参阅 AutoML Natural Language 客户端库。 如需了解详情,请参阅 AutoML Natural Language Python API 参考文档

如需向 AutoML Natural Language 进行身份验证,请设置应用默认凭据。如需了解详情,请参阅为本地开发环境设置身份验证

from google.cloud import automl

# TODO(developer): Uncomment and set the following variables
# project_id = "YOUR_PROJECT_ID"
# dataset_id = "YOUR_DATASET_ID"
# path = "gs://YOUR_BUCKET_ID/path/to/data.csv"

client = automl.AutoMlClient()
# Get the full path of the dataset.
dataset_full_id = client.dataset_path(project_id, "us-central1", dataset_id)
# Get the multiple Google Cloud Storage URIs
input_uris = path.split(",")
gcs_source = automl.GcsSource(input_uris=input_uris)
input_config = automl.InputConfig(gcs_source=gcs_source)
# Import data from the input URI
response = client.import_data(name=dataset_full_id, input_config=input_config)

print("Processing import...")
print(f"Data imported. {response.result()}")

Java

如需了解如何安装和使用 AutoML Natural Language 的客户端库,请参阅 AutoML Natural Language 客户端库。 如需了解详情,请参阅 AutoML Natural Language Java API 参考文档

如需向 AutoML Natural Language 进行身份验证,请设置应用默认凭据。如需了解详情,请参阅为本地开发环境设置身份验证

import com.google.api.gax.longrunning.OperationFuture;
import com.google.cloud.automl.v1.AutoMlClient;
import com.google.cloud.automl.v1.DatasetName;
import com.google.cloud.automl.v1.GcsSource;
import com.google.cloud.automl.v1.InputConfig;
import com.google.cloud.automl.v1.OperationMetadata;
import com.google.protobuf.Empty;
import java.io.IOException;
import java.util.Arrays;
import java.util.concurrent.ExecutionException;
import java.util.concurrent.TimeUnit;
import java.util.concurrent.TimeoutException;

class ImportDataset {

  public static void main(String[] args)
      throws IOException, ExecutionException, InterruptedException, TimeoutException {
    // TODO(developer): Replace these variables before running the sample.
    String projectId = "YOUR_PROJECT_ID";
    String datasetId = "YOUR_DATASET_ID";
    String path = "gs://BUCKET_ID/path_to_training_data.csv";
    importDataset(projectId, datasetId, path);
  }

  // Import a dataset
  static void importDataset(String projectId, String datasetId, String path)
      throws IOException, ExecutionException, InterruptedException, TimeoutException {
    // Initialize client that will be used to send requests. This client only needs to be created
    // once, and can be reused for multiple requests. After completing all of your requests, call
    // the "close" method on the client to safely clean up any remaining background resources.
    try (AutoMlClient client = AutoMlClient.create()) {
      // Get the complete path of the dataset.
      DatasetName datasetFullId = DatasetName.of(projectId, "us-central1", datasetId);

      // Get multiple Google Cloud Storage URIs to import data from
      GcsSource gcsSource =
          GcsSource.newBuilder().addAllInputUris(Arrays.asList(path.split(","))).build();

      // Import data from the input URI
      InputConfig inputConfig = InputConfig.newBuilder().setGcsSource(gcsSource).build();
      System.out.println("Processing import...");

      // Start the import job
      OperationFuture<Empty, OperationMetadata> operation =
          client.importDataAsync(datasetFullId, inputConfig);

      System.out.format("Operation name: %s%n", operation.getName());

      // If you want to wait for the operation to finish, adjust the timeout appropriately. The
      // operation will still run if you choose not to wait for it to complete. You can check the
      // status of your operation using the operation's name.
      Empty response = operation.get(45, TimeUnit.MINUTES);
      System.out.format("Dataset imported. %s%n", response);
    } catch (TimeoutException e) {
      System.out.println("The operation's polling period was not long enough.");
      System.out.println("You can use the Operation's name to get the current status.");
      System.out.println("The import job is still running and will complete as expected.");
      throw e;
    }
  }
}

Node.js

如需了解如何安装和使用 AutoML Natural Language 的客户端库,请参阅 AutoML Natural Language 客户端库。 如需了解详情,请参阅 AutoML Natural Language Node.js API 参考文档

如需向 AutoML Natural Language 进行身份验证,请设置应用默认凭据。如需了解详情,请参阅为本地开发环境设置身份验证

/**
 * TODO(developer): Uncomment these variables before running the sample.
 */
// const projectId = 'YOUR_PROJECT_ID';
// const location = 'us-central1';
// const datasetId = 'YOUR_DISPLAY_ID';
// const path = 'gs://BUCKET_ID/path_to_training_data.csv';

// Imports the Google Cloud AutoML library
const {AutoMlClient} = require('@google-cloud/automl').v1;

// Instantiates a client
const client = new AutoMlClient();

async function importDataset() {
  // Construct request
  const request = {
    name: client.datasetPath(projectId, location, datasetId),
    inputConfig: {
      gcsSource: {
        inputUris: path.split(','),
      },
    },
  };

  // Import dataset
  console.log('Proccessing import');
  const [operation] = await client.importData(request);

  // Wait for operation to complete.
  const [response] = await operation.promise();
  console.log(`Dataset imported: ${response}`);
}

importDataset();

Go

如需了解如何安装和使用 AutoML Natural Language 的客户端库,请参阅 AutoML Natural Language 客户端库。 如需了解详情,请参阅 AutoML Natural Language Go API 参考文档

如需向 AutoML Natural Language 进行身份验证,请设置应用默认凭据。如需了解详情,请参阅为本地开发环境设置身份验证

import (
	"context"
	"fmt"
	"io"

	automl "cloud.google.com/go/automl/apiv1"
	"cloud.google.com/go/automl/apiv1/automlpb"
)

// importDataIntoDataset imports data into a dataset.
func importDataIntoDataset(w io.Writer, projectID string, location string, datasetID string, inputURI string) error {
	// projectID := "my-project-id"
	// location := "us-central1"
	// datasetID := "TRL123456789..."
	// inputURI := "gs://BUCKET_ID/path_to_training_data.csv"

	ctx := context.Background()
	client, err := automl.NewClient(ctx)
	if err != nil {
		return fmt.Errorf("NewClient: %w", err)
	}
	defer client.Close()

	req := &automlpb.ImportDataRequest{
		Name: fmt.Sprintf("projects/%s/locations/%s/datasets/%s", projectID, location, datasetID),
		InputConfig: &automlpb.InputConfig{
			Source: &automlpb.InputConfig_GcsSource{
				GcsSource: &automlpb.GcsSource{
					InputUris: []string{inputURI},
				},
			},
		},
	}

	op, err := client.ImportData(ctx, req)
	if err != nil {
		return fmt.Errorf("ImportData: %w", err)
	}
	fmt.Fprintf(w, "Processing operation name: %q\n", op.Name())

	if err := op.Wait(ctx); err != nil {
		return fmt.Errorf("Wait: %w", err)
	}

	fmt.Fprintf(w, "Data imported.\n")

	return nil
}

其他语言

C#: 请按照客户端库页面上的 C# 设置说明操作,然后访问 .NET 版 AutoML Natural Language 参考文档。

PHP: 请按照客户端库页面上的 PHP 设置说明操作,然后访问 PHP 版 AutoML Natural Language 参考文档。

Ruby: 请按照客户端库页面上的 Ruby 设置说明操作,然后访问 Ruby 版 AutoML Natural Language 参考文档。

为训练文档添加标签

为了有助于训练模型,数据集中的每个文档都必须添加标签,添加的方式与您希望 AutoML Natural Language 为类似文档添加标签的方式相同。训练数据的质量极大影响着所创建的模型的效果,进而影响该模型返回的预测结果的质量。AutoML Natural Language 会在训练期间忽略未添加标签的文档。

您可以通过以下三种方式为训练文档提供标签:

  • 将标签添加到 .csv 文件中(仅针对分类和情感分析)
  • 在 AutoML Natural Language 界面中为文档添加标签
  • 使用 AI Platform 数据标签服务请求人工标签添加者添加标签

AutoML API 无法执行添加标签的操作。

如需详细了解如何为 .csv 文件中的文档添加标签,请参阅准备训练数据

针对分类和情感分析添加标签

如需在 AutoML Natural Language 界面中为文档添加标签,请从数据集列表页面中选择相应数据集以查看其详细信息。所选数据集的显示名会显示在标题栏中,该页面还会列出数据集中的各个文档及其当前的标签。左侧导航栏汇总了已加标签和未加标签的文档数,使您可以按标签或情感值过滤文档列表。

文本项页面

文本项页面

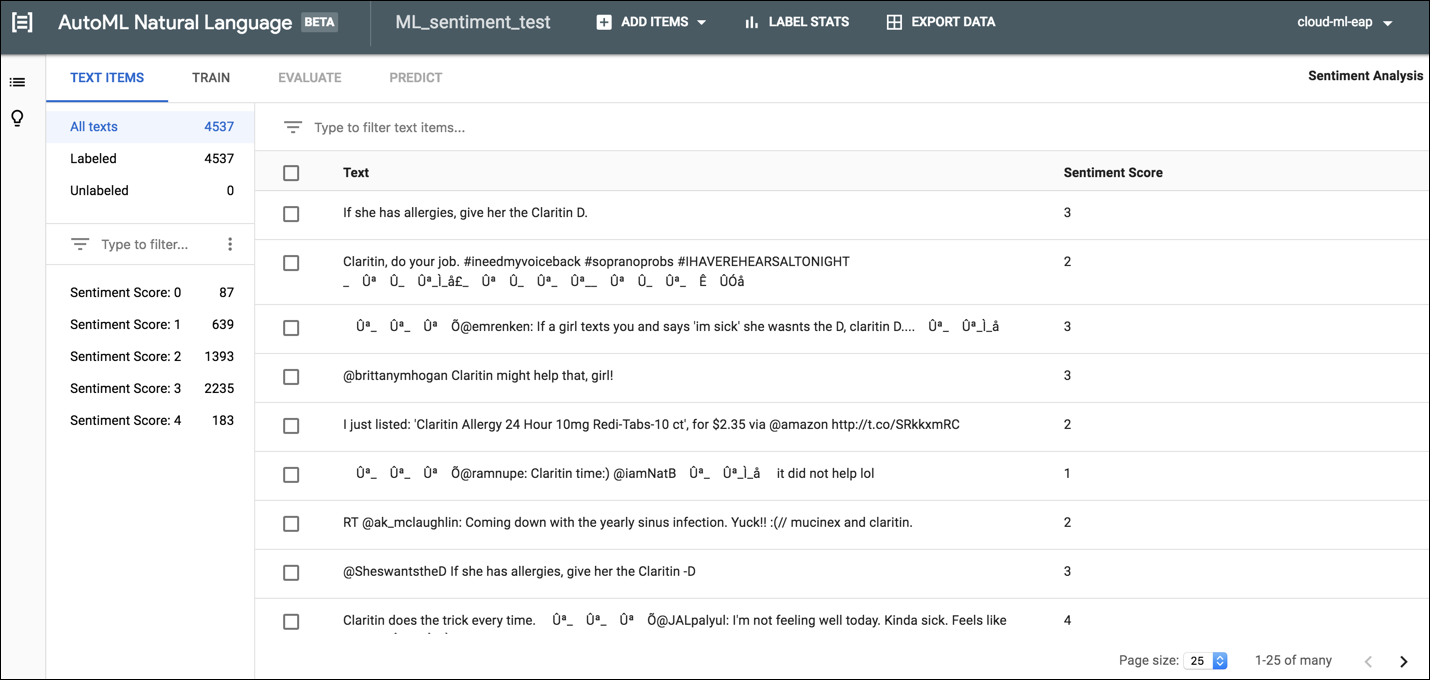
如需为未加标签的文档分配标签或情感值,或者更改文档标签,请选择要更新的文档以及要为其分配的标签或情感值。您可以通过以下两种方式更新文档的标签:

  • 点击要更新的文档旁边的复选框,然后从文档列表顶部显示的标签下拉列表中选择要应用的标签。

  • 点击要更新的文档所在的行,然后从文本详细信息 (Text detail) 页面上显示的列表中选择要应用的标签或情感值。
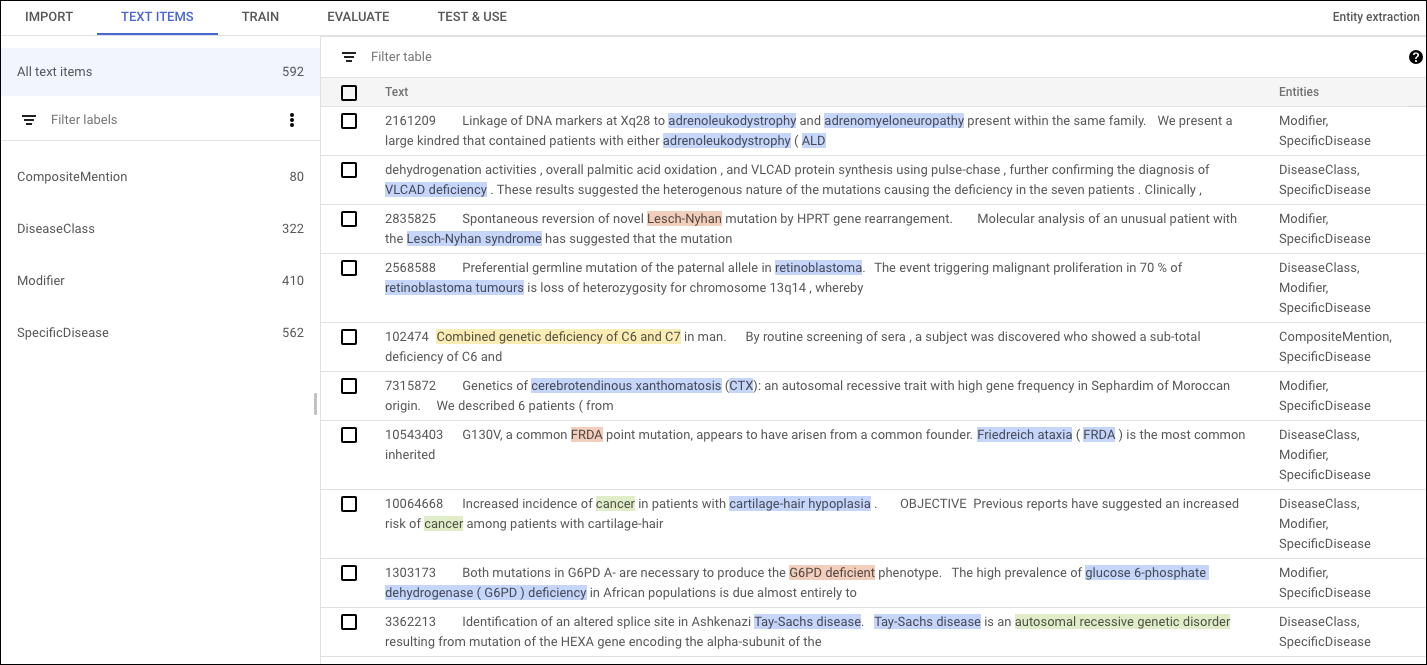
为实体提取标识实体

在训练自定义模型之前,您需要为数据集中的训练文档添加注释。 您可以在导入训练文档之前为其添加注释,也可以在 AutoML Natural Language 界面中添加注释。

如需在 AutoML Natural Language 界面中添加注释,请从数据集列表页面中选择相应数据集以查看其详细信息。所选数据集的显示名会显示在标题栏中,该页面还会列出数据集中的各个文档及其所有注释。左侧导航栏汇总了标签以及每个标签的显示次数。您还可以按标签过滤文档列表。

注释列表

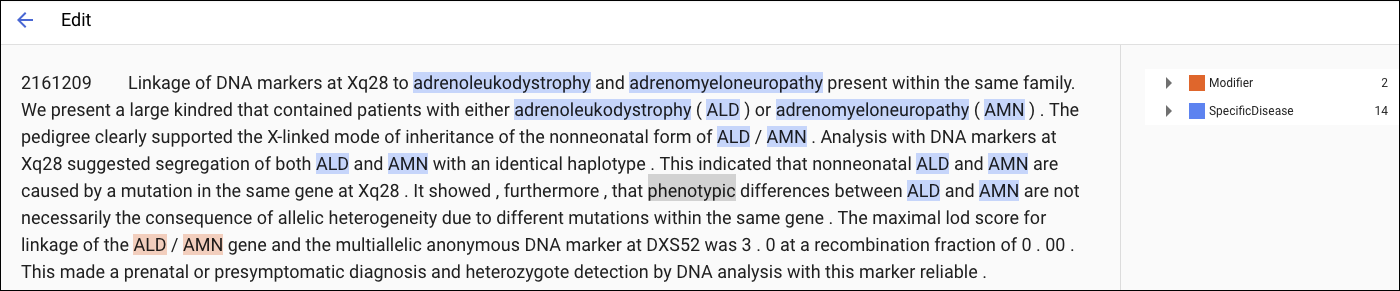
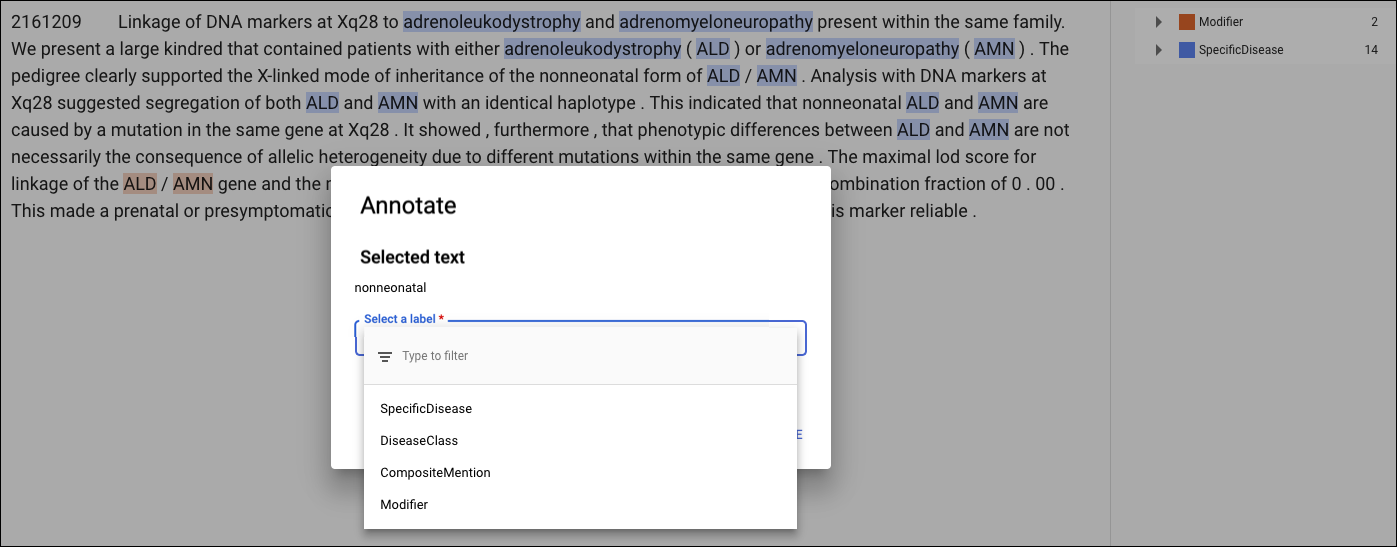
如需在文档中添加注释或者从文档中删除注释,请双击要更新的文档。修改页面会显示所选文档的完整文本,并突出显示之前的所有注释。

实体编辑器

对于 PDF 训练文档或导入时带有布局信息的文档,修改页面有两个标签页:纯文本结构化文本纯文本标签页会显示训练文档的原始内容,不带任何格式。结构化文本标签页会重新创建训练文档的基本布局。 (纯文本标签页还包含指向原始 PDF 文件的链接。)
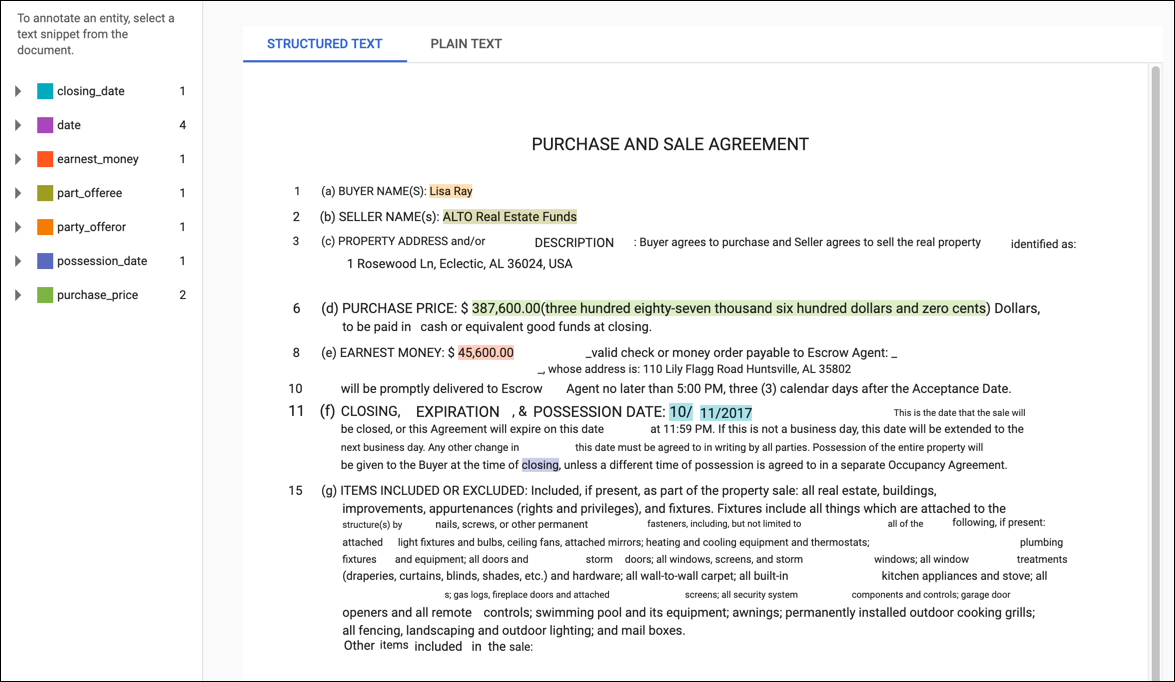
结构化文本编辑器

如需添加新注解,请突出显示代表实体的文本,再从添加注解对话框中选择标签,然后点击保存。当您在结构化文本标签页上添加注解时,AutoML Natural Language 会获取注解在页面上的位置以作为训练时考虑的一个因素。

添加注解

如需移除注解,请在右侧的标签列表中找到相应文本,然后点击旁边的垃圾桶图标。