多叢集網路是實用的工具,可支援區域高可用性、全球分散式使用者鄰近性 (可降低延遲),以及團隊間的機構隔離等用途。Google Kubernetes Engine (GKE) 內建多叢集網路功能,您可以在 GKE 叢集機群中啟用及大規模使用。這項功能也允許您在 GKE Standard 和 Autopilot 之間合併或遷移已部署的基礎架構,以滿足各個應用程式的架構需求。
使用 GKE Autopilot 叢集時,Google 會管理基礎架構,包括控制層和節點。如要改為設定及管理節點,GKE 提供標準模式。如要進一步瞭解模式之間的差異,請參閱選擇叢集作業模式。
本頁面會透過數種部署拓撲,展示這些功能。您將瞭解如何將部署在單一 GKE 叢集中的應用程式,遷移至 GKE Standard 和 Autopilot 叢集的多叢集部署作業。您可以使用 GKE 多叢集服務處理東西向流量,並使用多叢集閘道啟用多叢集南北向網路。
本頁面適用於使用或打算使用 GKE,在多個 Kubernetes 叢集部署服務的雲端架構師和營運團隊。閱讀本頁面之前,請先熟悉 Kubernetes。
多叢集服務和多叢集閘道
Kubernetes 可在不同雲端區域使用單一控制層執行,為服務提供復原能力和更高的可用性。GKE 更進一步,提供 GKE 多叢集服務 (MCS),可跨叢集探索及叫用服務。使用這項功能的服務可透過虛擬 IP 在叢集間探索及存取,這與叢集中可存取的 ClusterIP 服務行為相符。這種做法有以下優點:
- 服務可以在同一個或不同區域的多個叢集之間進行負載平衡 (東西向流量)。
- 可實現跨區域服務高可用性選項。
- 您可以在不同叢集中部署及管理有狀態和無狀態工作負載。
- 共用服務可在叢集之間使用。
如要進一步瞭解如何部署 MCS,請參閱「設定多叢集服務」。
GKE 實作 Kubernetes Gateway API 時,會使用 GKE Gateway 控制器。GKE 可透過 Gateway 部署負載平衡器,為 GKE 上部署的服務提供輸入 (南北向) 流量的路由。 Google Cloud GKE 也提供多叢集閘道 (MCG),可擴充 GKE 閘道控制器,佈建負載平衡器,將流量導向至部署在不同 GKE 叢集上的服務。
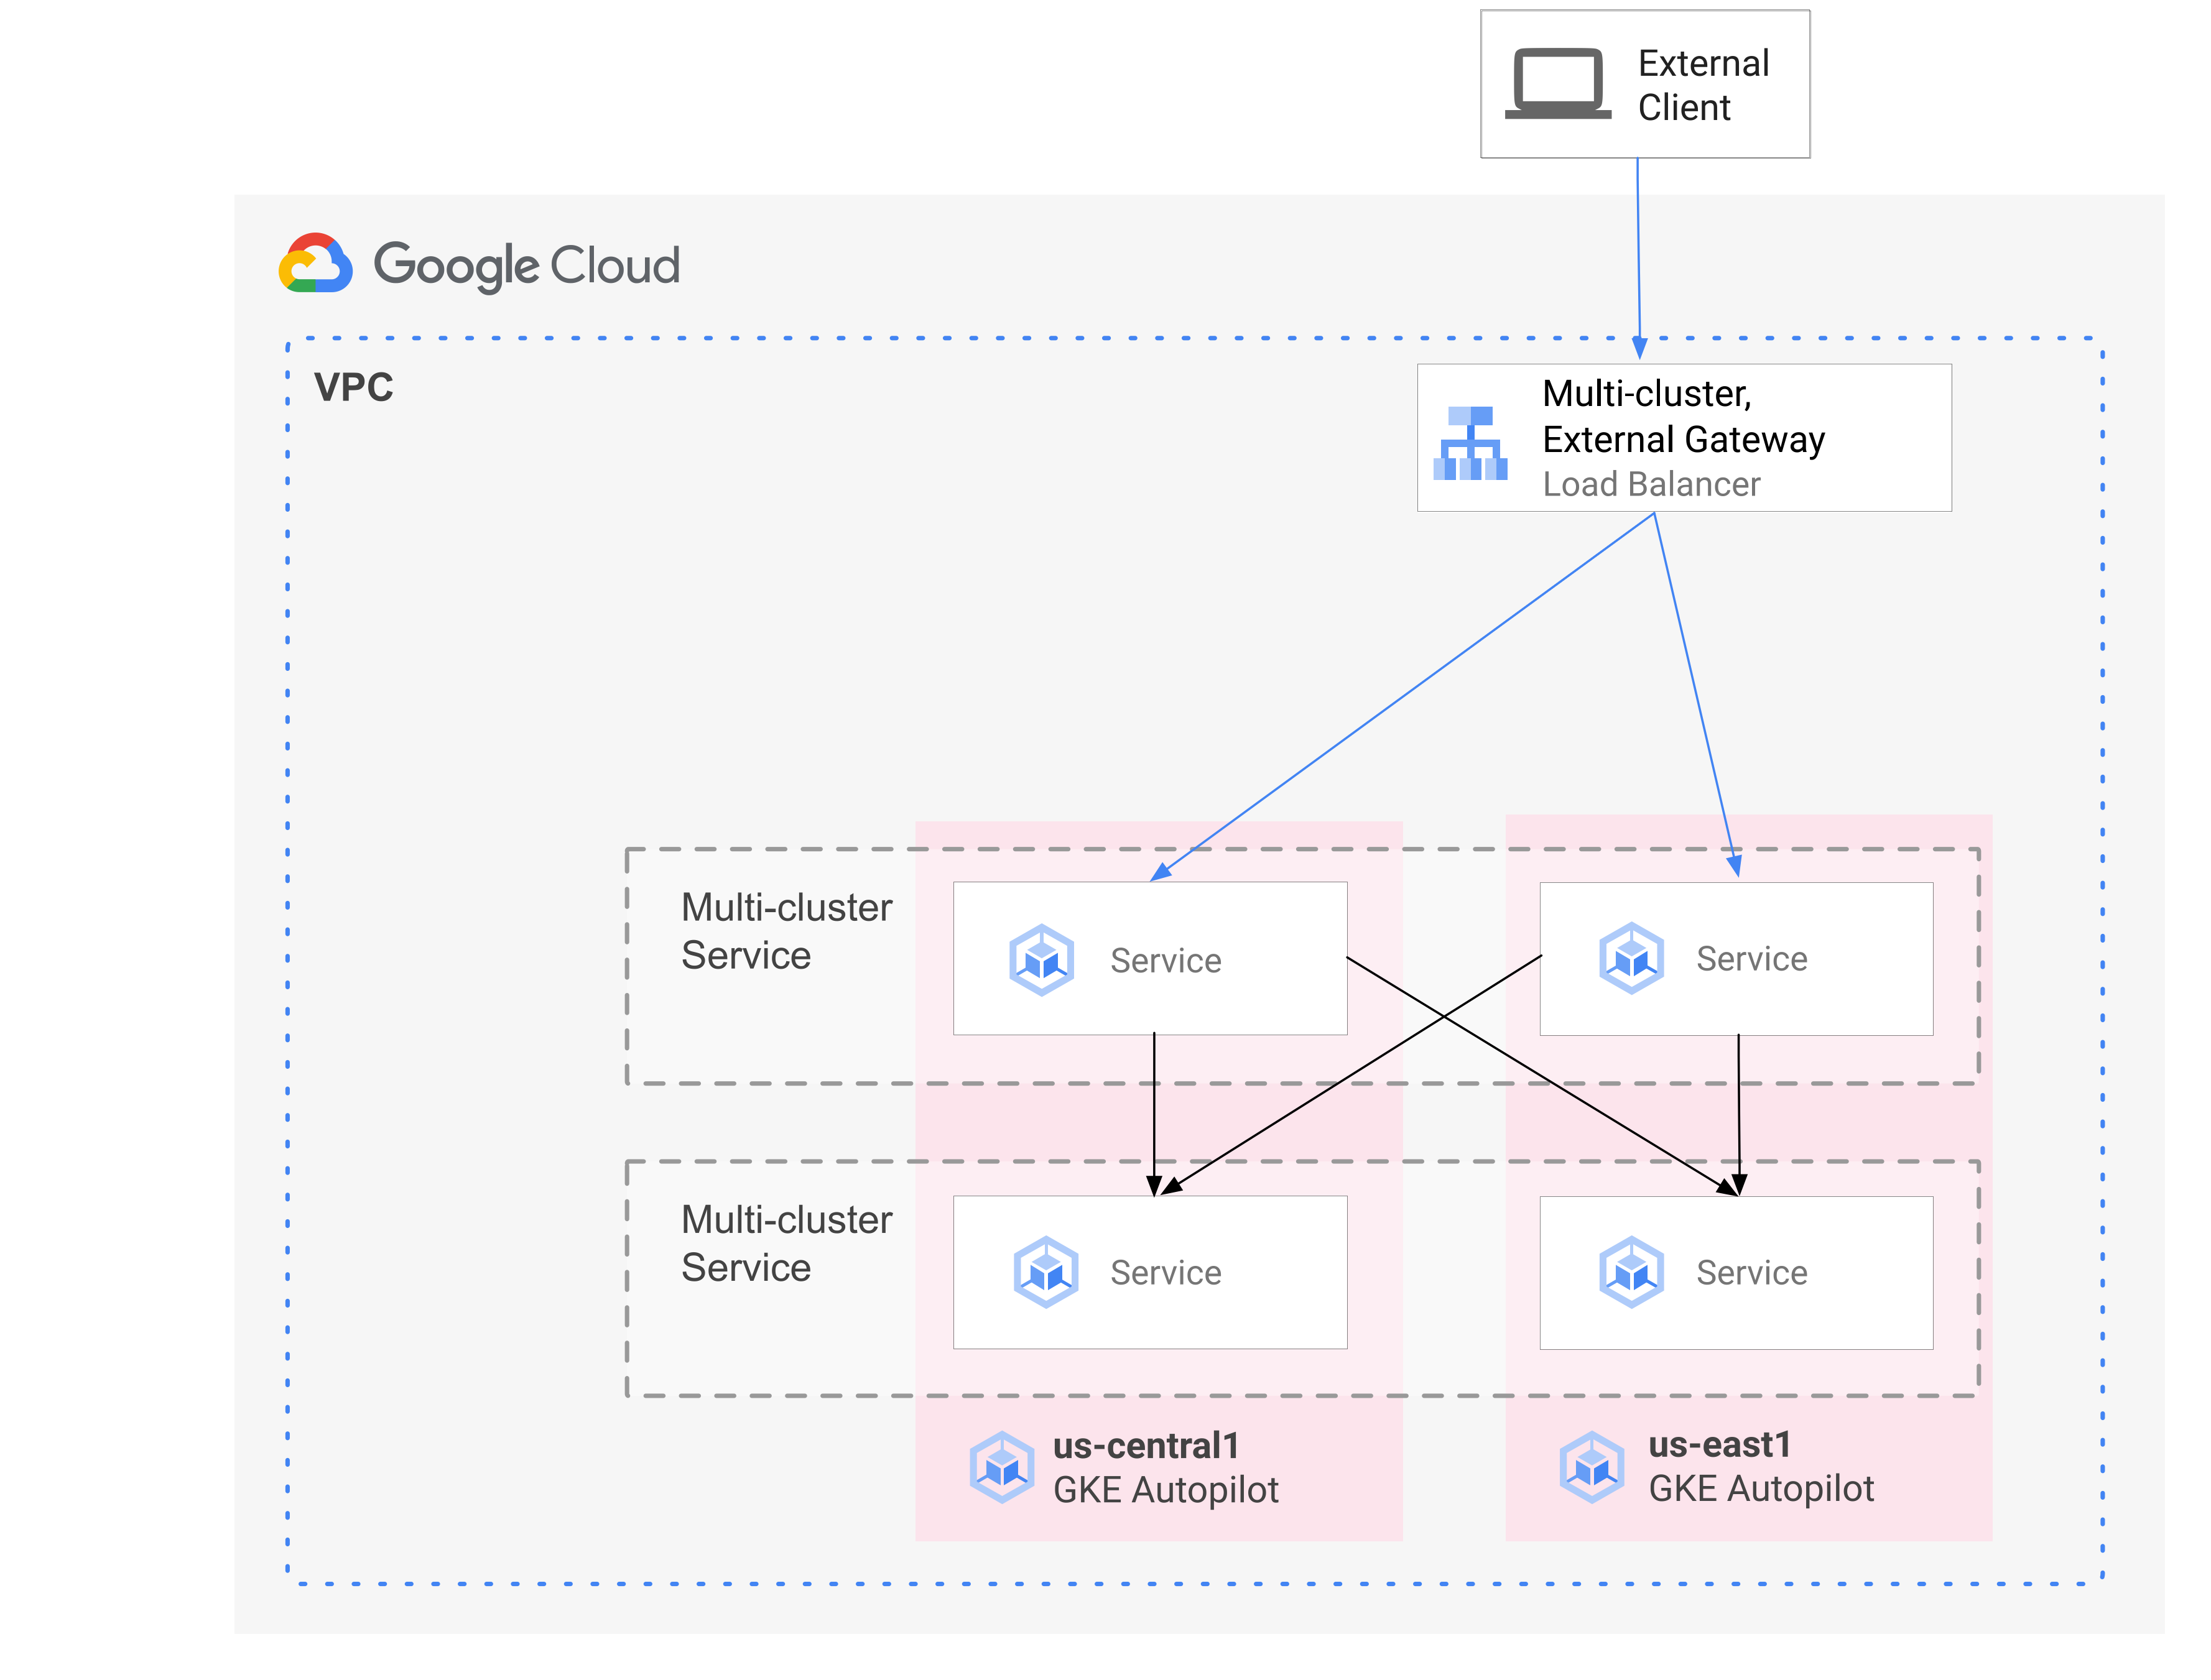
下圖顯示結合 MCS 和 MCG 後,您就能從單一控制平面管理服務部署和流量路徑的互補層面:
詳情請參閱「部署多叢集閘道」。
遷移作業總覽
GKE 多叢集網路功能可為各種設定檔的工作負載帶來好處。舉例來說,您可能想將具有突發流量的無狀態元件移至 Autopilot,因為 Autopilot 的成本模式更有效率。
或者,您可能想將應用程式前端放在更靠近使用者的位置。這種做法可縮短延遲時間並提供快取功能,進而提升應用程式效能和使用者體驗。同時,您可能有一些應用程式依賴的具狀態元件,只能位於一個位置。這項設定需要南北向多叢集負載平衡,才能將用戶端流量傳送至該位置的正確叢集。您也需要東西向多叢集負載平衡,才能在叢集之間傳送流量,連線至有狀態的元件。
本頁面會使用線上商店雲端微服務示範應用程式,說明如何運用多叢集模式,提升單一區域示範的部署作業。您會先從應用程式的單一區域版本開始。接著,使用多叢集服務和多叢集閘道新增高可用性和彈性元素,並利用 Autopilot 減少營運負擔。
初始單一叢集部署
在下圖中,Online Boutique 應用程式一開始會部署至名為 std-west 的單一 GKE Standard 模式叢集,並透過 LoadBalancer 服務公開:

遷移至多叢集服務
在下一個中繼步驟中,您會建立另外兩個叢集,並在其他區域部署無狀態服務。您會在兩個不同的區域中,建立兩個名為 auto-east 和 auto-central 的 GKE Autopilot 叢集,與單一 std-west GKE Standard 叢集不同,並將叢集註冊至Google Cloud 機群。
「機群」是一個 Google Cloud 概念,可按照邏輯整理叢集和其他資源,方便您使用及管理多叢集功能,並在不同系統中套用一致的政策。
您可以使用 ServiceExport,將 onlineboutique 命名空間中 std-west 叢集上的 cartservice 匯出至新的車隊叢集。您會在所有三個叢集上部署 Online Boutique 的 frontend 服務,並透過 ClusterIP 服務公開這項服務。然後使用 ServiceExports 將服務匯出至車隊。Online Boutique 的中介層服務 (例如 productcatalog、shipping 和 adservice) 也會部署至所有三個叢集。
在機群中任何叢集執行的 Pod,都可以將要求傳送至該服務的 ClusterSet URI,藉此存取匯出的 Service。要求會轉送至支援服務的端點。
前端服務可在同一個叢集內,在本機使用中介軟體服務 (例如 productcatalogservice 或 currencyservice)。這種架構有助於將傳入要求保留在前端回應要求的區域,並避免產生不必要的跨區域網路流量費用。
下圖說明這兩項多叢集服務。無狀態前端服務會部署到三個叢集,有狀態後端購物車服務則會部署到一個叢集。這張圖表也顯示,在這個中繼步驟中,前端服務的連入流量仍會透過前端外部 LoadBalancer 服務建立的外部直通式網路負載平衡器,轉送至 us-west1 中的原始 GKE Standard 叢集:

遷移至多叢集閘道
最後一個步驟是使用多叢集閘道,將外部用戶端要求傳送的 前端 Service 傳入流量,轉送至艦隊中多個叢集的服務。
名為 config-central 的第四個叢集會新增至車隊,用於代管及管理為 Gateway 和 HTTPRoute 資源建立的設定。HTTPRoute
資源會將 / 前置字元對應至前端 ServiceImport。
Online Boutique 前端的流量會傳送至其中一個可用區域的正常端點。這個方法會為 Online Boutique 應用程式架構新增高可用性元素。
在下圖中,多叢集閘道會部署全域 Cloud Load Balancer,將外部流量導向部署在機群中三個應用程式叢集上的無狀態 frontend 服務。

在最終狀態中,這個武斷模式會示範應用程式 (frontend、emailservice、checkoutservice、recommendationservice、paymentservice、productcatalogservice、currencyservice、shippingservice 和 adservice) 的有狀態 (cartservice 和 redis-cart) 和無狀態部分之間,存在鬆散耦合。雖然不在本頁的討論範圍內,但這種做法可讓您在日後有機會為具狀態服務層新增復原能力和高可用性。
準備環境
在本指南中,您將使用 Cloud Shell 輸入指令。Cloud Shell 可讓您在Google Cloud 主控台中存取指令列,並包括 Google Cloud SDK 和其他工具,例如 Google Cloud CLI。Cloud Shell 會以視窗形式顯示於Google Cloud 控制台底部。初始化可能需要幾分鐘的時間,但該視窗會立即顯示。
In the Google Cloud console, activate Cloud Shell.
在 Cloud Shell 中定義本指南所用的環境變數。 請將 PROJECT_ID 替換為您的專案 ID:
export PROJECT=PROJECT_ID
gcloud config set project ${PROJECT}
啟用本頁步驟所需的服務:
gcloud services enable \
    gkehub.googleapis.com \
    multiclusteringress.googleapis.com \
    dns.googleapis.com \
    trafficdirector.googleapis.com \
    cloudresourcemanager.googleapis.com \
    multiclusterservicediscovery.googleapis.com \
    container.googleapis.com

gcloud container fleet multi-cluster-services enable
Multi-cluster Services 會管理 Cloud DNS、防火牆規則和 Cloud Service Mesh 等元件,因此也必須啟用這些 API。 Google Cloud 詳情請參閱 Cloud Service Mesh 總覽。
輸出結果會與下列範例相似:
Operation "operations/acf.p2-822685001869-ee4ebe78-6dd8-465e-b0fd-3b0e5f964bad" finished successfully. Waiting for Feature Multi-cluster Services to be created...done.確認多叢集服務顯示「ACTIVE」狀態:
gcloud container fleet multi-cluster-services describe輸出結果會與下列範例相似:
createTime: '2021-11-30T21:59:25.245190894Z'
name: projects/PROJECT_ID/locations/global/features/multiclusterservicediscovery
resourceState:
  state: ACTIVE
spec: {}
updateTime: '2021-11-30T21:59:27.459063070Z'
如果 state 的值不是 ACTIVE,請參閱多叢集服務疑難排解詳細資料。
建立 Standard 和 Autopilot GKE 叢集:
gcloud container clusters create std-west \
    --location us-west1-a \
    --num-nodes=6 \
    --enable-ip-alias \
    --release-channel regular \
    --workload-pool=${PROJECT}. \
    --async

gcloud container clusters create-auto auto-east \
    --location us-east1 \
    --release-channel regular \
    --async

gcloud container clusters create-auto auto-central \
    --location us-central1 \
    --release-channel regular \
    --async

gcloud container clusters create config-central \
    --location us-central1 \
    --num-nodes=1 \
    --enable-ip-alias \
    --release-channel regular \
    --workload-pool=${PROJECT}. \
    --async
GKE Autopilot 叢集預設會啟用 GKE 適用的工作負載身分聯盟,因此建立這類叢集時,不必像 GKE Standard 叢集一樣使用
--workload-pool旗標。等待叢集的「STATUS」從「PROVISIONING」變更為「RUNNING」。 這項程序最多可能需要 10 分鐘的時間。你可以使用監看迴圈監控進度:
watch -n 20 --difference=permanent "gcloud container clusters list"輸出結果會與下列範例相似:
NAME: auto-central LOCATION: us-central1 MASTER_VERSION: 1.21.5-gke.1802 MASTER_IP: 107.178.213.138 MACHINE_TYPE: e2-medium NODE_VERSION: 1.21.5-gke.1802 NUM_NODES: 3 STATUS: PROVISIONING NAME: config-central LOCATION: us-central1 MASTER_VERSION: 1.21.5-gke.1802 MASTER_IP: MACHINE_TYPE: e2-medium NODE_VERSION: 1.21.5-gke.1802 NUM_NODES: 9 STATUS: PROVISIONING NAME: auto-east LOCATION: us-east1 MASTER_VERSION: 1.21.5-gke.1802 MASTER_IP: 35.229.88.209 MACHINE_TYPE: e2-medium NODE_VERSION: 1.21.5-gke.1802 NUM_NODES: 3 STATUS: PROVISIONING NAME: std-west LOCATION: us-west1-a MASTER_VERSION: 1.21.5-gke.1802 MASTER_IP: 35.197.93.113 MACHINE_TYPE: e2-medium NODE_VERSION: 1.21.5-gke.1802 NUM_NODES: 6 STATUS: PROVISIONING所有叢集都處於「RUNNING」狀態後,請按下
CTRL-C中斷指令。新增身分與存取權管理 (IAM) 政策繫結,授予車隊主專案 MCS 服務帳戶本身專案的「網路使用者」角色:
gcloud projects add-iam-policy-binding ${PROJECT} \
    --member "serviceAccount:${PROJECT}.[gke-mcs/gke-mcs-importer]" \
    --role "roles/compute.networkViewer"
您可以使用 GKE 適用的工作負載身分聯盟,授予 MCS 服務專案虛擬私有雲網路設定的讀取權。因此,機群主機專案的 MCS Importer GKE 服務帳戶需要這個角色。
輸出結果會與下列範例相似:
- members:
  - serviceAccount:PROJECT_ID.[gke-mcs/gke-mcs-importer]
  role: roles/compute.networkViewer
[...]
將 GKE Standard 和 Autopilot 叢集註冊至專案的機群。詳情請參閱「註冊叢集」。這個步驟最多可能需要 5 分鐘:
gcloud container fleet memberships register std-west \
    --gke-cluster us-west1-a/std-west \
    --enable-workload-identity \
    --project=${PROJECT}

gcloud container fleet memberships register auto-east \
    --gke-cluster us-east1/auto-east \
    --enable-workload-identity \
    --project=${PROJECT}

gcloud container fleet memberships register auto-central \
    --gke-cluster us-central1/auto-central \
    --enable-workload-identity \
    --project=${PROJECT}

gcloud container fleet memberships register config-central \
    --gke-cluster us-central1/config-central \
    --enable-workload-identity \
    --project=${PROJECT}
每個指令的輸出內容都類似下列範例:
Waiting for membership to be created...done.
Created a new membership [projects/PROJECT_ID/locations/global/memberships/std-west] for the cluster [std-west]
Generating the Connect Agent manifest...
Deploying the Connect Agent on cluster [std-west] in namespace [gke-connect]...
Deployed the Connect Agent on cluster [std-west] in namespace [gke-connect].
Finished registering the cluster [std-west] with the Hub.
連線至叢集並產生 kubeconfig 項目:
gcloud container clusters get-credentials std-west \
    --location us-west1-a --project $PROJECT

gcloud container clusters get-credentials auto-east \
    --location us-east1 --project $PROJECT

gcloud container clusters get-credentials auto-central \
    --location us-central1 --project $PROJECT

gcloud container clusters get-credentials config-central \
    --location us-central1 --project $PROJECT
每個指令的輸出內容都類似下列範例:
Fetching cluster endpoint and auth data.
kubeconfig entry generated for std-west.
重新命名叢集的背景資訊,方便您在本頁面其餘部分使用:
kubectl config rename-context \
    gke_${PROJECT}_us-west1-a_std-west \
    std-west

kubectl config rename-context \
    gke_${PROJECT}_us-east1_auto-east \
    auto-east

kubectl config rename-context \
    gke_${PROJECT}_us-central1_auto-central \
    auto-central

kubectl config rename-context \
    gke_${PROJECT}_us-central1_config-central \
    config-central
在本指南中,內容會根據所在位置命名。雖然您可以提供替代名稱,但本指南的後續步驟會使用這個步驟中使用的名稱。
在 std-west 上建立 onlineboutique 命名空間:
kubectl create namespace onlineboutique --context std-west輸出結果會與下列範例相似:
namespace/onlineboutique created複製 Online Boutique GitHub 存放區,並設定 WORKDIR 變數:
cd ~

git clone --branch release/v0.4.1 \
    https://github.com/GoogleCloudPlatform/microservices-demo.git

cd microservices-demo/release && export WORKDIR=`pwd`
在 std-west 上部署 Online Boutique。這個程序會為 Online Boutique 的所有微服務建立
Deployments和Services,並包含 LoadBalancer 類型的服務,可對外公開 Online Boutique 的前端服務:cd $WORKDIR kubectl apply -f kubernetes-manifests.yaml \ -n onlineboutique --context=std-west等待
LoadBalancerService 取得外部 IP:watch -n 20 --difference=permanent \ "kubectl get svc frontend-external -n onlineboutique --context=std-west"一開始的輸出內容會與下列範例類似:
NAME TYPE CLUSTER-IP EXTERNAL-IP PORT(S) AGE frontend-external LoadBalancer 10.60.5.62 <pending> 80:30359/TCP 43sService準備就緒後,EXTERNAL-IP 欄會顯示負載平衡器的公開 IP 位址。Service就緒後,請取得負載平衡器的外部 IP 位址,並使用 curl 確認前端已就緒。如果這個 curl 指令傳回錯誤,請稍候片刻再試一次:curl $(kubectl get svc frontend-external \ -n onlineboutique --context=std-west \ -o=jsonpath="{.status.loadBalancer.ingress[0].ip}") | \ grep -e Cluster -e Zone -e Podcurl 指令的成功輸出內容類似以下範例:
<b>Cluster: </b>std-west<br/> <b>Zone: </b>us-west1-a<br/> <b>Pod: </b>frontend-b7bddcc97-wdjsk在剩餘的叢集上建立 onlineboutique 命名空間:
kubectl create namespace onlineboutique --context auto-east

kubectl create namespace onlineboutique --context auto-central

kubectl create namespace onlineboutique --context config-central
每個指令的輸出內容都類似下列範例:
namespace/onlineboutique created將
ClusterSet中的 cartservice 從 std-west 叢集匯出至所有其他叢集。ServiceExport物件會註冊 cartservice Service,並透過 GKE 多叢集服務匯出至機群中所有具有 onlineboutique 命名空間的叢集。詳情請參閱「註冊要匯出的服務」。cat <<EOF>> $WORKDIR/cartservice-export.yaml kind: ServiceExport apiVersion: net.gke.io/v1 metadata: namespace: onlineboutique name: cartservice EOF kubectl apply -f $WORKDIR/cartservice-export.yaml \ -n onlineboutique --context=std-west- 第一個資訊清單用於前端
Deployment、Service和ServiceExport。 - 第二個資訊清單用於將中介軟體
Services(emailservice、checkoutservice、recommendationservice、paymentservice、productcatalogservice、currencyservice、shippingservice 和 adservice) 部署至所有執行 frontend 的區域。盡可能將要求保留在區域內,即可避免產生不必要的跨區域網路流量費用。 為包含資訊清單的 GitHub 存放區設定環境變數:
export MANIFEST_REPO_PATH=https://raw.githubusercontent.com/GoogleCloudPlatform/gke-networking-recipes/master/gateway/docs/cluster-migration套用資訊清單,將前端層部署至所有三個工作負載叢集:
kubectl apply -f ${MANIFEST_REPO_PATH}/onlineboutique-frontend-manifests.yaml \
    -n onlineboutique --context=std-west

kubectl apply -f ${MANIFEST_REPO_PATH}/onlineboutique-frontend-manifests.yaml \
    -n onlineboutique --context=auto-east

kubectl apply -f ${MANIFEST_REPO_PATH}/onlineboutique-frontend-manifests.yaml \
    -n onlineboutique --context=auto-central
套用資訊清單,將中介軟體層部署至所有三個工作負載叢集:
kubectl apply -f ${MANIFEST_REPO_PATH}/onlineboutique-middleware-manifests.yaml \ -n onlineboutique --context=std-west kubectl apply -f ${MANIFEST_REPO_PATH}/onlineboutique-middleware-manifests.yaml \ -n onlineboutique --context=auto-east kubectl apply -f ${MANIFEST_REPO_PATH}/onlineboutique-middleware-manifests.yaml \ -n onlineboutique --context=auto-central確認所有叢集都已成功向機群註冊:
gcloud container fleet memberships list --project=$PROJECT以下輸出範例顯示所有叢集都已成功註冊:
NAME: auto-central
EXTERNAL_ID: 21537493-32ea-4a41-990d-02be2c1b319f

NAME: config-central
EXTERNAL_ID: 4369423e-ea7b-482d-a0eb-93b560e67b98

NAME: std-west
EXTERNAL_ID: 7fcb048b-c796-476b-9698-001a00f91ab3

NAME: auto-east
EXTERNAL_ID: aae2d2ff-b861-4a38-bcaf-612f14810012
在 config-central 叢集上安裝 Gateway API 自訂資源定義:
kubectl --context=config-central kustomize "github.com/kubernetes-sigs/gateway-api/config/crd?ref=v0.5.0" \
    | kubectl apply -f -
這個步驟會安裝 Gateway API 自訂資源定義,包括
GatewayClass、Gateway和HTTPRoute資源。自訂資源定義由 Kubernetes 網路特別興趣小組維護。安裝完成後,即可使用 GKE Gateway 控制器。如果尚未啟用,請為機群啟用多叢集 Ingress。 啟用這項功能也會啟用多叢集閘道控制器。
gcloud container fleet ingress enable \
    --config-membership=config-central \
    --project=$PROJECT

gcloud container fleet ingress describe --project=$PROJECT
輸出結果會與下列範例相似:
createTime: '2021-12-08T23:10:52.505888854Z'
name: projects/PROJECT_ID/locations/global/features/multiclusteringress
resourceState:
  state: ACTIVE
spec:
  multiclusteringress:
    configMembership: projects/zl-mcs-expf61cbd13/locations/global/memberships/config-central
state:
  state:
    code: OK
    description: Ready to use
    updateTime: '2021-12-08T23:11:37.994971649Z'
updateTime: '2021-12-08T23:11:38.098244178Z'
如果 state 的值不是 ACTIVE,請參閱「多叢集 Ingress 的疑難排解和作業」。
確認
GatewayClasses可在 config-central 叢集上使用:kubectl get gatewayclasses --context=config-central輸出結果會與下列範例相似:
NAME                                  CONTROLLER                  AGE
gke-l7-global-external-managed        networking.gke.io/gateway   18s
gke-l7-global-external-managed-mc     networking.gke.io/gateway   19s
gke-l7-regional-external-managed      networking.gke.io/gateway   18s
gke-l7-regional-external-managed-mc   networking.gke.io/gateway   19s
gke-l7-gxlb                           networking.gke.io/gateway   74s
gke-l7-gxlb-mc                        networking.gke.io/gateway   16s
gke-l7-rilb                           networking.gke.io/gateway   74s
gke-l7-rilb-mc                        networking.gke.io/gateway   16s
不同的
GatewayClass資源有不同的功能。如要進一步瞭解何時該使用哪種型別,請參閱「GatewayClass 功能」。將
external-httpGateway 資源部署至config-central:cat <<EOF>> $WORKDIR/external-http-gateway.yaml kind: Gateway apiVersion: gateway.networking.k8s.io/v1 metadata: name: external-http namespace: onlineboutique spec: gatewayClassName: gke-l7-global-external-managed-mc listeners: - protocol: HTTP port: 80 name: http EOF kubectl apply -f external-http-gateway.yaml \ -n onlineboutique --context=config-central如
gatewayClassName欄位所示,這個資源屬於GatewayClassgke-l7-global-external-managed-mc,可管理第 7 層外部 Cloud Load Balancing,並公開多叢集應用程式在 config-central 上部署名為 public-frontend-route 的
HTTPRoute:cat <<EOF>> $WORKDIR/public-frontend-route.yaml kind: HTTPRoute apiVersion: gateway.networking.k8s.io/v1 metadata: name: public-frontend-route namespace: onlineboutique spec: parentRefs: - name: "external-http" hostnames: - "store.example.com" rules: - matches: - path: type: PathPrefix value: / backendRefs: - name: frontend group: net.gke.io kind: ServiceImport port: 80 EOF kubectl apply -f public-frontend-route.yaml \ -n onlineboutique --context=config-central部署
HTTPRoute資源時,系統會建立外部第 7 層 Cloud Load Balancing 資源,並公開由 std-west、auto-east 和 auto-central 叢集中執行的前端服務支援的前端ServiceImport。下圖顯示部署多叢集閘道後,流量如何轉送至任一應用程式叢集上的任一前端多叢集服務:
請等待負載平衡器準備就緒,並佈建外部 IP 位址,再繼續下一個步驟。系統最多可能需要 10 分鐘才能指派 IP 位址。你可以使用錶帶監控進度。負載平衡器的名稱採用以下模式:gkemcg-onlineboutique-external-http-k09mfhk74gop:
watch -n 20 --difference=permanent \
    "gcloud compute forwarding-rules list \
        | grep -A 5 NAME..*external-http"
輸出結果會與下列範例相似:
NAME: gkemcg-onlineboutique-external-http-k09mfhk74gop
REGION:
IP_ADDRESS: 34.149.29.176
IP_PROTOCOL: TCP
TARGET: gkemcg-onlineboutique-external-http-k09mfhk74gop
負載平衡器就緒後,請在 Cloud Shell 中執行下列指令,匯出透過套用 external-http-gateway.yaml 和 public-frontend-route.yaml 資訊清單建立的負載平衡器外部 IP 位址:
export EXTERNAL_LB_IP=$(kubectl --context=config-central \
                            -n onlineboutique get gateway external-http \
                            -o=jsonpath='{.status.addresses[0].value}')
當您使用適當的標頭向負載平衡器發送要求時,負載平衡器會傳回前端服務提供的 HTML 內容。舉例來說,由於您已設定
HTTPRoute資源,將store.example.com主機名稱對應至 frontendServiceImport,因此發出 HTTP 要求時,必須提供HOST標頭。如果下列 curl 範例傳回錯誤,請稍候幾分鐘再試一次:curl -H 'HOST: store.example.com' $EXTERNAL_LB_IP | \ grep -e Cluster -e Zone -e Podcurl 指令的成功輸出內容類似以下範例:
<b>Cluster: </b>auto-central<br/> <b>Zone: </b>us-central1-f<br/> <b>Pod: </b>frontend-7c7d596ddc-jdh8f建立用戶端 Pod:
kubectl run --context=std-west \
            --image=radial/busyboxplus:curl client-west \
            -- sh -c 'while sleep 3600; do :; done'

kubectl run --context=auto-east \
            --image=radial/busyboxplus:curl client-east \
            -- sh -c 'while sleep 3600; do :; done'

kubectl run --context=auto-central \
            --image=radial/busyboxplus:curl client-central \
            -- sh -c 'while sleep 3600; do :; done'
Pod 執行完畢後,請使用 curl 指令,從 std-west 叢集中的用戶端
Pod將要求傳送至負載平衡器端點,並查看回應:kubectl exec -it --context=std-west client-west \ -- curl -H 'HOST: store.example.com' $EXTERNAL_LB_IP | \ grep -e Cluster -e Zone -e Podcurl 指令的成功輸出內容類似以下範例:
<b>Cluster: </b>std-west<br/>
<b>Zone: </b>us-west1-a<br/>
<b>Pod: </b>frontend-7cf48b79cf-trzc4
在 auto-east 叢集中的用戶端
Pod執行相同的 curl 要求,並查看回應:kubectl exec -it --context=auto-east client-east \ -- curl -H 'HOST: store.example.com' $EXTERNAL_LB_IP | \ grep -e Cluster -e Zone -e Podcurl 指令的成功輸出內容類似以下範例:
<b>Cluster: </b>auto-east<br/>
<b>Zone: </b>us-east1-d<br/>
<b>Pod: </b>frontend-6784b6df98-scdws
由於這是 Autopilot 叢集,叢集可能需要佈建額外資源,才能排定
Pod。如果看到類似以下範例的輸出內容,請稍候片刻再試一次:Error from server (BadRequest): pod client-east does not have a host assigned在 auto-central 叢集中的用戶端
Pod執行 curl,並檢查回應:kubectl exec -it --context=auto-central client-central \ -- curl -H 'HOST: store.example.com' $EXTERNAL_LB_IP | \ grep -e Cluster -e Zone -e Podcurl 指令的成功輸出內容類似以下範例:
<b>Cluster: </b>auto-central<br/>
<b>Zone: </b>us-central1-b<br/>
<b>Pod: </b>frontend-6784b6df98-x2fv4
這些結果確認流量會轉送至最接近要求來源位置的對應 Pod。
從 std-west 叢集中的 client-west
Pod執行 curl 指令,並確認結果來自 us-west1 中的前端:kubectl exec -it --context=std-west client-west \ -- curl -H 'HOST: store.example.com' $EXTERNAL_LB_IP | \ grep -e Cluster -e Zone -e Podcurl 指令的成功輸出內容類似以下範例:
<b>Cluster: </b>std-west<br/>
<b>Zone: </b>us-west1-a<br/>
<b>Pod: </b>frontend-7cf48b79cf-trzc4
刪除 std-west 叢集中的 frontend
Deployment:kubectl delete deploy frontend \ -n onlineboutique --context=std-west輸出結果會與下列範例相似:
deployment.apps "frontend" deleted從 std-west 叢集中的 client-west
Pod傳送另一項要求。 您應該會看到來自其餘 frontendDeployments位於 auto-east 或 auto-central 叢集的回應:kubectl exec -it --context=std-west client-west \ -- curl -H 'HOST: store.example.com' $EXTERNAL_LB_IP | \ grep -e Cluster -e Zone -e Pod類似下列範例的輸出內容會指出回應這項要求的正常
Pod所在位置:<b>Cluster: </b>auto-central<br/> <b>Zone: </b>us-central1-b<br/> <b>Pod: </b>frontend-6784b6df98-x2fv4或
<b>Cluster: </b>auto-east<br/>
<b>Zone: </b>us-east1-d<br/>
<b>Pod: </b>frontend-6784b6df98-scdws
請多次執行指令,查看交替出現的結果。
建立及設定 GKE 叢集
為在本指南中示範多叢集模式,您會在三個不同的雲端區域中使用三個應用程式叢集,並使用一個叢集代管 Gateway 資源的設定。您會向與專案相關聯的機群註冊所有叢集。每個 Google Cloud 專案只能與一個車隊建立關聯。這個專案稱為機群主專案。
在 GKE Standard 上部署 Online Boutique
在示範部署的第一個步驟中,您會將整套 Online Boutique 應用程式服務部署至 us-west1 中的單一 GKE Standard 叢集 std-west。
您現在已在 us-west1-a 中執行 Online Boutique 的單一區域版本。
您也可以使用網路瀏覽器前往指派給 frontend-external LoadBalancer 服務的外部 IP,存取應用程式並觀察其行為。初始單一部署作業如下圖所示:
將 cartservice 匯出為多叢集服務
在本節中,您將開始為應用程式新增高可用性元素。將後端 cartservice 匯出為多叢集服務,匯入 GKE Autopilot 叢集。
套用多叢集模式的應用程式資訊清單
在本節中,您將套用兩個精選資訊清單,以部署多叢集模式。這些資訊清單包含您先前套用至 std-west 叢集的 kubernetes-manifests.yaml 部分內容:
在機群中任何叢集執行的 Pod,都可以透過以 SERVICE_NAME.NAMESPACE.svc.clusterset.local 格式將要求傳送至該服務的 ClusterSet URI,存取匯出的 Service。舉例來說,在所有三個範例叢集中,前端
Deployments 都能透過向 cartservice.onlineboutique.svc.clusterset.local 發出要求,使用 onlineboutique 命名空間中的 cartservice。
因此,每個資訊清單中的 cartservice 主機名稱都已更新為 ClusterSet URI。因此這個步驟非常重要。如果未更新這個服務主機名稱,前端服務會向 kube-dns 要求 cartservice,而不是 cartservice.onlineboutique.svc.clusterset.local。如果叢集沒有 cartservice 的本機版本,這個行為會導致叢集發生 HTTP Status 500 錯誤,並造成 frontend Pod 狀況不佳。
您現在已在 std-west、auto-east 和 auto-central 叢集中啟用 frontend Deployment、Service 和 ServiceExport。您也可以在每個叢集中,在本機執行 Online Boutique 中介軟體服務。不過,外部流量仍只會導向 us-west1 初始叢集中執行的 Service,如下圖所示:
啟用及設定多叢集閘道
在本節中,您將流量轉送至所有三個叢集中的前端,並對外部流量進行負載平衡。如要達成這項設定,請使用多叢集閘道 (MCG)。設定 MCG 的步驟如下,詳情請參閱「啟用多叢集閘道」一文。
在這些步驟中,您會使用 config-central 叢集來代管閘道資源的設定。
測試應用程式多區域轉送行為
使用多叢集服務和多叢集閘道的一項強大功能,就是將外部要求轉送至地理位置最近的叢集。
如要測試應用程式的多區域行為,請產生來自叢集部署所在各個區域的流量。在每個服務叢集 (std-west、auto-east 和 auto-central) 中建立一個小型 Pod,可用於將 HTTP 要求傳送至負載平衡器端點。結果會顯示回應的前端 Pod。
測試應用程式的多區域復原力
除了有效率地傳送流量,在多個區域中執行服務也能確保基礎架構發生故障時,服務仍可正常運作 (雖然這種情況很少發生)。
如要測試行為,請刪除特定叢集中的 frontend Deployments,然後從這些區域的用戶端 Pod 重試 curl 指令。請注意,應用程式仍可使用,並查看回應要求的 Pod 位置。
透過這個示範部署作業,您已使用多叢集服務和多叢集閘道,為 Online Boutique 應用程式新增彈性和地理位置分配元素。要求會轉送至最接近的地理區域,即使某個區域的前端或中介軟體服務發生問題,使用者仍可順利使用應用程式。