Cloud Tools for Eclipse には、App Engine スタンダード環境の新しい Java アプリケーションを作成するためのウィザードが Eclipse 内に用意されています。
始める前に
- Sign in to your Google Cloud account. If you're new to Google Cloud, create an account to evaluate how our products perform in real-world scenarios. New customers also get $300 in free credits to run, test, and deploy workloads.
-
In the Google Cloud console, on the project selector page, select or create a Google Cloud project.
-
Make sure that billing is enabled for your Google Cloud project.
-
Enable the Cloud Build API.
- Install the Google Cloud CLI.
-
To initialize the gcloud CLI, run the following command:
gcloud init -
In the Google Cloud console, on the project selector page, select or create a Google Cloud project.
-
Make sure that billing is enabled for your Google Cloud project.
-
Enable the Cloud Build API.
- Install the Google Cloud CLI.
-
To initialize the gcloud CLI, run the following command:
gcloud init Google Cloud コンソールで、Google Cloud プロジェクトの App Engine アプリケーションを作成します。
アプリのコンピューティングリソースを配置するリージョンを選択します。
- 最新バージョンの Cloud Tools for Eclipse があることを確認します。
App Engine スタンダード環境の新しい Java プロジェクトの作成
Eclipse で App Engine スタンダード環境の新しいプロジェクトを作成するには:
-
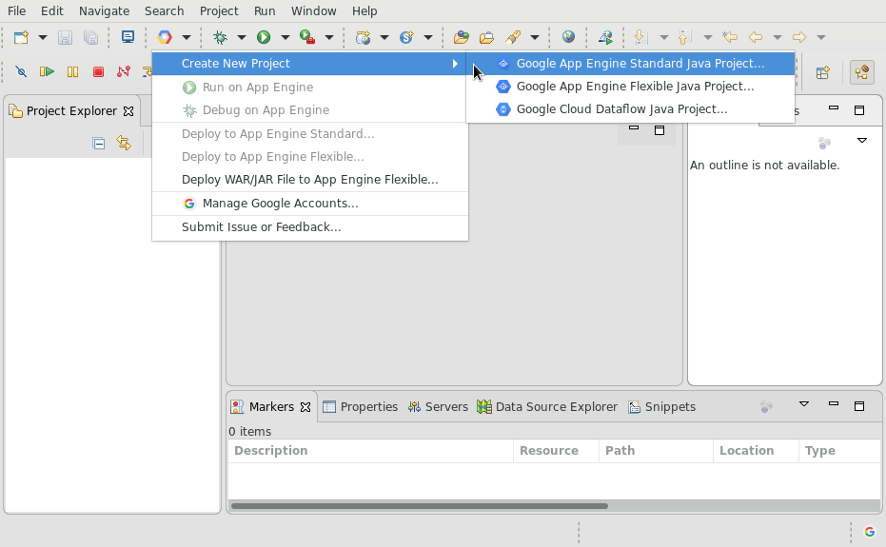
Google Cloud Platform ツールバー ボタン
 をクリックします。
 -
[Create New Project] > [Google App Engine Standard Java Project] を選択します。
-
プロジェクト名を入力し、(オプションで)Java パッケージも入力します。
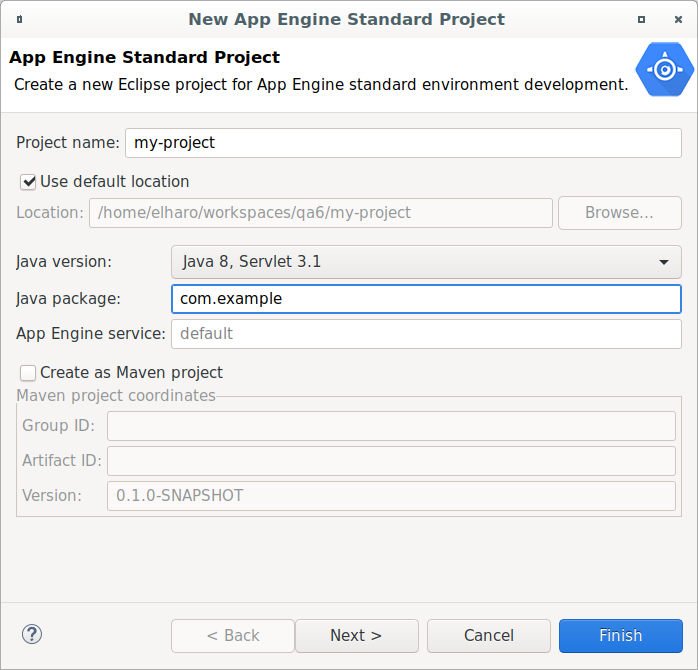
-
Maven ベースの App Engine プロジェクトを作成するには、[Create as Maven Project] をオンにし、Maven グループ ID とアーティファクト ID を入力します。
-
プロジェクトで必要なライブラリ(App Engine API、Google Cloud Endpoints、Objectify)を選択します。
-
[Finish] をクリックします。
ウィザードによって、ネイティブ Eclipse プロジェクトが簡単なサーブレットで生成されます。これは、IDE から実行し、デプロイすることができます。
次のステップ
- アプリケーションを作成したら、ローカル ワークステーションで実行およびデバッグできます。