Questo documento mostra come eseguire i workload batch SQL e PySpark di Serverless per Apache Spark per creare una tabella Apache Iceberg con metadati archiviati nel metastore BigLake. Per informazioni su altri modi per eseguire il codice Spark, consulta Eseguire il codice PySpark in un notebook BigQuery e Eseguire un carico di lavoro Apache Spark.
Prima di iniziare
Se non l'hai ancora fatto, crea un progetto e un bucket Cloud Storage. Google Cloud
Configurare il progetto
- Sign in to your Google Cloud account. If you're new to Google Cloud, create an account to evaluate how our products perform in real-world scenarios. New customers also get $300 in free credits to run, test, and deploy workloads.
-
In the Google Cloud console, on the project selector page, select or create a Google Cloud project.
Roles required to select or create a project
- Select a project: Selecting a project doesn't require a specific IAM role—you can select any project that you've been granted a role on.
-
Create a project: To create a project, you need the Project Creator
(
roles/resourcemanager.projectCreator), which contains theresourcemanager.projects.createpermission. Learn how to grant roles.
-
Enable the Dataproc, BigQuery, and Cloud Storage APIs.
Roles required to enable APIs
To enable APIs, you need the Service Usage Admin IAM role (
roles/serviceusage.serviceUsageAdmin), which contains theserviceusage.services.enablepermission. Learn how to grant roles. -
In the Google Cloud console, on the project selector page, select or create a Google Cloud project.
Roles required to select or create a project
- Select a project: Selecting a project doesn't require a specific IAM role—you can select any project that you've been granted a role on.
-
Create a project: To create a project, you need the Project Creator
(
roles/resourcemanager.projectCreator), which contains theresourcemanager.projects.createpermission. Learn how to grant roles.
-
Enable the Dataproc, BigQuery, and Cloud Storage APIs.
Roles required to enable APIs
To enable APIs, you need the Service Usage Admin IAM role (
roles/serviceusage.serviceUsageAdmin), which contains theserviceusage.services.enablepermission. Learn how to grant roles. Crea un bucket Cloud Storage nel tuo progetto.
- In the Google Cloud console, go to the Cloud Storage Buckets page.
- Click Create.
- On the Create a bucket page, enter your bucket information. To go to the next
step, click Continue.
-
In the Get started section, do the following:
- Enter a globally unique name that meets the bucket naming requirements.
- To add a
bucket label,
expand the Labels section (),
click add_box
Add label, and specify a
keyand avaluefor your label.
-
In the Choose where to store your data section, do the following:
- Select a Location type.
- Choose a location where your bucket's data is permanently stored from the Location type drop-down menu.
- If you select the dual-region location type, you can also choose to enable turbo replication by using the relevant checkbox.
- To set up cross-bucket replication, select
Add cross-bucket replication via Storage Transfer Service and
follow these steps:
Set up cross-bucket replication
- In the Bucket menu, select a bucket.
In the Replication settings section, click Configure to configure settings for the replication job.
The Configure cross-bucket replication pane appears.
- To filter objects to replicate by object name prefix, enter a prefix that you want to include or exclude objects from, then click Add a prefix.
- To set a storage class for the replicated objects, select a storage class from the Storage class menu. If you skip this step, the replicated objects will use the destination bucket's storage class by default.
- Click Done.
-
In the Choose how to store your data section, do the following:
- Select a default storage class for the bucket or Autoclass for automatic storage class management of your bucket's data.
- To enable hierarchical namespace, in the Optimize storage for data-intensive workloads section, select Enable hierarchical namespace on this bucket.
- In the Choose how to control access to objects section, select whether or not your bucket enforces public access prevention, and select an access control method for your bucket's objects.
-
In the Choose how to protect object data section, do the
following:
- Select any of the options under Data protection that you
want to set for your bucket.
- To enable soft delete, click the Soft delete policy (For data recovery) checkbox, and specify the number of days you want to retain objects after deletion.
- To set Object Versioning, click the Object versioning (For version control) checkbox, and specify the maximum number of versions per object and the number of days after which the noncurrent versions expire.
- To enable the retention policy on objects and buckets, click the Retention (For compliance) checkbox, and then do the following:
- To enable Object Retention Lock, click the Enable object retention checkbox.
- To enable Bucket Lock, click the Set bucket retention policy checkbox, and choose a unit of time and a length of time for your retention period.
- To choose how your object data will be encrypted, expand the Data encryption section (), and select a Data encryption method.
- Select any of the options under Data protection that you
want to set for your bucket.
-
In the Get started section, do the following:
- Click Create.
Concedi il ruolo Editor dati BigQuery (
roles/bigquery.dataEditor) all'account di servizio predefinito di Compute Engine,PROJECT_NUMBER-compute@developer.gserviceaccount.com. Per istruzioni, vedi Concedere un singolo ruolo.Esempio di Google Cloud CLI:
gcloud projects add-iam-policy-binding PROJECT_ID \
    --member PROJECT_NUMBER-compute@developer.gserviceaccount.com \
--role roles/bigquery.dataEditor
Note:
- PROJECT_ID e PROJECT_NUMBER sono elencati nella sezione Informazioni sul progetto della console Google Cloud Dashboard.
Copia i seguenti comandi Spark SQL localmente o in Cloud Shell in un file
iceberg-table.sql.USE CATALOG_NAME; CREATE NAMESPACE IF NOT EXISTS example_namespace; DROP TABLE IF EXISTS example_table; CREATE TABLE example_table (id int, data string) USING ICEBERG LOCATION 'gs://BUCKET/WAREHOUSE_FOLDER'; INSERT INTO example_table VALUES (1, 'first row'); ALTER TABLE example_table ADD COLUMNS (newDoubleCol double); DESCRIBE TABLE example_table;
Sostituisci quanto segue:
- CATALOG_NAME: il nome del catalogo Iceberg.
- BUCKET e WAREHOUSE_FOLDER: bucket Cloud Storage e cartella utilizzati come directory del warehouse Iceberg.
Esegui il comando seguente localmente o in Cloud Shell dalla directory contenente
iceberg-table.sqlper inviare il carico di lavoro Spark SQL.gcloud dataproc batches submit spark-sql iceberg-table.sql \ --project=PROJECT_ID \ --region=REGION \ --deps-bucket=BUCKET_NAME \ --version=2.2 \ --subnet=SUBNET_NAME \ --properties="spark.sql.catalog.CATALOG_NAME=org.apache.iceberg.spark.SparkCatalog,spark.sql.catalog.CATALOG_NAME.catalog-impl=org.apache.iceberg.gcp.bigquery.BigQueryMetastoreCatalog,spark.sql.catalog.CATALOG_NAME.gcp_project=PROJECT_ID,spark.sql.catalog.CATALOG_NAME.gcp_location=LOCATION,spark.sql.catalog.CATALOG_NAME.warehouse=gs://BUCKET/WAREHOUSE_FOLDER"
Note:
- PROJECT_ID: il tuo ID progetto Google Cloud . Gli ID progetto sono elencati nella sezione Informazioni sul progetto della Google Cloud console Dashboard.
- REGION: una regione di Compute Engine disponibile per eseguire il carico di lavoro.
- BUCKET_NAME: il nome del bucket Cloud Storage. Spark carica
le dipendenze del workload in una cartella
/dependenciesdi questo bucket prima di eseguire il workload batch. WAREHOUSE_FOLDER si trova in questo bucket. --version: Serverless per Apache Spark runtime versione 2.2 o successive.- SUBNET_NAME: il nome di una subnet VPC in
REGION. Se ometti questo flag, Serverless per Apache Spark seleziona la subnetdefaultnella regione della sessione. Serverless per Apache Spark abilita l'accesso privato Google (PGA) sulla subnet. Per i requisiti di connettività di rete, vedi Google Cloud Configurazione di rete di Serverless per Apache Spark. - LOCATION: una posizione BigQuery supportata. La località predefinita è "US".
--propertiesProprietà catalogo.
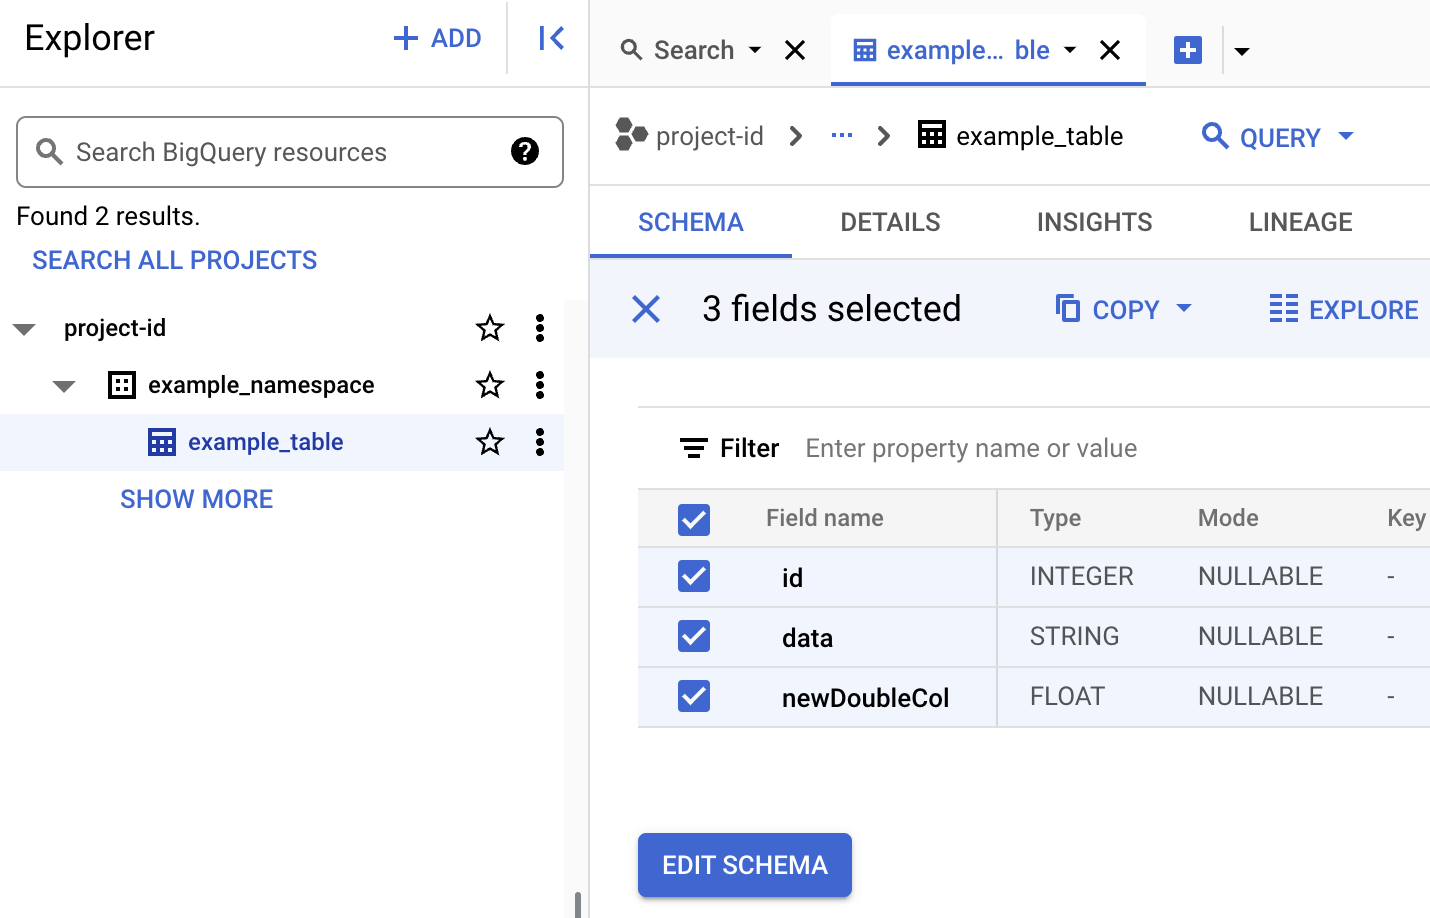
Visualizzare i metadati della tabella in BigQuery
Nella console Google Cloud , vai alla pagina BigQuery.
Visualizza i metadati della tabella Iceberg.
- Copia il seguente codice PySpark localmente o in
Cloud Shell
in un file
iceberg-table.py.from pyspark.sql import SparkSession spark = SparkSession.builder.appName("iceberg-table-example").getOrCreate() catalog = "CATALOG_NAME" namespace = "NAMESPACE" spark.sql(f"USE `{catalog}`;") spark.sql(f"CREATE NAMESPACE IF NOT EXISTS `{namespace}`;") spark.sql(f"USE `{namespace}`;") # Create table and display schema spark.sql("DROP TABLE IF EXISTS example_iceberg_table") spark.sql("CREATE TABLE example_iceberg_table (id int, data string) USING ICEBERG") spark.sql("DESCRIBE example_iceberg_table;") # Insert table data. spark.sql("INSERT INTO example_iceberg_table VALUES (1, 'first row');") # Alter table, then display schema. spark.sql("ALTER TABLE example_iceberg_table ADD COLUMNS (newDoubleCol double);") spark.sql("DESCRIBE example_iceberg_table;")
Sostituisci quanto segue:
- CATALOG_NAME e NAMESPACE: il nome del catalogo Iceberg
e lo spazio dei nomi si combinano per identificare la tabella Iceberg (
catalog.namespace.table_name).
- CATALOG_NAME e NAMESPACE: il nome del catalogo Iceberg
e lo spazio dei nomi si combinano per identificare la tabella Iceberg (
-
Esegui il seguente comando localmente o in
Cloud Shell
dalla directory contenente
iceberg-table.pyper inviare il carico di lavoro PySpark.gcloud dataproc batches submit pyspark iceberg-table.py \ --project=PROJECT_ID \ --region=REGION \ --deps-bucket=BUCKET_NAME \ --version=2.2 \ --subnet=SUBNET_NAME \ --properties="spark.sql.catalog.CATALOG_NAME=org.apache.iceberg.spark.SparkCatalog,spark.sql.catalog.CATALOG_NAME.catalog-impl=org.apache.iceberg.gcp.bigquery.BigQueryMetastoreCatalog,spark.sql.catalog.CATALOG_NAME.gcp_project=PROJECT_ID,spark.sql.catalog.CATALOG_NAME.gcp_location=LOCATION,spark.sql.catalog.CATALOG_NAME.warehouse=gs://BUCKET/WAREHOUSE_FOLDER"Note:
- PROJECT_ID: il tuo ID progetto Google Cloud . Gli ID progetto sono elencati nella sezione Informazioni sul progetto della Google Cloud console Dashboard.
- REGION: una regione di Compute Engine disponibile per eseguire il carico di lavoro.
- BUCKET_NAME: il nome del bucket Cloud Storage. Spark carica
le dipendenze del workload in una cartella
/dependenciesdi questo bucket prima di eseguire il workload batch. --version: Serverless per Apache Spark runtime versione 2.2 o successive.- SUBNET_NAME: il nome di una subnet VPC in
REGION. Se ometti questo flag, Serverless per Apache Spark seleziona la subnetdefaultnella regione della sessione. Serverless per Apache Spark abilita l'accesso privato Google (PGA) sulla subnet. Per i requisiti di connettività di rete, vedi Google Cloud Configurazione di rete di Serverless per Apache Spark. - LOCATION: una posizione BigQuery supportata. La località predefinita è "US".
- BUCKET e WAREHOUSE_FOLDER: bucket Cloud Storage e cartella utilizzati come directory del warehouse Iceberg.
--properties: Proprietà del catalogo.
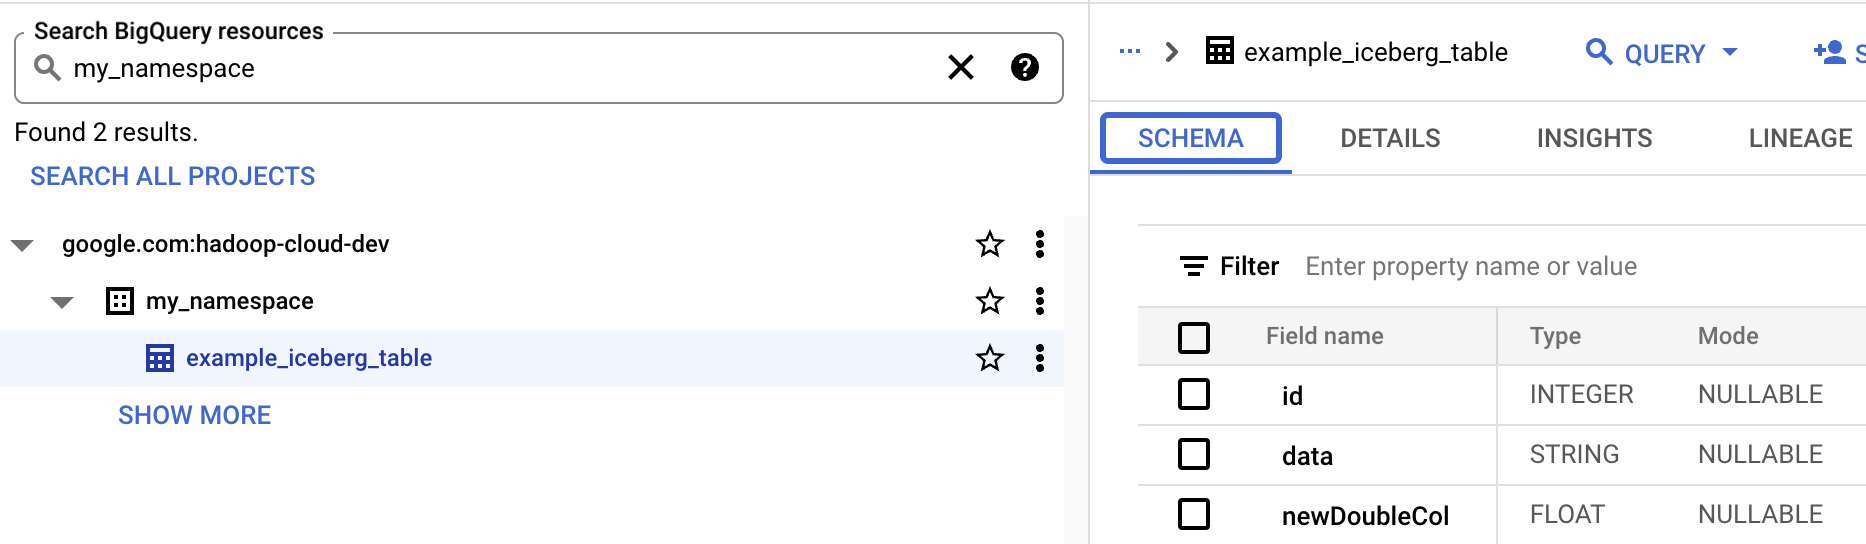
- Visualizza lo schema della tabella in BigQuery.
- Nella console Google Cloud , vai alla pagina BigQuery. Vai a BigQuery Studio
- Visualizza i metadati della tabella Iceberg.
Mappatura delle risorse OSS alle risorse BigQuery
Tieni presente il seguente mapping tra i termini delle risorse open source e delle risorse BigQuery:
Risorsa OSS Risorsa BigQuery Spazio dei nomi, database Set di dati Tabella partizionata o non partizionata Tabella Visualizza Visualizza Creare una tabella Iceberg
Questa sezione mostra come creare una tabella Iceberg con metadati nel metastore BigLake utilizzando i workload batch Spark SQL e PySpark di Serverless per Apache Spark.
Spark SQL
Esegui un carico di lavoro Spark SQL per creare una tabella Iceberg
I seguenti passaggi mostrano come eseguire un workload batch Spark SQL di Serverless per Apache Spark per creare una tabella Iceberg con i metadati della tabella archiviati nel metastore BigLake.
PySpark
I seguenti passaggi mostrano come eseguire un carico di lavoro batch PySpark Serverless per Apache Spark per creare una tabella Iceberg con i metadati della tabella archiviati nel metastore BigLake.