Support agents are a type of virtual agent that introduce conversational artificial intelligence (AI) and Natural Language Processing (NLP) to Contact Center AI Platform. They use the services of Dialogflow CX.
You can use the AI-powered virtual agents to act as the first line of customer support or configure them to handle support requests with limited to no human agent intervention.
You can use virtual agents to do the following:
Configure multiple, distinct virtual agents that focus on specific issues and assign to a specific queue.
Assign a virtual agent to answer incoming calls or chats, or use existing routing options at the queue level.
Allow your human agents to receive escalations from virtual agents.
Dialogflow CX virtual agents can be used for different communication methods. This removes the need to support multiple instances of a virtual agent reducing the overheads of implementation and maintenance as they can be used for both chat and voice.
End-user experience
End-users will experience seamless support, whether chatting with a virtual or human agent.
When sessions with virtual agents can't be contained or have technical issues, they can be escalated to a human agent.
The end-user is then placed in queue to be routed to an agent assigned to the queue.
Chat
Aside from the virtual agent's configurable name and avatar, there is no noticeable difference between agent types in the end-user UI.
It is also possible to add a button ("Skip to Human Agent" button, headphones icon) to the chat interface, which enables end-users to skip the virtual agent and be connected with a human agent. You can also configure user segments in your CRM to have specific groups of end-users (for example, VIPs) automatically bypass the virtual agent.
Call
Virtual agents for calls uses pre-programmed voice prompts and responses to interact with your end-users. Additionally they can use Generative AI to enable complex conversations. You can build in flows so that the end-user can be escalated to a human agent, or alternatively prevent escalation from happening. You can use your own voice talent to supply audio recordings, or use a simulated voice based on supplied text.
Agent experience
The agent experience is only slightly changed. The human agent will see that the session was escalated from a virtual agent in the CRM and in the agent adapter. For chat, the agent can see the conversation with the virtual agent in the chat adapter.
Human and virtual agents can both transfer calls or chats to queues and to each other. Queues attended by virtual agents are labeled for the human agent's awareness.
Virtual agent: Create and link Google Dialogflow CX agents
You can use Dialogflow CX, a natural language recognition platform, to integrate a conversational profile for virtual agents.
Virtual agent Dialogflow platforms
Dialogflow ES: This platform only supports agent setup for Chat channels. Select this option to onboard virtual agents built using Dialogflow ES.
Dialogflow CX: This option supports agent setup for both chat and voice channels. Agent interactions include advanced functions such as DTMF support, consumer barge-in, call companion, speech analysis, Conversational Insights, and many others. Select this option to onboard virtual agents built using Dialogflow CX.
Channel-specific responses
(CCAI Platform) automatically sets the channel value when calling the
Dialogflow API. Voice calls have the channel set to voice, and
chat conversations are set to chat. This applies to virtual agent support for
mobile chat, web chat, and IVR. These capabilities enable you to create
channel-specific responses within your virtual agents. For more information, see
Channel-specific response messages.
Create Dialogflow ES and Dialogflow CX virtual agents
Specific instructions for the creation of Dialogflow CX virtual agents and for Dialogflow ES virtual agents.
Create conversation profile for Dialogflow CX virtual agents
After you've made a virtual agent, to onboard it into the CCAI Platform portal, you must create a conversation profile in the Agent Assist console.
Navigate to Agent Assist.
Select Conversation Profiles from the menu.
In the Project drop-down list at the top, select the project that the Dialogflow CX virtual agent was created in.
In the Location drop-down list at the top, select the Google Cloud region that the virtual agent is located in.
Click Create new. The New Conversation Profile page is displayed.
Enter a name for your conversation profile. Note that this is the name that will appear in the CCAI Platform Portal for the list of available virtual agents.
To link the existing Dialogflow CX virtual agent to the conversation profile:
Navigate to Choose to use Dialogflow CX section.
Turn ON the Enable virtual agent toggle switch.
Enter the
Dialogflow CX Agent IDin the Agents field.
The Agents field appears, select the virtual agent that you created in Dialogflow CX.
For additional information, read about Agent Assist conversation profiles.
Conversation profiles provide the ability to use Dialogflow CX versions and environments. Environments are isolated spaces where you can deploy different versions of your Dialogflow CX agent. This lets you manage and test multiple versions of your virtual agent in a controlled way.
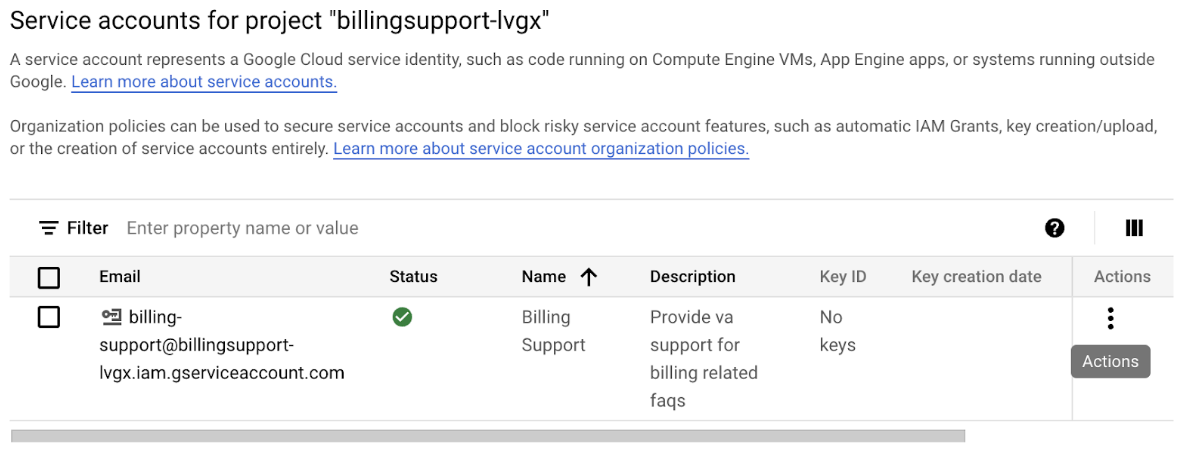
Create a service account and key
CCAI Platform integrates to Dialogflow CX using the Dialogflow API. Access to the API is controlled using Google Cloud service accounts and associated service account key. The service account and associated key are project specific, so if multiple virtual agents are being used from a single project, the same service account and key can be reused.
The following steps walk you through the process of creating the service key in Google Cloud. For more information about Google service accounts see What are service accounts?
If you have already created a service key with access to Dialogflow CX, you can skip this section, note that you must enter a service key into the CCAI Platform Portal to link a Dialogflow CX virtual agent.
To create a service account, grant the correct permissions and generate a service account key. Follow these steps:
Navigate to the Google Cloud console. A default project appears.
In the toolbar drop-down, select the Google project that you used to set up your Dialogflow CX agent.
Select IAM & Admin.
In the side navigation select Service Accounts. The service account console will load.
Click +Create Service Account.
Enter the service account details in Google Cloud service
Enter the service account details.
Display name for this service account.
Service account ID is required and must be unique.
Describe what this service account will do.
Grant this service account access to a project.
In the Select a role drop-down: Assign the Dialogflow API Admin role to the service account.
Click Continue.
Edit actions in the service accounts page
The Google Cloud service accounts page displays any service accounts associated with your project.
To create a service account key see Create a service account key. Follow Google recommended best practices for storing your key.
Based on how your company handles segmentation within Dialogflow CX, you can create multiple virtual agent platform entries and add specific Dialogflow CX agents, or create one platform with many Dialogflow CX agents.
Repeat the previous steps for each Dialogflow CX agent that you need to onboard to the CCAI Platform Portal.
Add a virtual agent platform
Dialogflow ES: This platform only supports agent setup for Chat channels. Select this option to onboard agents built using Dialogflow ES.
Dialogflow CX: This option supports agent setup for both Chat and Voice channels. Agent interactions include advanced functions such as DTMF support, consumer barge-in, CCAI Insights tracking, call companion, sentiment analysis, and others. Select this option to onboard agents built using Dialogflow CX.
Select this option to onboard virtual agents built using Dialogflow CX.
Go to Settings > Developer settings > Virtual agent platform.
Click + Add Platform.
The Add a virtual agent platform dialog appears.
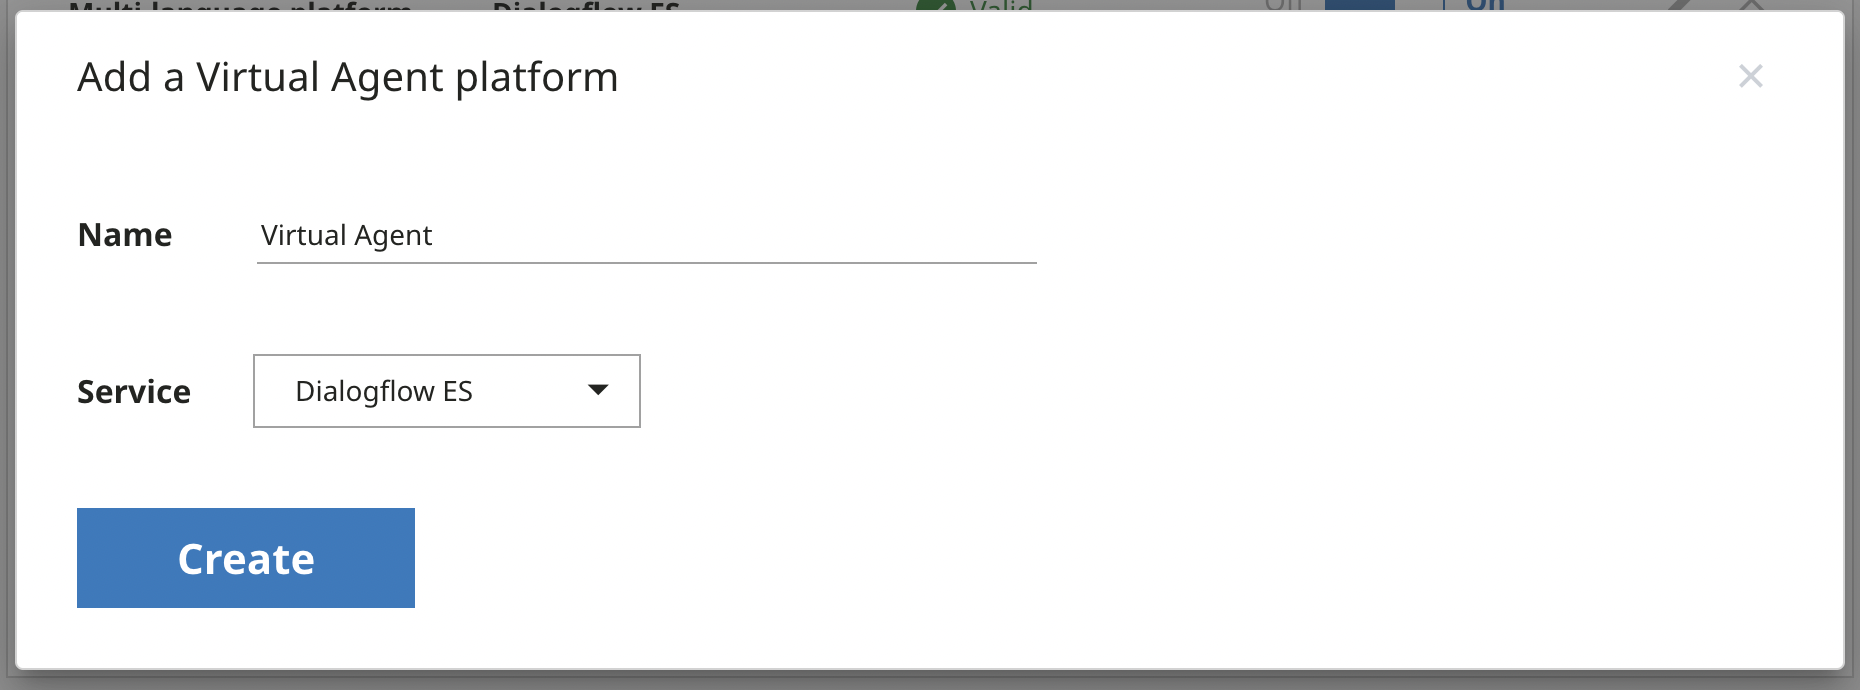
Enter a name for the new platform, consider using the project name that the virtual agents were created in.
Select from the following services:
Dialogflow ES
Dialogflow CX
Click Create.
Adjacent to the new virtual agent platform in the virtual agent platforms list, toggle the virtual agent platform to On.
Virtual agents onboarded using Dialogflow CX will use the
StreamingAnalyzeContent API that will best support DTMF inputs and future
virtual agent upgrades.
Virtual agent platform statuses
CCAI Platform validates service account keys based on JSON structure and key validity. A Dialogflow CX virtual agent is fully authenticated only when its key is in the Valid state:
Valid: All workflows in the platform are valid.
Needs Attention: One or more workflows in the platform are Invalid. Replace with valid service account keys to resolve.
Invalid: All workflows in the platform are Invalid. When a platform status is invalid, the platform is automatically disabled. Replace invalid service account keys with valid keys to resolve.
If the status is Invalid or Needs Attention, generate service account keys for any invalid keys, and replace the invalid keys with the new ones. For more information, see Create and delete service account keys.
When the configuration steps are complete, your virtual agents are ready. For more information about how to manage them, see Virtual agents: Managing and reporting.
Virtual agents: Management and reporting
The following sections provide details on how to manage virtual agents as well as the reporting that is available.
Manage virtual agents
Virtual agents, like human agents, must be added to the CCAI Platform Portal and then assigned to queues. You can personify a virtual agent with a name and avatar.
Add and personify a virtual agent
If you have built agents in Dialogflow CX and connected them to a CCAI Platform virtual agent platform, you can complete the following steps to add and personify those agents in the CCAI Platform Portal:
Go to Settings > Virtual agent.
Click Add virtual agent.
Select the virtual agent type, either Customer support or Task assistant.
Customer support is used for virtual agents that are serving sessions in queues.
Task assistant virtual agents are used by human agents to assist sessions.
Enter a name.
Select a virtual agent Platform and Workflow from the drop-down. Workflows represent authenticated Dialogflow CX agents.
Select the languages this virtual agent will use. Only languages that have been added in Settings > Languages and Messages will appear here.
To upload a custom avatar, mouse over the default image and click Update. A file selection screen appears and, once selected, you can use the built-in tool to crop the image:

Click Save.
Adjacent to the new virtual agent in the virtual agent page, click the virtual agent toggle to On.
At the top of the virtual agent page, switch virtual agents for chat and calls to On, depending on which channels you're using virtual agents for.
Assign virtual agents to queues
Each virtual agent can be assigned to one or more queues. They can be assigned to a queue with or without human agents assigned. However, in the case of virtual agent failure or service interruption, only human agents can protect against dropped sessions.
Go to Settings > Queue > Web (for chat virtual agent) or IVR (for call virtual agent).
Click the queue that you want to assign the virtual agent to:
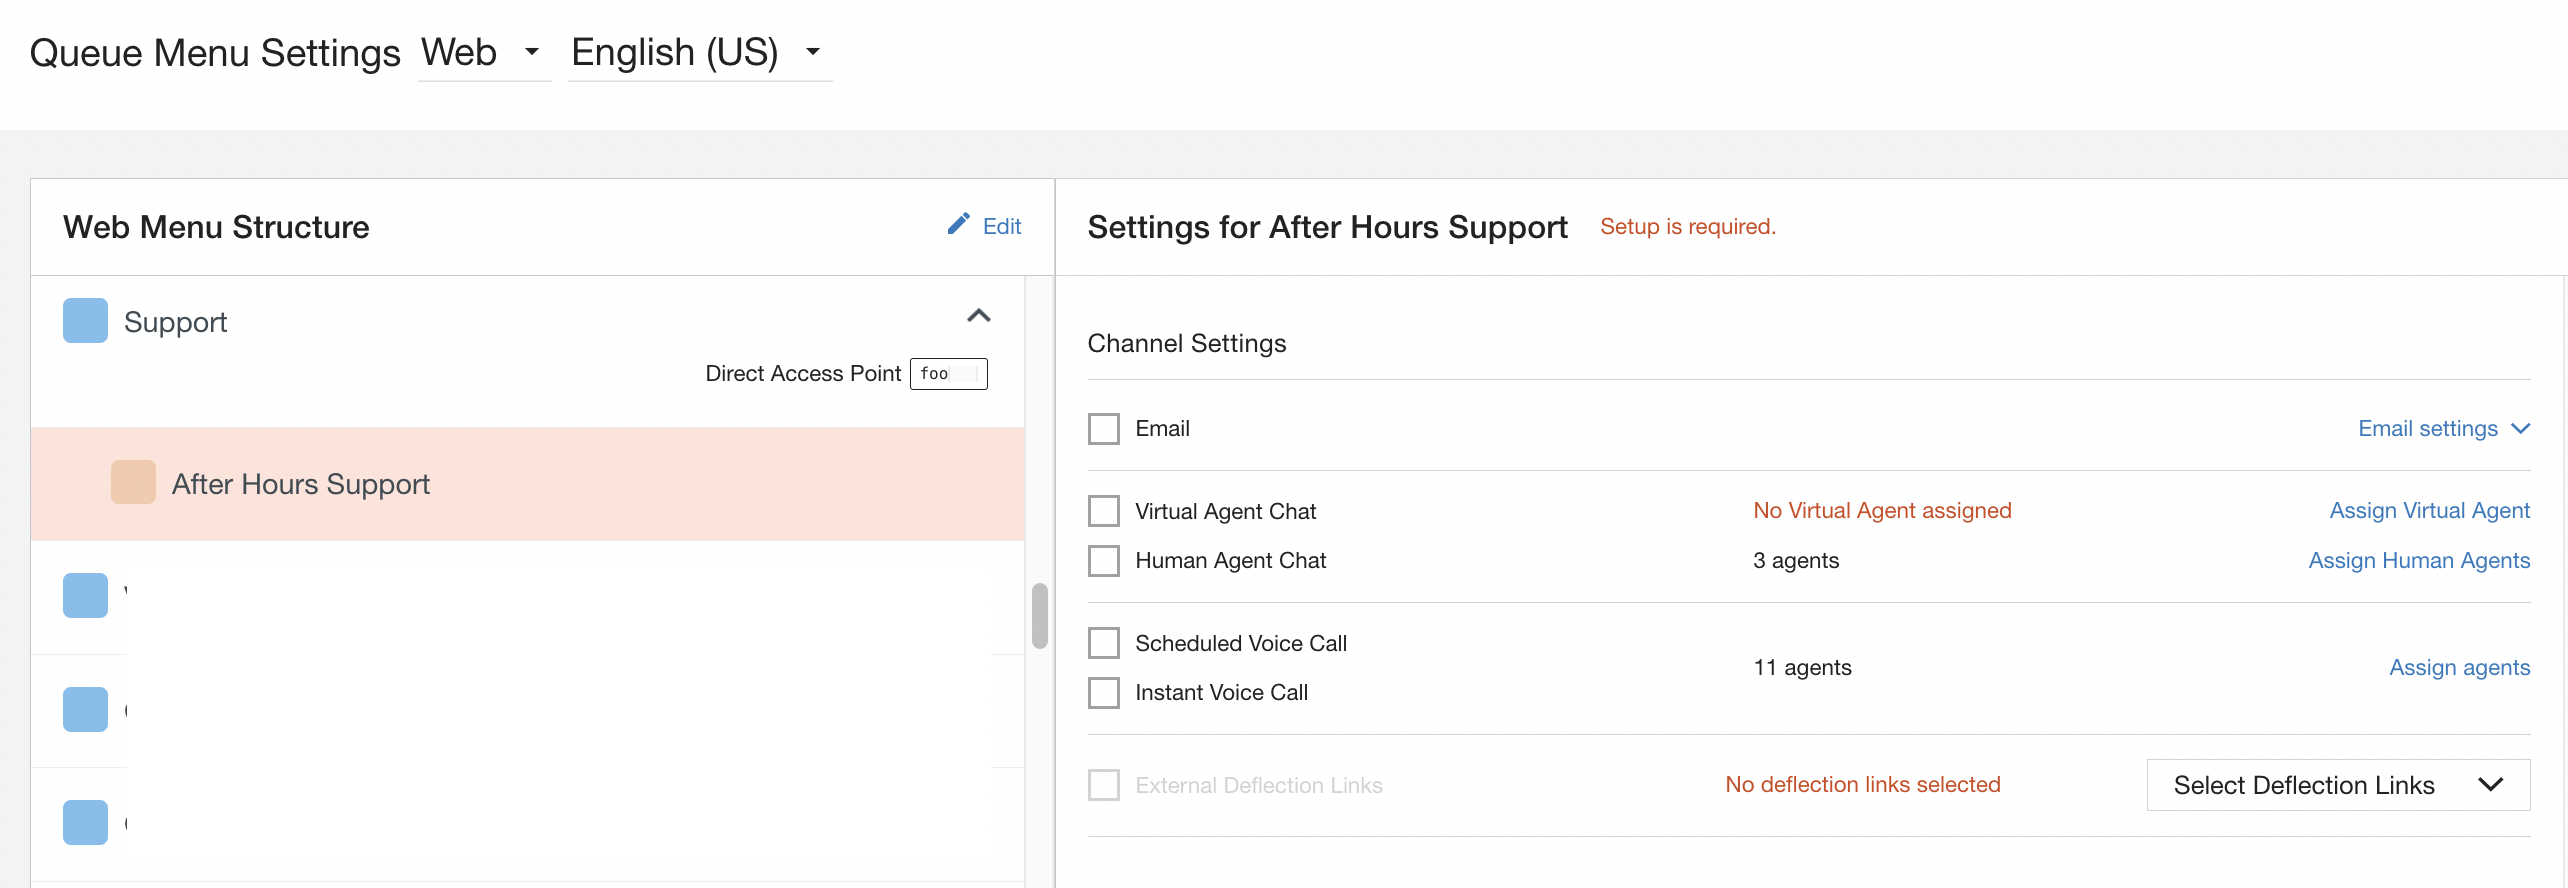
On the queue settings page, click Assign virtual agent.
From the virtual agent drop-down select an agent. Only actual agents in the On state are available.
Select this virtual agent's Hours of Operation:
24 Hours: The virtual agent is available to take chats any time. If there are no human agents online, no escalations are possible.
Queue hours: The virtual agent is available only during the time set in Settings > Support Center Details.
(Chat only) To give end-users the option of skipping the virtual agent, select Display Skip to human agent button. When this checkbox is marked, a headphones icon appears in the end-user UI. The end-user can click the icon any time during the chat session to be connected to a human agent.
(Chat only) If you have user segments configured in your CRM, you can Exclude users from virtual agent workflow. End-users who belong to the specified user segment are sent directly to a human agent. Switch the feature to On, then select a segment field and value from the drop-down menu.
Click Save.
On the queue Settings page, mark the virtual agent chat checkbox for Chat or virtual agent checkbox for Voice.
The virtual agent is now enabled for the queue.
Assign voice virtual agent transfers to top-level queues
To enable this capability, make sure that the top-level queue ID is entered as the destination in Dialogflow CX. You can find queue IDs in the Settings > Queue menu. Make sure that any required leaf queues are active.
In the IVR, the end-user will hear all the sub and leaf queue options below the top-level. If a op-level queue does not have any active sub or leaf queues or is configured incorrectly, the IVR Fallback mechanism will take action. It will either redirect the caller to the previous queue (if human agents are available), or it will convey an error message before disconnecting the call (if the escalating queue lacks human agents).
CRM integration configuration
The following setting only applies to the chat channel.
For sessions handled by virtual agents, the CRM behavior is set on the Operations Management page.
Go to Settings > Operation management > Virtual agent
Mark the checkbox, Create CRM cases for chats attended by Virtual Agents:
All attended chats: Each time an interaction is initiated by an end-user, a case is created in your CRM.
Minimum chats: Set the minimum chat message threshold. If the number of chats is less than this value, then a CRM case is not created. This can reduce the number of unnecessary cases.
(Optional) Mark the checkbox Close CRM cases when the chat session is resolved by a virtual agent.
To enable the gathering of a pre-configured metadata packet from your Web SDK when a chat is picked up by a virtual agent, mark the checkbox Collect configured custom data in chat session. The collected metadata is attached to the CRM ticket for that chat.
Click Save changes.
Virtual agent dashboard for chats
A full dashboard for virtual agent-specific data can be found in Dashboard > Virtual Agent.
Chats: Queued, ongoing, completed
The Chat monitoring pages have an Answered By column that indicates whether a chat was initially answered by a virtual or human agent.
Configure the assignment of chat or call records created by virtual agents
When a CRM record is created by a virtual agent (VA) for a call or a chat, you can configure how the record is assigned. This capability is only available for Kustomer, Zendesk, Salesforce, MS Dynamics, and custom CRMs.
To configure the assignment of chat or call records created by a VA, follow these steps:
In the CCAI Platform portal, click Settings > Operation Management. If you don't see the Settings menu, click Menu, and then click Settings > Operation Management.
Go to the Virtual Agent pane.
Do one of the following:
To assign chat records: under Chats, select one of the following options. Some options are not available with some CRM types.
Assign to a default user: chat records created by a VA are assigned to the default user. If you see this option but can't select it, you must set the default user for your CRM. For more information, see CRM default admin user.
Leave unassigned: chat records created by a VA are left unassigned.
Assign to a specific user: chat records created by a VA are assigned to a user that you specify. If you select this option, enter a user ID, and then click Validate.
To assign call records: under Calls, select one of the following options. Some options are not available with some CRM types.
Assign to a default user: call records created by a VA are assigned to the default user. If you see this option but can't select it, you must set the default user for your CRM. For more information, see CRM default admin user.
Leave unassigned: call records created by a VA are left unassigned.
Assign to a specific user: call records created by a VA are assigned to a user that you specify. If you select this option, enter a user ID, and then click Validate.
Click Save Changes.
Support for partial response in Dialogflow CX
CCAI Platform supports the partial response feature in Dialogflow CX. This is particularly useful when your virtual agent needs to call a webhook that will likely take a while to run and return a response. With partial response enabled, Dialogflow CX can immediately send an initial fulfillment message to the end-user, such as, "One moment while I look that up." This way, while the webhook runs and the final fulfillment message is generated, the end-user expects a short wait instead of assuming that there is a problem. For more information, see Partial response for streaming API.
Dialogflow CX also lets you specify if the playback of the partial response should be canceled upon returning the final fulfillment to CCAI Platform. If cancellation of partial response is enabled, CCAI Platform terminates the playback of the initial fulfillment if it is still playing and then starts the playback of the final fulfillment. This lets you respond with a partial response fulfillment that could include Speech Synthesis Markup Language (SSML) code to play an audio file, such as a simulated typing sound. The following example is a Dialogflow CX fulfillment that does this:
<speak>
  One moment while I look up your order.
  <audio src="typing-sound.mp3">
    <desc>Typing sound</desc>
    PURR (sound didn't load)
  </audio>
</speak>
For more information, see Allow cancellation of partial response playback.