Memperbarui kebijakan Otorisasi Biner
Dokumen ini menjelaskan cara mengecualikan gambar dalam kebijakan Otorisasi Biner.
Dalam dokumen ini, Anda akan memperbarui kebijakan untuk mengecualikan image container di Artifact Registry dari penerapan Otorisasi Biner dan menetapkan aturan default untuk melarang semua container lainnya di-deploy.
Sebelum memulai
- Sign in to your Google Cloud account. If you're new to Google Cloud, create an account to evaluate how our products perform in real-world scenarios. New customers also get $300 in free credits to run, test, and deploy workloads.
-
In the Google Cloud console, on the project selector page, select or create a Google Cloud project.
Roles required to select or create a project
- Select a project: Selecting a project doesn't require a specific IAM role—you can select any project that you've been granted a role on.
-
Create a project: To create a project, you need the Project Creator
(
roles/resourcemanager.projectCreator), which contains theresourcemanager.projects.createpermission. Learn how to grant roles.
-
Verify that billing is enabled for your Google Cloud project.
-
Enable the Artifact Registry, Binary Authorization APIs.
Roles required to enable APIs
To enable APIs, you need the Service Usage Admin IAM role (
roles/serviceusage.serviceUsageAdmin), which contains theserviceusage.services.enablepermission. Learn how to grant roles. -
Install the Google Cloud CLI.
-
Jika Anda menggunakan penyedia identitas (IdP) eksternal, Anda harus login ke gcloud CLI dengan identitas gabungan Anda terlebih dahulu.
-
Untuk melakukan inisialisasi gcloud CLI, jalankan perintah berikut:
gcloud init -
In the Google Cloud console, on the project selector page, select or create a Google Cloud project.
Roles required to select or create a project
- Select a project: Selecting a project doesn't require a specific IAM role—you can select any project that you've been granted a role on.
-
Create a project: To create a project, you need the Project Creator
(
roles/resourcemanager.projectCreator), which contains theresourcemanager.projects.createpermission. Learn how to grant roles.
-
Verify that billing is enabled for your Google Cloud project.
-
Enable the Artifact Registry, Binary Authorization APIs.
Roles required to enable APIs
To enable APIs, you need the Service Usage Admin IAM role (
roles/serviceusage.serviceUsageAdmin), which contains theserviceusage.services.enablepermission. Learn how to grant roles. -
Install the Google Cloud CLI.
-
Jika Anda menggunakan penyedia identitas (IdP) eksternal, Anda harus login ke gcloud CLI dengan identitas gabungan Anda terlebih dahulu.
-
Untuk melakukan inisialisasi gcloud CLI, jalankan perintah berikut:
gcloud init - Jika Anda tidak menggunakan Cloud Shell,
instal
kubectl. Buka halaman Cluster GKE di Google Cloud konsol.
Konsol menampilkan daftar cluster GKE dalam project Anda. Google Cloud
Klik Create Cluster.
Masukkan
test-clusterdi kolom Name.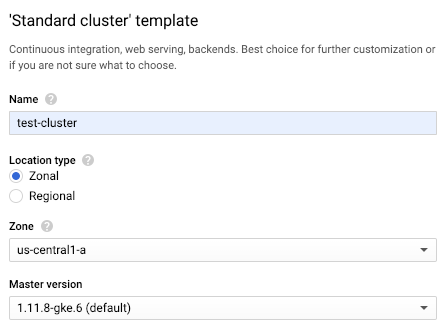
Pilih Zonal di opsi Jenis Lokasi.
Pilih
us-central1-adari daftar drop-down Zone.Klik link Keamanan untuk menampilkan panel Keamanan.
Di panel Security, pilih Enable Binary Authorization.
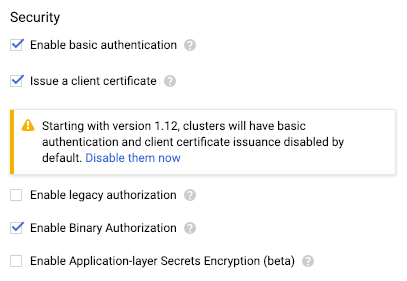
Pilih Khusus penerapan.
Klik Buat.
Buka halaman Binary Authorization di konsol Google Cloud .
Konsol menampilkan detail tentang kebijakan tersebut.
Klik Edit Kebijakan.
Di Project Default Rule, opsi Allow All Images dipilih.
Kembali ke halaman Binary Authorization di konsol Google Cloud .
Klik Edit Kebijakan.
Pilih Jangan Izinkan Semua Gambar.
Di bagian Gambar yang dikecualikan dari aturan deployment, luaskan Jalur gambar.
Klik Tambahkan Jalur Gambar.
Artifact Registry
Di New image path, tempel jalur berikut dari repositori Artifact Registry:
us-docker.pkg.dev/google-samples/containers/gke/hello-app:1.0Klik Selesai untuk menyimpan jalur gambar.
Klik Simpan Kebijakan.
Ekspor file YAML kebijakan:
gcloud container binauthz policy export > /tmp/policy.yaml
Di editor teks, ubah
evaluationModedariALWAYS_ALLOWmenjadiALWAYS_DENYdan tambahkan gambar yang dikecualikan keadmissionWhitelistPatterns.Untuk mengecualikan contoh gambar berikut dari Artifact Registry, ubah file YAML kebijakan Anda sebagai berikut:
admissionWhitelistPatterns: - namePattern: us-docker.pkg.dev/google-samples/containers/gke/hello-app:1.0 globalPolicyEvaluationMode: ENABLE defaultAdmissionRule: evaluationMode: ALWAYS_DENY enforcementMode: ENFORCED_BLOCK_AND_AUDIT_LOG name: projects/<var>PROJECT_ID</var>/policyImpor kembali file YAML kebijakan ke Otorisasi Biner:
gcloud container binauthz policy import /tmp/policy.yaml
Buat file teks dengan kebijakan yang diperbarui dalam format JSON:
cat > /tmp/policy.json << EOM { "name": "projects/${PROJECT_ID}/policy", "admissionWhitelistPatterns": [ { "namePattern": "us-docker.pkg.dev/google-samples/containers/gke/hello-app:1.0" } ], "globalPolicyEvaluationMode": "ENABLE", "defaultAdmissionRule": { "evaluationMode": "ALWAYS_DENY", "enforcementMode": "ENFORCED_BLOCK_AND_AUDIT_LOG" } } EOMKirim kebijakan yang telah diupdate ke REST API:
curl -X PUT \ -H "Content-Type: application/json" \ -H "Authorization: Bearer $(gcloud auth application-default print-access-token)" \ -H "x-goog-user-project: ${PROJECT_ID}" \ --data-binary @/tmp/policy.json \ "https://binaryauthorization.googleapis.com/v1/projects/${PROJECT_ID}/policy"Men-deploy image yang dikecualikan ke cluster.
Google Cloud console
Men-deploy gambar yang dikecualikan:
Buka halaman Cluster GKE di Google Cloud konsol.
Klik Deploy.
Konsol akan meminta Anda memasukkan detail tentang deployment.
Pilih Existing Container Image.
Masukkan jalur image container.
Artifact Registry
Untuk men-deploy image dari Artifact Registry, masukkan perintah berikut:
us-docker.pkg.dev/google-samples/containers/gke/hello-app:1.0Klik Lanjutkan.
Masukkan
hello-serverdi kolom Nama Aplikasi.Klik Deploy.
kubectl
Artifact Registry
Deploy image dari Artifact Registry:
kubectl run hello-server --image us-docker.pkg.dev/google-samples/containers/gke/hello-app:1.0 --port 8080
Pastikan gambar diizinkan untuk di-deploy:
Google Cloud console
Untuk memverifikasi bahwa image telah di-deploy, lakukan hal berikut:
- Buka halaman GKE.
- Buka halaman Workloads.
Beban kerja
hello-servermuncul dengan ikon hijau, yang menunjukkan bahwa beban kerja tersebut sedang berjalan.kubectl
Untuk memverifikasi bahwa image diizinkan untuk di-deploy, masukkan perintah berikut:
kubectl get pods
Anda akan melihat gambar berjalan.
Hapus pod.
Google Cloud console
Di halaman Workloads GKE:
Pilih beban kerja hello-server.
Klik Hapus.
Saat diminta untuk menghapus resource, klik Hapus.
kubectl
kubectl delete pod hello-server
Buka halaman Cluster GKE di Google Cloud konsol.
Pilih cluster
test-cluster, lalu klik Delete.- Untuk mempelajari lebih lanjut cara mengecualikan gambar, termasuk menggunakan karakter pengganti untuk mengecualikan beberapa gambar, lihat Mengecualikan gambar.
- Untuk tutorial end-to-end yang menjelaskan cara menyiapkan dan menerapkan kebijakan yang memerlukan pengesahan, lihat artikel berikut:
- Baca referensi kami tentang DevOps dan jelajahi program riset DevOps Research and Assessment (DORA).
Membuat cluster dengan Otorisasi Biner diaktifkan
Buat cluster GKE dengan Otorisasi Biner diaktifkan. Ini adalah cluster tempat Anda ingin menjalankan image container yang di-deploy.
Google Cloud console
gcloud
Jalankan gcloud container clusters create dengan flag --binauthz-evaluation-mode=PROJECT_SINGLETON_POLICY_ENFORCE
diaktifkan.
gcloud container clusters create \
    --binauthz-evaluation-mode=PROJECT_SINGLETON_POLICY_ENFORCE \
    --zone us-central1-a \
    test-cluster
Melihat Kebijakan default
Secara default, kebijakan Otorisasi Biner Anda dikonfigurasi untuk mengizinkan semua image container di-deploy.
Google Cloud console
Untuk melihat kebijakan default, lakukan hal berikut:
gcloud
Untuk melihat kebijakan default, ekspor file YAML kebijakan, lakukan hal berikut:
gcloud container binauthz policy export
Secara default, file memiliki konten berikut:
globalPolicyEvaluationMode: ENABLE
defaultAdmissionRule:
  evaluationMode: ALWAYS_ALLOW
  enforcementMode: ENFORCED_BLOCK_AND_AUDIT_LOG
name: projects/<var>PROJECT_ID</var>/policy
REST API
Untuk melihat kebijakan default, ambil dalam format JSON sebagai berikut:
curl \
    -H "Authorization: Bearer $(gcloud auth application-default print-access-token)" \
    -H "x-goog-user-project: ${PROJECT_ID}" \
    "https://binaryauthorization.googleapis.com/v1/projects/${PROJECT_ID}/policy"
REST API menampilkan hal berikut:
{
  "name": "projects/PROJECT_ID/policy",
  "globalPolicyEvaluationMode": "ENABLE",
  "defaultAdmissionRule": {
    "evaluationMode": "ALWAYS_ALLOW",
    "enforcementMode": "ENFORCED_BLOCK_AND_AUDIT_LOG"
  }
}
Hanya izinkan gambar yang dikecualikan
Bagian ini menjelaskan cara mengubah kebijakan untuk mengecualikan gambar dan melarang semua gambar lainnya di-deploy.
Google Cloud console
Untuk mengubah kebijakan, lakukan hal berikut:
gcloud
Untuk mengubah kebijakan agar mengizinkan contoh gambar dari Artifact Registry, lakukan hal berikut:
REST API
Untuk mengubah kebijakan, lakukan hal berikut:
Menguji kebijakan
Untuk menguji kebijakan dengan men-deploy image yang Anda tambahkan ke daftar yang diizinkan Exempt image, lakukan hal berikut:
Pembersihan
Agar akun Google Cloud Anda tidak dikenai biaya untuk resource yang digunakan pada halaman ini, ikuti langkah-langkah berikut.
Hapus cluster yang Anda buat di GKE:
Konsol
Untuk menghapus cluster, lakukan langkah-langkah berikut:
gcloud
Untuk menghapus cluster, masukkan perintah berikut:
gcloud container clusters delete \
    --zone=us-central1-a \
    test-cluster