Update a Binary Authorization policy
This document describes how to exempt images in Binary Authorization policies.
In this document, you update the policy to exempt container images in Artifact Registry from Binary Authorization enforcement and set the default rule to disallow all other containers from being deployed.
Before you begin
- Sign in to your Google Cloud account. If you're new to Google Cloud, create an account to evaluate how our products perform in real-world scenarios. New customers also get $300 in free credits to run, test, and deploy workloads.
-
In the Google Cloud console, on the project selector page, select or create a Google Cloud project.
Roles required to select or create a project
- Select a project: Selecting a project doesn't require a specific IAM role—you can select any project that you've been granted a role on.
-
Create a project: To create a project, you need the Project Creator
(
roles/resourcemanager.projectCreator), which contains theresourcemanager.projects.createpermission. Learn how to grant roles.
-
Verify that billing is enabled for your Google Cloud project.
-
Enable the Artifact Registry, Binary Authorization APIs.
Roles required to enable APIs
To enable APIs, you need the Service Usage Admin IAM role (
roles/serviceusage.serviceUsageAdmin), which contains theserviceusage.services.enablepermission. Learn how to grant roles. -
Install the Google Cloud CLI.
-
If you're using an external identity provider (IdP), you must first sign in to the gcloud CLI with your federated identity.
-
To initialize the gcloud CLI, run the following command:
gcloud init -
In the Google Cloud console, on the project selector page, select or create a Google Cloud project.
Roles required to select or create a project
- Select a project: Selecting a project doesn't require a specific IAM role—you can select any project that you've been granted a role on.
-
Create a project: To create a project, you need the Project Creator
(
roles/resourcemanager.projectCreator), which contains theresourcemanager.projects.createpermission. Learn how to grant roles.
-
Verify that billing is enabled for your Google Cloud project.
-
Enable the Artifact Registry, Binary Authorization APIs.
Roles required to enable APIs
To enable APIs, you need the Service Usage Admin IAM role (
roles/serviceusage.serviceUsageAdmin), which contains theserviceusage.services.enablepermission. Learn how to grant roles. -
Install the Google Cloud CLI.
-
If you're using an external identity provider (IdP), you must first sign in to the gcloud CLI with your federated identity.
-
To initialize the gcloud CLI, run the following command:
gcloud init - If you are not using Cloud Shell,
install
kubectl.
Create a cluster with Binary Authorization enabled
Create a GKE cluster with Binary Authorization enabled. This is the cluster where you want your deployed container images to run.
Google Cloud console
Go to the GKE Clusters page in the Google Cloud console.
The console displays a list of GKE clusters in your Google Cloud project.
Click Create Cluster.
Enter
test-clusterin the Name field.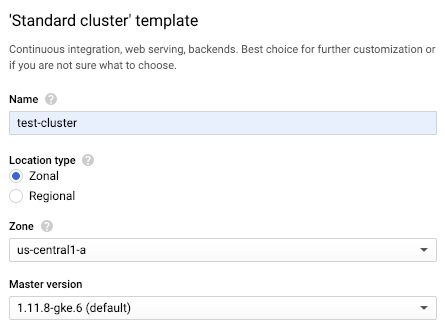
Select Zonal in the Location Type options.
Select
us-central1-afrom the Zone drop-down list.Click the Security link to reveal the Security panel.
In the Security panel, select Enable Binary Authorization.
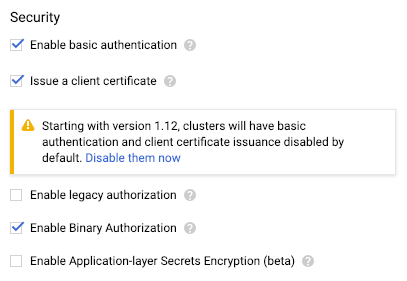
Select Enforce-only.
Click Create.
gcloud
Run gcloud container clusters create with the --binauthz-evaluation-mode=PROJECT_SINGLETON_POLICY_ENFORCE
flag enabled.
gcloud container clusters create \
    --binauthz-evaluation-mode=PROJECT_SINGLETON_POLICY_ENFORCE \
    --zone us-central1-a \
    test-cluster
View the Default policy
By default, your Binary Authorization policy is configured to allow all container images to be deployed.
Google Cloud console
To view the default policy, do the following:
Go to the Binary Authorization page in the Google Cloud console.
The console displays details about the policy.
Click Edit Policy.
In Project Default Rule, the option Allow All Images is selected.
gcloud
To view the default policy, export the policy YAML file, do the following:
gcloud container binauthz policy export
By default, the file has the following contents:
globalPolicyEvaluationMode: ENABLE
defaultAdmissionRule:
  evaluationMode: ALWAYS_ALLOW
  enforcementMode: ENFORCED_BLOCK_AND_AUDIT_LOG
name: projects/<var>PROJECT_ID</var>/policy
REST API
To view the default policy, retrieve it in JSON format as follows:
curl \
    -H "Authorization: Bearer $(gcloud auth application-default print-access-token)" \
    -H "x-goog-user-project: ${PROJECT_ID}" \
    "https://binaryauthorization.googleapis.com/v1/projects/${PROJECT_ID}/policy"
The REST API returns the following:
{
  "name": "projects/PROJECT_ID/policy",
  "globalPolicyEvaluationMode": "ENABLE",
  "defaultAdmissionRule": {
    "evaluationMode": "ALWAYS_ALLOW",
    "enforcementMode": "ENFORCED_BLOCK_AND_AUDIT_LOG"
  }
}
Allow only exempt images
This section describes how to modify the policy to exempt images and disallow all other images from being deployed.
Google Cloud console
To modify the policy, do the following:
Return to the Binary Authorization page in the Google Cloud console.
Click Edit Policy.
Select Disallow All Images.
Under Images exempt from deployment rules, expand Image paths.
Click Add Image Paths.
Artifact Registry
In New image path, paste the following path from an Artifact Registry repository:
us-docker.pkg.dev/google-samples/containers/gke/hello-app:1.0Click Done to save the image path.
Click Save Policy.
gcloud
To modify the policy to allow example images from Artifact Registry, do the following:
Export the policy YAML file:
gcloud container binauthz policy export > /tmp/policy.yaml
In a text editor, change the
evaluationModefromALWAYS_ALLOWtoALWAYS_DENYand add exempt images toadmissionWhitelistPatterns.To exempt the following example images from Artifact Registry, modify your policy YAML file as follows:
admissionWhitelistPatterns:
- namePattern: us-docker.pkg.dev/google-samples/containers/gke/hello-app:1.0
globalPolicyEvaluationMode: ENABLE
defaultAdmissionRule:
  evaluationMode: ALWAYS_DENY
  enforcementMode: ENFORCED_BLOCK_AND_AUDIT_LOG
name: projects/<var>PROJECT_ID</var>/policy
Import the policy YAML file back into Binary Authorization:
gcloud container binauthz policy import /tmp/policy.yaml
REST API
To modify the policy, do the following:
Create a text file with the updated policy in JSON format:
cat > /tmp/policy.json << EOM
{
  "name": "projects/${PROJECT_ID}/policy",
  "admissionWhitelistPatterns": [
    {
      "namePattern": "us-docker.pkg.dev/google-samples/containers/gke/hello-app:1.0"
    }
  ],
  "globalPolicyEvaluationMode": "ENABLE",
  "defaultAdmissionRule": {
    "evaluationMode": "ALWAYS_DENY",
    "enforcementMode": "ENFORCED_BLOCK_AND_AUDIT_LOG"
  }
}
EOM
Send the updated policy to the REST API:
curl -X PUT \
    -H "Content-Type: application/json" \
    -H "Authorization: Bearer $(gcloud auth application-default print-access-token)" \
    -H "x-goog-user-project: ${PROJECT_ID}" \
    --data-binary @/tmp/policy.json  \
    "https://binaryauthorization.googleapis.com/v1/projects/${PROJECT_ID}/policy"
Test the policy
To test the policy by deploying image you added to the Exempt image allowlist,
do the following:
Deploy an exempt image to the cluster.
Google Cloud console
Deploy an exempt image:
Go to the GKE Clusters page in the Google Cloud console.
Click Deploy.
The console prompts you to enter details about the deployment.
Select Existing Container Image.
Enter the container image path.
Artifact Registry
To deploy an image from Artifact Registry enter the following:
us-docker.pkg.dev/google-samples/containers/gke/hello-app:1.0Click Continue.
Enter
hello-serverin the Application Name field.Click Deploy.
kubectl
Artifact Registry
Deploy the image from Artifact Registry:
kubectl run hello-server --image us-docker.pkg.dev/google-samples/containers/gke/hello-app:1.0 --port 8080
Verify that the image was allowed to deploy:
Google Cloud console
To verify that the image was deployed, do the following:
- Go to the GKE page.
- Go to the Workloads page.
The
hello-serverworkload appears with a green icon, indicating it is running.kubectl
To verify that the image was allowed to deploy, enter the following command:
kubectl get pods
You see the image running.
Delete the pod.
Google Cloud console
In the GKE Workloads page:
Select the hello-server workload.
Click Delete.
When prompted to delete resources, click Delete.
kubectl
kubectl delete pod hello-server
Clean up
To avoid incurring charges to your Google Cloud account for the resources used on this page, follow these steps.
Delete the cluster you created in GKE:
Console
To delete the cluster, do the following:
Go to the GKE Clusters page in the Google Cloud console.
Select the
test-clustercluster and click Delete.
gcloud
To delete the cluster, enter the following command:
gcloud container clusters delete \
    --zone=us-central1-a \
    test-cluster
What's next
- To learn more about exempting images, including using wildcards to exempt multiple images, see Exempt images.
- For end-to-end tutorials that describe how to set up and enforce a policy that requires attestations, see the following:
- Read our resources about DevOps and explore the DevOps Research and Assessment (DORA) research program.