Solution Guide: Google Cloud Backup and DR for Oracle on Bare Metal Solution
Overview
To provide resiliency for your Oracle databases inside a Bare Metal Solution environment, you need to have a clear strategy for database backups and disaster recovery. To help you with this requirement, the Solution Architect team at Google Cloud did some extensive testing of the Google Cloud Backup and DR Service and compiled their findings into this guide. As a result, we'll show you the best ways to deploy, configure, and optimize your backup and recovery options for Oracle databases within a Bare Metal Solution environment by using the Backup and DR Service. We'll also share some performance figures from our testing results so you can have a benchmark to compare with your own environment. You'll find this guide useful if you are a backup administrator, a Google Cloud admin, or an Oracle DBA.
Background
In June 2022, the Solution Architect team began a proof-of-concept (PoC) demonstration of Google Cloud Backup and DR for an enterprise customer. To meet their criteria for success, we needed to support recovery for their 50 TB Oracle database and restore the database within 24 hours.
This goal posed a number of challenges, but most people involved in the PoC believed that we could achieve this result and that we should proceed with the PoC. We felt that there was relatively low risk because we had previous testing data from the Backup and DR engineering team showing that it was possible to achieve these results. We also shared the results of the test with the customer to make them feel comfortable in proceeding with the PoC.
During the PoC, we learned how to configure multiple elements together successfully – Oracle, Google Cloud Backup and DR, storage, and regional extension links – in a Bare Metal Solution environment. By following the best practices we learned, you can enable your own successful outcomes.
"Your mileage may vary" is a really good way to think about the overall results from this document. Our goal is to share some knowledge about what we learned, what you should focus on, things you should avoid, and areas to investigate if you are not seeing the performance or outcomes that you want. We hope this guide will help you build confidence with the proposed solutions, and that your requirements can be met.
Architecture
Figure 1 shows a simplified view of the infrastructure that you need to build when you deploy Backup and DR to protect Oracle databases running in a Bare Metal Solution environment.
Figure 1: Components for using Backup and DR with Oracle databases in a Bare Metal Solution environment

As you can see in the diagram, this solution requires the following components:
- Bare Metal Solution regional extension–Allows you to run Oracle databases in a third-party data center adjacent to a Google Cloud data center, and use your existing on-premises software licenses.
- Backup and DR service project–Enables you to host your backup/recovery appliance, and backup Bare Metal Solution and Google Cloud workloads in Cloud Storage buckets.
- Compute service project–Gives you a location to run your Compute Engine VMs.
- Backup and DR Service–Provides the Backup and DR management console that lets you maintain your backups and disaster recovery.
- Host project–Lets you create regional subnets in a shared VPC that can connect the Bare Metal Solution regional extension to the Backup and DR Service, the backup/recovery appliance, your Cloud Storage buckets, and your Compute Engine VMs.
Install Google Cloud Backup and DR
The Backup and DR solution at minimum requires the following two major components for the solution to work:
- Backup and DR management console–An HTML 5 UI and API endpoint that enables you to create and manage backups from within the Google Cloud console.
- Backup/recovery appliance–This device acts as the task worker in performing the backups, and mounts and restores type tasks.
Google Cloud manages the Backup and DR management console. You need to deploy the management console in a service producer project (Google Cloud management side), and deploy the backup/recovery appliance in a service consumer project (customer side). For more information about Backup and DR, see Set up and plan a Backup and DR deployment. To view the definition of a service producer and a service consumer, see the Google Cloud glossary.
Before you begin
To install the Google Cloud Backup and DR Service, you need to complete the following configuration steps before you start the deployment:
- Enable a
private services access
connection. You must establish this connection before you can start the
installation. Even if you already have a private services access subnet
configured, it must have a
/23subnet at minimum. For example, if you already configured a/24subnet for the private services access connection, we recommend that you add a/23subnet. Even better, you can add a/20subnet to ensure that you can add more services at a later time. - Configure Cloud DNS so that it is accessible in the VPC network where you deploy the backup/recovery appliance. This ensures proper resolution of googleapis.com (via private or public lookup).
- Configure network default routes and firewall rules to allow egress traffic
to
*.googleapis.com(via Public IPs) orprivate.googleapis.com(199.36.153.8/30) on TCP port 443, or an explicit egress for0.0.0.0/0. Again, you need to configure the routes and firewall in the VPC network where you install your backup/recovery appliance. We also recommend using Google Private Access as a preferred option – see Configure Private Google Access for more information. - Enable the following APIs in your consumer project:
- Compute Engine API
- Cloud Key Management Service (KMS) API
- Cloud Resource Manager API (for Host Project and Service Project if in use)
- Identity and Access Management API
- Workflows API
- Cloud Logging API
- If you have enabled any organization policies, make sure you configure the
following:
constraints/cloudkms.allowedProtectionLevelsincludeSOFTWAREorALL.
- Configure the following firewall rules:
- Ingress from the backup/recovery appliance in the Compute Engine VPC to the Linux Host (Agent) on port TCP-5106.
- If you use a block-based backup disk with iSCSI, then egress from the Linux host (Agent) in Bare Metal Solution to the backup/recovery appliance in the Compute Engine VPC on port TCP-3260.
- If you use an NFS or dNFS-based backup disk, then egress from the Linux host
(Agent) in Bare Metal Solution to the backup/recovery appliance in the
Compute Engine VPC on the following ports:
- TCP/UDP-111 (rpcbind)
- TCP/UDP-756 (status)
- TCP/UDP-2049 (nfs)
- TCP/UDP-4001 (mountd)
- TCP/UDP-4045 (nlockmgr)
- Configure Google Cloud DNS to resolve Bare Metal Solution hostnames and domains, to ensure name resolution is consistent across Bare Metal Solution servers, VMs, and Compute Engine-based resources such as the Backup and DR Service.
Install the Backup and DR management console
- Enable the Backup and DR Service API if not already enabled.
In the Google Cloud console, use the navigation menu to go to the Operations section and select Backup and DR:
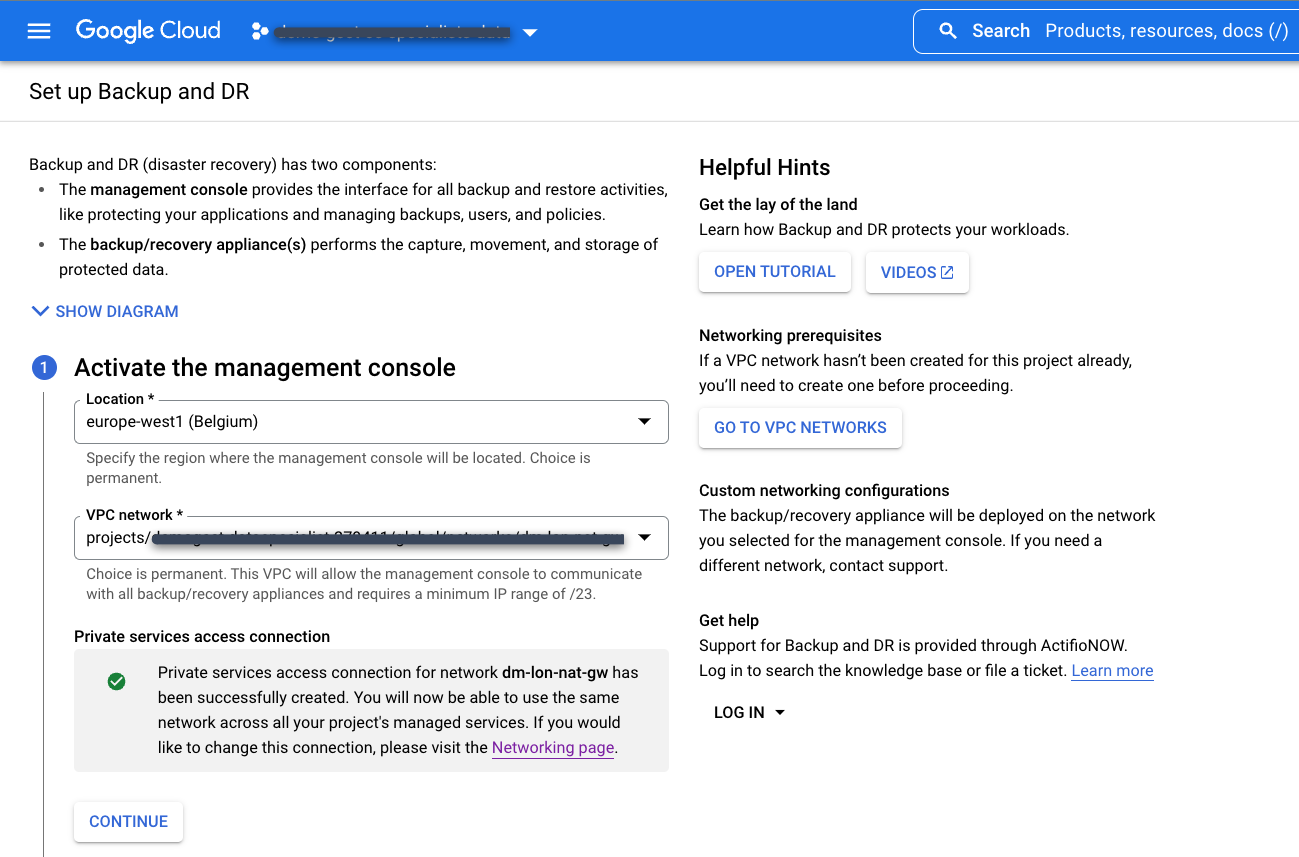
Select your existing private services access connection that you created previously.
Choose the location for the Backup and DR management console. This is the region where you deploy the Backup and DR management console user interface in a service producer project. Google Cloud owns and maintains management console resources.
Choose the VPC network in the service consumer project that you want to connect to the Backup and DR Service. This is commonly a Shared VPC or host project.
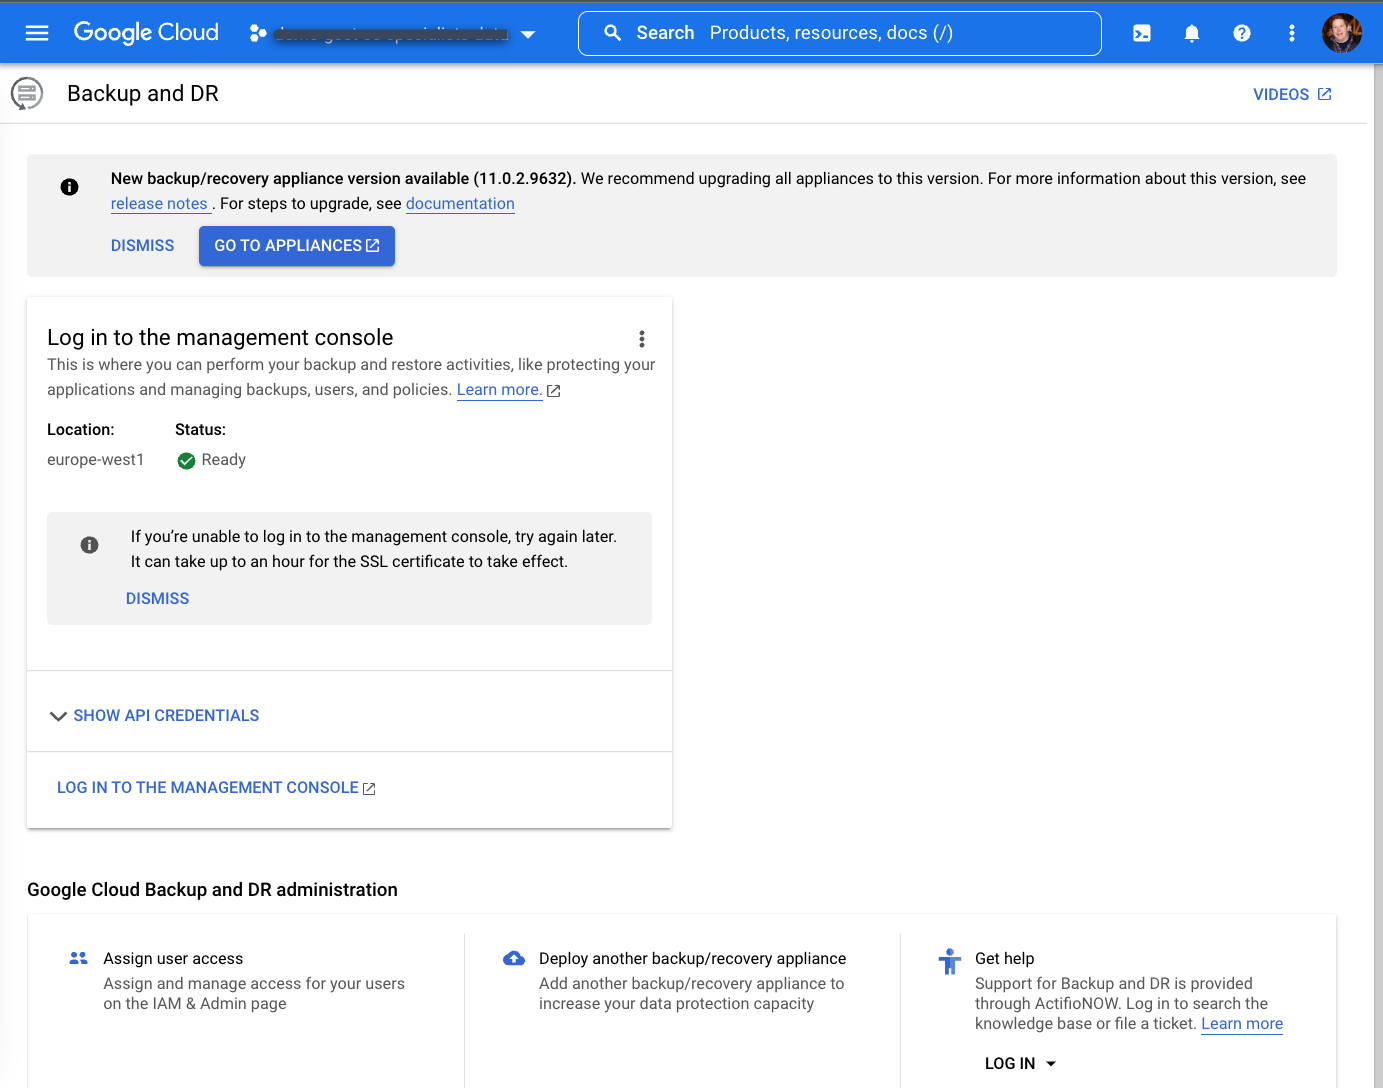
After waiting up to one hour, you should see the following screen when the deployment completes.
Install the backup/recovery appliance
On the Backup and DR page, click Log in to the Management Console:
https://bmc-PROJECT_NUMBER-GENERATED_ID-dot-REGION.backupdr.googleusercontent.com/
In the main page of the Backup and DR management console, go to the Appliances page:
https://bmc-PROJECT_NUMBER-GENERATED_ID-dot-REGION.backupdr.googleusercontent.com/#clusters
Enter the name of the backup/recovery appliance. Note that Google Cloud automatically adds additional random numbers at the end of name once the deployment starts.
Choose the consumer project where you want to install the backup/recovery appliance.
Choose your preferred region, zone, and subnetwork.
Select a storage type. We recommend choosing Standard Persistent Disk for PoCs and SSD Persistent Disk for a production environment.
Click the Begin Installation button. Expect the process to take an hour to deploy both the Backup and DR management console and first backup/recovery appliance.
You can add other backup/recovery appliances in other regions or zones after the initial installation process is complete.
Configure Google Cloud Backup and DR
In this section, you'll learn the steps needed to configure the Backup and DR Service and protect your workloads.
Configure a service account
As of version 11.0.2 (December 2022 release of Backup and DR), you can use a single service account to run the backup/recovery appliance to access Cloud Storage buckets, and protect your Compute Engine virtual machines (VMs) (not covered in this document).
Service account roles
Google Cloud Backup and DR uses Google Cloud Identity and Access Management (IAM) for user and service account authorization and authentication. You can use predefined roles to enable a variety of backup capabilities. The two most important are as follows:
- Backup and DR Cloud Storage Operator–Assign this role to the service account(s) used by a backup/recovery appliance that connects to the Cloud Storage bucket(s). The role allows creation of Cloud Storage buckets for Compute Engine snapshot backups, and to access buckets with existing agent-based backup data for restoring workloads.
- Backup and DR Compute Engine Operator–Assign this role to the service account(s) used by a backup/recovery appliance to create Persistent Disk snapshots for Compute Engine virtual machines. Besides creating snapshots, this role allows the service account to restore VMs in the same source project or alternate projects.
You can find your service account by viewing the Compute Engine VM running your backup/recovery appliance in your consumer/service project, and looking at the service account value listed in the API and identity management section.
To provide the proper permissions to your backup/recovery appliances, go to the Identity and Access Management page and grant the following Identity and Access Management roles to your backup/recovery appliance service account.
- Backup and DR Cloud Storage Operator
- Backup and DR Compute Engine Operator (optional)
Configure storage pools
Storage pools store data in physical storage locations. You should use Persistent Disk for your most recent data (1-14 days), and Cloud Storage for longer-term retention (days, weeks, months and years).
Cloud Storage
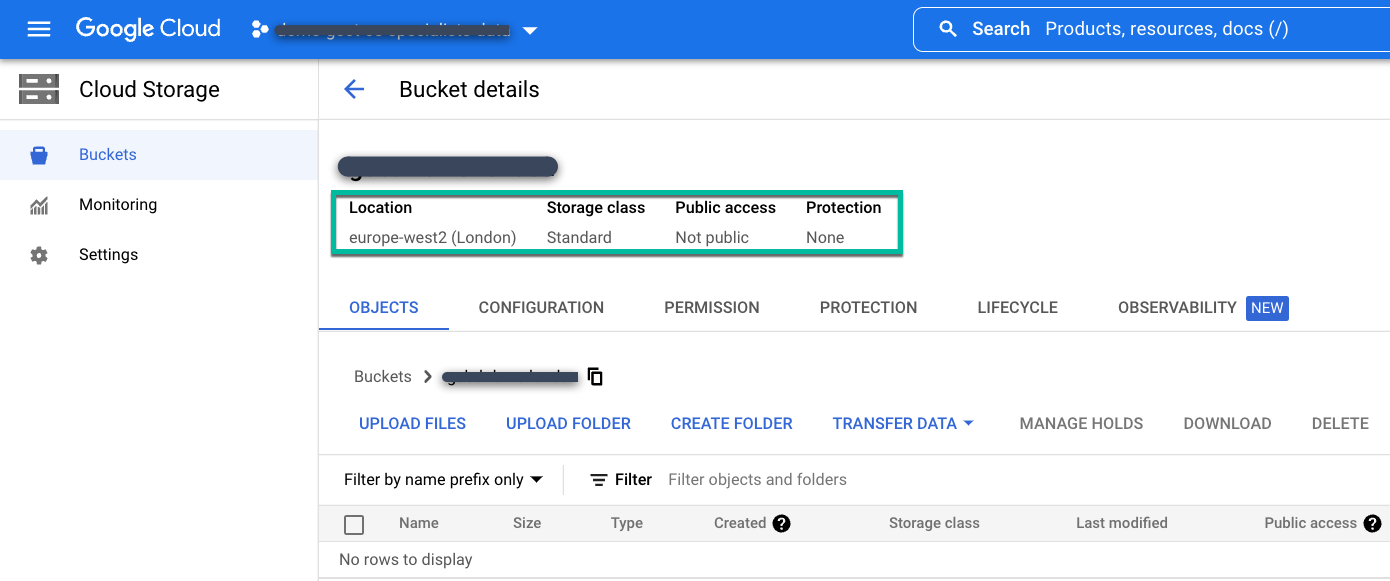
Create a regional or multi-region standard bucket in the location where you need to store the backup data.
Follow these instructions to create a Cloud Storage bucket:
- From the Cloud Storage Buckets page, name the bucket.
- Select your storage location.
- Choose a storage class: standard, nearline, or coldline.
- If you choose nearline or coldline storage, set the Access Control mode to Fine-grained. For standard storage, accept the default access control mode of Uniform.
Finally, do not configure any additional data protection options and click Create.
Next, add this bucket to the backup/recovery appliance. Go to the Backup and DR management console.
https://bmc-PROJECT_NUMBER-GENERATED_ID-dot-REGION.backupdr.googleusercontent.com/
Select the Manage > Storage Pools menu item.
https://bmc-PROJECT_NUMBER-GENERATED_ID-dot-REGION.backupdr.googleusercontent.com/#pools
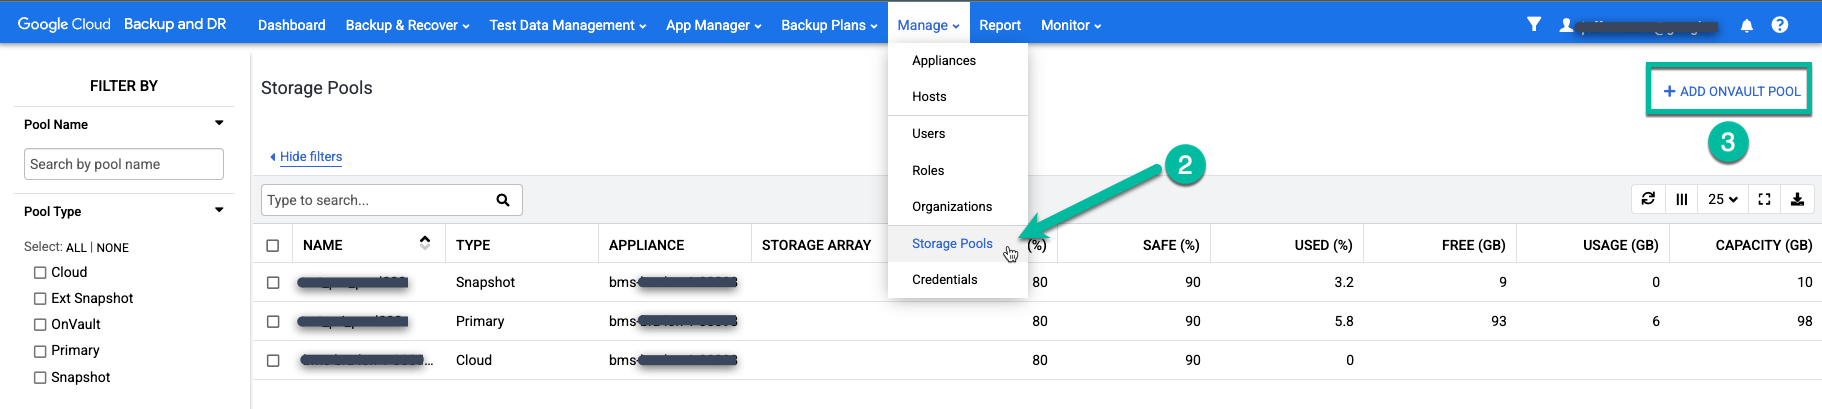
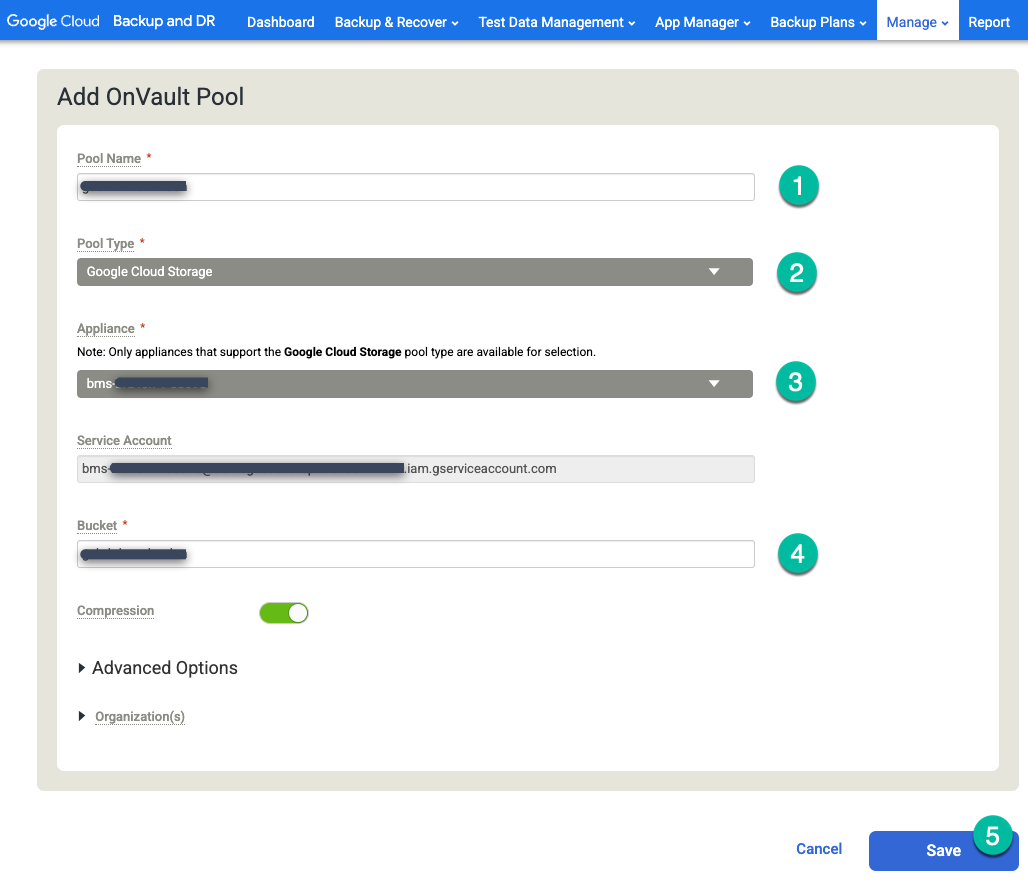
Click the far right side option +Add OnVault Pool.
https://bmc-PROJECT_NUMBER-GENERATED_ID-dot-REGION.backupdr.googleusercontent.com/#addonvaultpool
- Type a name for the Pool name.
- Choose Cloud Storage for the Pool Type.
- Select the appliance that you want to attach to the Cloud Storage bucket.
- Enter the Cloud Storage bucket name.
Click Save.
Persistent Disk snapshot pools
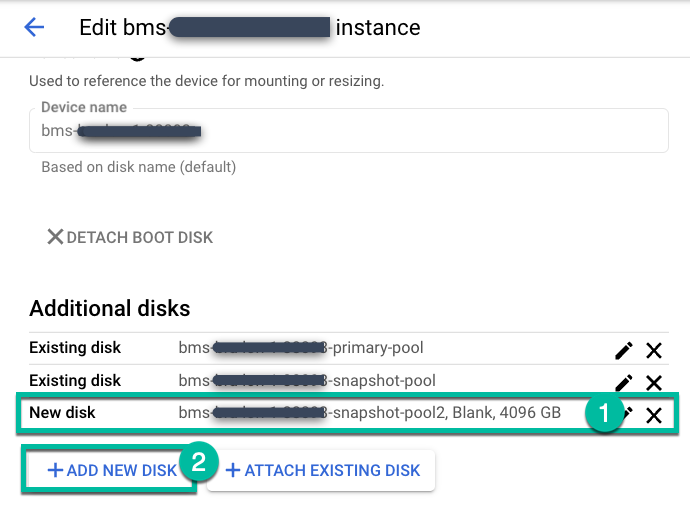
If you have deployed the backup/recovery appliance with standard or SSD options, the Persistent Disk snapshot pool will be 4TB by default. If your source databases or file systems require a larger size pool, then you can edit the settings for your deployed backup/recovery appliance, add a new Persistent Disk, and either create a new custom pool or configure another default pool.
Go to Manage > Appliances page.
https://bmc-PROJECT_NUMBER-GENERATED_ID-dot-REGION.backupdr.googleusercontent.com/#clusters
Edit the backup-server instance, and click +Add New Disk.
- Give the disk a name.
- Select a Blank disk type.
- Choose standard, balanced, or SSD depending on your needs.
- Enter the disk size you need.
Click Save.
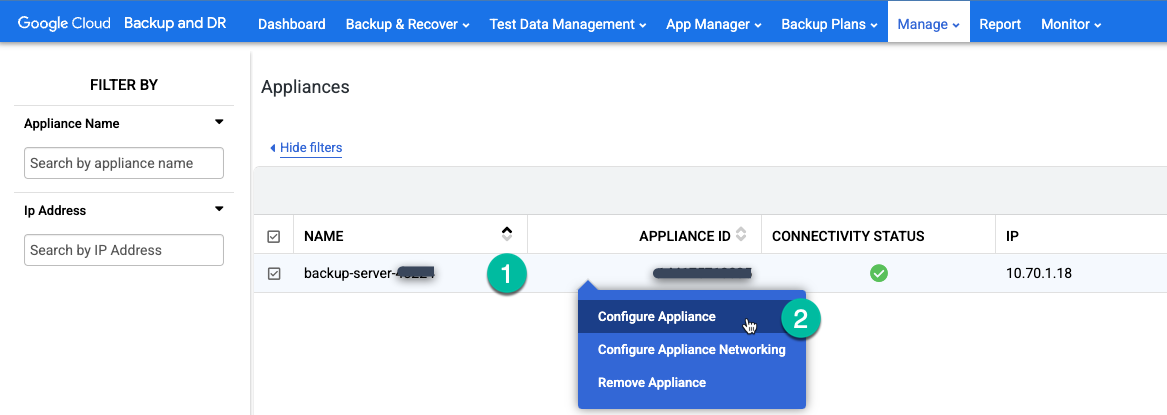
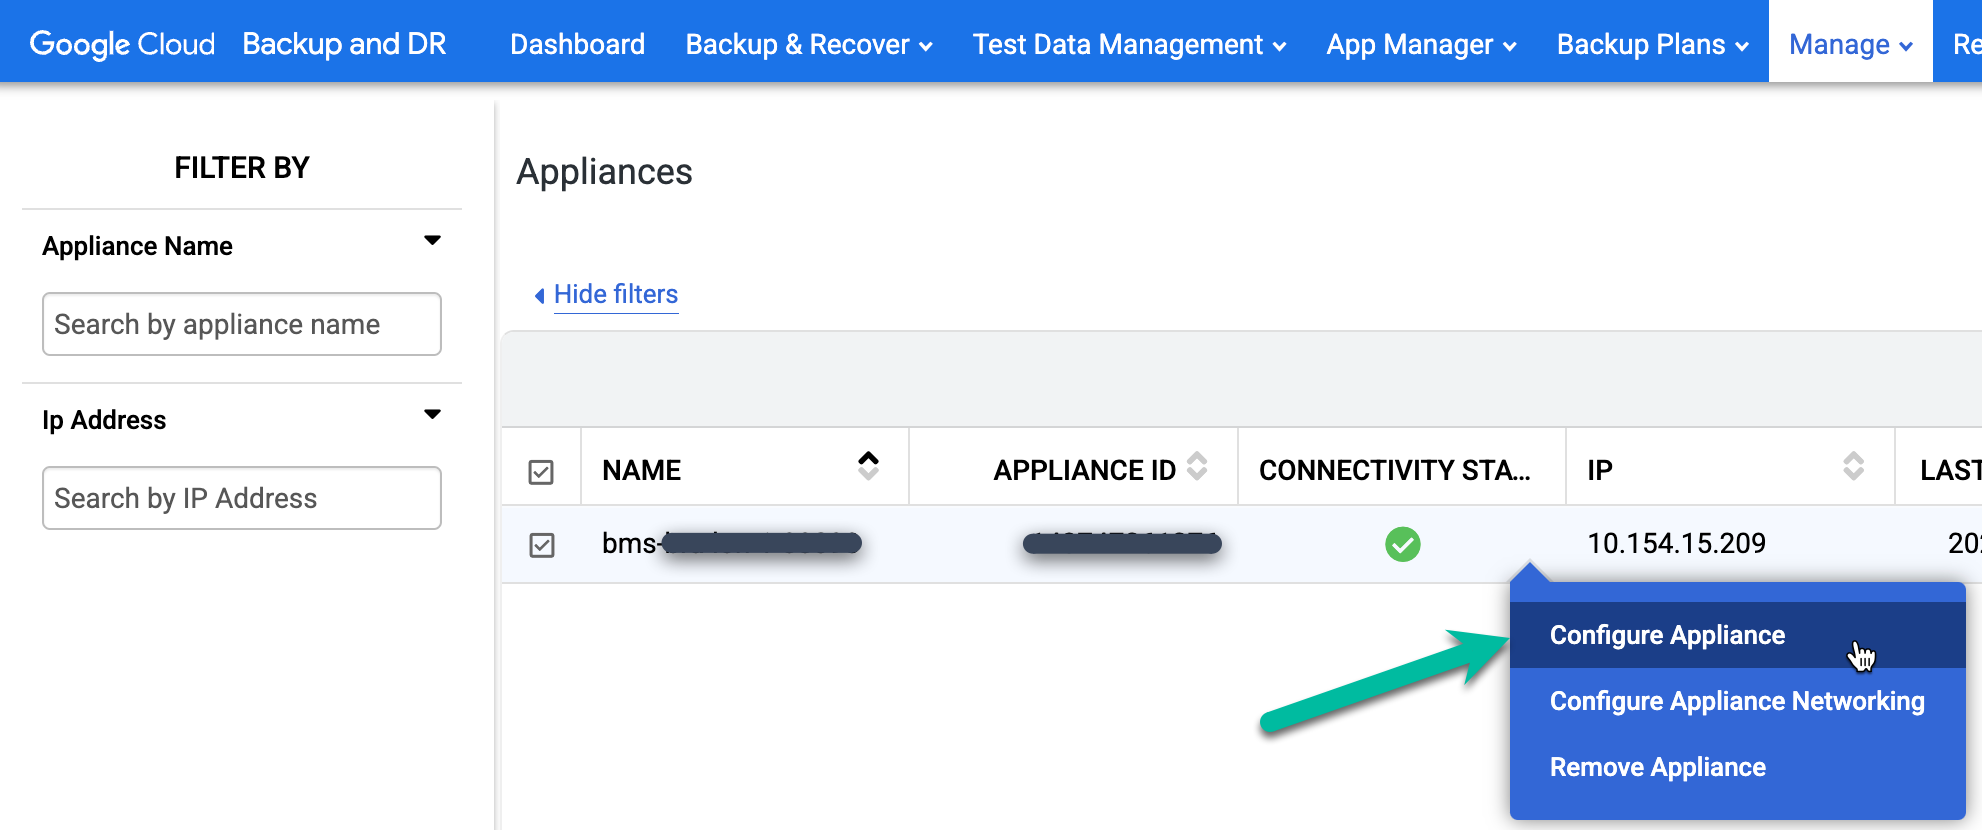
Go to the Manage > Appliances page in the Backup and DR management console.
https://bmc-PROJECT_NUMBER-GENERATED_ID-dot-REGION.backupdr.googleusercontent.com/#clusters
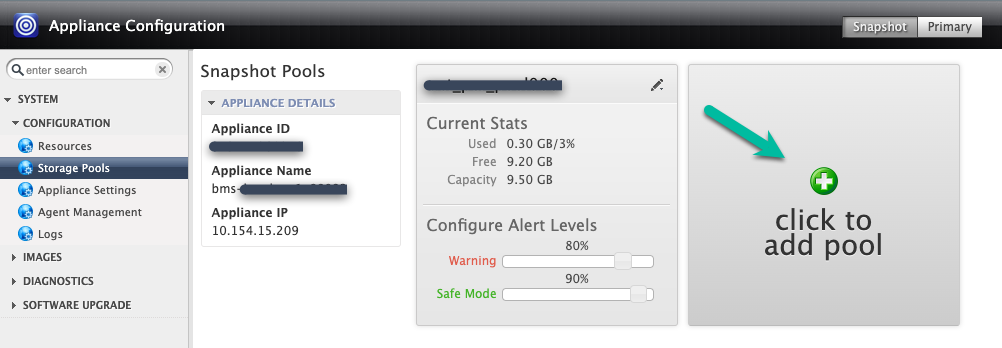
Right-click the appliance name and select Configure Appliance from the menu.
You can either add the disk to the existing snapshot pool (expansion), or you can create a new pool (however, don't mix Persistent Disk types in the same pool). If expanding, click the top right icon for the pool you want to expand.
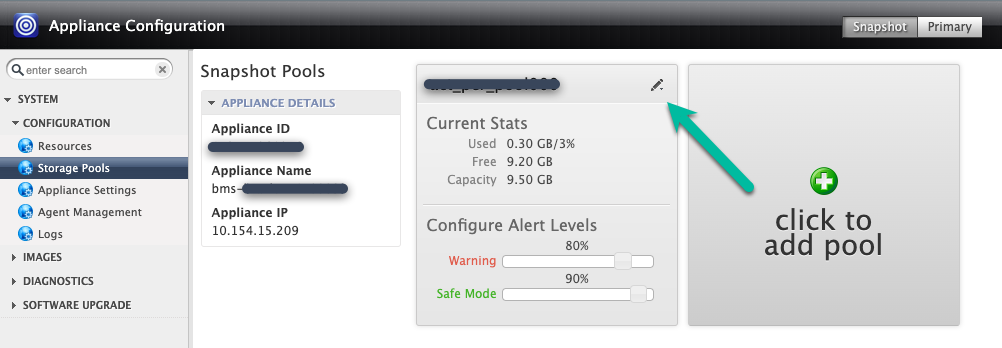
In this example, you create a new pool with the Click to add pool option. After you click this button, wait 20 seconds for the next page to open.
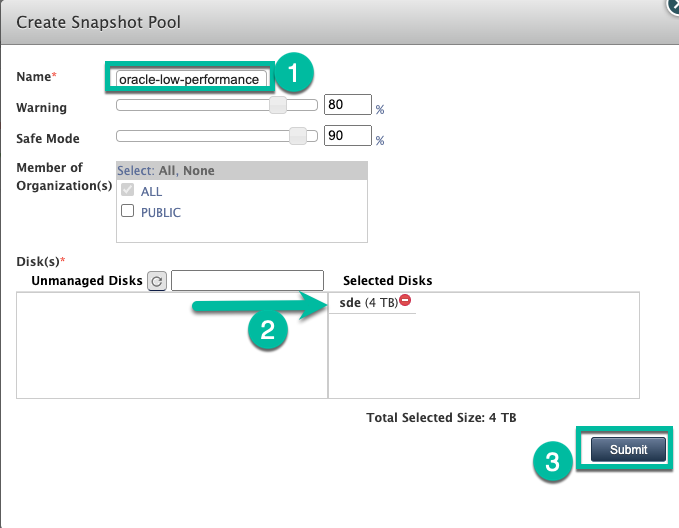
In this step, configure your new pool.
- Give the pool a name, and click the green + icon to add the disk to the pool.
- Click Submit.
- Confirm you want to continue by typing PROCEED in capitals when prompted.
Click Confirm.
Your pool will now be expanded or created with the Persistent Disk.
Configure backup plans
Backup plans enable you to configure two key elements for backing up any database, VM, or file system. Backup plans incorporate profiles and templates.
- Profiles let you define when to backup something, and how long the backup data should be retained.
- Templates provide a configuration item that lets you decide which backup/recovery appliance and storage pool (Persistent Disk, Cloud Storage, etc.) should be used for the backup task.
Create a profile
In the Backup and DR management console, go to the Backup Plans > Profiles page.
https://bmc-PROJECT_NUMBER-GENERATED_ID-dot-REGION.backupdr.googleusercontent.com/#manageprofiles
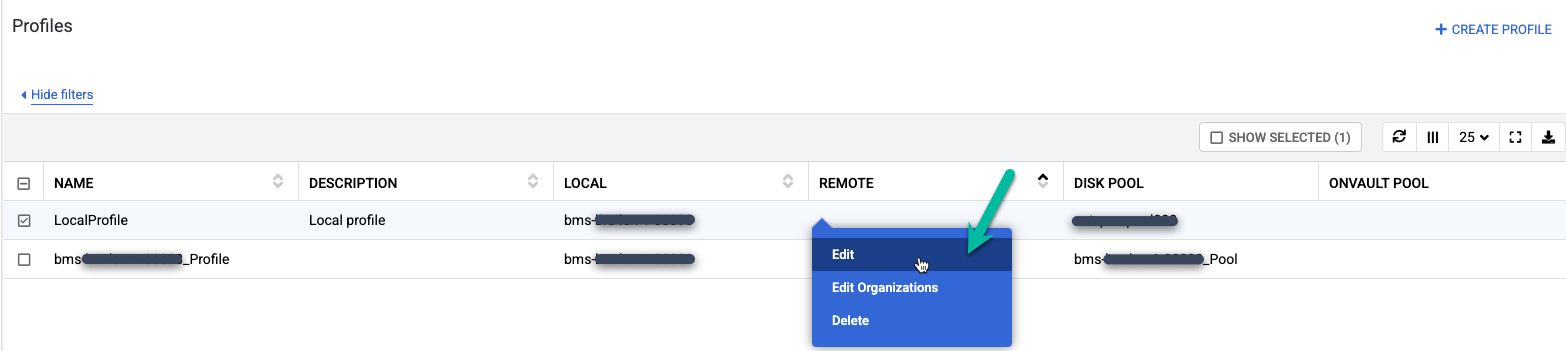
Two profiles will already be created. You can use one profile for Compute Engine VM snapshots, and you can edit the other profile and use it for Bare Metal Solution backups. You can have multiple profiles, which is useful if you are backing up many databases that require different disk tiers for backup. For example, you can create one pool for SSD (higher performance), and one pool for standard Persistent Disks (standard performance). For each profile, you can choose a different snapshot pool.
Right-click the default profile named LocalProfile and select Edit.
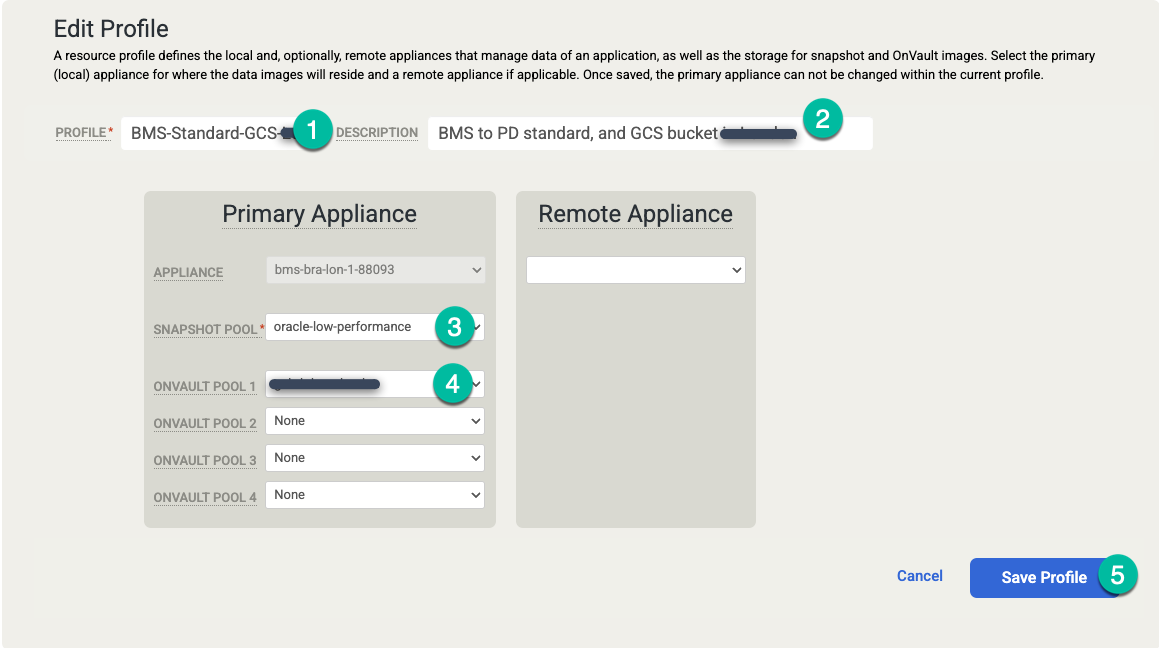
Make the following changes:
- Update the Profiles settings with a more meaningful profile name and description. You can specify the disk tier to be used, where the Cloud Storage bucket(s) are located, or other information that explains the purpose of this profile.
- Change the snapshot pool to the expanded or new pool you created earlier.
- Select an OnVault Pool (Cloud Storage bucket) for this profile.
Click Save Profile.
Create a template
In the Backup and DR management console, go to the Backup Plans > Templates menu.
https://bmc-PROJECT_NUMBER-GENERATED_ID-dot-REGION.backupdr.googleusercontent.com/#managetemplates
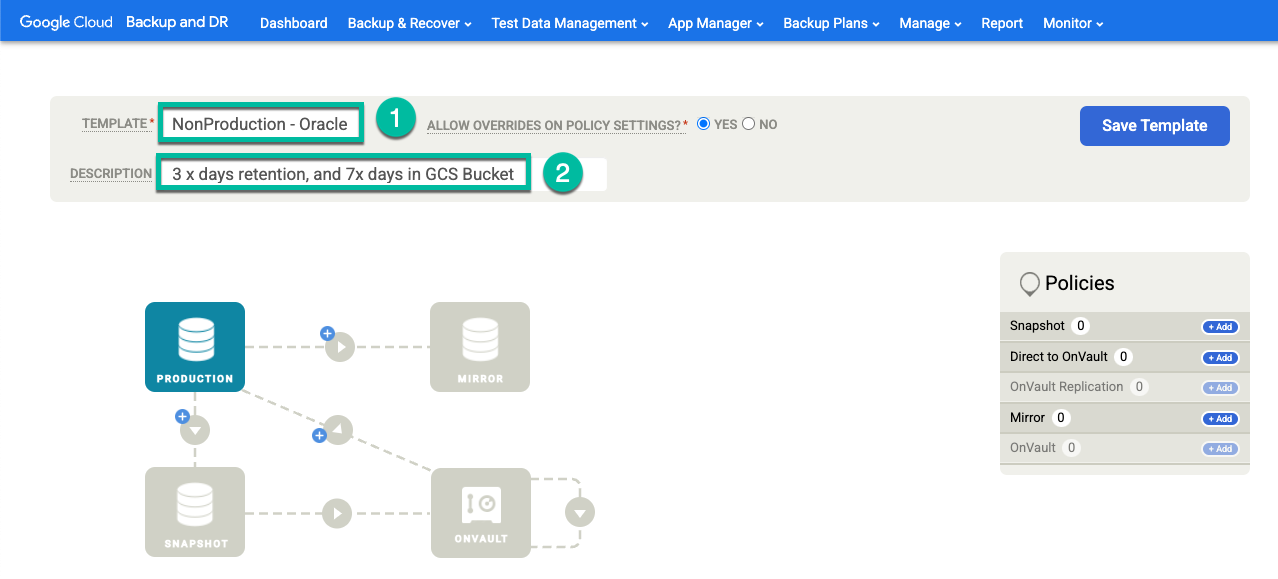
Click +Create Template.
- Give the template a name.
- Select Yes for Allow overrides on policy settings.
- Add a description of this template.
Click Save Template.
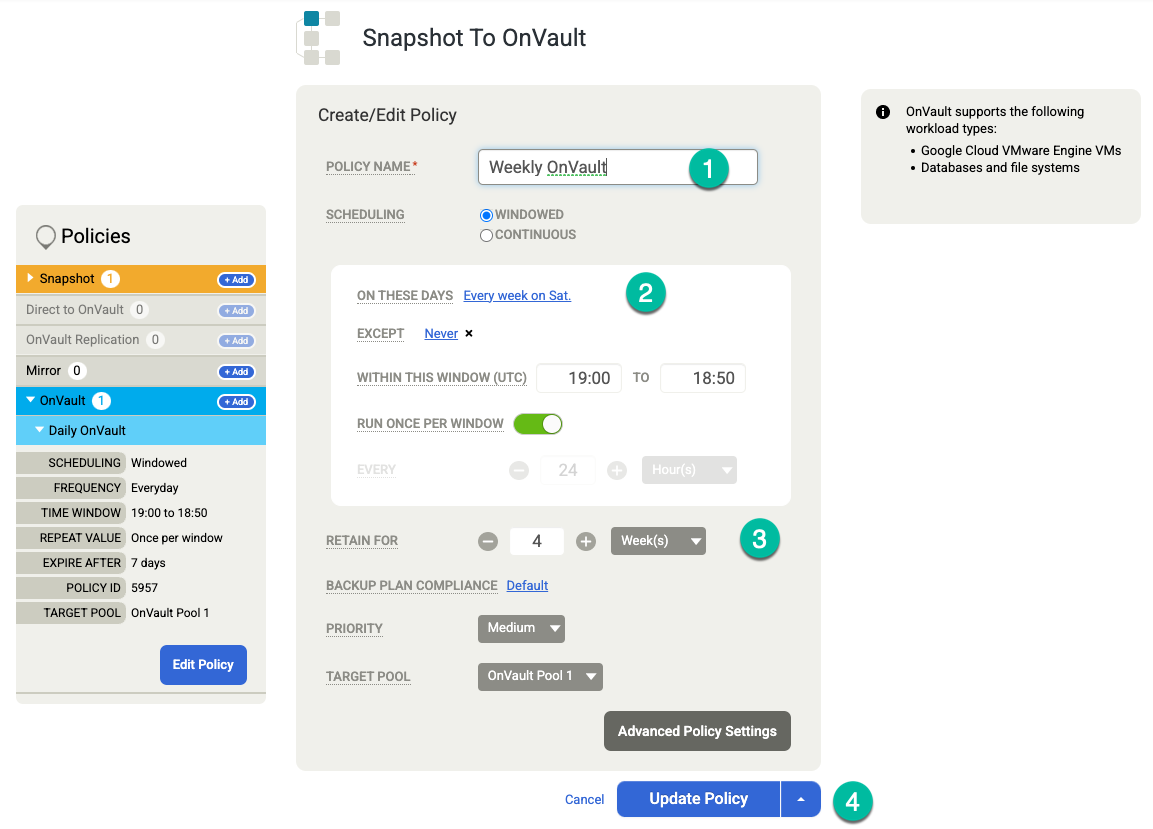
In your template, configure the following:
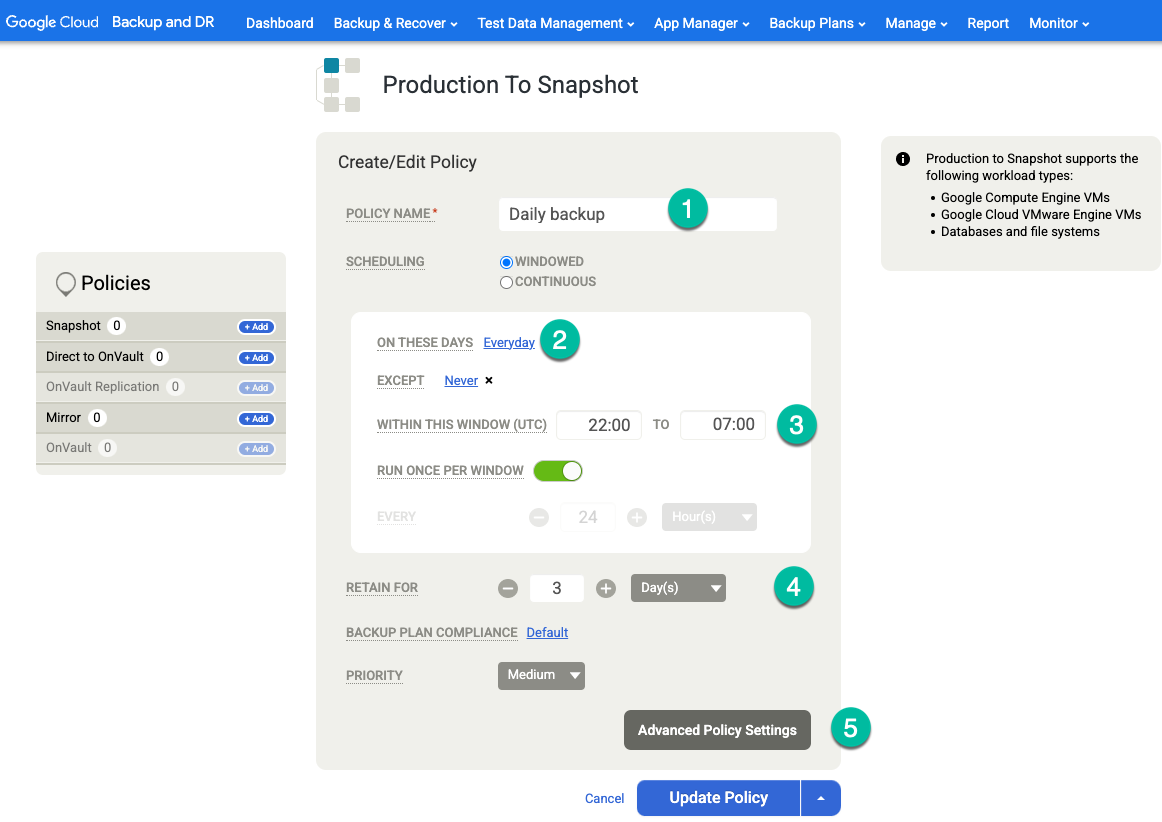
- In the Policies section on the right, click +Add.
- Provide a policy name.
- Select the checkbox for the days you want the policy to run, or leave the default as Everyday.
- Edit the window for the jobs that you want to run within that time period.
- Select a retention time.
Click Advanced Policy Settings.
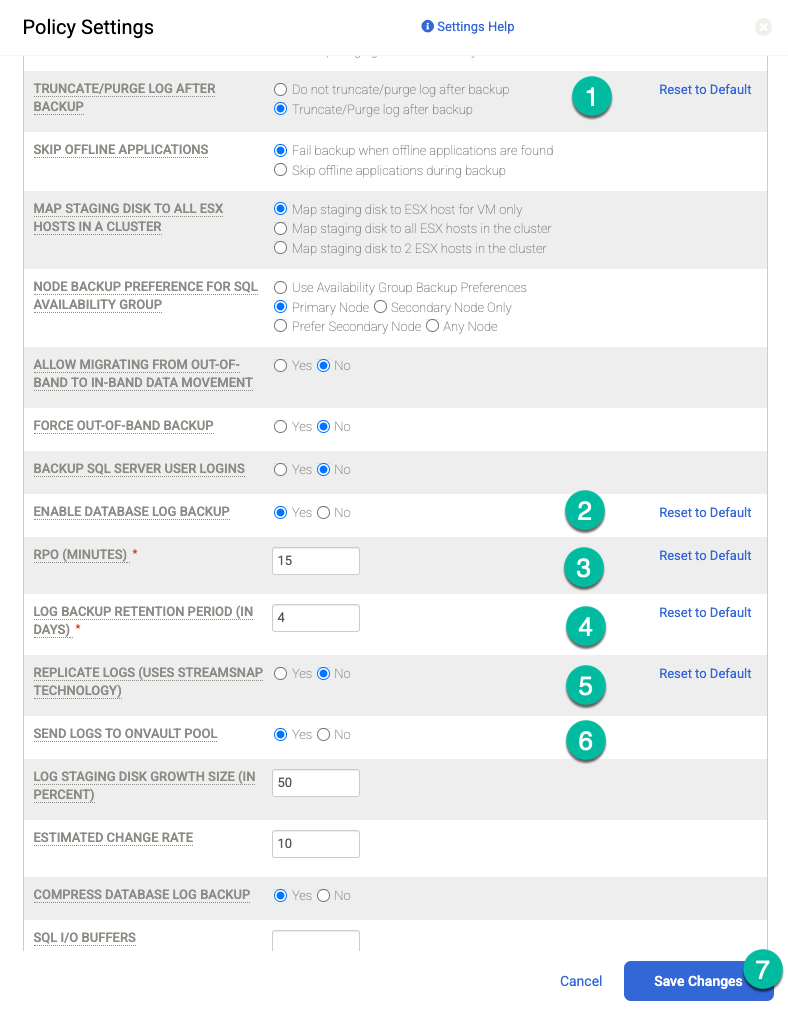
If you want to perform archive log backups on a regular frequency (for example, every 15 minutes) and replicate the archive logs to Cloud Storage, you need to enable the following policy settings:
- Set Truncate/Purge Log after Backup to Truncate if this is what you want.
- Set Enable Database Log Backup to Yes if desired.
- Set RPO (Minutes) to your desired archive log backup interval.
- Set Log Backup Retention Period (in Days) to your desired retention period.
- Set Replicate Logs (Uses Streamsnap Technology) to No.
- Set Send Logs to OnVault Pool to Yes if you want to send logs to your Cloud Storage bucket. Otherwise, select No.
Click Save Changes.
Click Update Policy to save your changes.
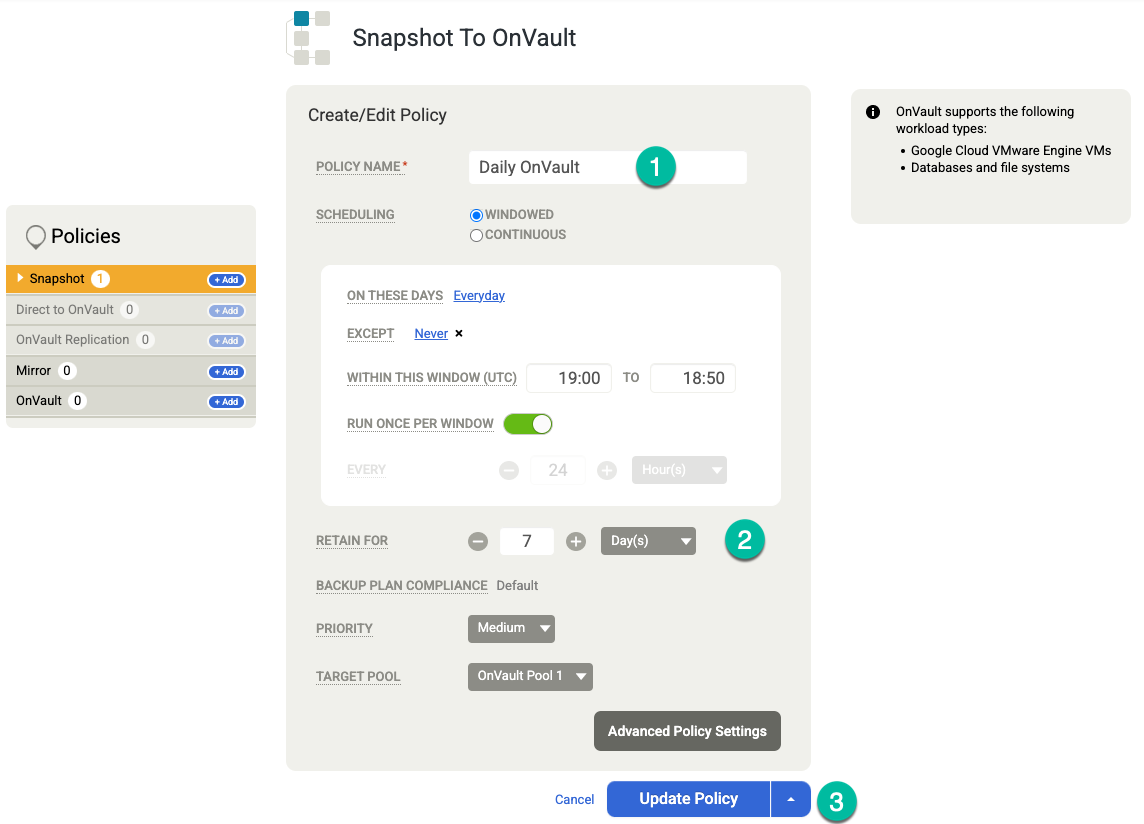
For OnVault on the right hand side, perform the following actions:
- Click +Add.
- Add the policy name.
- Set the Retention in days, weeks, months or years.
Click Update Policy.
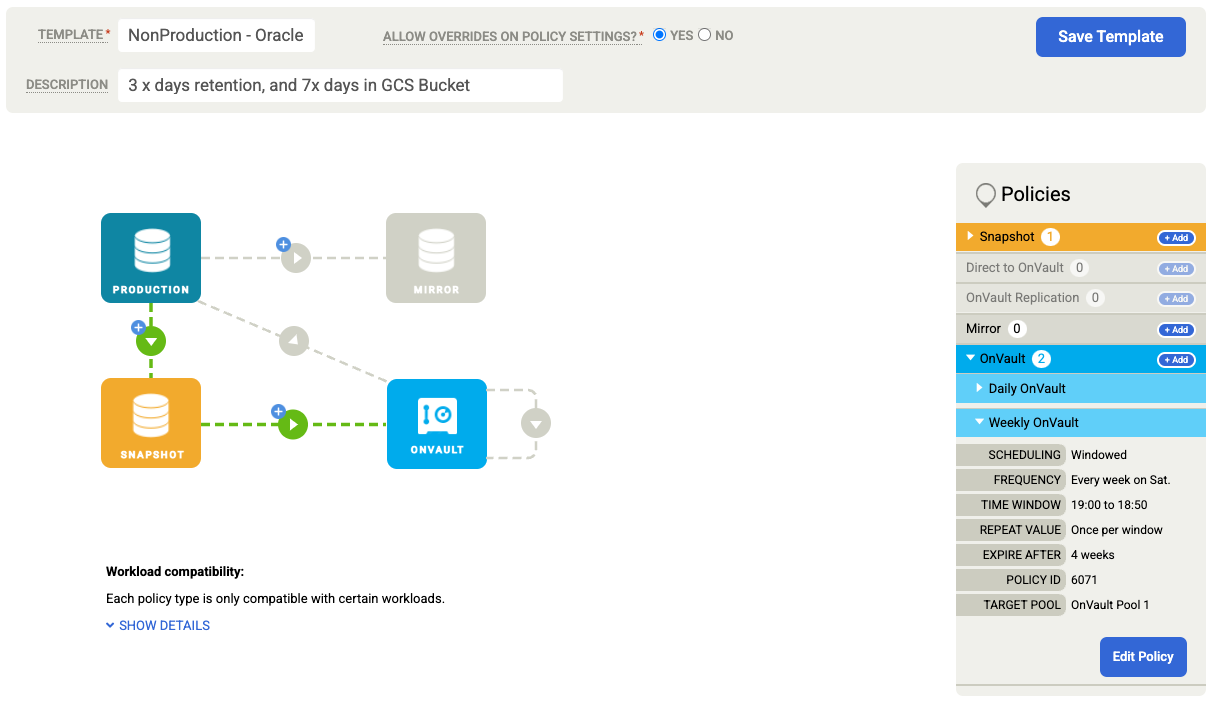
(Optional) If you need to add more retention options, create additional policies for weekly, monthly, and yearly retention. To add another retention policy, follow these steps:
- For OnVault on the right, click +Add.
- Add a policy name.
- Change the value for On These Days to the day you want to trigger this job.
- Set the Retention in Days, Weeks, Months, or Years.
Click Update Policy.
Click Save Template. In the following example, you'll see a snapshot policy that retains backups for 3 days in the Persistent Disk tier, 7 days for OnVault jobs, and 4 weeks total. The weekly backup runs Saturday nights.
Back up an Oracle database
The Google Cloud Backup and DR architecture provides application-consistent, incremental-forever Oracle backup to Google Cloud, and instant recovery and cloning for multi-terabyte Oracle databases.
Google Cloud Backup and DR uses the following Oracle APIs:
- RMAN image copy API–An image copy of a data file is much faster to restore because the physical structure of the data file already exists. The Recovery Manager (RMAN) directive BACKUP AS COPY creates image copies for all data files of the entire database and retains the data file format.
- ASM and CRS API–Use the Automatic Storage Management (ASM) and Cluster Ready Services (CRS) API to manage the ASM backup disk group.
- RMAN archive log backup API–This API generates archive logs, backs them up to a staging disk, and purges them from the production archive location.
Configure the Oracle hosts
The steps to setting up your Oracle hosts include installing the agent, adding the hosts to Backup and DR, configuring the hosts, and discovering the Oracle database(s). Once everything is in place, you can perform your backups of the Oracle database to Backup and DR.
Install the backup agent
Installing the Backup and DR agent is relatively straightforward. You only need to install the agent the first time you use the host, and then subsequent upgrades can be done from within the Backup and DR user interface in the Google Cloud console. You need to be logged in as a root user or in a sudo authenticated session to perform an agent installation. You do not need to reboot the host to complete the installation.
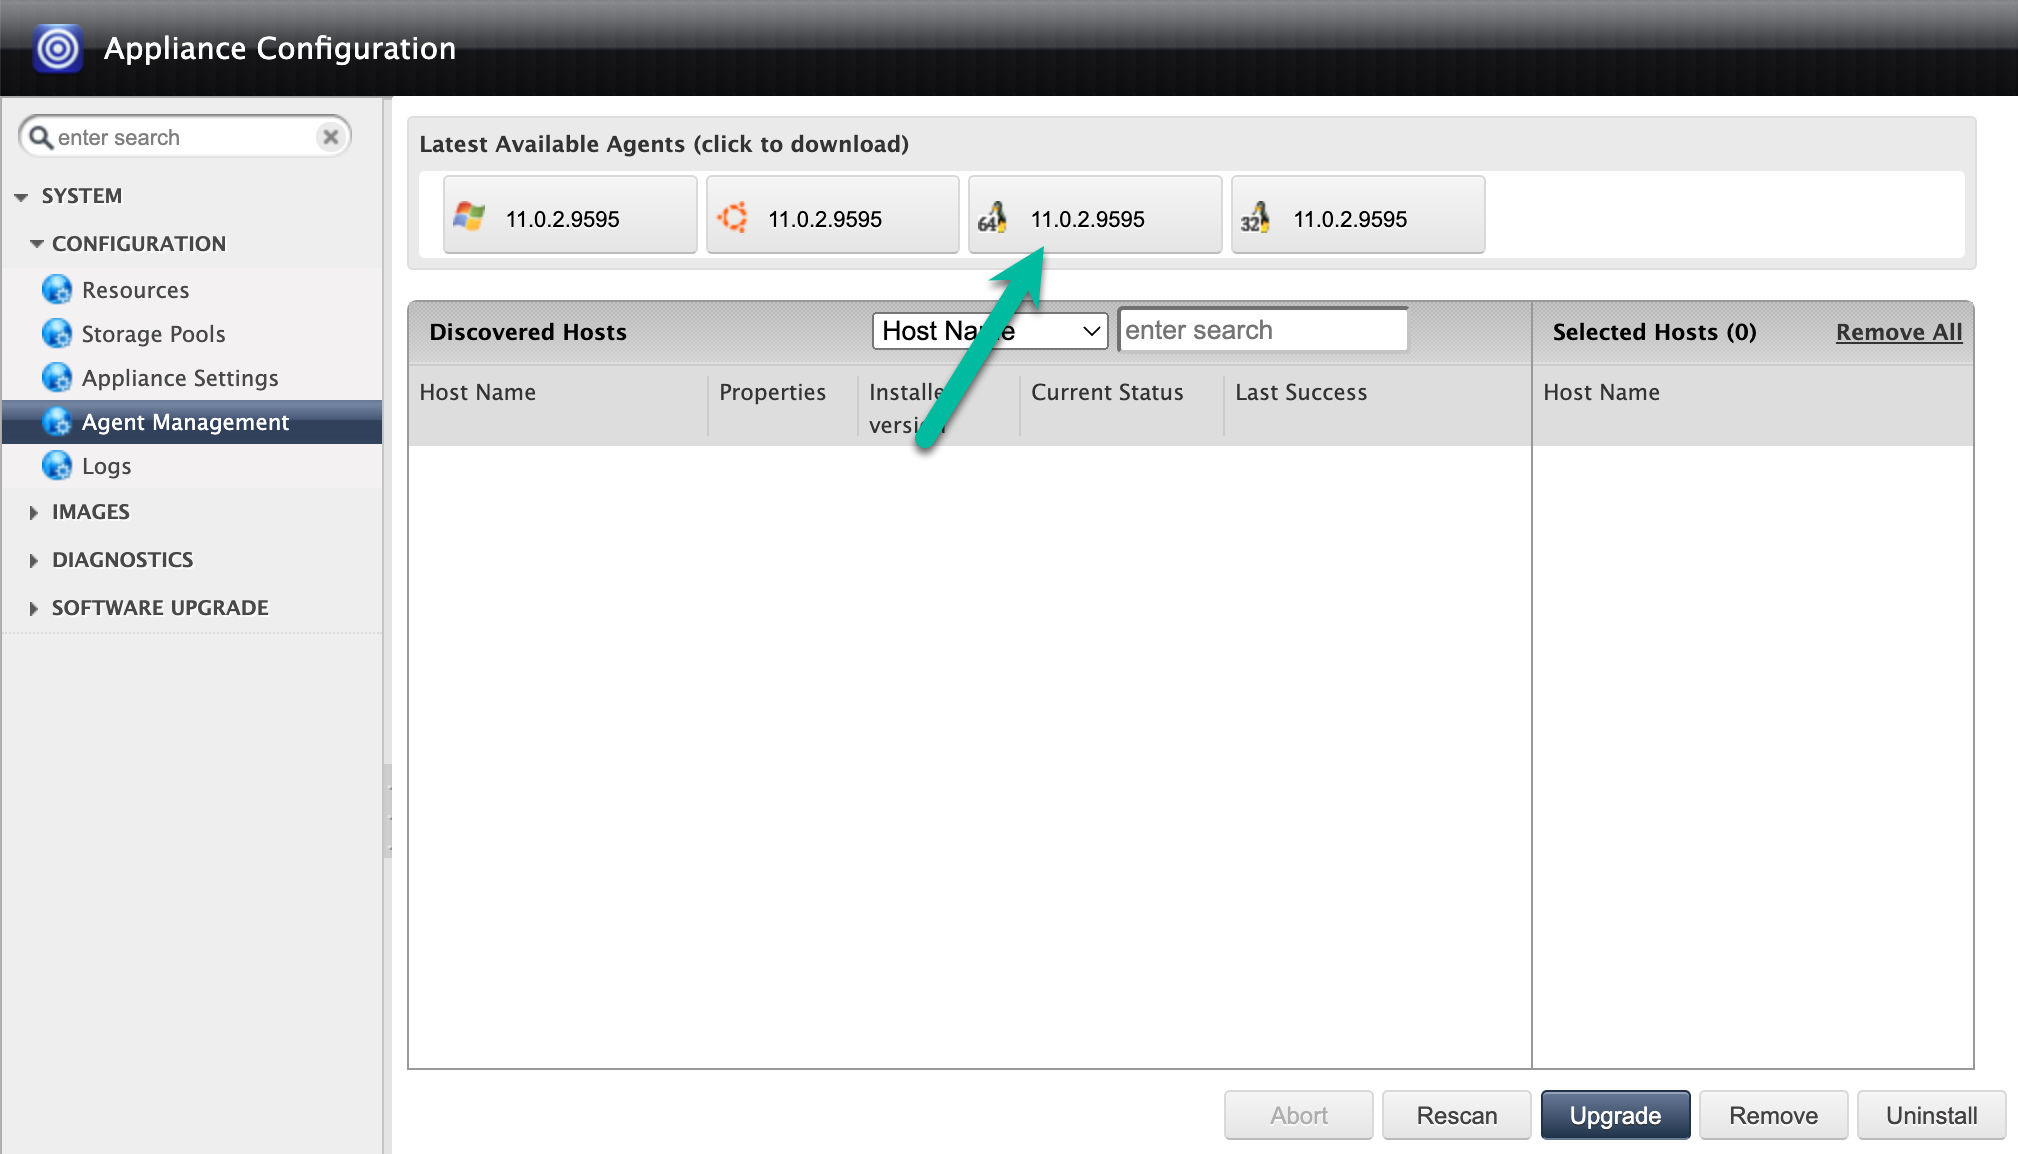
Download the backup agent from either the user interface or through the Manage > Appliances page.
https://bmc-PROJECT_NUMBER-GENERATED_ID-dot-REGION.backupdr.googleusercontent.com/#clusters
Right-click the name of the backup/recovery appliance and select Configure Appliance. A new browser window opens.
Click the Linux 64 Bit icon to download the backup agent to the computer that hosts your browser session. Use scp (secure copy) to move the downloaded agent file to the Oracle hosts for installation.
Alternatively, you can store the backup agent in a Cloud Storage bucket, enable downloads, and use
wgetorcurlcommands to download the agent directly to your Linux hosts.curl -o agent-Linux-latestversion.rpm https://storage.googleapis.com/backup-agent-images/connector-Linux-11.0.2.9595.rpm
Use the
rpm -ivhcommand to install the backup agent.It is very important that you copy the automatically-generated secret key. Using the Backup and DR management console, you need to add the secret key to the host metadata.
The output of the command is similar to the following:
[oracle@host `~]# sudo rpm -ivh agent-Linux-latestversion.rpm
Verifying... ################################# [100%]
Preparing... ################################# [100%]
Updating / installing…
  1:udsagent-11.0.2-9595 ################################# [100%]
Created symlink /etc/systemd/system/multi-user.target.wants/udsagent.service → /usr/lib/systemd/system/udsagent.service.
Action Required:
-- Add this host to Backup and DR management console to backup/recover workloads from/to this host. You can do this by navigating to Manage->Hosts->Add Host on your management console.
-- A secret key is required to complete this process. Please use b010502a8f383cae5a076d4ac9e868777657cebd0000000063abee83 (valid for 2 hrs) to register this host.
-- A new secret key can be generated later by running: '/opt/act/bin/udsagent secret --reset --restart
If you use the
iptablescommand, open the ports for the backup agent firewall (TCP 5106) and Oracle services (TCP 1521):sudo iptables -A INPUT -p tcp --dport 5106 -j ACCEPT sudo iptables -A INPUT -p tcp --dport 1521 -j ACCEPT sudo firewall-cmd --permanent --add-port=5106/tcp sudo firewall-cmd --permanent --add-port=1521/tcp sudo firewall-cmd --reload
Add hosts to Backup and DR
In the Backup and DR management console, go to Manage > Hosts.
https://bmc-PROJECT_NUMBER-GENERATED_ID-dot-REGION.backupdr.googleusercontent.com/#hosts
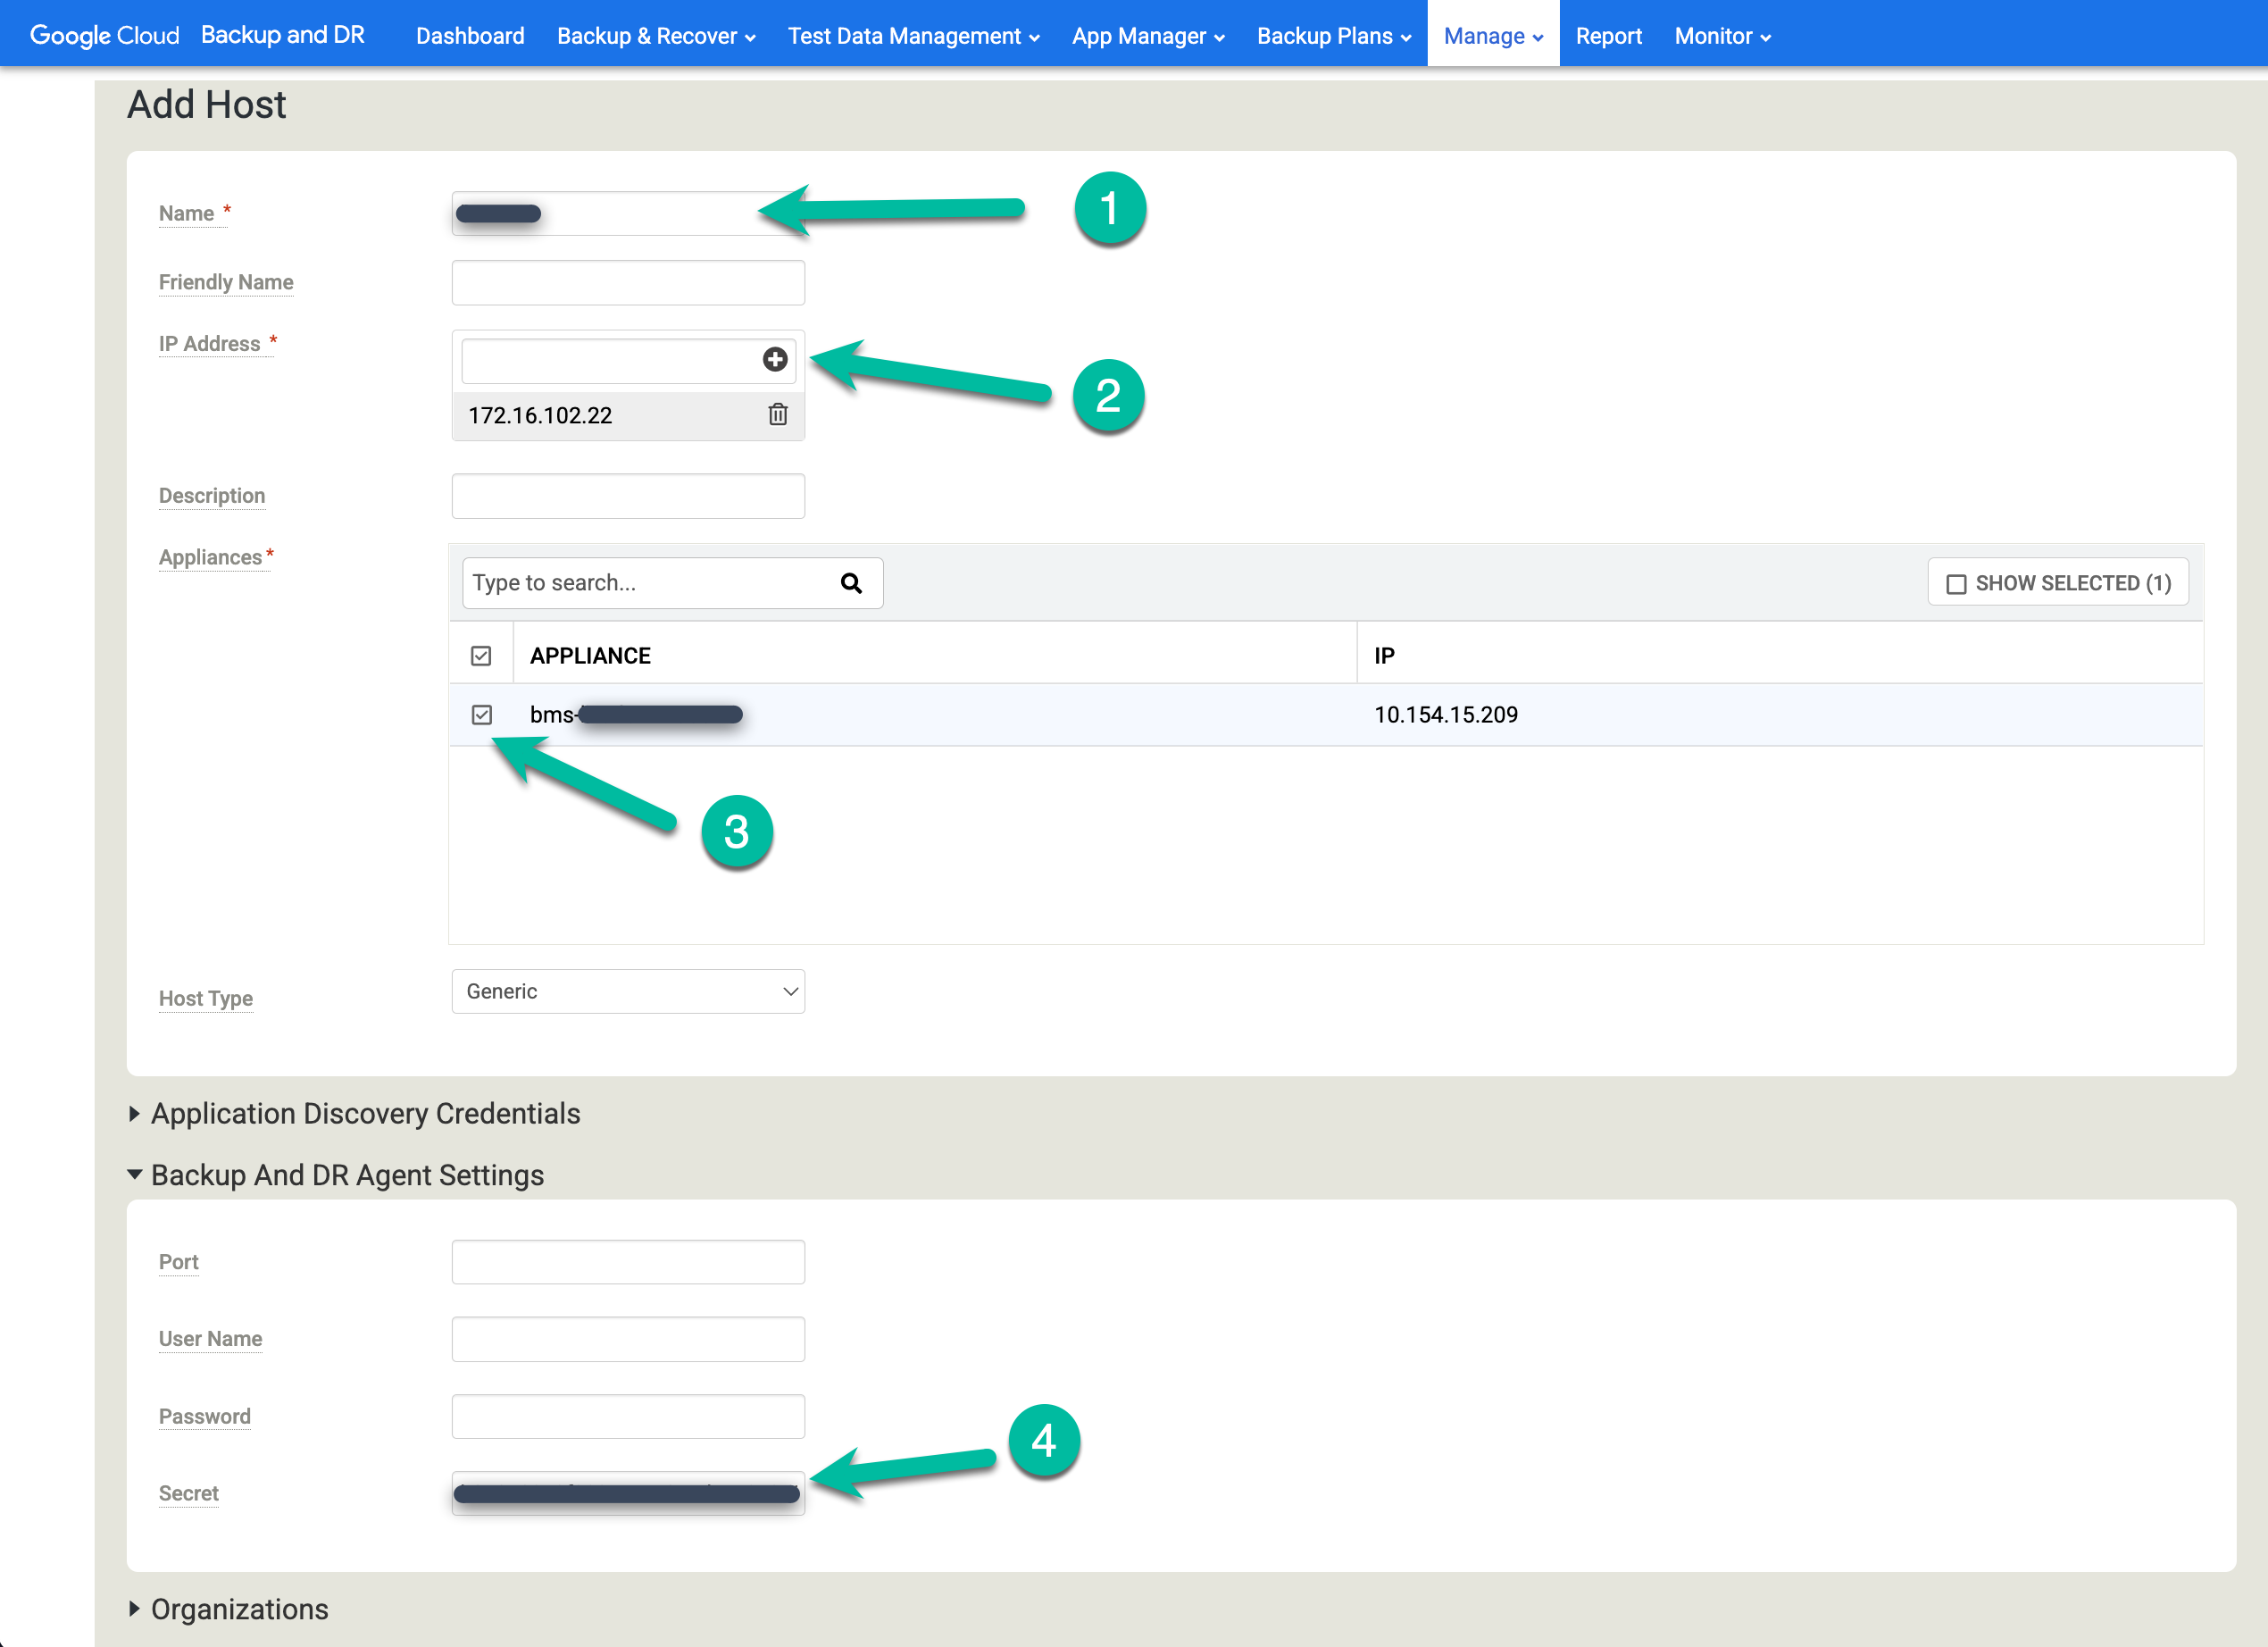
- Click +Add Host.
- Add the hostname.
- Add an IP address for the host and click the + button to confirm the configuration.
- Click the appliance(s) where you want to add the host.
- Paste the secret key. You must perform this task less than two hours after you install the backup agent and the secret key is generated.
Click Add to save the host.
If you receive an error or Partial Success message, try the following workarounds:
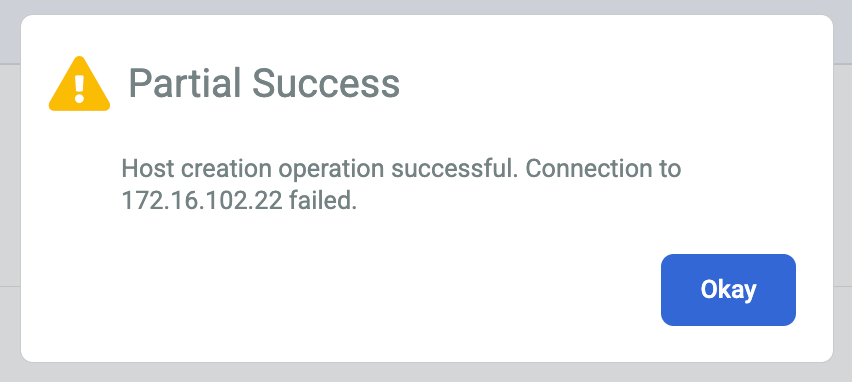
The backup agent encryption secret key may have timed out. If you did not add the secret key to the host within two hours of its creation. You can generate a new secret key on the linux host using the following command line syntax:
/opt/act/bin/udsagent secret --reset --restart
The firewall that allows communication between the backup/recovery appliance and the agent installed on the host might not be configured properly. Follow the steps to open the ports for the backup agent firewall and Oracle services.
The Network Time Protocol (ntp) configuration for your Linux hosts might be misconfigured. Check and verify that your NTP settings are correct.
When you fix the underlying issue, you should see the Certificate Status change from N/A to Valid.

Configure the hosts
In the Backup and DR management console, go to Manage > Hosts.
https://bmc-PROJECT_NUMBER-GENERATED_ID-dot-REGION.backupdr.googleusercontent.com/#hosts
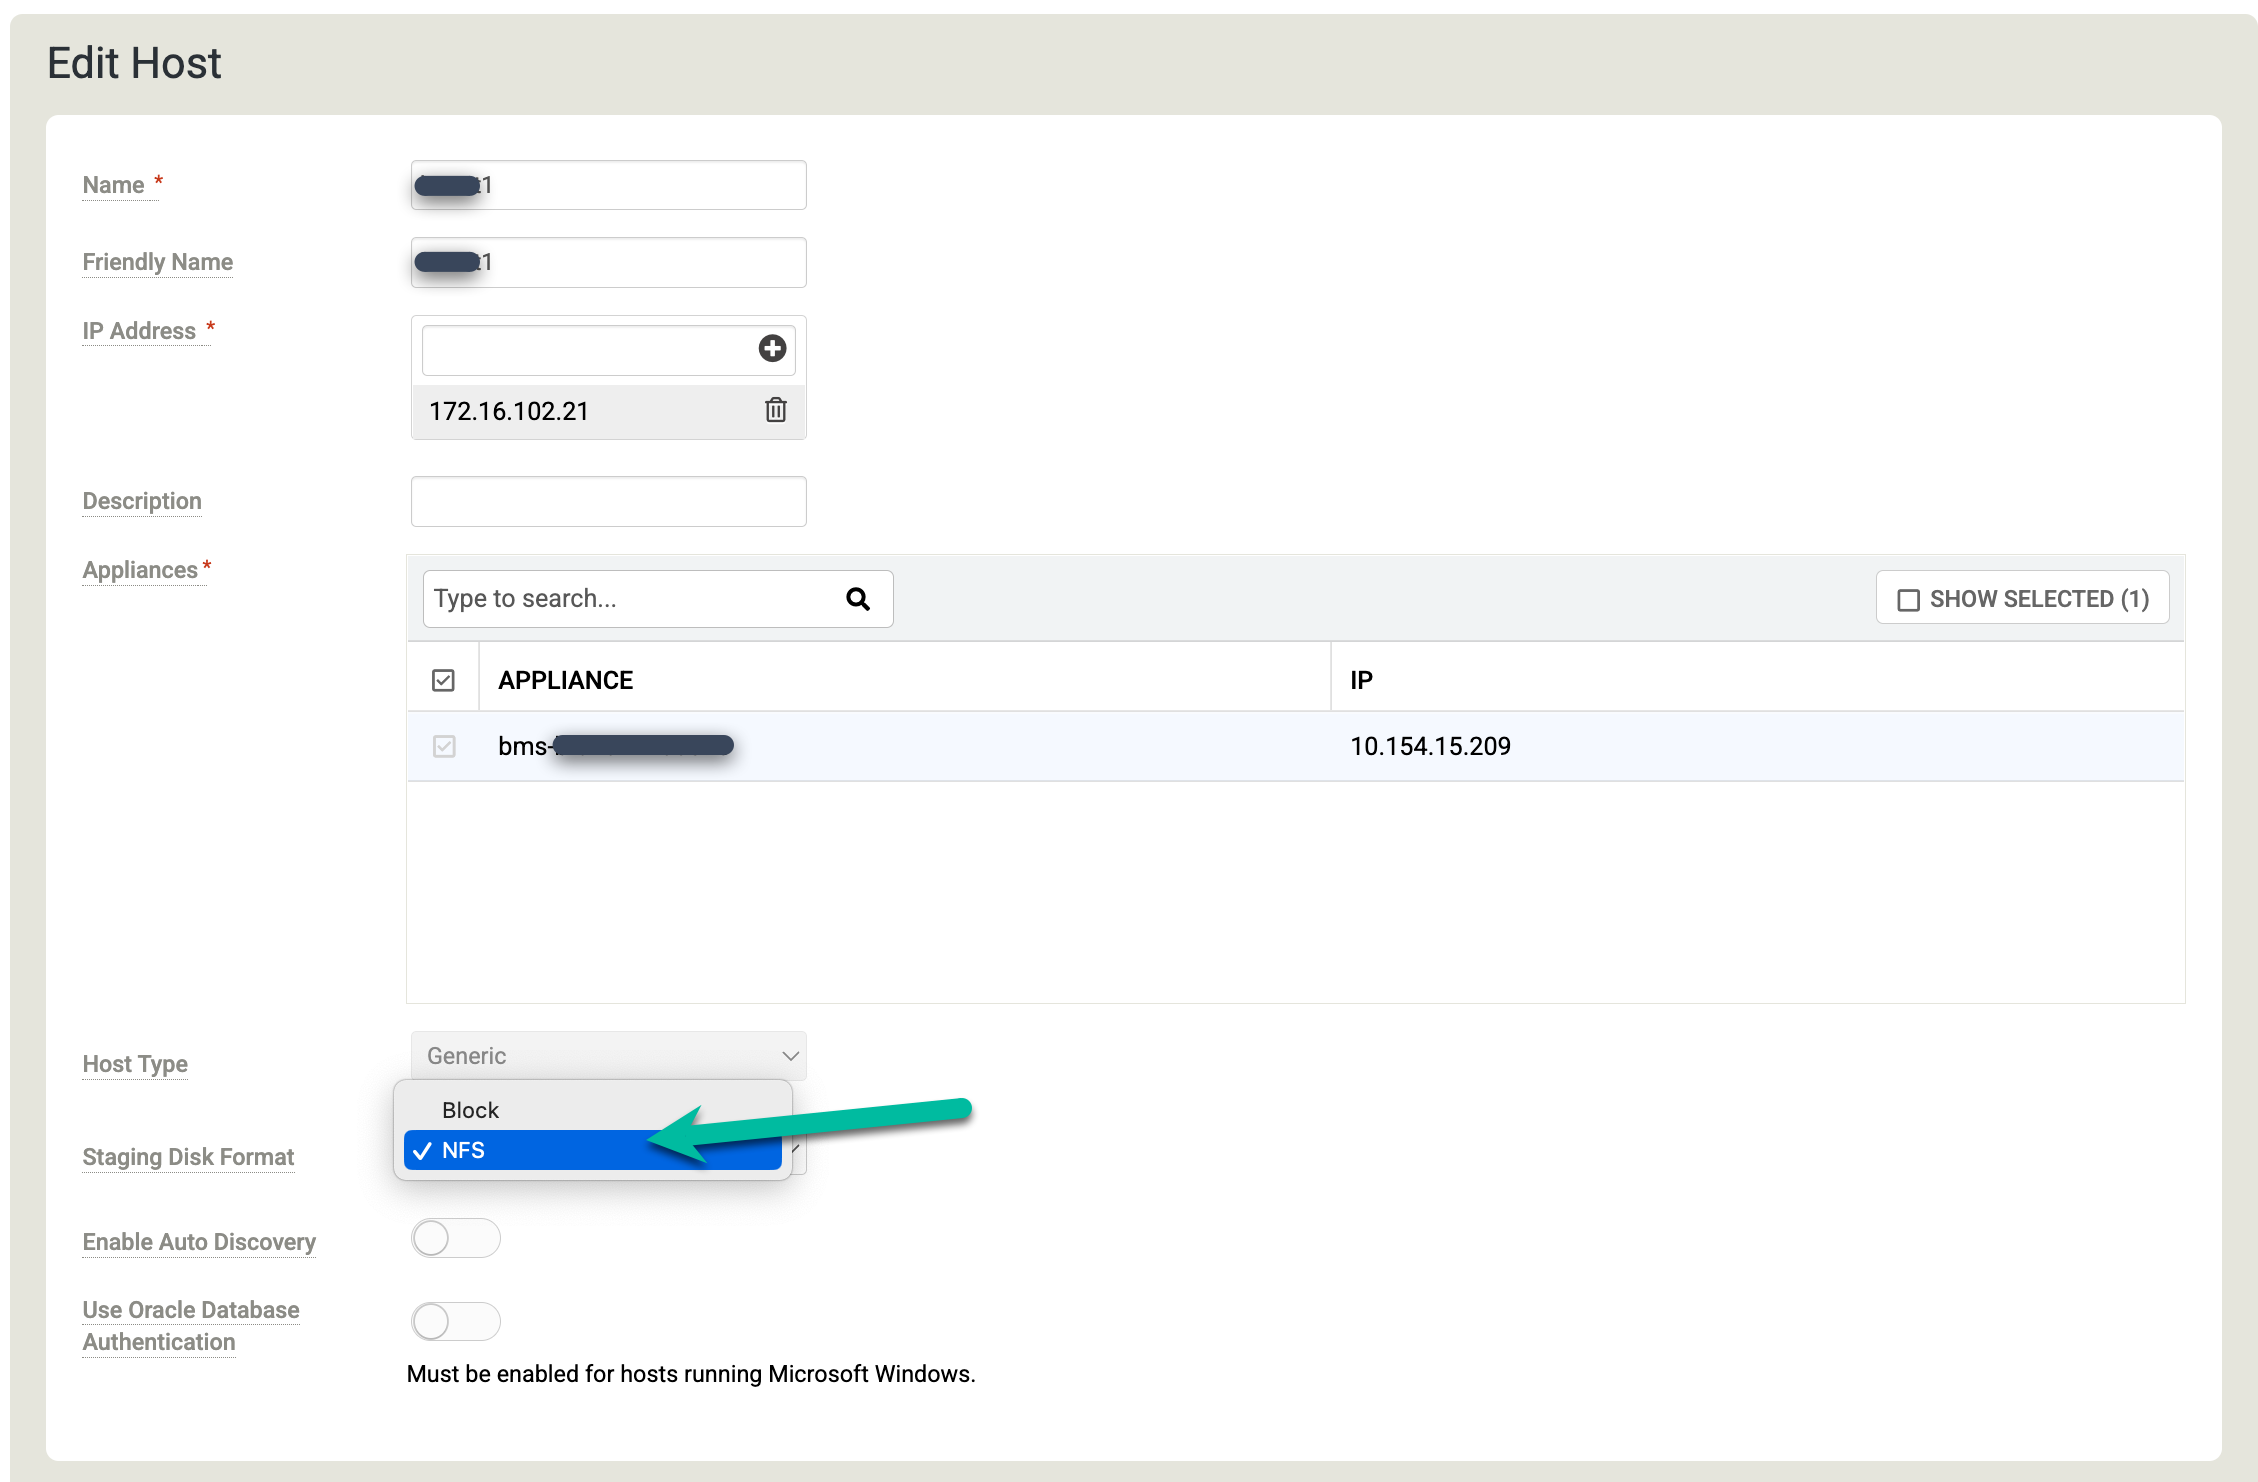
Right-click the Linux host where you want to back up your Oracle databases and select Edit.
Click Staging Disk Format and choose NFS.
Scroll down to the Discovered Applications section, and click Discover Applications to start the appliance-to-agent discovery process.
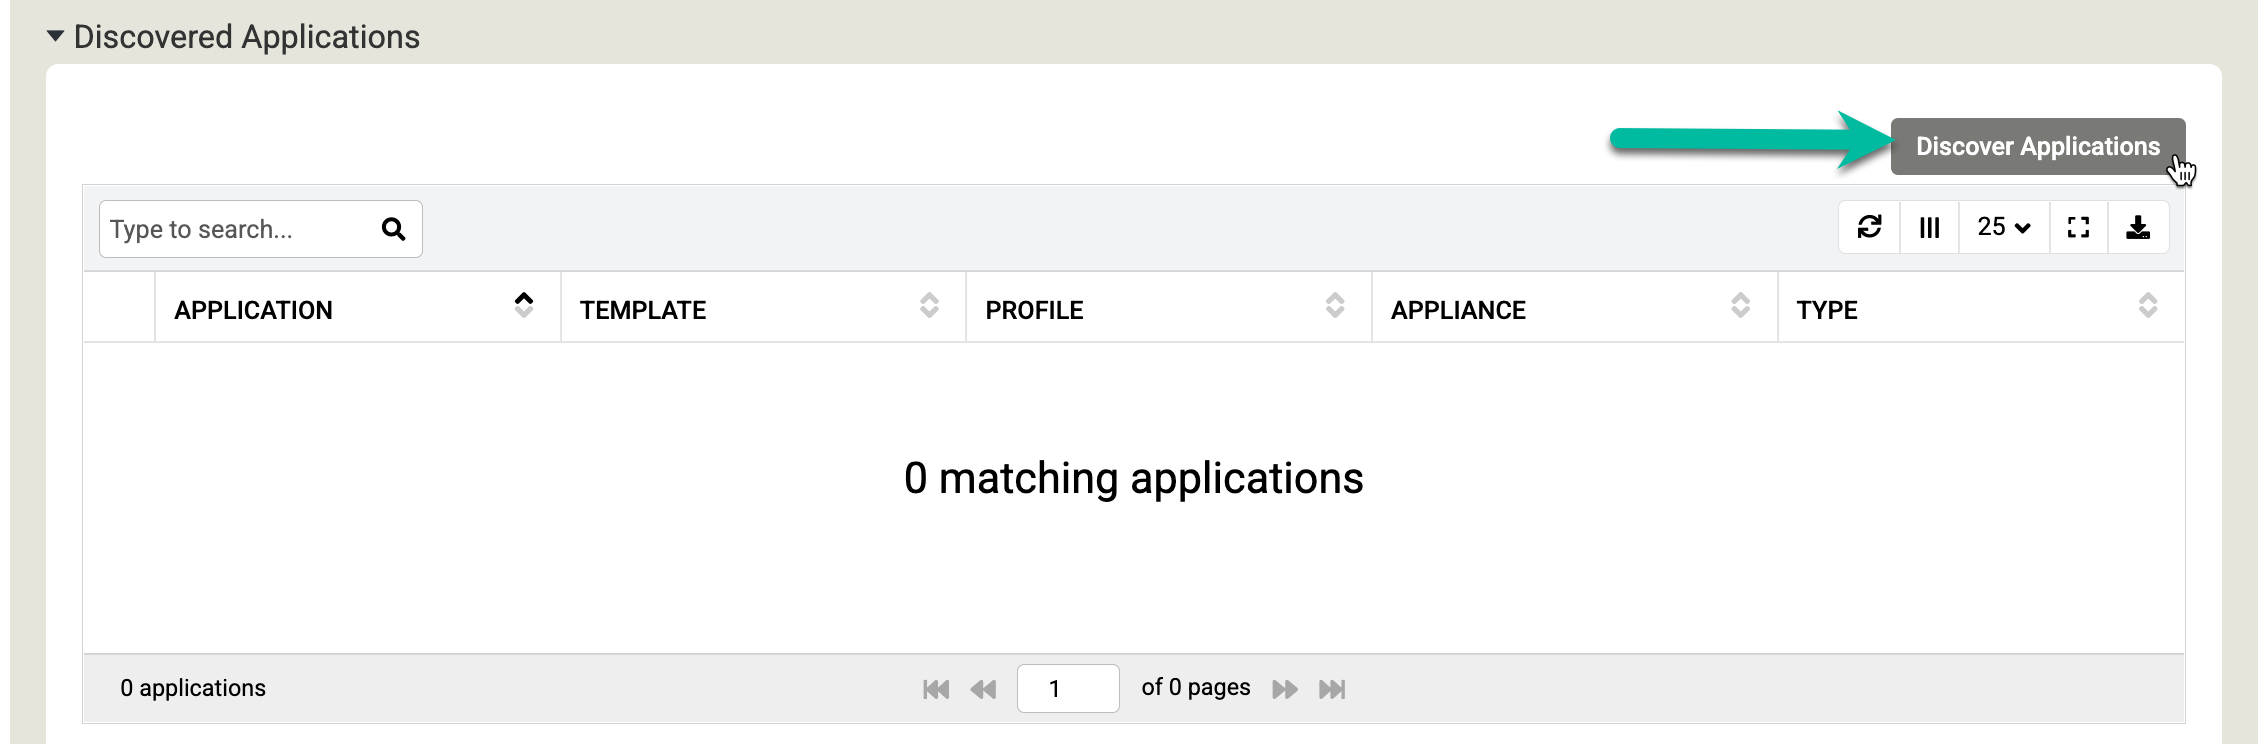
Click Discover to begin the process. The discovery process takes up to 5 minutes. When complete, the discovered file systems and Oracle databases appear in the applications window.

Click Save to update the changes to your hosts.
Prepare the Linux host
By installing iSCSI or NFS utilities packages in your Linux OS-based host, you can map a staging disk to a device that writes the backup data. Use the following commands to install iSCSI and NFS utilities. Although you can use either or both sets of utilities, this step ensures that you have what you need when you need it.
To install the iSCSI utilities, run the following command:
sudo yum install -y iscsi-initiator-utils
To install the NFS utilities, run the following command:
sudo yum install -y nfs-utils
Prepare the Oracle database
This guide assumes that you already have an Oracle instance and database set up and configured. Google Cloud Backup and DR supports protection of databases running on file systems, ASM, Real Application Clusters (RAC), and many other configurations. For more information, see Backup and DR for Oracle databases.
You need to configure a few items before starting the backup job. Some of these tasks are optional, however we do recommend the following settings for optimal performance:
- Use SSH to connect to the Linux host and log in as the Oracle user with su privileges.
Set the Oracle environment to your specific instance:
. oraenv
ORACLE_SID = [ORCL] ?
The Oracle base remains unchanged with value /u01/app/oracle
Connect to SQL*Plus with the
sysdbaaccount:sqlplus / as sysdba
Use the following commands to enable ARCHIVELOG mode. The output of the commands is similar to the following:
SQL> shutdown

Database closed.
Database dismounted.
ORACLE instance shut down.

SQL> startup mount

ORACLE instance started.

Total System Global Area 2415918600 bytes
Fixed Size 9137672 bytes
Variable Size 637534208 bytes
Database Buffers 1761607680 bytes
Redo Buffers 7639040 bytes
Database mounted.

SQL> alter database archivelog;

Database altered.

SQL> alter database open;

Database altered.

SQL> archive log list;
Database log mode Archive Mode
Automatic archival Enabled
Archive destination /u01/app/oracle/product/19c/dbhome_1/dbs/arch
Oldest online log sequence 20
Next log sequence to archive 22
Current log sequence 22

SQL> alter pluggable database ORCLPDB save state;

Pluggable database altered.
Configure Direct NFS for the Linux host:
cd $ORACLE_HOME/rdbms/lib
make -f [ins_rdbms.mk](http://ins_rdbms.mk/) dnfs_on
Configure block change tracking. First check to see if it is enabled or disabled. The following example shows block change tracking as disabled:
SQL> select status,filename from v$block_change_tracking;

STATUS     FILENAME
---------- ------------------------------------------------------------------
DISABLED
SQL> alter database enable block change tracking using file +ASM_DISK_GROUP_NAME/DATABASE_NAME/DBNAME.bct;

Database altered.
Issue the following command when using a file system:
SQL> alter database enable block change tracking using file '$ORACLE_HOME/dbs/DBNAME.bct';;

Database altered.
Verify that block change tracking is now enabled:
SQL> select status,filename from v$block_change_tracking;

STATUS     FILENAME
---------- ------------------------------------------------------------------
ENABLED    +DATADG/ORCL/CHANGETRACKING/ctf.276.1124639617
Protect an Oracle database
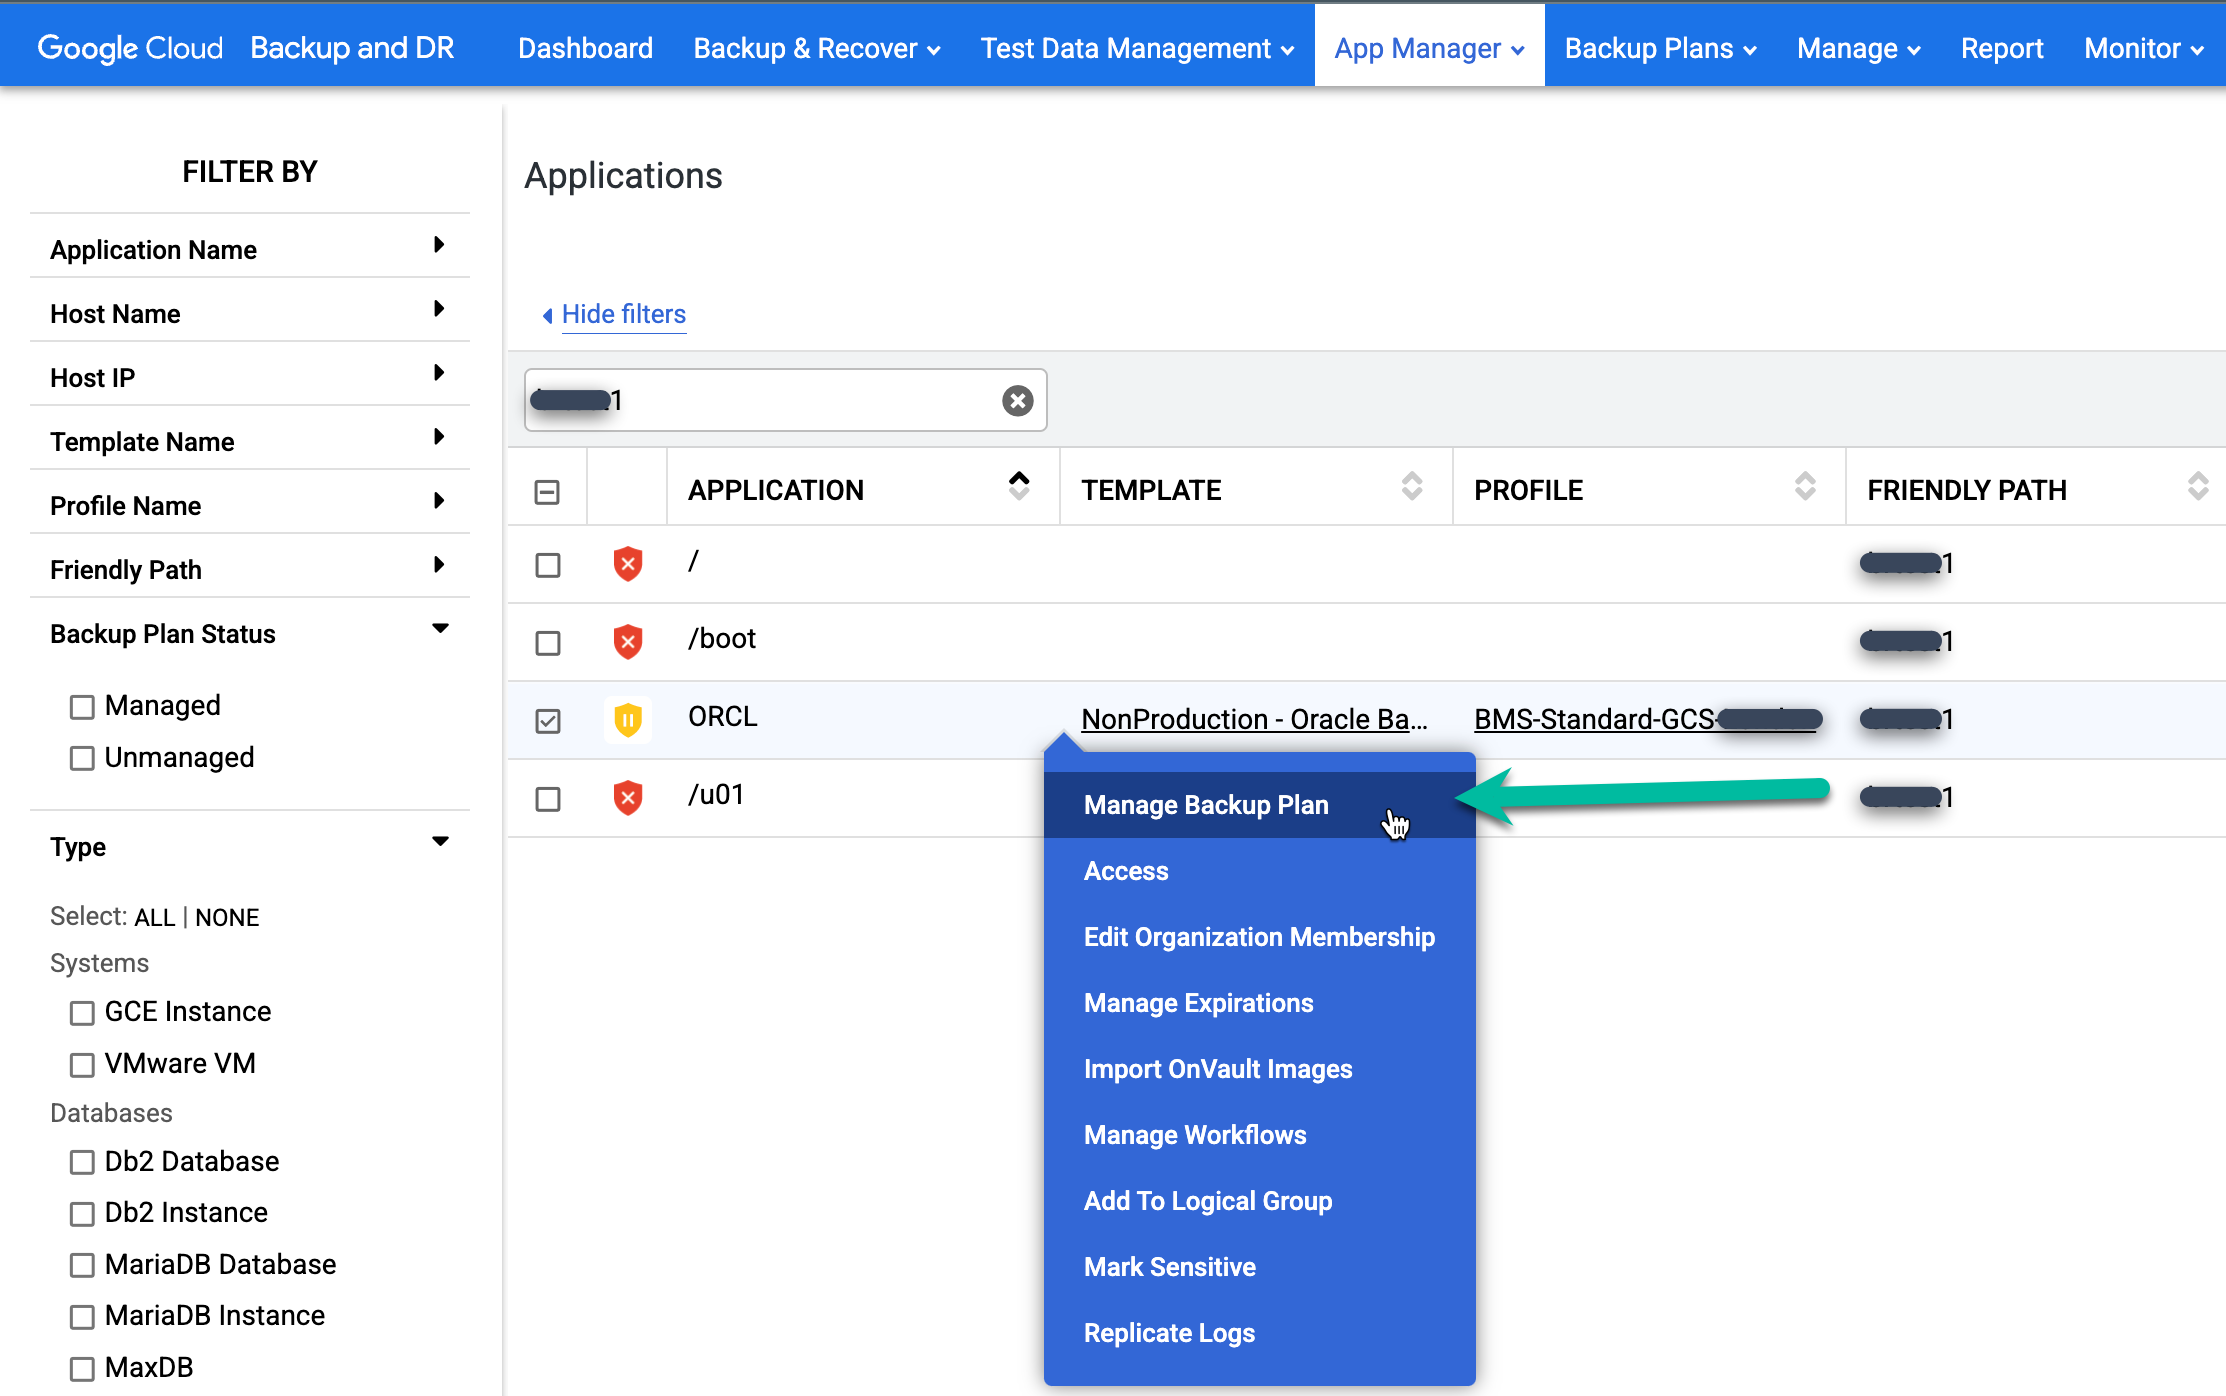
In the Backup and DR management console, go to the App Manager > Applications page.
https://bmc-PROJECT_NUMBER-GENERATED_ID-dot-REGION.backupdr.googleusercontent.com/#applications
Right-click the Oracle database name you want to protect and select Manage Backup Plan from the menu.
Select the template and profile you want to use, then click Apply Backup Plan.
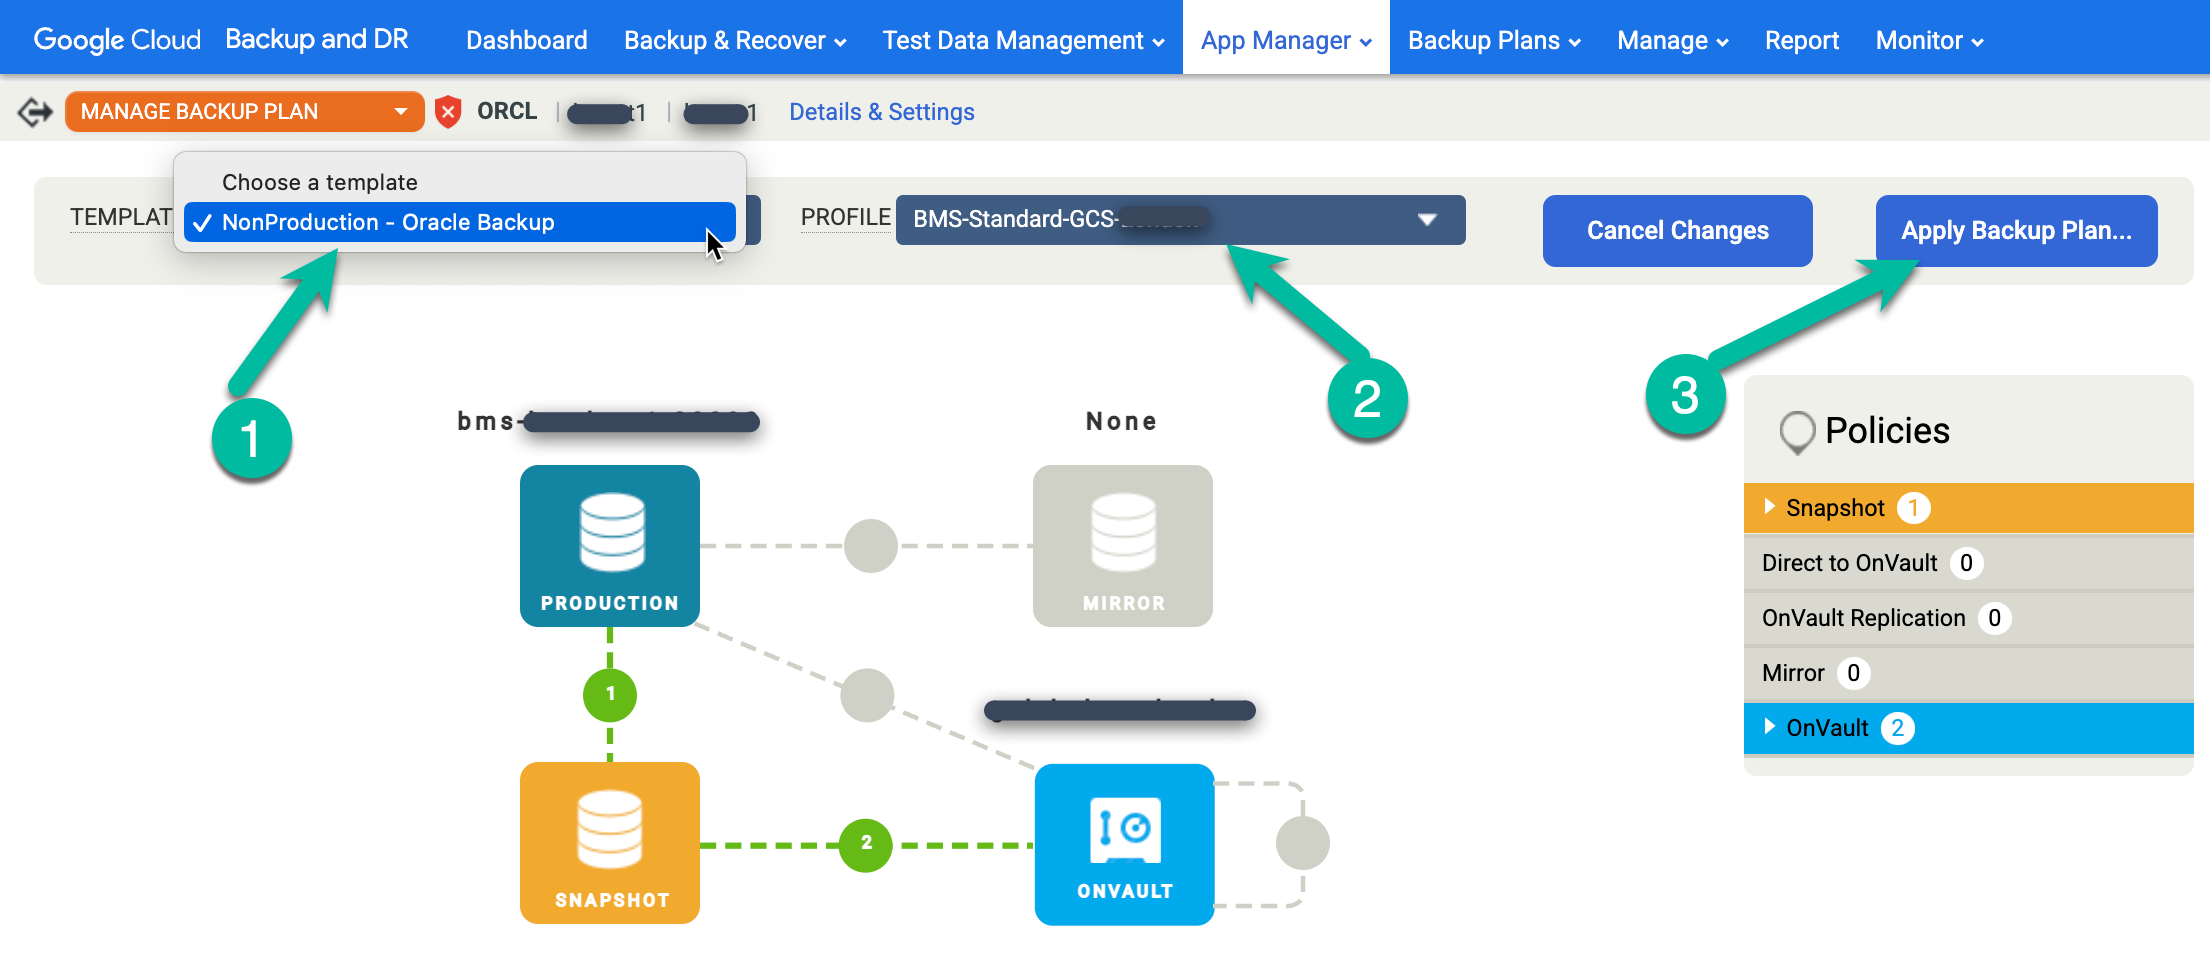
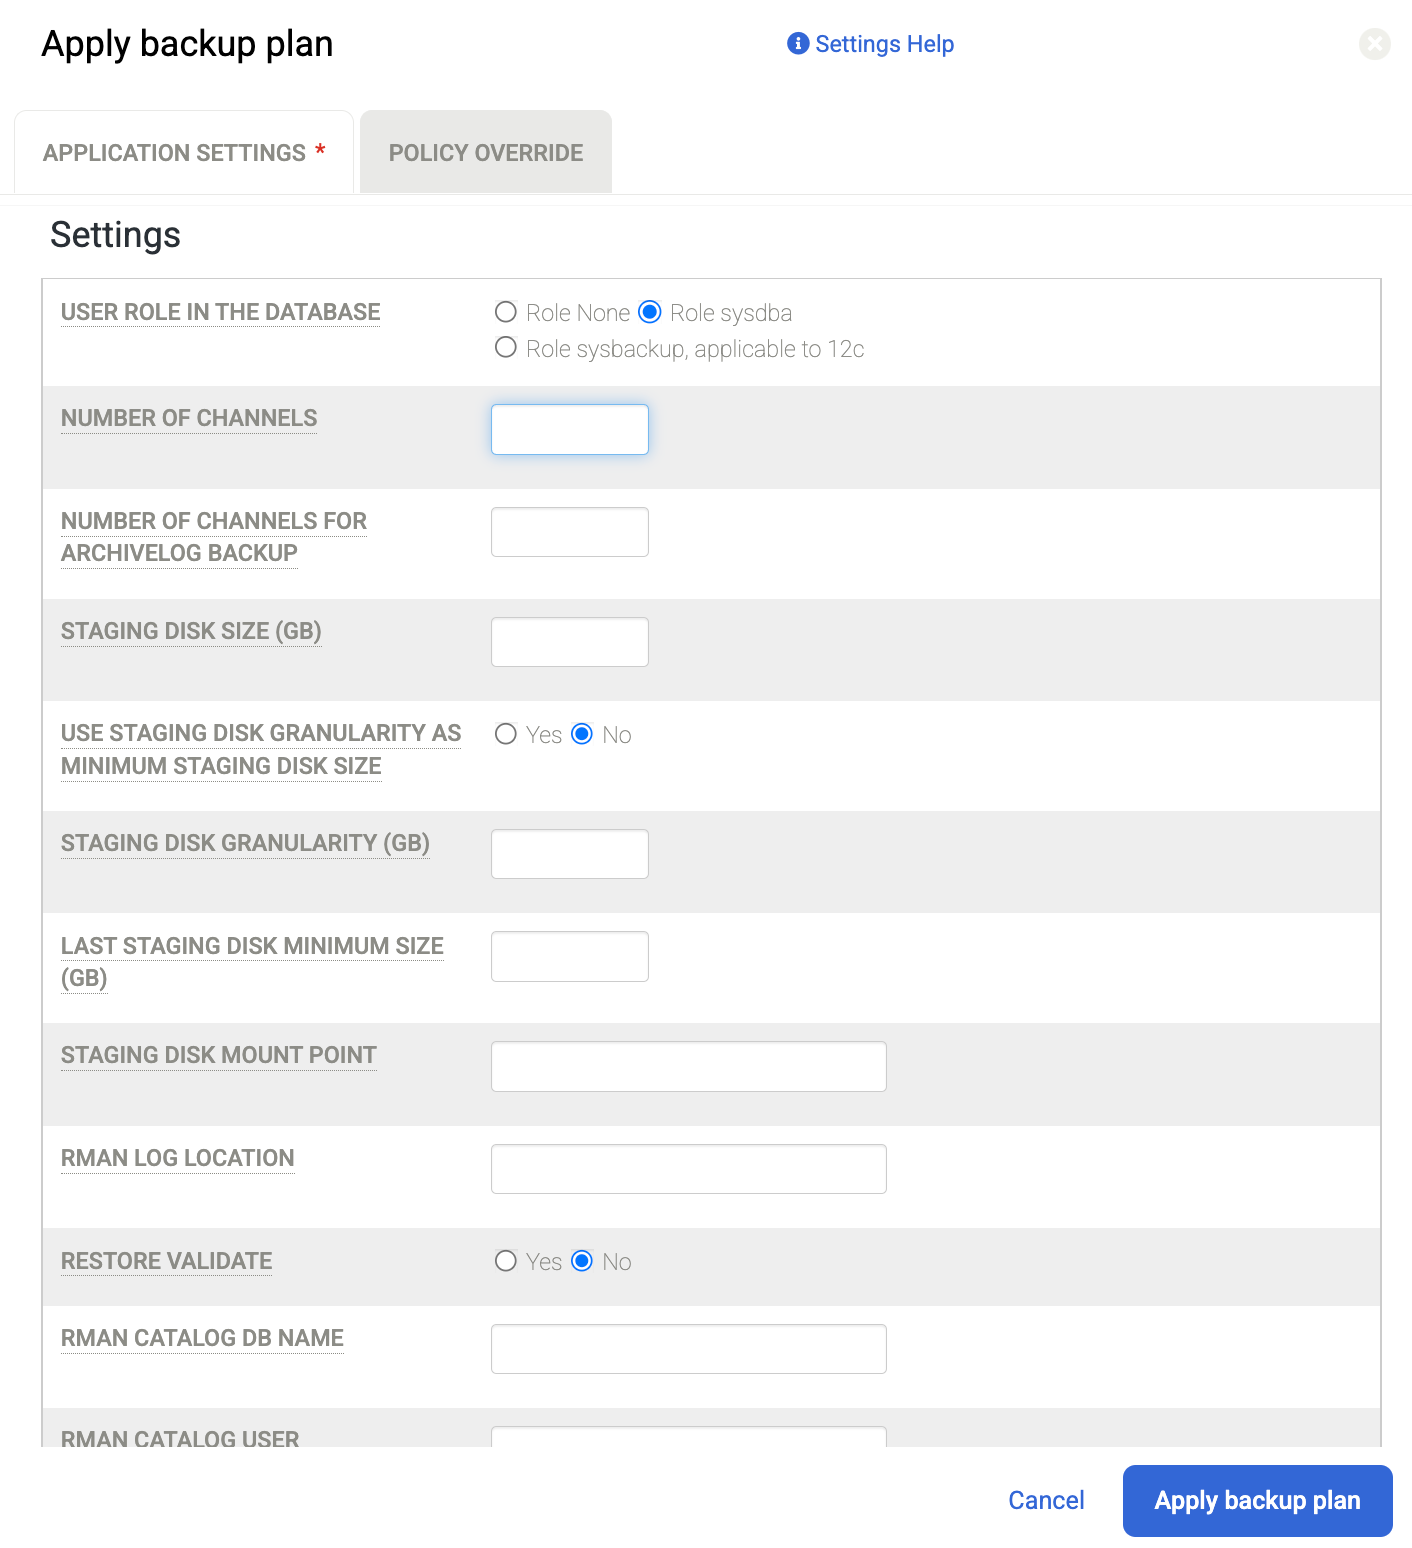
When prompted, set any Advanced Settings specific for Oracle and RMAN that are required for your configuration. When complete, click Apply Backup Plan.
Number of Channels for example, defaults to 2. So if you have a larger number of CPU cores, you can increase the number of channels for parallel backup operations, and set this to a larger number.
To learn more about advanced settings, see Configure application details and settings for Oracle databases.
In addition to these settings, you can change the protocol the staging disk uses to map the disk from the Backup Appliance to the host. Go to Manage > Hosts page, and select the host you want to Edit. Check the option for Staging Disk Format to Guest. By default Block format is selected, which maps the staging disk via iSCSI, else this can be changed to NFS, and then the staging disk uses the NFS protocol instead.
Default settings depend on your database format. If you use ASM, the system uses
iSCSI to send the backup an ASM disk group. If you use a file system, the system
uses iSCSI to send the backup to a file system. If you wish to use NFS or Direct
NFS (dNFS), then you must change the Hosts settings for the staging disk to
NFS. Instead, if you use the default setting, all backup staging disks use
block storage format and iSCSI.
Start the backup job
In the Backup and DR management console, go to the App Manager > Applications page.
https://bmc-PROJECT_NUMBER-GENERATED_ID-dot-REGION.backupdr.googleusercontent.com/#applications
Right-click the Oracle database that you want to protect and choose Manage Backup Plan from the menu.
Click the Snapshot menu on the right and click Run Now. This starts an on-demand backup job.
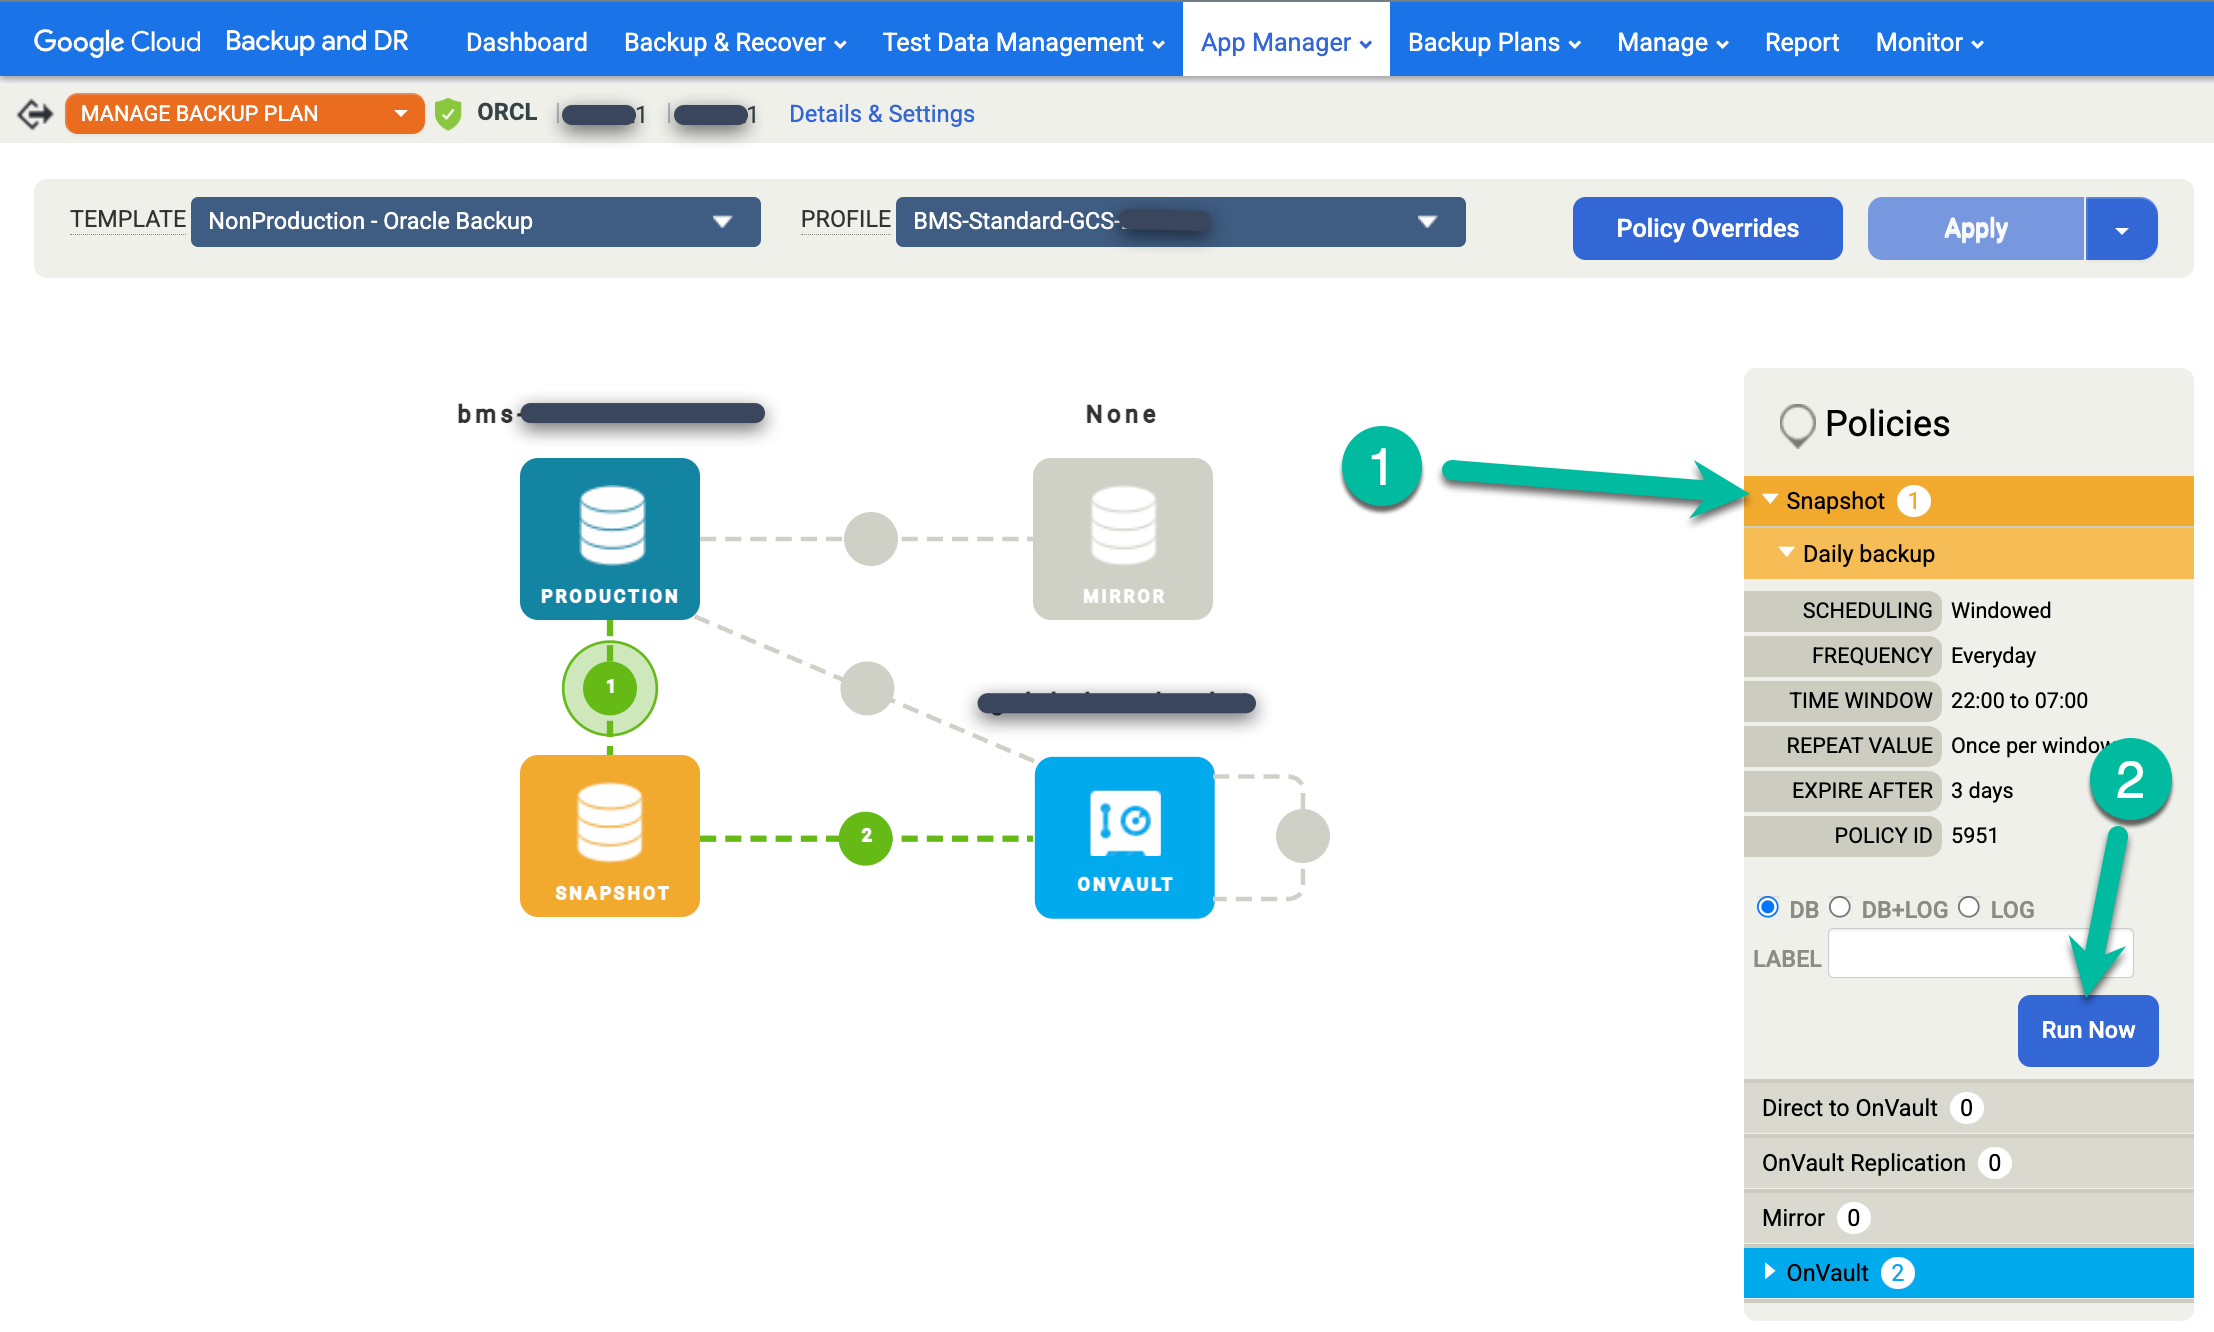
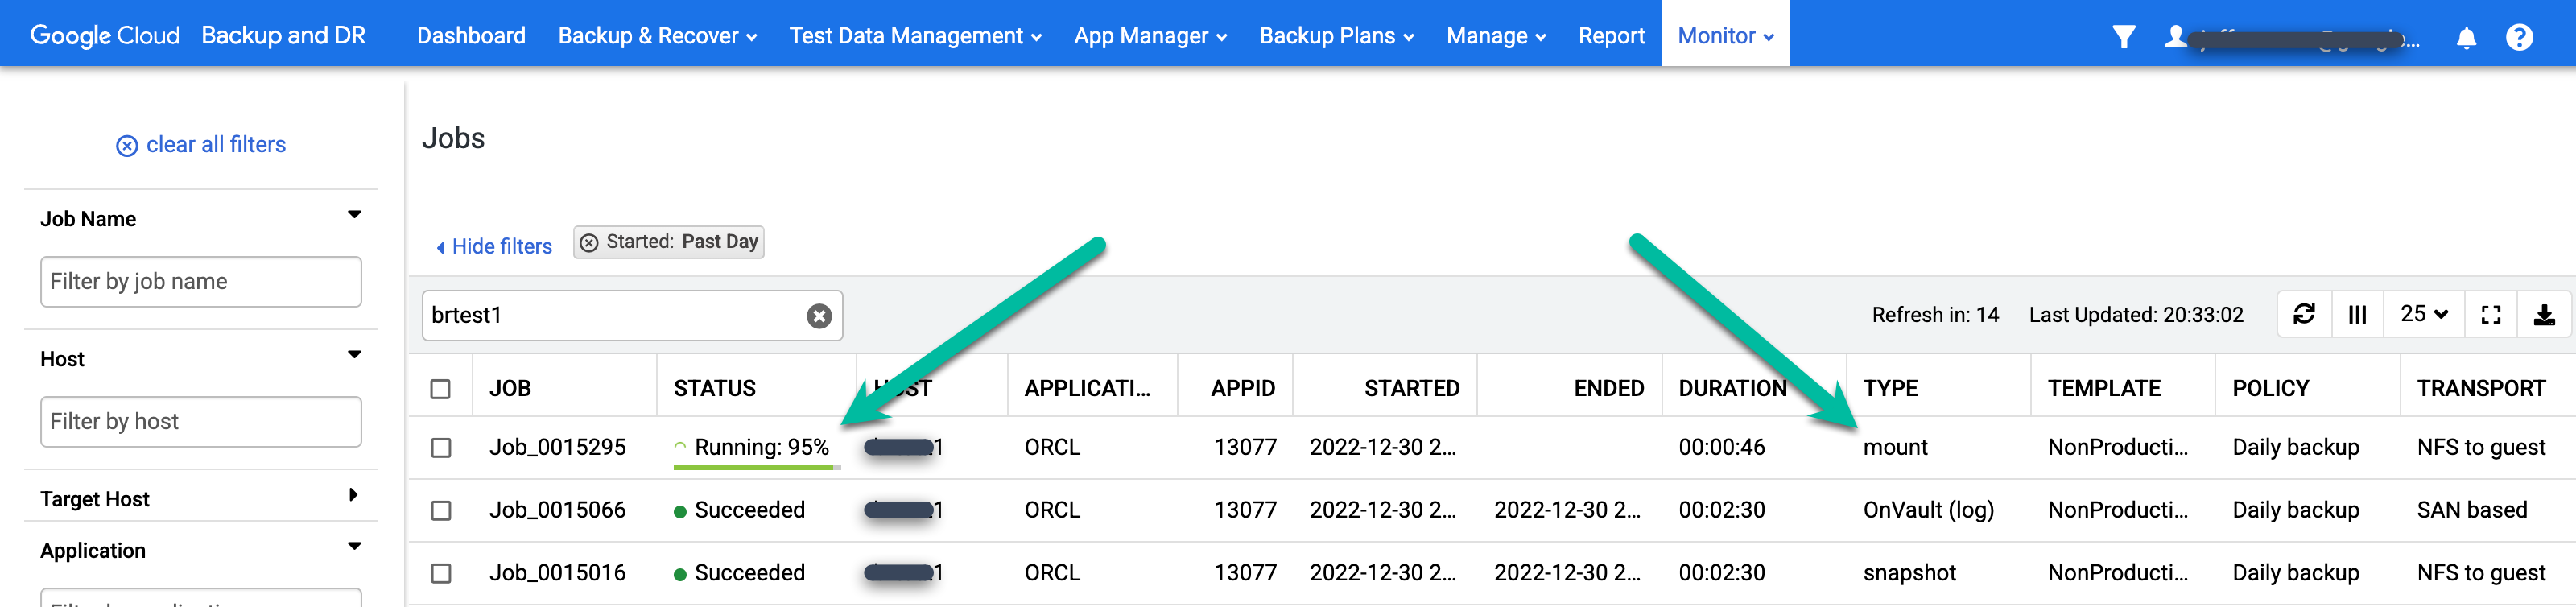
To monitor backup job status, go to the Monitor > Jobs menu and view job status. It can take 5 to 10 seconds for a job to appear in the job list. The following is an example of a running job:

When a job is successful, you can use metadata to view the details for a specific job.
- Apply filters and add search terms to find jobs that interest you. The following example uses the Succeeded and Past Day filters, along with a search for the test1 host.
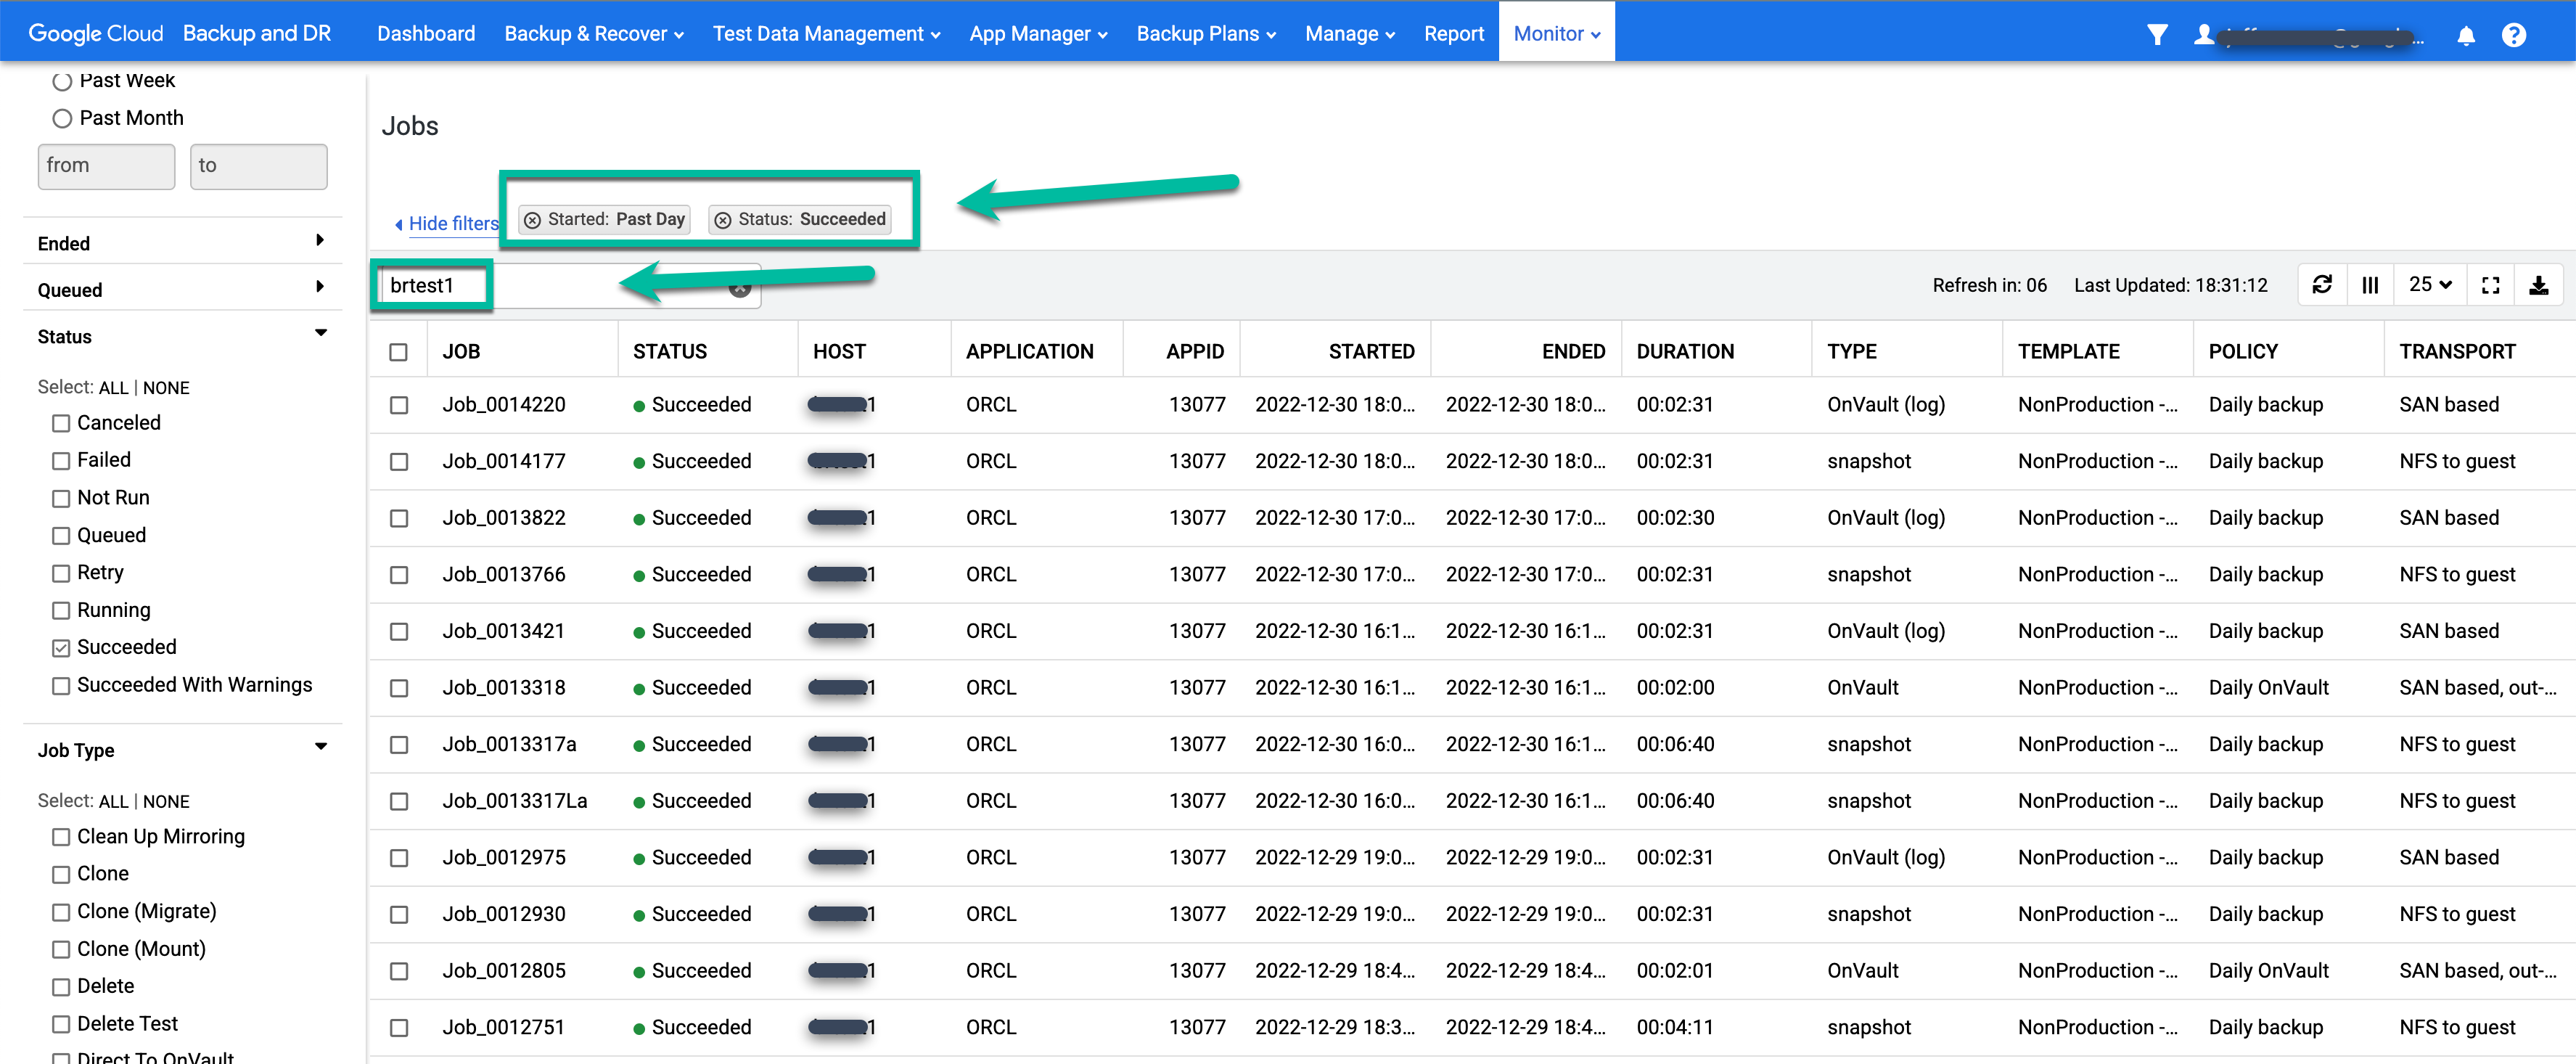
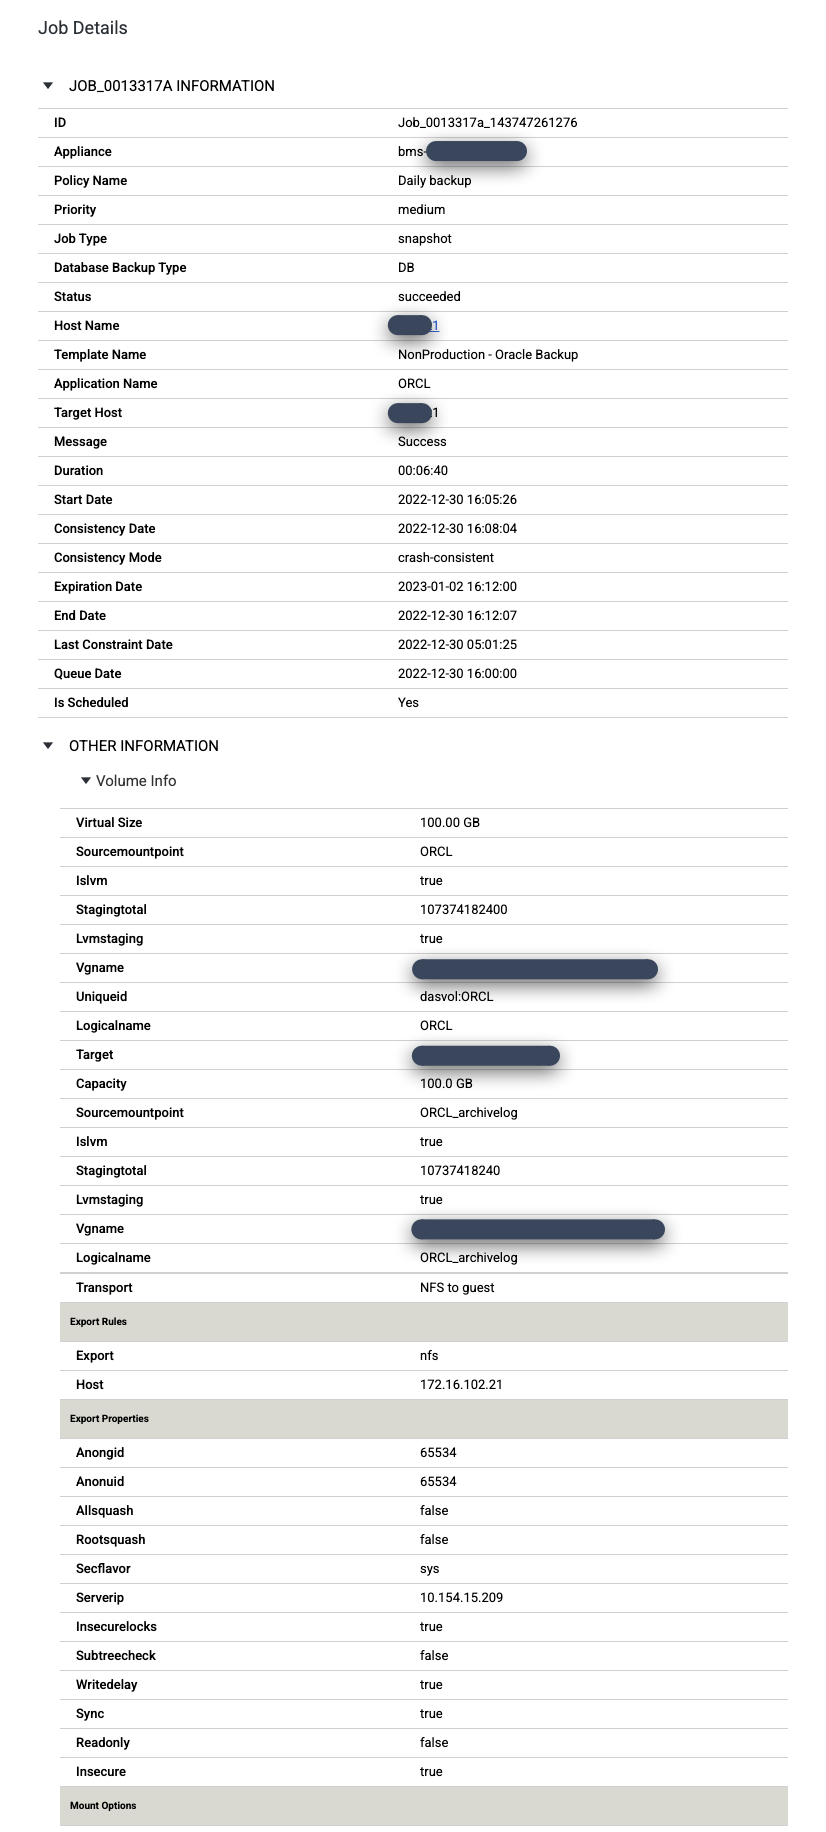
To take a closer look at a specific job, click on the job in the Job column. A new window opens. As you can see in the following example, each backup job captures a large amount of information.
Mount and restore an Oracle database
Google Cloud Backup and DR has a number of different features for accessing a copy of an Oracle database. The two main methods are as follows:
- App aware mounts
- Restores (Mount and migrate, and traditional restore)
Each of these methods have different benefits, so you need to select which one you want to use depending on your use case, performance requirements, and how long you need to retain the database copy. The following sections contain some recommendations for each feature.
App aware mounts
You use mounts to gain rapid access to a virtual copy of an Oracle database. You can configure a mount when performance is not critical, and the database copy lives for only a few hours to a few days.
The key benefit of a mount is that it does not consume large amounts of additional storage. Instead, the mount uses a snapshot from the backup disk pool, which can be a snapshot pool on a Persistent Disk or an OnVault pool in Cloud Storage. Using the virtual copy snapshot feature minimizes the time for accessing the data because the data does not need to be copied first. The backup disk handles all reads, and a disk in the snapshot pool stores all writes. As a result, mounting virtual copies are quick to access, and do not overwrite the backup disk copy. Mounts are ideal for development, testing, and DBA activities where schema changes or updates need to be validated before rolling them out to production.
Mount an Oracle database
In the Backup and DR management console, go to the Backup and Recover > Recover page.
https://bmc-PROJECT_NUMBER-GENERATED_ID-dot-REGION.backupdr.googleusercontent.com/#recover/selectapp
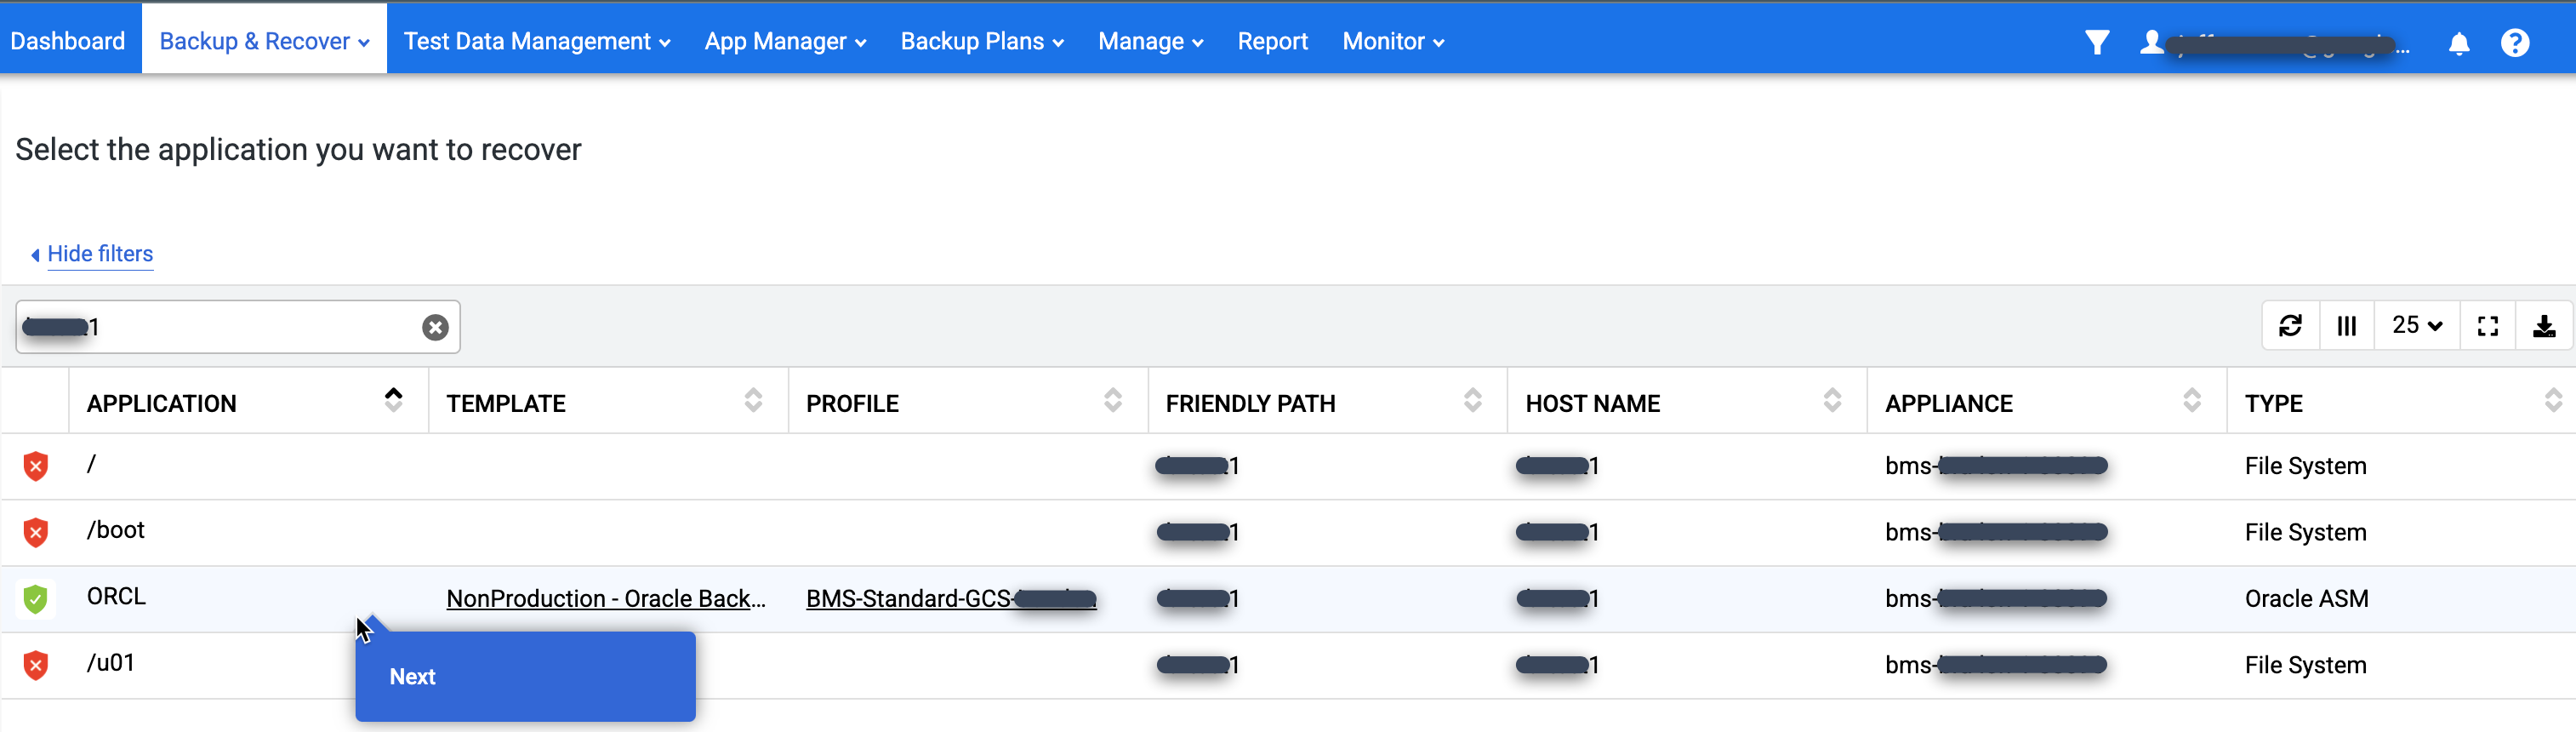
In the Application list, find the database that you want to mount, right-click the database name, and click Next:

The Timeline Ramp View appears and displays all the available point-in-time images. You can also scroll back to see long term retention images if they don't appear in the ramp view. The system selects the newest image by default.

If you prefer to see a table view for the point-in-time images, click the Table option to change the view:
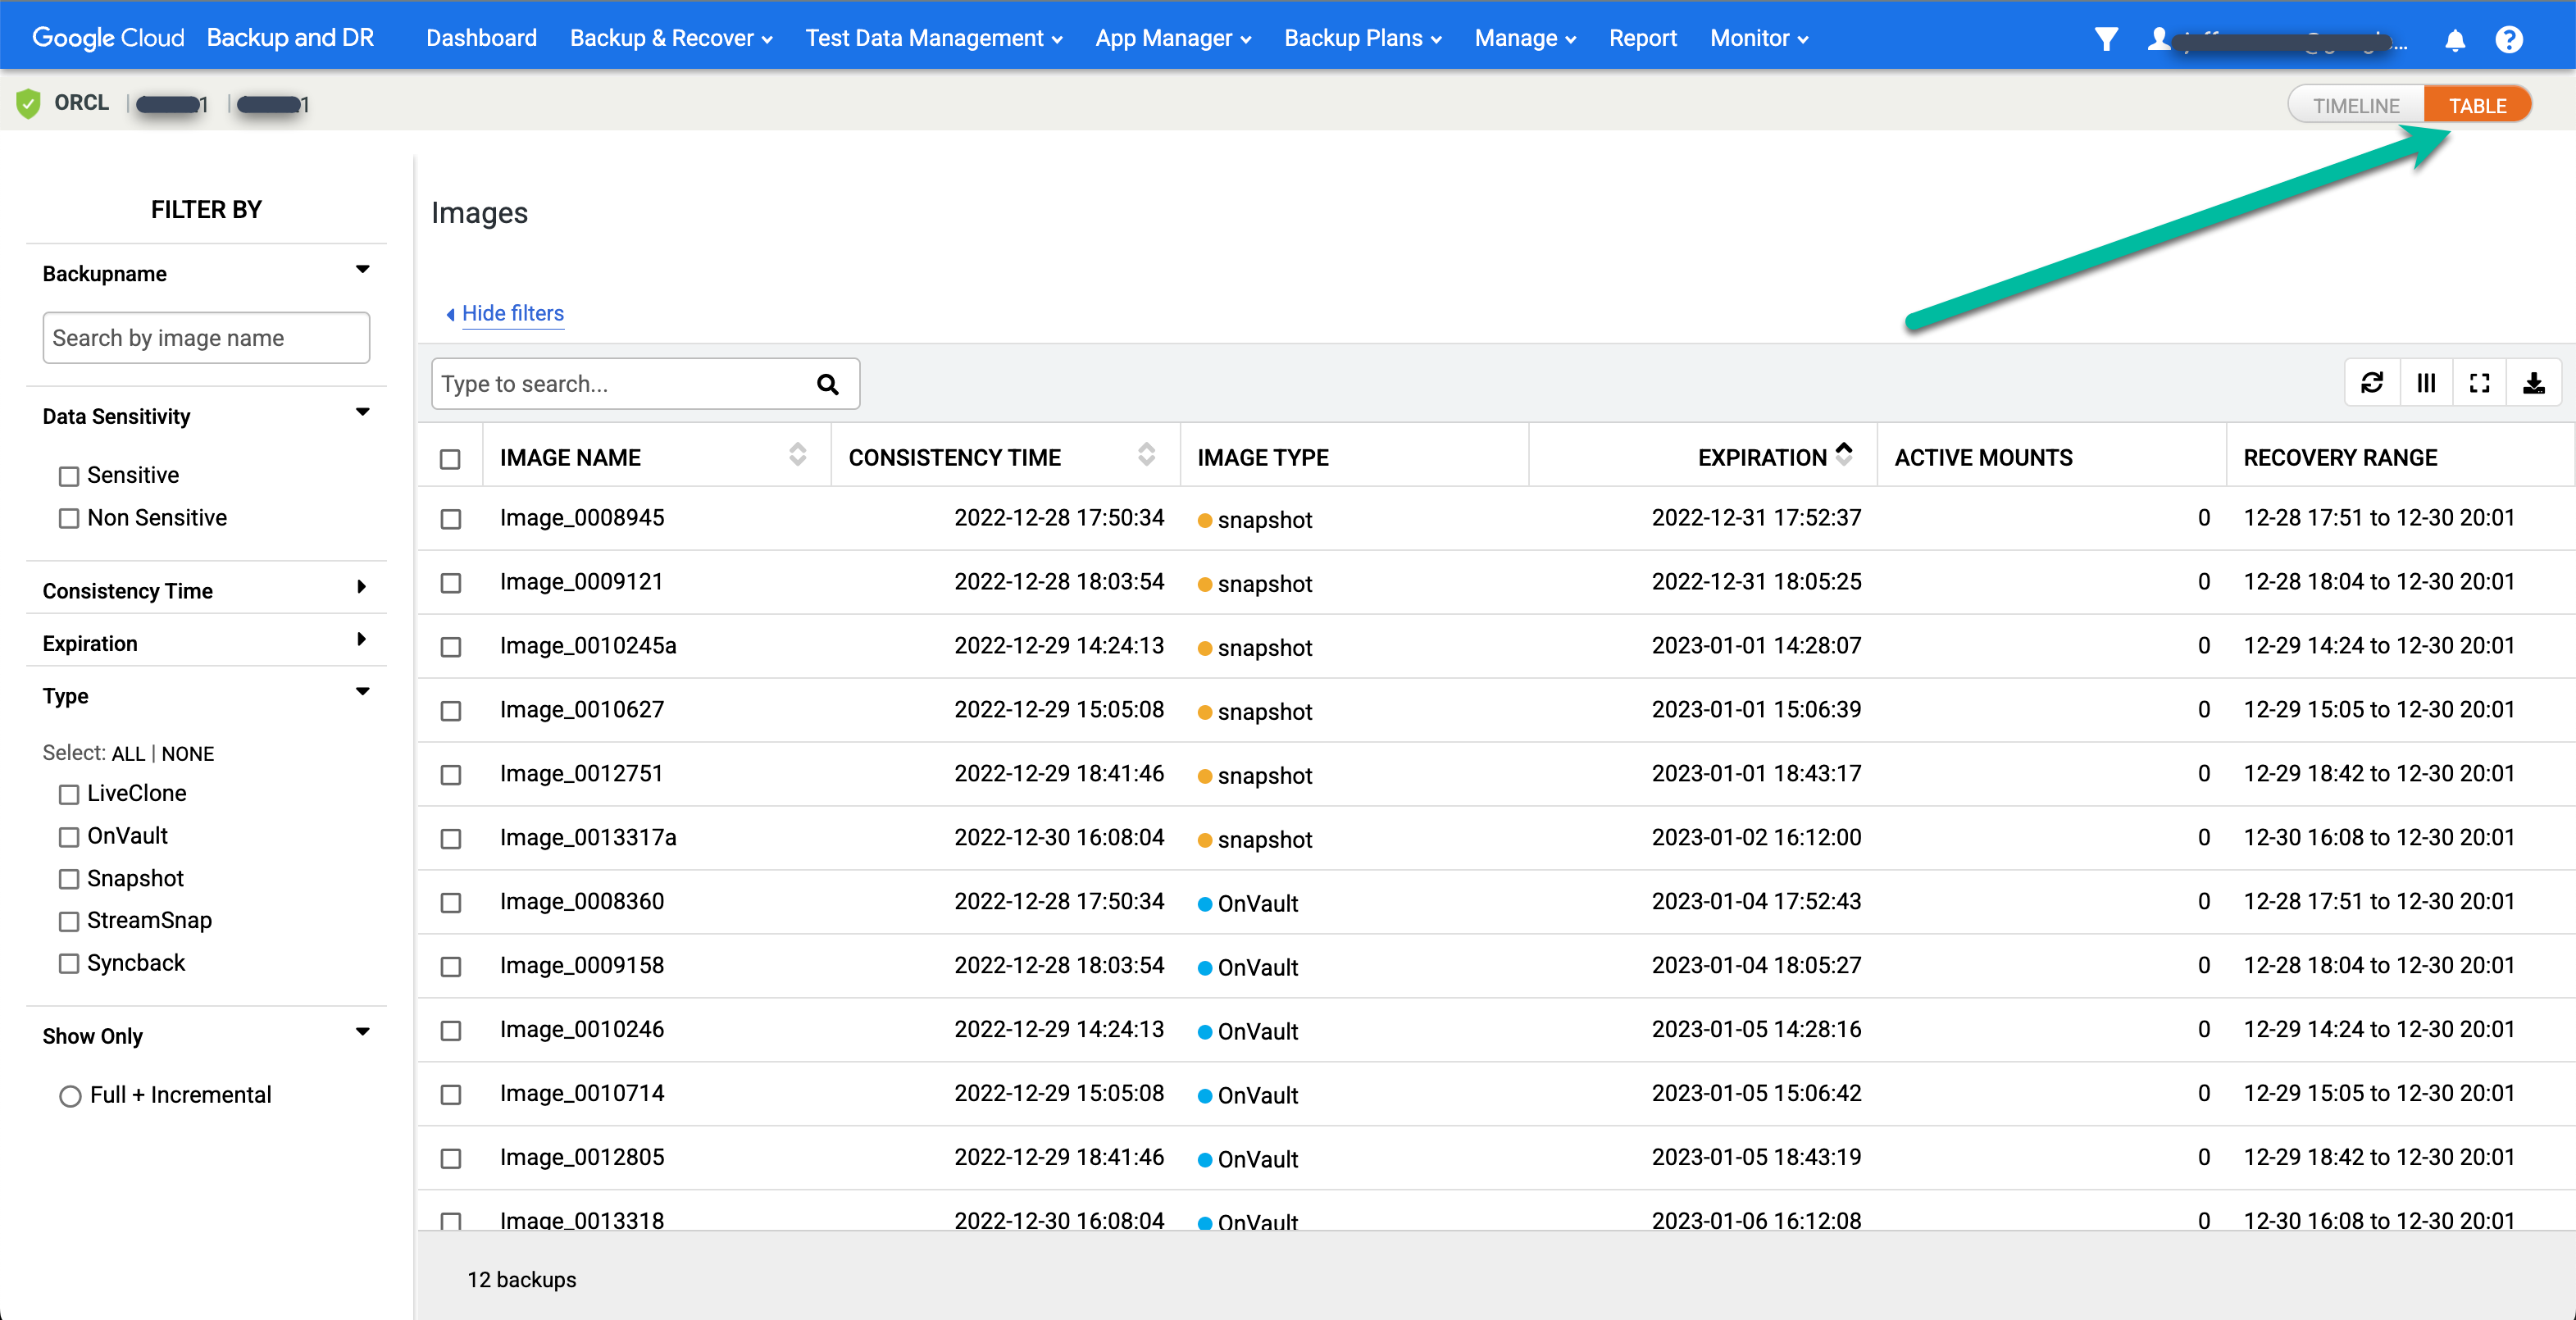
Find your desired image and select Mount:

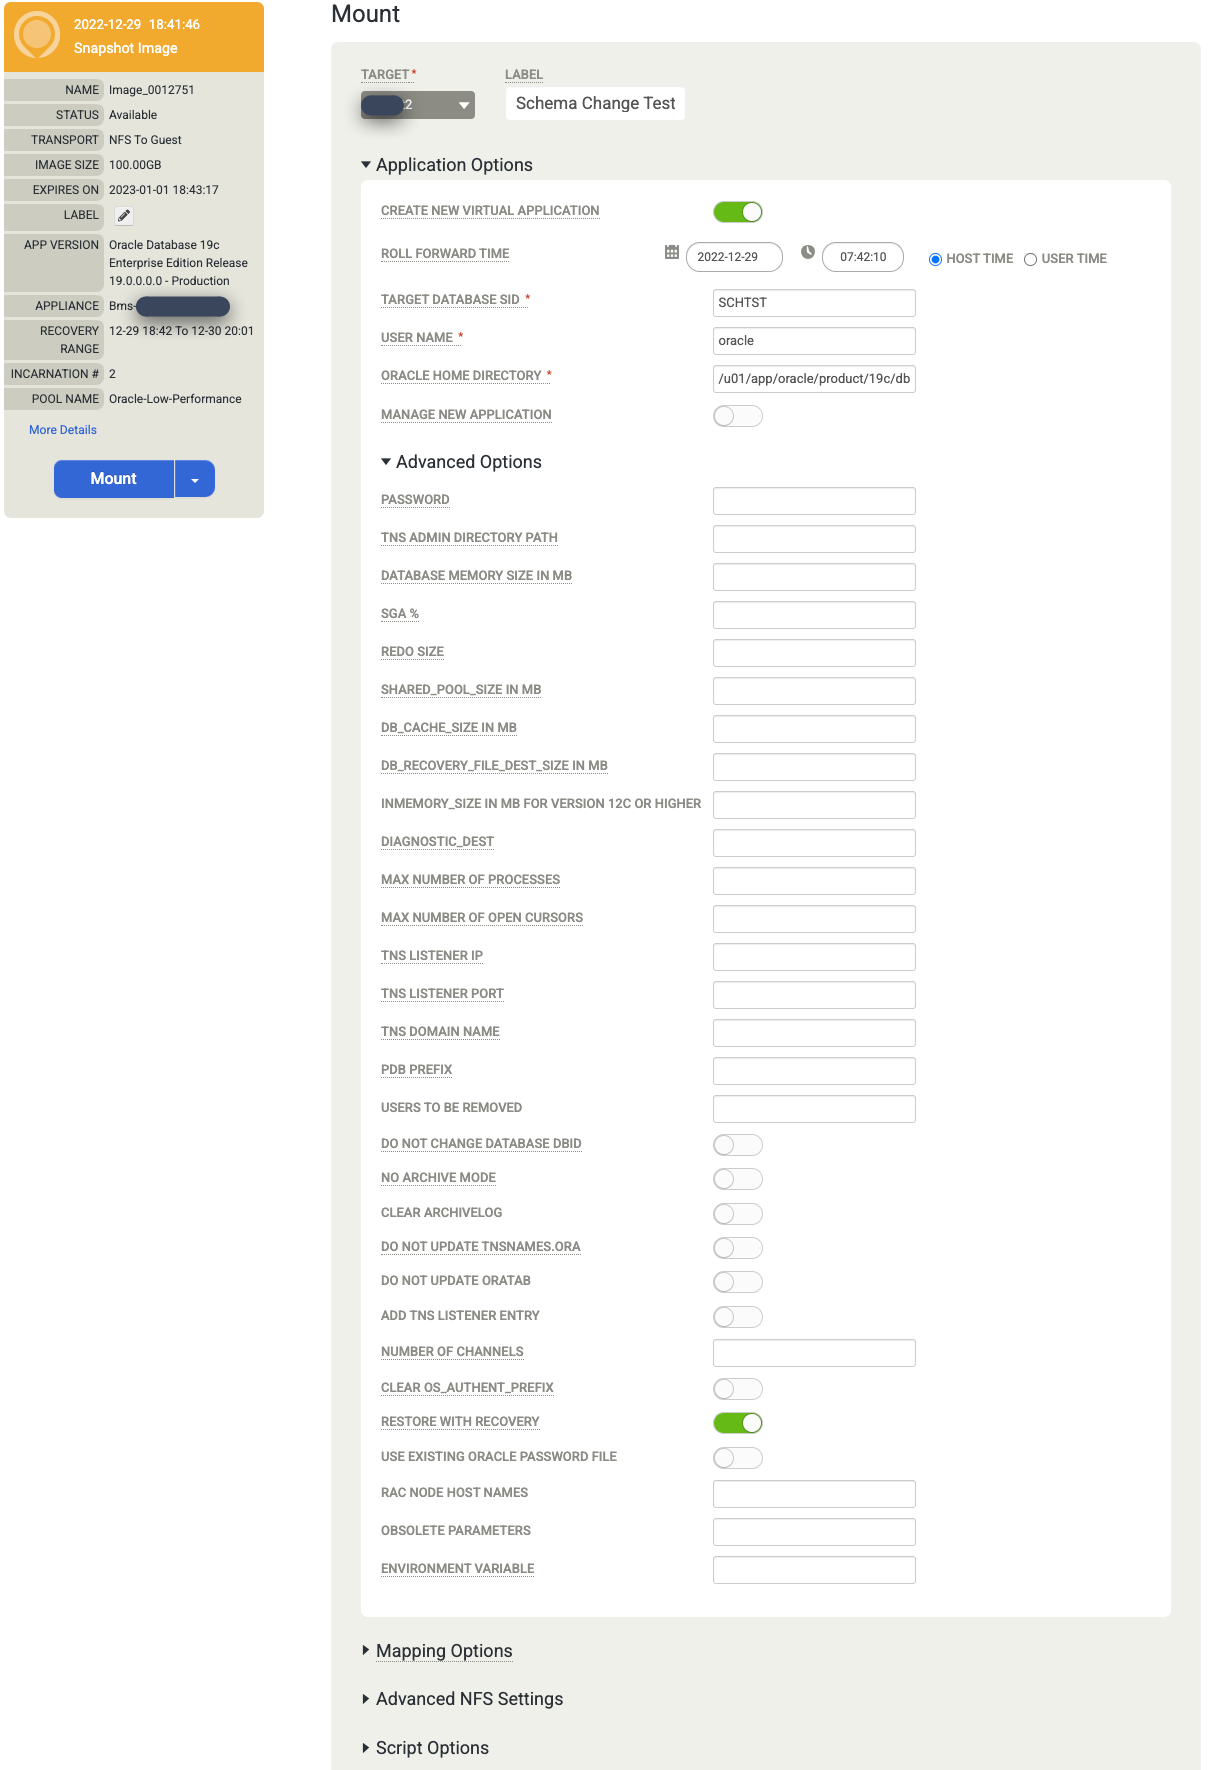
Choose the Application Options for the database you mount.
- Select the Target Host from the drop-down menu. Hosts appear in this list if you added them previously.
- (Optional) Enter a label.
- In the Target Database SID field, enter the identifier for the target database.
- Set the User Name to oracle. This name becomes the OS user name for authentication.
- Enter the Oracle Home Directory. For this example, use
/u01/app/oracle/product/19c/dbhome_1. - If you configure the database logs to be backed up, the Roll Forward Time becomes available. Click the clock/time selector and choose the roll forward point.
- Restore with Recovery is enabled by default. This option mounts and opens the database for you.
When you finish entering the information, click Submit to start the mounting process.
Monitor job progress and success
You can monitor the running job by going to the Monitor > Jobs page.
https://bmc-PROJECT_NUMBER-GENERATED_ID-dot-REGION.backupdr.googleusercontent.com/#jobs
The page shows the status and job type.
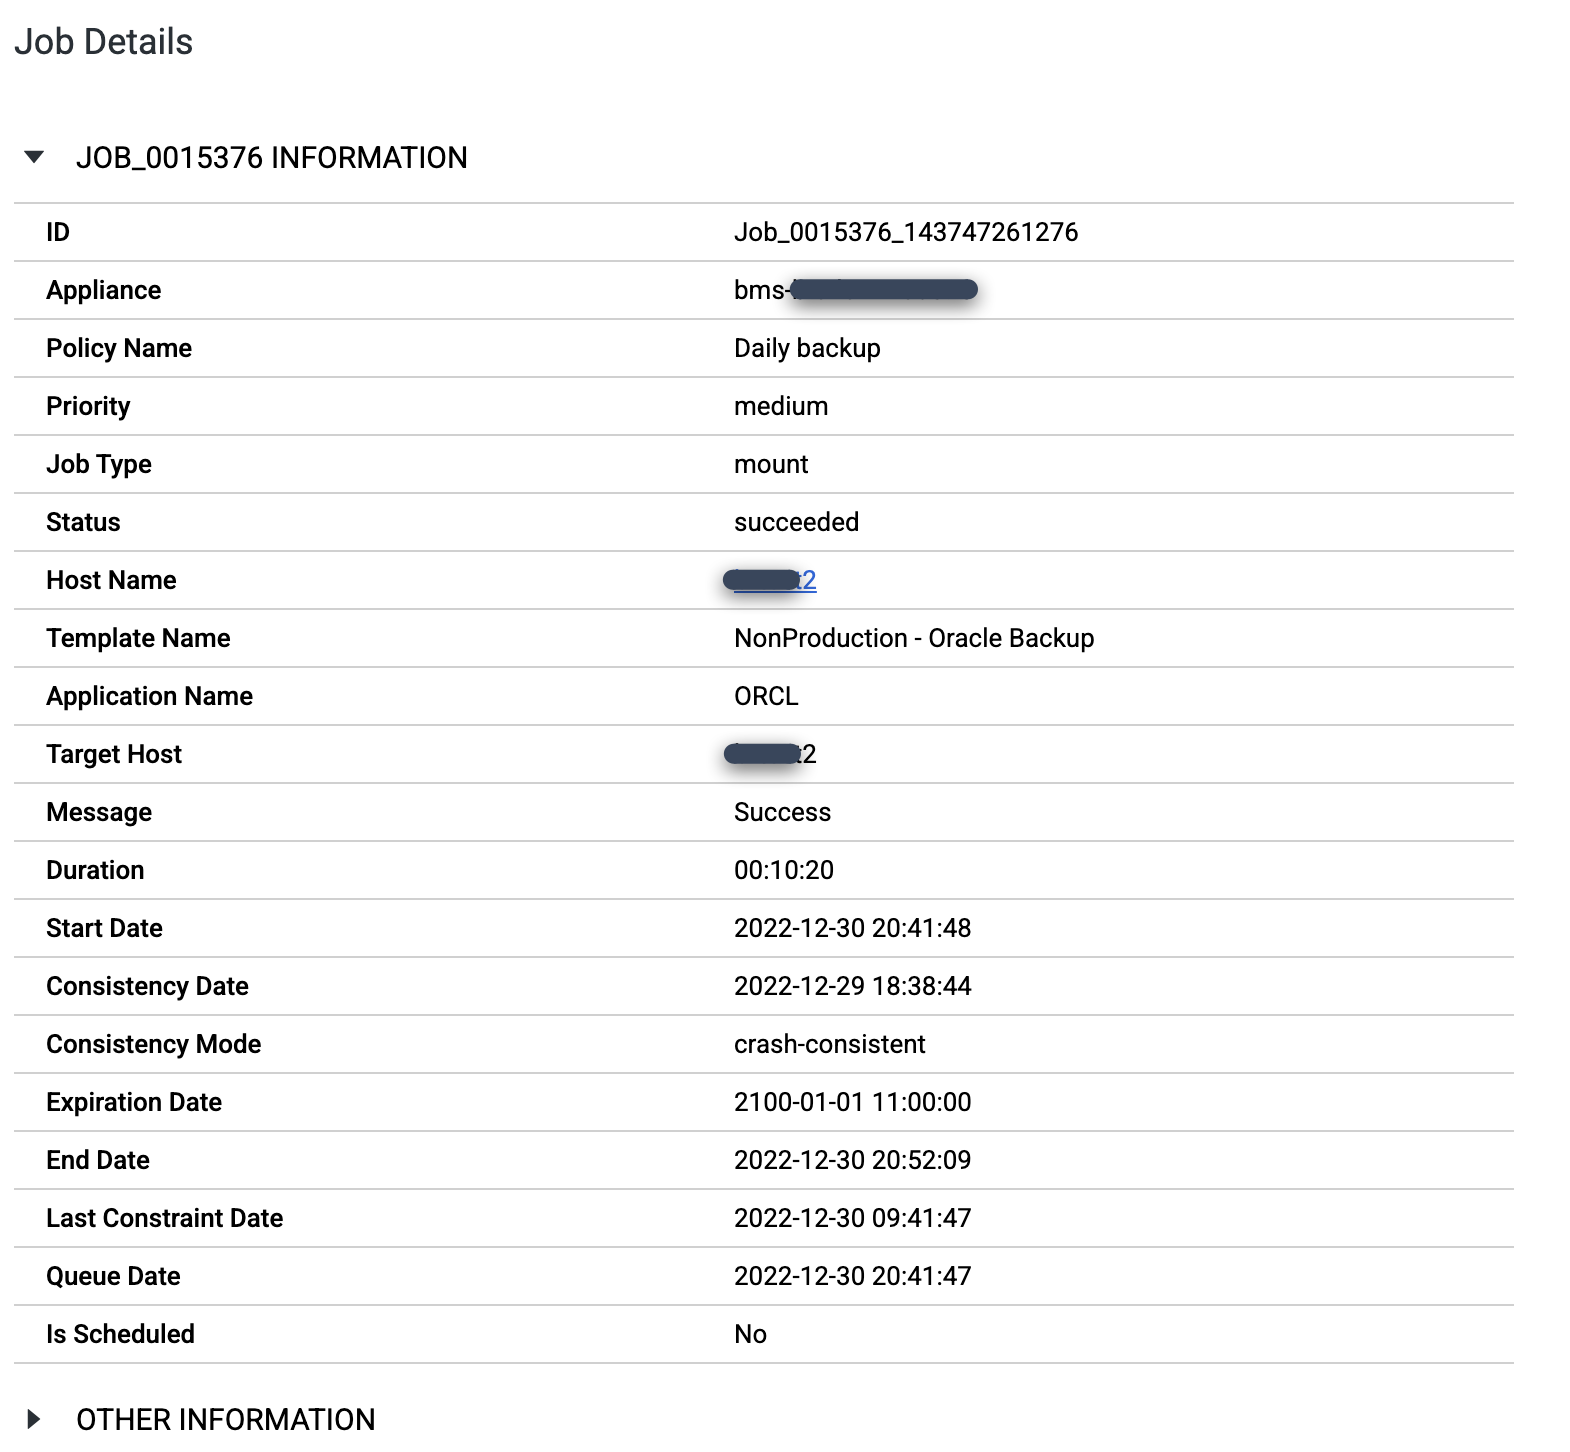
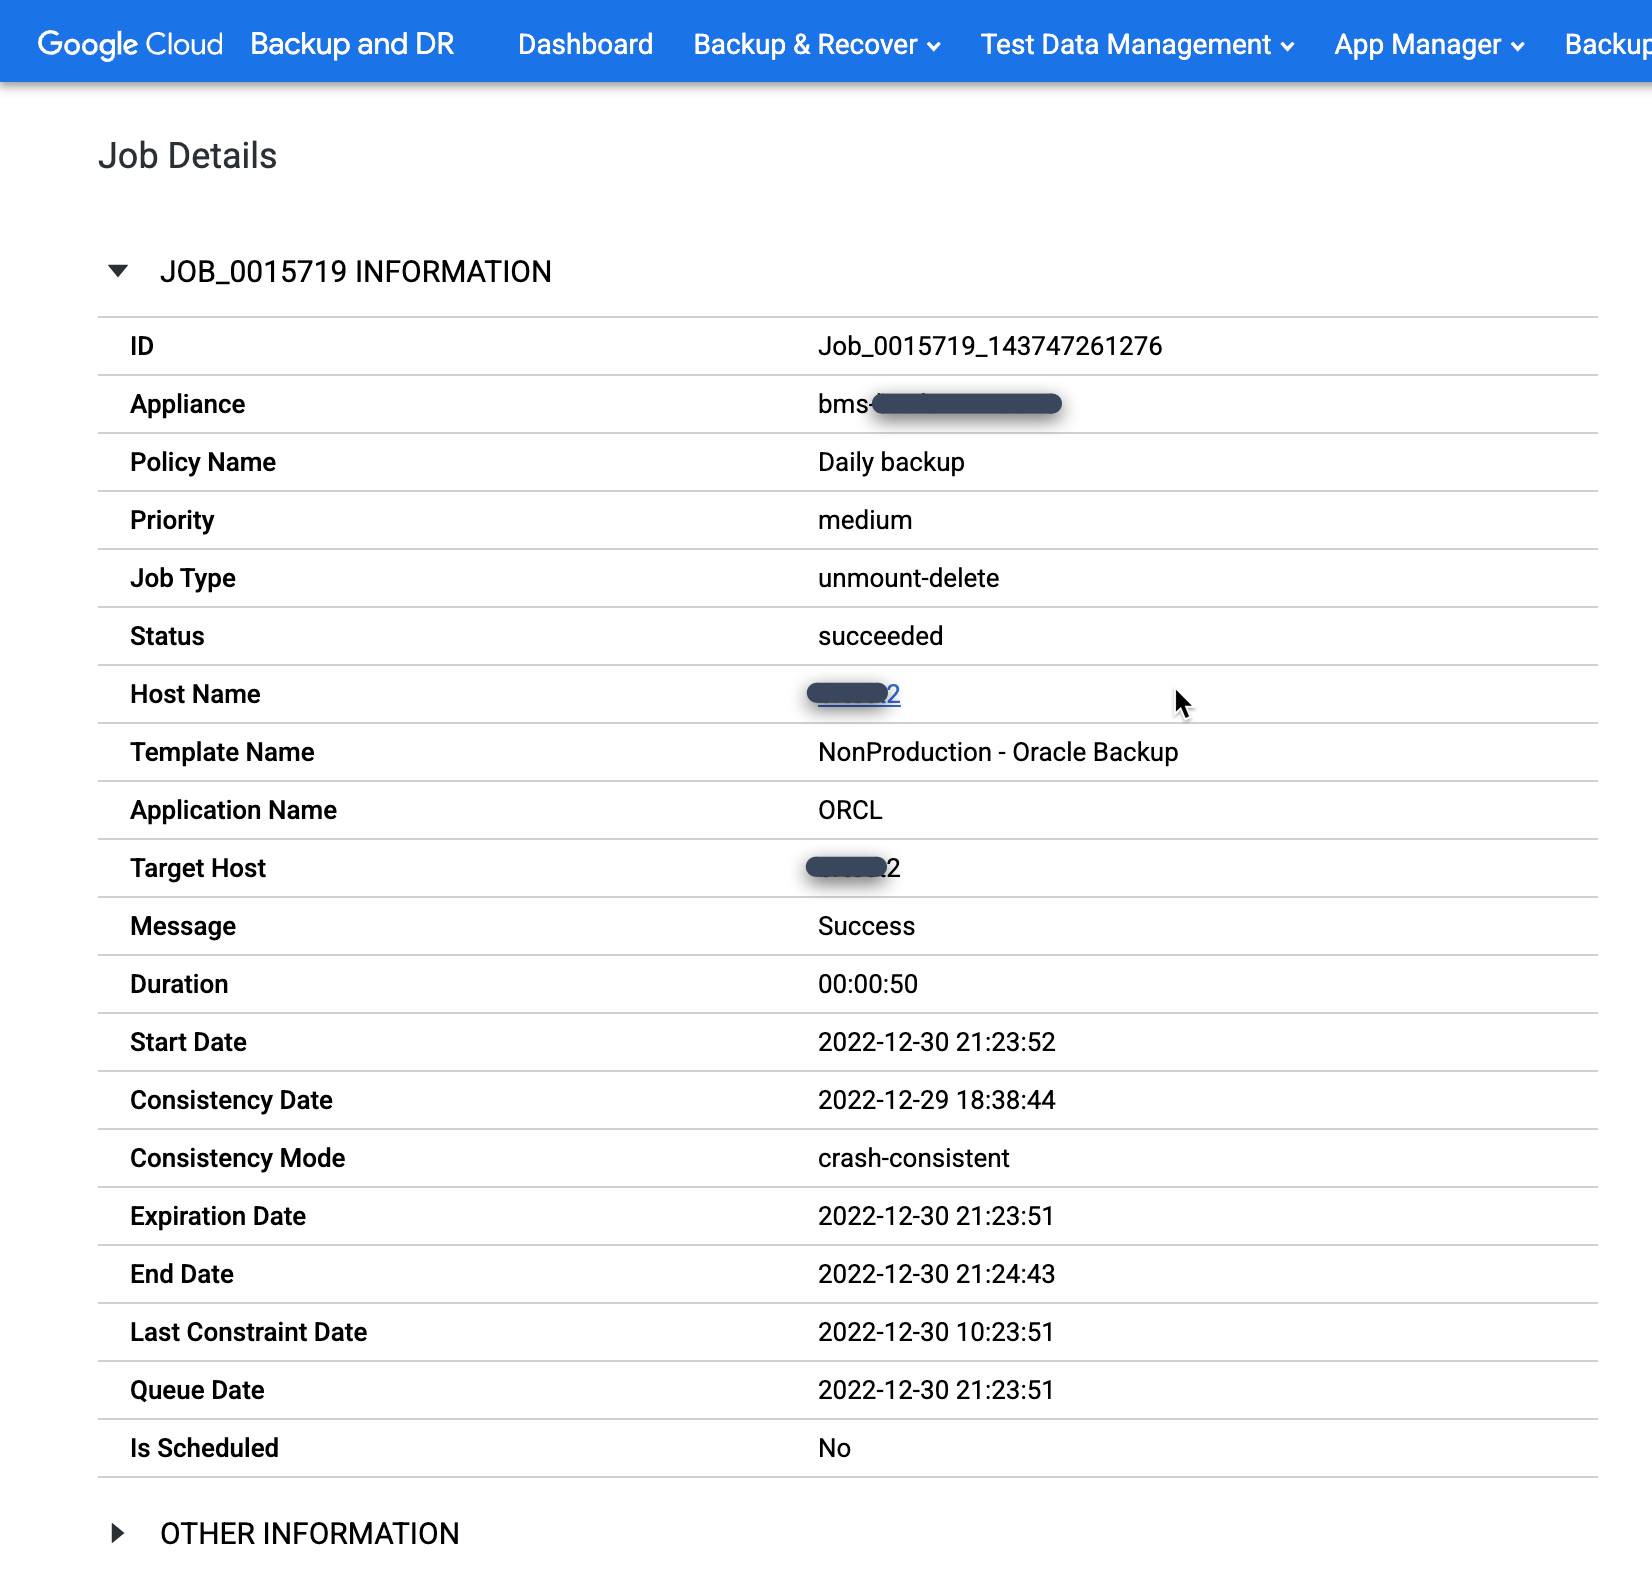
When the mount job completes, you can view job details by clicking the Job Number:
To view the pmon processes for the SID you created, log in to the target host and issue the
ps -ef |grep pmoncommand. In the following output example, the SCHTEST database is operational and has a process ID of 173953.[root@test2 ~]# ps -ef |grep pmon oracle 1382 1 0 Dec23 ? 00:00:28 asm_pmon_+ASM oracle 56889 1 0 Dec29 ? 00:00:06 ora_pmon_ORCL oracle 173953 1 0 09:51 ? 00:00:00 ora_pmon_SCHTEST root 178934 169484 0 10:07 pts/0 00:00:00 grep --color=auto pmon
Unmount an Oracle database
After you finish using the database, you should unmount and delete the database. There are two methods to find a mounted database:
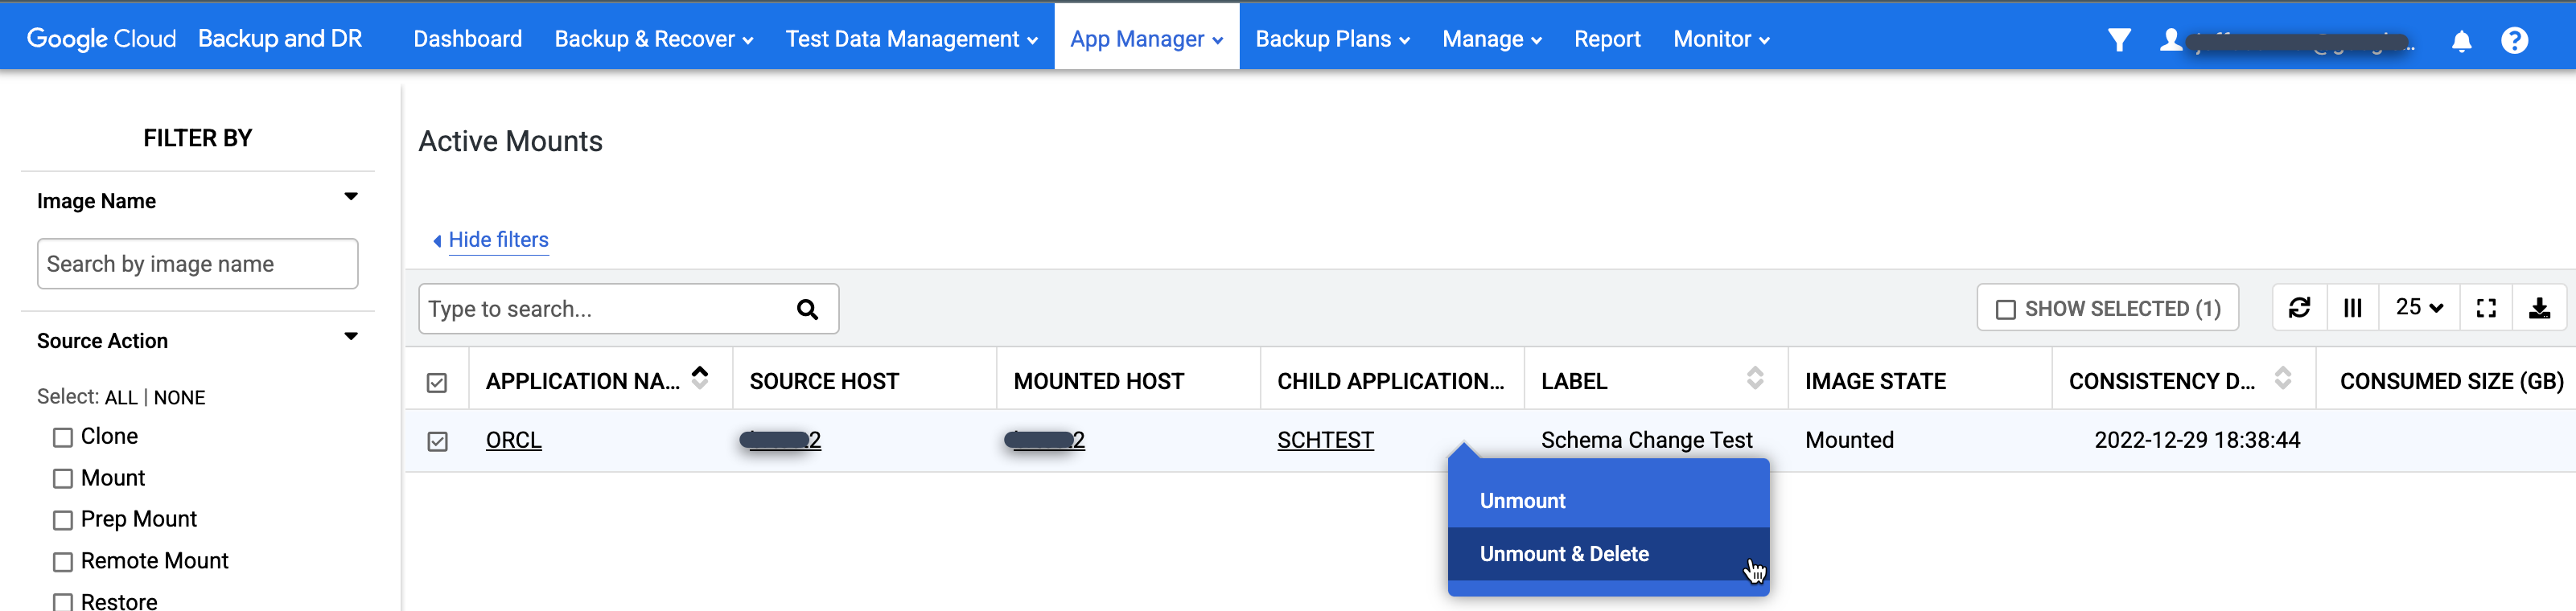
Go to App Manager > Active Mounts page.
https://bmc-PROJECT_NUMBER-GENERATED_ID-dot-REGION.backupdr.googleusercontent.com/#activemounts
This page contains a global view of all mounted applications (file systems and databases) currently in use.
Right-click the mount you want to clean up and select Unmount and Delete from the menu. This action will not delete backup data. It only removes the virtual mounted database from the target host and the snapshot cache disk that contained the stored writes for the database.
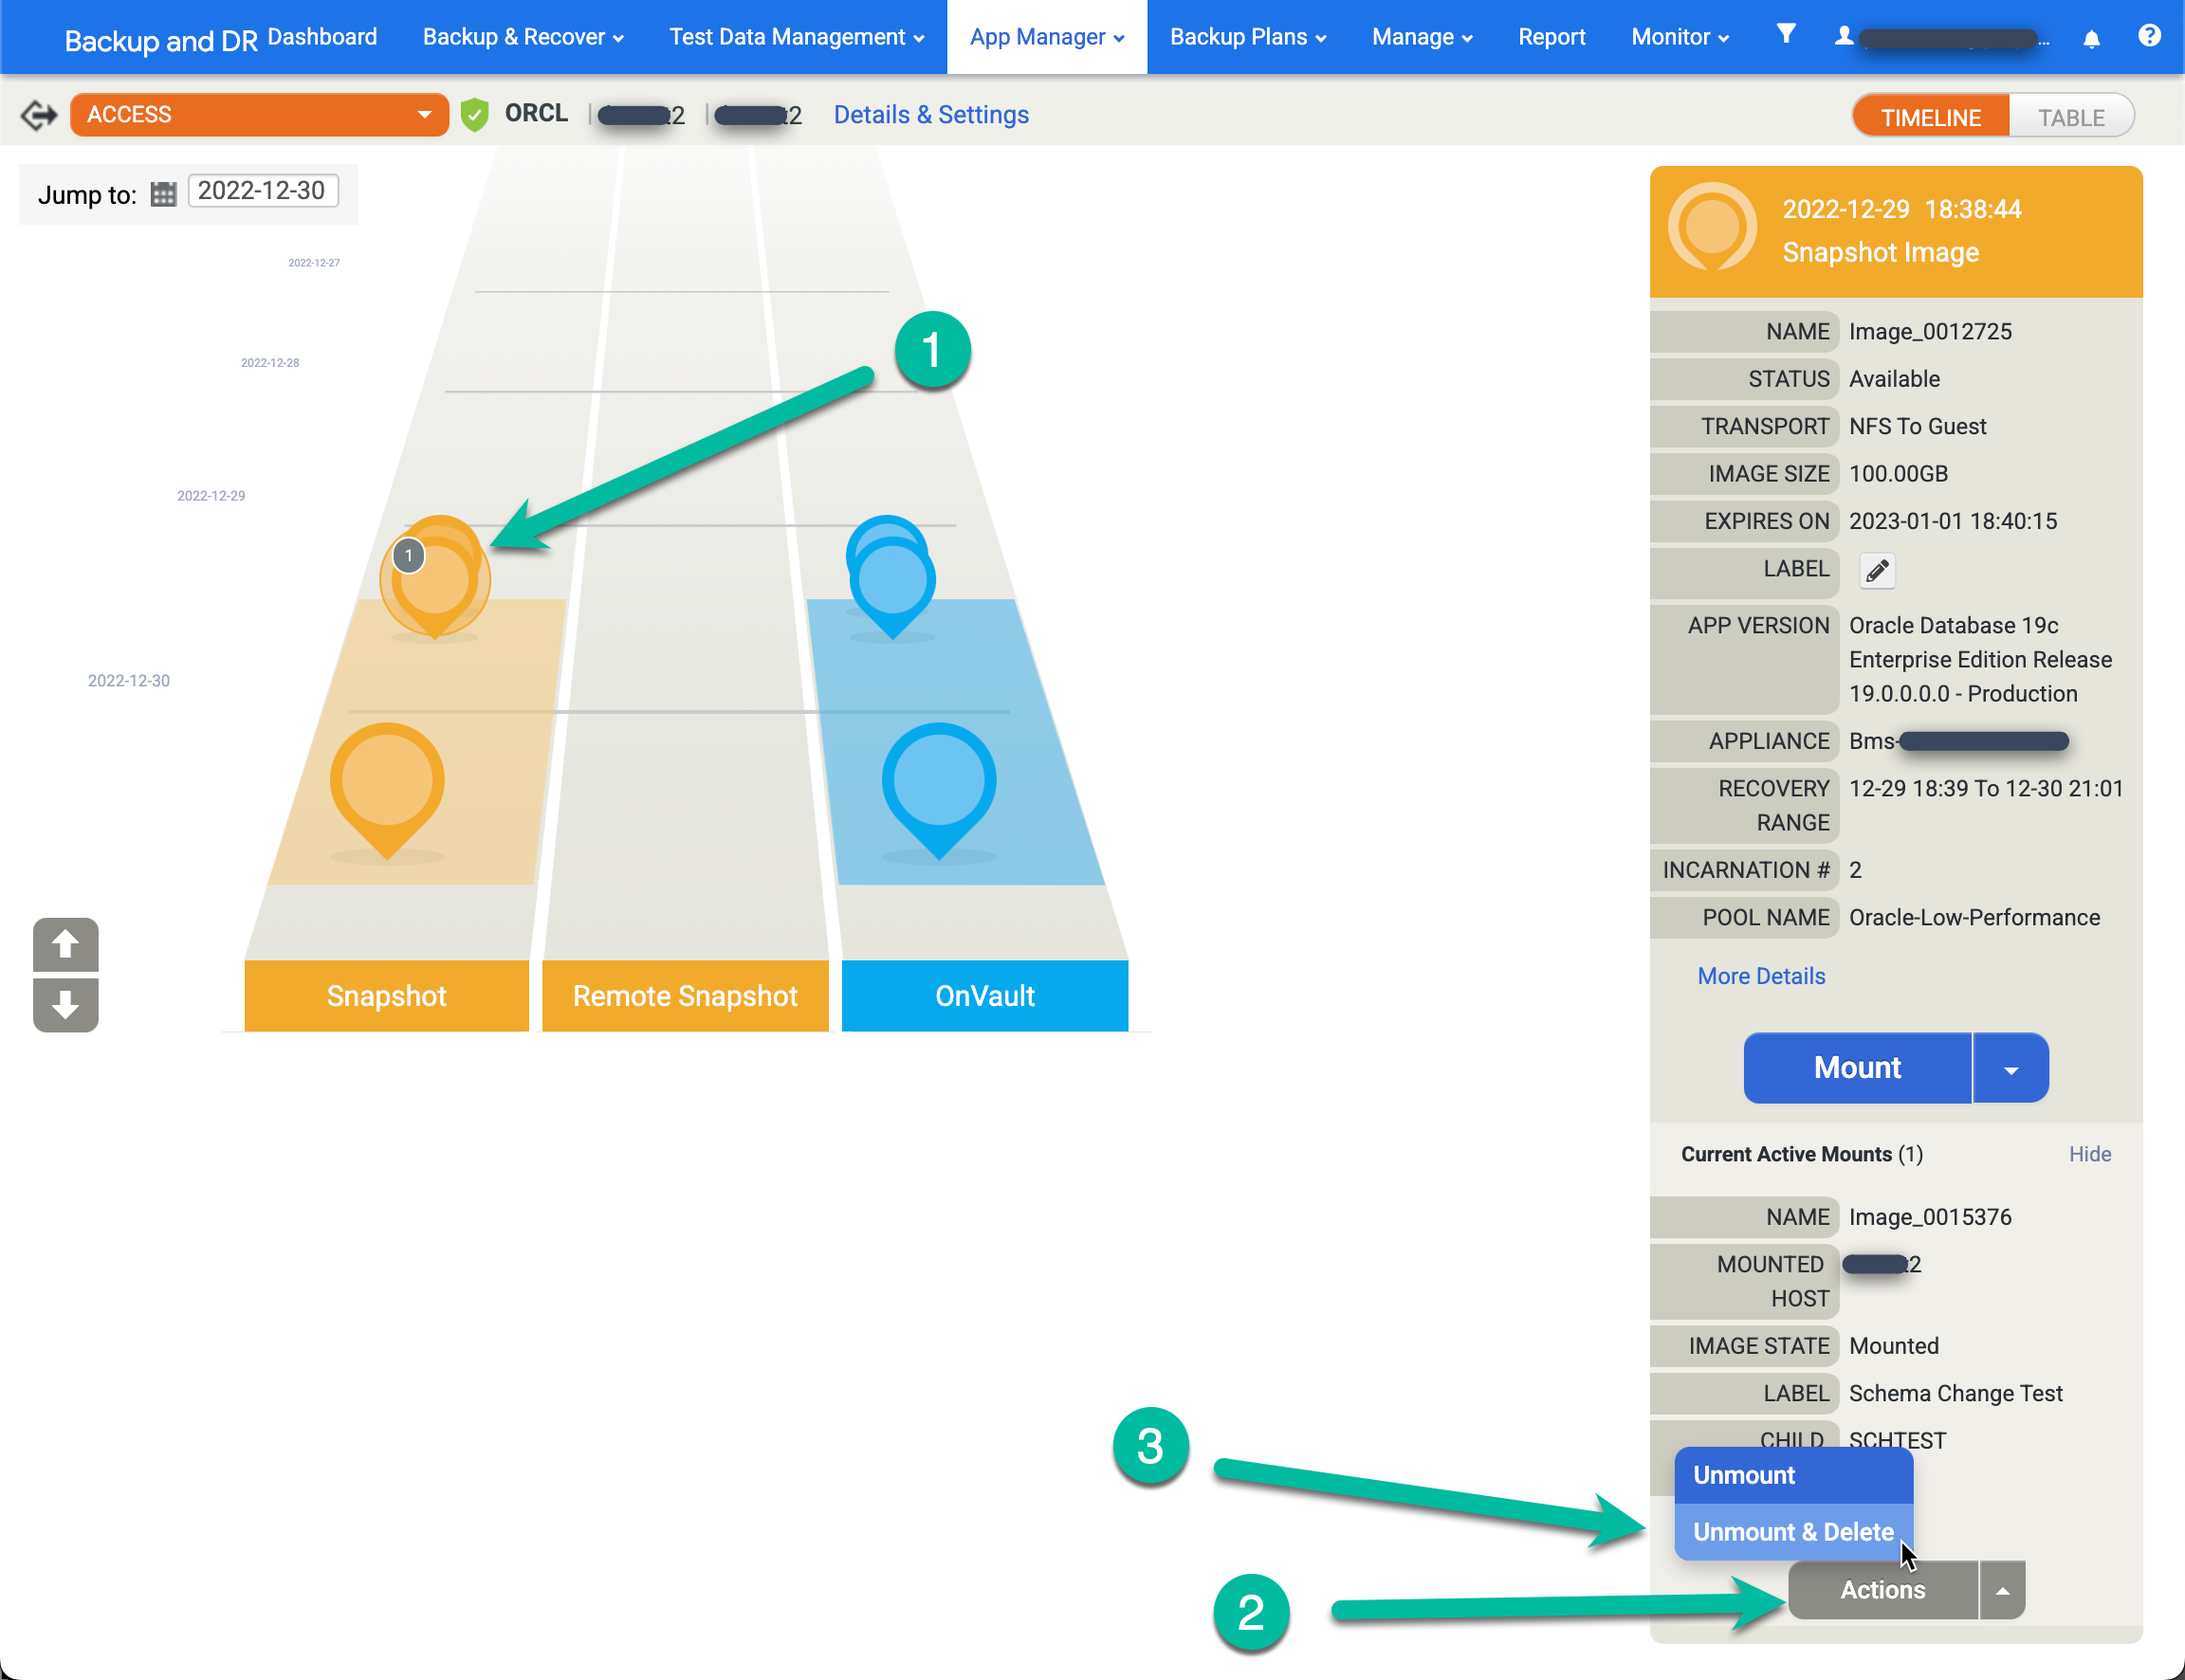
Go to App Manager > Applications page.
https://bmc-PROJECT_NUMBER-GENERATED_ID-dot-REGION.backupdr.googleusercontent.com/#applications
- Right-click the source app (database) and select Access.
- On the left hand ramp, you see a gray circle with a number inside which indicates the Number of active mounts from this point in time. Click that image and a new menu appears.
- Click Actions.
- Click Unmount and Delete.
- Click Submit and confirm this action on the next screen.
A few minutes later, the system removes the database from the target host, and cleans up and removes all disks. This action frees up any disk space in the snapshot pool being used for writes to the redo disk for active mounts.
You can monitor unmounted jobs the same as any other job. Go to the Monitor > Jobs menu to monitor the progress of the job being unmounted and confirm that the job completes.
https://bmc-PROJECT_NUMBER-GENERATED_ID-dot-REGION.backupdr.googleusercontent.com/#jobs
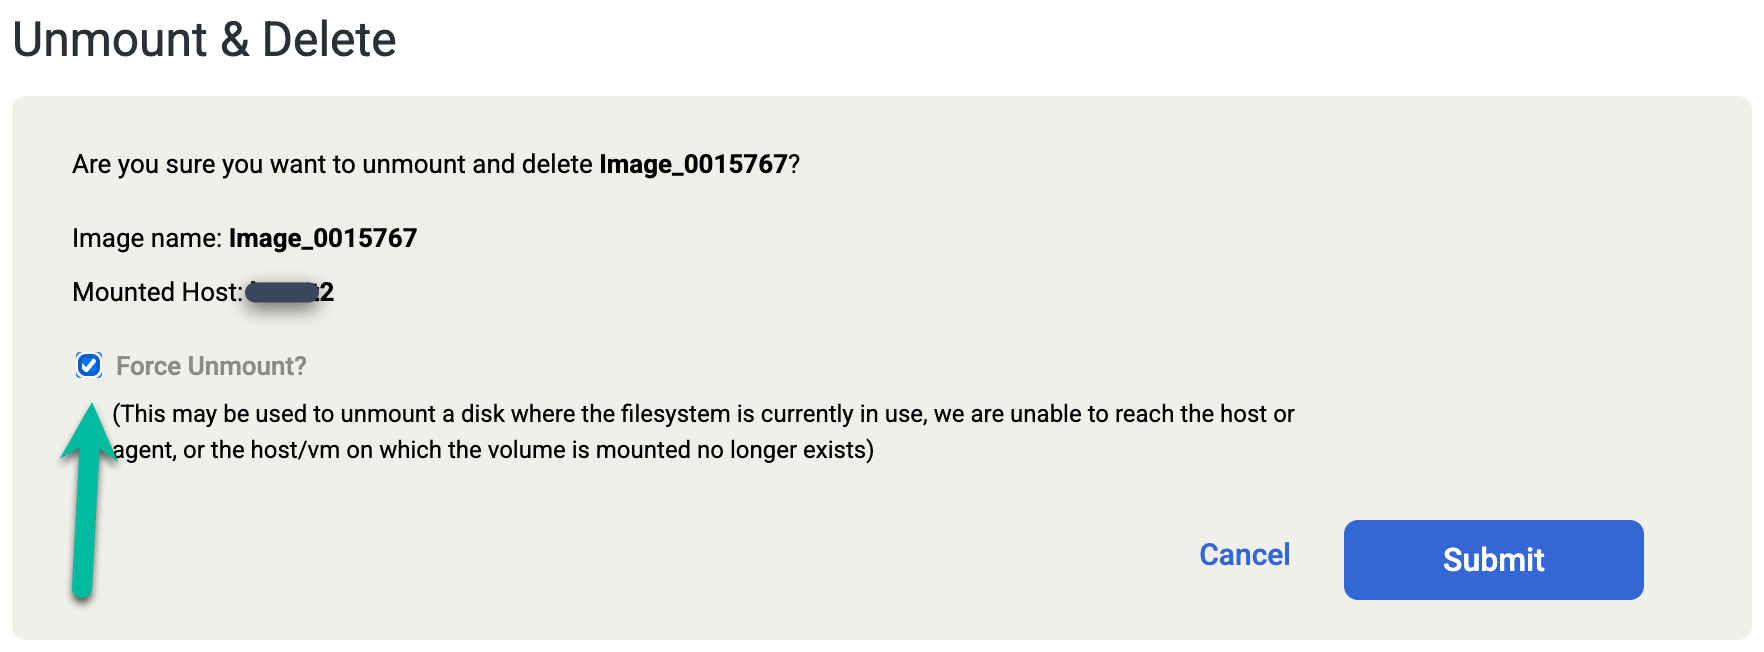
If you accidentally delete the Oracle database manually, or shutdown the database before you run the Unmount and Delete job, perform the Unmount and Delete job again and select the Force Unmount option on the confirmation screen. This action forcibly removes the redo staging disk from the target host and deletes the disk from the snapshot pool.
Restores
You use restores to recover production databases when an issue or corruption occurs and you need to copy all files for the database to a local host from a backup copy. You normally perform a restore after a disaster type event, or for non-production testing copies. In such an instance, your customers typically need to wait for you to copy the previous files back to the source host before they restart their databases. However, Google Cloud Backup and DR also supports a restore feature (copy files and start database), and a mount and migrate feature, where you mount the database (time to access is quick), and you can copy data files to the local machine while the database is mounted and accessible. The mount and migrate feature is useful for low recovery time objective (RTO) scenarios.
Mount and migrate
Mount and migrate-based recovery has two phases:
- Phase 1–The restore mount phase provides instant access to the database by starting from the mounted copy.
- Phase 2–The restore migration phase migrates the database to the production storage location while the database is online.
Restore mount - Phase 1
This phase gives you instant access to the database from a selected image presented by the backup/recovery appliance.
- A copy of the selected backup image is mapped to the target database server and presented to the ASM or file system layer based on the source database backup image format.
- Use the RMAN API to perform the following tasks:
- Restore the Control file and Redo Log file to the specified local control file and redo file location (ASM diskgroup or file system).
- Switch the database to the copy of the image presented by the backup/recovery appliance.
- Roll-forward all available archive logs to the specified recovery point.
- Open the database in read and write mode.
- The database runs from the mapped copy of the backup image presented by the backup/recovery appliance.
- The Control File and the Redo Log file of the database gets placed on the selected local production storage location (ASM diskgroup or file system) on the target.
- After a successful restore mount operation, the database becomes available for production operations. You can use the Oracle online datafile move API to move the data back to the production storage location (ASM disk group or file system) while the database and application are up and running.
Restore migration - Phase 2
Moves the database datafile online to the production storage:
- Data migration runs in the background. Use the Oracle online datafile move API to migrate the data.
- You move the datafiles from the Backup and DR presented copy of the backup image to the selected target database storage (ASM diskgroup or file system).
- When the migration job completes, the system removes and unmaps the Backup and DR-presented backup image copy (ASM diskgroup or file system) from the target, and the database runs from your production storage.
For more information about mount and migrate recovery, see: Mount and migrate an Oracle backup image for instant recovery to any target.
Restore an Oracle database
In the Backup and DR management console, go to the Backup and Recover > Recover page.
https://bmc-PROJECT_NUMBER-GENERATED_ID-dot-REGION.backupdr.googleusercontent.com/#recover/selectapp
In the Application list, right-click the name of the database that you want to restore and select Next:
The Timeline Ramp View appears, displaying all the available point-in-time images. You can also scroll back if you need to view the long-term retention images that don't appear in the ramp. The system always selects the newest image by default.
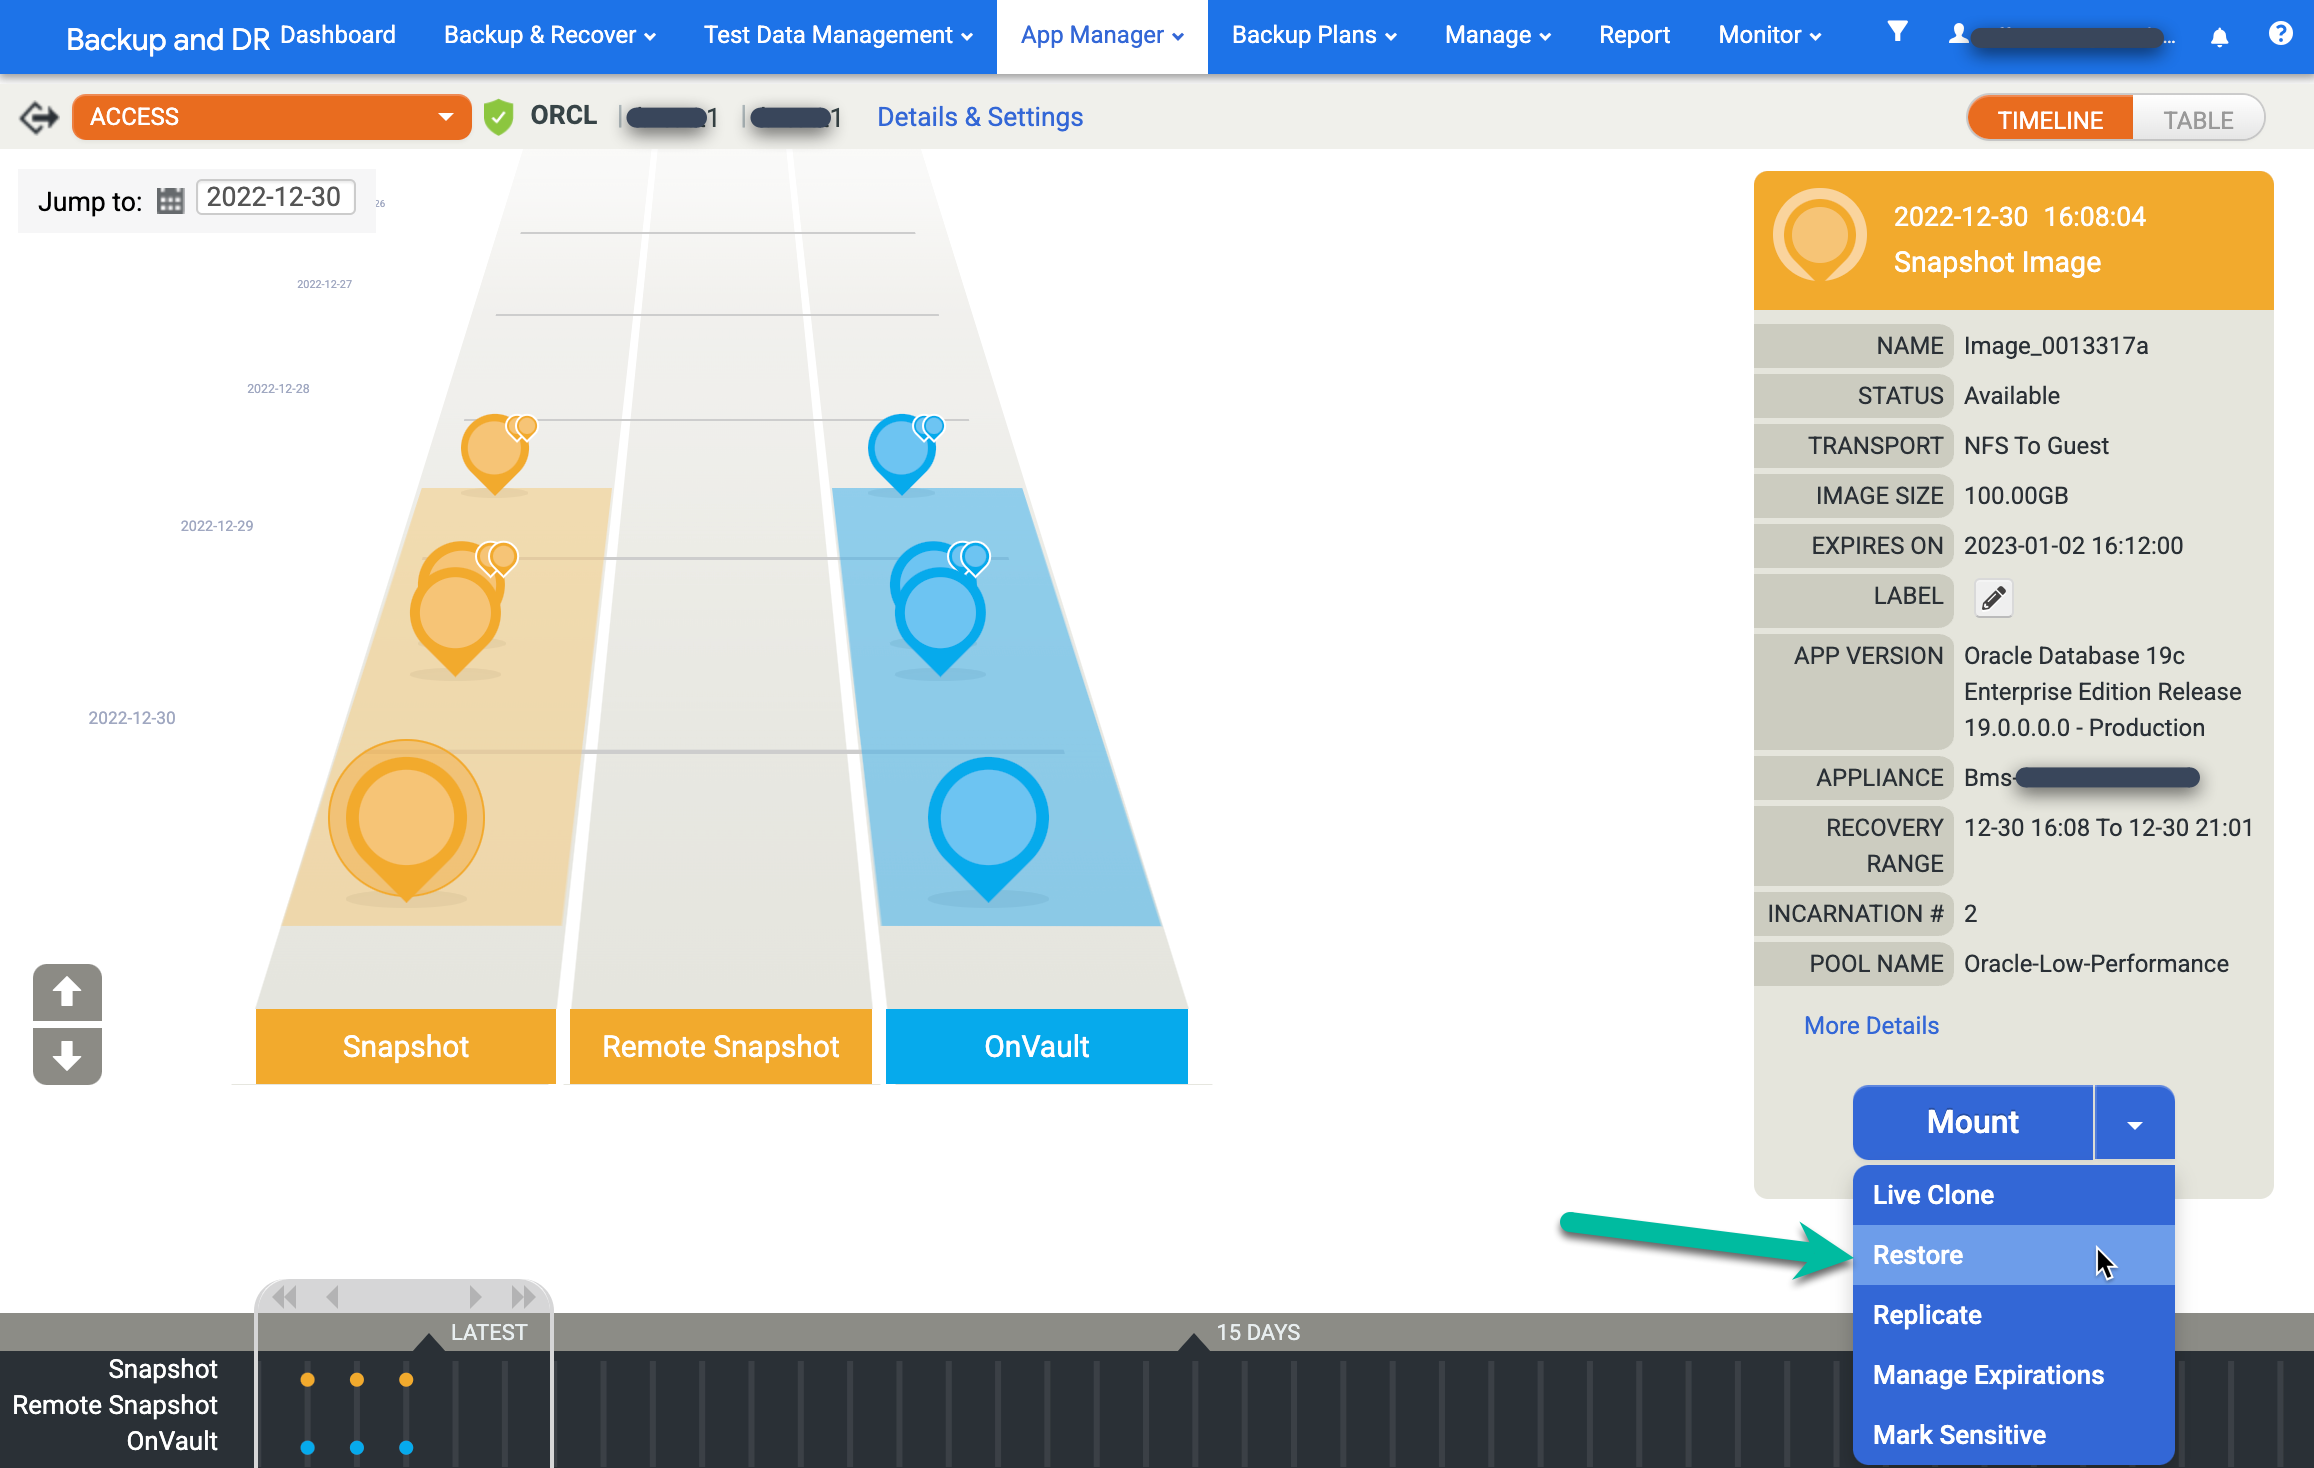
To restore an image, click the Mount menu and select Restore:
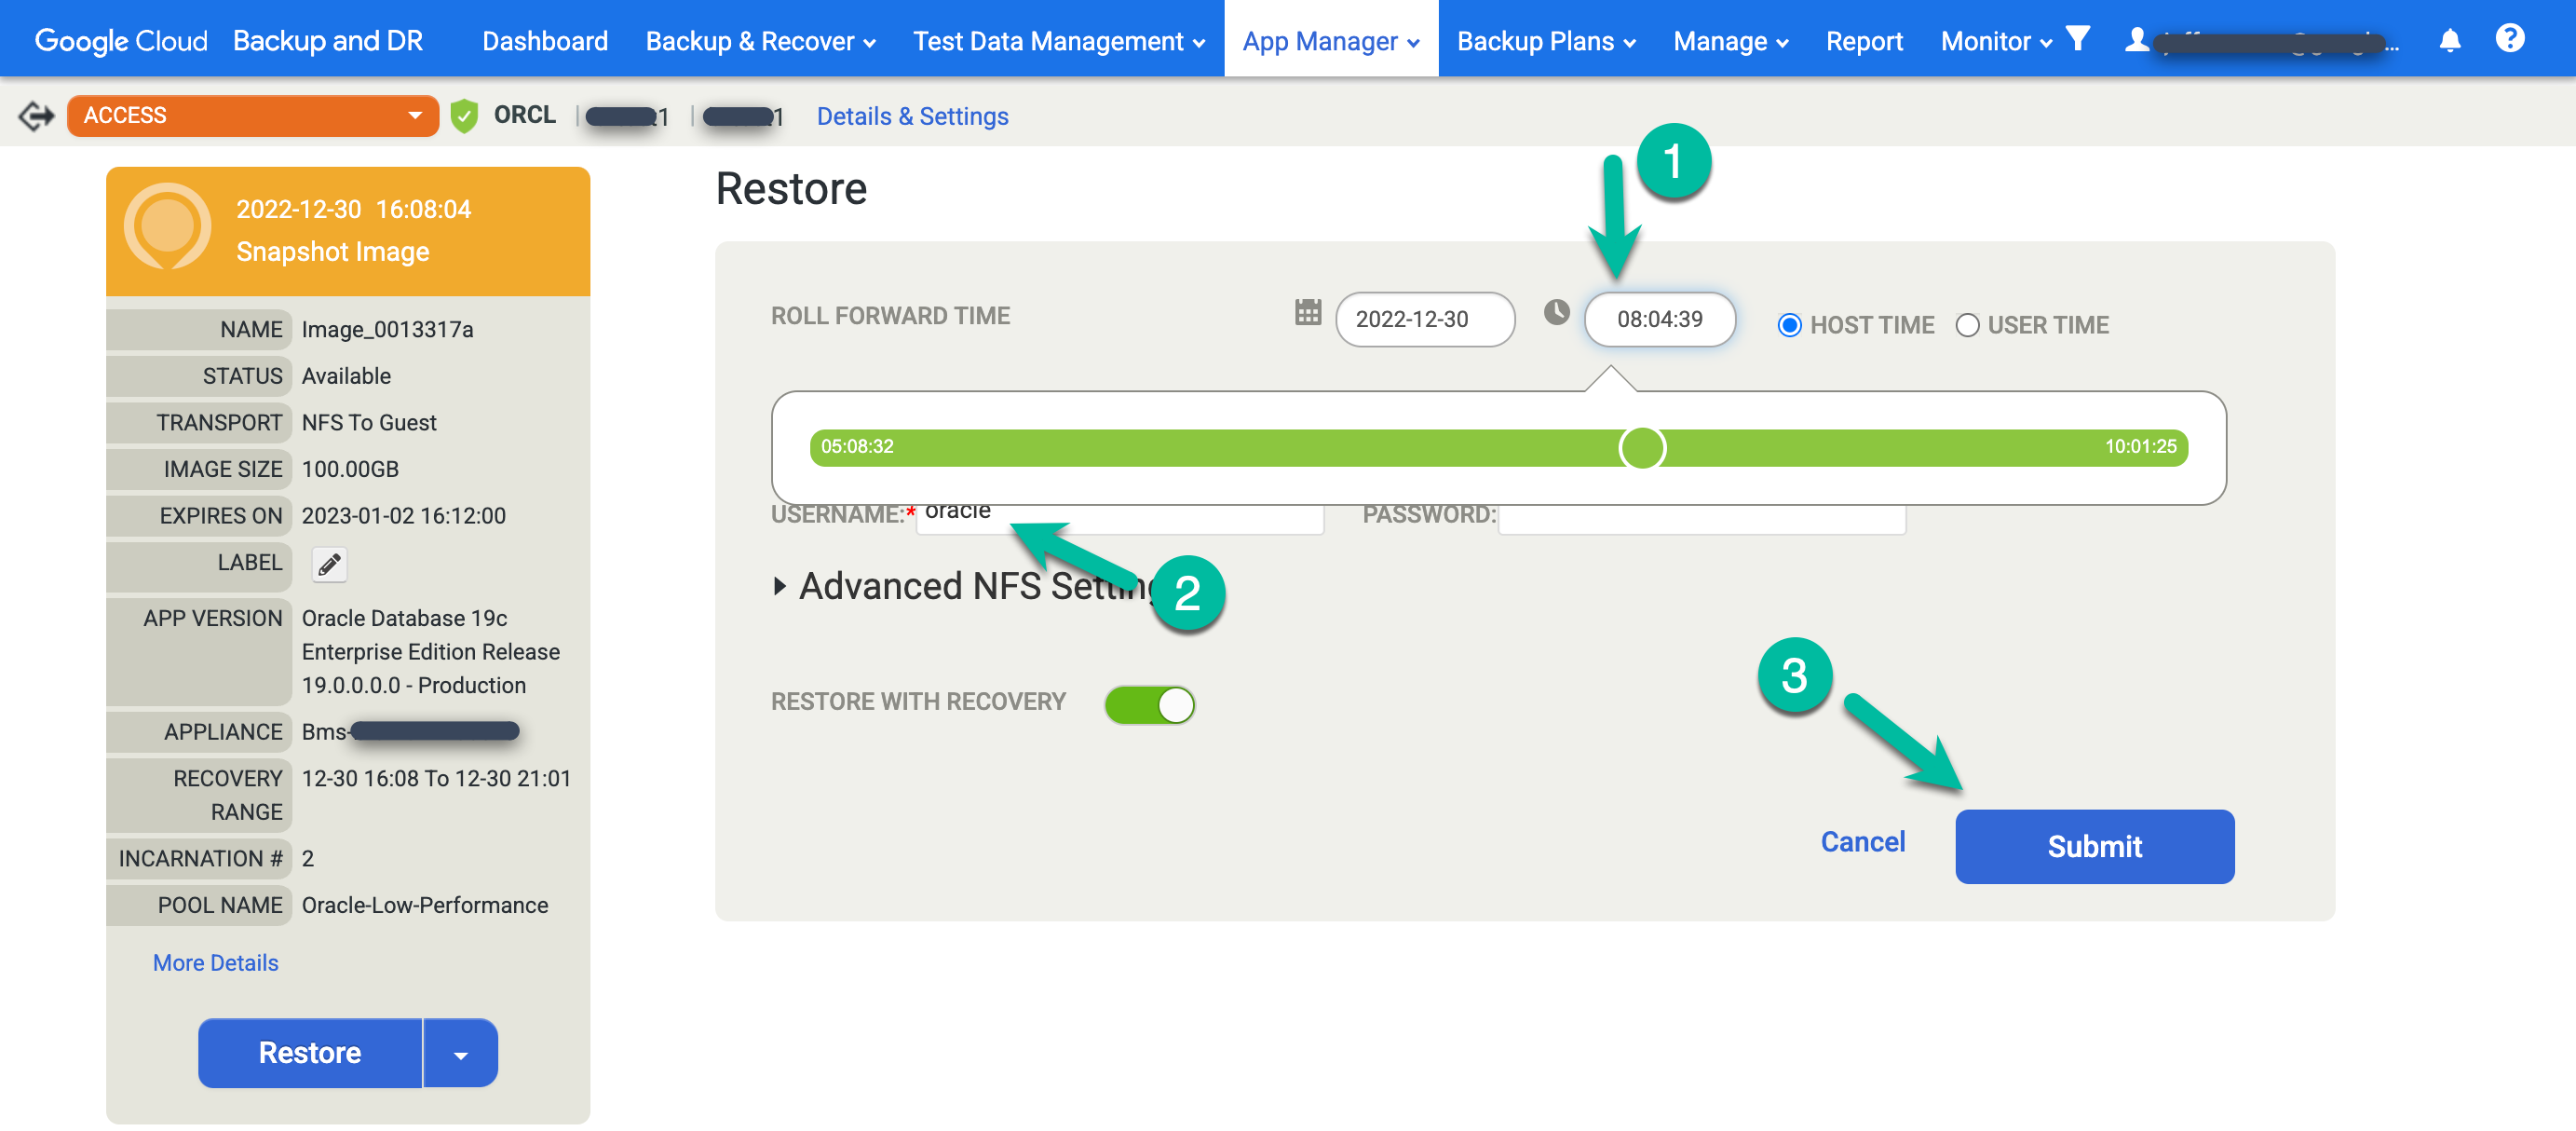
Choose your restore options.
- Select the Roll Forward Time. Click the clock and choose the desired point in time.
- Enter the username you plan to use for Oracle.
- If your system uses database authentication, enter a password.
To start the job, click Submit.
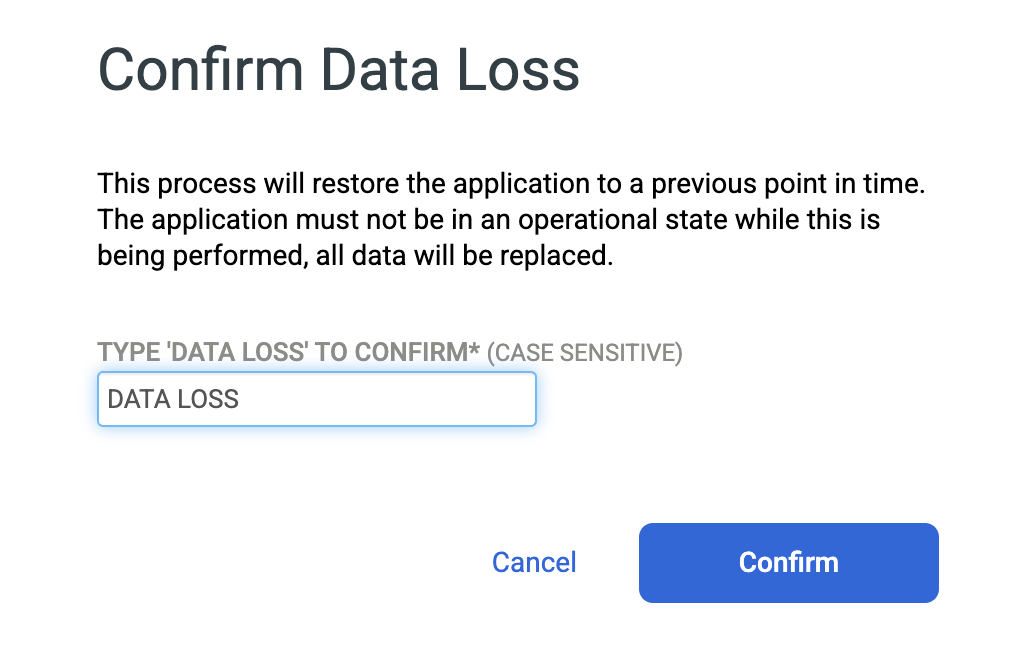
Type DATA LOSS to confirm that you want to overwrite the source database, and click Confirm.
Monitor job progress and success
To monitor the job, go to the Monitor > Jobs page.
https://bmc-PROJECT_NUMBER-GENERATED_ID-dot-REGION.backupdr.googleusercontent.com/#jobs
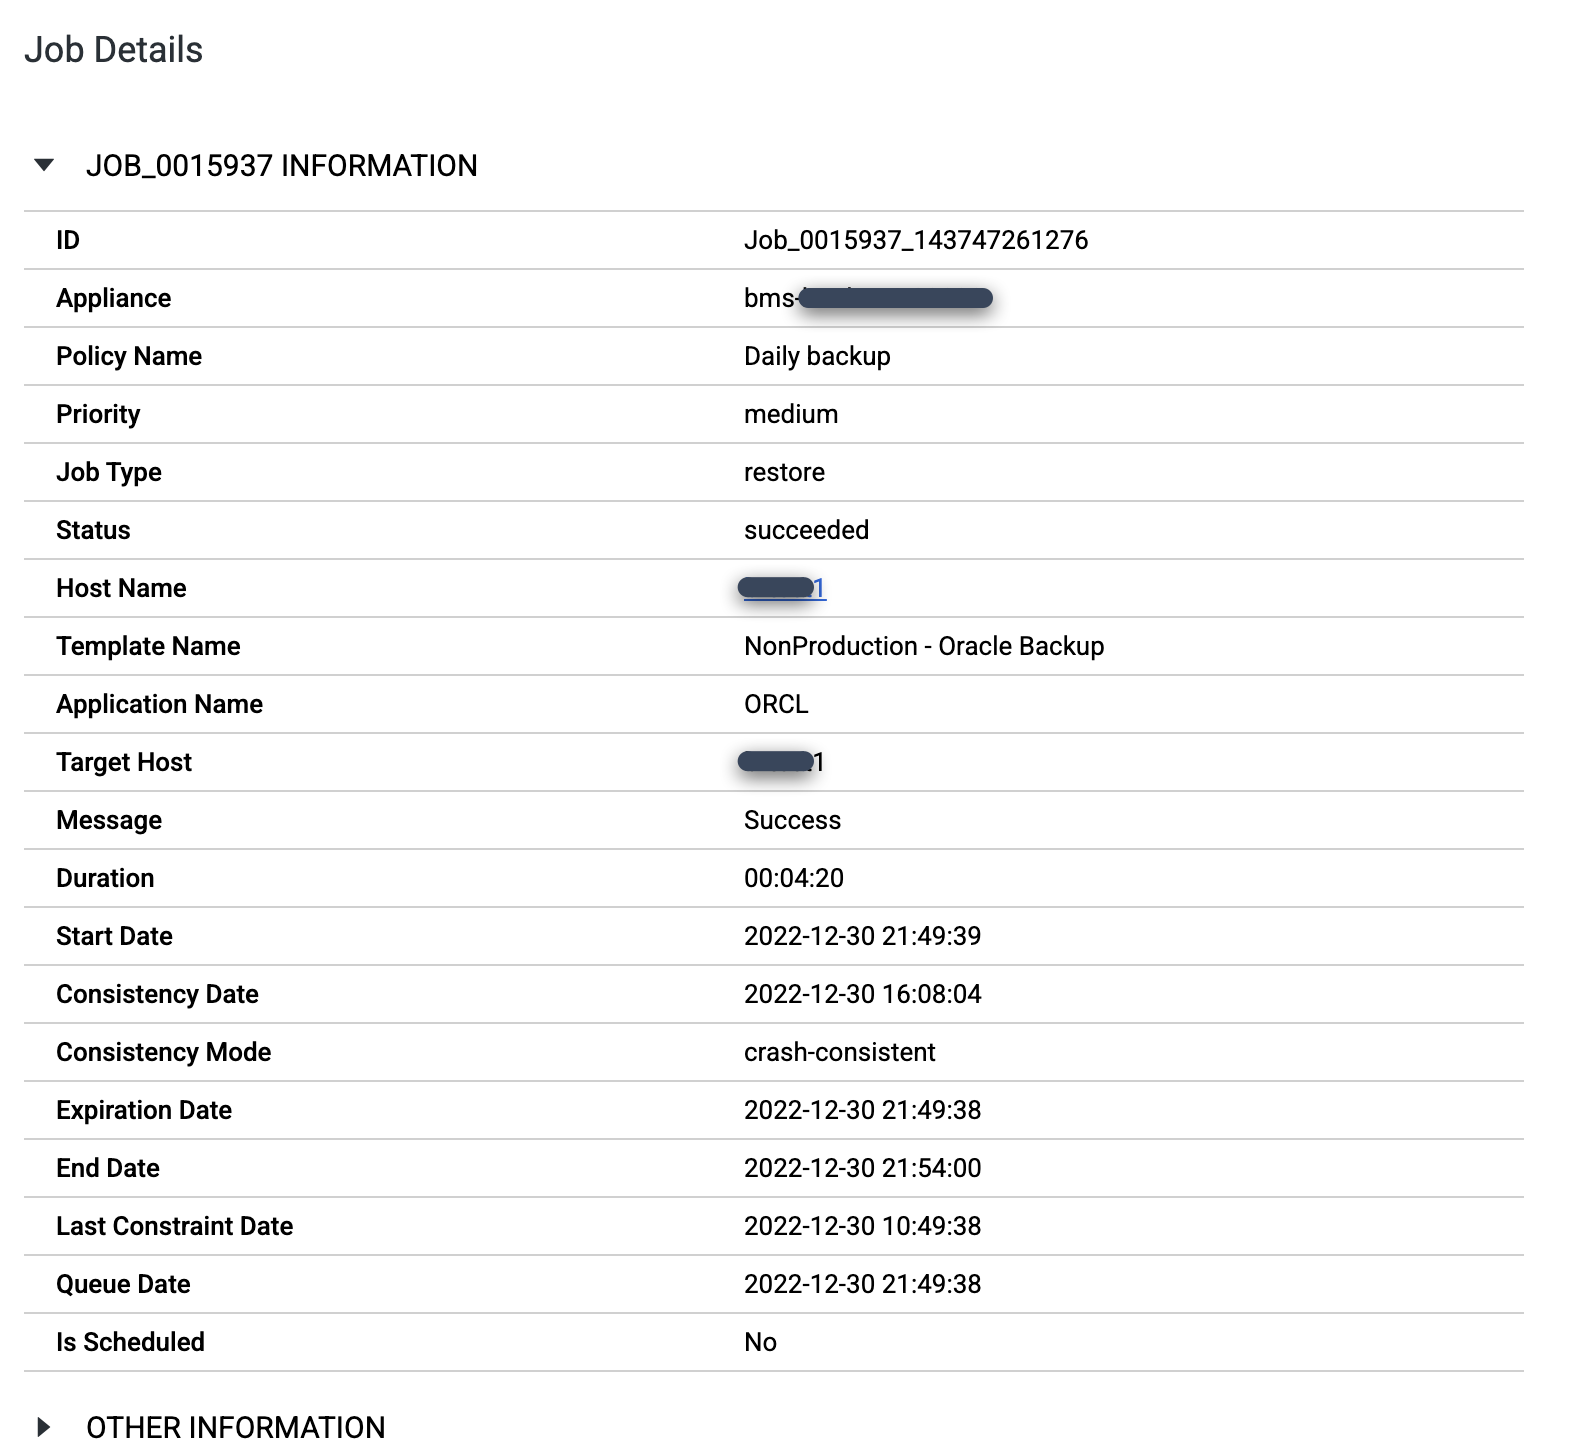
When the job completes, click the Job Number to review the job details and metadata.
Protect the restored database
When the database restore job completes, the system does not back up the database automatically after being restored. In other words, when you restore a database that previously had a backup plan, the backup plan does not activate by default.
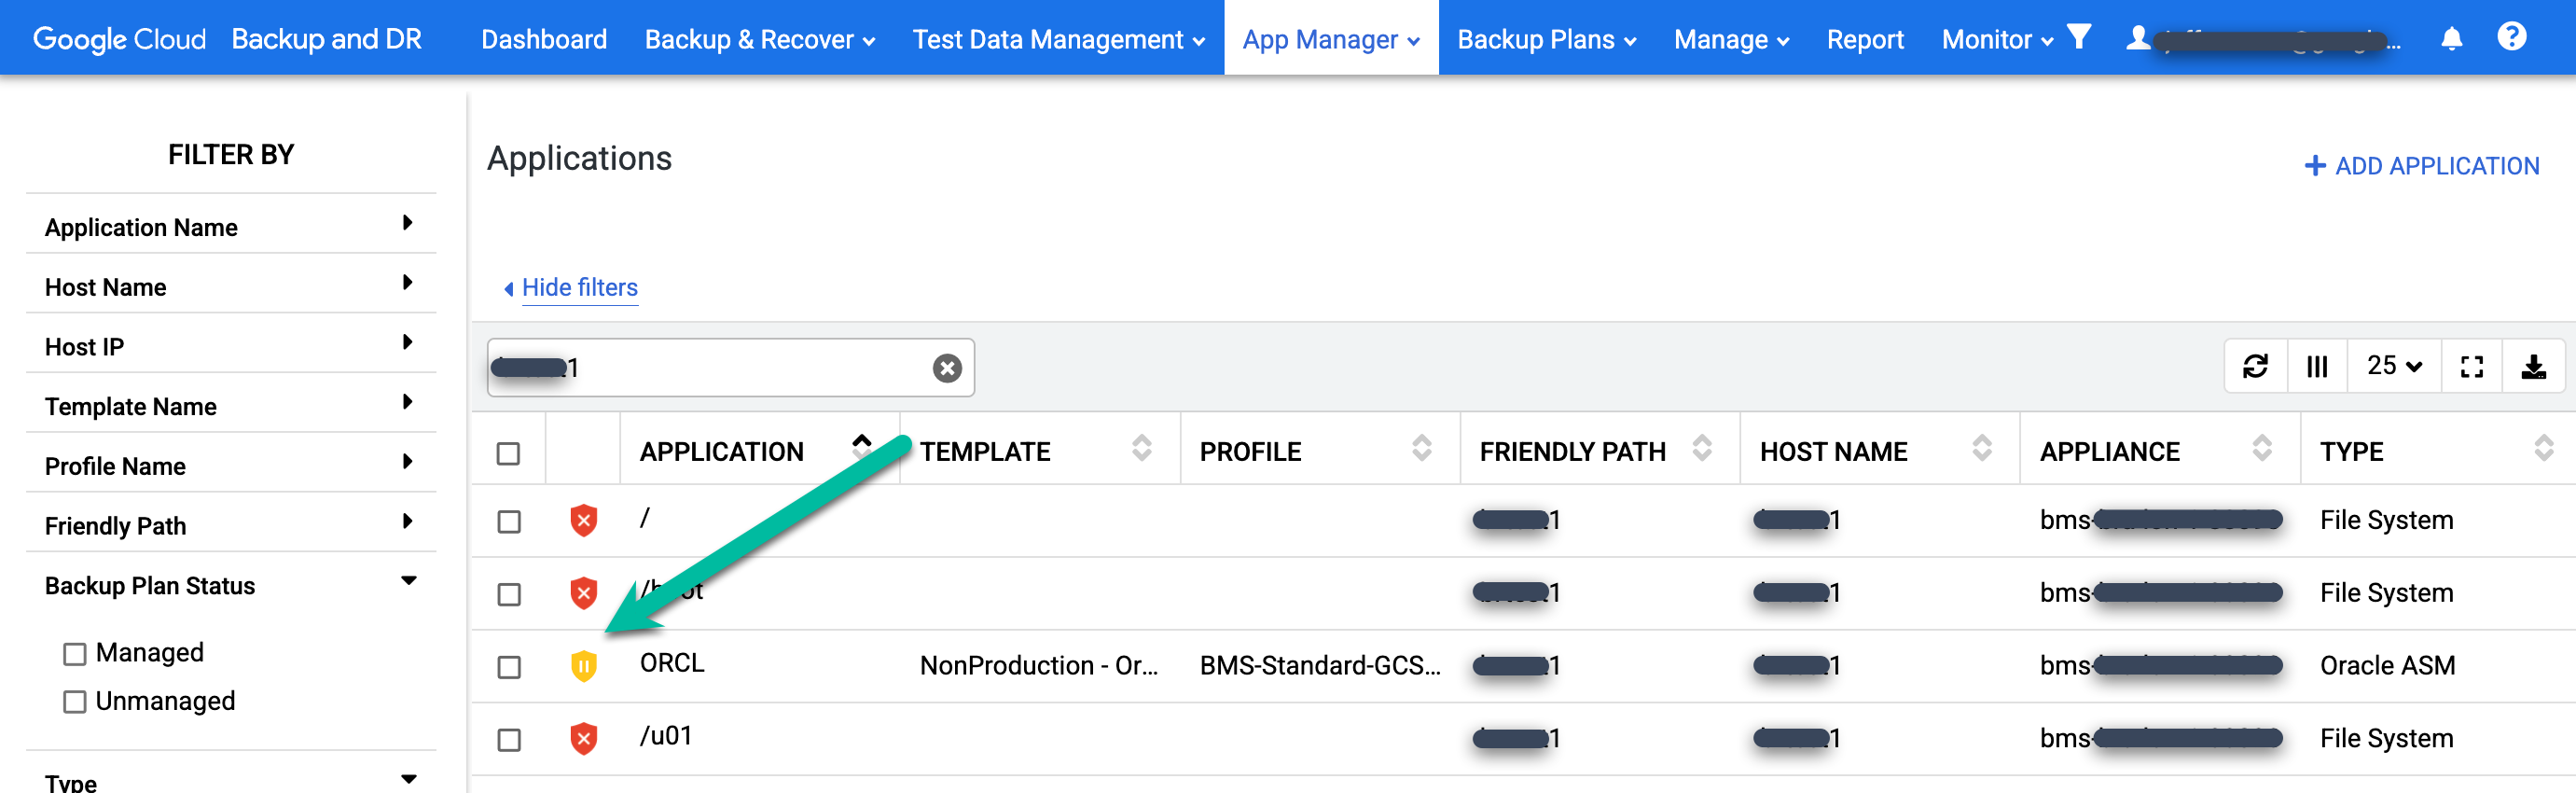
To verify that the backup plan is not running, go to the App Manager > Applications page.
https://bmc-PROJECT_NUMBER-GENERATED_ID-dot-REGION.backupdr.googleusercontent.com/#applications
Find the restored database in the list. The protection icon changes from green to yellow, which indicates that the system is not scheduled to run backup jobs for the database.
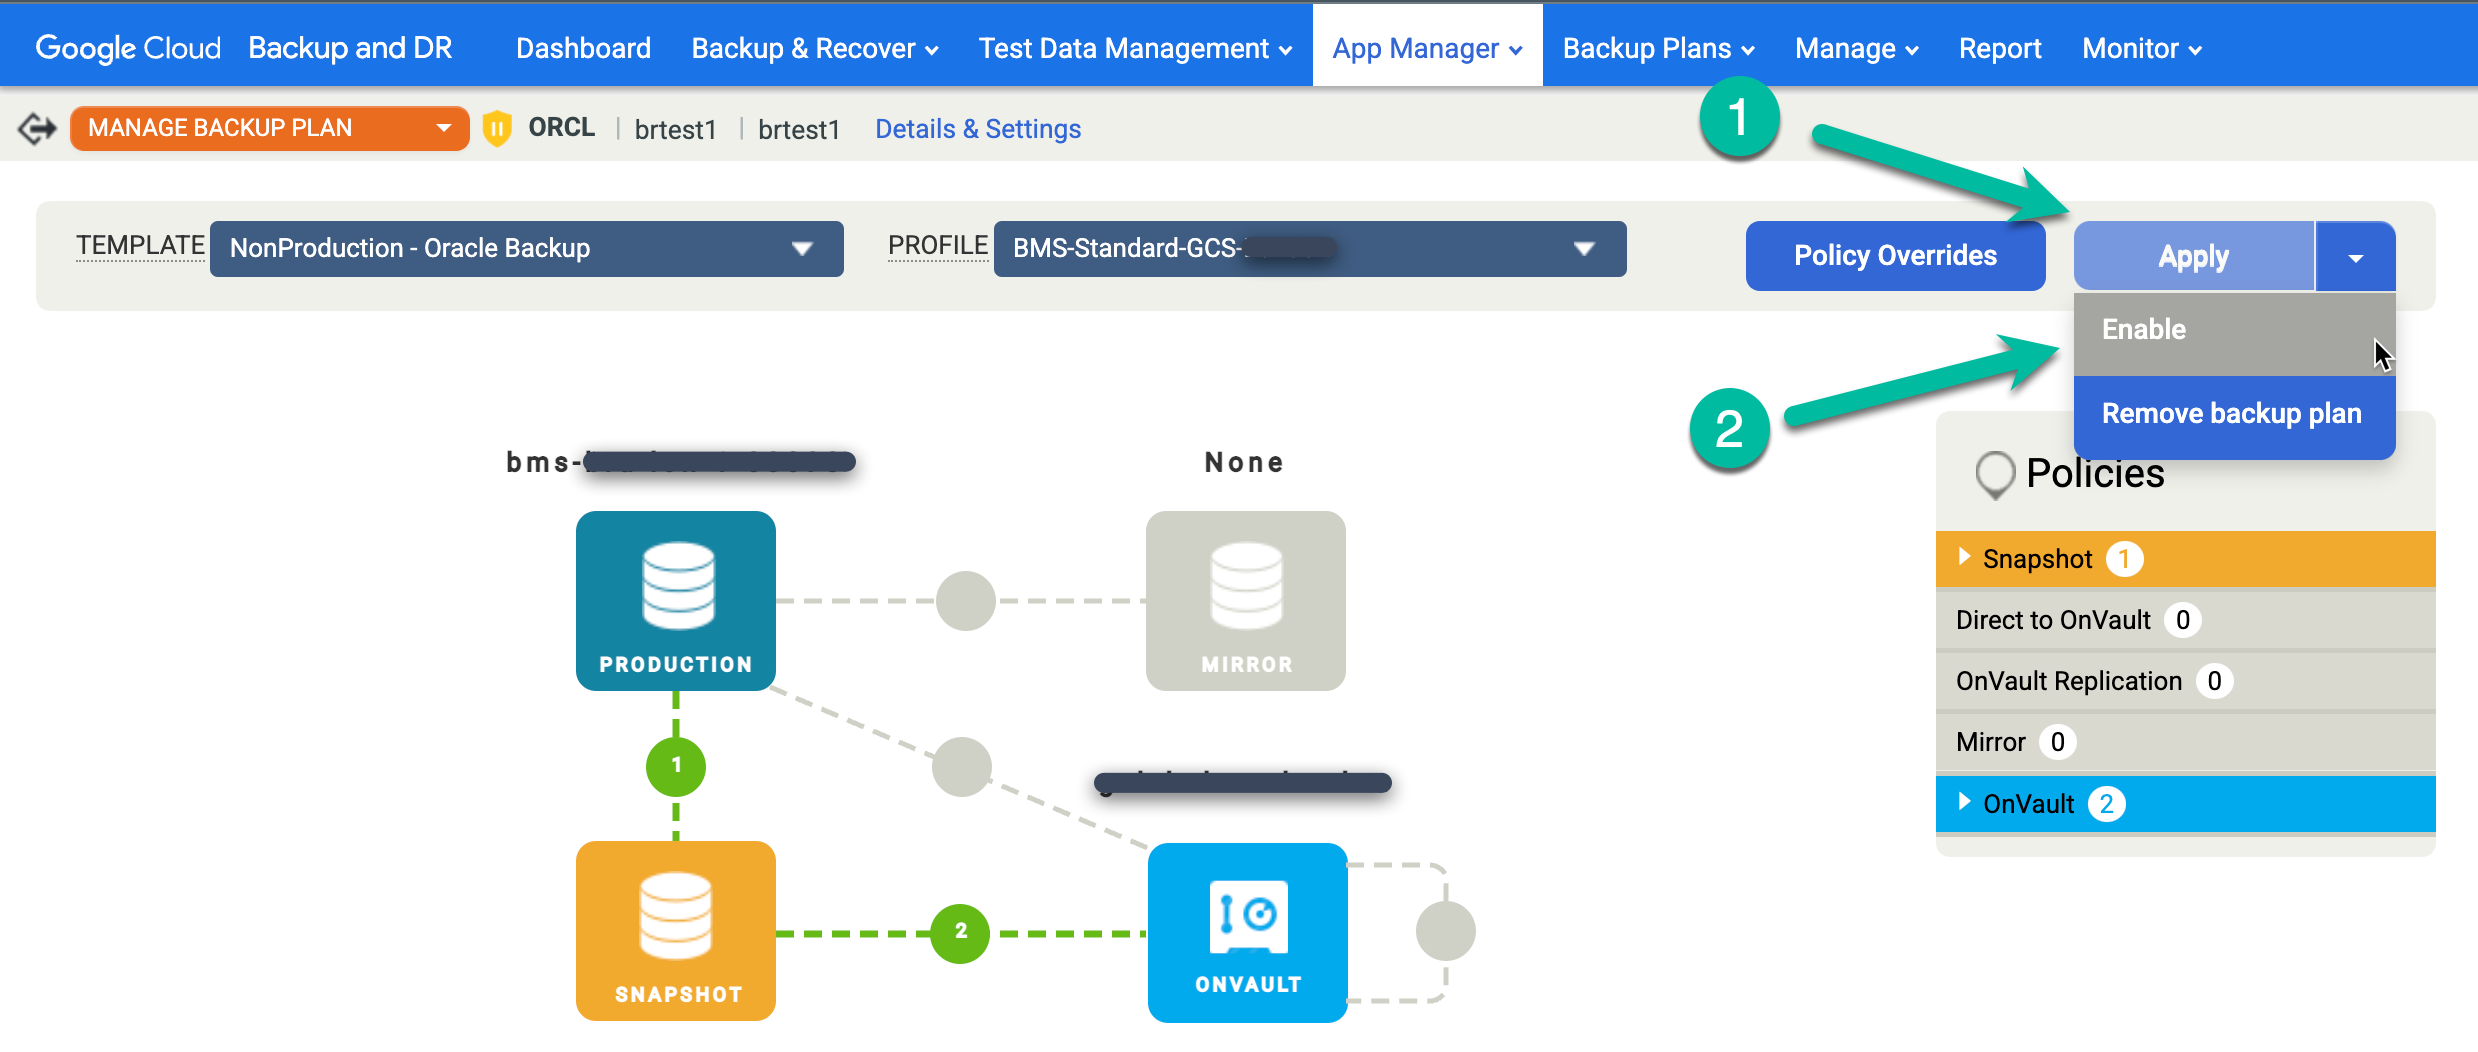
To protect the restored database, look in the Application column for the database that you want to protect. Right-click the database name and select Manage Backup Plan.
Re-enable the scheduled backup job for the restored database.
- Click the Apply menu and select Enable.
Confirm any Oracle Advanced Settings, and click Enable backup plan.
Troubleshooting and optimization
This section provides some helpful tips to aid you when troubleshooting your Oracle backups, optimizing your system, and considering adjustments for RAC and Data Guard environments.
Oracle backup troubleshooting
Oracle configurations contain a number of dependencies to ensure the backup task succeeds. The following steps provide several suggestions for configuring the Oracle instances, listeners, and databases to ensure success.
To verify that the Oracle listener for the service and instance that you want to protect is configured and running, issue the
lsnrctl statuscommand:[oracle@test2 lib]$ lsnrctl status LSNRCTL for Linux: Version 19.0.0.0.0 - Production on 29-DEC-2022 07:43:37 Copyright (c) 1991, 2021, Oracle. All rights reserved. Connecting to (ADDRESS=(PROTOCOL=tcp)(HOST=)(PORT=1521)) STATUS of the LISTENER ------------------------ Alias LISTENER Version TNSLSNR for Linux: Version 19.0.0.0.0 - Production Start Date 23-DEC-2022 20:34:17 Uptime 5 days 11 hr. 9 min. 20 sec Trace Level off Security ON: Local OS Authentication SNMP OFF Listener Parameter File /u01/app/19c/grid/network/admin/listener.ora Listener Log File /u01/app/oracle/diag/tnslsnr/test2/listener/alert/log.xml Listening Endpoints Summary... (DESCRIPTION=(ADDRESS=(PROTOCOL=tcp)(HOST=test2.localdomain)(PORT=1521))) (DESCRIPTION=(ADDRESS=(PROTOCOL=ipc)(KEY=EXTPROC1521))) Services Summary... Service "+ASM" has 1 instance(s). Instance "+ASM", status READY, has 1 handler(s) for this service... Service "+ASM_DATADG" has 1 instance(s). Instance "+ASM", status READY, has 1 handler(s) for this service... Service "ORCL" has 1 instance(s). Instance "ORCL", status READY, has 1 handler(s) for this service... Service "ORCLXDB" has 1 instance(s). Instance "ORCL", status READY, has 1 handler(s) for this service... Service "f085620225d644e1e053166610ac1c27" has 1 instance(s). Instance "ORCL", status READY, has 1 handler(s) for this service... Service "orclpdb" has 1 instance(s). Instance "ORCL", status READY, has 1 handler(s) for this service... The command completed successfully
Verify that you configured the Oracle database in ARCHIVELOG mode. If the database runs in a different mode, you might see failed jobs with the Error Code 5556 message as follows:
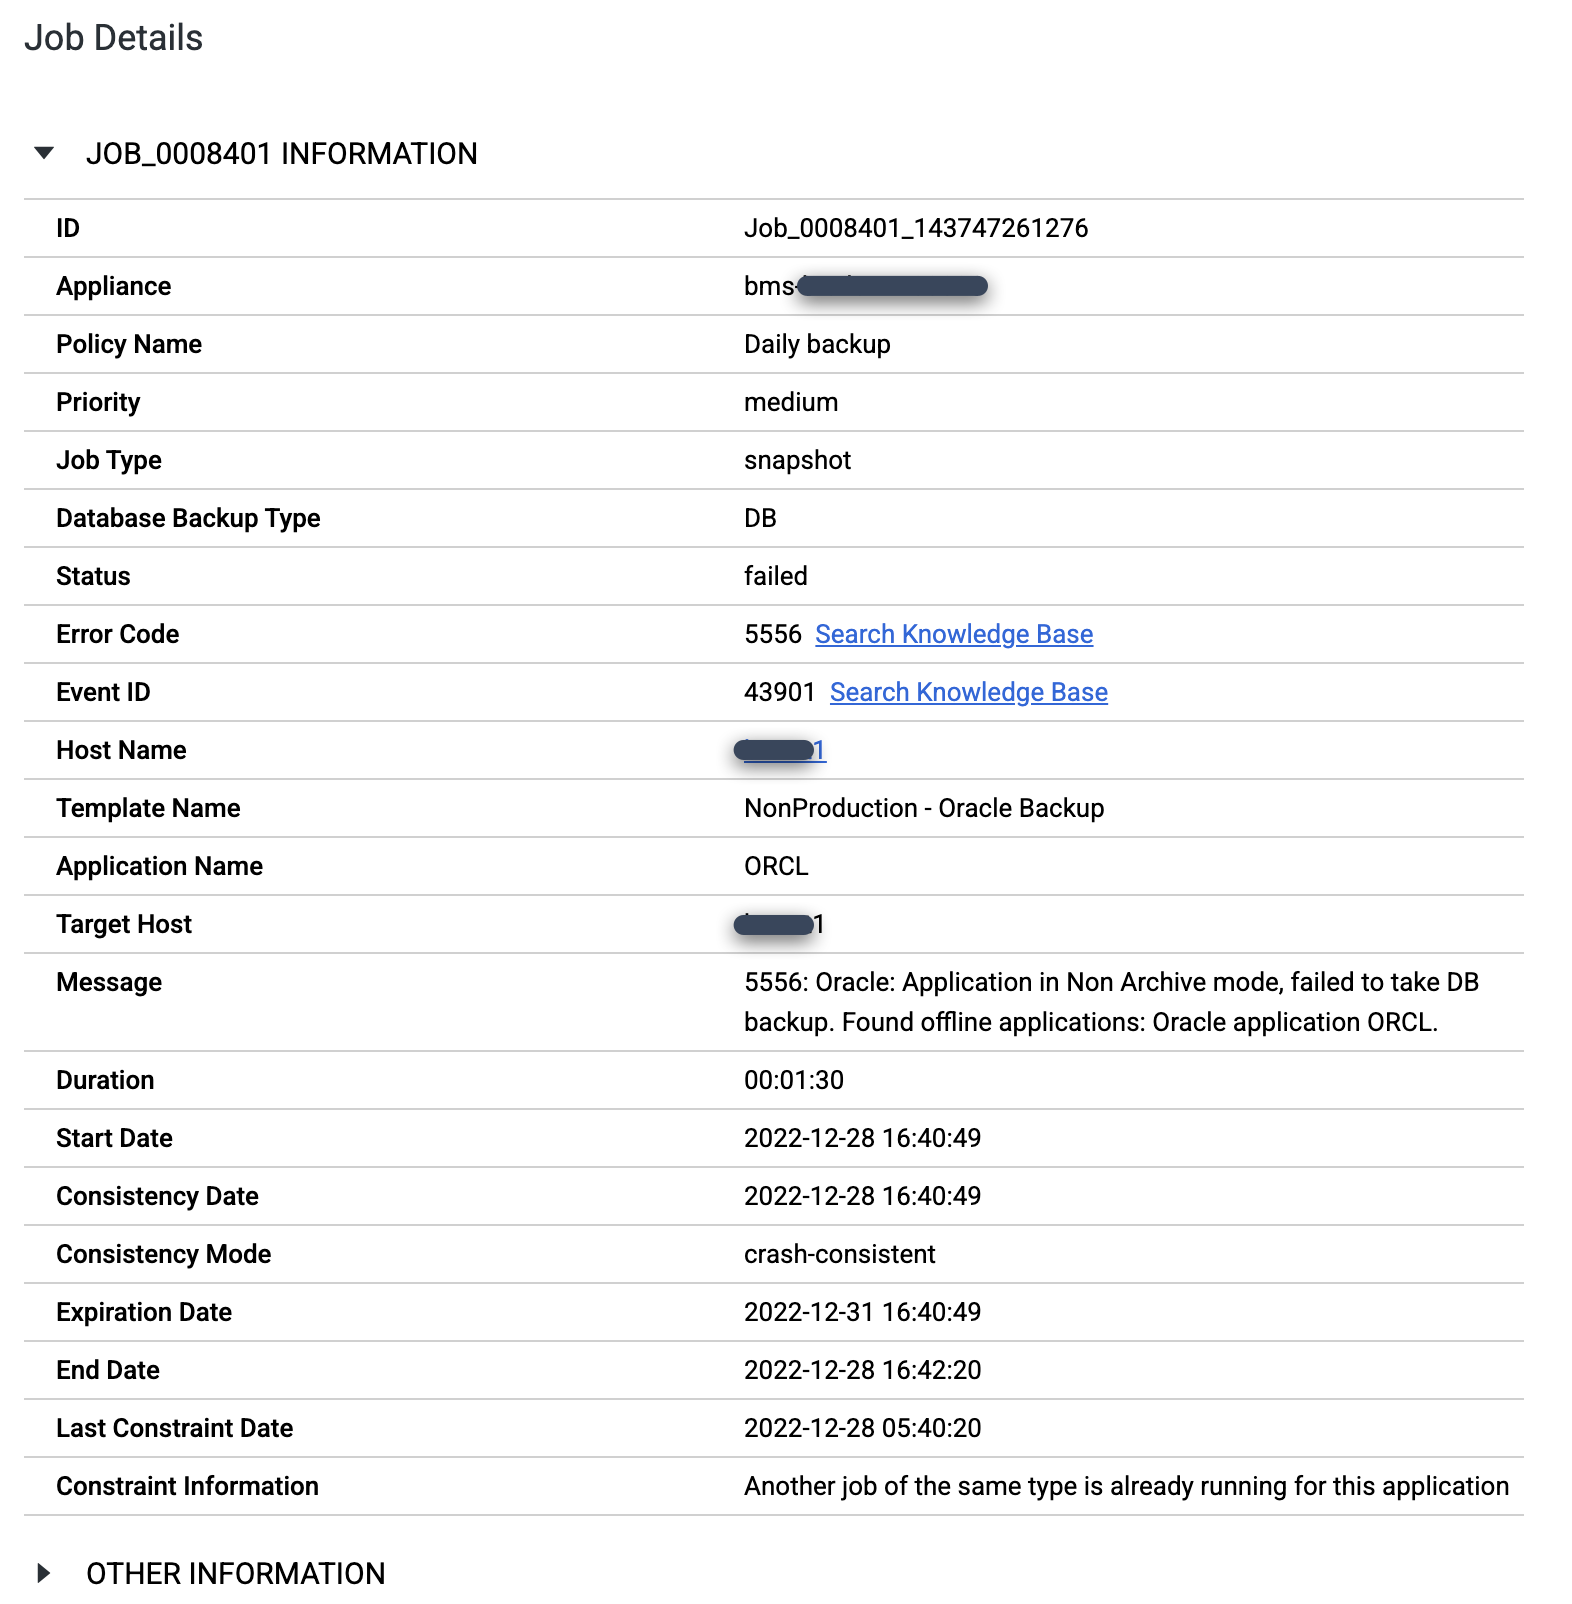
export ORACLE_HOME=ORACLE_HOME_PATH
export ORACLE_SID=DATABASE_INSTANCE_NAME
export PATH=$ORACLE_HOME/bin:$PATH

sqlplus / as sysdba
SQL> set tab off
SQL> archive log list;

Database log mode             Archive Mode
Automatic archival            Enabled
Archive destination           +FRA
Oldest online log sequence    569
Next log sequence to archive  570
Current log sequence          570
Enable block change tracking on the Oracle database. While this is not mandatory for the solution to work, enabling block change tracking prevents the need to perform a significant amount of post-processing work to calculate changed blocks and helps to reduce backup job times:
SQL> select status,filename from v$block_change_tracking;

STATUS     FILENAME
---------- ------------------------------------------------------------------
ENABLED    +DATADG/ORCL/CHANGETRACKING/ctf.276.1124639617
Verify that the database uses the
spfile:sqlplus / as sysdba SQL> show parameter spfile NAME TYPE VALUE ------------------ ----------- ------------ spfile string +DATA/ctdb/spfilectdb.ora
Enable Direct NFS (dnfs) for Oracle database hosts. While not mandatory, if you need the fastest method to backup and restore the Oracle databases, dnfs is the preferred choice. To improve the throughput even more, you can change the staging disk on a per host basis and enable dnfs for Oracle.
Configure tnsnames for resolution for Oracle database hosts. If you do not include this setting, RMAN commands often fail. The following is a sample of the output:
[oracle@test2 lib]$ tnsping ORCL

TNS Ping Utility for Linux: Version 19.0.0.0.0 - Production on 29-DEC-2022 07:55:18

Copyright (c) 1997, 2021, Oracle. All rights reserved.

Used parameter files:

Used TNSNAMES adapter to resolve the alias
Attempting to contact (DESCRIPTION = (ADDRESS = (PROTOCOL = TCP)(HOST = test2.localdomain)(PORT = 1521)) (CONNECT_DATA = (SERVER = DEDICATED) (SERVICE_NAME = ORCL)))
OK (0 msec)
The
SERVICE_NAMEfield is important for RAC configurations. The service name represents the alias used to advertise the system to external resources that communicate with the cluster. In the Details and Settings options for the protected database, use the Advanced Setting for Oracle Service Name. Enter the specific service name that you want to use on the nodes that run the backup job.The Oracle database uses the service name only for database authentication. The database does not use the service name for OS authentication. For example, the database name could be CLU1_S, and the instance name could be CLU1_S.
If the Oracle service name is not listed, create a service name entry on the server(s) in the tnsnames.ora file located at
$ORACLE_HOME/network/adminor at$GRID_HOME/network/adminby adding the following entry:CLU1_S = (DESCRIPTION = (ADDRESS = (PROTOCOL = TCP)(HOST =
)(PORT = 1521)) (CONNECT_DATA = (SERVER = DEDICATED) (SERVICE_NAME = CLU1_S) ) ) If the tnsnames.ora file is in a non-standard location, provide the absolute path to the file in the Application Details and Settings page described in Configure application details and settings for Oracle databases.
Verify that you configured the service name entry for the database correctly. Log in to Oracle Linux and configure the Oracle environment:
TNS_ADMIN=TNSNAMES.ORA_FILE_LOCATION
tnsping CLU1_S
Review the database user account to ensure a successful connection to the Backup and DR application:
sqlplus act_rman_user/act_rman_user@act_svc_dbstd as sysdba
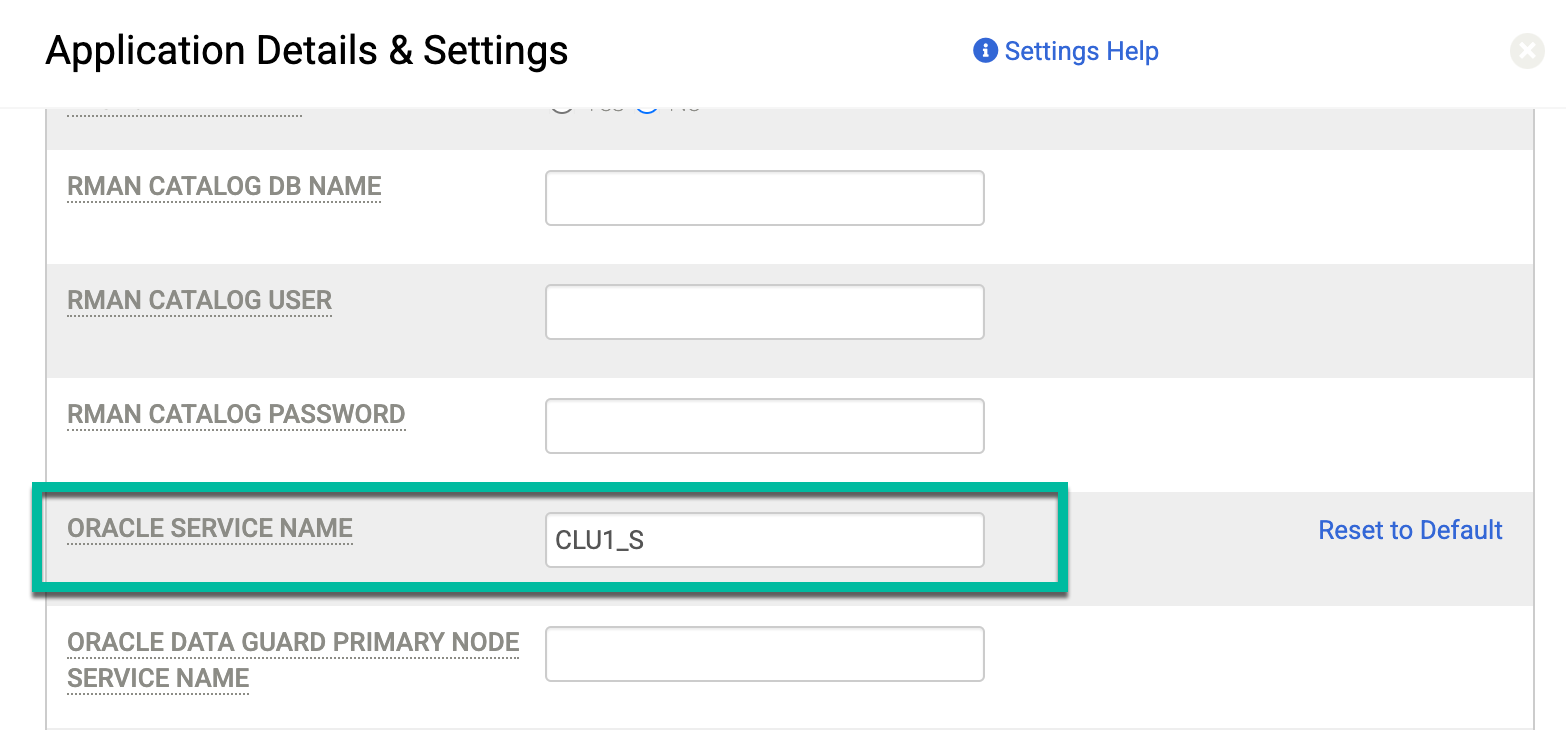
In the Application Details and Settings page described in Application Details and Settings for Oracle Databases, enter the service name you created (CLU1_S) in the Oracle Service Name field:
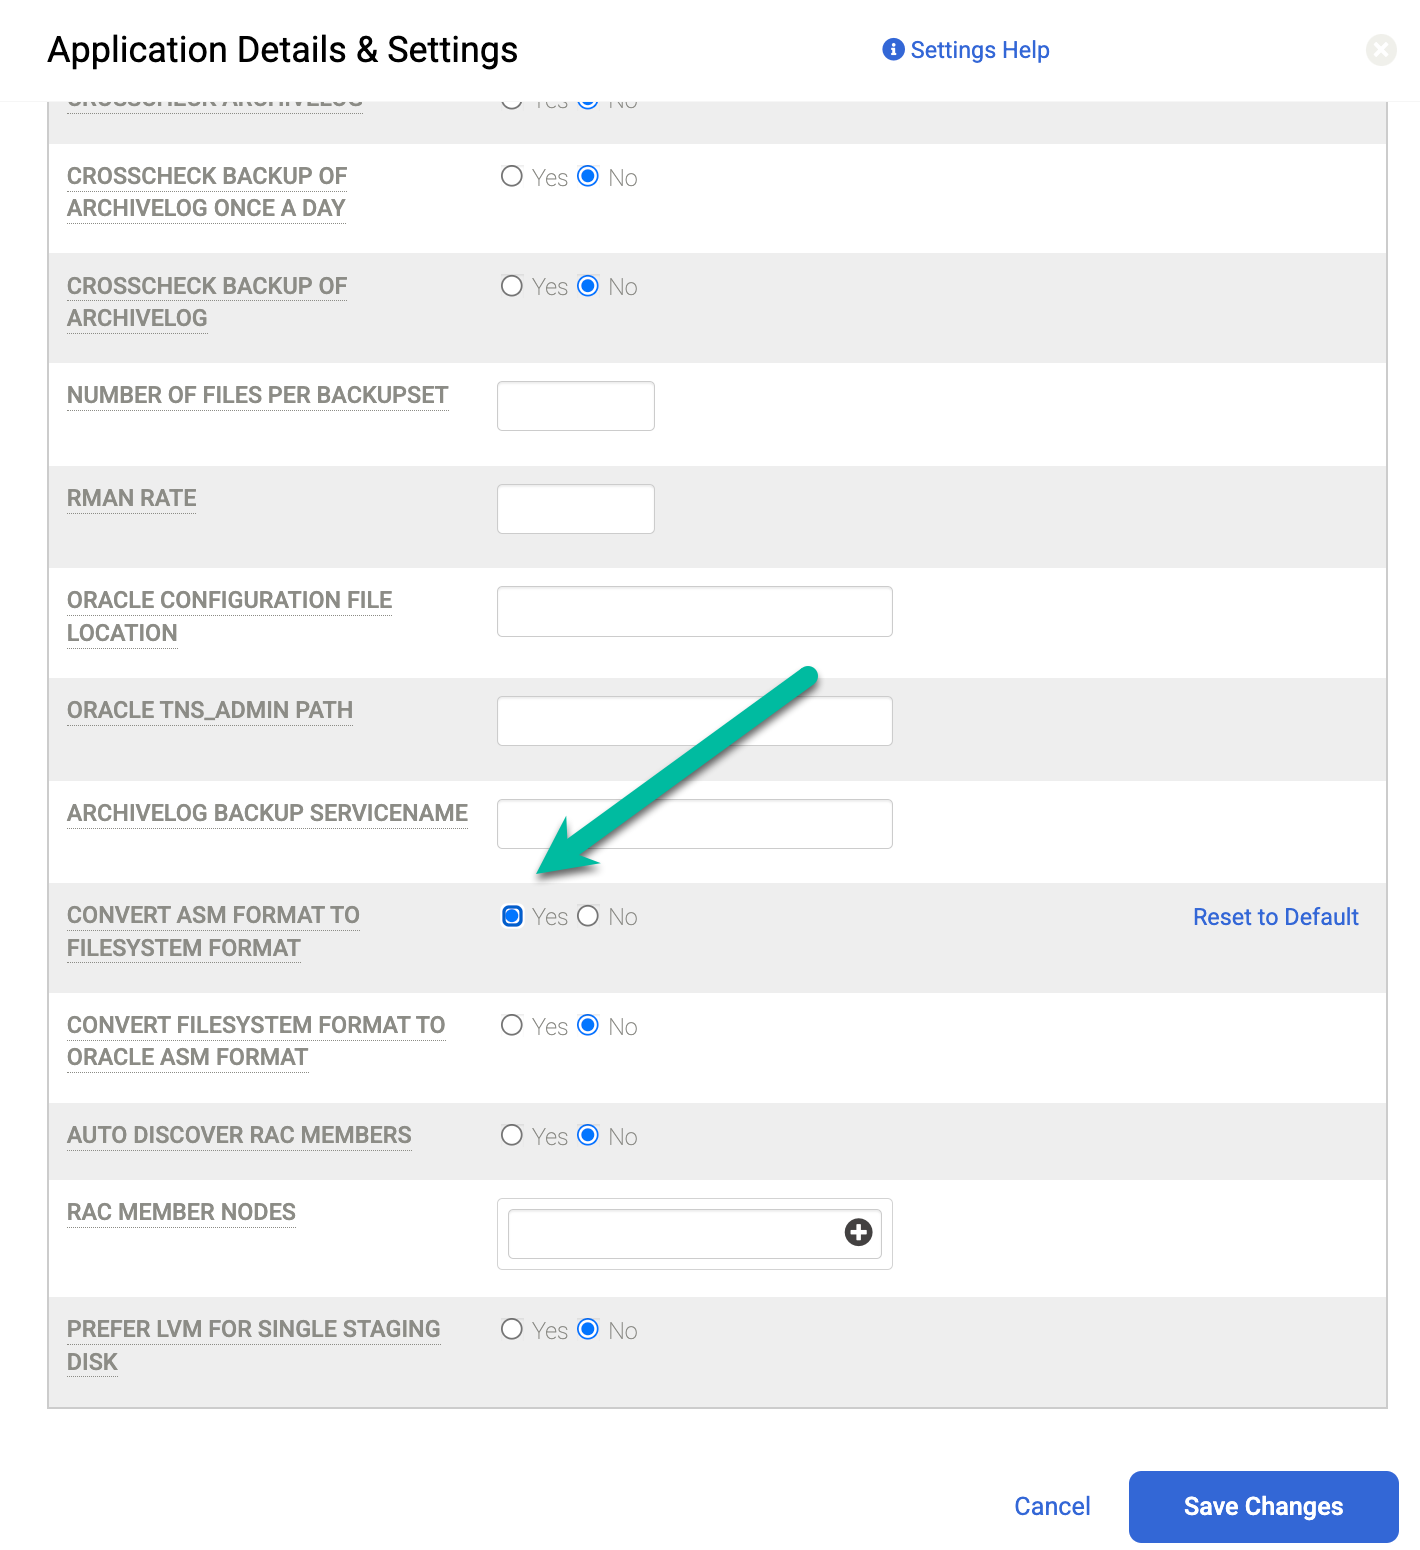
Error Code 870 says that "ASM backups with ASM on NFS staging disks is not supported." If you receive this error, you do not have the correct setting configured in Details and Settings for the instance that you want to protect. In this misconfiguration, the host uses NFS for the staging disk, but the source database runs on ASM.
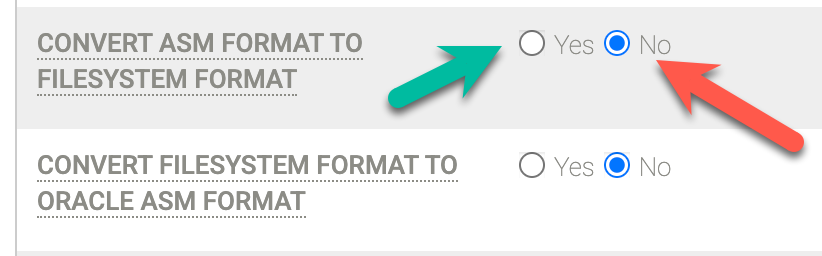
To fix this issue, set the Convert ASM Format to Filesystem Format field to Yes. After you change this setting, rerun the backup job.
Error Code 15 tells you the Backup and DR system "Could not connect to the backup host." If you receive this error, it indicates one of three issues:
- The firewall between the backup/recovery appliance and the host on which you installed the agent does not allow TCP port 5106 (the agent listening port).
- You did not install the agent.
- The agent is not running.
To fix this issue, reconfigure the firewall settings as needed and ensure that the agent is working. After you fix the underlying cause, run the
service udsagent statuscommand. The following output example shows that the Backup and DR agent service is running correctly:[root@test2 ~]# service udsagent status Redirecting to /bin/systemctl status udsagent.service udsagent.service - Google Cloud Backup and DR service Loaded: loaded (/usr/lib/systemd/system/udsagent.service; enabled; vendor preset: disabled) Active: active (running) since Wed 2022-12-28 05:05:45 UTC; 2 days ago Process: 46753 ExecStop=/act/initscripts/udsagent.init stop (code=exited, status=0/SUCCESS) Process: 46770 ExecStart=/act/initscripts/udsagent.init start (code=exited, status=0/SUCCESS) Main PID: 46789 (udsagent) Tasks: 8 (limit: 48851) Memory: 74.0M CGroup: /system.slice/udsagent.service ├─46789 /opt/act/bin/udsagent start └─60570 /opt/act/bin/udsagent start Dec 30 05:11:30 test2 su[150713]: pam_unix(su:session): session closed for user oracle Dec 30 05:11:30 test2 su[150778]: (to oracle) root on none
Log messages from your backups can help you diagnose issues. You can access the logs on the source host where the backup jobs run. For Oracle database backups, there are two main log files available in the
/var/act/logdirectory:- UDSAgent.log–Google Cloud Backup and DR agent log that records API requests, running job statistics, and other details.
- SID_rman.log–Oracle RMAN log that records all RMAN commands.
Additional Oracle considerations
When you implement Backup and DR for Oracle databases, be aware of the following considerations when you deploy Data Guard and RAC.
Data Guard considerations
You can backup both primary and standby Data Guard nodes. However, if you choose to protect databases only from the standby nodes, you need to use Oracle Database Authentication rather than OS authentication when you back up the database.
RAC considerations
The Backup and DR solution does not support concurrent backup from multiple nodes in a RAC database if the staging disk is set to NFS mode. If your system requires concurrent backup from multiple RAC nodes, use Block (iSCSI) as the staging disk mode and set this on a per host basis.
For an Oracle RAC database using ASM, you must place the snapshot control file
in the shared disks. To verify this configuration, connect to RMAN and run the
show all command:
rman target /

RMAN> show all
CONFIGURE RETENTION POLICY TO REDUNDANCY 1; # default

CONFIGURE BACKUP OPTIMIZATION OFF; # default
CONFIGURE DEFAULT DEVICE TYPE TO DISK; # default
CONFIGURE CONTROLFILE AUTOBACKUP OFF; # default
CONFIGURE CONTROLFILE AUTOBACKUP FORMAT FOR DEVICE TYPE DISK TO '%F'; # default
CONFIGURE DEVICE TYPE DISK PARALLELISM 1 BACKUP TYPE TO BACKUPSET; # default
CONFIGURE SNAPSHOT CONTROLFILE NAME TO '/mnt/ctdb/snapcf_ctdb.f';
In a RAC environment, you must map the snapshot control file to a shared ASM
disk group. To assign the file to the ASM disk group, use the
Configure Snapshot Controlfile Name command:
CONFIGURE SNAPSHOT CONTROLFILE NAME TO '+/snap_ .f';
Recommendations
Depending on your requirements, you might need to make decisions regarding certain features that have an effect on the overall solution. Some decisions can affect price, which in turn can affect performance, such as choosing standard Persistent Disks (pd-standard) or performance Persistent Disks (pd-ssd) for the backup/recovery appliance snapshot pools.
In this section, we share our recommended choices to help you ensure optimal performance for Oracle database backup throughput.
Select the optimal machine type and Persistent Disk type
When using a backup/recovery appliance with an application such as a file system or a database, you can measure performance based on how quickly the host instance's data transfers between the Compute Engine instances.
- Compute Engine Persistent Disk device speeds are based on three factors: the machine type, the total amount of memory attached to the instance, and the vCPU count of the instance.
- The number of vCPUs in an instance determines the network speed allocated to a Compute Engine instance. The speed ranges from 1 Gbps for a shared vCPU up to 16 Gbps for 8 or more vCPUs.
- Combining these limits, Google Cloud Backup and DR defaults to using an e2-standard-16 for a standard size machine type for a backup/recovery appliance. From this starting point, you have three choices for disk allocation:
Choice |
Pool Disk |
Maximum Sustained Writes |
Maximum Sustained Reads |
Minimal |
10 GB |
N/A |
N/A |
Standard |
4096 GB |
400 MiB/s |
1200 MiB/s |
SSD |
4096 GB |
1000 MiB/s |
1200 MiB/s |
Compute Engine instances use up to 60% of their allocated network for I/O to their attached Persistent Disks, and reserve 40% for other uses. For more details, see Other Factors that Affect Performance.
Recommendation: Selecting an e2-standard-16 machine type and a minimum of 4096 GB of PD-SSD provides the best performance for backup/recovery appliances. As a second choice, you can select an n2-standard-16 machine type for your backup/recovery appliance. This option gives you additional performance benefits in the range of 10-20% but does come with additional costs. If this matches with your use case, contact Cloud Customer Care to make this change.
Optimize your snapshots
To increase the productivity of a single backup/recovery appliance, you can run simultaneous snapshot jobs from multiple sources. Each individual job reduces in speed. However, with enough jobs, you can achieve the sustained write cap for the Persistent Disk volumes in the snapshot pool.
When you use iSCSI for the staging disk, you can back up a single large instance to a backup/recovery appliance with roughly a 300-330MB/s sustained write speed. In our testing, we saw this held true for everything from 2TB up to 80TB in a snapshot, assuming that you configure both the source host and backup/recovery appliance at an optimal size and they're in the same region and zone.
Choose the correct staging disk
if you need significant performance and throughput, Direct NFS can add significant benefit versus iSCSI as the choice of staging disk to use for Oracle database backups. Direct NFS consolidates the number of TCP connections, which improves scalability and network performance.
When you enable Direct NFS for an Oracle database, configure sufficient source CPU (for example, 8x vCPUs and 8 RMAN channels), and establish a 10GB link between your Bare Metal Solution regional extension and Google Cloud, you can back up a single Oracle database with increased throughput between 700-900+ MB/s. RMAN restore speeds also benefit from Direct NFS, where you can see throughput levels reach the 850 MB/s range and above.
Balance cost and throughput
It's also important to understand that all backup data is stored in a compressed format to the backup/recovery appliance snapshot pool, which is done to reduce cost. The performance overheads for this compression benefit are marginal. However, for encrypted data (TDE) or heavily compressed datasets, there will likely be some measurable, though marginal impact to your throughput figures.
Understand the factors that impact performance for the network and your backup servers
The following items affect network I/O between Oracle on Bare Metal Solution and your backup servers in Google Cloud:
Flash storage
Similar to Google Cloud Persistent Disk, the flash storage arrays that provide the storage for Bare Metal Solution systems increase I/O capabilities based on how much storage you assign to the host. The more storage you allocate, the better the I/O. For consistent results, we recommend that you provision at least 8 TB of flash storage.
Network latency
Google Cloud Backup and DR backup jobs are sensitive to the network latency between the Bare Metal Solution hosts and the backup/recovery appliance in Google Cloud. Small increases in latency can create large changes to backup and restore times. Different Compute Engine zones offer different network latencies to the Bare Metal Solution hosts. It is a good idea to test each zone for optimal placement of the backup/recovery appliance.
Number of processors used
The Bare Metal Solution servers come in several sizes. We recommend that you scale your RMAN channels to suit the available CPUs, with greater possible speed from larger systems.
Cloud Interconnect
The hybrid interconnect between Bare Metal Solution and Google Cloud is available in several sizes, such as 5 Gbps, 10 Gbps, and 2x10 Gbps, with full performance from the dual 10 GB option. It is also possible to configure a dedicated interconnect link that will be used exclusively for backup and restore operations. This option is recommended for customers that want to isolate their backup traffic from database or application traffic that may traverse the same link, or guarantee full bandwidth where backup and restore operations are critical to ensure that you meet your recovery point objective (RPO) and recovery time objective (RTO).
What's Next
Here are some additional links and information about Google Cloud Backup and DR that you might find helpful.
- For additional steps regarding setting up Google Cloud Backup and DR, see the Backup and DR product documentation.
- To see product installation and feature demonstrations, see the Google Cloud Backup and DR video playlist.
- To view compatibility information for Google Cloud Backup and DR, see Support Matrix: Backup and DR. It is important to verify that you are running supported versions of Linux and Oracle database instances.
- For additional steps regarding Oracle Database protection, see Backup and DR for Oracle Databases and Protect a discovered Oracle database.
- File systems like NFS, CIFS, ext3, and ext4 can also be protected with Google Cloud Backup and DR. To view the available options, see Apply a backup plan to protect a file system.
- To enable alerts for Google Cloud Backup and DR, see Configure a log-based alert and watch the Google Cloud Backup and DR Alert Notifications setup video.
- To open a support case, contact Cloud Customer Care.