Add NFS file storage to a Bare Metal Solution environment
This guide provides instructions for setting up and using Network File System (NFS) for file storage in a Bare Metal Solution environment. This document assumes basic familiarity with using NFS file systems and basic knowledge of Linux system administration.
Understand NFS file storage for Bare Metal Solution
You can use NFS as local, shared, file storage for common scripts, installation files, and backup files. An NFS volume provides storage to one or more Bare Metal Solution servers through an NFS mounted directory. After you mount the NFS volume on your Bare Metal Solution servers, you can access the storage like any other file system.
Using NFS file storage on Bare Metal Solution requires 2 steps:
- Decide on the settings you want for the NFS volume and share them with Google Cloud.
- Mount the NFS volume on your Bare Metal Solution server.
Here are some helpful tips and facts to assist you when using NFS file storage on Bare Metal Solution:
- Bare Metal Solution servers communicate with the NFS volume across a services subnet reserved from the client or private networks that you assigned to the Bare Metal Solution environment. For typical /24 networks, we recommend you use a /28 subnet for services such as NFS.
- You can assign one NFS volume per subnet. As a result, NFS volumes cannot be shared across multiple VLANs.
- Google Cloud uses NFS v3 in the Bare Metal Solution environment.
- We do not recommend using NFS to store Oracle data files or log files.
- Google Cloud provides NFS within the same regional extension that hosts Bare Metal Solution. NFS file storage does not span across Google Cloud regions. If you require multi-region shared storage, consider using Filestore. We do not provide storage-based replication between NFS volumes or regions.
- Google Cloud encrypts data at rest. For data in transit between a Bare Metal Solution server and the storage device, data is not encrypted. If you need data encryption of data for transit traffic, we recommend that you configure encryption at the application level. For more information, see How can I encrypt my traffic over Cloud Interconnect?
- NFS file storage for Bare Metal Solution does not provide throttling on network bandwidth. Because high-volume, high-concurrency batch workloads (such as backups) might affect the performance of other workloads, consider limiting the bandwidth usage and simultaneous processing of such batch workloads.
- Other shared storage options provided by Google Cloud include Filestore and Google Cloud Storage buckets mounted with FUSE on the Bare Metal Solution server. You can allocate this storage dynamically in Google Cloud using the Google Cloud console and uses the Cloud Interconnect joining the regional extension to the Google Cloud region.
For more information about NFS, see Network File System.
For more information about using NFS file storage with an Oracle database, see the following articles (requires an Oracle account):
Request NFS file storage for Bare Metal Solution
When you want to add NFS file storage to your Bare Metal Solution environment, you need to order your NFS volumes through Google Cloud Sales. After you order the NFS volumes and we assign them to you, you can set them up by following the steps in Create an NFS volume.
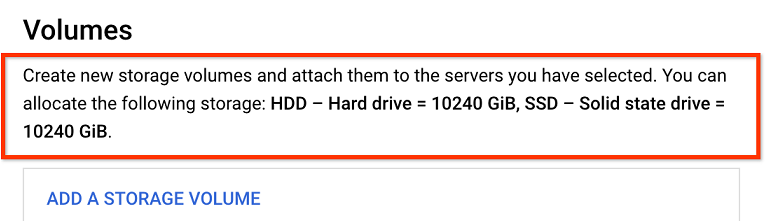
You can view your available volume quota in the Volumes section of the Google Cloud console intake form, as shown in the following example:
If you do not have enough volume quota available for provisioning, please contact Google Cloud Sales to order more.
Once your volume quota is available, you need to gather and provide the following information to provision NFS file storage for your Bare Metal Solution environment:
| Field | Description | Example |
|---|---|---|
| Google Cloud project ID | Visit the Welcome page of your Google Cloud project to find your Project ID. | My Project |
| Region | Google Cloud region nearby the regional extension that hosts your Bare Metal Solution environment. | us-central1 |
| Client and Private networks | The two subnets you selected when you set up your Bare Metal Solution environment. | In our documentation examples, 192.168.1.0/24 is the client network that connects to Google Cloud, and 192.168.2.0/24 is the private network used for services within the regional extension. |
| Name | Name of the NFS volume. | Select a name for the volume. If you do not choose a name, Google Cloud generates the NFS volume name for you automatically. An example name is at-1234567-nfs001. |
| Type | The type of storage you request to save your data. Options include All flash to select a solid-state drive (SSD) and All disk to select a hard disk drive (HDD). | All flash |
| Size | Select the size of the drive you need. You can choose a minimum of 100 GiB up to a maximum of 16 TiB worth of storage capacity. | 1 TiB (1024 GiB) |
| Enable snapshots | Choose Yes if you want to enable a daily snapshot, or
choose No to disable.
|
Yes |
| Protocol | Specify the storage protocol that you want to use. Use this field to tell us that you need NFS. | NFS (Network File System) |
| Network | Subnet that can access the NFS volume. Usually, this is the client network in a Bare Metal Solution environment. | Reuse the value you selected above in Client and Private networks. |
| Target | Allows access to the NFS volume from an individual Bare Metal Solution server (Single server), or all servers on a subnet (CIDR). | CIDR |
| Server | Name of the Bare Metal Solution server that can access the NFS volume. | For example, at-7654321-svr001 |
| Service IP Address range | Select a subset of your network IP address range from your client or private
network to be used for storage and services. Google Cloud reserves this
range for services such as NFS. The service IP address range typically uses a
/26, /27, or /28 subnet. For an Oracle installation, use your Bare Metal Solution client network for NFS file storage and reserve the private network for Oracle applications. |
In this example, 192.168.1.240/28 is a subnet of the client network. |
| Mount permissions | Select read-write or read-only permissions. | Read-write |
| No root squash | We recommend that you set this option to True for new NFS volumes.
By default, an NFS volume has permission 755 and owner root(0).
Writing files to new NFS volumes is not possible when root squash is enabled,
as all new NFS volumes are owned by user "root". Therefore, first
create an NFS volume with no_root_squash=True, build the directory
structure, change permission or ownership of the NFS volume, and then modify
the NFS volume with no_root_squash=False by removing and re-adding
the allowed client.
See
Update an NFS volume.
|
True |
| Allow SUID | Selecting this option enables users to receive file owner permissions temporarily when executing a file, program, or command. If you do not select this option, NFS does not provide temporary file owner permissions. | False |
| Allow dev | Selecting this option enables the file system to interpret character or block special devices. If you do not select this option, the system can still write to the NFS volume, but cannot create character or block special devices. | True |
After Google Cloud processes your order, you'll be sent an NFS volume path. It appears in the following format:
NFS_SERVER_IP_ADDRESS:/NFS_SHARE_NAME
For example, if the NFS server IP address is 192.168.1.240 and the NFS share name is at-1234567-nfs001, the resulting NFS volume path looks like this:
192.168.1.240:/at-1234567-nfs001
Configure NFS file storage for Bare Metal Solution
The following example helps you configure NFS file storage for your Bare Metal Solution servers, and uses Red Hat Enterprise Linux commands. If you use a different operating system, the commands you need to use might be different.
Before you mount the NFS volume.
- Ensure you have created a jump host VM instance to access your Bare Metal Solution server. For information, see Create a jump host VM instance on Google Cloud.
Provide internet access to your Bare Metal Solution server so it can download any required installation packages. For information about internet access, see Accessing the internet.
Navigate to your Bare Metal Solution server console.
In your Google Cloud project, navigate to Compute Engine > VM instances.
Click the SSH button for your jump host VM instance.
Use SSH to connect to your Bare Metal Solution server and log in with your username and password.
[USERNAME@INSTANCE_JUMP_HOST ~]$ ssh ADMIN_USER@BMS_SERVER_IP_ADDRESS
ADMIN_USER@BMS_SERVER_IP_ADDRESS's password:
Last login: Wed May 26 22:25:47 2021 from JUMP_HOST_IP_ADDRESS
[ADMIN_USER@BMS_SERVER_NAME ~]$
Add a DNS server entry in your Bare Metal Solution server to access DNS.
sudo bash -c "echo \"nameserver DNS_SERVER_IP_ADDRESS\" >> /etc/resolv.conf"
You can also use Cloud DNS and specify inbound forwarder entry points in place of the DNS server IP address. For more information on Cloud DNS, see Cloud DNS overview.
Configure your operating system to allow package updates.
Install the NFS package in your Bare Metal Solution server.
sudo yum install -y nfs-utils
Mount your NFS volume.
Create a mount directory in your Bare Metal Solution server.
sudo mkdir -p /mnt/DIRECTORY_NAME
Find your NFS volume path sent to you by Google Cloud.
Mount the NFS volume. For generic usage of NFS, use the following command:
sudo mount -t nfs NFS_SERVER_IP_ADDRESS:/NFS_SHARE_NAME /mnt/DIRECTORY_NAME
 sudo mount -t nfs -o \
   rw,bg,hard,nointr,rsize=32768,wsize=32768,tcp,vers=3,timeo=600,nconnect=8 \
   NFS_SERVER_IP_ADDRESS:/NFS_SHARE_NAME /mnt/DIRECTORY_NAME
 sudo mount -t nfs -o \
   rw,bg,hard,nointr,rsize=32768,wsize=32768,tcp,vers=3,timeo=600 \
   NFS_SERVER_IP_ADDRESS:/NFS_SHARE_NAME /mnt/DIRECTORY_NAME
 sudo mount -t nfs -o \
  -rw,bg,hard,nointr,rsize=32768,wsize=32768,tcp,vers=3,timeo=600,actimeo=0 \
  NFS_SERVER_IP_ADDRESS:/NFS_SHARE_NAME /mnt/DIRECTORY_NAME
To mount the NFS volume automatically if the server reboots, add the following entries to the end of the fstab file. This file is in the /etc directory of your Bare Metal Solution server. Use sudo administrator permissions and a text editor to edit the file, and ensure there are 3 spaces between each entry.
NFS_SERVER_IP_ADDRESS:/NFS_SHARE_NAME /mnt/DIRECTORY_NAME nfs defaults,nofail 0 0
[ADMIN_USER@BMS_SERVER_NAME ~]$ sudo -i
[root@BMS_SERVER_NAME ~]# cd /etc
[root@BMS_SERVER_NAME etc]# vi fstab
[root@BMS_SERVER_NAME etc]# cat fstab
#
# /etc/fstab
# Created by anaconda on Sun Feb 16 10:06:11 2020
#
# Accessible filesystems, by reference, are maintained under '/dev/disk'
# See man pages fstab(5), findfs(8), mount(8) and/or blkid(8) for more info
#
/dev/mapper/rootvg-rootlv /                       xfs     defaults        0 0
UUID=bc39a085-d080-488e-9402-d22558bc88ae /boot                   xfs     defaults        0 0
UUID=4127-64CB          /boot/efi               vfat    defaults,uid=0,gid=0,umask=0077,shortname=winnt 0 0
/dev/mapper/rootvg-homelv /home                   xfs     defaults        0 0
/dev/mapper/rootvg-optlv /opt                    xfs     defaults        0 0
/dev/mapper/rootvg-tmplv /tmp                    xfs     defaults        0 0
/dev/mapper/rootvg-varlv /var                    xfs     defaults        0 0
/dev/mapper/rootvg-swaplv swap                    swap    defaults        0 0
**NFS_SERVER_IP_ADDRESS:/NFS_SHARE_NAME   /mnt/DIRECTORY_NAME   nfs    defaults,nofail   0 0**
Verify that you can access the volume.
mount -l | grep nfs
NFS_SERVER_IP_ADDRESS:/NFS_SHARE_NAME on /mnt/DIRECTORY_NAME type nfs
(rw,relatime,vers=3,rsize=65536,wsize=65536,namlen=255,
hard,proto=tcp,timeo=600,retrans=2,sec=sys,mountaddr=NFS_SERVER_IP_ADDRESS,
mountvers=3,mountport=635,mountproto=udp,local_lock
=none,addr=NFS_SERVER_IP_ADDRESS)
Add a test file in your NFS directory.
cd /mnt/DIRECTORY_NAME
echo 'testing' | sudo tee -a testfile
sudo cat testfile
sudo rm testfile
View NFS file storage for Bare Metal Solution
Use the following command to view a volume.
mount | grep NFS_SHARE_NAME
NFS_SERVER_IP_ADDRESS:/NFS_SHARE_NAME on /mnt/DIRECTORY_NAME type nfs
(rw,relatime,vers=3,rsize=65536,wsize=65536,namlen=255,
hard,proto=tcp,timeo=600,retrans=2,sec=sys,mountaddr=NFS_SERVER_IP_ADDRESS,
mountvers=3,mountport=635,mountproto=udp,local_lock
=none,addr=NFS_SERVER_IP_ADDRESS)
Unmount NFS file storage for Bare Metal Solution
Use the following commands to unmount the NFS volume and confirm its removal.
sudo umount /mnt/DIRECTORY_NAME
mount | grep NFS_SHARE_NAME