Go-Pakete automatisch scannen
Hier erfahren Sie, wie Sie das automatische Scannen aktivieren, ein Container-Image in Artifact Registry übertragen und eine Liste der im Image gefundenen Sicherheitslücken aufrufen.
Die Artefaktanalyse scannt jedes Mal, wenn ein Image in Artifact Registry übertragen wird, nach Sicherheitslücken. Plattformadministratoren und Anwendungsentwickler können diese automatische Scanfunktion nutzen, um Risiken in ihrer Softwarebereitstellungspipeline zu erkennen.
In dieser Kurzanleitung wird ein einfaches, öffentlich verfügbares Paket verwendet, um eine Art von Paketscan zu demonstrieren. Standardmäßig scannt die Artefaktanalyse mehrere Pakettypen auf Sicherheitslücken, sobald Sie die Scanning API aktivieren. Zu den unterstützten Pakettypen gehören: Betriebssystem, Go, Java (Maven), Python und Node.js (npm).
Hinweise
- Sign in to your Google Cloud account. If you're new to Google Cloud, create an account to evaluate how our products perform in real-world scenarios. New customers also get $300 in free credits to run, test, and deploy workloads.
-
Install the Google Cloud CLI.
-
Wenn Sie einen externen Identitätsanbieter (IdP) verwenden, müssen Sie sich zuerst mit Ihrer föderierten Identität in der gcloud CLI anmelden.
-
Führen Sie folgenden Befehl aus, um die gcloud CLI zu initialisieren:
gcloud init -
Create or select a Google Cloud project.
Roles required to select or create a project
- Select a project: Selecting a project doesn't require a specific IAM role—you can select any project that you've been granted a role on.
-
Create a project: To create a project, you need the Project Creator
(
roles/resourcemanager.projectCreator), which contains theresourcemanager.projects.createpermission. Learn how to grant roles.
-
Create a Google Cloud project:
gcloud projects create PROJECT_ID
Replace
PROJECT_IDwith a name for the Google Cloud project you are creating. -
Select the Google Cloud project that you created:
gcloud config set project PROJECT_ID
Replace
PROJECT_IDwith your Google Cloud project name.
-
Verify that billing is enabled for your Google Cloud project.
-
Enable the Artifact Registry and Container Scanning APIs:
Roles required to enable APIs
To enable APIs, you need the Service Usage Admin IAM role (
roles/serviceusage.serviceUsageAdmin), which contains theserviceusage.services.enablepermission. Learn how to grant roles.gcloud services enable containerscanning.googleapis.com
artifactregistry.googleapis.com -
Install the Google Cloud CLI.
-
Wenn Sie einen externen Identitätsanbieter (IdP) verwenden, müssen Sie sich zuerst mit Ihrer föderierten Identität in der gcloud CLI anmelden.
-
Führen Sie folgenden Befehl aus, um die gcloud CLI zu initialisieren:
gcloud init -
Create or select a Google Cloud project.
Roles required to select or create a project
- Select a project: Selecting a project doesn't require a specific IAM role—you can select any project that you've been granted a role on.
-
Create a project: To create a project, you need the Project Creator
(
roles/resourcemanager.projectCreator), which contains theresourcemanager.projects.createpermission. Learn how to grant roles.
-
Create a Google Cloud project:
gcloud projects create PROJECT_ID
Replace
PROJECT_IDwith a name for the Google Cloud project you are creating. -
Select the Google Cloud project that you created:
gcloud config set project PROJECT_ID
Replace
PROJECT_IDwith your Google Cloud project name.
-
Verify that billing is enabled for your Google Cloud project.
-
Enable the Artifact Registry and Container Scanning APIs:
Roles required to enable APIs
To enable APIs, you need the Service Usage Admin IAM role (
roles/serviceusage.serviceUsageAdmin), which contains theserviceusage.services.enablepermission. Learn how to grant roles.gcloud services enable containerscanning.googleapis.com
artifactregistry.googleapis.com Öffnen Sie in der Google Cloud Console die Seite Repositories.
Klicken Sie auf Repository erstellen.
Geben Sie auf der Seite Repository erstellen die folgenden Einstellungen ein:
- Name:
quickstart-docker-repo - Format: Docker
- Modus: Standard
- Standorttyp: Region
- Region:
us-central1
- Name:
Klicken Sie auf Erstellen.
Wechseln Sie in das Verzeichnis, in dem Sie das Container-Image speichern möchten.
Kopieren Sie ein Bild in Ihr lokales Verzeichnis. Sie können beispielsweise Docker verwenden, um das neueste Go-Image von Docker Hub abzurufen.
docker pull golang:1.17.6-alpine- PROJECT ist Ihre Google Cloud
Projekt-ID.
Wenn die Projekt-ID einen Doppelpunkt (
:) enthält, finden Sie weitere Informationen unter Auf Domains beschränkte Projekte. us-central1ist die Region des Artifact Registry-Repositorys.docker.pkg.devist der Hostname für Docker-Repositories.quickstart-imageist der Image-Name, der im Repository verwendet werden soll. Der Image-Name kann sich vom Image-Namen des lokalen Images unterscheiden.tag1ist ein Tag, das Sie dem Docker-Image hinzufügen. Wenn Sie kein Tag angegeben haben, wendet Docker das Standard-Taglatestan.Rufen Sie die Liste der Repositories ab.
Klicken Sie in der Liste der Repositories auf ein Repository.
Klicken Sie in der Liste der Bilder auf einen Bildnamen.
Alle Sicherheitslücken für jeden Image-Digest werden in der Spalte Sicherheitslücken angezeigt.

Wenn Sie die Liste der Sicherheitslücken für ein Image aufrufen möchten, klicken Sie auf den Link in der Spalte Vulnerabilities (Sicherheitslücken).
Im Bereich Scanergebnisse wird eine Zusammenfassung der gescannten Pakettypen, der Gesamtzahl der Sicherheitslücken, der Sicherheitslücken mit verfügbaren Korrekturen, der Sicherheitslücken ohne Korrekturen und des effektiven Schweregrads angezeigt.

In der Tabelle mit den Sicherheitslücken sind für jede gefundene Sicherheitslücke der Name der Common Vulnerabilities and Exposures (CVE), der effektive Schweregrad, die CVSS-Punktzahl (Common Vulnerability Scoring System), Korrekturen (sofern verfügbar), der Name des Pakets, das die Sicherheitslücke enthält, und der Pakettyp aufgeführt.
In derGoogle Cloud Console werden in dieser Tabelle bis zu 1.200 Sicherheitslücken pro Seite angezeigt. Sie können diese Dateien filtern und sortieren, um eine bestimmte Datei, ein bestimmtes Verzeichnis, eine bestimmte Ebene oder einen bestimmten Dateityp nach Dateiendung zu prüfen.
Klicken Sie auf den Namen der CVE, um Details zu einer bestimmten CVE aufzurufen.
Wenn Sie Details zum Auftreten von Sicherheitslücken wie Versionsnummer und betroffene Stelle aufrufen möchten, klicken Sie in der Zeile mit dem Namen der Sicherheitslücke auf Anzeigen oder Behobene anzeigen. Der Linktext lautet Ansehen für Sicherheitslücken ohne Korrektur und Behobene ansehen für Sicherheitslücken, bei denen eine Korrektur angewendet wurde.
Öffnen Sie in Artifact Registry die Liste Ihrer Repositories.
Klicken Sie auf der Seite Repositories auf ein Repository.
Klicken Sie auf der Seite Repository Details (Repository-Details) auf ein Bild.
Klicken Sie in der Liste der Image-Versionen auf einen Image-Digest.
Klicken Sie auf der Seite mit den Details zum Image-Digest auf den Tab Sicherheitslücken.
Wenn schichtbasierte Metadaten verfügbar sind, wird in der Artefaktanalyse in der Leiste Ebene eine auswählbare Liste von Ebenen angezeigt:

Klicken Sie auf das Drop-down-Menü für Ebenen, um die Liste der Ebenen aufzurufen.
Eine Drop-down-Liste mit einer nummerierten Liste von Ebenen wird geöffnet. Ebene 0 stellt die unterste Ebene dar, wobei jede folgende Ebene auf der vorherigen aufbaut. Es werden nur Ebenen angezeigt, in denen Sicherheitslücken gefunden wurden.
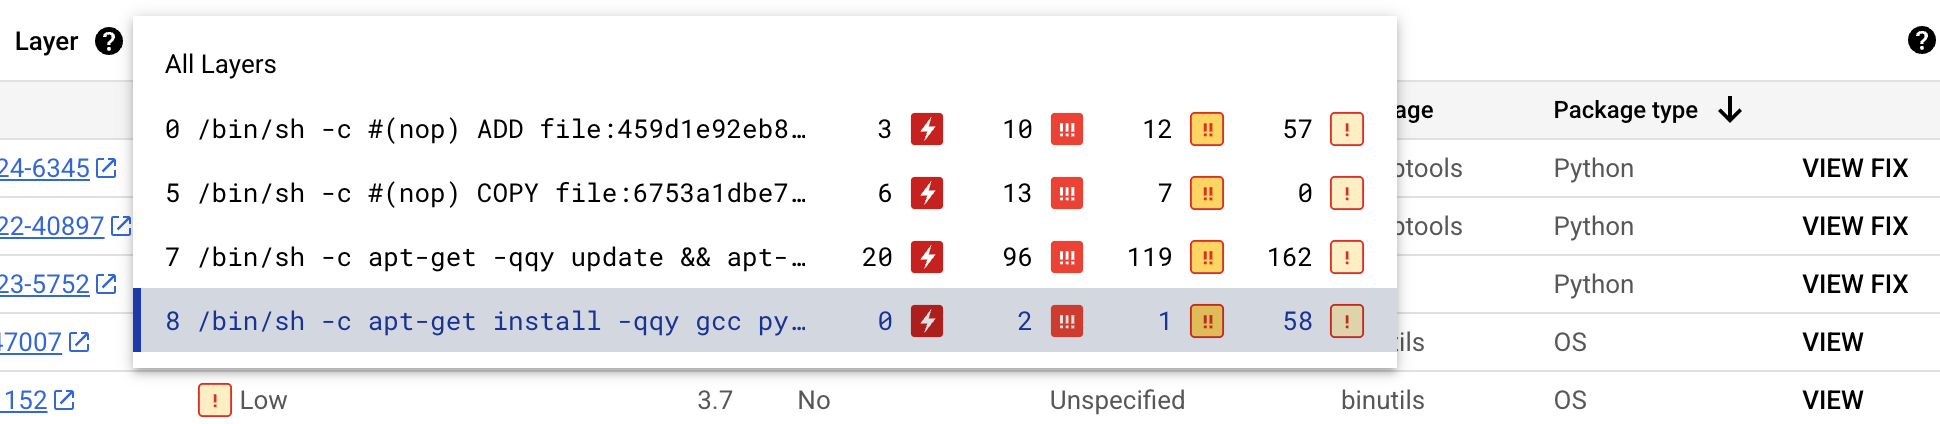
Für jedes Layer zeigt die Artefaktanalyse den Docker-Befehl, der zum Erstellen des Layers verwendet wurde, und die Anzahl der in diesem Layer gefundenen Sicherheitslücken.
Wenn Sie mehr über die Sicherheitslücken in einer bestimmten Ebene erfahren möchten, wählen Sie eine Ebene aus der Liste aus.
Die Tabelle mit den Sicherheitslücken wird aktualisiert und enthält nur die Sicherheitslücken, die in der ausgewählten Ebene gefunden wurden. Sie können weitere Filter anwenden oder bestimmte Sicherheitslücken untersuchen.
Klicken Sie neben einer Sicherheitslücke auf ANSEHEN oder KORREKTUR ANSEHEN, um detailliertere Informationen zur Sicherheitslücke aufzurufen.
In der Seitenleiste Details zur Sicherheitslücke werden Dateipfade angezeigt, in denen Pakete Sicherheitslücken aufweisen.
Bewegen Sie den Mauszeiger in der Tabelle Dateispeicherorte auf das Fragezeichen, um zusätzliche Metadaten für die Ebene aufzurufen.
In einem Dialogfeld werden der Layer-Index, der Layer-Build-Befehl, der Layer-Digest und das Basis-Image angezeigt, in dem Sie die Sicherheitslücke beheben können.
Docker-Repository in Artifact Registry erstellen
Erstellen Sie ein Docker-Repository zum Speichern des Beispiel-Images für diese Kurzanleitung.
Die Seite Repositories wird angezeigt. Ihr quickstart-docker-repo-Repository wird der Repository-Liste hinzugefügt.
Authentifizierung konfigurieren
Bevor Sie Images mit Artifact Registry hoch- oder herunterladen können, müssen Sie Docker so konfigurieren, dass die Google Cloud CLI zum Authentifizieren von Anfragen an Artifact Registry verwendet wird.
Richten Sie in Cloud Shell oder in Ihrer lokalen Shell die Authentifizierung für Docker-Repositories in der Region us-central1 ein:
gcloud auth configure-docker us-central1-docker.pkg.dev
Paket erhalten
Paket mit einem Repository-Namen taggen
Wenn Sie ein Paket in Artifact Registry hochladen möchten, müssen Sie den Befehl docker push so konfigurieren, dass das Image an einen bestimmten Speicherort hochgeladen wird.
Führen Sie den folgenden Befehl aus, um das Image als quickstart-image:tag1 zu taggen:
docker tag golang:1.17.6-alpine \
us-central1-docker.pkg.dev/PROJECT/quickstart-docker-repo/quickstart-image:tag1
Wobei:
Image in Artifact Registry hochladen
Die Artefaktanalyse scannt automatisch neue Go-Pakete, wenn sie in Artifact Registry hochgeladen werden.
Führen Sie den folgenden Befehl aus, um Ihr Image per Push in Ihr Docker-Repository in Artifact Registry zu übertragen:
docker push us-central1-docker.pkg.dev/PROJECT/quickstart-docker-repo/quickstart-image:tag1
Ersetzen Sie PROJECT durch Ihre Google Cloud
Projekt-ID.
Wenn die Projekt-ID einen Doppelpunkt (:) enthält, finden Sie weitere Informationen unter Auf Domains beschränkte Projekte.
Ergebnisse des Scannens auf Sicherheitslücken ansehen
So sehen Sie die Sicherheitslücken in einem Image:
Sicherheitslücken in einer bestimmten Ebene ansehen
Artefaktanalyse stellt schichtspezifische Metadaten bereit, mit denen Sie ermitteln können, welches Paket Sicherheitslücken enthält und mit welchem Docker-Build-Befehl diese Schicht eingeführt wurde.
So rufen Sie schichtbasierte Metadaten zu Sicherheitslücken in der Google Cloud -Console auf:
Bereinigen
Löschen Sie das Google Cloud -Projekt zusammen mit den Ressourcen, damit Ihrem Google Cloud -Konto die auf dieser Seite verwendeten Ressourcen nicht in Rechnung gestellt werden.
Wenn Sie für diese Anleitung ein neues Projekt erstellt haben, können Sie es jetzt löschen.Delete a Google Cloud project:
gcloud projects delete PROJECT_ID