The Velostrata On-Premises Backend virtual appliance connects to VM disks in your on-premises data center and streams or migrates them to Google Cloud via Cloud Extensions.
The Velostrata Backend is distributed as an Open Virtualization Format (OVF) package. In order to install OVF packages, the VMware Client Integration Plug-in must be installed on your local machine. If it is not installed when running an operation that requires it, you are prompted to install it.
The Velostrata Manager requires the following, based on the number of VMs to be migrated concurrently:
| Migration Size | Resources |
|---|---|
|
2 vCPU, 4GB RAM |
|
4 vCPU, 8 GB RAM |
Deploying and configuring the Velostrata On-Premises Backend virtual appliance
- Download the Velostrata Backend. You can verify the integrity of the files using the SHA256 checksum.
Sign in to vSphere via the Flash Web Client.
Right-click a parent object of one of the VMs to be migrated (such as a Datacenter) and select Deploy OVF Template
Select the Velostrata OVA file.
Choose the Host/ Cluster in your vSphere data center where you want to run the Velostrata Backend.
Select a Disk Format.
Make sure you are in the Properties section on the left pane.
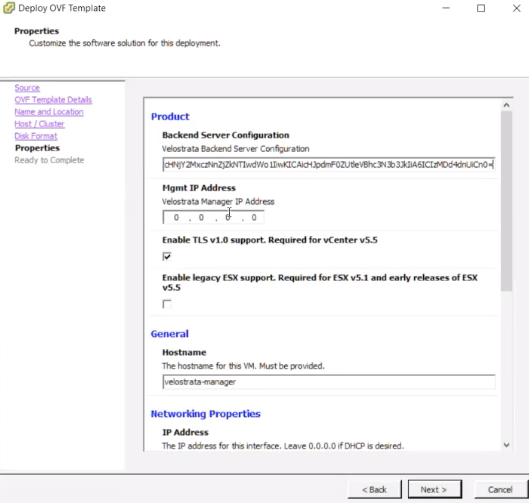
Paste the token you copied from the Velostrata Manager on Google Cloud into Velostrata Backend Server Configuration.
Add the Private IP address of the Velostrata Manager (for example
10.1.1.123) running on Google Cloud.Expand the Networking Properties section. Enter the Hostname for the Virtual Appliance. Enter a static IP Address, Netmask, Default Gateway, and DNS server for the Velostrata Manager.
If you would like to use an HTTP proxy for telemetry and log uploads, fill in the HTTP Proxy parameter. Note: Proxy authentication is not supported.
If your VPN to Google Cloud is not configured with dynamic routing, you can enter the Static network route to reach subnets on Google Cloud. The address is in the form
x.x.x.x/xy.y.y.y, wherex.x.x.x/xis the Google Cloud VPC network address in CIDR format andy.y.y.yis the VPN Gateway IP address.Click Next and review the Ready to complete page.
Check Power on after deployment to power up the Velostrata backend right away.
Click Finish. The Deploy OVF template task appears.
Configuring the Velostrata Service Role and Permissions in vCenter
This procedure describes how to manually add a service role to the vCenter Server for Velostrata. A PowerShell script is also available for creating this Role.
To configure the Velostrata service role and permissions in vCenter:
- Login to the vCenter Web Client.
- Select Home > Administration > Roles.
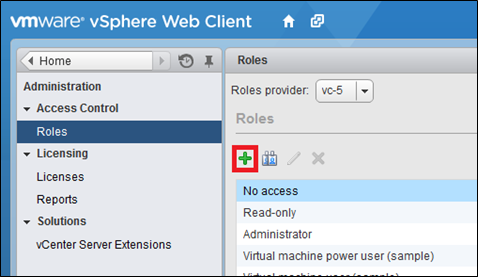
Role dialog box (click to enlarge) - Click + to create a new role.
- Check the boxes for the following privileges:
- Alarms
- Create alarm
- Modify alarm
- Remove alarm
- Set alarm status
- Global
- Enable methods
- Disable methods
- Licenses
- Log event
- Virtual Machine
- Provisioning > Allow disk access
- Provisioning > Allow disk read-only access
- Provisioning > Allow virtual machine download
- Snapshot management > Create snapshot
- Snapshot management > Remove snapshot
- Snapshot management > Revert to Snapshot
- Snapshot management > Rename Snapshot
- Configuration > Configure managedBy
- Interaction > Power On
- Interaction > Power Off
- Datastore
- Low level file operations
- Extension
- Register extension
- Unregister extension
- Update extension
- Task
- Create task
- Update task
- Alarms
To configure the permissions for the Velostrata Service user in vCenter:
- Select Home > Inventory Lists > vCenter Servers.
- Right-click on the required vCenter server, and select
All vCenter Actions > Add Permission.

Add Permission dialog box (click to enlarge) - Select a user in the left pane, and assign the Velostrata Service Role (in the right pane) to the user.
- Select Propagate to Child Objects, and click OK.
Deploying the Velostrata VMware vCenter Plugin
Once the Velostrata Backend has successfully connected and registered with the Velostrata Manager on Google Cloud, you need to register and deploy the Velostrata VMware vCenter Web Client Plugin. This enables Velostrata management operations and monitoring in the vCenter UI.
- Make sure that a Velostrata vCenter Service Account (user) and Role have been created before proceeding.
- Sign in to your Velostrata Manager.
- Click the System Settings icon.
- If the Velostrata Backend was able to connect
to the Velostrata Manager, the IP for the
backend appears with a Status of Registered and Connected.
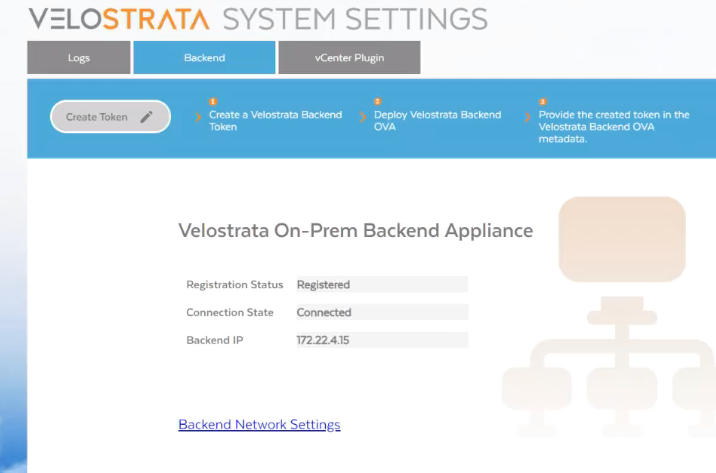
Screenshot of a registered and connected appliance (click to enlarge) - On the top bar of the page, click vCenter Plugin and then click
Register vCenter Plugin.

Registering a plugin (click to enlarge) - Enter the vCenter address or DNS name, user, password
- The vCenter plugin requires network connectivity to the Velostrata Manager.
If this is not open by default, you can either create a direct route
on your vCenter server or use a proxy. If using a proxy,
add the Proxy IP and the Proxy Port.
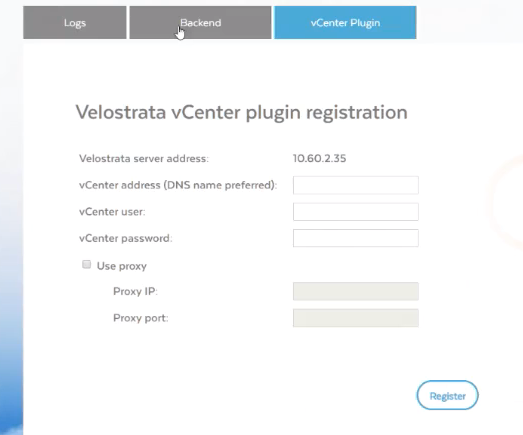
Registration parameters for a plugin (click to enlarge) - Click Register to register the plugin.